reBot Arm B601-RS エンボディドエージェント設計フレームワーク





環境構築 → モデルダウンロード → LLM 切り替え → ハンドアイキャリブレーション → デモ実行 → トラブルシューティング
このチュートリアルは、wrc_demo プロジェクトの操作ガイドです。本ガイドの手順に従うことで、ゼロからのクローン取得からデモの実行までを 1〜2 時間 で完了できます。
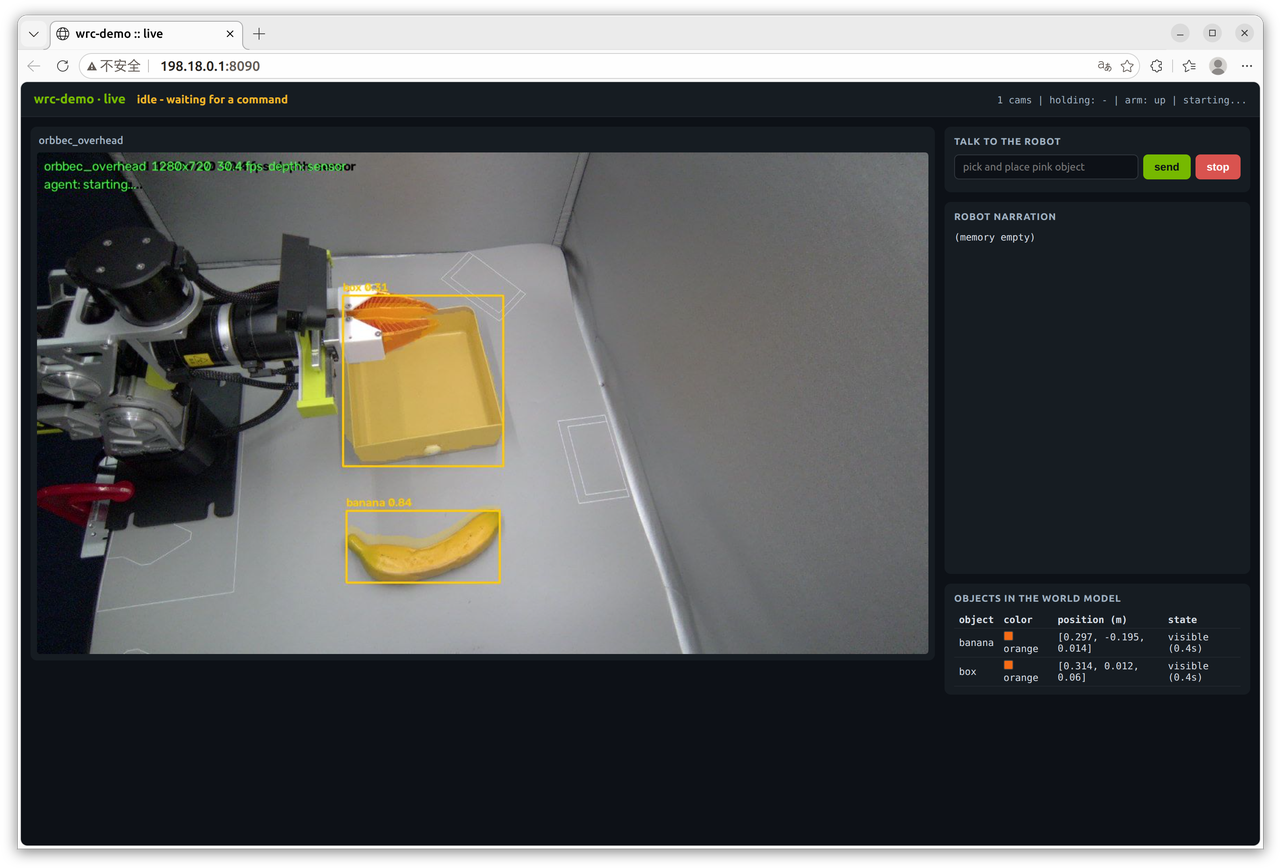
wrc_demo は reBot Arm B601-RS(RobStride バス)向けのビジュアル把持デモで、Ubuntu 22.04 + Python 3.10 + conda wrc-demo 環境上で動作します。デモは自然言語の指示(例:「赤いブロックをつかんで」)を受け取り、自動的に把持計画を立てて実行します。
0. チートシート
システム要件
| 項目 | 要件 |
|---|---|
| オペレーティングシステム | Ubuntu 22.04+ / Debian 12+ / WSL2 |
| Python | 3.10(conda 環境内) |
| メモリ | 16 GB 以上(モックは 8 GB から起動可能) |
| ディスク | 10 GB 以上 |
| GPU(オプション) | NVIDIA RTX 5070 / 4090 / H100 など |
| VRAM | 8 GB 以上 |
1. プロジェクトの目的と対象読者
- プロジェクトの目的:Vision Language Model(VLM)を reBot Arm B601-RS に接続し、自然言語の指示を自動的に把持アクションへ変換できるようにします — VLM が物体を選択し、Pinocchio が逆運動学(IK)を解き、
SafetyHarnessが 50 Hz の各ウェイポイントごとにフェイルクローズド検証を実行します。 - 対象読者:NVIDIA GPU + Ubuntu 22.04 + Python 3.10 の基礎知識を持ち、デモを実行したい/検出器を改造したい/スキルを追加したい開発者。
2. プロジェクト概要
2.1 プロジェクトの特徴
-
ビジョン言語モデル駆動の 3 段階意思決定
Qwen3-VL-2B-Instruct-AWQ-4bit をデフォルトのタスクプランニング用ブレインとして使用しており、VRAM 8 GB のデバイス上でネイティブに動作できます。コマンド解析は Reflex → Habit → LLM の 3 段階の高速・低速パスに従います — 「赤いブロックをつかんで」のような一般的な指示は、LLM を呼び出さずに Reflex テンプレート構文を直接通過し、新しいタスクのみが VLM を利用します。 -
ハンドアイキャリブレーション + 6 自由度把持計画(フェイルクローズド)
ハンドアイキャリブレーションスクリプト(ArUco チェッカーボード + Pinocchio FK + 関節 SE(3) LM 最適化)を内蔵し、トップ(ETH)カメラレイアウトをサポートします。ストリーミング軌道の各ポイントはSafetyHarnessによって検証され、いずれかの検証に失敗した場合、ロボットアームは動作途中で即座に停止します。 -
6 個の TOOL_SPECS + 5 個の MCP ゲートウェイ
最上位レイヤーは 6 個のセーフティゲート付きツールを公開します:pick_and_place/grasp_object/place_at/on/move_t/teach_record/replay+task_done。さらに MCP ゲートウェイは 5 個のツールを公開します:camera_snapshot/world_state/live_view_url/emergency_stop/reset_stop。新しいスキルを追加する際にプロトコル変換作業は一切不要です。 -
完全なトレース + エピソード記憶
各スキル呼び出しは、ASPIRE スタイルのマルチモーダルトレース(trace.jsonl+ 前後のキーフレーム JPEG)として書き出され、15 秒のイベントウィンドウ + オブジェクト永続性の信念を持つため、「10 秒前に見えたカップ」を遮蔽後でも操作できます。 -
モック優先の開発体験
フルスタックモック(--camera mock --arm mock --llm mock)により、ハードウェアなしで完全な意思決定パイプラインを実行できます。モックテストと実機は同じセキュリティコードを実行します。
2.2 仕様
| カテゴリ | パラメータ | 仕様 |
|---|---|---|
| ハードウェア | ロボットアーム | reBot Arm B601-RS(RobStride バス、6 自由度 + グリッパ) |
| カメラ | Orbbec Gemini 2 / Intel RealSense D435i / D405 | |
| 通信 | USB2CAN 経由の CAN バス;USB 3.0 カメラ | |
| 制御ホスト | Ubuntu 22.04+ PC / DGX Spark | |
| ローカル LLM | デフォルトプロファイル | local_qwen3_vl(Qwen3-VL-2B-Instruct-AWQ-4bit) |
| 推論フレームワーク | vLLM 0.6+(マルチモーダル推論) | |
| VRAM 要件 | 8 GB 以上(約 30 トークン/秒) | |
| 重みサイズ | 約 2.4 GB | |
| クラウド LLM | Anthropic | Claude(ビジョン + ツール;ANTHROPIC_API_KEY 環境変数) |
| OpenAI 互換 | 任意の OpenAI 互換エンドポイント(OPENAI_API_KEY 環境変数) | |
| MiniMax | api.minimax.com(MINIMAX_API_KEY 環境変数;テキストのみ) | |
| 検出器 | デフォルト | YOLOE-11s-seg(オープンボキャブラリ検出 + インスタンスセグメンテーション) |
| オプション | YOLOE-26l-seg(より高精度だが 2 倍遅い) | |
| テキストエンコーディング | MobileCLIP2-B torchscript(Apple apple/MobileCLIP2-B → 自前で trace 取得) | |
| ソフトウェアスタック | 運動学 | Pinocchio 3.x(FK/IK、DLS + ランダムリスタート) |
| RobStride ドライバ | motorbridge(SocketCAN)+ ベンダー提供 SDK | |
| 把持バックエンド | camera-camera / GraspGen-X(ZMQ)/ 解析的 OBB(3 層) | |
| Python | 3.10 | |
| スキルシステム | TOOL_SPECS 合計 | 6(task_done 終端 1 個 + 実スキル 5 個を含む) |
| アームモーションスキル | _MOTION_SKILLS 内の 18 個の文字列リテラル | |
| MCP ツールセット | TOOL_SPECS - _EXCLUDED_TOOLS + _EXTRA_TOOLS = 6 - 1 + 5 = 10 | |
| 安全性 | 軌道チェック | 50 Hz ストリーミングの各ウェイポイントが SafetyHarness.approve() を通過 |
| フェイルモード | フェイルクローズド(いずれかの違反 → 動作途中で中断) | |
| 関節マージン | IK limit_margin=0.025 > ハーネス joint_margin=0.02(不変条件) |
2.3 部品表(BOM)
| コンポーネント | 数量 | 同梱 |
|---|---|---|
| reBot Arm B601-RS ロボットアーム | 1 | ✅ |
| グリッパ(事前取り付け済み) | 1 | ✅ |
| USB2CAN シリアルブリッジ | 1 | ✅ |
| 48V 電源アダプタ | 1 | ✅ |
| USB-C / 通信用ケーブル | 1 | ✅ |
| RGB-D 深度カメラ(Orbbec Gemini 2 推奨) | 1 | ✅ |
| カメラコネクタ / 取付ブラケット | 1 | ✅ |
| Ubuntu 22.04+ 制御ホスト(NVIDIA GPU 8 GB 以上) | 1 | ❌ 自前で用意 |
配線手順
- ロボットアーム:48V 電源 → ロボットアーム;USB2CAN → ホストの USB ポート(初回使用時は
sudo ip link set can0 up type can bitrate 1000000が必要) - カメラ:Orbbec USB 3.0 → ホストの USB 3.0 ポート
- パーミッション設定:
# One-time read/write permission for USB devices
sudo chmod a+rw /dev/bus/usb/*/*

# Orbbec udev rules (recommended for first installation)
sudo bash scripts/install_udev_rules.sh
sudo udevadm control --reload-rules
sudo udevadm trigger
# The kit includes PCAN-USB, usually can0 or can1 should appear directly
sudo modprobe peak_usb
ip -br link

# If can0 appears, set the bitrate
sudo ip link set can0 down 2>/dev/null
sudo ip link set can0 type can bitrate 1000000
sudo ip link set can0 up
2.4 環境要件
ハードウェア
| 項目 | 要件 |
|---|---|
| CPU | x86_64(aarch64 はテスト対象外) |
| メモリ | 16 GB 以上(モックは 8 GB から、ローカル LLM には 16 GB 推奨) |
| ディスク | 10 GB 以上(モデル重み + conda 環境 + トレース蓄積) |
| GPU(ローカル LLM 推論用) | NVIDIA RTX 5070 / 4090 / H100 |
ソフトウェア
| 項目 | 要件 |
|---|---|
| Python | 3.10(conda 環境内) |
| Conda | miniforge3 / miniconda / anaconda |
| システムパッケージ | libusb-1.0-0-dev, ffmpeg, git, can-utils |
ネットワーク
| リソース | 説明 |
|---|---|
| GitHub | github.com/TheMoonAstronaut/wrc をクローン |
| HuggingFace | YOLOE / MobileCLIP2 / Qwen3-VL の重みをダウンロード |
| PyPI | ultralytics / openai / anthropic / pin / motorbridge をインストール |
3. 環境構成
3.0 最短ルート:5 分でモックを実行
インストールを確認するためにモックだけを実行したい場合(他の内容を読まない場合)、次の 3 コマンドだけで十分です:
git clone https://github.com/TheMoonAstronaut/wrc.git
cd wrc
conda env create -f environment.yml && conda activate wrc-demo

# Run mock test (17 passed, 1 skipped ≈ 30 seconds)
pytest tests/test_extrinsics_loader.py \
        tests/test_hand_eye_compensation_per_camera.py \
        tests/test_demo_yaml_llm_profile.py -q
環境名は wrc-demo に固定されています。名前をカスタマイズする必要がある場合(例:チームの命名規約)、environment.yml の name: フィールドを変更し、それに応じて後続のコマンドを置き換えてください。
pyorbbecsdk2 は environment.yml には含まれていません ** — その依存チェーン pyorbbecsdk2 → open3d==0.18.0 → dash → plotly → ipywidgets → ... により、pip が resolution-too-deep を頻繁に起こすためです。Orbbec SDK は別途インストールしてください。
torch も environment.yml には含まれていません ** — ultralytics は torch をオプション扱いにしていますが、import ultralytics によって import torch が呼び出されます。
3.1 前提条件
- reBot Arm B601-RS クイックスタート を完了していること(ロボットアームの組み立て、ゼロ点初期化、モーター ID 設定)— 実機ハードウェアでのみ必須
- NVIDIA GPU + CUDA ドライバがインストールされていること(ローカル LLM 推論にのみ必須)
- miniforge3 などの conda ツールがインストールされていること
- Ubuntu 22.04+ / Debian 12+ / WSL2
3.2 システム依存関係(実機ハードウェアで必須)
sudo apt update
sudo apt install -y libusb-1.0-0-dev ffmpeg git can-utils
libusb-1.0-0-dev:Orbbec 深度カメラ用ffmpeg:UVC4K / RealSense RGB ストリーム用can-utils:SocketCAN の立ち上げ(ロボットアーム用)
3.3 インストール後: PyTorch を別途インストールする(CUDA 版)
作業ディレクトリ:このセクション以降のすべてのコマンドは、wrc リポジトリのルートディレクトリにいることを前提としています。新しいシェルを開いた場合は、最初に cd wrc を実行してください。
# You should have already cd wrc now; if not:
cd /path/to/wrc
conda activate wrc-demo
3.3.1 Pytorch と Torchvision のインストール
お使いのデバイスの CUDA バージョンに応じて、公式チュートリアル に従って Pytorch と Torchvision をインストールしてください。
stable CUDA 12.8 をインストールする必要がある場合は、次のコマンドを実行します。
PYTHONNOUSERSITE=1 pip install --force-reinstall \
  torch torchvision torchaudio \
  --index-url https://download.pytorch.org/whl/cu128
3.3.2 conda 環境で PyTorch を読み込む
PyTorch は nvidia パッケージを site-packages/nvidia/lib/ に配置しますが、conda はこれらのパスを自動的に LD_LIBRARY_PATH に追加しません。このフックがないと、新しいシェルで import torch を実行したときに OSError: libcudart.so.13: cannot open shared object file が報告されます。
次のコマンドを実行して、nvidia LD_LIBRARY_PATH conda hook をインストールします。
bash scripts/install_nvidia_libs_hook.sh
フックが有効かどうかを確認します(新しいシェルで動作することを確認)
source /home/seeed/miniforge3/envs/wrc-demo/etc/conda/activate.d/nvidia_libs.sh
python -c "import torch; print('torch:', torch.__version__, 'cuda:', torch.cuda.is_available())"
# Expected: torch: 2.13.0+cu130 cuda: True
3.4 Depth Camera SDK のインストール
このプロジェクトは Orbbec Gemini 2、RealSense D435i / D405 などの RGB-D デプスカメラをサポートしています。
Orbbec Gemini 2
Orbbec Gemini 2 は pyorbbecsdk(Orbbec SDK v2 の Python 版)に依存します。方法 1 を推奨します:
方法 1: pip でインストール(推奨)
conda activate wrc-demo
PYTHONNOUSERSITE=1 pip install pyorbbecsdk2
必ず PYTHONNOUSERSITE=1 を追加してください。そうしないと、pip はパッケージを ~/.local/lib/python3.10/site-packages/(ユーザーレベルの site-packages)にインストールし、conda 環境側は空のままになります。
方法 2: GitHub のソースコードからインストール(ネットワークの問題がある場合、または最新バージョンを使用したい場合)
sudo apt-get install -y cmake build-essential libusb-1.0-0-dev

# Switch to ~/sdk directory (not the wrc directory)
mkdir -p ~/sdk && cd ~/sdk
git clone https://github.com/orbbec/pyorbbecsdk.git
cd pyorbbecsdk
PYTHONNOUSERSITE=1 pip install -e .

# Return to the wrc directory after installation
cd -
中国本土のユーザーは、gitee ミラーを使用して高速化できます:git clone https://gitee.com/orbbecdeveloper/pyorbbecsdk.git
RealSense D435i / D405
RealSense SDK(pyrealsense2)は通常ソースからコンパイルする必要があるため、Intel の公式ドキュメントを参照することを推奨します。
4. モデル重みの取得
4.1 MobileCLIP2 テキストエンコーダのインストール
Apple は HuggingFace apple/MobileCLIP2-B 上で PyTorch の重みを公開しており、YOLOE のテキストプロンプト検出では .ts 版が必要です。
conda activate wrc-demo

# Download MobileCLIP2 .pt
PYTHONNOUSERSITE=1 python scripts/setup_models.py --fetch
フォーマット変換 trace .pt → .ts(手動)**
PYTHONNOUSERSITE=1 pip install "open_clip_torch>=2.30"

PYTHONNOUSERSITE=1 python <<'PY'
import torch, open_clip
full = open_clip.create_model_from_pretrained("MobileCLIP2-B", pretrained="models/mobileclip2_b.pt", return_transform=False)
class Wrap(torch.nn.Module):
    def __init__(self, m): super().__init__(); self.m = m
    def forward(self, t):
        f = self.m(t); return f / f.norm(dim=-1, keepdim=True)
torch.jit.trace(Wrap(full.text).eval(), torch.zeros(2, 77, dtype=torch.long), strict=False).save("models/mobileclip2_b.ts")
PY
手動検証
PYTHONNOUSERSITE=1 python -c "import torch; m=torch.jit.load('models/mobileclip2_b.ts'); o=m(torch.zeros(2,77,dtype=torch.long)); print(o.shape, o.norm(dim=-1).tolist())"
# Expected: torch.Size([2, 512]) [1.0, 1.0]
4.1.1 YOLOE テキストエンコーダの探索パスについて
ultralytics が mobileclip*.ts を読み込む際は、現在の作業ディレクトリ(CWD)のみを参照し、models/ は参照しません。
もし python -m wrc_demo.apps.demo ... を直接実行し、CWD が models/ 配下でない場合は、「Download failure for ... mobileclip_*.ts」と表示されます。
上記のエラーを解決するには、次のコマンドを実行します。
# Two processing methods when running python directly (choose one)
ln -sf models/mobileclip2_b.ts mobileclip2_b.ts     # Project root symlink
4.2 Qwen3-VL ローカル LLM 重みのダウンロード
クラウド API を使用する予定の場合は、このステップをスキップできます:
このチュートリアルでは、llm.profile=local_qwen3_vl をデフォルトとし、AWQ-4bit 量子化版(8GB VRAM で動作)に対応します。
hf download cyankiwi/Qwen3-VL-2B-Instruct-AWQ-4bit \
  --local-dir models/qwen3-vl-2b-awq-4bit
# → https://huggingface.co/cyankiwi/Qwen3-VL-2B-Instruct-AWQ-4bit
hf download でネットワークの問題がある場合は、github リポジトリからダウンロードすることもできます。
git clone https://huggingface.co/cyankiwi/Qwen3-VL-2B-Instruct-AWQ-4bit models/qwen3-vl-2b-awq-4bit
# If it gets stuck for too long, just press ctrl + c to stop
cd models/qwen3-vl-2b-awq-4bit && git lfs pull
4.3 チートシート
| アセット | サイズ | 必要性 | 取得方法 |
|---|---|---|---|
qwen3-vl-2b-awq-4bit/ | 約 2. | 4 GB | ローカル LLM デプロイ(8 GB VRAM)に必須 |
yoloe-26s-seg.pt | 約 31 MB | オープンボキャブラリ検出(2026-09 以降推奨) | Seeed-Projects/reBot-DevArm-Grasp をクローン後に cp で抽出;既存の mobileclip2_b.ts を使用し、blt.ts は不要 |
yoloe-26l-seg.pt | 約 75 MB | 任意(高精度、約 2 倍遅い) | 上記と同様;mobileclip2_b.ts も使用 |
yoloe-11s-seg.pt | 約 28 MB | 非推奨 — mobileclip_blt.ts(572 MB、初回起動時のダウンロードに約 1.5 時間)が必要 | レガシーモデルの重みが必要な場合のみ使用;元に戻すには configs/demo.yaml の model: フィールドを変更 |
mobileclip2_b.pt | 約 571 MB | YOLOE 26s/l テキストエンコーディングのソース(生の PyTorch 版) | python scripts/setup_models.py --fetch により apple/MobileCLIP2-B から自動取得 |
mobileclip2_b.ts | 約 253 MB | YOLOE 26s/l テキストエンコーディング(実行時に実際に読み込まれるもの) | 手動で trace(§4.1 参照);ダウンロード後 必ず models/ または CWD に配置する必要あり — §4.1.1 参照 |
mobileclip_blt.ts | 約 572 MB | YOLOE 11s テキストエンコーディング(非推奨、ソースのダウンロードが困難) | 手動で trace、ソースは apple/MobileCLIP-B-LT;11s モデル使用時のみ必要 |
pyrealsense2 | コンパイル済み成果物 | RealSense ユーザーのみ | Intel 公式ドキュメントに従ってコンパイル |
5. ハンドアイキャリブレーション
キャリブレーションの目的は、デモに ピクセル座標 ↔ ロボットベース座標系 間の変換を認識させることです。data/clip/hand_eye_top.json はマスキング済みの参照行列であり、あなたのカメラは再キャリブレーションが必須です。
5.1 準備
1. ArUco チェッカーボードの印刷
ArUco 4x4 辞書からチェッカーボードを印刷し、ID = 0、1 辺の長さ = 0.10 m(10 cm)とします。推奨ソース:~/wrc/aruco100x100.pdf
印刷後、辺の長さを正確に測定します(プリンタが画像を拡大縮小する可能性があります)。測定した値を --marker-size パラメータとして使用してください。
2. カメラ接続 + CAN バス
# Plug Orbbec into USB 3.0, grant camera permissions
sudo chmod a+rw /dev/bus/usb/*/*

# CAN bus (robotic arm)
sudo ip link set can0 down 2>/dev/null
sudo ip link set can0 type can bitrate 1000000
sudo ip link set can0 up
3. デバイス一覧
wrc-calib-top --list
# Expected: lists Orbbec device index + serial number

# Write camera serial number
wrc-calib-top --bind top --serial `xxxx`
# Replace the content in `xxxx` with the listed camera serial number
5.2 上部カメラ ETH キャリブレーション
ETH = Eye-To-Hand:カメラはロボットアームの外部の固定位置に取り付けられます。図のようにキャリブレーションボードを配置します。
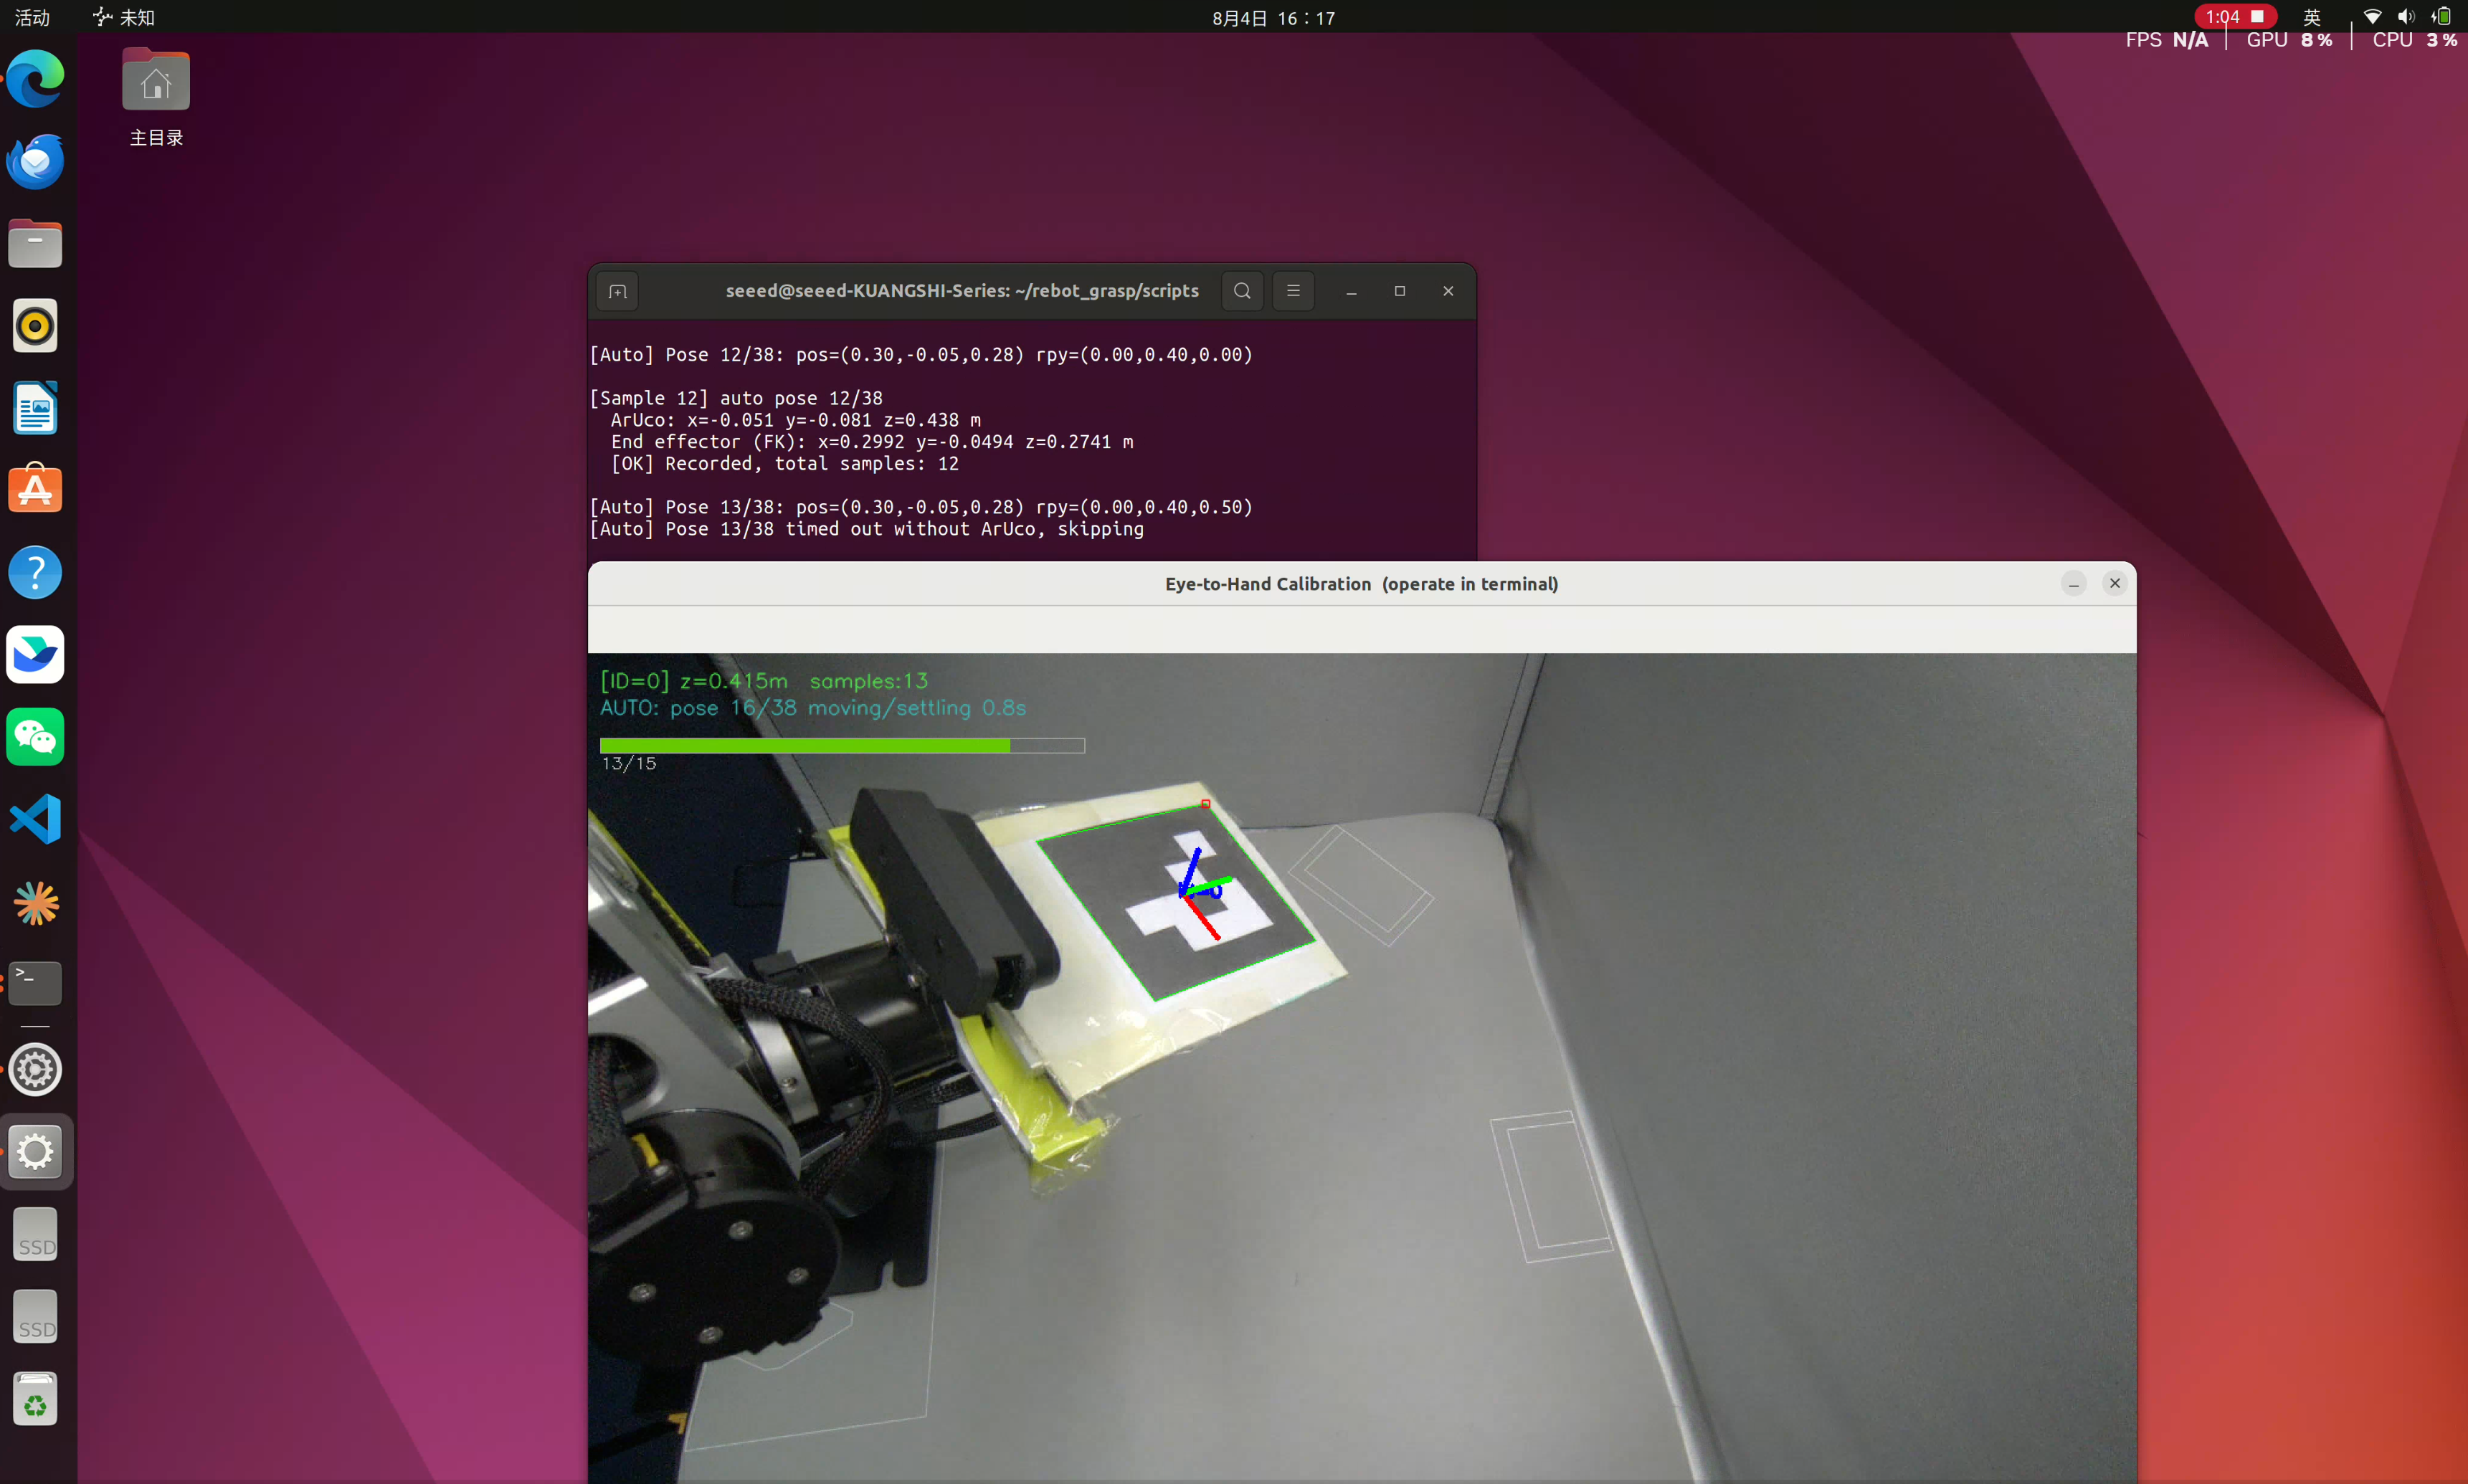
# Automatic mode (automatically runs 25+ sampling points with preset poses)
wrc-calib-top --marker-size 0.10 --n 30 \
  --out data/calibration/hand_eye_top.local.json

# Manual mode (press ENTER to sample each time)
wrc-calib-top --marker-size 0.10 --manual --n 30 \
  --out data/calibration/hand_eye_top.local.json
hand_eye_top.local.json ファイルは .gitignore によって自動的に無視され(リポジトリを汚染しません)、実機のキャリブレーション結果です。
このデモでは、ロボットアームの安全な作業領域があらかじめ定義されています。広い範囲での把持・配置動作中に IK ソルバが失敗する場合は、カメラの固定位置を調整して再キャリブレーションする必要があります(安定したカメラ位置はロボットアームベースから約 36cm × 36cm 離れた位置です)。
キャリブレーション原理
このツールは内部で joint_solve を実行します(SE(3) LM + Huber + 3*MAD 外れ値除去):
wrc_demo.control.kinematics.Kinematicsからの FK(RS URDF 上の Pinocchio、joint_signs=[-1]*6、ee_frame='gripper_end')- cv2.aruco + SDK 内部パラメータからの PnP
出力:
data/calibration/hand_eye_top.json— マスキング済み参照行列(使用しないでください、serial=REDACTED)data/calibration/hand_eye_top.local.json— あなたの実機キャリブレーション結果
5.3 キャリブレーション RMSE の検証
再キャリブレーションは行わず、既知のベース座標系上の点で直接検証します:
wrc-calib-top --verify \
  --json data/calibration/hand_eye_top.local.json \
  --known-points "0.30,0.00,0.02;0.25,-0.05,0.02;0.35,0.05,0.02"
# Expected: RMSE < 10 mm (reference set.py:320)
6. LLM 設定
6.1 決定木
What is your VRAM size?
├─ ≥ 8 GB  → Option A: Local model (local_qwen3_vl)
├─ Have API key → Option B: Cloud API (anthropic / openai / minimax)
└─ Neither → Option C: mock (test only)
6.2 オプション A: ローカルモデル(推奨、8 GB 以上の VRAM)
vLLM サービスを起動します(別のターミナルで):
conda activate wrc-demo
bash scripts/start_cosmos3_server.sh --bg    # Start in background
sleep 60                                    # Wait for vLLM to load the model (~60s for first run)

# Health check
bash scripts/start_cosmos3_server.sh --status
# Expected: [status] vllm running, PID <xxx>
vLLM 0.6 以降は Qwen3-VL のマルチモーダル推論をサポートしています。AWQ 4bit 量子化版は 8 GB VRAM で約 30 tokens/s で動作します。
6.3 オプション B: クラウド API(GPU 不要)
二層構成 — YAML プロファイルファイル + 環境変数キー:
a. YAML プロファイルファイル (configs/llm/*.yaml)
| File | 目的 | 主要フィールド |
|---|---|---|
anthropic.yaml | Claude | type: anthropic, model: claude-sonnet-5 |
openai.yaml | OpenAI / OpenAI 互換 | type: openai_compat, base_url, model |
minimax.yaml | MiniMax | type: openai_compat + 固定 base_url: https://api.minimax.chat/v1 + env_key: MINIMAX_API_KEY |
local_qwen3_vl.yaml | ローカル vLLM(デフォルト) | キー不要 |
mock.yaml | スクリプト化されたモック | テスト用 |
b. 使用するプロファイルの選択 (configs/demo.yaml)
llm:
  profile: local_qwen3_vl    # ← Modify this line (mock / anthropic / openai / minimax / local_qwen3_vl)
CLI から一時的に切り替え: wrc-demo --llm anthropic --task "..."
c. API キー(環境変数)
| profile | 参照される環境変数 |
|---|---|
anthropic | ANTHROPIC_API_KEY |
openai | OPENAI_API_KEY(OPENAI_BASE_URL でエンドポイントを変更) |
minimax | MINIMAX_API_KEY(YAML の env_key: フィールドから読み取り) |
local_qwen3_vl | 不要 |
実行
conda activate wrc-demo

# ⚠ Important: `PUT_KEY_HERE` below is a **placeholder**, must be replaced with your real key

# Claude (Anthropic key format: sk-ant-api03-...)
export ANTHROPIC_API_KEY=PUT_KEY_HERE

# OpenAI (or any OpenAI compatible endpoint; key format: sk-...)
export OPENAI_API_KEY=PUT_KEY_HERE

# MiniMax (key format: sk-cp-...)
export MINIMAX_API_KEY=PUT_KEY_HERE

# Verify env var is set correctly
echo "ANTHROPIC_API_KEY prefix: ${ANTHROPIC_API_KEY:0:10}..."
echo "MINIMAX_API_KEY prefix: ${MINIMAX_API_KEY:0:10}..."
クラウド API_KEY を export で設定した場合、その有効範囲は現在のターミナルのみです。key を ~/.bashrc に永続化したい場合(export は現在のシェルにのみ有効で、新しいシェルでは再設定が必要):
# Replace PUT_KEY_HERE with your real key (one full line)
echo 'export ANTHROPIC_API_KEY=PUT_KEY_HERE' >> ~/.bashrc

# Immediately reload and verify bashrc syntax is correct (will not expose key content)
bash -n ~/.bashrc && echo "✓ bashrc syntax OK"

source ~/.bashrc
# Verify env var is actually set
echo "ANTHROPIC_API_KEY prefix: ${ANTHROPIC_API_KEY:0:10}..."
別案として、YAML にキーを直接書き込むこともできます(非推奨):
# configs/llm/minimax.yaml has two writing methods:

# Method A (recommended, key is in env var)
type: openai_compat
base_url: https://api.minimax.chat/v1
model: MiniMax-M3
env_key: MINIMAX_API_KEY          # ← This is the "name of the env var", not the value

# Method B (key written directly in YAML, but will be tracked by git)
type: openai_compat
base_url: https://api.minimax.chat/v1
model: MiniMax-M3
api_key: PUT_KEY_HERE             # ← Write real key here (**not recommended**, will be tracked by git)
6.4 LLM を切り替える 2 つの方法
方法 1: CLI による一時的な上書き
# Single run with cloud model, tip: minimax can be replaced with the actual cloud model you use
wrc-demo --llm minimax --task "go to home" --no-view --no-serve

# Single run with local model (overrides default in demo.yaml)
wrc-demo --llm local_qwen3_vl --task "go to home" --no-view --no-serve
上記 2 つのテストスクリプトは、モデル接続が確立されているかを確認するためだけに使用され、実際にロボットアームを制御することはありません。
7. デモの実行
7.1 デモの起動
# Start the project
bash /home/seeed/wrc/scripts/start_all.sh --repl --real
正常に実行された後のターミナル出力例:
# Output example:
(wrc-demo) seeed@seeed-KUANGSHI-Series:~/wrc$ bash /home/seeed/wrc/scripts/start_all.sh --repl --real
============================================================
  wrc_demo + Qwen3-VL-AWQ-4bit one-shot launcher
============================================================
  mode:    real hardware
  camera:  orbbec_overhead
  arm:     rebot_rs
  task:    <interactive>

[1/3] check vLLM...
  vLLM already running (skipped)

[2/3] start wrc_demo...
[wrc-demo] cameras=['orbbec_overhead'] arm=rebot_rs llm=local_qwen3_vl view=False
[wrc-demo] traces -> /home/seeed/wrc/runs/20260903_153216
load extensions from /home/seeed/miniforge3/envs/wrc-demo/lib/python3.10/site-packages/pyorbbecsdk/extensions
[stream] live view on http://192.168.3.175:8090/
[wrc-demo] LIVESTREAM dashboard: http://192.168.3.175:8090/
Type a task (empty line to quit).
task>
ブラウザでページを開き、ターミナルに出力された [wrc-demo] LIVESTREAM dashboard: http:xxxx リンクをクリックすると、対話を通じてロボットアームを制御できます。
対話コマンド送信後のターミナル出力例:
=== task report ===
task:    go to home
success: True
path:    reflex (3.08s)
steps:   1
summary: done via reflex path in 3.08s: move_home()

[✓ done] task complete — arm parked at home. Enter a new task or press Enter to quit.

=== task report ===
task:    Wave and say hello
success: True
path:    llm (14.66s)
steps:   3
summary: Robot waved hello three times as requested.
このデモでは、ロボットアームのために事前定義された安全な作業領域が設定されています。広い範囲での把持および配置動作中に IK ソルバが失敗する場合は、カメラの固定位置を調整して再キャリブレーションを行う必要があります(安定したカメラ位置はロボットアームのベースから約 36cm × 36cm 離れた位置です)。
7.2 実行可能なタスク
テキスト対話制御には 2 つのパスがあり、path: llm & path: reflex です。
reflex は事前に読み込まれたテキスト(モックモード)を指し、LLM を動作させずに、あらかじめ用意された固定テキストを使用してロボットにさまざまなタスクを実行させることを保証します。
安定した reflex コマンドは次のとおりです:
pick up X and put in Y  # Complete pick+place

open the gripper        # Open the gripper

look around             # List objects recognized by the camera

go home                 # Return to origin
llm は、実際に接続されたクラウドモデルまたはローカルにデプロイされたモデルによる解析を指し、言語テキストをより柔軟に理解し、対応するスキルを呼び出すことができます。
スキルと対応する機能は次のとおりです:
skill_get_observation	 # Take photo + recognize
skill_localize_object	 # Single object localization
skill_grasp_object	     # Grasp only
skill_place_at	         # Place to coordinates
skill_place_on_object	 # Place on object
skill_open_gripper	     # Open gripper
skill_close_gripper	     # Close gripper
8. カスタム設定
8.1 新しい LLM プロファイルの追加
wrc-demo の LLM バックエンドはプラガブルです。新しい LLM プロファイルを追加する必要がある場合、configs/llm/<name>.yaml という 1 つのファイルが 1 つのプロファイルになります。
切り替えるには、demo.yaml 内の 1 行 profile: <name> を変更します。
現在組み込みの 5 つのプロファイル:
| profile | 目的 | 必要な環境変数 |
|---|---|---|
local_qwen3_vl | デフォルト、ローカル Qwen3-VL-2B-AWQ-4bit(vLLM 8080) | 不要 |
mock | オフラインスクリプト、純粋なテスト(§7.4 トラブルシューティングで使用) | 不要 |
anthropic | Anthropic Claude | ANTHROPIC_API_KEY |
openai | OpenAI / OpenAI 互換プロトコル | OPENAI_API_KEY |
minimax | MiniMax クラウド(環境変数に移行済み) | MINIMAX_API_KEY |
新しいプロファイルを追加する必要がある場合は、以下の手順に従ってください:
ステップ 1: yaml をテンプレートとしてコピー
(1) 多くの国内 LLM(DeepSeek / Moonshot Kimi / DashScope Qwen / Zhipu / SiliconFlow)は、すべて OpenAI Chat Completions プロトコルに従っています。 openai.yaml からコピーします:
cp configs/llm/openai.yaml configs/llm/kimi.yaml
(2) Anthropic プロトコルの場合は、anthropic.yaml からコピーします。
ステップ 2: yaml 内の 4 つのフィールドを修正
configs/llm/kimi.yaml を開き、4 つのフィールドだけを修正します:
type: openai                # Protocol type (see "How to choose type" below)
model: moonshot-v1-8k       # Model name (check vendor documentation)
base_url: https://api.moonshot.cn/v1   # API endpoint, **do not miss the trailing /v1**
env_key: MOONSHOT_API_KEY   # Which env var to read
supports_vision: false      # Whether it supports images (critical, see below)
temperature: 0.0            # Generally no need to modify
max_tokens: 1024            # Generally no need to modify
timeout_s: 30               # Can be adjusted to 60 for slow networks
ステップ 3: demo.yaml でプロファイルを切り替え
configs/demo.yaml を開き、llm: ブロックを見つけて、1 行だけ変更します:
llm:
  profile: kimi    # ← Change to new profile name (remove .yaml suffix)
ステップ 4: 環境変数の設定 + 検証
(1) 一時的な export(現在のシェルでのみ有効)
export MOONSHOT_API_KEY=sk-...
(2) 環境変数が有効になっているか確認
echo "${MOONSHOT_API_KEY:0:8}"
(3) demo.yaml を変更せずに、--llm フラグ付きでテスト実行
conda activate wrc-demo
python -m wrc_demo.apps.demo --llm kimi --task "list the objects" --no-view --no-serve
(4) 標準出力に「[wrc-demo] llm=kimi」と表示されるか確認します。LLM からの応答メッセージがあれば成功です(空のシーンでも問題ありません)。
8.2 把持精度の変更
configs/demo.yaml 内の grasp.* ブロックを編集します:
grasp:
  backend: obb                          # obb (default fallback) / graspgenx (learning-based)
  pregrasp_offset_m: 0.08              # Hover height (along -approach direction)
  insertion_depth_m: 0.0              # TCP offset along +tool-x
  depth_fraction: 0.35                 # How deep to grasp from the top of the object
  exempt_radius_m: 0.15                # Grasp safety cylinder radius
  move_duration_s: 2.5
  descend_duration_s: 2.0
  release_height_m: 0.05
  air_grasp_frac: 0.04                # Gripper opening below this = empty grasp
  approach_pitch_rad: 1.2             # Angle between approach direction and +z (~69°)
より保守的(より高精度で遅い)にする → n_samples を増やす(vLLM の思考時間が長くなる);より攻撃的(高速)にする → 減らす。
ハンドアイ補正(hand_eye_compensation_m)、configs/cameras/orbbec_overhead.yaml の extrinsics を編集します。
把持姿勢はカメラ座標からベース座標系へ T_cam2base を介して変換されます — このステップでのずれは把持の着地点に直接伝播します。このリンク上のずれの微調整は、hand_eye_compensation_m の値を調整することで行えます。
# configs/cameras/orbbec_overhead.yaml
extrinsics:
  source: "${repo}/data/calibration/hand_eye_top.json"
  mode: eye_to_hand
  hand_eye_compensation_m:    # Meters; default [0, 0, 0] = identity (no effect)
    x: 0.00
    y: 0.
```00
    z: 0.00
The three values X, Y, and Z are used to add a manual translation offset on top of the calibrated T_hand_eye to ensure stable grasping of objects.
8.3 Modify detector configuration
# configs/demo.yaml
detector:
  type: yoloe                          # yoloe / yolo-world
  model: ${repo}/models/yoloe-11s-seg.pt
  conf: 0.20                           # 信頼度しきい値(低いほど検出数は増えるが、誤検出も増える)

detect_classes: ["banana", "cracker box", "soup can", "cube", "box", "pen", "toy"]
# ↑ このリストは、オープンボキャブラリモードで YOLOE にどのラベルを探すかを指示します
8.4 Modify safety thresholds
Invariant: The limit_margin=0.025 parameter of Kinematics.ik (in src/wrc_demo/control/kinematics.py) must be strictly greater than the harness's joint_margin=0.02. Adjusting only one of these values will break the boundary between IK and safety verification. Adjust both together!
# configs/demo.yaml
safety:
  workspace:                          # TCP ワークスペース AABB(メートル)
    min: [0.10, -0.30, -0.01]
    max: [0.50, 0.30, 0.55]
  table_z: 0.0                        # テーブル高さ(ベース座標系)
  table_clearance: 0.02              # TCP のテーブルクリアランス
  max_joint_vel: 1.2                  # rad/s(各ウェイポイントで適用)
  joint_margin: 0.02                  # rad(URDF 制限内のマージン)
  watchdog_s: 5.0                     # 認識結果の有効期限による停止時間
  keep_out: []                        # 非侵入(E-stop)AABB のリスト
9. Add new skills
Prerequisites: Familiarity with Python + Pinocchio + ultralytics. This section is a 30-minute quick start; to understand the underlying design, refer to src/wrc_demo/skills/runtime.py.
9.1 5 steps to add a new skill
All skills are added to the SkillRuntime class in src/wrc_demo/skills/runtime.py (no need to create a new .py file).
Step 1: Write the skill_<name>() method
# src/wrc_demo/skills/runtime.py
from ..types import SkillError, SafetyViolation

class SkillRuntime:
    # ... 既存のメソッド ...

    def skill_my_skill(self, foo: str, bar: int = 0) -> dict:
        """1 行の説明。戻り値: {...}"""
        if not foo:
            raise SkillError("foo must be non-empty")
        # ... ロジックをここに記述(self.arm(SafeArm)を必ず使用し、self.arm.raw に直接アクセスしないこと) ...
        return {"ok": True, "result": "..."}
Step 2: Add an entry to TOOL_SPECS
# src/wrc_demo/skills/runtime.py
TOOL_SPECS.append({
    "name": "my_skill",
    "description": "...",
    "parameters": {
        "type": "object",
        "properties": {
            "foo": {"type": "string"},
            "bar": {"type": "integer", "default": 0},
        },
        "required": ["foo"],
    },
})
Step 3: Add motion skills to _MOTION_SKILLS
_MOTION_SKILLS = {
    # ... 既存の 18 個のエントリ ...
    "my_skill",
}
This is the only location where WorldWatcher belief fusion is paused — if fusion is not paused during arm movement, held objects will be incorrectly re-fused to their in-air position.
Step 4: Automatic tracing and MCP exposure
SkillRuntime.execute() is the single scheduling entry point; mcp_server.py serves TOOL_SPECS minus _EXCLUDED_TOOLS plus _EXTRA_TOOLS — once added, the skill can be called by LLM/MCP.
Step 5: (Optional) Add regex to _RULES
Enable common commands to use the fast reflex path (no LLM call):
# src/wrc_demo/agent/reflex.py
_RULES.append((
    re.compile(r"^my command pattern\s+(\w+)", re.IGNORECASE),
    "my_skill",
))
9.2 Add a new detector
Implement the new detector class in src/wrc_demo/perception/detector.py:
from .detector import Detector

class MyDetector:
    def __init__(self, model_path: str, **kwargs):
        # モデルを読み込む
        ...

    def detect(self, frame) -> list[Detection]:
        # Detection オブジェクトのリストを返す
        ...
Add a branch in apps/demo.py::_make_detector():
if dcfg.type == "my_detector":
    from wrc_demo.perception.my_detector import MyDetector
    return MyDetector(dcfg.model)
9.3 Add a new grasp planner
src/wrc_demo/grasping/my_planner.py:
from .selector import Grasp

def plan_my_grasps(fix, cloud, cfg) -> list[Grasp]:
    # Grasp オブジェクトのリストを返す
    ...
Add a layer in SkillRuntime._plan_grasps() (stacked by default on top of the camera-frame, graspgenx, and obb layers).
10. Architecture Overview
This chapter is reference material — a guide to understanding how
wrc_demoorganizes code. Read the process in §9.1 before writing code; to understand the design rationale, refer to §10.3 Key Design Decisions.
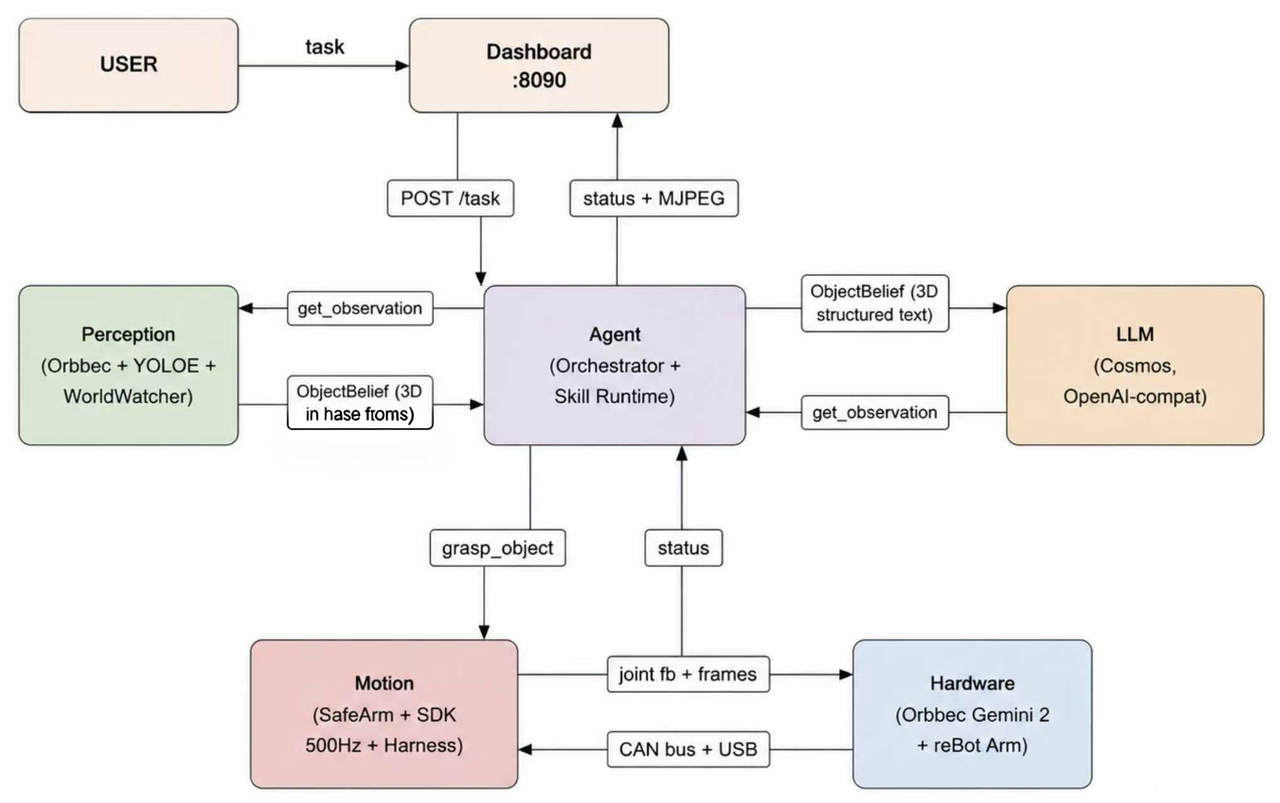
10.1 Three-tier decision making (Reflex → Habit → LLM)
wrc_demo splits decision making into a three-tier fast/slow path system, similar to human fast/slow thinking:
N 台のカメラ ──CameraStream(各スレッド、最新フレームスロット、古いフレームは破棄)
   │
   ├── WorldWatcher(スレッド、約 3 Hz):detector + HSV カラータグ
   │     └─> BeliefStore(スレッドセーフ):ラベル + 色 + 3D + 鮮度
   └── StreamServer(MJPEG ダッシュボード):カメラグリッド + ナレーション + オブジェクトテーブル

チャットコマンド("pick and place pink object")
   ├─ 第 1 層 REFLEX    テンプレート構文 → スキル呼び出し                          (約 µs)
   ├─ 第 2 層 HABIT     経験メモリ(ハッシュ化 BoW コサイン類似度 ≥ 0.9)              (約 ms)
   └─ 第 3 層 LLM       生のオーケストレータループ(1 ターンあたり 2〜15 秒)
        すべての層が同じ安全ゲート付き SkillRuntime を使用
Key mechanisms:
- Latest-slot streaming: Consumers always receive the most recent frame; sensors never fall behind (
perception/stream.py) - Always-hot world model: WorldWatcher continuously fuses depth and extrinsic parameters from each camera into BeliefStore, turning command parsing into a dictionary lookup instead of an observe→detect round trip. Fusion is paused during movement (to avoid in-air re-fusion) and sends heartbeats to the safety watchdog.
- Color matching without CLIP: Detection results map the median HSV value of masks to color names, which are stored in the belief store and matched against color terms in queries — "pink object" works even with a closed-set COCO detector. VLMs can still be consulted (tier 3/advisor), but are never used in the hot path.
- One-call pick-and-place:
skill_pick_and_place= resolve → grasp → place → home, total execution time = robot arm movement time. - LazyArm: The MCP gateway preheats cameras, detectors, and the world model on startup, but motors are not enabled until the first motion command is received — starting the chat server does not power on the robot.
10.2 Module diagram (simplified)
src/wrc_demo/
├── types.py            Frame / Detection / ObjectFix / Grasp / RobotState
├── config.py           YAML プロファイル(cameras/、arms/、llm/)を Cfg にマージ
│
├── perception/         # 4 種類のカメラバックエンド + YOLOE detector + 深度アラインメント
├── calibration/        # ハンドアイキャリブレーション(ArUco + Pinocchio FK + LM)
├── memory/             # エピソード記憶 + 信念 + 把持結果
├── control/            # Pinocchio FK/IK + モック + lazy + 実機 RS + SafeArm
├── safety/             # フェイルクローズドなウェイポイント検証
├── grasping/           # 3 層の把持計画
├── agent/              # オーケストレータ + reflex + advisor + LLM クライアント + トレース
├── skills/              # SkillRuntime + TOOL_SPECS + ビジネスロジック(teach、master_arm など)
└── apps/                # demo / record / viewer / stream_server / mcp_server
10.3 Key design decisions
| Decision | Rationale |
|---|---|
Frame.rgb is BGR, depth_m is metric float32 | Unit differences between L515 (0.25 mm/unit) and D4xx (1 mm/unit) caused bugs in the baseline; conversion at the camera boundary ensures unit safety for all downstream consumers. |
| Grasp planning in base coordinate system, not camera coordinate system | The baseline derived approach vectors from camera ray direction, making grasp quality dependent on camera pose. Here, mask points are lifted to 3D, transformed to the base coordinate system, and the OBB in the base frame provides yaw, width, and height — camera pose only affects visibility, not grasp geometry. |
| Learned grasping as default, analytical grasping always available | grasp.backend: graspgenx sends the object's base-frame point cloud to the GraspGen-X ZMQ service (scripts/serve_graspgenx.sh, port :5556), prioritizing ranked 6-DoF grasps before analytical OBB candidates. Any server error silently falls back to OBB — the demo will never freeze due to a dead model server. |
| Custom kinematics wrapper | The ReBotArm SDK's kinematics silently reads its own global config file (ignoring the passed hw_yaml), causing the DM installation URDF to be loaded for RS arms (incorrect tool coordinate system). We explicitly load the RS URDF from assets/. |
| Feedback, no sleep | The baseline used sleep(duration + 0.6); the RS motor's motorbridge get_state() never decodes type-0x18 report frames, so actual position is obtained from mechPos (0x7019) parameter reads — verified on this rig. |
| Fail-closed safety | The SDK does not execute anything outside of IK. Our harness gates every streaming waypoint; grasp descent only occurs within an explicit exemption cylinder around the target, allowing "do not touch the table" and "grasp objects on the table" to coexist. |
10.4 Module dependency graph
            ┌──────────────────────────────────────────────────────────────┐
            │                apps/  (エントリーポイント)                  │
            │   demo.py (build_runtime)   mcp_server.py   dashboard_runner │
            └────────────┬──────────────────────┬────────────────┬─────────┘
                         │                      │                │
        ┌────────────────▼─────────┐   ┌────────▼────────┐  ┌────▼─────────┐
        │   agent/  (オーケストレータ) │   │  skills/        │  │  perception/ │
        │   orchestrator.py        │◄──│  runtime.py     │  │  camera_base │
        │   reflex.py (tier1)      │   │   6 skills      │  │  + cameras/  │
        │   advisor.py  (tier3)    │   │  TOOL_SPECS     │  │  detector    │
        │   llm.py                 │   │  trace auto     │  │  depth_prov  │
        └────────┬─────────────────┘   └────────┬─────────┘  └────┬─────────┘
                 │                            │                │
                 ▼                            ▼                ▼
        ┌─────────────────────────────────────────────────────────────────┐
        │              memory/  +  grasping/  +  control/                 │
        │   BeliefStore   GraspMemory   camera_grasp + obb_grasp + graspgenx│
        │   EpisodicMem   (3層)        Kinematics + MockArm + SafeArm     │
        └────────────────────────────┬────────────────────────────────────┘
                                     │
                                     ▼
        ┌─────────────────────────────────────────────────────────────────┐
        │                       safety/  (フェイルクローズ)              │
        │   SafetyHarness.approve(waypoint)  vet_pose()  非常停止ラッチ │
        └─────────────────────────────────────────────────────────────────┘
                                     │
                                     ▼
              ベンダー提供SDK + pyorbbecsdk + ultralytics + pin + motorbridge
10.5 Trace sequence diagram (one pick_and_place call)
t=0.0s  ユーザー  ──→  build_runtime()
                   ├─ Kinematics(urdf, joint_signs)
                   ├─ make_arm(cfg) ── RebotArm.connect()
                   ├─ CameraRig(N) ── Open + warm_up
                   ├─ LockedDetector(YOLOE weights)
                   ├─ EpisodicMemory / BeliefStore / TraceLogger
                   └─ SkillRuntime(...)

t=0.5s  WorldWatcher スレッド開始 (3 Hz detector pass → beliefs)

t=1.0s  ユーザー --task "pick up red block"
        AgentOrchestrator.run_task()
        ├─ tier1 REFLEX: 正規表現マッチ ──→ pick_and_place ヒット?  ──→ 実行
        └─ (フォールバック) tier2 HABIT ──→ tier3 LLM ──→ tool_calls

t=1.1s  SkillRuntime.execute("pick_and_place")
        ├─ tracer.start()
        ├─ belief.find("red block")  ── 締め切り5秒まで待機
        ├─ _plan_grasps() ── カメラ + graspgenx + obb ── 再ランク付け
        ├─ select_grasps() ── IK ── ハーネス事前審査
        ├─ safe_arm.move_joints() ── 各50Hzウェイポイント ── SafetyHarness.approve
        ├─ グリッパー2段階クローズ ── ストール検出
        ├─ リフト + 配置 + ホーム
        └─ tracer.finish()  ── trace.jsonl + キーフレーム + ナレーション

t=N.5s  report.success ── print "✓ done — arm parked at home"
10.6 Comparison of the three grasp planning layers
| Layer | Trigger condition | Data source | Output | Failure behavior |
|---|---|---|---|---|
1. camera-frame planner (camera_grasp.py::plan_grasp_from_mask) | Always — as long as detection has mask + depth | segmentation mask + depth → cv2.minAreaRect → depth-quantile back-project → camera-frame Grasp | Grasp(approach, position, width, height) | Fall back to layer 2 |
2. GraspGen-X ZMQ (graspgenx_backend.py) | grasp.backend == "graspgenx" and server at :5556 is reachable | base-frame point cloud → learned 6-DoF grasp | List of Grasp (top-k=32) | Server timeout / disconnect → silent fallthrough |
3. analytic OBB (obb_grasp.py::plan_grasps_from) | Always | base-frame OBB (yaw, width, height) | List of Grasp | No failure — always returns |
All layers output the same Grasp dataclass; GraspOutcomeMemory re-ranks across layers; select_grasp() performs jaw-width filtering + IK walk + harness pre-vet (including 7 samples along the descent path).
10.7 Verification status (as of 2026-08-28)
- 17 unit + integration tests passed, 1 skipped (mock stack, ~30s)
- Full suite: ~290 unit + integration tests passed (hardware-tagged tests deselected by default)
- 2 adversarial multi-view reviews: 2026-07-16 (4 reviewers × skeptic verification, 29 confirmed defects) + 2026-07-18 livestreaming redesign (45-agent workflow, 33 confirmed findings)
- Real robot verification: L515 streaming, RobStride
mechPosparameter reads (can0 read-only), YOLO inference (CUDA, GB10), GraspGen-X backend (first-light verification) - Not verified: Real robot motion (requires on-site gripper re-verification + hand-eye calibration)