Seeed Studio XIAO ESP32-C5 による Bluetooth の使用
| Seeed Studio XIAO ESP32-C5 |
|---|
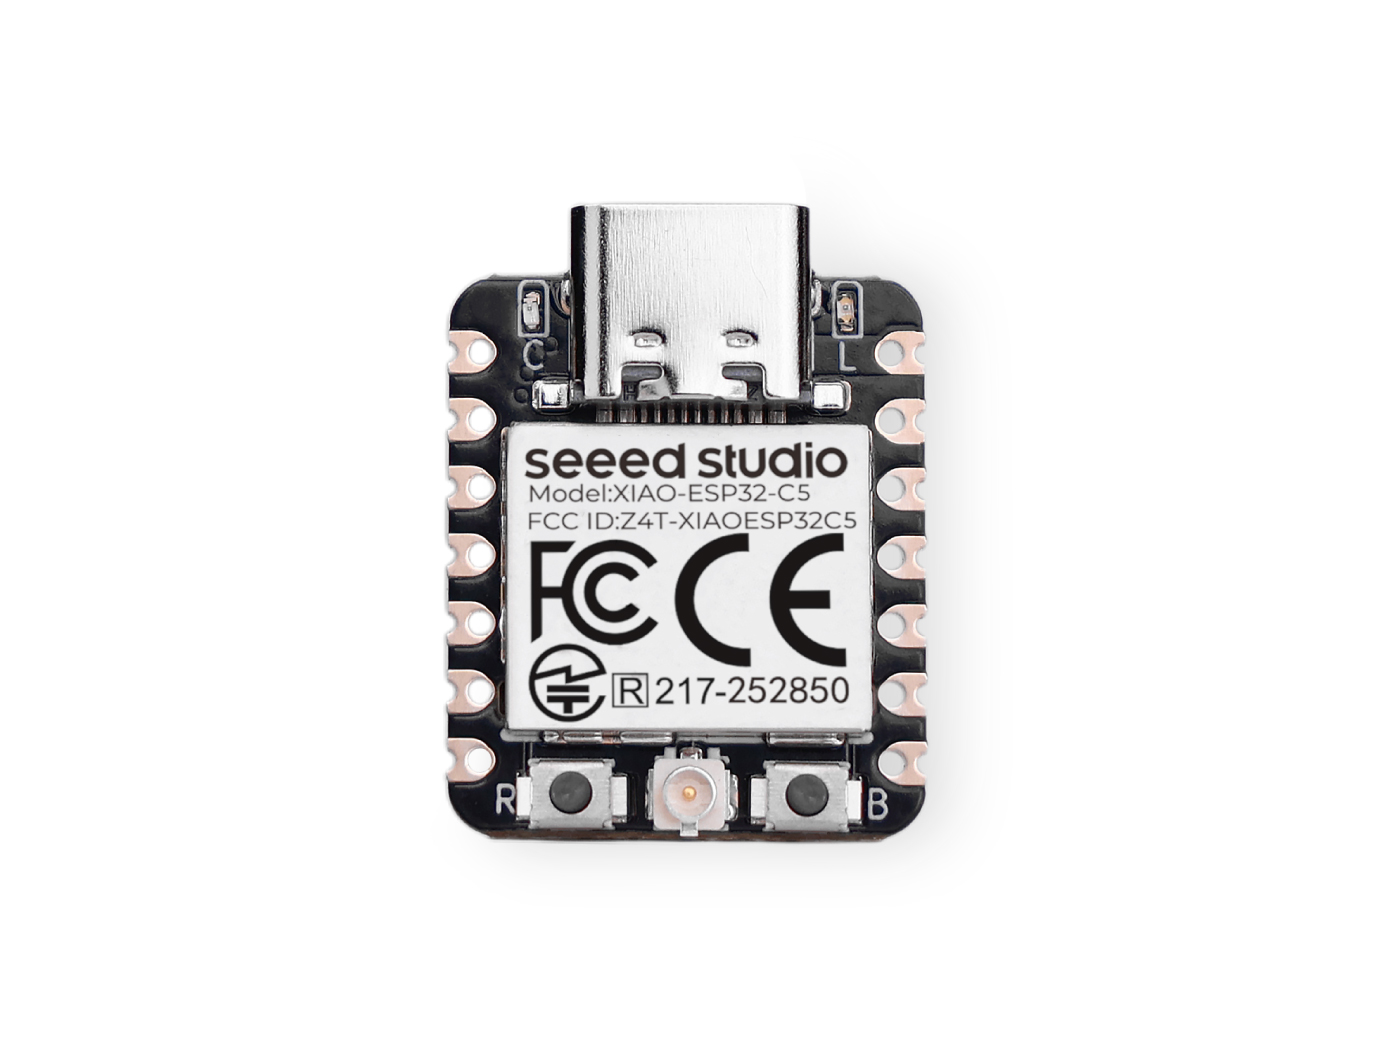 |
Seeed Studio XIAO ESP32-C5 は、Bluetooth 5、BLE、および Mesh ネットワーキングをサポートする高性能な開発ボードであり、ワイヤレス接続を必要とする幅広い IoT アプリケーションに最適な選択肢です。優れた RF 性能により、XIAO ESP32-C5 はさまざまな距離で信頼性が高く高速なワイヤレス通信を提供でき、短距離および長距離の両方のワイヤレスアプリケーションに対応できる汎用的なソリューションとなります。本チュートリアルでは、XIAO ESP32-C5 の Bluetooth 機能の基本的な特徴に焦点を当て、近くの Bluetooth デバイスをスキャンする方法、Bluetooth 接続を確立する方法、そして Bluetooth 接続を介してデータを送受信する方法について説明します。
入門ガイド
アンテナの取り付け
Seeed Studio XIAO ESP32-C5 のパッケージの中には、専用の Wi-Fi/BT アンテナコネクタ が含まれています。WiFi/Bluetooth の信号強度を最適化するには、同梱されているアンテナを取り出し、コネクタに取り付ける必要があります。
Bluetooth Low Energy (BLE) の使用
Bluetooth Low Energy、略して BLE は、省電力型の Bluetooth 規格です。BLE の主な用途は、短距離で少量のデータ(低帯域幅)を送信することです。常時オンである Bluetooth とは異なり、BLE は接続が開始されるとき以外は常にスリープモードのままです。
ESP32-C5 は BLE のみをサポートし、Bluetooth Classic には対応していません
このような特性から、BLE はボタン電池で動作し、定期的に少量のデータをやり取りする必要があるアプリケーションに適しています。例えば、ヘルスケア、フィットネス、トラッキング、ビーコン、セキュリティ、ホームオートメーションといった分野で BLE は大いに役立ちます。
これにより、消費電力を非常に低く抑えることができます。BLE の消費電力は、使用状況にもよりますが、Bluetooth と比べておよそ 100 倍も少なくなります。
XIAO ESP32-C5 の BLE 機能については、次の 3 つのセクションでその使い方を紹介します。
- いくつかの基本概念 -- まず、BLE で頻繁に使われる可能性のある概念を理解し、BLE プログラムの実行プロセスや考え方を理解しやすくします。
- BLE スキャナ -- このセクションでは、近くの Bluetooth デバイスを検索し、それらをシリアルモニタに出力する方法を説明します。
- BLE サーバー/クライアント -- このセクションでは、XIAO ESP32-C5 をサーバーおよびクライアントとして使用し、指定したデータメッセージを送受信する方法を説明します。また、スマートフォンから XIAO へのメッセージの送受信にも使用します。
いくつかの基本概念
サーバーとクライアント
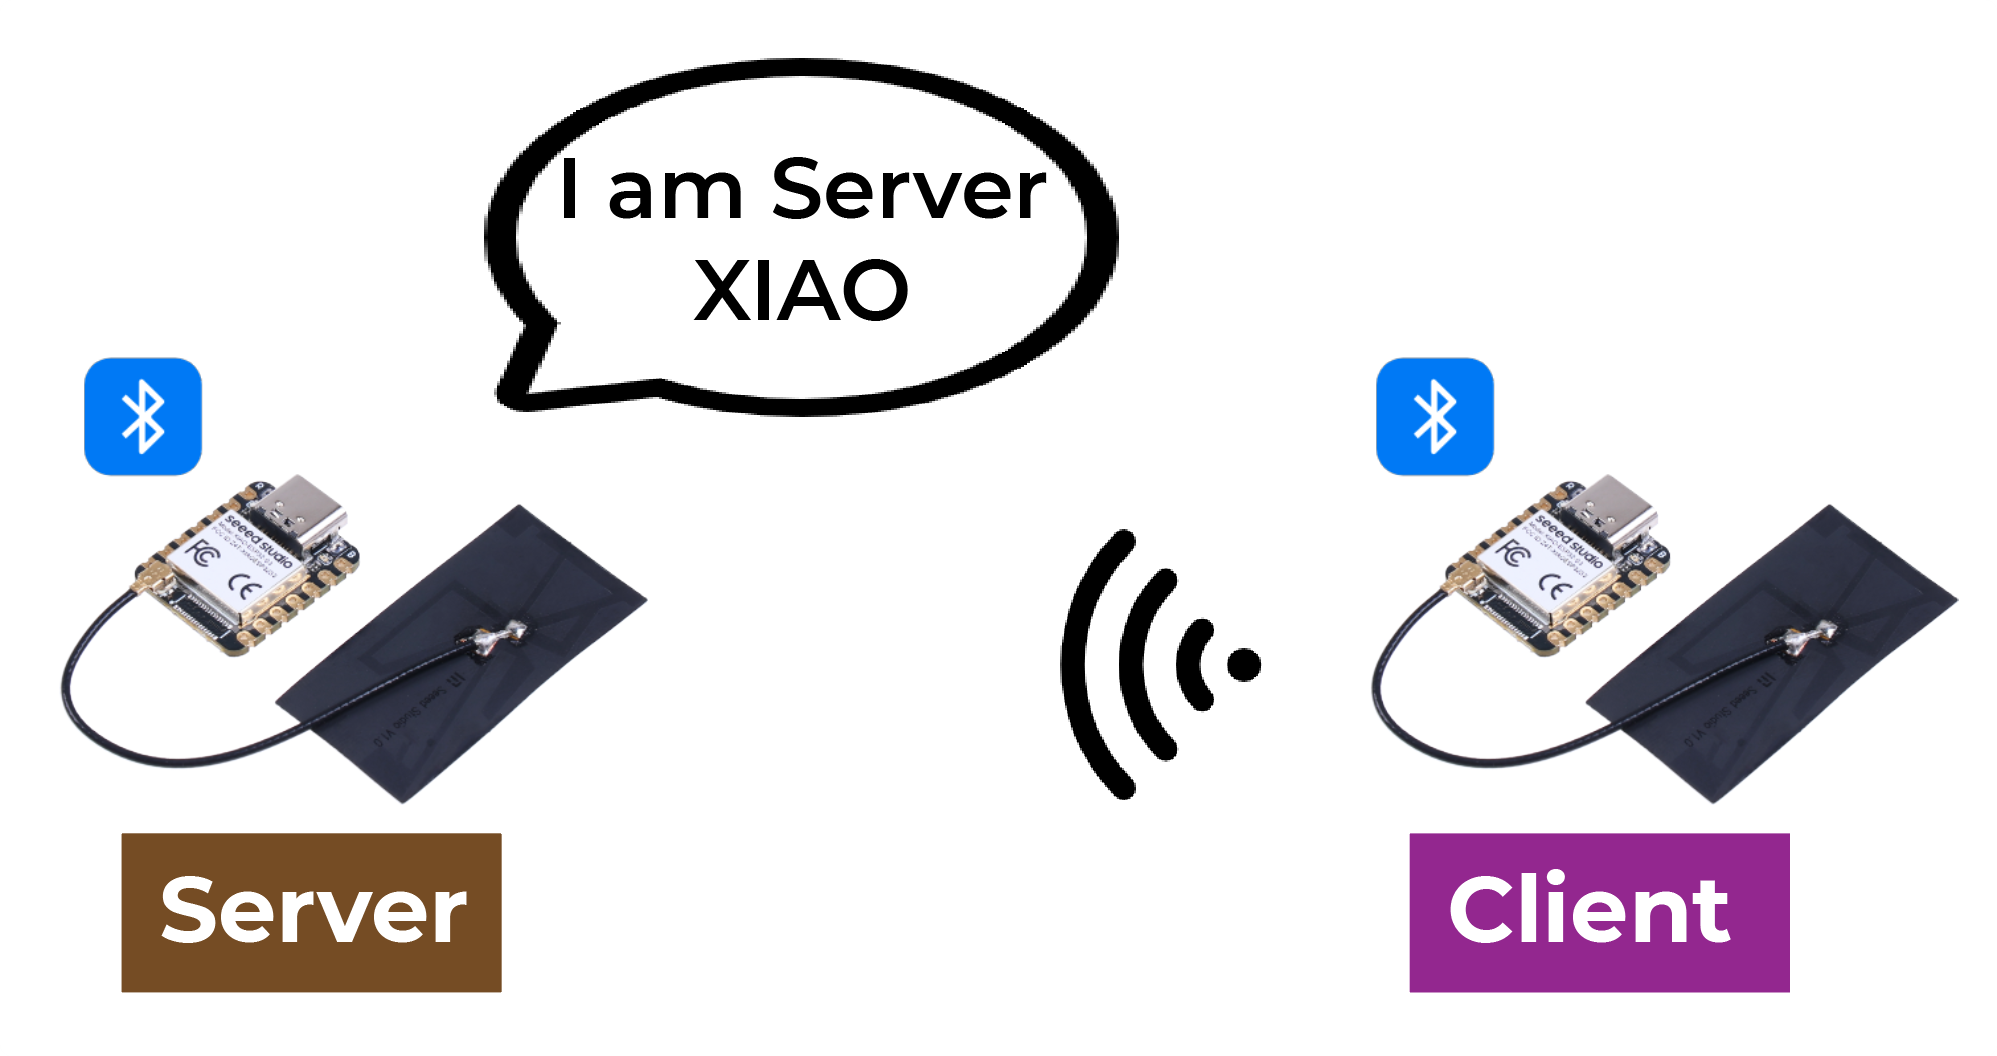
Bluetooth Low Energy では、デバイスにはサーバーとクライアントの 2 種類があります。XIAO ESP32-C5 は、クライアントとしてもサーバーとしても動作させることができます。
サーバーは自分の存在をアドバタイズして他のデバイスから見つけられるようにし、クライアントが読み取ることのできるデータを保持します。クライアントは近くのデバイスをスキャンし、目的のサーバーを見つけると接続を確立し、受信データを待ち受けます。これはポイントツーポイント通信と呼ばれます。
Attribute(属性)
Attribute とは、実際には 1 つのデータ要素のことです。各 Bluetooth デバイスはサービスを提供するために使用され、サービスはデータの集合体です。この集合体はデータベースと呼ぶことができ、そのデータベース内の各エントリが Attribute です。ここでは Attribute をデータエントリと訳すことができます。Bluetooth デバイスを 1 つの表としてイメージすると、その表の各行が Attribute に相当します。

GATT
2 つの Bluetooth デバイスが接続を確立するとき、どのように通信するかを決めるためのプロトコルが必要です。GATT(Generic Attribute Profile)はそのようなプロトコルであり、Bluetooth デバイス間でデータをどのように送受信するかを定義しています。
GATT プロトコルでは、デバイスの機能や特性は、サービス、キャラクタリスティック、ディスクリプタと呼ばれる構造に整理されます。サービスは、デバイスが提供する関連する機能や特徴の集合を表します。各サービスには複数のキャラクタリスティックを含めることができ、センサーデータや制御コマンドなど、そのサービスの特定のプロパティや動作を定義します。各キャラクタリスティックには一意の識別子と値があり、これを読み書きすることで通信を行います。ディスクリプタは、キャラクタリスティック値の形式やアクセス権限など、キャラクタリスティックのメタデータを記述するために使用されます。
GATT プロトコルを使用することで、Bluetooth デバイスはセンサーデータの送信やリモートデバイスの制御など、さまざまなアプリケーションシナリオで通信することができます。
BLE Characteristic(キャラクタリスティック)
ATT は Attribute Protocol の略です。これは BLE におけるデータ交換の基盤となるメカニズムです。ATT は、Requests、Responses、Notifications、Indications などの一連のコマンドに依存しています。Bluetooth プロトコルスタックにおいて、ATT はデータの転送を担当するレイヤーであり、Bluetooth データパケットを解析する際の主な焦点となります。
ATT コマンドは、正式には ATT PDU(Protocol Data Unit)と呼ばれます。これには、read、write、notify、indicate の 4 つのカテゴリがあります。これらのコマンドは 2 種類に分けることができます。Write Request や Indication のような操作は相手からの応答を必要としますが、Write Command や Notification は応答を必要としません。
Service と Characteristic は GATT レイヤーで定義されます。サービス側はサービスを提供し、サービスはデータであり、そのデータが属性です。Service と Characteristic はデータの論理的な表現であり、ユーザーが目にするデータは最終的に Service と Characteristic の形に変換されます。
モバイル端末の視点から、サービスとキャラクタリスティックがどのように見えるかを見てみましょう。nRF Connect は、各パケットがどのような構造になっているべきかを非常に視覚的に示してくれるアプリケーションです。
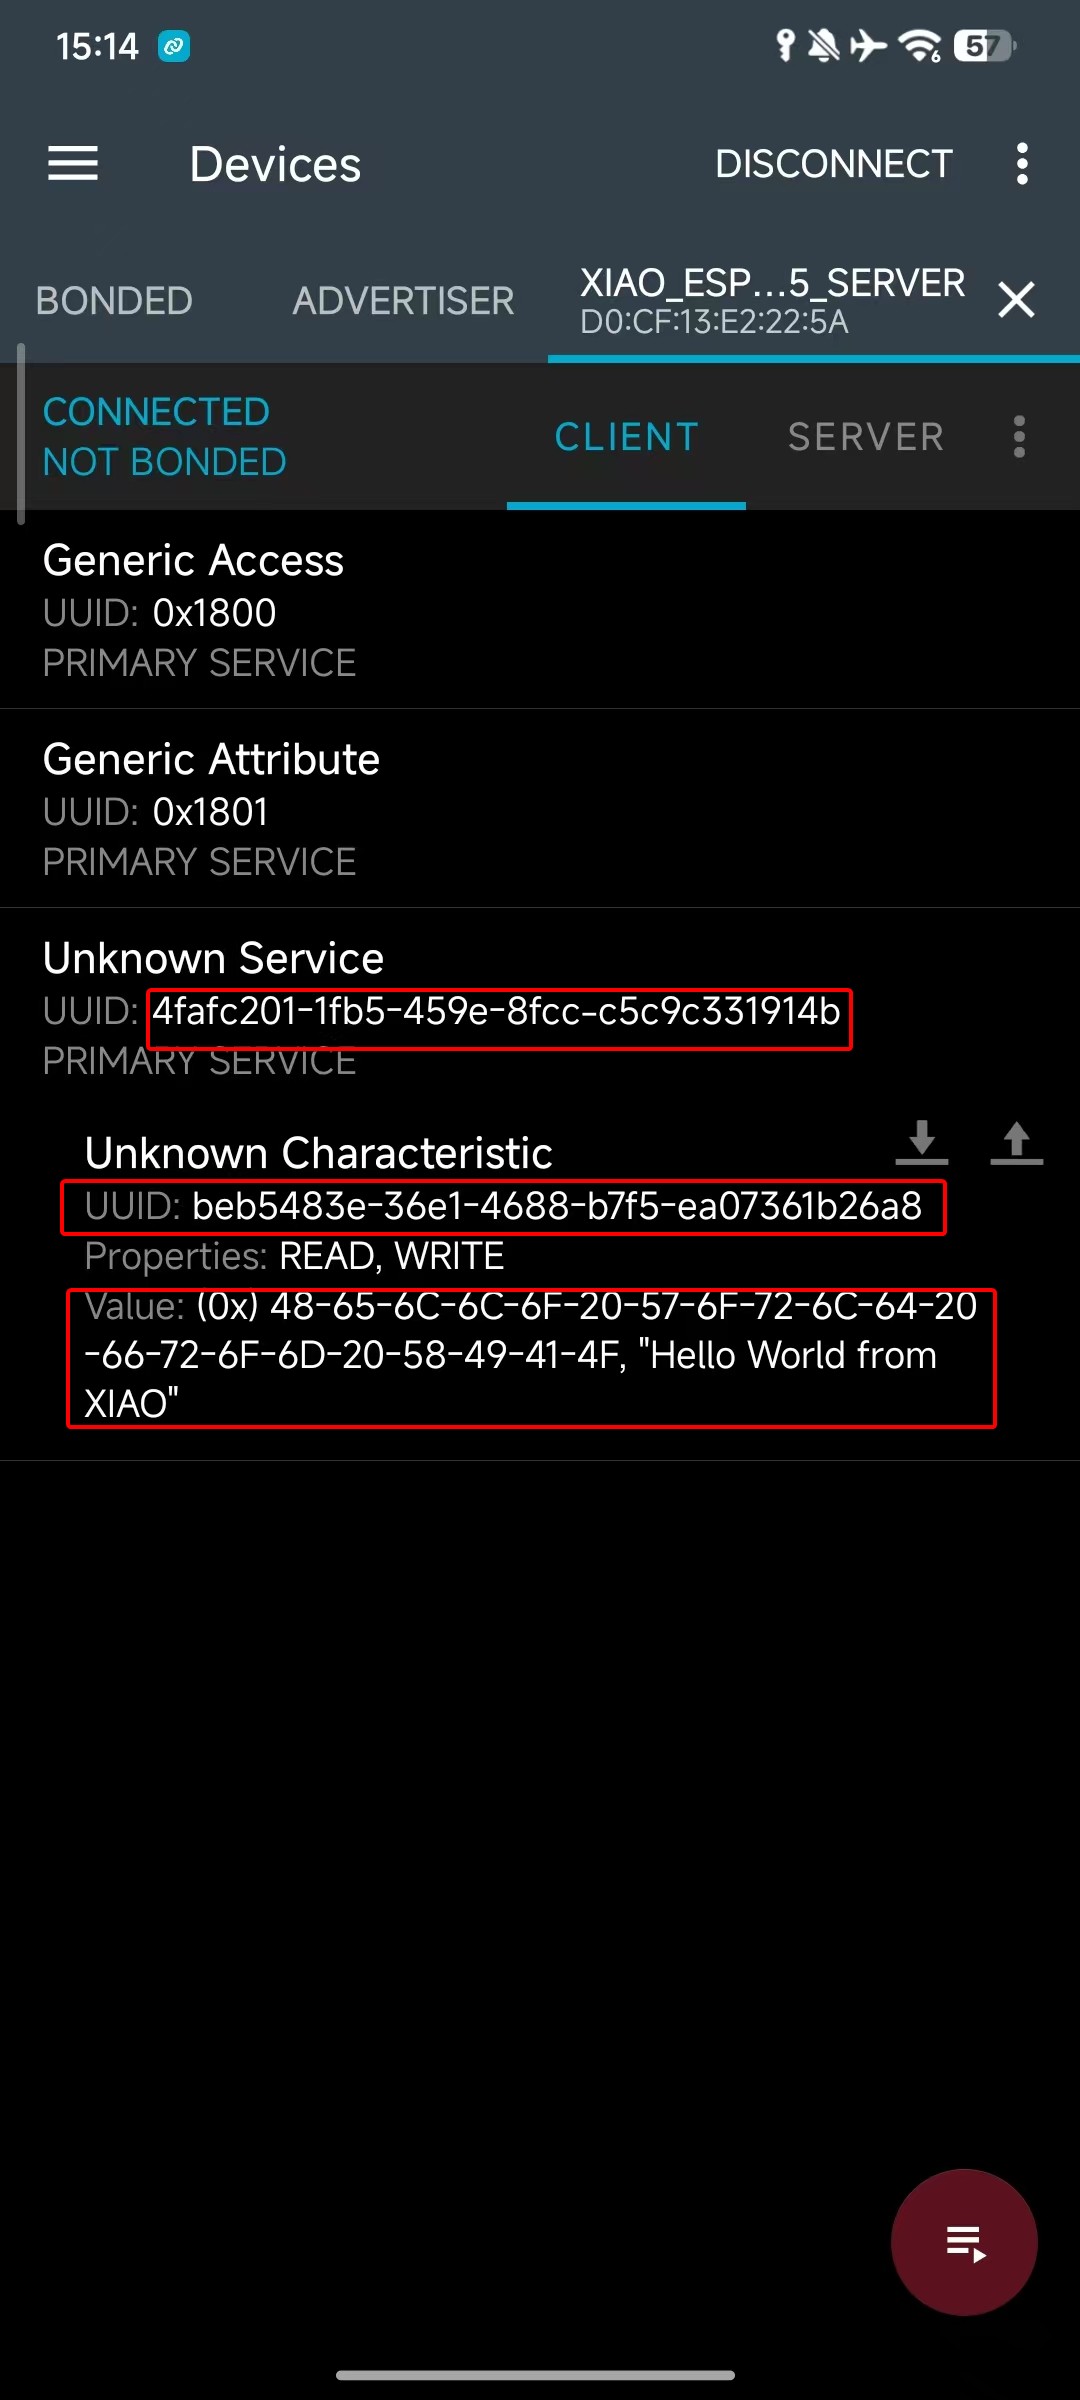
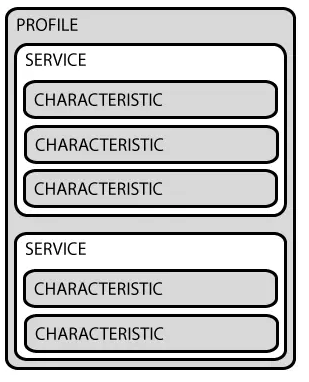
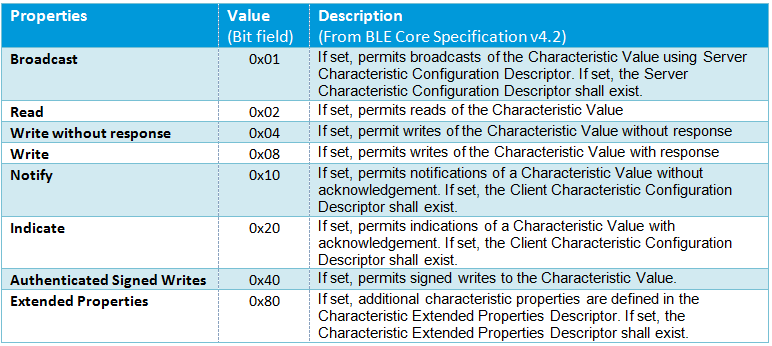
ご覧のとおり、Bluetooth 仕様では、特定の Bluetooth アプリケーションは複数のサービスで構成され、各サービスは複数のキャラクタリスティックで構成されています。1 つのキャラクタリスティックは、UUID、Properties(プロパティ)、Value(値)から成ります。
Properties は、キャラクタリスティックに対してどのような操作が可能か、またその権限を表すために使用されます。例えば、読み取り、書き込み、通知などをサポートしているかどうかです。これは、ATT PDU に含まれる 4 つのカテゴリと似ています。
UUID
各サービス、キャラクタリスティック、ディスクリプタには UUID(Universally Unique Identifier)が割り当てられています。UUID は一意の 128 ビット(16 バイト)の数値です。例えば次のようになります。
ea094cbd-3695-4205-b32d-70c1dea93c35
SIG (Bluetooth Special Interest Group) で規定されているすべてのタイプ、サービス、プロファイルには短縮 UUID が用意されています。しかし、アプリケーションで独自の UUID が必要な場合は、この UUID generator website を使って生成することができます。
BLE 使用例
次に、いくつかの実用的な例を通して、XIAO ESP32-C5 上で Bluetooth Low Energy (BLE) を使用する方法を紹介します。
以下のサンプルは Arduino IDE をベースに実装されています。Arduino IDE をまだ使用したことがない場合は、こちらを参照してください: Getting Started with Seeed Studio XIAO ESP32-C5
BLE スキャナ
BLE スキャナモードでは、XIAO ESP32-C5 は Central または Observer として動作します。接続を確立する代わりに、周囲の他のデバイスによってブロードキャストされる Advertising パケットを受信します。
プログラム
- 以下は、XIAO ESP32-C5 で BLE スキャナモードを使用する方法を示す参考コードスニペットです。
#include <BLEDevice.h>
#include <BLEUtils.h>
#include <BLEScan.h>
#include <BLEAdvertisedDevice.h>

int scanTime = 5; // Scanning duration (seconds)
BLEScan* pBLEScan;

class MyAdvertisedDeviceCallbacks: public BLEAdvertisedDeviceCallbacks {
    void onResult(BLEAdvertisedDevice advertisedDevice) {
      // Callback function when a device is discovered
      Serial.printf("Device found: %s \n", advertisedDevice.toString().c_str());
    }
};

void setup() {
  Serial.begin(115200);
  Serial.println("Initializing BLE Scanner...");

  BLEDevice::init("");
  pBLEScan = BLEDevice::getScan(); // Create scan object
  pBLEScan->setAdvertisedDeviceCallbacks(new MyAdvertisedDeviceCallbacks());
  pBLEScan->setActiveScan(true); // Active scan (consumes more power but gets more complete information)
  pBLEScan->setInterval(100);
  pBLEScan->setWindow(99);
}

void loop() {
  Serial.println("Starting scan...");
  // false here means do not keep duplicate device results, true to keep
  BLEScanResults* foundDevices = pBLEScan->start(scanTime, false);

  Serial.print("Scan finished, number of devices found: ");
  Serial.println(foundDevices->getCount());
  Serial.println("Scan completed, clearing results...");

  pBLEScan->clearResults();   // Clear cache to release memory
  delay(2000);
}
効果の確認
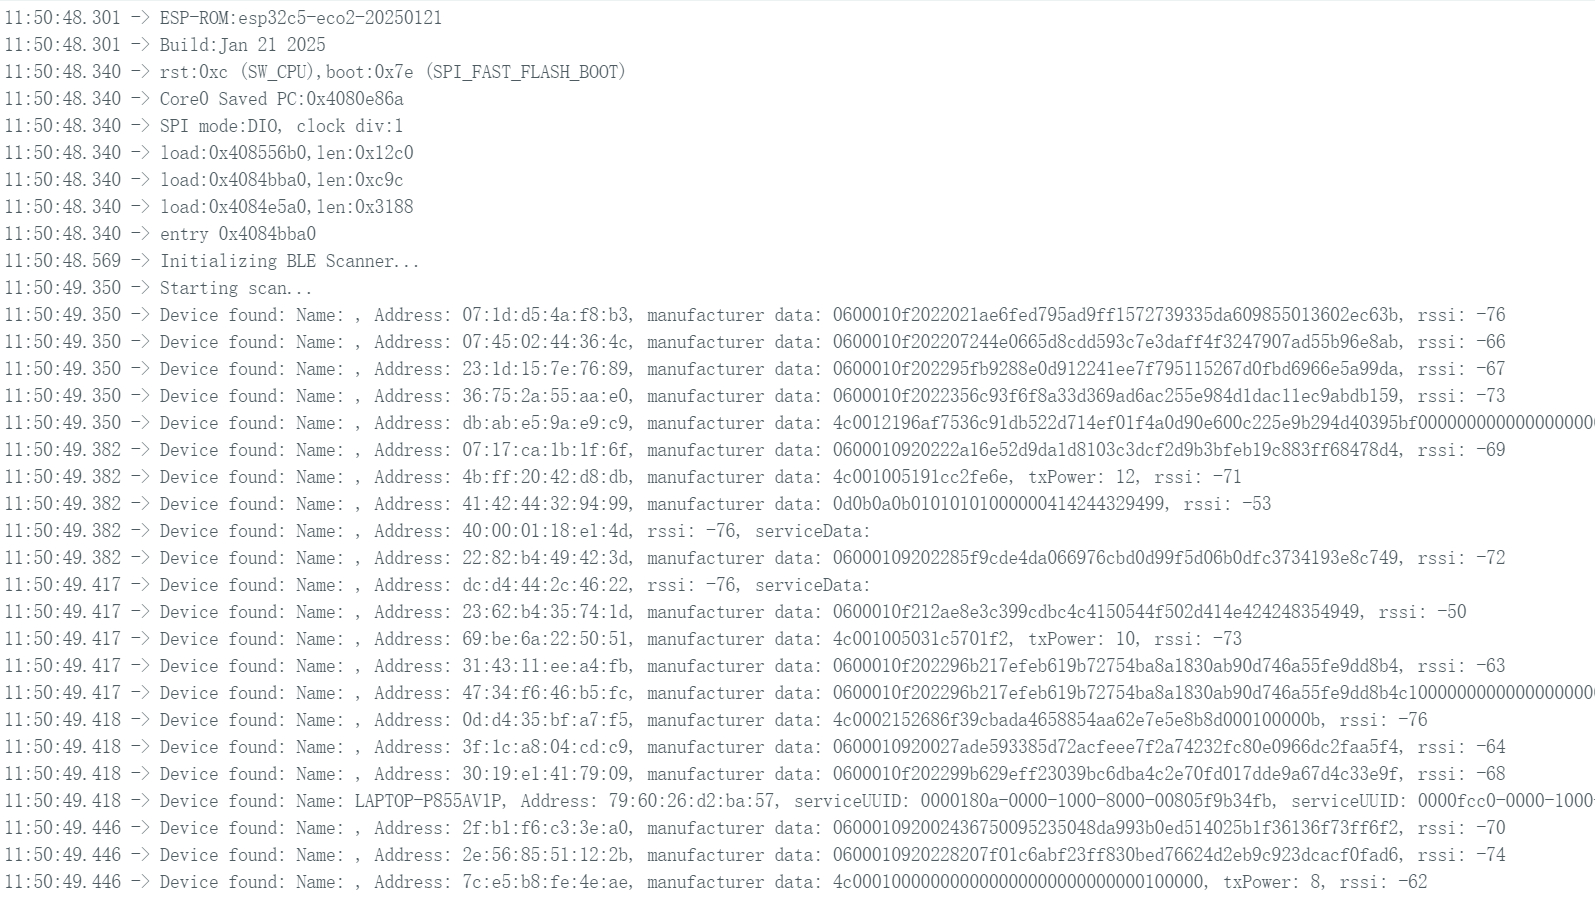
- コードを書き込み、シリアルモニタを開きます。XIAO ESP32-C5 が周囲の Bluetooth デバイスをスキャンし、関連情報を出力します。
BLE サーバー / クライアント
BLE サーバーモードでは、Service と Characteristic を作成し、その存在をブロードキャストして、他のデバイスが接続してデータの読み書きを行うのを待ちます。
BLE クライアントモードでは、クライアントが特定の Service UUID をスキャンし、サーバーを見つけた後に接続を開始し、サーバーの Characteristic 値を読み書きします。
BLE サーバープログラム
次に、XIAO ESP32-C5 上で BLE サーバーを構成する方法を、コード例を用いて説明します。
- 参考コード
#include <BLEDevice.h>
#include <BLEUtils.h>
#include <BLEServer.h>

// Website for generating UUID: uuidgenerator.net
#define SERVICE_UUID        "4fafc201-1fb5-459e-8fcc-c5c9c331914b"
#define CHARACTERISTIC_UUID "beb5483e-36e1-4688-b7f5-ea07361b26a8"

class MyCallbacks: public BLECharacteristicCallbacks {
    void onWrite(BLECharacteristic *pCharacteristic) {
      String value = pCharacteristic->getValue();
      if (value.length() > 0) {
        Serial.print("Data received from Client: ");
        for (int i = 0; i < value.length(); i++)
          Serial.print(value[i]);
        Serial.println();
      }
    }
};

void setup() {
  Serial.begin(115200);

  // 1. Initialize BLE
  BLEDevice::init("XIAO_ESP32C5_Server");

  // 2. Create Server
  BLEServer *pServer = BLEDevice::createServer();

  // 3. Create Service
  BLEService *pService = pServer->createService(SERVICE_UUID);

  // 4. Create Characteristic (set read/write permissions)
  BLECharacteristic *pCharacteristic = pService->createCharacteristic(
                                         CHARACTERISTIC_UUID,
                                         BLECharacteristic::PROPERTY_READ |
                                         BLECharacteristic::PROPERTY_WRITE
                                       );

  pCharacteristic->setCallbacks(new MyCallbacks()); // Set write callback function
  pCharacteristic->setValue("Hello World from XIAO"); // Set initial value

  // 5. Start Service
  pService->start();

  // 6. Start Advertising
  BLEAdvertising *pAdvertising = BLEDevice::getAdvertising();
  pAdvertising->addServiceUUID(SERVICE_UUID);
  pAdvertising->setScanResponse(true);
  pAdvertising->setMinPreferred(0x06);
  BLEDevice::startAdvertising();
}

void loop() {
  delay(2000);
}
効果の確認
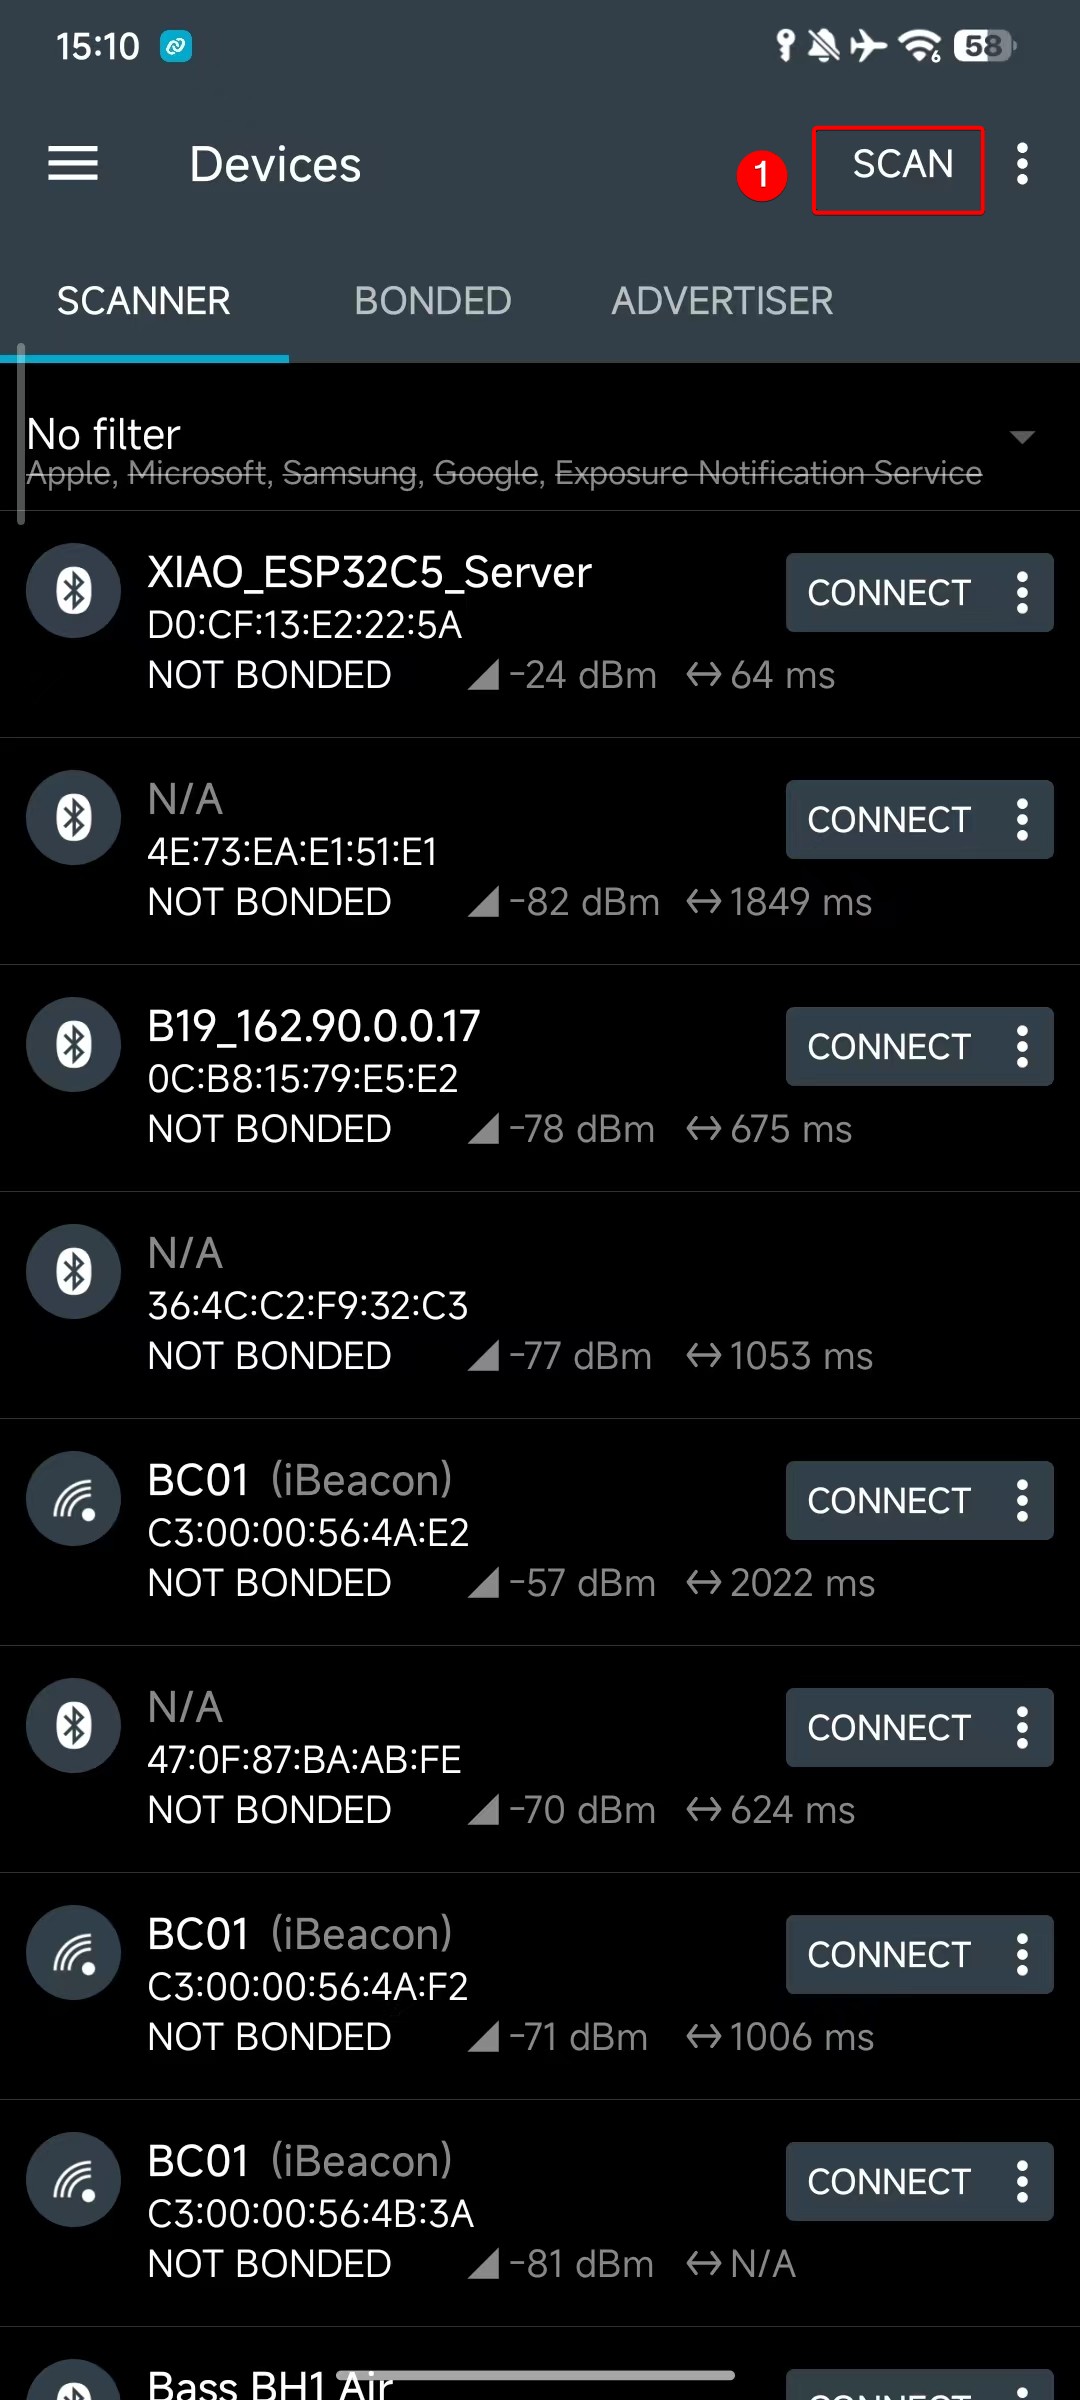
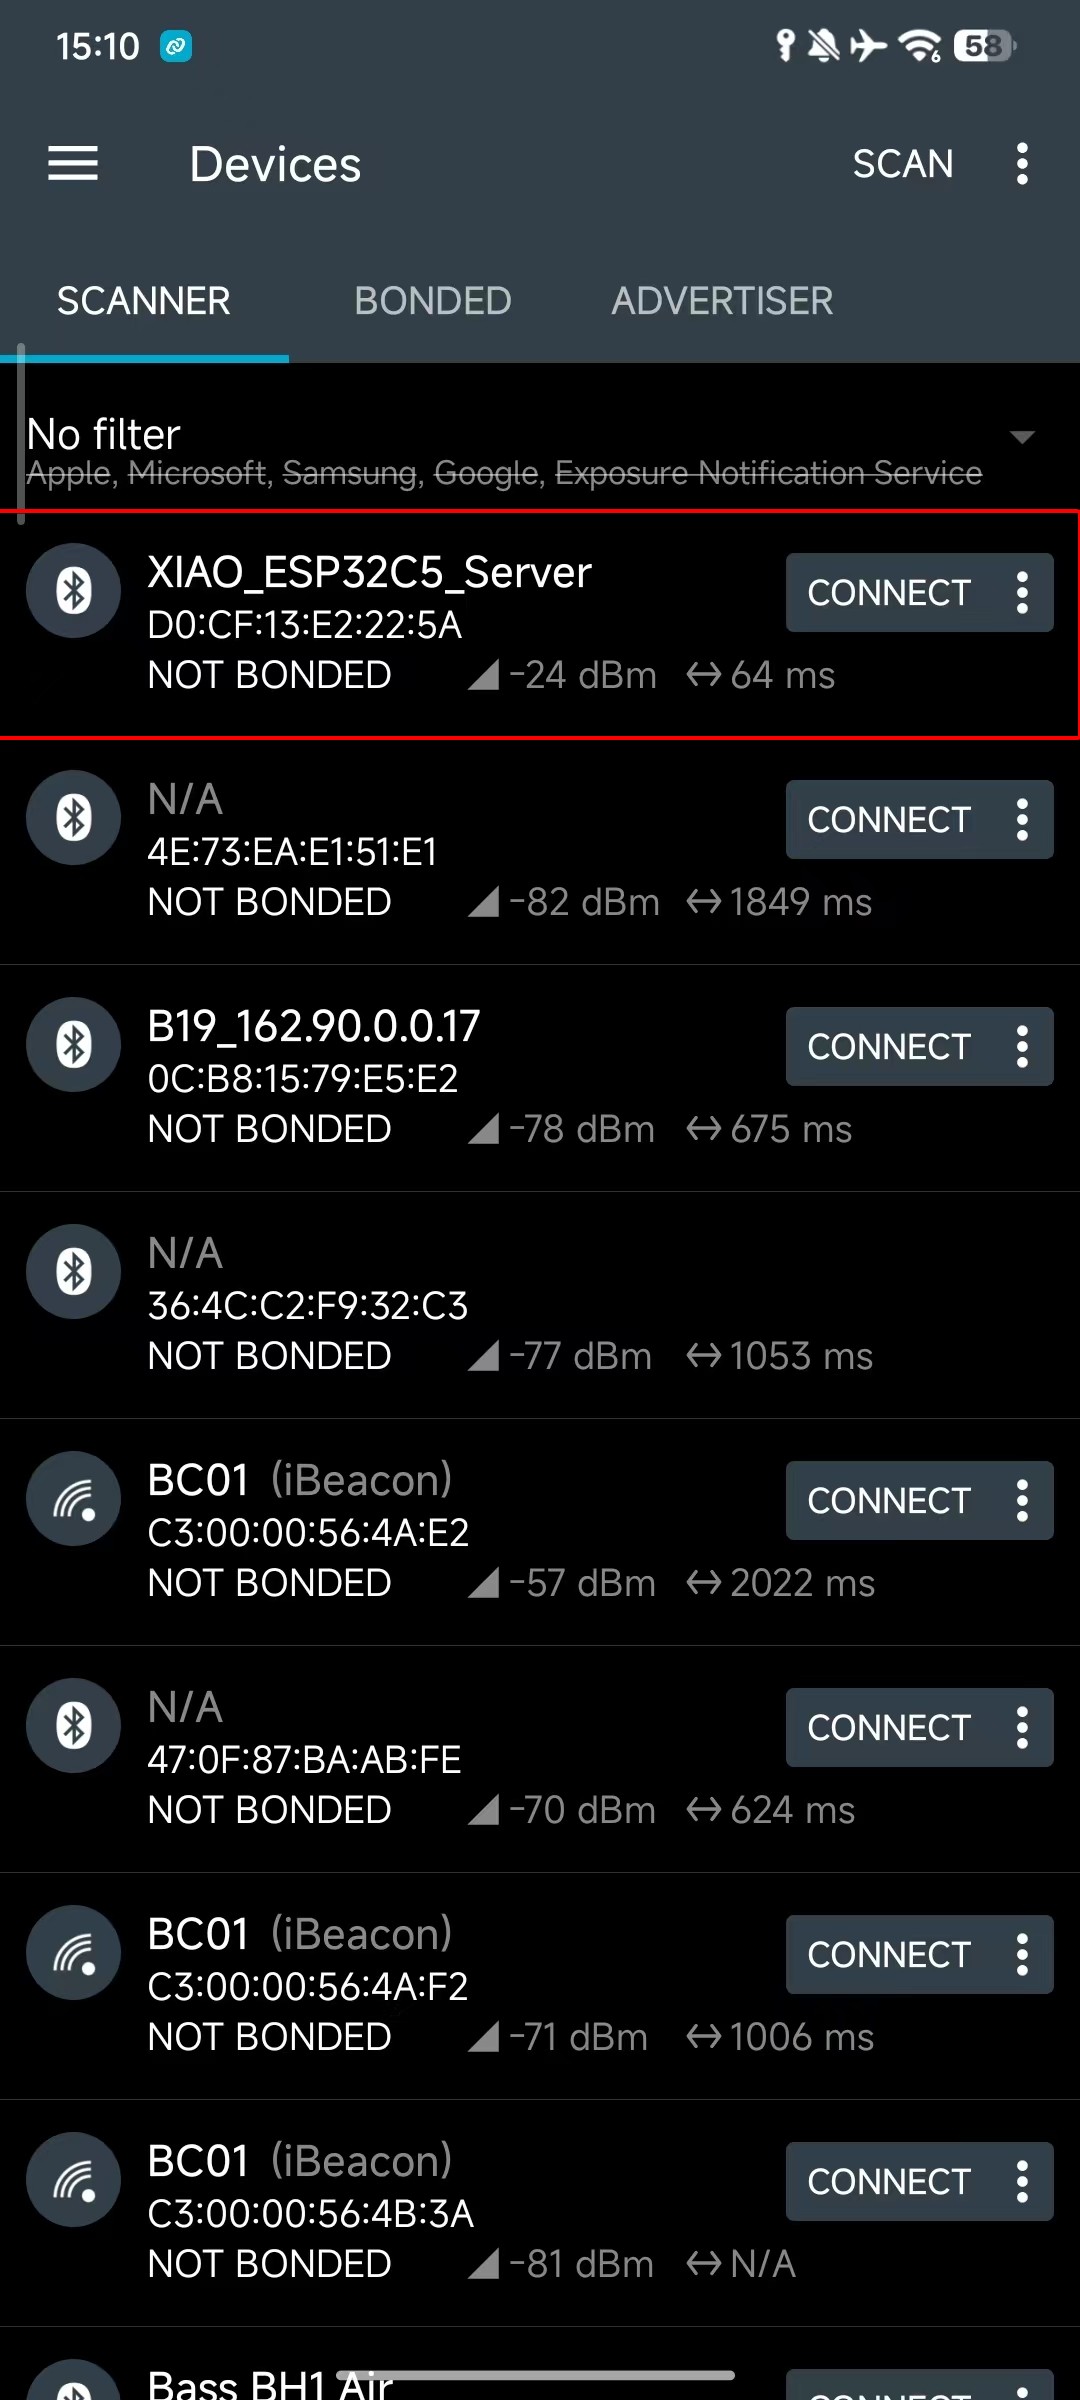
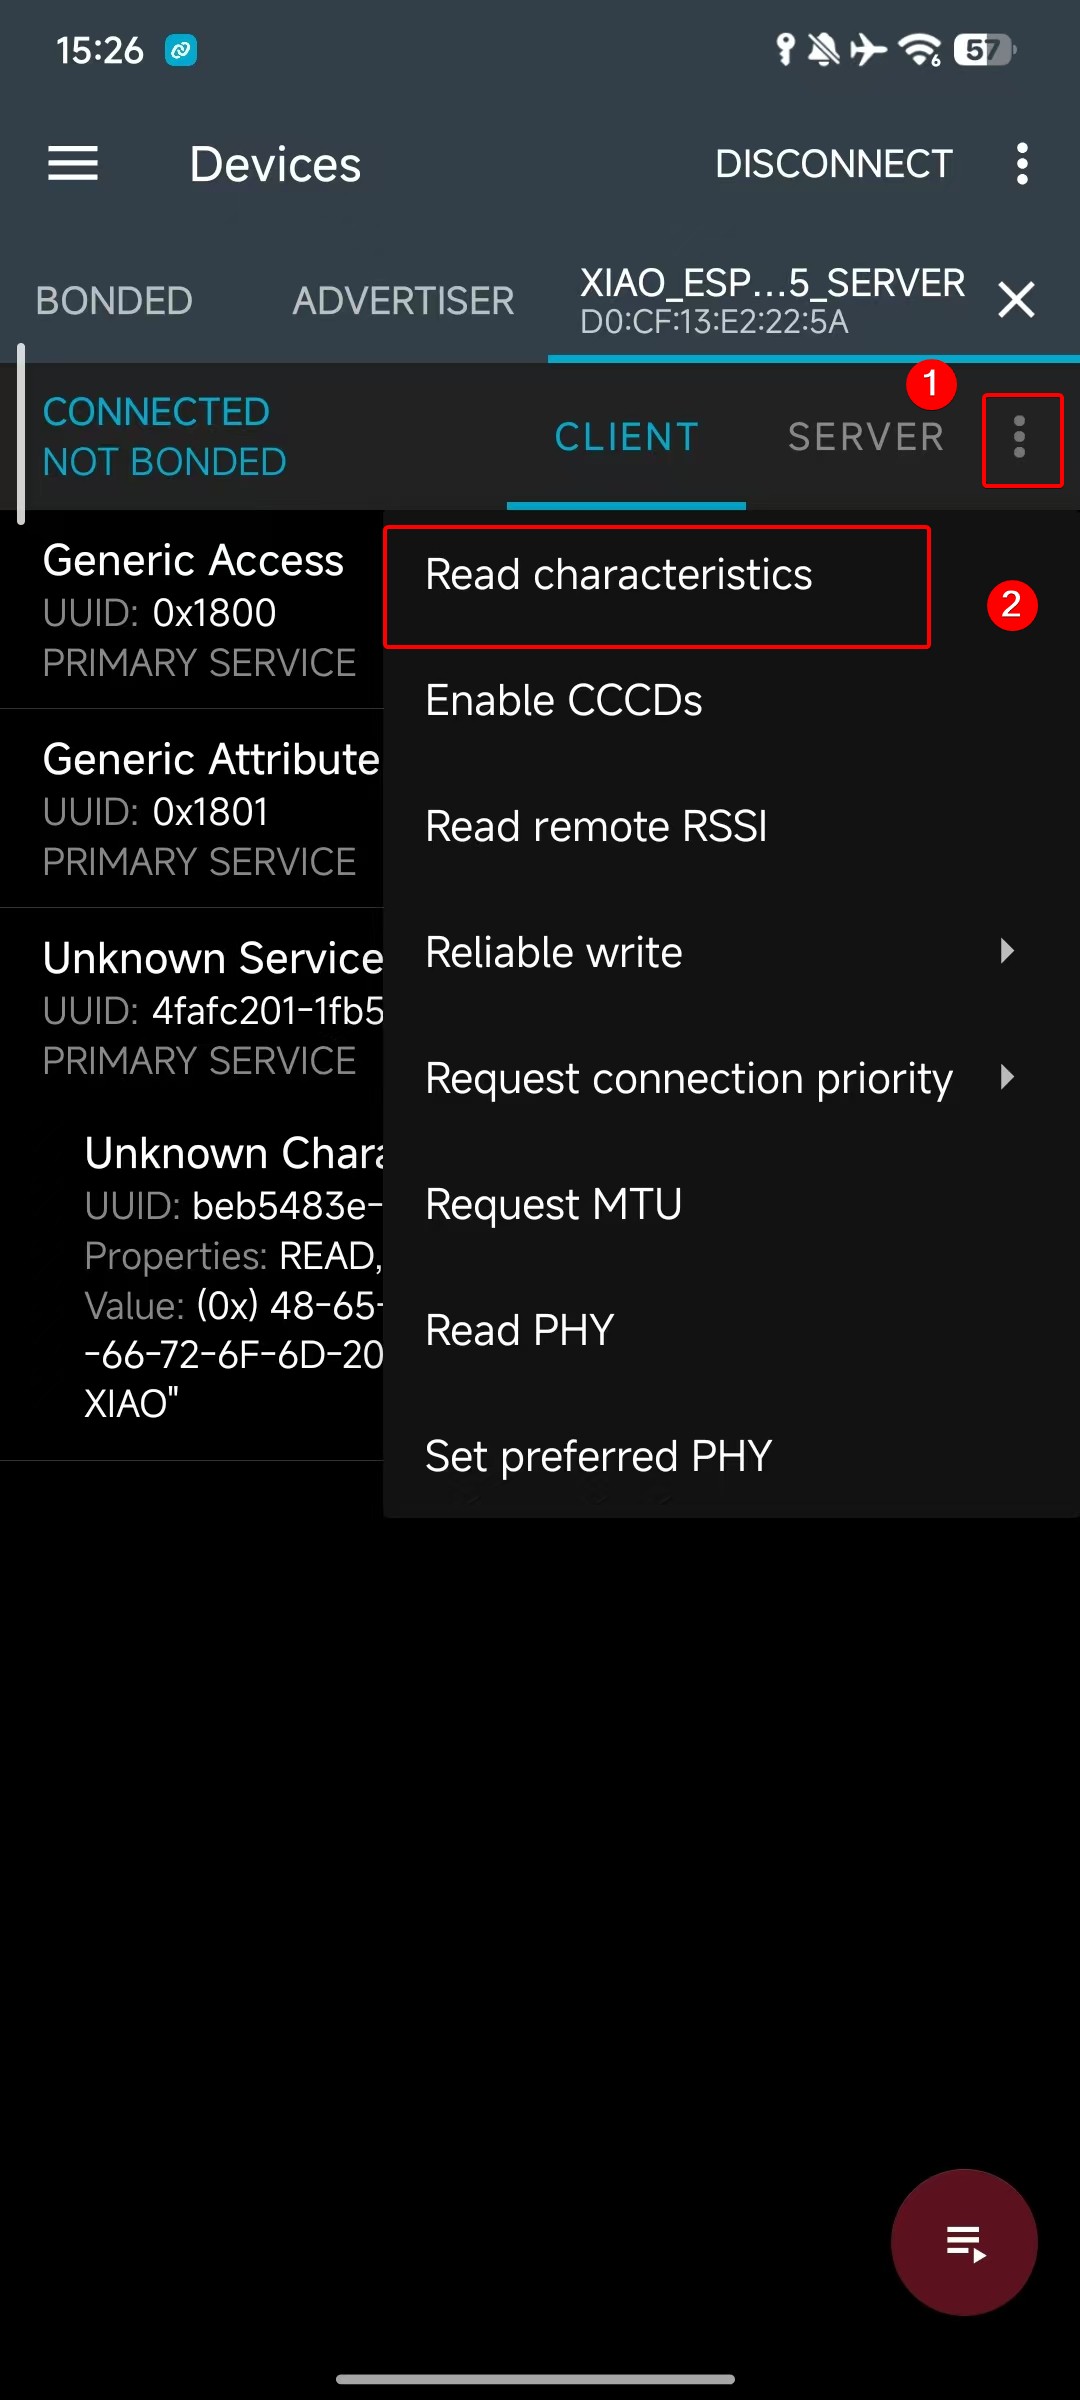
- コードを書き込んだ後、nRF Connect アプリをダウンロードし、スキャンして BLE デバイス(上記の XIAO_ESP32C5_Server という名前)を見つけて選択し、接続を確立します。
同時に、主要なモバイルアプリストアで nRF Connect アプリを検索してダウンロードできます。これにより、スマートフォンで Bluetooth デバイスを検索して接続できます。
- Android: nRF Connect
- IOS: nRF Connect
ソフトウェアをダウンロードしたら、以下の手順に従って XIAO ESP32-C5 を検索して接続すると、アドバタイズされている Hello World from XIAO が表示されます。
 |  |  | |
BLE クライアントプログラム
次に、XIAO ESP32-C5 上で BLE クライアントを構成する方法を、コード例を用いて説明します。クライアント機能を使用するには、少なくとも 2 台の XIAO Bluetooth 対応デバイスが必要です。1 台はサーバーとしてデータを送信し、もう 1 台はクライアントとしてデータを受信します。
参考コード
#include <BLEDevice.h>
#include <BLEUtils.h>
#include <BLEScan.h>
#include <BLEAdvertisedDevice.h>
#include <BLEClient.h>

// UUID of the Server (must be exactly the same as the Server)
static BLEUUID serviceUUID("4fafc201-1fb5-459e-8fcc-c5c9c331914b");
static BLEUUID charUUID("beb5483e-36e1-4688-b7f5-ea07361b26a8");

// Scanning parameters
const int scanTime = 10; // Scanning duration (seconds)

// Global variables
static BLEAddress serverAddress;        // Address of the found Server
static bool deviceFound = false;        // Whether the target device is found
static BLERemoteCharacteristic* pRemoteCharacteristic = nullptr;
static BLEClient* pClient = nullptr;

// Scan callback: called when a device is discovered
class MyAdvertisedDeviceCallbacks : public BLEAdvertisedDeviceCallbacks {
  void onResult(BLEAdvertisedDevice advertisedDevice) {
    // Check if it contains the service UUID we need
    if (advertisedDevice.haveServiceUUID() && advertisedDevice.isAdvertisingService(serviceUUID)) {
      Serial.print("Found target Server! Name: ");
      Serial.print(advertisedDevice.getName().c_str());
      Serial.print(", Address: ");
      Serial.println(advertisedDevice.getAddress().toString().c_str());

      serverAddress = advertisedDevice.getAddress();
      deviceFound = true;

      // Stop scanning (stop once found)
      BLEDevice::getScan()->stop();
    }
  }
};

// Client connection callback (optional, used to monitor connection status)
class MyClientCallbacks : public BLEClientCallbacks {
  void onConnect(BLEClient* pclient) {
    Serial.println("Connected to Server successfully!");
  }

  void onDisconnect(BLEClient* pclient) {
    Serial.println("Disconnected from Server.");
    deviceFound = false;  // Rescan next time
  }
};

void setup() {
  Serial.begin(115200);
  while (!Serial); // Wait for serial port to open (optional)

  Serial.println("Starting BLE Client...");

  BLEDevice::init("XIAO_Client");  // Client device name

  // Start the first scan
  scanAndConnect();
}

void loop() {
  // If connected successfully, read/write data every 5 seconds
  if (pClient && pClient->isConnected() && pRemoteCharacteristic) {
    // Read characteristic value
    String value = pRemoteCharacteristic->readValue();
    Serial.print("Read value from Server: ");
    Serial.println(value.c_str());

    // Write new data (with response)
    String sendMsg = "Hello from Client @ " + String(millis() / 1000) + "s";
    pRemoteCharacteristic->writeValue(sendMsg.c_str(), true);  // true = require response
    Serial.println("Sent: " + sendMsg);

    delay(5000);
  }
  else {
    // Not connected or disconnected → rescan
    if (!deviceFound || (pClient && !pClient->isConnected())) {
      Serial.println("Server not connected, rescanning...");
      scanAndConnect();
    }
    delay(1000);
  }
}

// Encapsulate scan + connect logic
void scanAndConnect() {
  BLEScan* pBLEScan = BLEDevice::getScan();
  pBLEScan->setAdvertisedDeviceCallbacks(new MyAdvertisedDeviceCallbacks());
  pBLEScan->setActiveScan(true);  // Active scan to get more information
  pBLEScan->setInterval(100);
  pBLEScan->setWindow(99);

  Serial.println("Scanning for Server...");
  deviceFound = false;
  pBLEScan->start(scanTime, false);  // Scan for scanTime seconds

  if (!deviceFound) {
    Serial.println("Target Server not found, will retry later.");
    return;
  }

  // Create client and connect after finding the device
  pClient = BLEDevice::createClient();
  pClient->setClientCallbacks(new MyClientCallbacks());

  Serial.print("Connecting to ");
  Serial.println(serverAddress.toString().c_str());

  if (!pClient->connect(serverAddress)) {
    Serial.println("Connection failed!");
    return;
  }

  // Get remote service
  BLERemoteService* pRemoteService = pClient->getService(serviceUUID);
  if (pRemoteService == nullptr) {
    Serial.println("Failed to find service UUID");
    pClient->disconnect();
    return;
  }
  Serial.println("Service found.");

  // Get remote characteristic
  pRemoteCharacteristic = pRemoteService->getCharacteristic(charUUID);
  if (pRemoteCharacteristic == nullptr) {
    Serial.println("Failed to find characteristic UUID");
    pClient->disconnect();
    return;
  }
  Serial.println("Characteristic found. Ready to communicate!");
}
効果の確認
- コードを書き込み、シリアルモニタを開いて観察すると、サーバーから送信された Bluetooth データを受信していることがわかります。
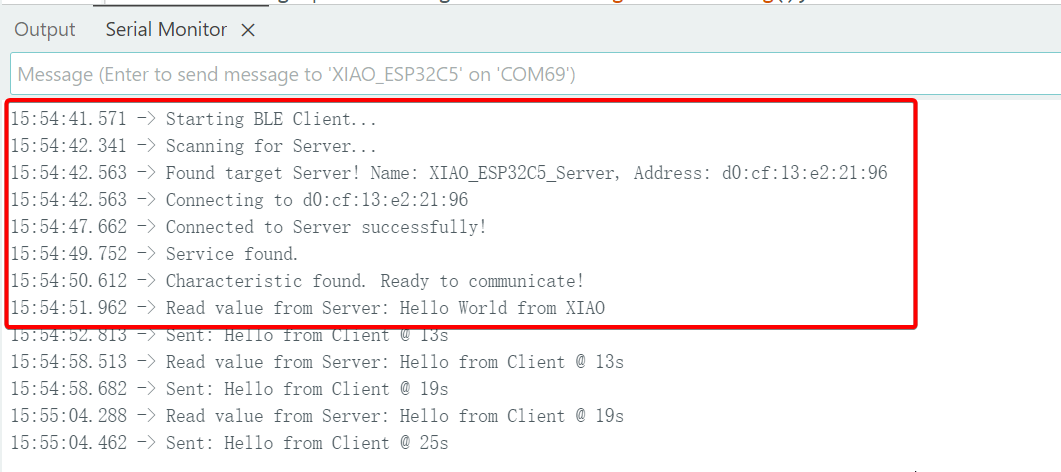
クライアント機能を検証する際は、事前に別の XIAO デバイスにサーバープログラムを書き込んでおく必要があります。そうしないと、検証は失敗します。
NimBLE-Arduino
標準の Arduino BLEDevice ライブラリは Bluedroid プロトコルスタックに基づいており、機能はフルですが、Flash と RAM を多く消費します。NimBLE は BLE プロトコルスタックを完全に書き直したもので(Apache Mynewt 由来)、次のような利点があります。
-
非常に小さいメモリフットプリント(RAM 使用量を 50%以上削減)。
-
より高速な接続速度。
-
API 互換性:標準の Arduino BLE ライブラリの文法とほぼ完全な互換性を持つよう設計されており、ヘッダーファイルの変更と、わずかな型の調整だけで利用できます。
詳細については、作者の GitHub リポジトリ NimBLE-Arduino を参照してください。
次に、NimBLE-Arduino ライブラリに基づいた Bluetooth スキャン機能を実装します。
プログラム
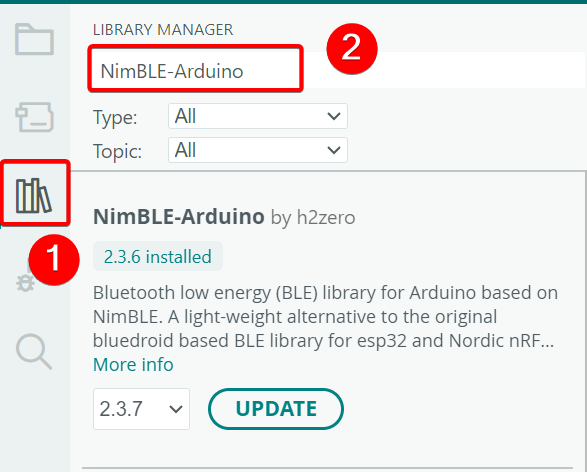
- NimBLE-Arduino ライブラリをインストールします。
リファレンスコード
#include <Arduino.h>
#include <NimBLEDevice.h>
#include <NimBLEAdvertisedDevice.h>
#include "NimBLEEddystoneTLM.h"
#include "NimBLEBeacon.h"

#define ENDIAN_CHANGE_U16(x) ((((x) & 0xFF00) >> 8) + (((x) & 0xFF) << 8))

int         scanTime = 5 * 1000; // In milliseconds
NimBLEScan* pBLEScan;

class ScanCallbacks : public NimBLEScanCallbacks {
    void onResult(const NimBLEAdvertisedDevice* advertisedDevice) override {
        if (advertisedDevice->haveName()) {
            Serial.print("Device name: ");
            Serial.println(advertisedDevice->getName().c_str());
            Serial.println("");
        }

        if (advertisedDevice->haveServiceUUID()) {
            NimBLEUUID devUUID = advertisedDevice->getServiceUUID();
            Serial.print("Found ServiceUUID: ");
            Serial.println(devUUID.toString().c_str());
            Serial.println("");
        } else if (advertisedDevice->haveManufacturerData() == true) {
            std::string strManufacturerData = advertisedDevice->getManufacturerData();
            if (strManufacturerData.length() == 25 && strManufacturerData[0] == 0x4C && strManufacturerData[1] == 0x00) {
                Serial.println("Found an iBeacon!");
                NimBLEBeacon oBeacon = NimBLEBeacon();
                oBeacon.setData(reinterpret_cast<const uint8_t*>(strManufacturerData.data()), strManufacturerData.length());
                Serial.printf("iBeacon Frame\n");
                Serial.printf("ID: %04X Major: %d Minor: %d UUID: %s Power: %d\n",
                              oBeacon.getManufacturerId(),
                              ENDIAN_CHANGE_U16(oBeacon.getMajor()),
                              ENDIAN_CHANGE_U16(oBeacon.getMinor()),
                              oBeacon.getProximityUUID().toString().c_str(),
                              oBeacon.getSignalPower());
            } else {
                Serial.println("Found another manufacturers beacon!");
                Serial.printf("strManufacturerData: %d ", strManufacturerData.length());
                for (int i = 0; i < strManufacturerData.length(); i++) {
                    Serial.printf("[%X]", strManufacturerData[i]);
                }
                Serial.printf("\n");
            }
            return;
        }

        NimBLEUUID eddyUUID = (uint16_t)0xfeaa;

        if (advertisedDevice->getServiceUUID().equals(eddyUUID)) {
            std::string serviceData = advertisedDevice->getServiceData(eddyUUID);
            if (serviceData[0] == 0x20) {
                Serial.println("Found an EddystoneTLM beacon!");
                NimBLEEddystoneTLM foundEddyTLM = NimBLEEddystoneTLM();
                foundEddyTLM.setData(reinterpret_cast<const uint8_t*>(serviceData.data()), serviceData.length());

                Serial.printf("Reported battery voltage: %dmV\n", foundEddyTLM.getVolt());
                Serial.printf("Reported temperature from TLM class: %.2fC\n", (double)foundEddyTLM.getTemp());
                int   temp     = (int)serviceData[5] + (int)(serviceData[4] << 8);
                float calcTemp = temp / 256.0f;
                Serial.printf("Reported temperature from data: %.2fC\n", calcTemp);
                Serial.printf("Reported advertise count: %d\n", foundEddyTLM.getCount());
                Serial.printf("Reported time since last reboot: %ds\n", foundEddyTLM.getTime());
                Serial.println("\n");
                Serial.print(foundEddyTLM.toString().c_str());
                Serial.println("\n");
            }
        }
    }
} scanCallbacks;

void setup() {
    Serial.begin(115200);
    Serial.println("Scanning...");

    NimBLEDevice::init("Beacon-scanner");
    pBLEScan = BLEDevice::getScan();
    pBLEScan->setScanCallbacks(&scanCallbacks);
    pBLEScan->setActiveScan(true);
    pBLEScan->setInterval(100);
    pBLEScan->setWindow(100);
}

void loop() {
    NimBLEScanResults foundDevices = pBLEScan->getResults(scanTime, false);
    Serial.print("Devices found: ");
    Serial.println(foundDevices.getCount());
    Serial.println("Scan done!");
    pBLEScan->clearResults(); // delete results scan buffer to release memory
    delay(2000);
}
動作確認
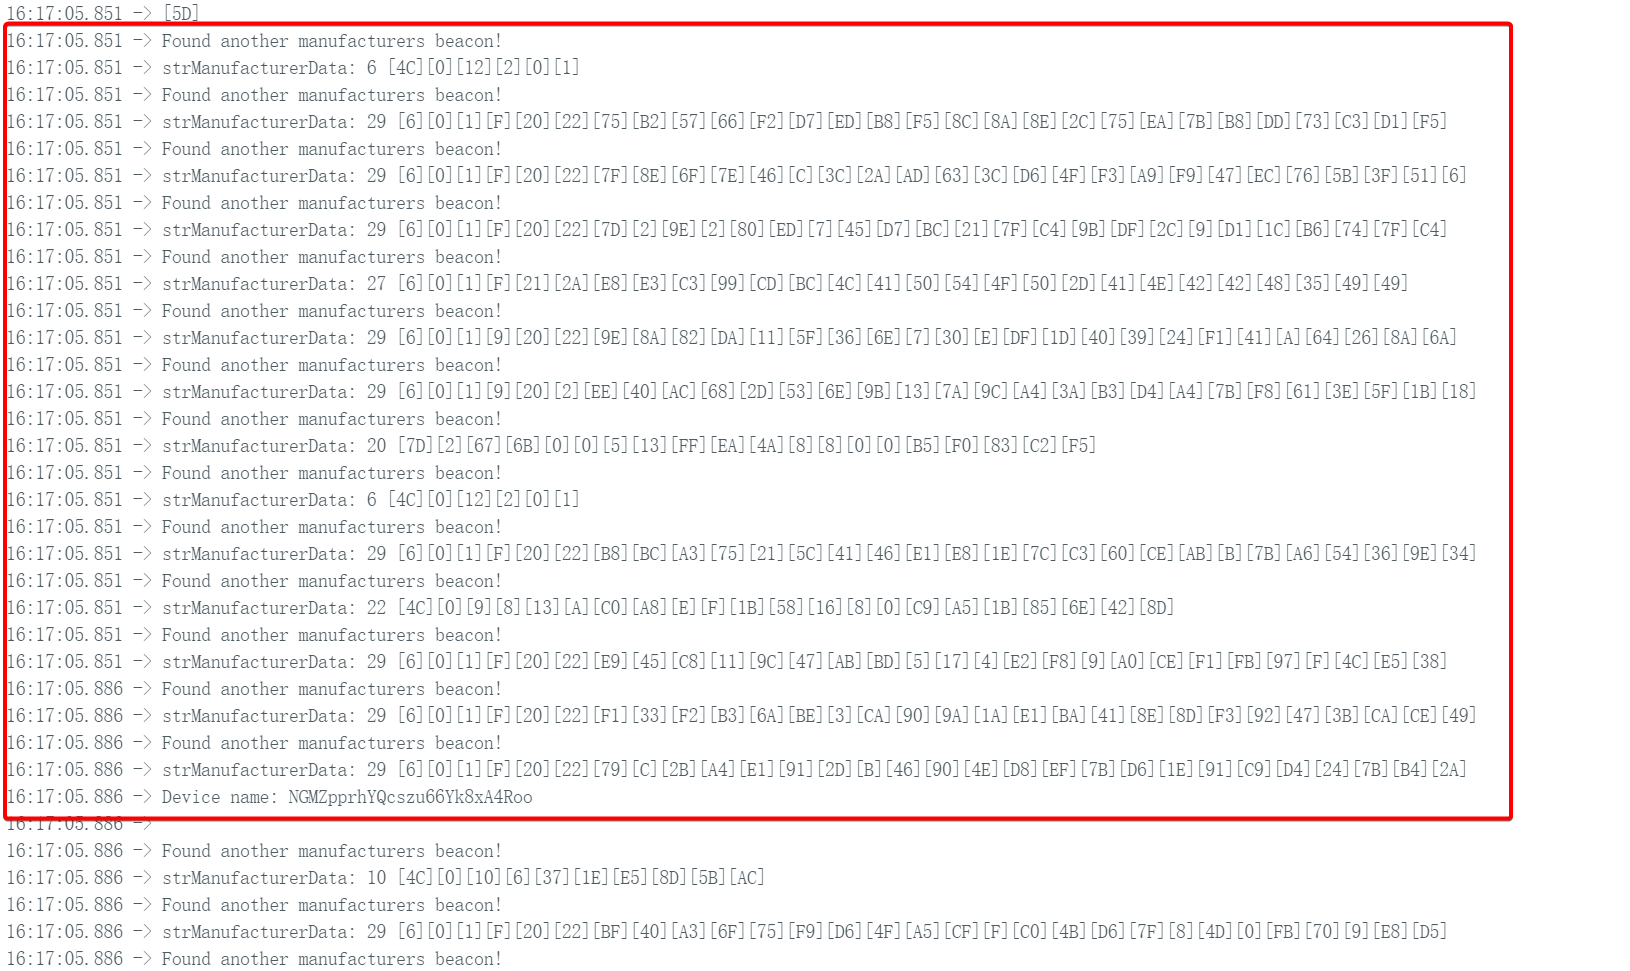
- コードを書き込み、シリアルモニタを開いて観察します。こちらも Bluetooth スキャン機能を実装していますが、より高速なスキャン速度になっています。
例:Home Assistant への接続
ここまでで、XIAO ESP32-C5 の BLE モードについて基本的な理解が得られたはずです。
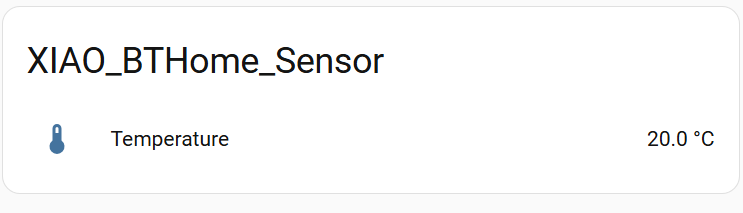
次に、より実践的なプロジェクトに取り組んでみましょう。XIAO ESP32-C5 に温湿度センサ(またはシンプルなボタンスイッチ)を模擬させ、BLE を介してセンサデータや状態を定期的にブロードキャストします。Home Assistant はこの BLE デバイスを自動的に検出し、追加の複雑な統合設定を行うことなく、インターフェース上に現在の温度・湿度値(またはボタン状態)を直接表示します。
このシンプルな例は、ESP32-C5 が IoT(モノのインターネット)やスマートホーム分野において持つ大きな可能性を十分に示しています。低消費電力で開発が容易であり、パッシブ BLE デバイスをすぐに利用できるサポートにより、誰でも素早く自分だけのスマートセンサネットワークを構築できます。
Home Assistant を使用したことがない場合は、こちらをご覧ください:Connecting XIAO ESP32-C5 to Home Assistant
- リファレンスコード
#include <NimBLEDevice.h>

// Simulated temperature value
float temp = 20.0;

void setup() {
  Serial.begin(115200);

  // 1. Initialize NimBLE
  NimBLEDevice::init("XIAO_BTHome_Sensor");

  // 2. Create advertising object
  NimBLEAdvertising *pAdvertising = NimBLEDevice::getAdvertising();

  // ==========================================
  // Construct BTHome data packet (This is the most critical part)
  // ==========================================
  // Reference: https://bthome.io/format/

  std::string serviceData = "";

  // A. BTHome device information byte (Required)
  // bit 0: Encryption (0=No)
  // bit 1-2: Version (2=v2)
  // Result: 0100 0000 -> 0x40
  serviceData += (char)0x40;

  // B. Temperature data (16-bit, 0.01 factor)
  // ID: 0x02 (Temperature)
  serviceData += (char)0x02;

  // Value: Assume 25.50°C -> 2550 (0x09F6) -> Little-endian: F6 09
  int16_t tempInt = (int16_t)(temp * 100);
  serviceData += (char)(tempInt & 0xFF);        // Low byte
  serviceData += (char)((tempInt >> 8) & 0xFF); // High byte

  // C. Battery level (8-bit, %) - Optional
  // ID: 0x01 (Battery)
  serviceData += (char)0x01;
  serviceData += (char)85; // 85%

  // ==========================================

  // 3. Put the constructed data into Service Data
  // BTHome UUID is 0xFCD2
  NimBLEAdvertisementData oAdvertisementData = NimBLEAdvertisementData();
  oAdvertisementData.setFlags(0x06); // General Discovery Mode
  oAdvertisementData.setServiceData(NimBLEUUID((uint16_t)0xFCD2), serviceData);

  // 4. Set advertising parameters
  pAdvertising->setAdvertisementData(oAdvertisementData);

  // 5. Start advertising (Advertise every 3 seconds, can be set longer to save power in practice)
  pAdvertising->start();

  Serial.println("BTHome advertising started...");
}

void loop() {
  // To update data dynamically: stop advertising -> update data -> restart advertising
  // For simple demonstration, only static advertising logic is used here
  // In actual projects, you will read sensors here, update oAdvertisementData, then enter sleep mode
  delay(10000);
}
- コードを書き込み、Home Assistant プラットフォームを開きます。Settings -> Devices & Services の下に BTHome デバイスが見つかるので、ダッシュボードに追加します。
技術サポート & 製品ディスカッション
弊社製品をお選びいただきありがとうございます。私たちは、製品をできるだけスムーズにご利用いただけるよう、さまざまなサポートを提供しています。お好みやニーズに応じて選べる複数のコミュニケーションチャネルをご用意しています。