Seeed Studio XIAO ESP32C6でのBluetooth使用方法
| Seeed Studio XIAO ESP32C6 |
|---|
 |
Seeed Studio XIAO ESP32C6は、Bluetooth 5、BLE、およびMeshネットワーキングをサポートする強力な開発ボードで、ワイヤレス接続を必要とする幅広いIoTアプリケーションに理想的な選択肢です。優れたRF性能により、XIAO ESP32C6は様々な距離で信頼性の高い高速ワイヤレス通信を提供でき、短距離および長距離ワイヤレスアプリケーションの両方に対応する汎用的なソリューションとなっています。このチュートリアルでは、近くのBluetoothデバイスをスキャンする方法、Bluetooth接続を確立する方法、Bluetooth接続を介してデータを送受信する方法など、XIAO ESP32C6のBluetooth機能の基本的な機能に焦点を当てます。
Bluetooth Low Energy (BLE) の使用方法
Bluetooth Low Energy(略してBLE)は、電力消費を抑えたBluetoothの変種です。BLEの主な用途は、少量のデータ(低帯域幅)の短距離伝送です。常時オンのBluetoothとは異なり、BLEは接続が開始される場合を除いて、常にスリープモードを維持します。
この特性により、BLEはコイン電池で動作し、定期的に少量のデータを交換する必要があるアプリケーションに適しています。例えば、BLEはヘルスケア、フィットネス、トラッキング、ビーコン、セキュリティ、ホームオートメーション業界で非常に有用です。
これにより、非常に低い電力消費を実現します。BLEは(使用ケースによりますが)Bluetoothの約100分の1の電力を消費します。
XIAO ESP32C6のBLE部分について、以下の3つのセクションでその使用方法を紹介します。
- 基本的な概念 -- BLEプログラムの実行プロセスと考え方を理解するために、BLEで頻繁に使用される可能性のある概念をまず理解します。
- BLEスキャナー -- このセクションでは、近くのBluetoothデバイスを検索し、シリアルモニターに出力する方法を説明します。
- BLEサーバー/クライアント -- このセクションでは、XIAO ESP32C6をサーバーおよびクライアントとして使用して、指定されたデータメッセージを送受信する方法を説明します。また、電話からXIAOへのメッセージの受信または送信にも使用します。
- BLEセンサーデータ交換 -- これは完全なチュートリアルの最後のセクションで、BLEを通じてセンサーデータを送信する方法を説明するセンサーの例を紹介します。
基本的な概念
サーバーとクライアント
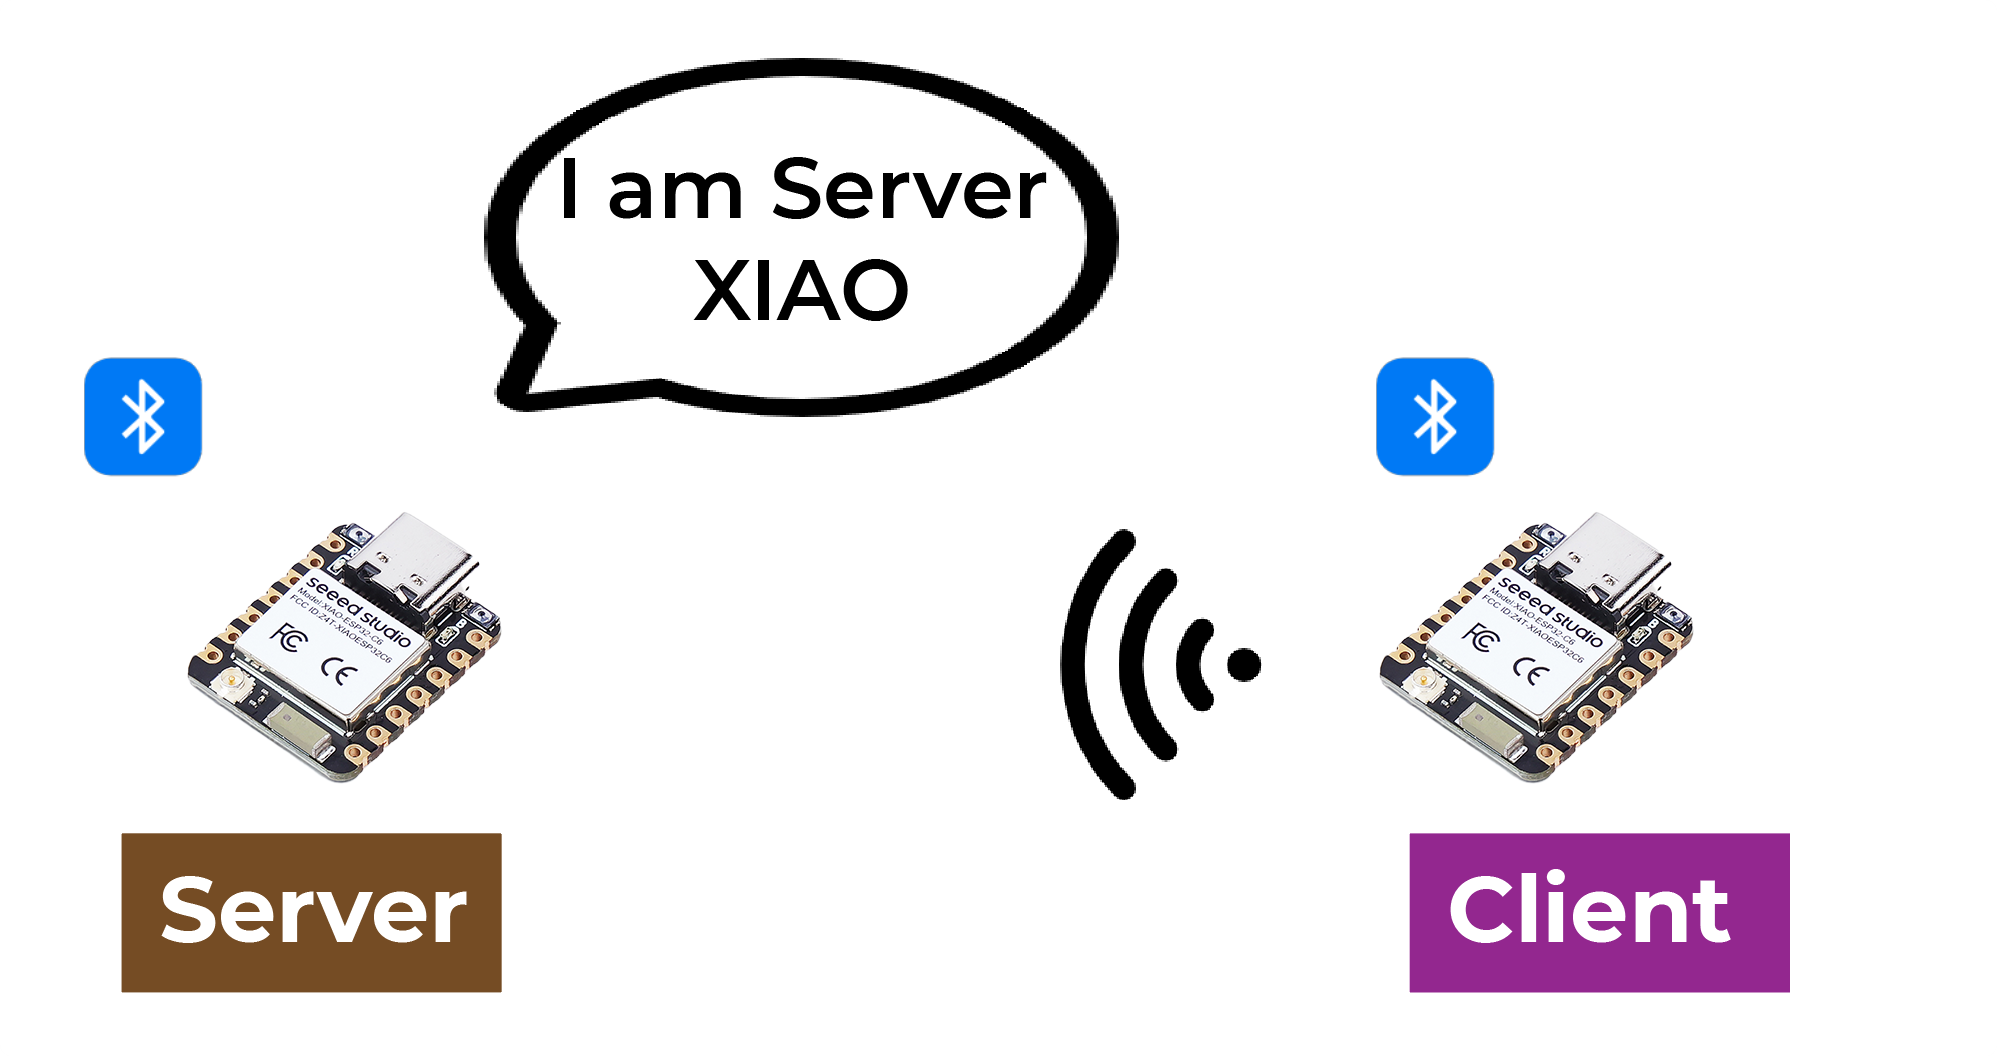
Bluetooth Low Energyには、サーバーとクライアントの2種類のデバイスがあります。XIAO ESP32C6は、クライアントまたはサーバーのいずれかとして動作できます。
サーバーは自身の存在をアドバタイズして他のデバイスに発見されるようにし、クライアントが読み取ることができるデータを含んでいます。クライアントは近くのデバイスをスキャンし、探しているサーバーを見つけると、接続を確立して受信データを待機します。これはポイントツーポイント通信と呼ばれます。
属性
属性は実際にはデータの一部です。各Bluetoothデバイスはサービスを提供するために使用され、サービスはデータの集合であり、この集合はデータベースと呼ぶことができます。データベース内の各エントリは属性です。そのため、ここでは属性をデータエントリと翻訳します。Bluetoothデバイスをテーブルとして想像でき、テーブル内の各行が属性です。

GATT
2つのBluetoothデバイスが接続を確立する際、通信方法を決定するプロトコルが必要です。GATT(Generic Attribute Profile)は、Bluetoothデバイス間でデータを送信する方法を定義するプロトコルです。
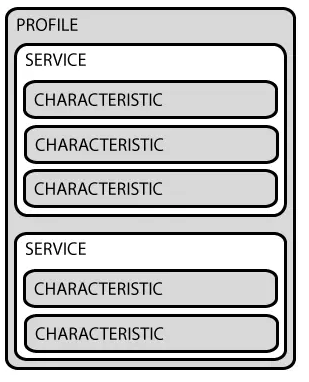
GATTプロトコルでは、デバイスの機能と特性は、サービス、特性、および記述子と呼ばれる構造に整理されます。サービスは、デバイスが提供する関連する機能と特徴のセットを表します。各サービスには複数の特性を含めることができ、これらはセンサーデータや制御コマンドなど、サービスの特定の属性や動作を定義します。各特性には一意の識別子と値があり、通信のために読み取りまたは書き込みが可能です。記述子は、特性値の形式やアクセス許可など、特性のメタデータを記述するために使用されます。
GATTプロトコルを使用することで、Bluetoothデバイスは、センサーデータの送信やリモートデバイスの制御など、さまざまなアプリケーションシナリオで通信できます。
BLE特性
ATT(Attribute Protocol)の正式名称は属性プロトコルです。最終的に、ATTはATTコマンドのグループ、つまりリクエストとレスポンスコマンドで構成されます。ATTはBluetoothヌルパケットの最上位層でもあり、つまりATTはBluetoothパケットを最も分析する場所です。
ATTコマンドは、正式にはATT PDU(Protocol Data Unit)として知られています。これには4つのカテゴリが含まれます:read、write、notify、indicate。これらのコマンドは2つのタイプに分けることができます:レスポンスが必要な場合はリクエストが続き、逆にACKのみが必要でレスポンスが不要な場合はリクエストが続きません。
ServiceとCharacteristicはGATT層で定義されます。Service側がServiceを提供し、Serviceはデータであり、データは属性です。ServiceとCharacteristicはデータの論理的な表現、またはユーザーが見ることができるデータが最終的にServiceとCharacteristicに変換されます。
モバイルの観点から、サービスと特性がどのように見えるかを見てみましょう。nRF Connectは、各パケットがどのように見えるべきかを非常に視覚的に示すアプリケーションです。
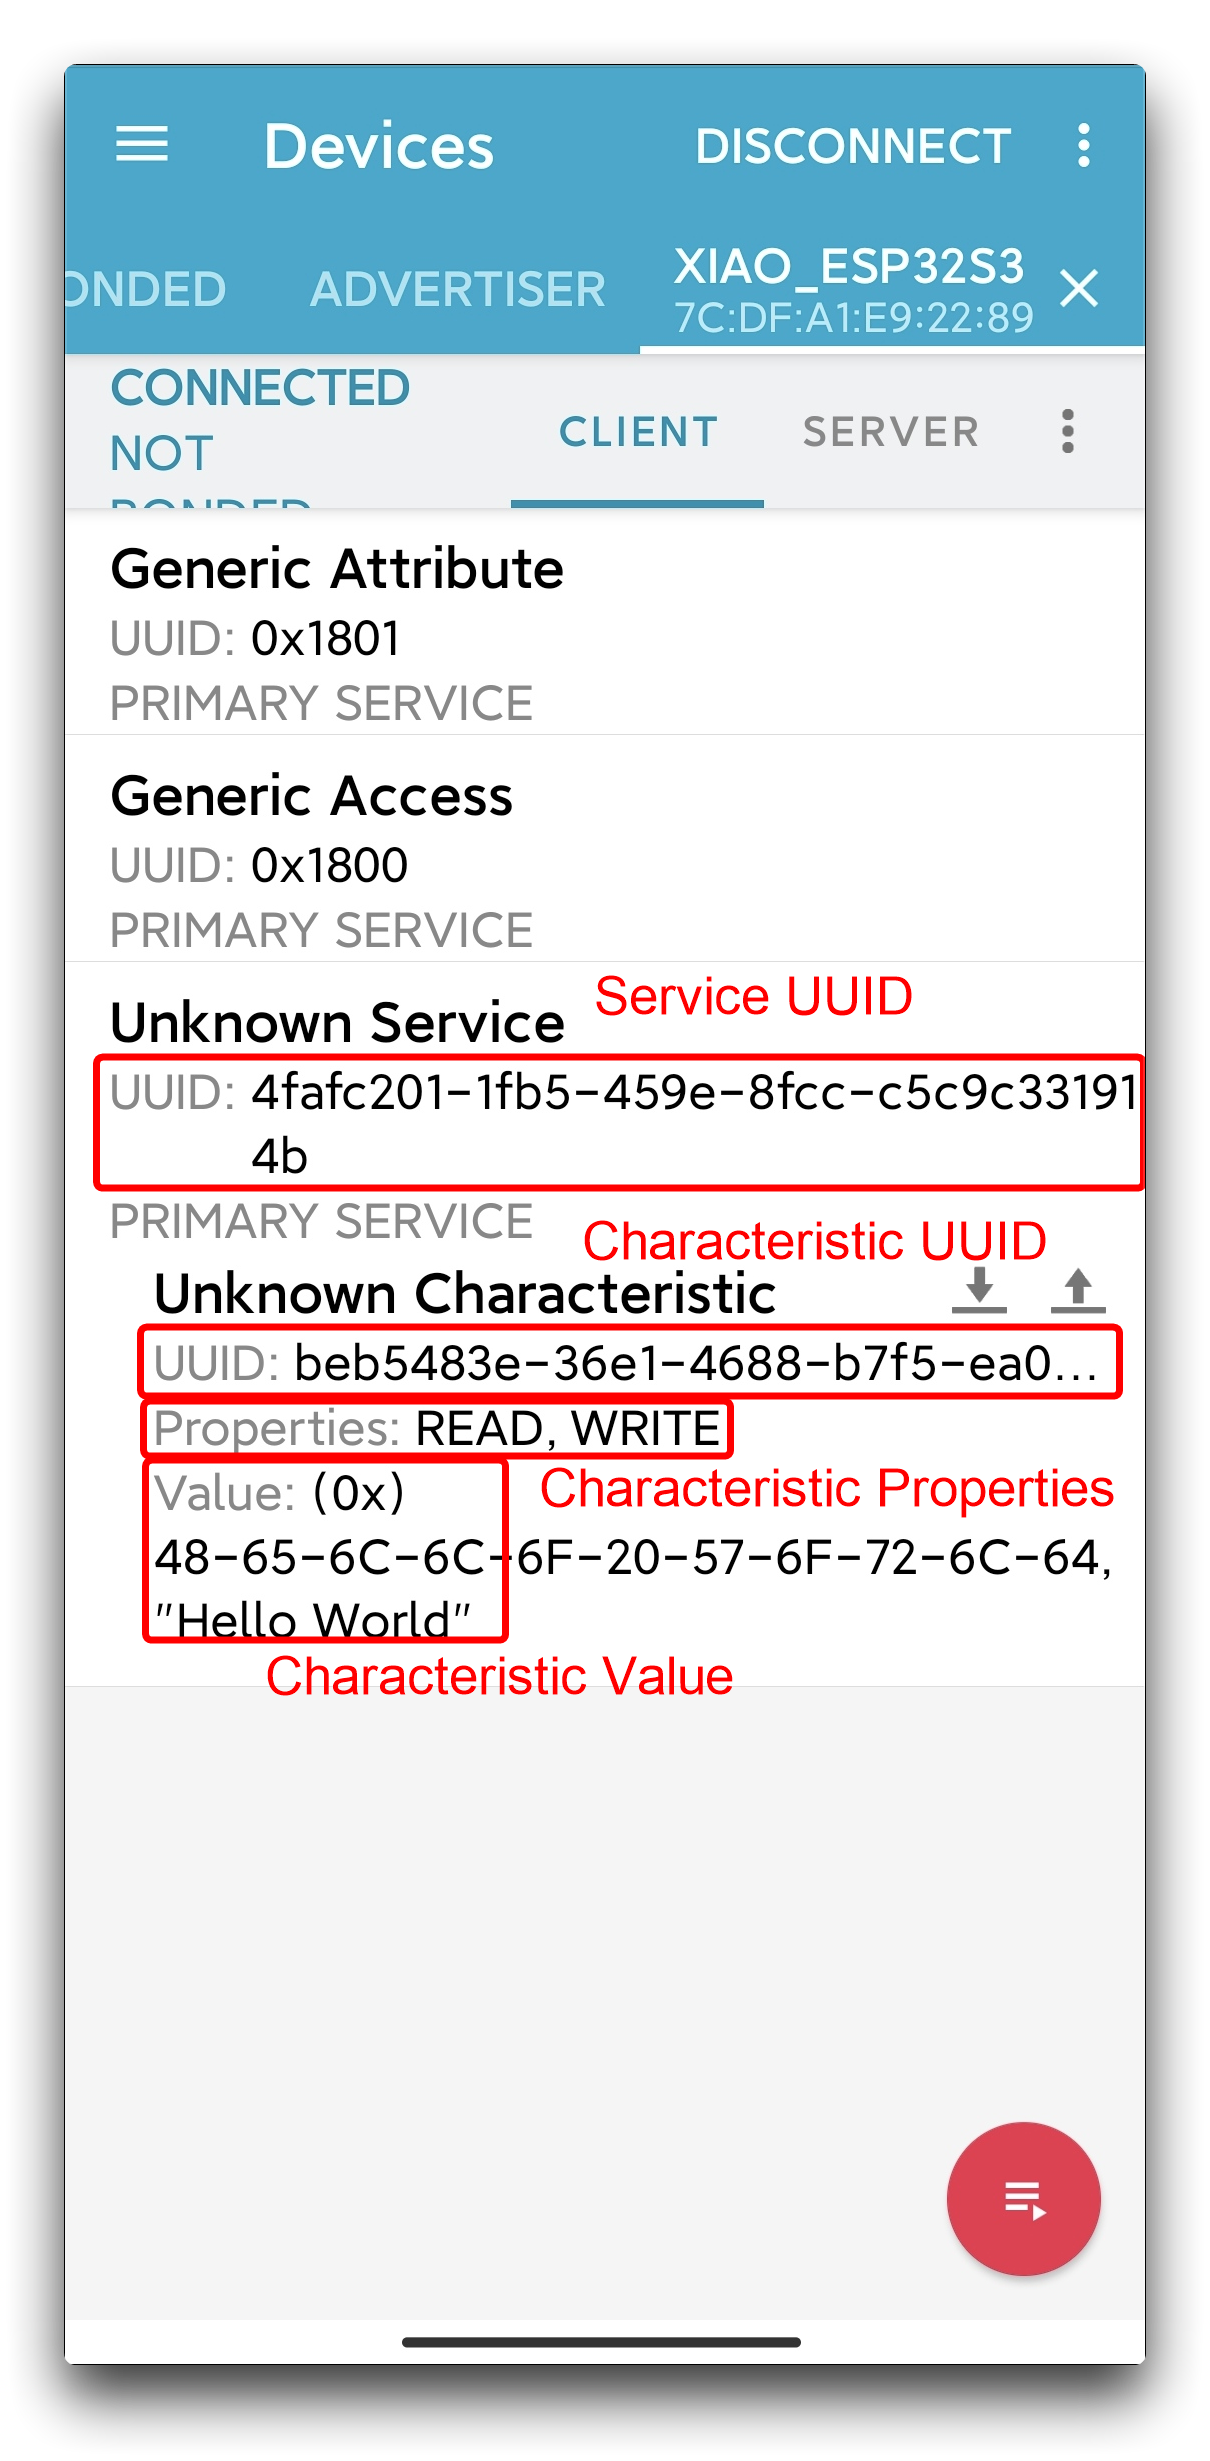
ご覧のように、Bluetooth仕様では、各特定のBluetoothアプリケーションは複数のServiceで構成され、各Serviceは複数のCharacteristicで構成されています。Characteristicは、UUID、Properties、およびValueで構成されています。
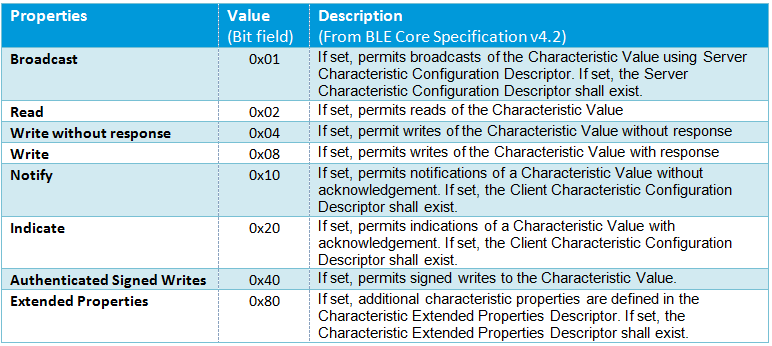
Propertiesは、読み取り、書き込み、通知などをサポートするかどうかなど、characteristicに対する操作の種類と権限を記述するために使用されます。これは、ATT PDUに含まれる4つのカテゴリに似ています。
UUID
各service、characteristic、descriptorにはUUID(Universally Unique Identifier)があります。UUIDは一意の128ビット(16バイト)の番号です。例えば:
ea094cbd-3695-4205-b32d-70c1dea93c35
SIG (Bluetooth Special Interest Group) で指定されているすべてのタイプ、サービス、プロファイルには短縮UUIDがあります。しかし、アプリケーションが独自のUUIDを必要とする場合は、この UUID生成ウェブサイト を使用して生成できます。
BLEスキャナー
XIAO ESP32C6 BLEスキャナーの作成は簡単です。以下はスキャナーを作成するサンプルプログラムです。
#include <BLEDevice.h>
#include <BLEUtils.h>
#include <BLEScan.h>
#include <BLEAdvertisedDevice.h>

int scanTime = 5; //In seconds
BLEScan* pBLEScan;

class MyAdvertisedDeviceCallbacks: public BLEAdvertisedDeviceCallbacks {
    void onResult(BLEAdvertisedDevice advertisedDevice) {
      Serial.printf("Advertised Device: %s \n", advertisedDevice.toString().c_str());
    }
};

void setup() {
  Serial.begin(115200);
  Serial.println("Scanning...");

  BLEDevice::init("");
  pBLEScan = BLEDevice::getScan(); //create new scan
  pBLEScan->setAdvertisedDeviceCallbacks(new MyAdvertisedDeviceCallbacks());
  pBLEScan->setActiveScan(true); //active scan uses more power, but get results faster
  pBLEScan->setInterval(100);
  pBLEScan->setWindow(99);  // less or equal setInterval value
}

void loop() {
  // put your main code here, to run repeatedly:
  BLEScanResults foundDevices = *pBLEScan->start(scanTime, false);
  Serial.print("Devices found: ");
  Serial.println(foundDevices.getCount());
  Serial.println("Scan done!");
  pBLEScan->clearResults();   // delete results fromBLEScan buffer to release memory
  delay(10000);
}
XIAO ESP32C6 マザーボードを選択してプログラムをアップロードできます。プログラムがスムーズに動作する場合は、シリアルモニターを開いてボーレートを115200に設定すると、以下の結果を確認できます。
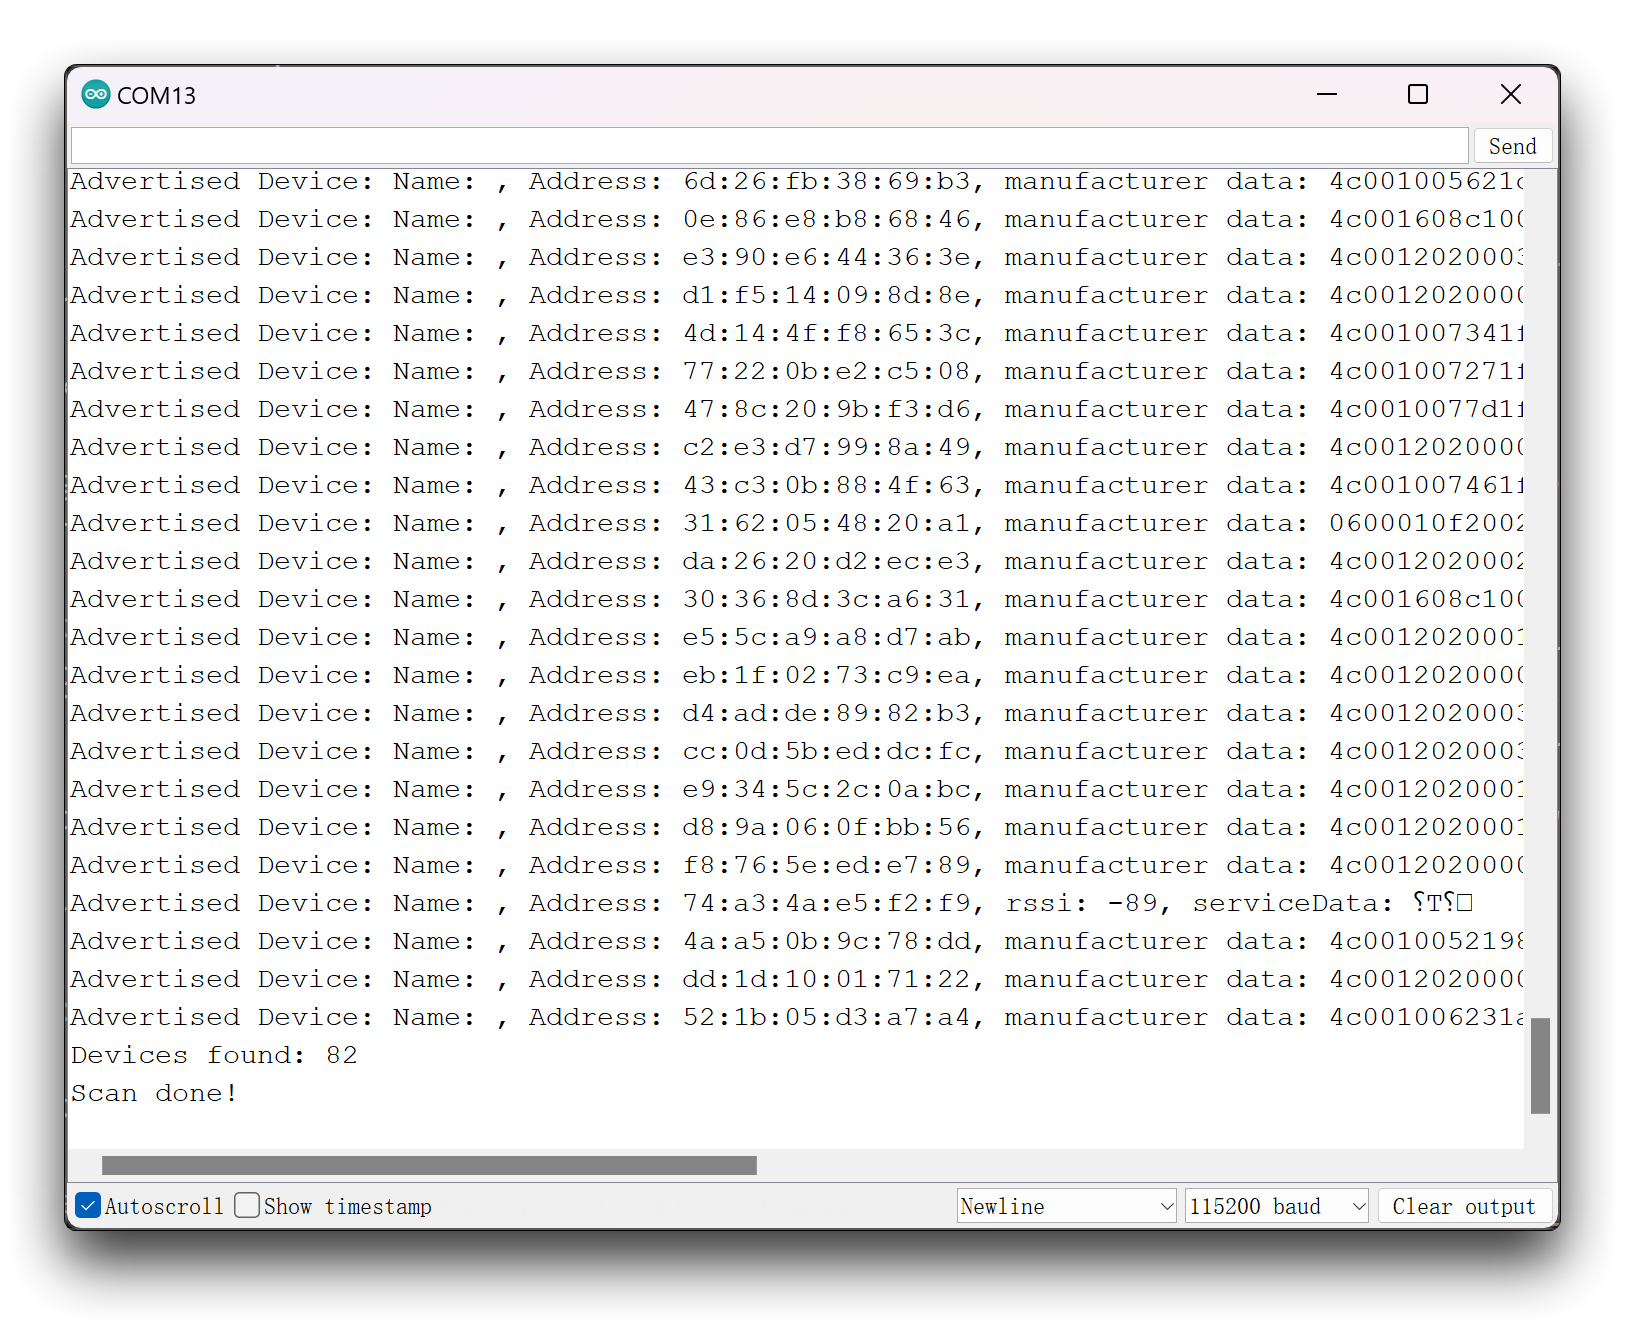
このプログラムは、スキャンされたBluetoothデバイスの名前、MACアドレス、製造者データ、信号を出力します。
プログラムの注釈
BLE機能に必要なライブラリをインポートすることから始まります。
次に、BLEAdvertisedDeviceCallbacksクラスから継承するMyAdvertisedDeviceCallbacksというクラスを定義します。このクラスにはonResultという関数があり、スキャン中にアドバタイズされたBluetoothデバイスが見つかったときに呼び出されます。この関数はSerial.printf関数を使用してデバイスの情報をシリアルポートに出力します。このクラスはスキャン中にBluetoothデバイス情報を処理するために使用できます。
class MyAdvertisedDeviceCallbacks: public BLEAdvertisedDeviceCallbacks {
    void onResult(BLEAdvertisedDevice advertisedDevice) {
      Serial.printf("Advertised Device: %s \n", advertisedDevice.toString().c_str());
    }
};
Setup 関数では、スキャン間隔とウィンドウ値を含む指定されたパラメータでBLEスキャンを設定します。また、BLEデバイスを初期化し、スキャン中に発見されたアドバタイズデバイスを処理するためのコールバック関数を設定します。
BLEDevice::init("");
pBLEScan = BLEDevice::getScan();
pBLEScan->setAdvertisedDeviceCallbacks(new MyAdvertisedDeviceCallbacks());
pBLEScan->setActiveScan(true);
pBLEScan->setInterval(100);
pBLEScan->setWindow(99);
最後に、loop関数は指定されたスキャン時間とブロッキングフラグでBLEスキャンを開始します。その後、見つかったデバイス数をシリアルポートに出力し、メモリを解放するために結果バッファをクリアします。
BLEScanResults foundDevices = *pBLEScan->start(scanTime, false);
Serial.print("Devices found: ");
Serial.println(foundDevices.getCount());
Serial.println("Scan done!");
pBLEScan->clearResults();
BLE サーバー/クライアント
前述のように、XIAO ESP32C6 はサーバーとクライアントの両方として動作できます。サーバーとしてのプログラムとその使用方法を見てみましょう。以下のプログラムをXIAOにアップロードすると、サーバーとして動作し、XIAOに接続されたすべてのBluetoothデバイスに「Hello World」メッセージを送信します。
//Server Code
#include <BLEDevice.h>
#include <BLEUtils.h>
#include <BLEServer.h>

#define SERVICE_UUID        "4fafc201-1fb5-459e-8fcc-c5c9c331914b"
#define CHARACTERISTIC_UUID "beb5483e-36e1-4688-b7f5-ea07361b26a8"

void setup() {
  Serial.begin(115200);
  Serial.println("Starting BLE work!");

  BLEDevice::init("XIAO_ESP32C6");
  BLEServer *pServer = BLEDevice::createServer();
  BLEService *pService = pServer->createService(SERVICE_UUID);
  BLECharacteristic *pCharacteristic = pService->createCharacteristic(
                                         CHARACTERISTIC_UUID,
                                         BLECharacteristic::PROPERTY_READ |
                                         BLECharacteristic::PROPERTY_WRITE
                                       );

  pCharacteristic->setValue("Hello World");
  pService->start();
  // BLEAdvertising *pAdvertising = pServer->getAdvertising();  // this still is working for backward compatibility
  BLEAdvertising *pAdvertising = BLEDevice::getAdvertising();
  pAdvertising->addServiceUUID(SERVICE_UUID);
  pAdvertising->setScanResponse(true);
  pAdvertising->setMinPreferred(0x06);  // functions that help with iPhone connections issue
  pAdvertising->setMinPreferred(0x12);
  BLEDevice::startAdvertising();
  Serial.println("Characteristic defined! Now you can read it in your phone!");
}

void loop() {
  // put your main code here, to run repeatedly:
  delay(2000);
}
一方で、主要なモバイルアプリストアでnRF Connectアプリを検索してダウンロードできます。このアプリを使用すると、スマートフォンでBluetoothデバイスを検索して接続できます。
- Android: nRF Connect
- IOS: nRF Connect
ソフトウェアをダウンロードした後、以下に示す手順に従ってXIAO ESP32C6を検索して接続すると、アドバタイズされた「Hello World」が表示されます。
 |  |  |  |
別のXIAO ESP32C6をクライアントとして使用してサーバーからメッセージを受信したい場合は、クライアントXIAOに対して以下の手順を使用できます。
// Client Code
#include "BLEDevice.h"
//#include "BLEScan.h"

// The remote service we wish to connect to.
static BLEUUID serviceUUID("4fafc201-1fb5-459e-8fcc-c5c9c331914b");
// The characteristic of the remote service we are interested in.
static BLEUUID    charUUID("beb5483e-36e1-4688-b7f5-ea07361b26a8");

static boolean doConnect = false;
static boolean connected = false;
static boolean doScan = false;
static BLERemoteCharacteristic* pRemoteCharacteristic;
static BLEAdvertisedDevice* myDevice;

static void notifyCallback(
  BLERemoteCharacteristic* pBLERemoteCharacteristic,
  uint8_t* pData,
  size_t length,
  bool isNotify) {
    Serial.print("Notify callback for characteristic ");
    Serial.print(pBLERemoteCharacteristic->getUUID().toString().c_str());
    Serial.print(" of data length ");
    Serial.println(length);
    Serial.print("data: ");
    Serial.write(pData, length);
    Serial.println();
}

class MyClientCallback : public BLEClientCallbacks {
  void onConnect(BLEClient* pclient) {
  }

  void onDisconnect(BLEClient* pclient) {
    connected = false;
    Serial.println("onDisconnect");
  }
};

bool connectToServer() {
    Serial.print("Forming a connection to ");
    Serial.println(myDevice->getAddress().toString().c_str());

    BLEClient*  pClient  = BLEDevice::createClient();
    Serial.println(" - Created client");

    pClient->setClientCallbacks(new MyClientCallback());

    // Connect to the remove BLE Server.
    pClient->connect(myDevice);  // if you pass BLEAdvertisedDevice instead of address, it will be recognized type of peer device address (public or private)
    Serial.println(" - Connected to server");
    pClient->setMTU(517); //set client to request maximum MTU from server (default is 23 otherwise)

    // Obtain a reference to the service we are after in the remote BLE server.
    BLERemoteService* pRemoteService = pClient->getService(serviceUUID);
    if (pRemoteService == nullptr) {
      Serial.print("Failed to find our service UUID: ");
      Serial.println(serviceUUID.toString().c_str());
      pClient->disconnect();
      return false;
    }
    Serial.println(" - Found our service");

    // Obtain a reference to the characteristic in the service of the remote BLE server.
    pRemoteCharacteristic = pRemoteService->getCharacteristic(charUUID);
    if (pRemoteCharacteristic == nullptr) {
      Serial.print("Failed to find our characteristic UUID: ");
      Serial.println(charUUID.toString().c_str());
      pClient->disconnect();
      return false;
    }
    Serial.println(" - Found our characteristic");

    // Read the value of the characteristic.
    if(pRemoteCharacteristic->canRead()) {
      String value = pRemoteCharacteristic->readValue();
      Serial.print("The characteristic value was: ");
      Serial.println(value);
    }

    if(pRemoteCharacteristic->canNotify())
      pRemoteCharacteristic->registerForNotify(notifyCallback);

    connected = true;
    return true;
}
/**
 * Scan for BLE servers and find the first one that advertises the service we are looking for.
 */
class MyAdvertisedDeviceCallbacks: public BLEAdvertisedDeviceCallbacks {
 /**
   * Called for each advertising BLE server.
   */
  void onResult(BLEAdvertisedDevice advertisedDevice) {
    Serial.print("BLE Advertised Device found: ");
    Serial.println(advertisedDevice.toString().c_str());

    // We have found a device, let us now see if it contains the service we are looking for.
    if (advertisedDevice.haveServiceUUID() && advertisedDevice.isAdvertisingService(serviceUUID)) {

      BLEDevice::getScan()->stop();
      myDevice = new BLEAdvertisedDevice(advertisedDevice);
      doConnect = true;
      doScan = true;

    } // Found our server
  } // onResult
}; // MyAdvertisedDeviceCallbacks

void setup() {
  Serial.begin(115200);
  Serial.println("Starting Arduino BLE Client application...");
  BLEDevice::init("");

  // Retrieve a Scanner and set the callback we want to use to be informed when we
  // have detected a new device.  Specify that we want active scanning and start the
  // scan to run for 5 seconds.
  BLEScan* pBLEScan = BLEDevice::getScan();
  pBLEScan->setAdvertisedDeviceCallbacks(new MyAdvertisedDeviceCallbacks());
  pBLEScan->setInterval(1349);
  pBLEScan->setWindow(449);
  pBLEScan->setActiveScan(true);
  pBLEScan->start(5, false);
} // End of setup.

// This is the Arduino main loop function.
void loop() {
  // If the flag "doConnect" is true then we have scanned for and found the desired
  // BLE Server with which we wish to connect.  Now we connect to it.  Once we are
  // connected we set the connected flag to be true.
  if (doConnect == true) {
    if (connectToServer()) {
      Serial.println("We are now connected to the BLE Server.");
    } else {
      Serial.println("We have failed to connect to the server; there is nothin more we will do.");
    }
    doConnect = false;
  }

  // If we are connected to a peer BLE Server, update the characteristic each time we are reached
  // with the current time since boot.
  if (connected) {
    String newValue = "Time since boot: " + String(millis()/1000);
    Serial.println("Setting new characteristic value to \"" + newValue + "\"");

    // Set the characteristic's value to be the array of bytes that is actually a string.
    pRemoteCharacteristic->writeValue(newValue.c_str(), newValue.length());
  }else if(doScan){
    BLEDevice::getScan()->start(0);  // this is just example to start scan after disconnect, most likely there is better way to do it in arduino
  }

  delay(1000); // Delay a second between loops.
} // End of loop
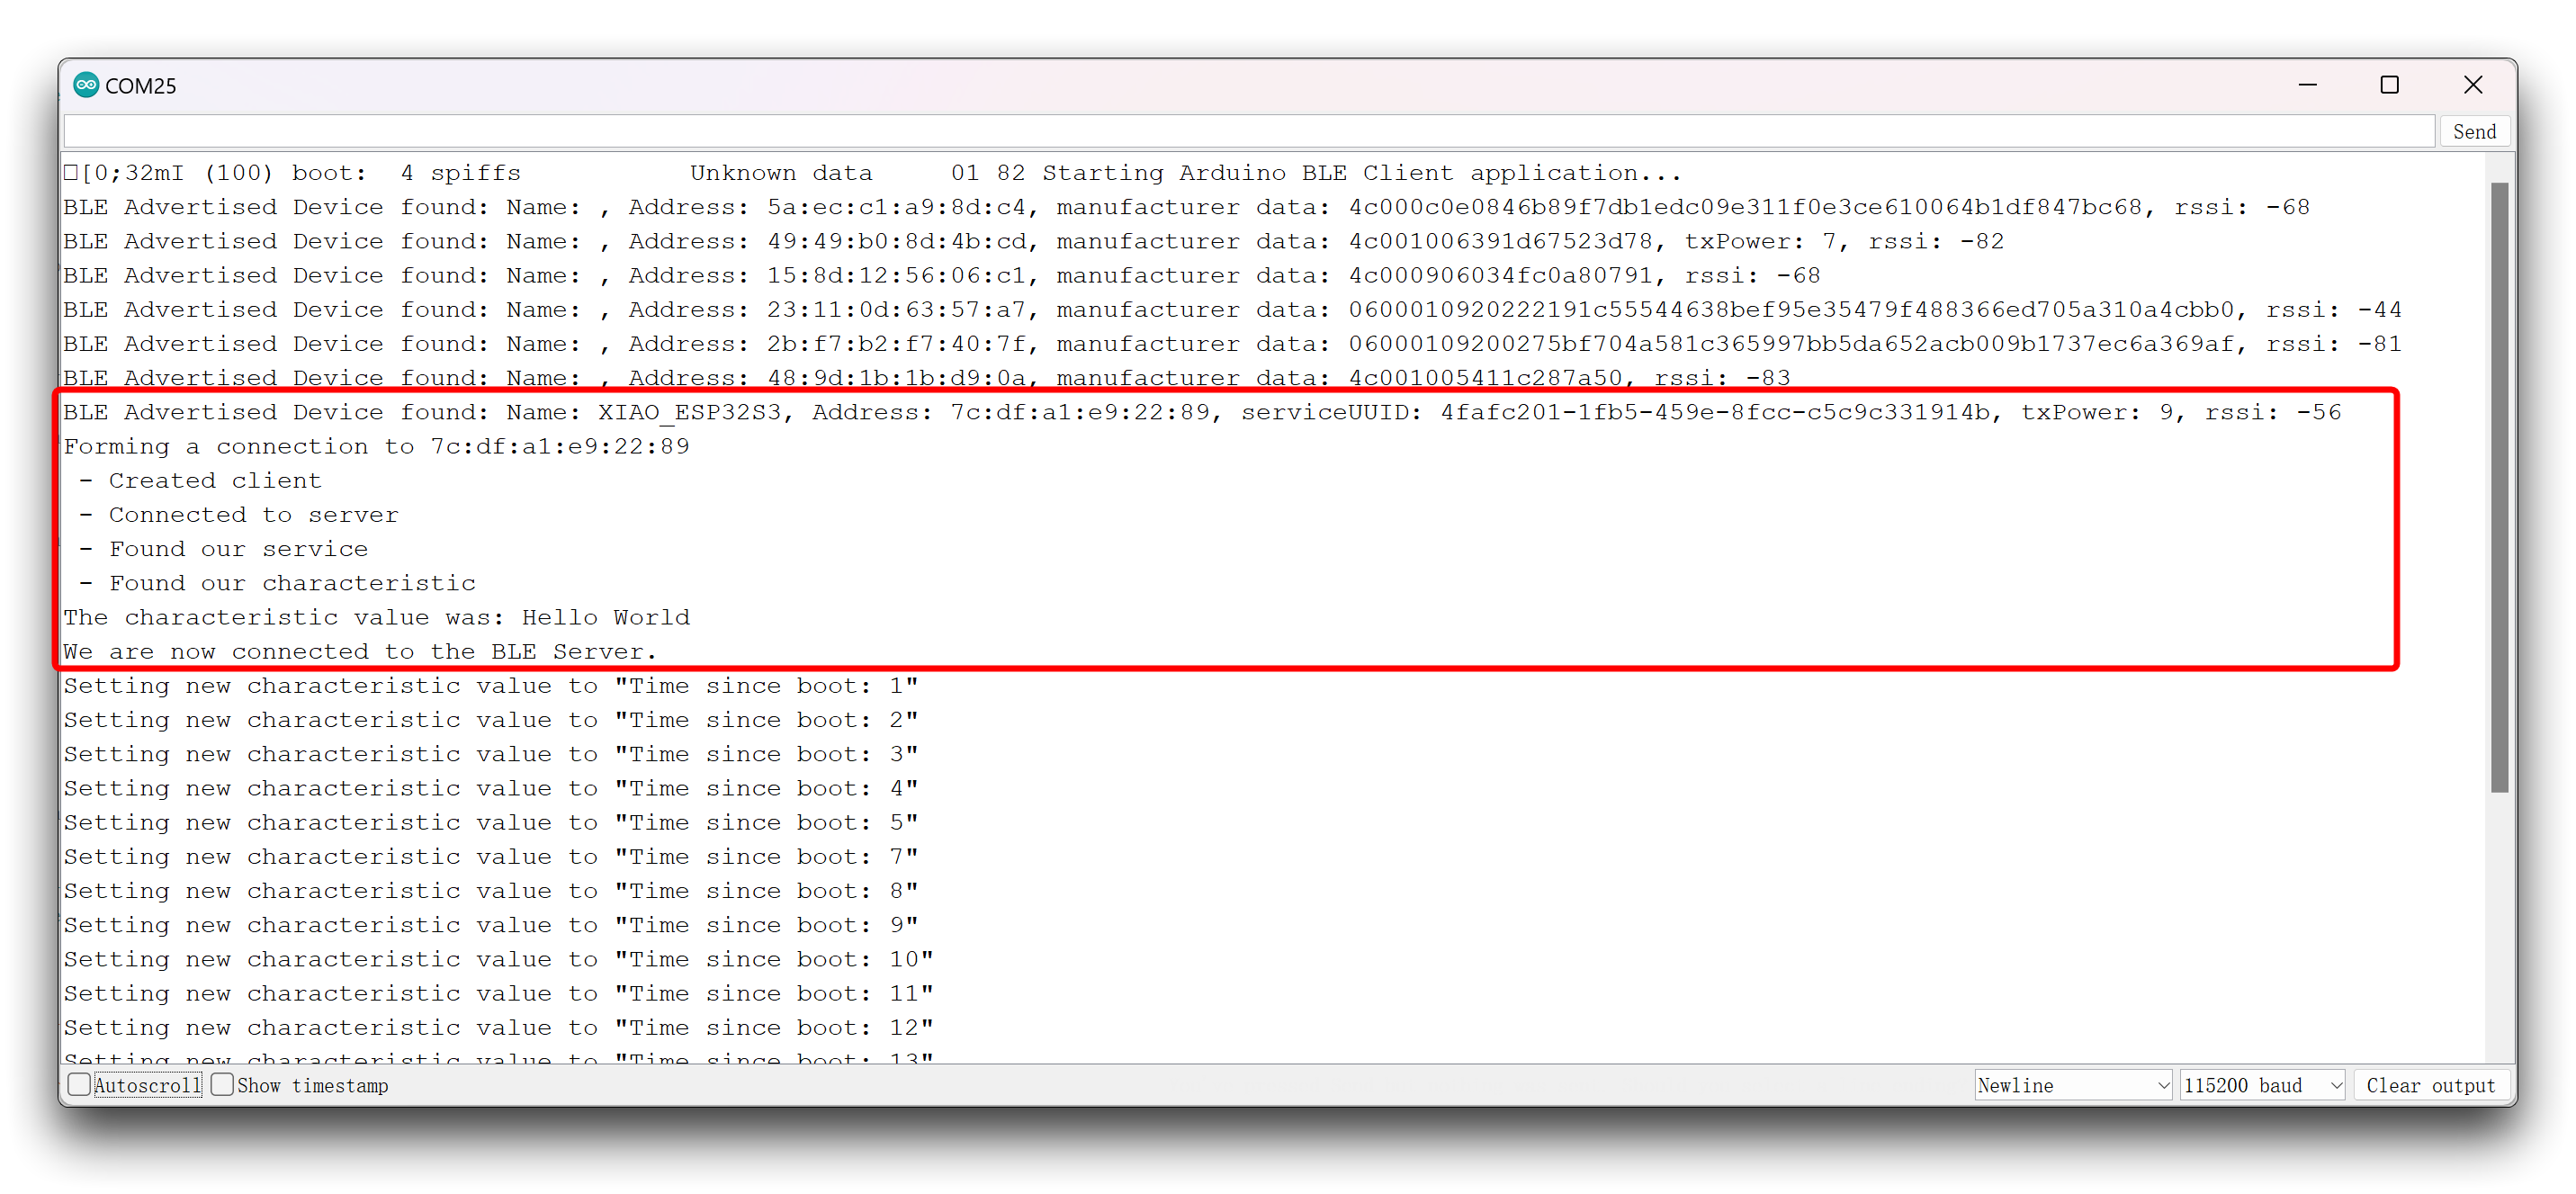
上記のプログラムはXIAOをクライアントにして、近くのBluetoothデバイスを検索します。BluetoothデバイスのUUIDが提供したUUIDと一致すると、そのデバイスに接続してその特性値を取得します。
プログラムの注釈
BLEサーバーのサンプルコードがどのように動作するかを簡単に見てみましょう。まず、BLE機能に必要なライブラリをインポートすることから始まります。次に、サービスと特性のUUIDを定義する必要があります。
#define SERVICE_UUID "4fafc201-1fb5-459e-8fcc-c5c9c331914b"
#define CHARACTERISTIC_UUID "beb5483e-36e1-4688-b7f5-ea07361b26a8"
デフォルトのUUIDをそのまま使用することもできますし、uuidgenerator.netにアクセスして、サービスと特性用のランダムなUUIDを作成することもできます。
次に、「XIAO_ESP32C6」という名前のBLEデバイスを作成します。この名前は好きなものに変更できます。次の行では、BLEデバイスをサーバーとして設定します。その後、先ほど定義したUUIDを使用してBLEサーバー用のサービスを作成します。
BLEServer *pServer = BLEDevice::createServer();
BLEService *pService = pServer->createService(SERVICE_UUID);
その後、そのサービスの特性を設定します。ご覧のように、先ほど定義したUUIDも使用し、特性のプロパティを引数として渡す必要があります。この場合は、READとWRITEです。
BLECharacteristic *pCharacteristic = pService->createCharacteristic(
                                     CHARACTERISTIC_UUID,
                                     BLECharacteristic::PROPERTY_READ |
                                     BLECharacteristic::PROPERTY_WRITE
                                     );
特性を作成した後、setValue() メソッドでその値を設定できます。この場合、値を「Hello World」というテキストに設定しています。このテキストは好きなものに変更できます。将来のプロジェクトでは、このテキストはセンサーの読み取り値やランプの状態などにすることができます。
最後に、サービスとアドバタイジングを開始して、他のBLEデバイスがこのBLEデバイスをスキャンして見つけられるようにします。
BLEAdvertising *pAdvertising = pServer->getAdvertising();
pAdvertising->start();
これは、BLEサーバーを作成する方法の簡単な例です。このコードではloop()で何も実行されませんが、新しいクライアントが接続したときに何が起こるかを追加できます(いくつかのガイダンスについてはBLE_notifyの例を確認してください)。
BLEセンサーデータ交換
次に、実際の世界に移って事例を完成させます。この事例では、XIAO ESP32C6を光強度センサーに接続し、Bluetoothを介して光センサーの値を別のXIAO ESP32C6に送信し、拡張ボードの画面に表示します。
配線の便宜のため、2つのXIAO拡張ボードを使用します。サンプルプログラムは参考用のみで、実際のプロジェクトのニーズに応じて製品を選択できます。
| Seeed Studio XIAO ESP32C6 | Seeed Studio Expansion Base for XIAO with Grove OLED | Grove - Digital Light Sensor - TSL2561 |
|---|---|---|
|  | 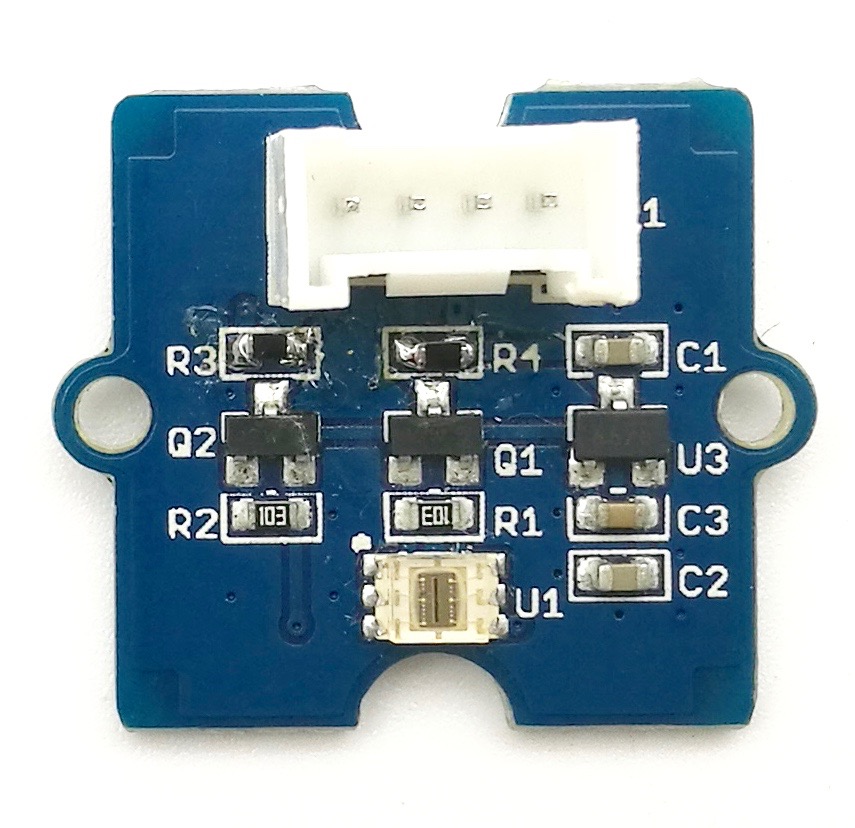 |
上記のハードウェア準備に加えて、以下のライブラリを準備し、Arduino IDE環境にダウンロードして追加する必要があります。
- OLEDディスプレイu8g2のライブラリ:
- Grove - Digital Light Sensor - TSL2561のライブラリ:
2つのXIAOを準備する必要があります。1つはサーバー、もう1つはクライアントとして使用します。以下はサーバーとしてのサンプルプログラムです。サーバーとしてのXIAOには以下の主なタスクがあります。
- 第一に、光センサーからリアルタイム値を取得する
- 第二に、Bluetoothサーバーを作成する
- 第三に、Bluetoothを通じて光強度値をアドバタイズする
- 第四に、ディスプレイにリアルタイムの光強度と送信状況を表示する
//server
#include <BLEDevice.h>
#include <BLEUtils.h>
#include <BLE2902.h>
#include <BLEServer.h>
#include <Wire.h>
#include <Digital_Light_TSL2561.h>
#include <Arduino.h>
#include <U8x8lib.h>
#include <Wire.h>

// OLEDs without Reset of the Display
U8X8_SSD1306_128X64_NONAME_HW_I2C u8x8(/* clock=*/ SCL, /* data=*/ SDA, /* reset=*/ U8X8_PIN_NONE);

//BLE Server name (the other ESP32 name running the server sketch)
#define bleServerName "XIAOESP32C6_BLE"

BLECharacteristic *pCharacteristic;
bool deviceConnected = false;

int light_val = 0;

class MyServerCallbacks: public BLEServerCallbacks {
  void onConnect(BLEServer* pServer) {
    deviceConnected = true;
  };

  void onDisconnect(BLEServer* pServer) {
    deviceConnected = false;
  }
};

void setup() {
  Serial.begin(115200);

  //OLED display setup
  u8x8.begin();
  u8x8.setFlipMode(1);

  u8x8.setFont(u8x8_font_chroma48medium8_r);
  u8x8.drawString(0, 3, "Starting...");

  Wire.begin();
  TSL2561.init();

  BLEDevice::init(bleServerName);
  BLEServer *pServer = BLEDevice::createServer();
  pServer->setCallbacks(new MyServerCallbacks());

  BLEService *pService = pServer->createService(BLEUUID((uint16_t)0x181A)); // Environmental Sensing
  pCharacteristic = pService->createCharacteristic(
    BLEUUID((uint16_t)0x2A59), // Analog Output
    BLECharacteristic::PROPERTY_NOTIFY
  );
  pCharacteristic->addDescriptor(new BLE2902());

  pService->start();
  BLEAdvertising *pAdvertising = BLEDevice::getAdvertising();
  pAdvertising->addServiceUUID(pService->getUUID());
  pAdvertising->setScanResponse(true);
  pAdvertising->setMinPreferred(0x0);
  pAdvertising->setMinPreferred(0x1F);
  BLEDevice::startAdvertising();
  u8x8.clearDisplay();
}

void loop() {
  if (deviceConnected) {
    light_val = TSL2561.readVisibleLux();
    pCharacteristic->setValue(light_val);
    pCharacteristic->notify();
    u8x8.setFont(u8x8_font_chroma48medium8_r);
    u8x8.setCursor(0, 0);
    u8x8.print("Light Value:");
    u8x8.clearLine(2);
    u8x8.setCursor(0, 2);
    u8x8.print(light_val);
    u8x8.drawString(0, 4, "Sending...");
    delay(10); // bluetooth stack will go into congestion, if too many packets are sent
  }
}
XIAOの1つにプログラムをアップロードした後、プログラムがスムーズに動作する場合は、スマートフォンを取り出してnRF Connect APPを使用し、XIAOESP32C6_BLEという名前のBluetoothデバイスを検索し、接続して、下図に示すボタンをクリックすると、センサーデータ情報を受信できます。
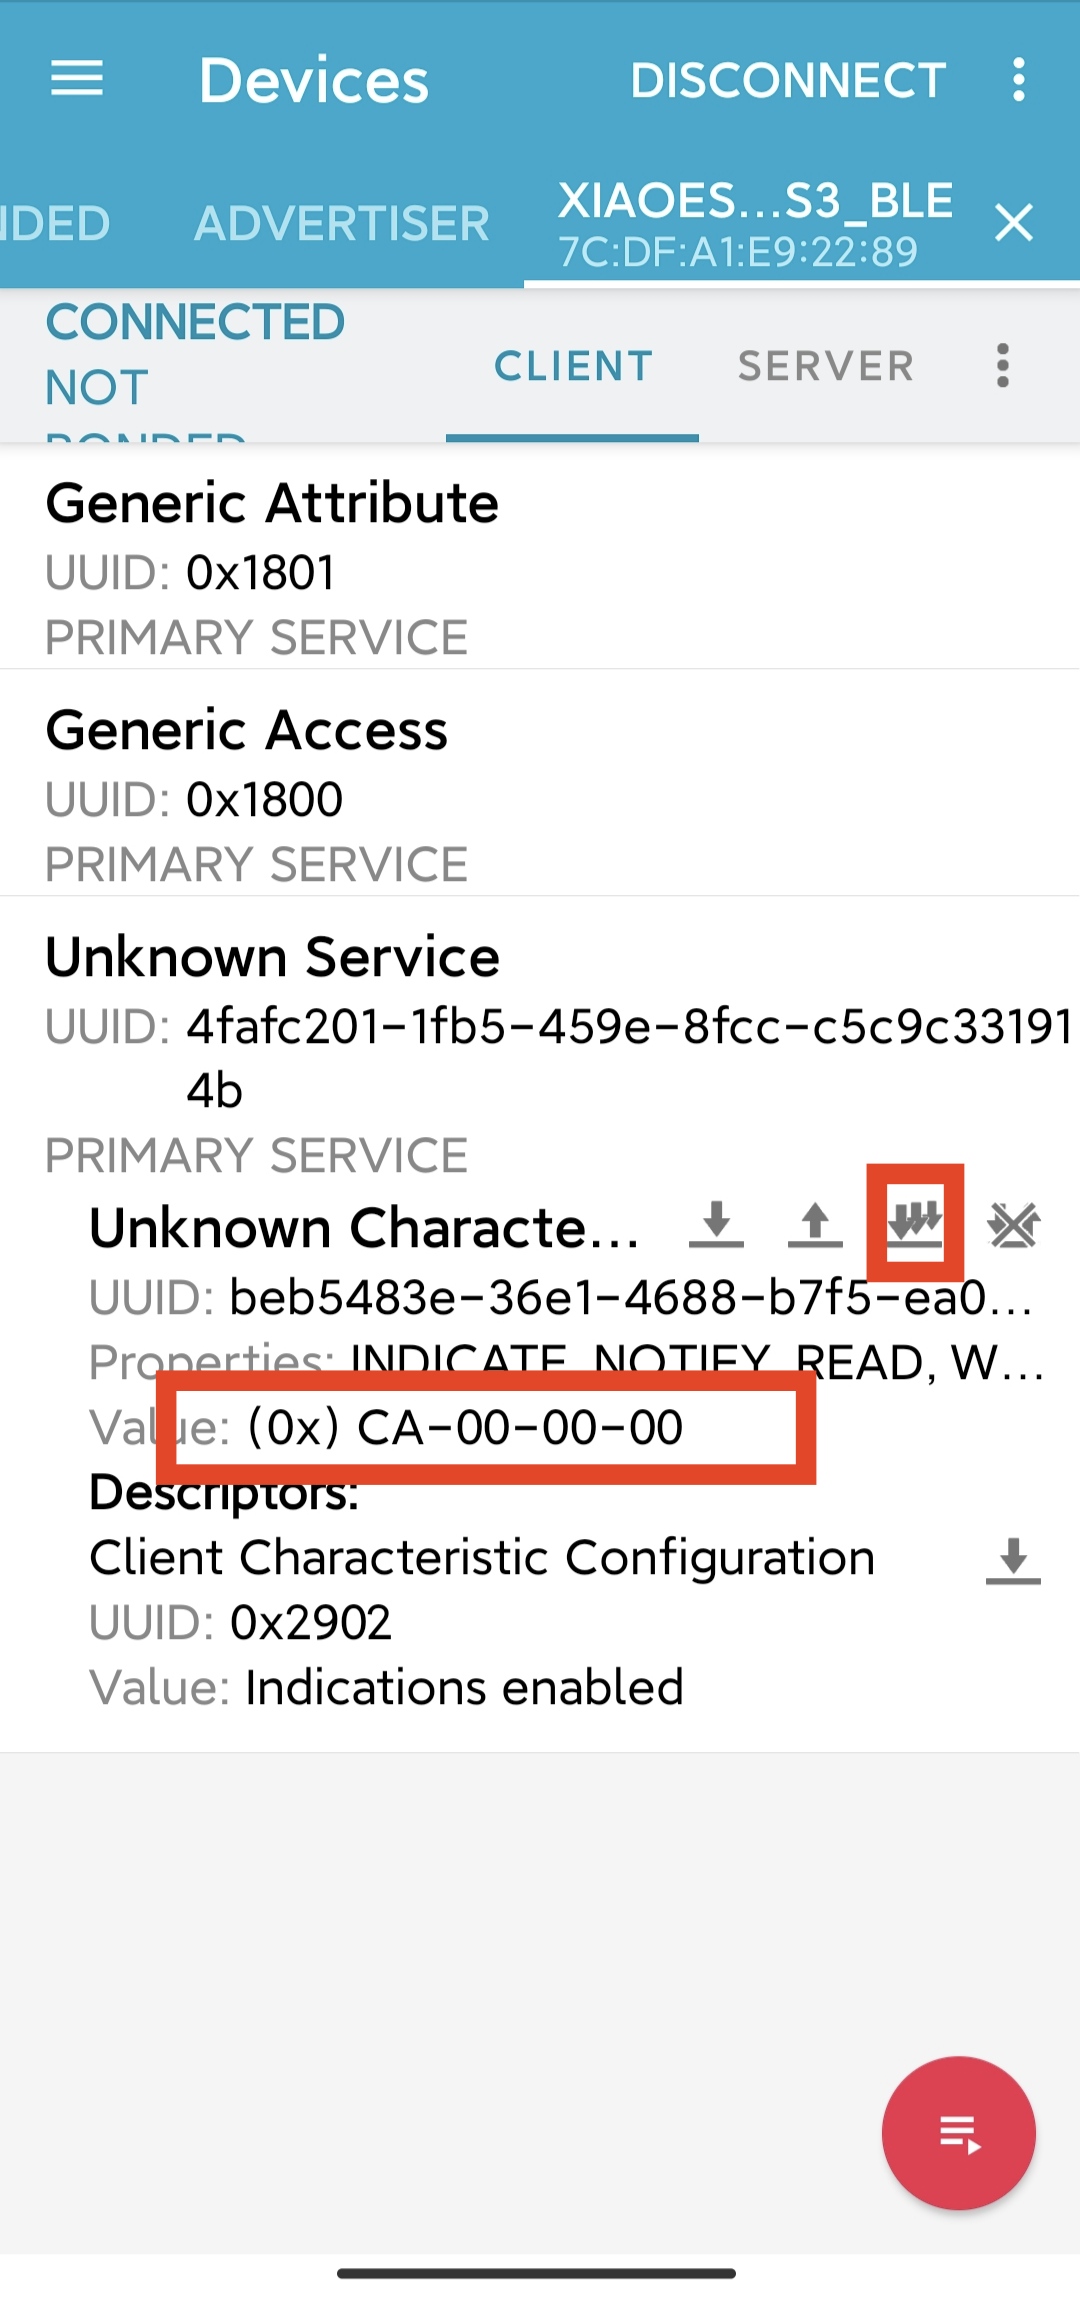
ここで、ソフトウェアの操作方法が前の例とは少し異なることがわかります。これは一般的に、センサーの種類のメッセージを送信する際に、メッセージの効率性を確保するためにnotifyのプロパティを使用することを選択するためです。
次に、クライアントとして動作し、データを収集して表示する他のXIAOを取り出す必要があります。
//client
#include <BLEDevice.h>
#include <BLEUtils.h>
#include <BLEClient.h>
#include <BLEServer.h>
#include <Arduino.h>
#include <U8x8lib.h>
#include <Wire.h>

// OLEDs without Reset of the Display
U8X8_SSD1306_128X64_NONAME_HW_I2C u8x8(/* clock=*/ SCL, /* data=*/ SDA, /* reset=*/ U8X8_PIN_NONE);

BLEClient*  pClient;
bool doconnect = false;

//BLE Server name (the other ESP32 name running the server sketch)
#define bleServerName "XIAOESP32C6_BLE"

//Address of the peripheral device. Address will be found during scanning...
static BLEAddress *pServerAddress;

BLEUUID serviceUUID("181A"); // Environmental Sensing
BLEUUID charUUID("2A59");    // Analog Output

char light_val[1024];

//Callback function that gets called, when another device's advertisement has been received
class MyAdvertisedDeviceCallbacks: public BLEAdvertisedDeviceCallbacks {
  void onResult(BLEAdvertisedDevice advertisedDevice) {
    if (advertisedDevice.getName() == bleServerName) { //Check if the name of the advertiser matches
      advertisedDevice.getScan()->stop(); //Scan can be stopped, we found what we are looking for
      pServerAddress = new BLEAddress(advertisedDevice.getAddress()); //Address of advertiser is the one we need
      Serial.println("Device found. Connecting!");
    }
  }
};

//function that prints the latest sensor readings in the OLED display
void printReadings(){
  u8x8.setFont(u8x8_font_chroma48medium8_r);
  u8x8.setCursor(0, 0);
  u8x8.print("Light Value:");
  u8x8.drawString(0, 2, light_val);
}

void setup() {
  Serial.begin(115200);
  //OLED display setup
  u8x8.begin();
  u8x8.setFlipMode(1);

  u8x8.setFont(u8x8_font_chroma48medium8_r);
  u8x8.drawString(0, 3, "Starting...");

  Serial.println("Starting BLE client...");

  BLEDevice::init("XIAOESP32C6_Client");

  // Retrieve a Scanner and set the callback we want to use to be informed when we
  // have detected a new device.  Specify that we want active scanning and start the
  // scan to run for 30 seconds.
  BLEScan* pBLEScan = BLEDevice::getScan();
  pBLEScan->setAdvertisedDeviceCallbacks(new MyAdvertisedDeviceCallbacks());
  pBLEScan->setActiveScan(true);
  pBLEScan->start(30);

  pClient = BLEDevice::createClient();
  // Connect to the remove BLE Server.
  pClient->connect(*pServerAddress);
  Serial.println(" - Connected to server");

  // Obtain a reference to the service we are after in the remote BLE server.
  BLERemoteService* pRemoteService = pClient->getService(serviceUUID);
  if (pRemoteService == nullptr) {
    u8x8.clearDisplay();
    u8x8.drawString(0, 3, "False UUID");
    Serial.print("Failed to find our service UUID: ");
    Serial.println(serviceUUID.toString().c_str());
    return;
  }

  // Obtain a reference to the characteristics in the service of the remote BLE server.
  BLERemoteCharacteristic* pCharacteristic = pRemoteService->getCharacteristic(charUUID);
  if (pCharacteristic == nullptr) {
    u8x8.clearDisplay();
    u8x8.drawString(0, 3, "False UUID");
    Serial.print("Failed to find our characteristic UUID");
    return;
  }
  Serial.println(" - Found light value characteristics");
  u8x8.clearDisplay();
  u8x8.drawString(0, 3, "Connected!");

  pCharacteristic->registerForNotify([](BLERemoteCharacteristic* pBLERemoteCharacteristic, uint8_t* pData, size_t length, bool isNotify) {
    Serial.println("Notify received");
    Serial.print("Value: ");
    Serial.println(*pData);
    snprintf(light_val, sizeof(light_val), "%d", *pData);
  });

  doconnect = true;
  u8x8.clearDisplay();
  u8x8.drawString(0, 4, "Receiving...");
}

void loop() {
  if (doconnect) {
    BLERemoteService* pRemoteService = pClient->getService(serviceUUID);
    BLERemoteCharacteristic* pCharacteristic = pRemoteService->getCharacteristic(charUUID);
    pCharacteristic->registerForNotify([](BLERemoteCharacteristic* pBLERemoteCharacteristic, uint8_t* pData, size_t length, bool isNotify) {
      Serial.println("Notify received");
      Serial.print("Value: ");
      Serial.println(*pData);
      snprintf(light_val, sizeof(light_val), "%d", *pData);
    });
  }
  printReadings();
  delay(1000);
  u8x8.clearLine(2);
}
上記の例を使用する際は、クライアントプログラムを使用する前に、サーバープログラムをアップロードし、正常に動作していることを確認することをお勧めします。プログラムがスムーズに動作すれば、以下の結果が表示されます。
プログラムの注釈
上記のプログラムについて、より重要な部分を選んで説明します。まずサーバープログラムから始めます。
プログラムの冒頭で、Bluetoothサーバーの名前を定義します。この名前は任意に設定できますが、このBluetoothデバイスを検索する際にこの名前に依存するため、覚えておく必要があります。
#define bleServerName "XIAOESP32C6_BLE"
チュートリアルの前のセクションでは、サーバーの下にCharacteristicがあり、Characteristicの下に値とその他のコンテンツがあることについて説明しました。そのため、広告を作成する際にはこの原則に従う必要があります。
BLEService *pService = pServer->createService(BLEUUID((uint16_t)0x181A)); // Environmental Sensing
  pCharacteristic = pService->createCharacteristic(
    BLEUUID((uint16_t)0x2A59), // Analog Output
    BLECharacteristic::PROPERTY_NOTIFY
  );
  pCharacteristic->addDescriptor(new BLE2902());
上記のプログラムでは、createService() がサーバーを作成するために使用されていることがわかります。パラメータは特定のUUID: 0x181A です。GATTのルールでは、0x181A は環境監視タイプのデータを示し、同じCharacteristicのUUID: 0x2A59 も特別な意味を持ちます。GATTでは、これはアナログ出力を示します。これは光センサー値のケースに適合するため、ここではそのように定義しています。GATTが私たちのために準備した特定のUUIDの意味については、こちらで読むことができます。
もちろん、GATT標準に従わずにUUIDを設定することもできます。これら2つの値が一意であり、クライアントがこれらのUUIDを認識して値を見つける能力に影響しないことを確認するだけです。uuidgenerator.netにアクセスして、サービスとcharacteristicのためのランダムなUUIDを作成することができます。
createCharacteristic() 関数の2番目のパラメータは、プロパティを設定するためのものです。ここでは、データが継続的に送信されることを確保するために、PROPERTY_NOTIFY に設定する必要があることに注意してください。
pCharacteristic->setValue(light_val);
pCharacteristic->notify();
最後に、loopでは、読み取った光センサーの値を10msごとにアドバタイズするだけです。
次のステップはクライアントプログラムで、これははるかに複雑に見えるでしょう。
プログラムの開始時は、まだ非常に馴染みのある内容です。この内容がサーバー側で設定したものと一致していることを確認する必要があります。
//BLE Server name (the other ESP32 name running the server sketch)
#define bleServerName "XIAOESP32C6_BLE"

BLEUUID serviceUUID("181A"); // Environmental Sensing
BLEUUID charUUID("2A59");    // Analog Output
次に、コールバック関数を記述します。この関数の主な機能は、近くのBluetoothデバイスを検索し、提供されたBluetoothデバイス名と比較して、それをキャプチャし、そのMACアドレスを取得することです。
class MyAdvertisedDeviceCallbacks: public BLEAdvertisedDeviceCallbacks {
  void onResult(BLEAdvertisedDevice advertisedDevice) {
    if (advertisedDevice.getName() == bleServerName) { //Check if the name of the advertiser matches
      advertisedDevice.getScan()->stop(); //Scan can be stopped, we found what we are looking for
      pServerAddress = new BLEAddress(advertisedDevice.getAddress()); //Address of advertiser is the one we need
      Serial.println("Device found. Connecting!");
    }
  }
};
以下の手順は、サーバーで光強度値を見つけるための鍵となります。まず、サーバーUUIDを見つけ、次にサーバー下のCharacteristicのUUIDを探し、最後に光の値を見つける必要があります。この解析方法は、Bluetoothのデータ構造と一対一で対応しています。
// Obtain a reference to the service we are after in the remote BLE server.
BLERemoteService* pRemoteService = pClient->getService(serviceUUID);
if (pRemoteService == nullptr) {
  Serial.print("Failed to find our service UUID: ");
  Serial.println(serviceUUID.toString().c_str());
  return;
}

// Obtain a reference to the characteristics in the service of the remote BLE server.
BLERemoteCharacteristic* pCharacteristic = pRemoteService->getCharacteristic(charUUID);
if (pCharacteristic == nullptr) {
  Serial.print("Failed to find our characteristic UUID");
  return;
}
Serial.println(" - Found light value characteristics");

pCharacteristic->registerForNotify([](BLERemoteCharacteristic* pBLERemoteCharacteristic, uint8_t* pData, size_t length, bool isNotify) {
    Serial.println("Notify received");
    Serial.print("Value: ");
    Serial.println(*pData);
  });
最後に、光の値がポインタpDataに配置されます。
上記の例は、単一センサーの単一値の最もシンプルな例を示しています。Bluetooth経由で複数のセンサーまたは複数のセンサー値をアドバタイズしたい場合は、こちらのチュートリアル例を読むことをお勧めします。
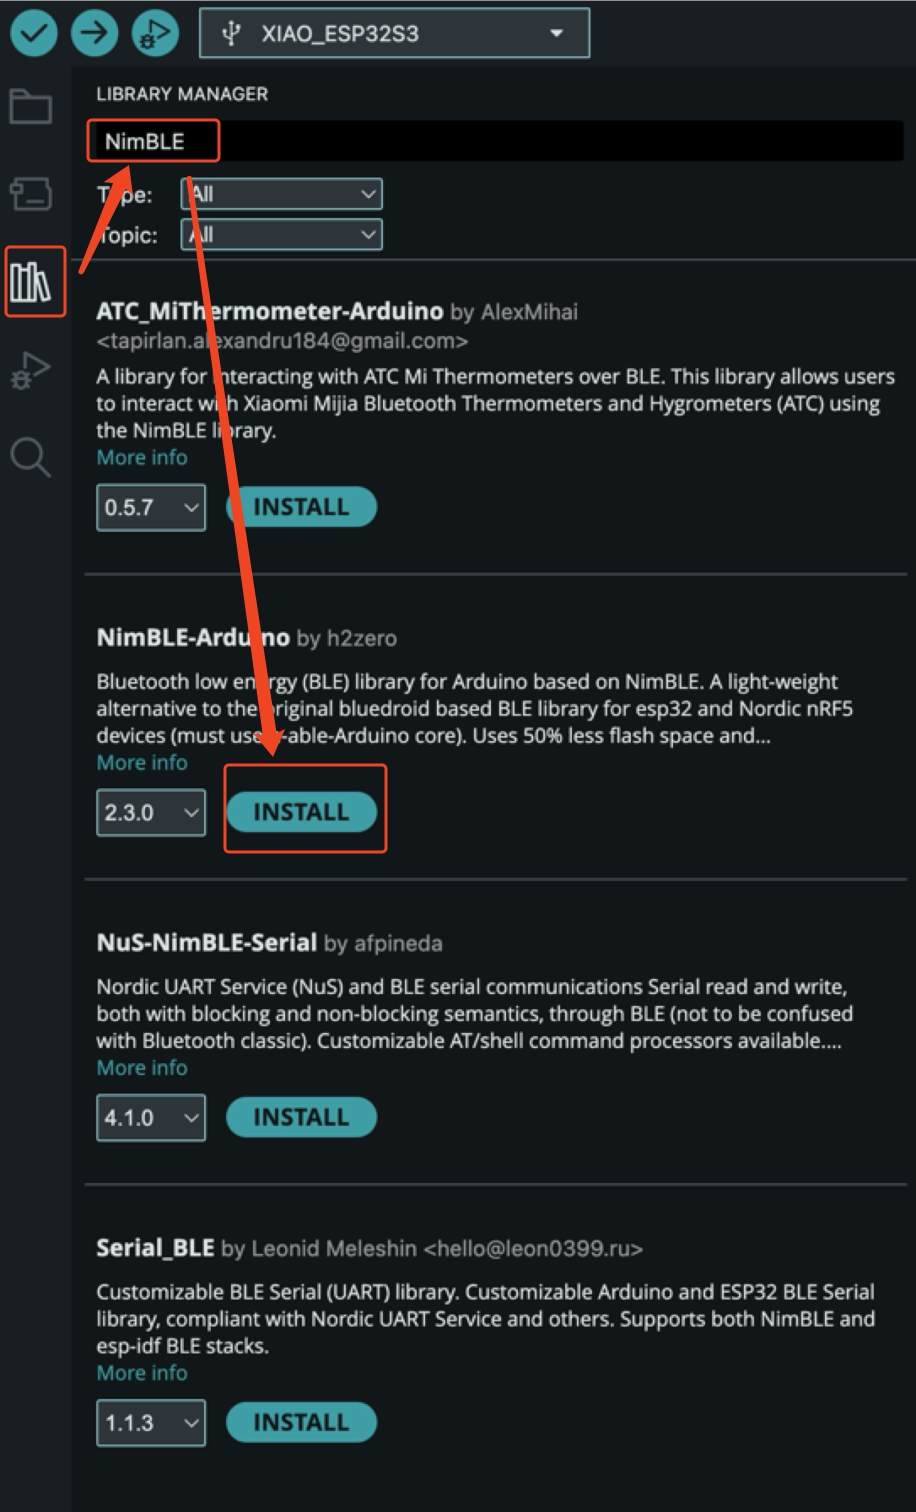
NimBLE-Arduino
概要
このライブラリは、bluedroidベースのライブラリと比較して、ESP32 BLEアプリケーションのリソース使用量を大幅に削減し、パフォーマンスを向上させます。目標は、合理的な範囲で元のライブラリとの互換性を維持しつつ、NimBLEスタックを使用することです。さらに、このライブラリは元のライブラリよりも改善された機能と安定性を提供するため、より積極的に開発・保守されます。
詳細については、作者のGithub リンクをご覧ください。
ステップ1.ライブラリの追加
ステップ2.例
コード
#include <Arduino.h>
#include <NimBLEDevice.h>
#include <NimBLEAdvertisedDevice.h>
#include "NimBLEEddystoneTLM.h"
#include "NimBLEBeacon.h"

#define ENDIAN_CHANGE_U16(x) ((((x) & 0xFF00) >> 8) + (((x) & 0xFF) << 8))

int         scanTime = 5 * 1000; // In milliseconds
NimBLEScan* pBLEScan;

class ScanCallbacks : public NimBLEScanCallbacks {
    void onResult(const NimBLEAdvertisedDevice* advertisedDevice) override {
        if (advertisedDevice->haveName()) {
            Serial.print("Device name: ");
            Serial.println(advertisedDevice->getName().c_str());
            Serial.println("");
        }

        if (advertisedDevice->haveServiceUUID()) {
            NimBLEUUID devUUID = advertisedDevice->getServiceUUID();
            Serial.print("Found ServiceUUID: ");
            Serial.println(devUUID.toString().c_str());
            Serial.println("");
        } else if (advertisedDevice->haveManufacturerData() == true) {
            std::string strManufacturerData = advertisedDevice->getManufacturerData();
            if (strManufacturerData.length() == 25 && strManufacturerData[0] == 0x4C && strManufacturerData[1] == 0x00) {
                Serial.println("Found an iBeacon!");
                NimBLEBeacon oBeacon = NimBLEBeacon();
                oBeacon.setData(reinterpret_cast<const uint8_t*>(strManufacturerData.data()), strManufacturerData.length());
                Serial.printf("iBeacon Frame\n");
                Serial.printf("ID: %04X Major: %d Minor: %d UUID: %s Power: %d\n",
                              oBeacon.getManufacturerId(),
                              ENDIAN_CHANGE_U16(oBeacon.getMajor()),
                              ENDIAN_CHANGE_U16(oBeacon.getMinor()),
                              oBeacon.getProximityUUID().toString().c_str(),
                              oBeacon.getSignalPower());
            } else {
                Serial.println("Found another manufacturers beacon!");
                Serial.printf("strManufacturerData: %d ", strManufacturerData.length());
                for (int i = 0; i < strManufacturerData.length(); i++) {
                    Serial.printf("[%X]", strManufacturerData[i]);
                }
                Serial.printf("\n");
            }
            return;
        }

        NimBLEUUID eddyUUID = (uint16_t)0xfeaa;

        if (advertisedDevice->getServiceUUID().equals(eddyUUID)) {
            std::string serviceData = advertisedDevice->getServiceData(eddyUUID);
            if (serviceData[0] == 0x20) {
                Serial.println("Found an EddystoneTLM beacon!");
                NimBLEEddystoneTLM foundEddyTLM = NimBLEEddystoneTLM();
                foundEddyTLM.setData(reinterpret_cast<const uint8_t*>(serviceData.data()), serviceData.length());

                Serial.printf("Reported battery voltage: %dmV\n", foundEddyTLM.getVolt());
                Serial.printf("Reported temperature from TLM class: %.2fC\n", (double)foundEddyTLM.getTemp());
                int   temp     = (int)serviceData[5] + (int)(serviceData[4] << 8);
                float calcTemp = temp / 256.0f;
                Serial.printf("Reported temperature from data: %.2fC\n", calcTemp);
                Serial.printf("Reported advertise count: %d\n", foundEddyTLM.getCount());
                Serial.printf("Reported time since last reboot: %ds\n", foundEddyTLM.getTime());
                Serial.println("\n");
                Serial.print(foundEddyTLM.toString().c_str());
                Serial.println("\n");
            }
        }
    }
} scanCallbacks;

void setup() {
    Serial.begin(115200);
    Serial.println("Scanning...");

    NimBLEDevice::init("Beacon-scanner");
    pBLEScan = BLEDevice::getScan();
    pBLEScan->setScanCallbacks(&scanCallbacks);
    pBLEScan->setActiveScan(true);
    pBLEScan->setInterval(100);
    pBLEScan->setWindow(100);
}

void loop() {
    NimBLEScanResults foundDevices = pBLEScan->getResults(scanTime, false);
    Serial.print("Devices found: ");
    Serial.println(foundDevices.getCount());
    Serial.println("Scan done!");
    pBLEScan->clearResults(); // delete results scan buffer to release memory
    delay(2000);
}
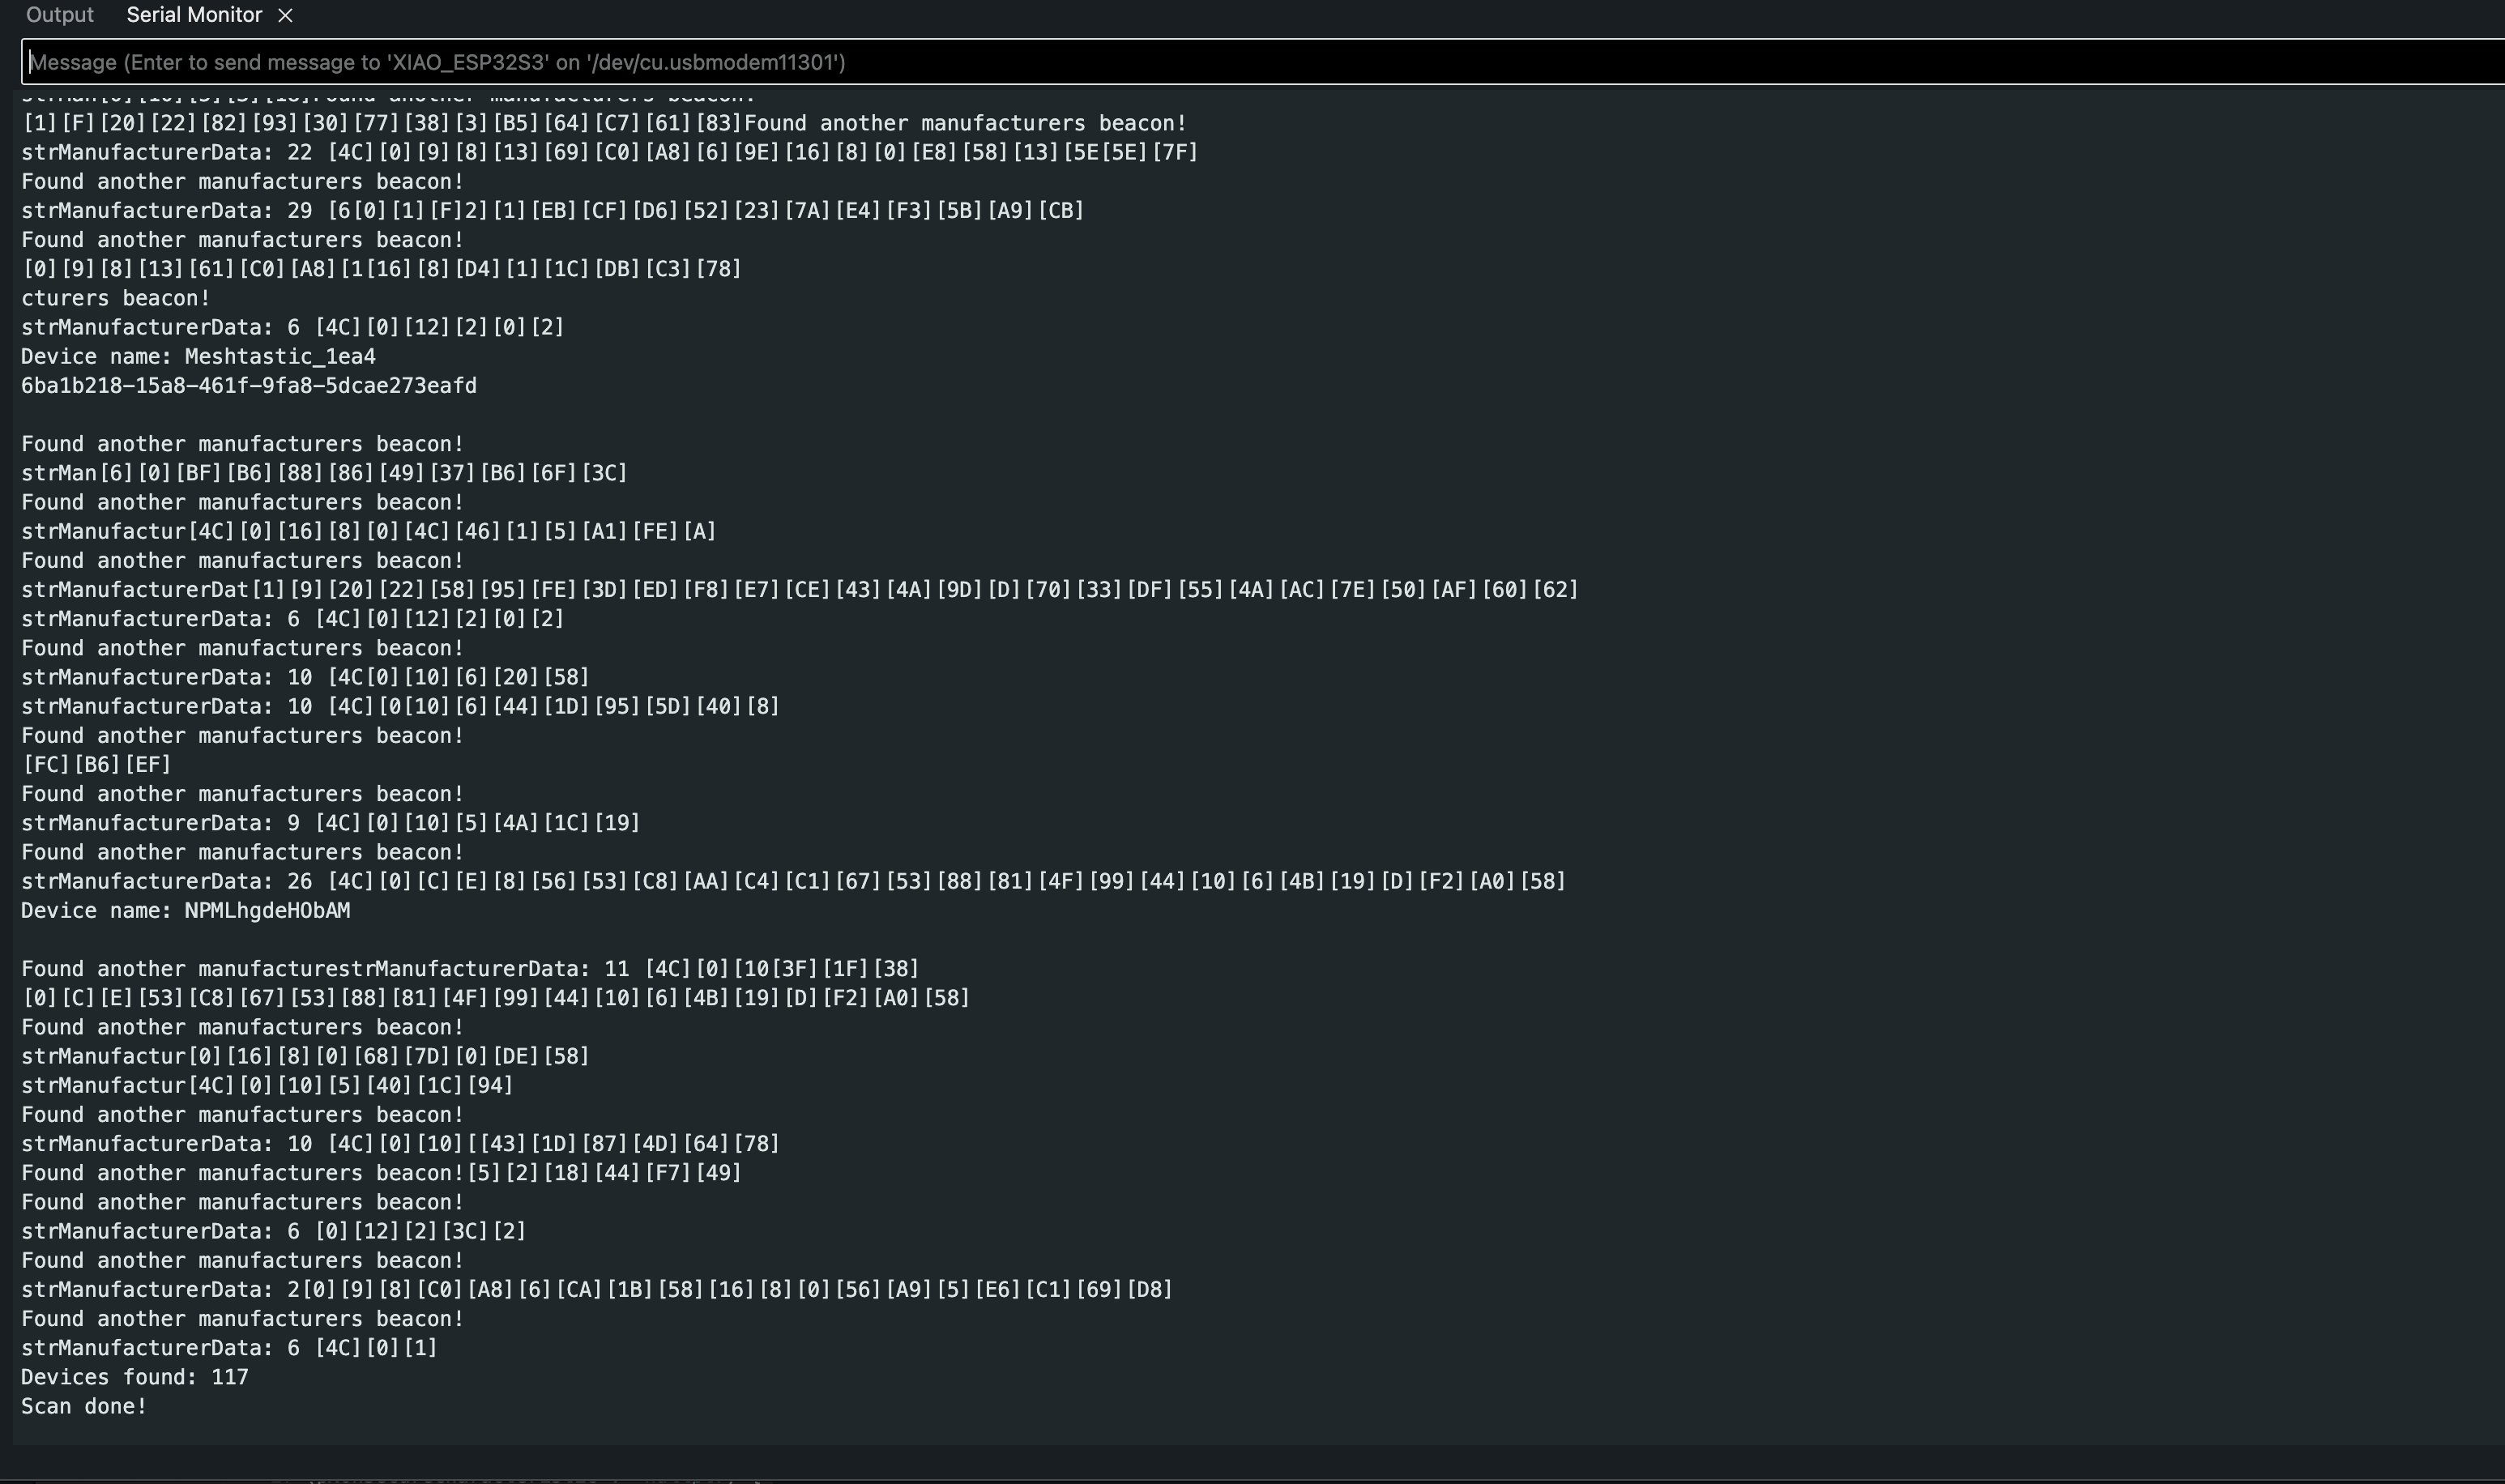
結果
技術サポート & 製品ディスカッション
私たちの製品をお選びいただき、ありがとうございます!私たちは、お客様の製品体験が可能な限りスムーズになるよう、さまざまなサポートを提供しています。異なる好みやニーズに対応するため、複数のコミュニケーションチャンネルを用意しています。