Seeed Jetson Serial Debugging Guide
🔧Jetson Serial Debugging Guide
For Seeed Studio Jetson carrier boards, covering Windows / Linux / macOS platforms,
from serial debugging to system monitoring, helping resolve black screen, boot failure, flashing errors, and other core issues.
Debugging Prerequisites
Hardware Preparation
- Seeed Jetson development board (properly powered)
- USB data cable (USB-C or Micro-B depending on carrier board model) / 3.3V USB-to-UART module
- Host computer (any Windows / Linux / macOS)
Recommended Software Tools
| OS | Recommended Tools |
|---|---|
| Windows | PuTTY / MobaXterm, etc. |
| Linux | screen / minicom / picocom, etc. |
| macOS | screen / minicom, etc. |
The Linux commands in this guide are tested on Ubuntu 22.04 LTS. Other distributions may require adjustments to package managers (e.g., dnf, pacman) or path configurations.
UART Serial Debugging (Core)
UART serial is the low-level entry point for Jetson debugging, allowing you to view complete Bootloader and kernel boot logs, and resolve black screen, boot failure, serial port occupation, and other core issues.
All Seeed Jetson debug ports use 3.3V logic level. Never use 5V modules, or permanent damage will occur!
The onboard USB-C debug port has integrated level conversion, so you can connect directly with a USB data cable.
Debug Port Connection Methods for Each Series
You can find the corresponding device model on the reComputer Series Introduction page, locate its debug port position, and then connect the debug port to the host computer using a USB data cable.
You must use a USB data cable that supports data transfer, not a charge-only cable. Some cheap USB-C cables only provide power and cannot transmit data, which will result in the serial port not being recognized in Device Manager. If the host shows no response after connecting, try replacing the USB cable first.
USB-to-Serial Chips and Drivers
Seeed Jetson carrier boards use different USB-to-serial chips for their debug ports. The driver support status for each chip on different operating systems is as follows:
| Chip Model | USB VID | Windows | Linux | macOS |
|---|---|---|---|---|
| Silicon Labs CP210x | 10C4 | Requires VCP Driver | Built-in kernel | Requires VCP Driver |
| WCH CH340/CH343 | 1A86 | Requires WCH Driver | Built-in kernel | Requires WCH Driver |
| FTDI FT232 | 0403 | Requires FTDI Driver | Built-in kernel | Built-in on macOS 12+ |
- Windows: Check device name under
Ports (COM & LPT)in Device Manager - Linux: Run
lsusband look forID xxxx:xxxxfield - macOS: System Information → USB → Check USB device tree
Port Identification and Connection (Baud Rate: 115200)
After connecting the debug cable, identify the corresponding serial device on the host and establish a connection:
- Windows
- Linux
- macOS
Identify Port: Press Win + R, type powershell, press Enter to open terminal, and run:
Get-PnpDevice | Where-Object { $_.FriendlyName -match 'COM' } | Select-Object FriendlyName, Status | Format-Table -AutoSize
This command retrieves all devices with COM in their name via the Windows Plug and Play (PnP) interface, displaying their friendly names and connection status. Output example:
FriendlyName                                  Status
------------                                  ------
Silicon Labs CP210x USB to UART Bridge (COM8) OK
Here, Silicon Labs CP210x USB to UART Bridge (COM8) is the serial device corresponding to the Jetson debug port, with port number COM8.
You can also check via Device Manager (Win + X → Device Manager), expand the Ports (COM & LPT) node. However, some USB-to-serial devices may not appear under this node if drivers are not properly installed. They might show up under Other devices with a yellow exclamation mark. In such cases, the command-line method is more reliable.
Driver Installation (if device not recognized):
If the PowerShell output does not contain any CP210x / Silicon Labs entry, the driver is not installed. Use the following command to search by USB VID (unaffected by driver installation status):
Get-PnpDevice | Where-Object { $_.InstanceId -match 'VID_10C4' } | Select-Object FriendlyName, Status | Format-List
If Status shows Error, download and install the Silicon Labs CP210x VCP driver:
# Download and extract CP210x VCP driver
Invoke-WebRequest -Uri "https://www.silabs.com/documents/public/software/CP210x_VCP_Windows.zip" -OutFile "$env:TEMP\CP210x_VCP_Windows.zip" -UseBasicParsing
Expand-Archive -Path "$env:TEMP\CP210x_VCP_Windows.zip" -DestinationPath "$env:TEMP\CP210x_VCP_Windows" -Force

# Silent install (UAC prompt will appear, click "Yes")
Start-Process -FilePath "$env:TEMP\CP210x_VCP_Windows\CP210x_VCP_Windows\CP210xVCPInstaller_x64.exe" -ArgumentList "/s" -Verb RunAs -Wait
After installation, re-run the identification command to confirm Status changes to OK.
If your carrier board uses a different USB-to-serial chip, download the corresponding driver:
- CH343 (VID:1A86): CH343 Driver Download
- FT232 (VID:0403): FTDI VCP Driver Download
Serial Connection (PuTTY): If PuTTY is not installed, first install it via winget:
winget install PuTTY.PuTTY
After installation, restart the terminal and run the following command to launch PuTTY in serial mode:
putty -serial COM8 -sercfg 115200
Replace COM8 with the actual port number you identified. After connecting, press Enter once to see the login prompt.
Serial Connection (MobaXterm GUI):
MobaXterm is a powerful Windows terminal tool that supports serial connections, suitable for users who prefer a graphical interface. Download: https://mobaxterm.mobatek.net/download.html
Steps:
- Open MobaXterm, click the Session button in the toolbar
- Select Serial
- Serial port — select
COM8(the port identified earlier) - Confirm baud rate is
115200, data bits 8, stop bits 1, no parity - Click OK to establish connection
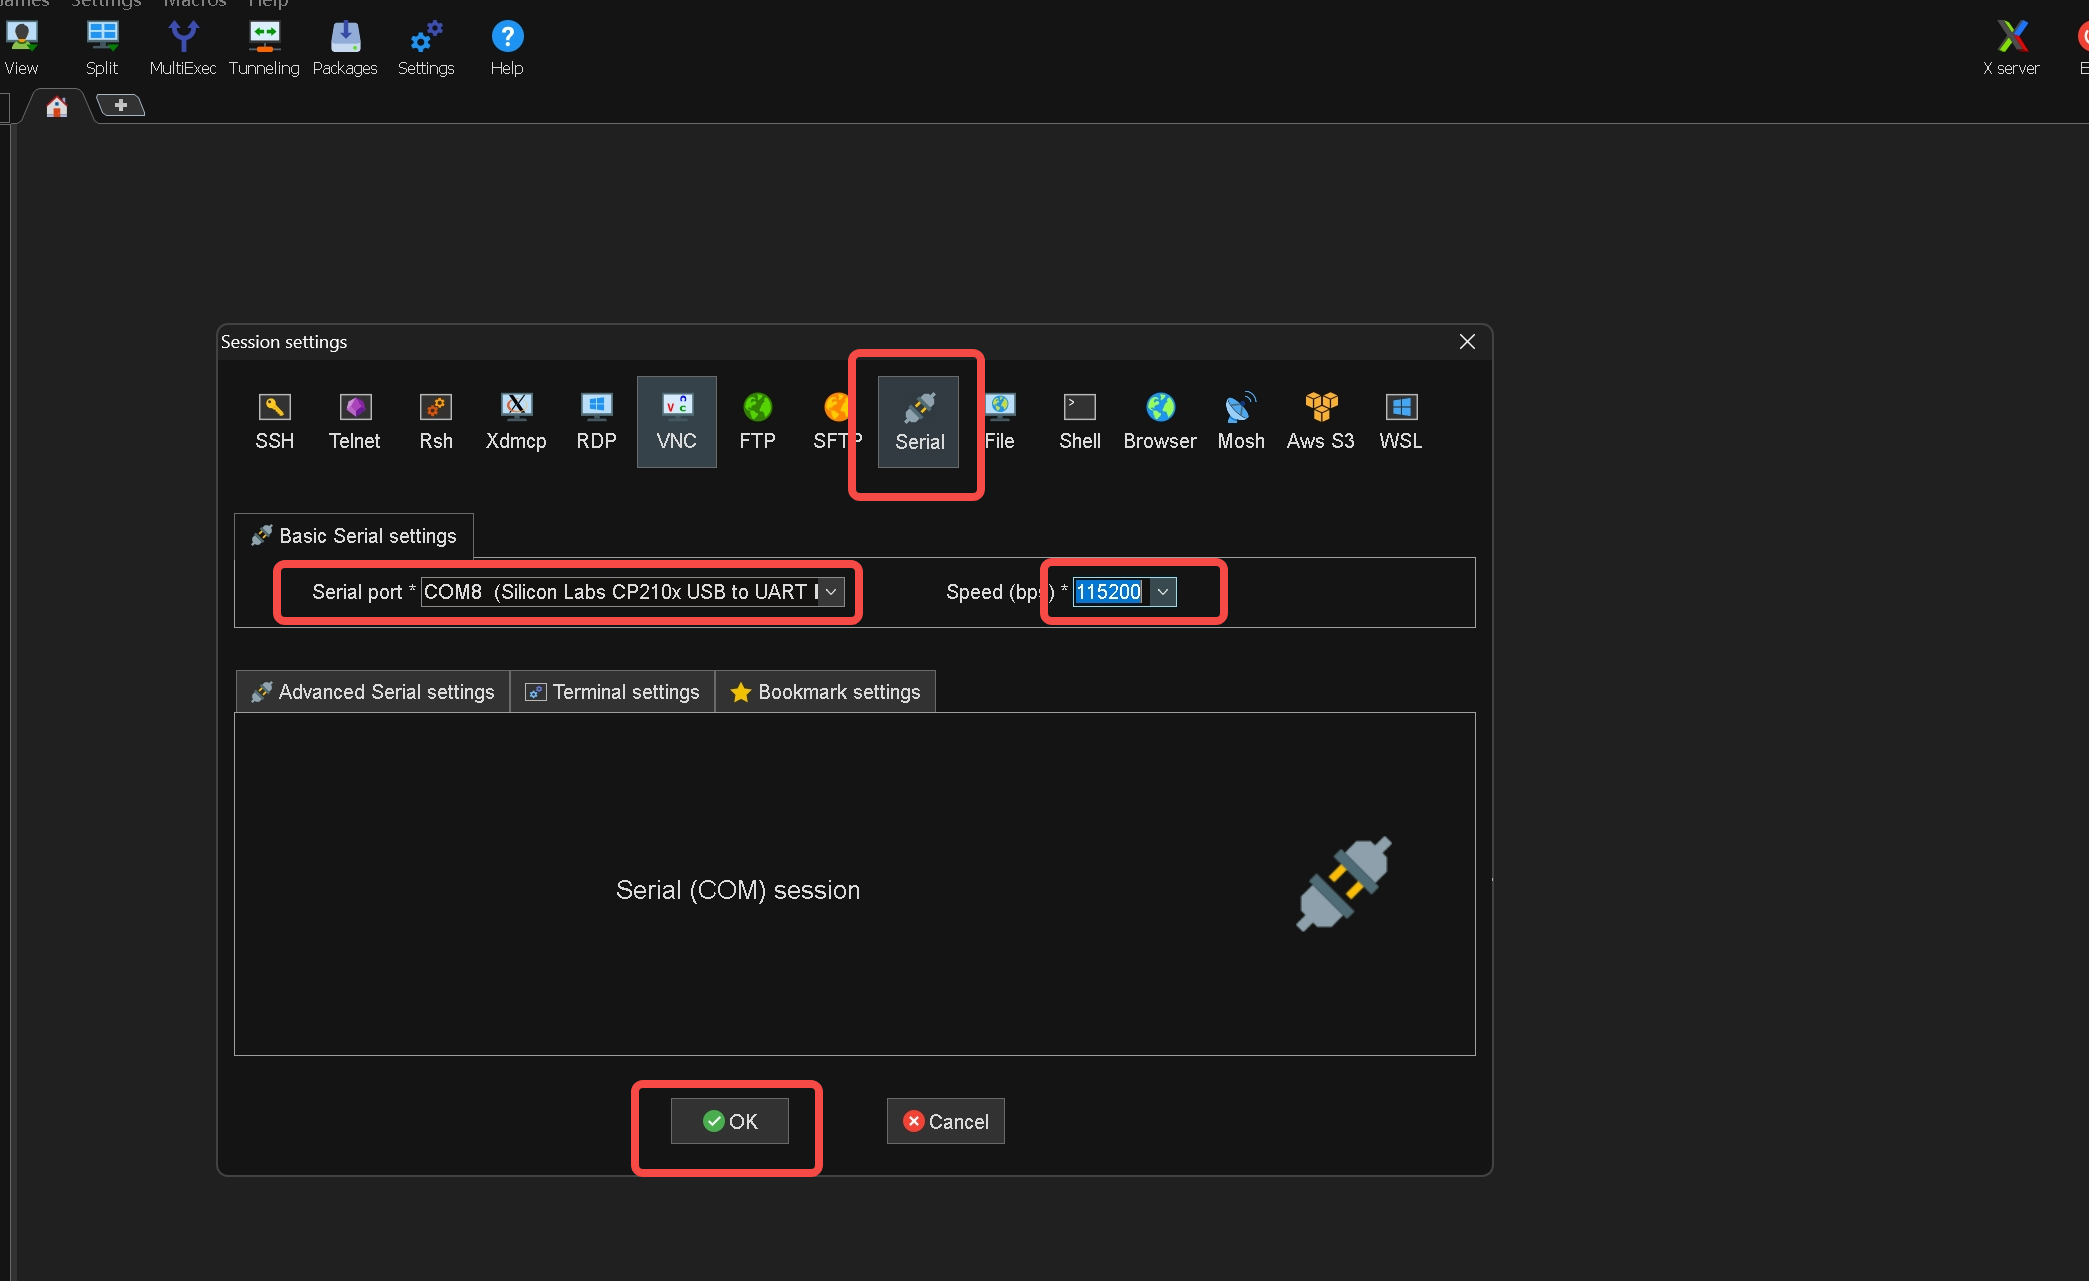
After connecting, press Enter once to trigger the login prompt. Enter username seeed, password seeed to log in.
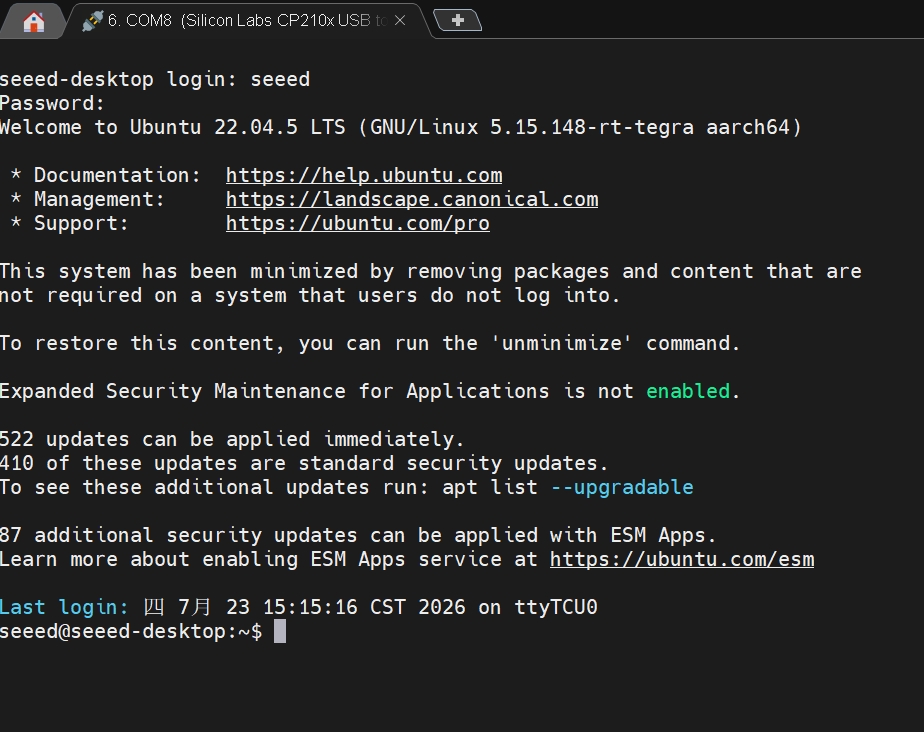
MobaXterm supports tab management, built-in SFTP file transfer, and session configuration saving, suitable for repeated debugging scenarios.
Identify Port:
# List USB devices to find the UART Bridge chip
lsusb
Output example (key line):
Bus 003 Device 005: ID 10c4:ea60 Silicon Labs CP210x UART Bridge
# Check kernel-recognized serial device nodes
dmesg | grep -i ttyUSB
[ 1234.567890] usb 3-1: cp210x converter now attached to ttyUSB0
# Confirm device node exists
ls -l /dev/ttyUSB*
crw-rw---- 1 root dialout 188, 0 Jul 22 19:00 /dev/ttyUSB0
Usually appears as /dev/ttyACM0 or /dev/ttyUSB0.
Serial Connection (screen):
# Install screen (if not installed)
sudo apt install screen

# Connect to serial
sudo screen /dev/ttyUSB0 115200

# Connect with logging
sudo screen -L -Logfile /tmp/serial.log /dev/ttyUSB0 115200
To exit screen: press Ctrl+A, then K, and confirm with y.
Serial Connection (picocom):
# Install picocom
sudo apt install picocom

# Connect to serial
sudo picocom -b 115200 /dev/ttyUSB0

# Connect with logging (records all I/O to file)
sudo picocom -b 115200 --logfile /tmp/serial.log /dev/ttyUSB0
To exit picocom: press Ctrl+A, then Ctrl+X.
Serial Port Permission:
On Linux, serial devices belong to the dialout group by default. Regular users need to be added to this group for sudo-free access.
# Method 1: Add user to dialout group (permanent, requires re-login or reboot)
sudo usermod -aG dialout $USER

# Method 2: Use sudo each time (temporary)
sudo picocom -b 115200 /dev/ttyUSB0

# Method 3: Configure udev rules (recommended, sudo-free)
sudo bash -c 'echo "SUBSYSTEM==\"tty\", ATTRS{idVendor}==\"10c4\", MODE=\"0660\", GROUP=\"dialout\", TAG+=\"uaccess\"" > /etc/udev/rules.d/99-tegra-serial.rules'
sudo udevadm control --reload-rules && sudo udevadm trigger
The idVendor=="10c4" in the udev rule above corresponds to Silicon Labs CP210x chip. If using other chips (e.g., CH340 1a86, FTDI 0403), replace with the corresponding VID.
The ModemManager service on Linux hosts may mistakenly occupy the Jetson debug serial port, causing connection failure or no output. If there is no response after connecting, run the following commands to release it:
sudo systemctl stop ModemManager
sudo systemctl disable ModemManager
Identify Port:
# List all serial devices (cu.* for connection, tty.* for monitoring)
ls /dev/cu.* /dev/tty.*
Output example:
/dev/cu.SLAB_USBtoUART /dev/tty.SLAB_USBtoUART
/dev/cu.*(Call-Up): For calling out from the host to a device — recommended/dev/tty.*: For calling into the system (e.g., modem), waits for DCD signal
You can also view connected USB devices through System Information (Cmd + Space → "System Information" → USB).
Serial Connection (screen):
macOS includes the screen command by default, no additional installation needed:
# Connect to serial
screen /dev/cu.SLAB_USBtoUART 115200
To exit screen: press Ctrl+A, then K, and confirm with y.
Serial Connection (minicom):
For more features (e.g., file transfer, config saving), install minicom:
# Install via Homebrew
brew install minicom

# Connect to serial
minicom -D /dev/cu.SLAB_USBtoUART -b 115200

# First-time setup: enter configuration menu
minicom -s
To exit minicom: press Ctrl+A then X, select Yes to confirm.
Some USB-to-serial chips require manual driver installation on macOS:
- Silicon Labs CP210x: VCP Driver Download
- CH340/CH343: WCH Official Driver Download
- FTDI FT232: Built-in driver on macOS 12+, usually no installation needed
If you get Permission denied when connecting, macOS's TCC (Transparency, Consent, and Control) mechanism may be blocking terminal access to serial devices. Solutions:
- Run with
sudo:sudo screen /dev/cu.SLAB_USBtoUART 115200 - Or grant terminal access to serial ports in System Settings → Privacy & Security
After connecting, press Enter. If the Jetson is powered on, you will see a login prompt:
seeed-desktop login:
Enter your username and password to log in (default username seeed, password seeed).
Serial Port Parameters Reference
| Parameter | Value |
|---|---|
| Device node | /dev/ttyUSB0 (Linux) / COMx (Windows) |
| USB chip | Silicon Labs CP210x UART Bridge (10c4:ea60) and other common chips |
| Baud rate | 115200 |
| Data bits | 8 |
| Stop bits | 1 |
| Parity | None |
| Flow control | None |
Non-Interactive Batch Command Execution
Automatically send commands and record output via pipe, suitable for scripted operations:
# Batch send multiple commands
echo "seeed" | sudo -S bash -c '
rm -f /tmp/serial.log
(sleep 0.5
printf "uname -a\n"; sleep 1
printf "cat /etc/nv_tegra_release\n"; sleep 1
printf "lsusb\n"; sleep 2
printf "free -h\n"; sleep 1
sleep 1
) | timeout 10 picocom -b 115200 --logfile /tmp/serial.log /dev/ttyUSB0 2>&1
cat /tmp/serial.log
' < /dev/null 2>&1
Parameter Explanation:
sleep 0.5: Wait for picocom initializationprintf "cmd\n": Send command (with newline character)sleep N: Wait for command execution (complex commands need more time)timeout 10: Maximum picocom runtime--logfile: Record all serial I/O< /dev/null: Prevent sudo password from interfering with bash stdin
System Boot and Kernel Debugging
Through the UART serial port, you can capture complete Jetson boot logs to diagnose boot hangs, kernel panics, and other issues.
Boot Three Stages
┌─────────────────┐    ┌──────────────────┐    ┌─────────────────┐
│  Bootloader     │ →  │  Kernel Boot     │ →  │  System Init     │
│  CBoot/U-Boot   │    │  Linux Load Drivers│   │  systemd Service│
│  Serial Only    │    │  Core Debug Info  │    │  User Mode      │
└─────────────────┘    └──────────────────┘    └─────────────────┘
Enable Complete Boot Logs
By default, the quiet parameter hides most logs. You can enable them with the following steps:
- Edit the boot configuration file:
sudo vim /boot/extlinux/extlinux.conf
- Find the
APPENDline, removequiet, and addignore_loglevel - After reboot, you can view complete kernel logs via serial port
Boot configuration file example (extlinux.conf):
TIMEOUT 30
DEFAULT primary

MENU TITLE L4T boot options

LABEL primary
      MENU LABEL primary kernel
      LINUX /boot/Image
      FDT /boot/dtb/tegra234-p3768-0000+p3767-0005-nv-super.dtb
      INITRD /boot/initrd
      OVERLAYS /boot/tegra234-p3767-camera-p3768-imx477-quad-seeed.dtbo
      APPEND ${cbootargs} root=PARTUUID=71ff5c5e-33ca-40de-a4ac-34e8fb444c56 rw rootwait rootfstype=ext4 mminit_loglevel=4 console=ttyTCU0,115200 firmware_class.path=/etc/firmware fbcon=map:0 nospectre_bhb video=efifb:off console=tty0
If you can connect via SSH, you can also view kernel logs directly:
dmesg --follow
journalctl -k -f
Kernel Log Viewing
View kernel logs via serial port or SSH:
# View recent kernel logs
sudo dmesg | tail -30
Output example:
[   16.578803] nvidia-modeset: Loading NVIDIA UNIX Open Kernel Mode Setting Driver for aarch64  540.4.0
[   16.591774] [drm] [nvidia-drm] [GPU ID 0x00020000] Loading driver
[   16.894182] [drm] Initialized nvidia-drm 0.0.0 20160202 for 13800000.display on minor 1
[   18.949172] IPv6: ADDRCONF(NETDEV_CHANGE): wlP7p1s0: link becomes ready
[   25.658172] pwm-tegra-tachometer 39c0000.tachometer: Tachometer Overflow is detected
System Information Query
After connecting via serial, you can run the following commands to view Jetson system information.
Kernel Version
uname -a
Linux seeed-desktop 5.15.148-rt-tegra #1 SMP PREEMPT_RT Fri Jun 26 14:21:16 CST 2026 aarch64 aarch64 aarch64 GNU/Linux
L4T / JetPack Version
cat /etc/nv_tegra_release
# R36 (release), REVISION: 4.3, GCID: 38968081, BOARD: generic, EABI: aarch64, DATE: Wed Jan  8 01:49:37 UTC 2025
# KERNEL_VARIANT: oot
TARGET_USERSPACE_LIB_DIR=nvidia
TARGET_USERSPACE_LIB_DIR_PATH=usr/lib/aarch64-linux-gnu/nvidia
Device Tree Information
# Device tree model
cat /proc/device-tree/model | tr -d '\0'; echo
NVIDIA Jetson Orin Nano Engineering Reference Developer Kit Super
# Device tree compatible string
cat /proc/device-tree/compatible | tr -d '\0'; echo
nvidia,p3768-0000+p3767-0005-supernvidia,p3767-0005nvidia,tegra234
OS Version
cat /etc/lsb-release
DISTRIB_ID=Ubuntu
DISTRIB_RELEASE=22.04
DISTRIB_CODENAME=jammy
DISTRIB_DESCRIPTION="Ubuntu 22.04.5 LTS"
hostname
seeed-desktop
Hardware Information Query
After connecting via serial, you can run the following commands to view Jetson hardware information.
USB Devices
lsusb
Bus 002 Device 002: ID 0424:5744 Microchip Technology, Inc. (formerly SMSC) Hub
Bus 002 Device 001: ID 1d6b:0003 Linux Foundation 3.0 root hub
Bus 001 Device 005: ID 0bda:c822 Realtek Semiconductor Corp. Bluetooth Radio
Bus 001 Device 003: ID 1a40:0101 Terminus Technology Inc. Hub
Bus 001 Device 004: ID 0424:2740 Microchip Technology, Inc. (formerly SMSC) Hub Controller
Bus 001 Device 002: ID 0424:2744 Microchip Technology, Inc. (formerly SMSC) Hub
Bus 001 Device 001: ID 1d6b:0002 Linux Foundation 2.0 root hub
PCI Devices
lspci
0001:00:00.0 PCI bridge: NVIDIA Corporation Device 229e (rev a1)
0001:01:00.0 Ethernet controller: Microchip Technology / SMSC Device 7430 (rev 11)
0004:00:00.0 PCI bridge: NVIDIA Corporation Device 229c (rev a1)
0004:01:00.0 Non-Volatile memory controller: Phison Electronics Corporation PS5013 E13 NVMe Controller (rev 01)
0007:00:00.0 PCI bridge: NVIDIA Corporation Device 229a (rev a1)
0007:01:00.0 Network controller: Realtek Semiconductor Co., Ltd. RTL8822CE 802.11ac PCIe Wireless Network Adapter
0008:00:00.0 PCI bridge: NVIDIA Corporation Device 229c (rev a1)
0008:01:00.0 Ethernet controller: Realtek Semiconductor Co., Ltd. RTL8111/8168/8411 PCI Express Gigabit Ethernet Controller (rev 15)
CPU Information
lscpu | head -25
Architecture:                       aarch64
CPU op-mode(s):                     32-bit, 64-bit
Byte Order:                         Little Endian
CPU(s):                             6
On-line CPU(s) list:                0-5
Vendor ID:                          ARM
Model name:                         Cortex-A78AE
Model:                              1
Thread(s) per core:                 1
Core(s) per cluster:                3
Socket(s):                          -
Cluster(s):                         2
Stepping:                           r0p1
CPU max MHz:                        1728.0000
CPU min MHz:                        115.2000
BogoMIPS:                           62.50
L1d cache:                          384 KiB (6 instances)
L1i cache:                          384 KiB (6 instances)
L2 cache:                           1.5 MiB (6 instances)
L3 cache:                           4 MiB (2 instances)
NUMA node(s):                       1
NUMA node0 CPU(s):                  0-5
Memory
free -h
               total        used        free      shared  buff/cache   available
Mem:           7.4Gi       559Mi       6.1Gi        29Mi       766Mi       6.7Gi
Swap:          3.7Gi          0B       3.7Gi
Disk Usage
df -h
Filesystem       Size  Used Avail Use% Mounted on
/dev/nvme0n1p1   116G   18G   93G  16% /
tmpfs            3.8G   84K  3.8G   1% /dev/shm
tmpfs            1.5G   27M  1.5G   2% /run
tmpfs            5.0M  4.0K  5.0M   1% /run/lock
/dev/nvme0n1p10   63M  110K   63M   1% /boot/efi
Block Devices
lsblk
NAME         MAJ:MIN RM   SIZE RO TYPE MOUNTPOINTS
loop0          7:0    0     4K  1 loop /snap/bare/5
loop1          7:1    0 188.5M  1 loop /snap/chromium/3478
...
nvme0n1      259:0    0 119.2G  0 disk
├─nvme0n1p1  259:1    0 117.8G  0 part /
├─nvme0n1p2  259:2    0   128M  0 part
├─nvme0n1p3  259:3    0   768K  0 part
...
└─nvme0n1p15 259:15   0 479.5M  0 part
NVMe Partition Table
sudo fdisk -l /dev/nvme0n1 | head -30
Disk /dev/nvme0n1: 119.24 GiB, 128035676160 bytes, 250069680 sectors
Disk model: NHESR128GTLEW-I3C-2
Units: sectors of 1 * 512 = 512 bytes
Sector size (logical/physical): 512 bytes / 512 bytes
I/O size (minimum/optimal): 512 bytes / 512 bytes
Disklabel type: gpt
Disk identifier: 56FD10F7-6157-4F81-92CE-652E0183C667

Device            Start       End   Sectors   Size Type
/dev/nvme0n1p1  3050048 250069639 247019592 117.8G Microsoft basic data
/dev/nvme0n1p2       40    262183    262144   128M Microsoft basic data
...
/dev/nvme0n1p10  821800    952871    131072    64M EFI System
...
System Monitoring and Advanced Hardware Debugging
tegrastats — Real-time System Monitoring
tegrastats is NVIDIA's official Jetson system monitoring tool for viewing CPU/GPU usage, temperature, frequency, and other information:
# Real-time monitoring
tegrastats

# Customized output (1 second refresh, total 10 times)
tegrastats --interval 1000 --stop 10
Output example:
07-22-2026 19:16:38 RAM 629/7621MB (lfb 3x4MB) SWAP 0/3811MB (cached 0MB) CPU [2%@1036,0%@1036,0%@1036,0%@1036,0%@729,0%@729] GR3D_FREQ 0% cpu@36.031C soc2@35.5C soc0@36.125C gpu@36.5C tj@36.812C soc1@36.812C VDD_IN 4625mW/4625mW VDD_CPU_GPU_CV 527mW/527mW VDD_SOC 1379mW/1379mW
jtop — Enhanced Visual Monitoring
jtop provides an interactive TUI interface. Installation:
sudo pip3 install -U jetson-stats
sudo systemctl restart jtop.service
jtop
Device Tree Files
View the currently used device tree files:
ls /boot/dtb/
kernel_tegra234-p3768-0000+p3767-0005-nv.dtb
tegra234-p3768-0000+p3767-0005-nv-super.dtb
NVIDIA Software Packages
View installed NVIDIA software packages:
dpkg -l | grep nvidia | head -20
ii  nvidia-cuda                                6.2.1+b38                                   arm64        NVIDIA CUDA Meta Package
ii  nvidia-cuda-dev                            6.2.1+b38                                   arm64        NVIDIA CUDA dev Meta Package
ii  nvidia-l4t-3d-core                         36.4.3-20250107174145                       arm64        NVIDIA GL EGL Package
ii  nvidia-l4t-apt-source                      36.4.3-20250107174145                       arm64        NVIDIA L4T apt source list debian package
ii  nvidia-l4t-bootloader                      36.4.3-20250107174145                       arm64        NVIDIA Bootloader Package
ii  nvidia-l4t-camera                          36.4.3-20250107174145                       arm64        NVIDIA Camera Package
ii  nvidia-l4t-configs                         36.4.3-20250107174145                       arm64        NVIDIA configs debian package
ii  nvidia-l4t-core                            36.4.3-20250107174145                       arm64        NVIDIA Core Package
ii  nvidia-l4t-cuda                            36.4.3-20250107174145                       arm64        NVIDIA CUDA Package
ii  nvidia-l4t-cuda-utils                      36.4.3-20250107174145                       arm64        NVIDIA CUDA utilities
ii  nvidia-l4t-firmware                        36.4.3-20250107174145                       arm64        NVIDIA Firmware Package
ii  nvidia-l4t-gstreamer                       36.4.3-20250107174145                       arm64        NVIDIA GST Application files
ii  nvidia-l4t-init                            36.4.3-20250107174145                       arm64        NVIDIA Init debian package
ii  nvidia-l4t-jetson-io                       36.4.3-20250107174145                       arm64        NVIDIA Jetson.IO debian package
MTD / QSPI Devices
cat /proc/mtd 2>/dev/null || echo no-mtd
ls /dev/mtd* 2>/dev/null || echo no-mtd-dev
dev:    size   erasesize  name
no-mtd-dev
Some devices do not have MTD device nodes; QSPI flash is not exposed via /dev/mtd.
CoreSight Hardware-Level Debugging
Used for analyzing hard-to-reproduce crashes, performance bottlenecks, based on OpenCSD + perf tools:
# Record instruction execution flow
perf record -e cs_etm/@<trace-id>/u ls

# Analyze logs
perf report --stdio --dump
CoreSight supports STM (System Trace Macrocell), which can efficiently replace printk software debugging. For detailed configuration, refer to the NVIDIA Official Debugging Documentation.
Network and Kernel Modules
Network Interfaces
ip addr show
1: lo: <LOOPBACK,UP,LOWER_UP> mtu 65536 qdisc noqueue state UNKNOWN group default qlen 1000
    link/loopback 00:00:00:00:00:00 brd 00:00:00:00:00:00
    inet 127.0.0.1/8 scope host lo
2: enP8p1s0: <NO-CARRIER,BROADCAST,MULTICAST,UP> mtu 1500 qdisc mq state DOWN group default qlen 1000
    link/ether 3c:6d:66:5d:a8:2c brd ff:ff:ff:ff:ff:ff
3: can0: <NOARP,ECHO> mtu 16 qdisc noop state DOWN group default qlen 10
    link/can
4: wlP7p1s0: <BROADCAST,MULTICAST,UP,LOWER_UP> mtu 1500 qdisc mq state UP group default qlen 1000
    link/ether 6c:d5:52:cc:9a:1d brd ff:ff:ff:ff:ff:ff
    inet 192.168.6.116/23 brd 192.168.7.255 scope global noprefixroute wlP7p1s0
Loaded Kernel Modules
lsmod | head -30
Module                  Size  Used by
nvidia_drm             94208  1
nvidia_modeset       1302528  5 nvidia_drm
lzo_rle                16384  36
lzo_compress           16384  1 lzo_rle
zram                   28672  12
zsmalloc               36864  1 zram
nvme_fabrics           24576  0
ramoops                28672  0
reed_solomon           20480  1 ramoops
bridge                270336  0
...
snd_soc_tegra210_admaif   131072  1
snd_soc_tegra186_asrc    40960  1
snd_soc_tegra_pcm      16384  1 snd_soc_tegra210_admaif
Flashing and Recovery
When the system crashes or fails to boot, you can reflash using official tools. For detailed flashing steps, please refer to the Flashing Jetson Linux page, which covers BSP download, environment preparation, device-specific flashing steps, and common issue troubleshooting.
Flashing Debug Logs
When flashing fails, be sure to collect two types of logs for troubleshooting:
- Host side: Complete output log from the flashing terminal
- Target side: Jetson boot log captured via UART serial port (core troubleshooting evidence)
- When flashing fails, check the UART serial log first — it usually reveals the root cause directly
- Common issues include: BSP version mismatch, USB connection problems, host environment configuration, etc.
- For assistance, please collect complete logs and contact technical support
Common Issue Troubleshooting
| Issue | Troubleshooting Direction |
|---|---|
| Serial connection failure | Check USB cable, port number, voltage standard (3.3V) |
| No boot log | Confirm debug port connection is correct; remove kernel quiet boot parameter |
| Flashing failure | Check UART serial log first; confirm carrier board model and JetPack version match |
| Insufficient serial port permissions | Linux: Add user to dialout group; sudo usermod -aG dialout $USER |
| Serial port occupied by ModemManager | sudo systemctl stop ModemManager; or permanently disable |
| Device cannot enter recovery mode | Check jumper/button is correct; try different USB cable or port |
Appendix: Official Resources
NVIDIA Developer
NVIDIA's official developer portal, including technical documentation, SDK downloads, and development resources for the Jetson platform.
Jetson Development Tools Tutorial
Jetson development tools overview and usage tutorials provided by Seeed Studio.
reComputer Jetson for Beginners
A beginner-friendly reComputer Jetson project with rich examples and tutorials.
Technical Support and Product Discussion
Thank you for choosing our products! We provide multiple support channels to ensure a smooth experience.