Remote Development
The Remote Dev module gives you browser-based access to a full development environment running directly on your Jetson — without needing to attach a monitor or keyboard to the device.
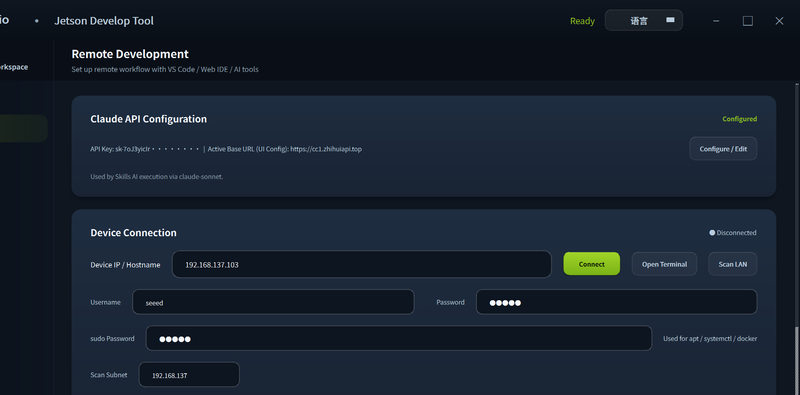
Available Tools
| Tool | Access Method | Description |
|---|---|---|
| VS Code Server | Browser | Full VS Code IDE running on Jetson, accessed via browser |
| Jupyter Lab | Browser | Interactive Python notebook environment |
| VNC Remote Desktop | Browser (noVNC) or VNC client | Full graphical desktop of the Jetson |
| SSH Terminal | Inline terminal | Quick terminal access within the DevelopTool |
| AI Agent Install | One-click | Install Claude Code, Codex, or OpenClaw CLI on Jetson |
VS Code Server
- Connect to your Jetson device.
- In the Remote Dev tab, click Launch VS Code Server.
- The tool installs
code-serveron Jetson (first time only) and starts it. - Click the Open in Browser button — VS Code opens in your default browser connected to the Jetson.
You can open any folder on the Jetson filesystem, install extensions, run terminals, and debug code just as you would in a local VS Code.
Jupyter Lab
- Click Launch Jupyter Lab in the Remote Dev tab.
- Jupyter Lab starts on the Jetson and the access URL (with token) is shown.
- Click Open in Browser to connect.
VNC Remote Desktop
- Click Launch VNC in the Remote Dev tab.
- The tool configures a VNC server on Jetson (first time only).
- Access via the built-in noVNC browser viewer, or connect using any VNC client with the shown address and port.
For the best VNC performance on a local network, a dedicated VNC client (e.g. TigerVNC) is faster than the browser-based noVNC viewer.
AI Agent Install
The AI Agent section lets you install AI coding assistants directly on your Jetson:
| Agent | Description |
|---|---|
| Claude Code | Anthropic's CLI coding agent |
| OpenClaw | Seeed's open-source agent framework |
Click Install next to the desired agent. The tool handles all dependency setup for the Jetson ARM environment.
PC Network Sharing
The PC Network Sharing module lets you share your host PC's internet connection to the Jetson device over a direct Ethernet cable — useful when the Jetson has no Wi-Fi card installed, or when working in a lab environment without a local router.

How It Works
The PC acts as a router: it bridges its active internet interface (Wi-Fi or another Ethernet port) to the Ethernet interface connected to the Jetson. The tool also auto-detects your proxy settings and forwards them to the Jetson so tools like apt, pip, and docker pull work transparently.
Setup
What you need:
- An Ethernet cable connecting the host PC and the Jetson
- The host PC must have an active internet connection (Wi-Fi or second Ethernet)
Steps:
- Connect the Ethernet cable between PC and Jetson.
- Open the PC Network Sharing tab in the DevelopTool.
- Select the outbound interface (the PC's internet-facing connection, e.g.
wlan0oreth0). - Select the inbound interface (the Ethernet port connected to the Jetson, e.g.
eth1). - Click Enable Sharing.
- The tool configures NAT, assigns the Jetson an IP via DHCP, and displays the Jetson's IP address.
Once active, the Jetson will have full internet access through the PC.
If you are behind a corporate proxy, enable the Auto Proxy Forward toggle. The tool will detect your PC's proxy settings and set http_proxy / https_proxy environment variables on the Jetson session automatically.
Disabling Network Sharing
Click Disable Sharing to stop the bridge and restore the original network configuration on the PC.
Jetson Init
The Jetson Init module provides a guided serial terminal wizard that walks you through the NVIDIA first-boot setup (OEM config) without needing a monitor or keyboard connected to the Jetson. It is the recommended way to initialize a freshly flashed Jetson device.

When to Use Jetson Init
- After flashing a fresh JetPack image onto a Jetson device
- When the Jetson has no display connected and you need to complete the initial OOBE (Out-of-Box Experience)
- To configure the system hostname, username, password, timezone, and Wi-Fi network on first boot
Setup
What you need:
- A USB-to-serial (UART) cable connected to the Jetson's debug serial port (usually a 3-pin or 4-pin header on the carrier board)
- The DevelopTool running on the host PC
Steps:
- Connect the serial cable between the host PC and the Jetson's UART debug port.
- Power on the Jetson.
- Open the Jetson Init tab in the DevelopTool.
- Select the correct serial port (e.g.
COM3on Windows,/dev/ttyUSB0on Linux) and set the baud rate to 115200. - Click Connect.

- The wizard detects the first-boot prompt and guides you through:
- Accepting the NVIDIA license agreement
- Setting the system language and locale
- Creating the default username and password
- Configuring the network (Ethernet DHCP or Wi-Fi)
- Setting the hostname and timezone
- Once setup is complete, the Jetson reboots and the assigned IP address is displayed.
After Jetson Init completes, you can immediately switch to Device Management or use the Remote Dev tools above with the IP address shown.
Tech Support & Product Discussion
Thank you for choosing our products! We are here to provide you with different support to ensure that your experience with our products is as smooth as possible. We offer several communication channels to cater to different preferences and needs.