How to use the Lekiwi in Lerobot
This tutorial repository maintains the verified stable release of Lerobot as of June 5, 2025. Currently, Hugging Face has rolled out a major upgrade to Lerobot, introducing many new features. If you want to experience the latest tutorials, please follow the official documentation for guidance.
Introduction
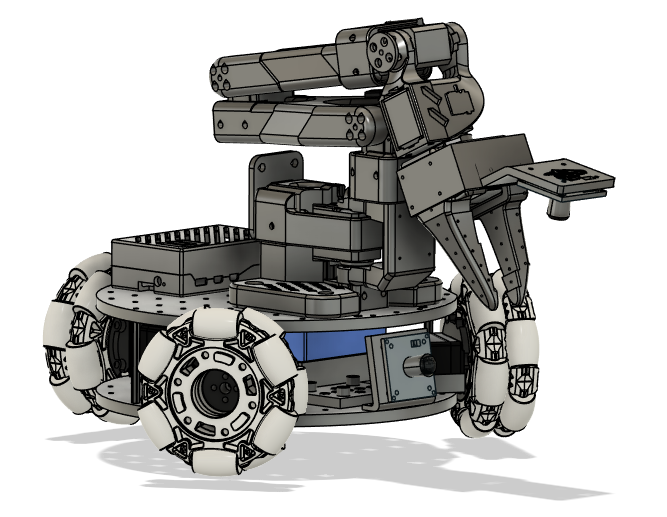
The Lekiwi is a fully open-source robotic car project launched by SIGRobotics-UIUC. It includes the detailed 3D printing files and operation guides, designed to be compatible with the LeRobot imitation learning framework. It supports the SO101 robotic arm to enable a complete imitation learning pipeline,
Main Features
- Open-source and low-cost: It is an open-source, low-cost robotic car solution from The Lekiwi
- Integration with LeRobot: Designed for integration with LeRobot platform
- Abundant learning resources: Provides comprehensive open-source learning resources like assembly and calibration guides, and tutorials for testing, data collection, training and deployment to assist users in quickly getting started and developing robotic applications.
- Compatible with Nvidia: Deploy this arm kit with reComputer Mini J4012 Orin NX 16 GB.
- Multi-Scene Application: It is applicable to fields such as education, scientific research, automated production, and robotics, helping users achieve efficient and precise robot operations in various complex tasks.
Seeed Studio is only responsible for the quality of the hardware itself. The tutorials are strictly updated in accordance with the official documentation. If you encounter software issues or environment dependency problems that cannot be resolved, please promptly report the issue to the LeRobot platform or the LeRobot Discord channel.
-
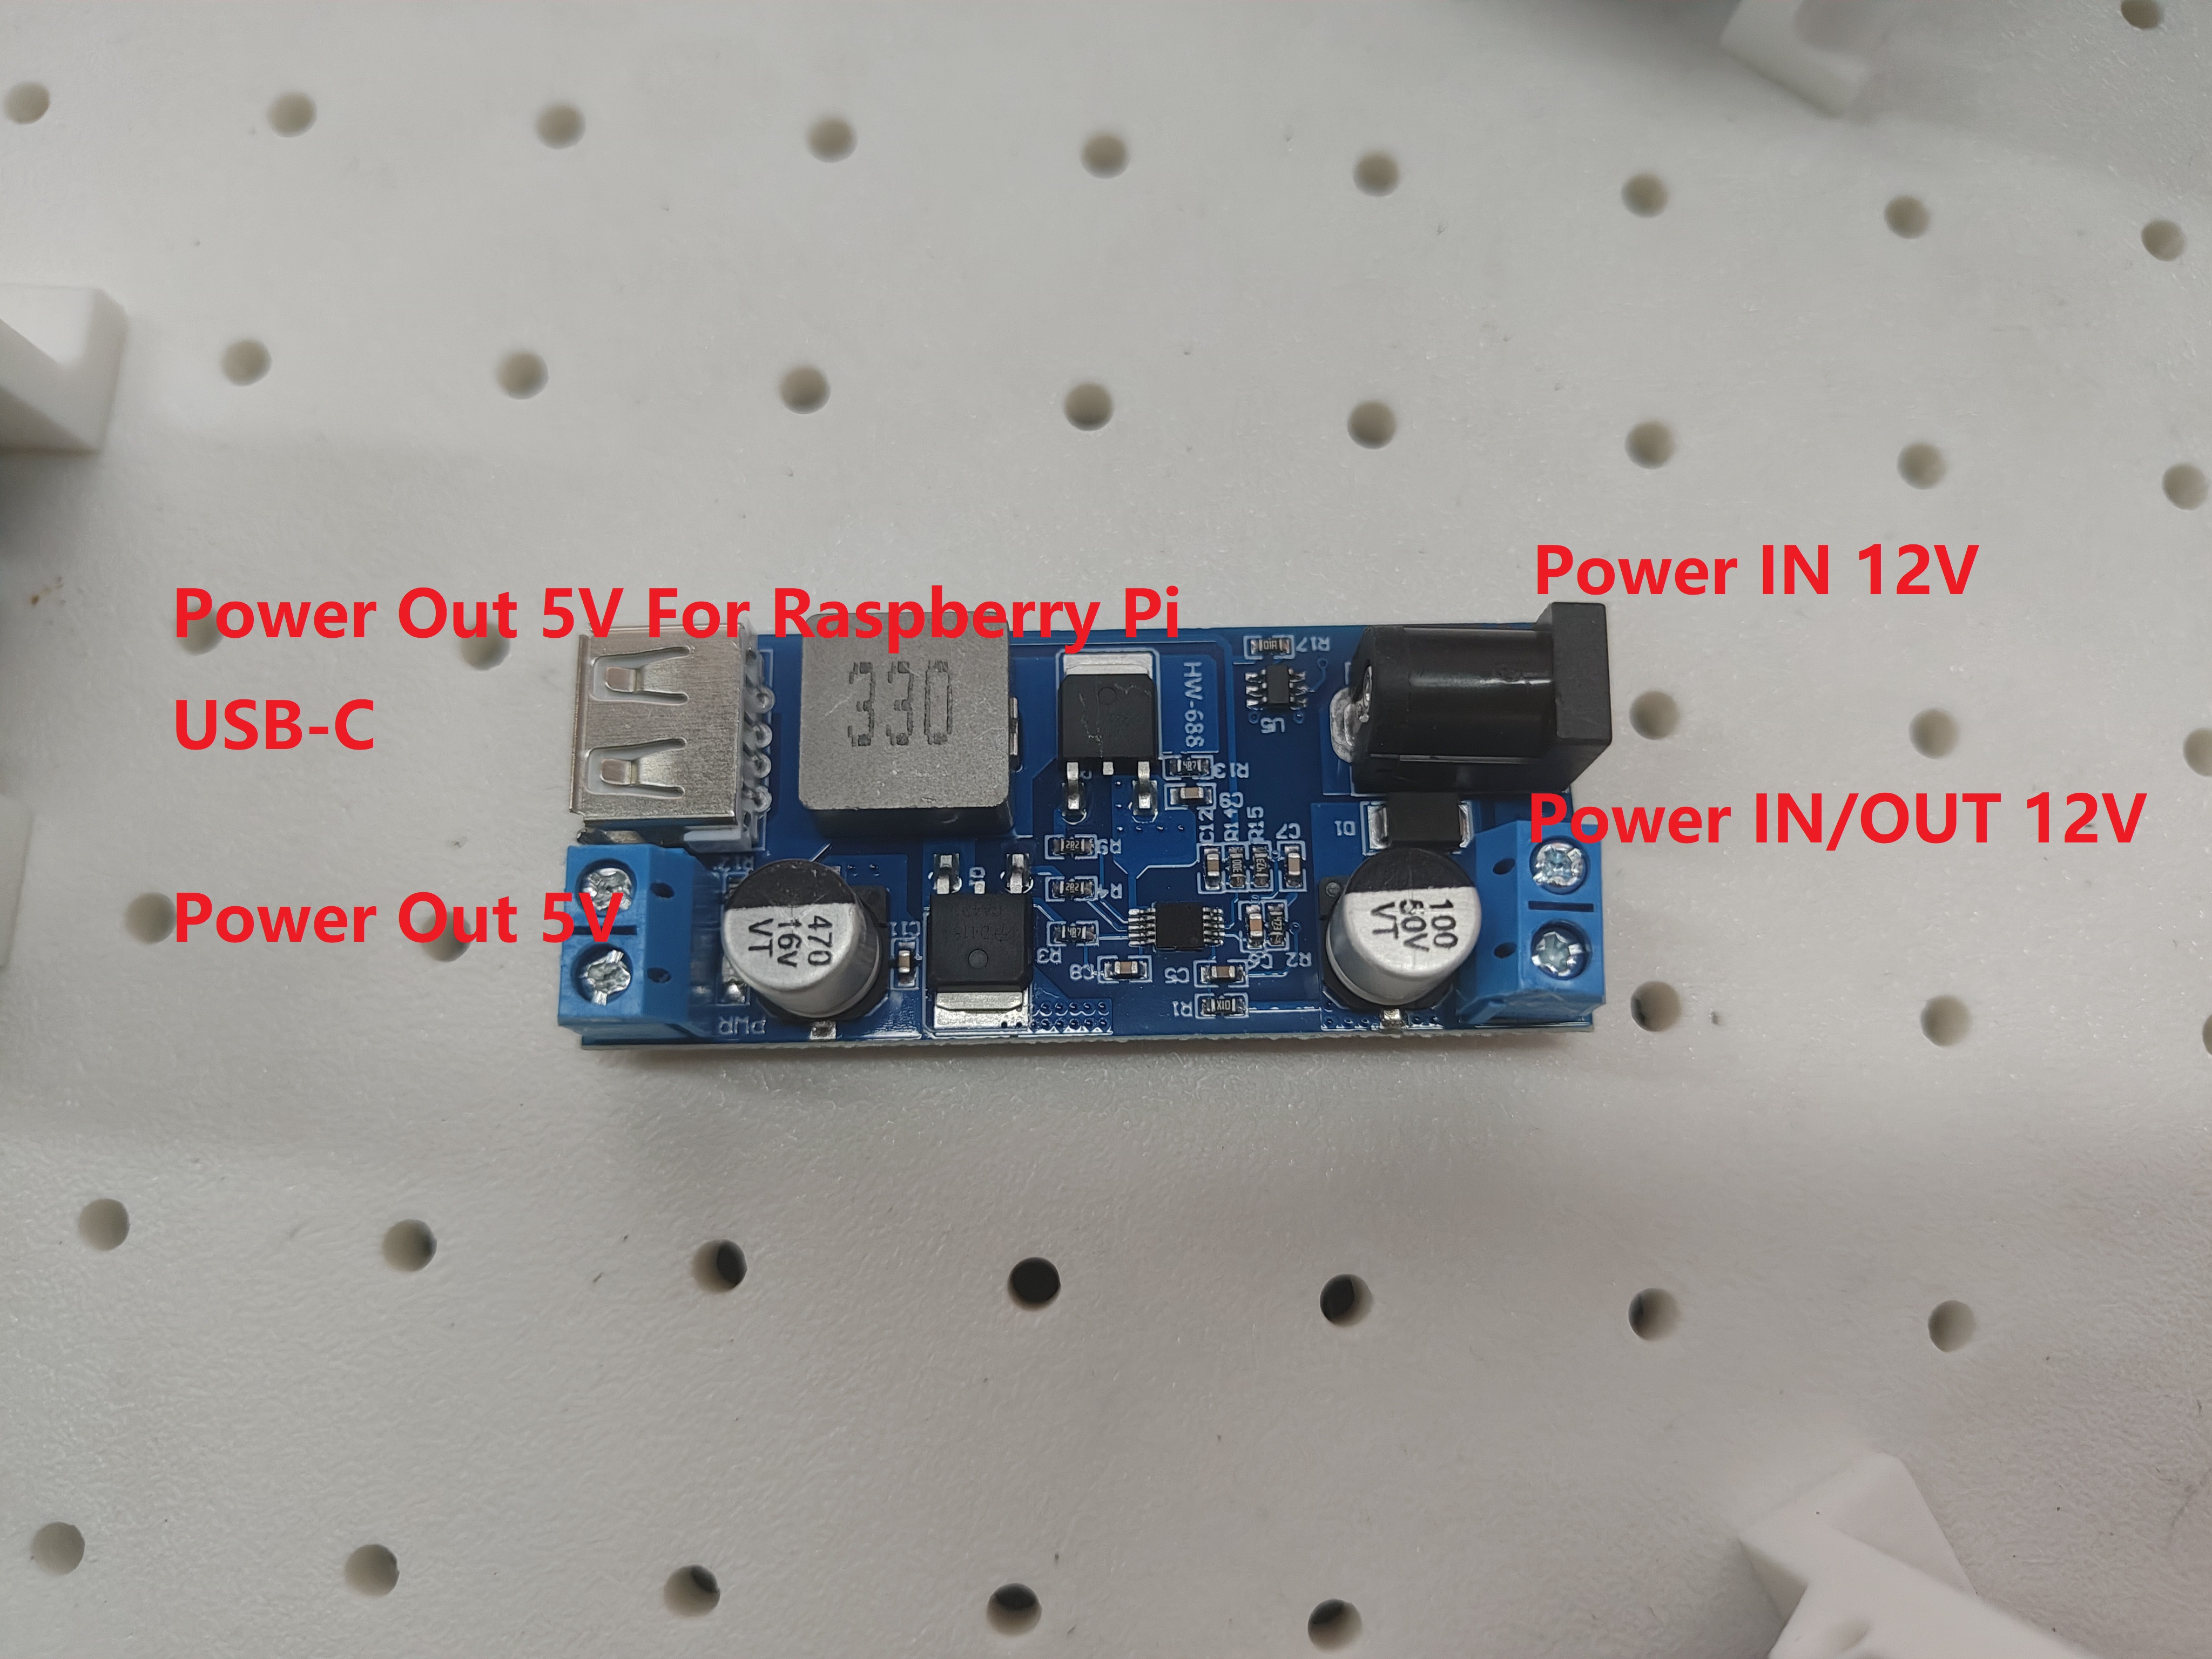
All servo motors in the LeKiwi chassis require 12V power supply. For users with 5V robotic arms, we provide a 12V-to-5V step-down converter module. Please note that circuit modification will be required on your part.
-
A 12V power supply - You may select this option at checkout if needed. If you already own a 12V power supply, you may skip this option and simply convert your power supply's output connector to a 5521 DC plug.
-
Raspberry Pi controller and camera - These must be purchased separately through the order interface.
Specification
| Type | Lekiwi |
|---|---|
| Servo Motos | 3x 12v STS3215 1:345 Gear Rate |
| Power Supply | 12V DC or Battery |
| Angle sensor | 12-bit magnetic encoder |
| Recommended Operating Temperature Range | 0℃~40℃ |
| Communication Method | UART |
| Control Method | PC |
Bill of Materials(BOM)
| Part | Amount | Included |
|---|---|---|
| STS3215 1:345 12V Servo Motos | 3 | ✅ |
| Omnidirectional wheel/universal wheel | 3 | ✅ |
| Lekiwi 3D printed enclosure | 1 | ✅ |
| DC-DC Buck Power Module - 24V/12V to 5V | 1 | ✅ |
| Motor Control Board | 1 | ✅ |
| DC Male to Dual DC Male 5521 Y-Cable | 1 | ✅ |
| USB Cable;Type C 2.0 to Type C 2.0-Black;L150mm | 1 | ✅ |
| USB 3.1 Type C to A Cable 0.5 Meter | 1 | ✅ |
| Plug Power Adapter;Black-12V-2A AC/DC | 1 | ✅ |
| M2 M3 M4 Assorted Screw | Enough | ✅ |
| Raspberry pi | 1 | Option |
| USB Camera | 1 | Option |
| Depth Camera | 2 | Option |
| SO-ARM101 Pro | 1 | Option |
| 12V High - Capacity Lithium - ion Battery Pack E326S | 1 | Option |
Initial System Environment
For Ubuntu x86:
- Ubuntu 22.04
- CUDA 12+
- Python 3.10
- Torch 2.6
For Jetson Orin:
- Jetson JetPack 6.0+
- Python 3.10
- Torch 2.6
For Raspberry Pi:
- Raspberry Pi5 4G~16G
3D Printing Guide
Parts
We provide ready-to-print STL files for the 3D-printed parts below. These can be printed with generic PLA filament on consumer-grade FDM printers. We tested on a Bambu Lab P1S printer. For all components, we just load into bambuslicer, auto-rotate and auto-arrange, enable any recommended supports, and print.
| Item | Quantity | Notes |
|---|---|---|
| Base plate Top | 1 | |
| Base plate Bottom | 1 | |
| Drive motor mount | 3 | |
| Servo wheel hub | 3 | Use Supports |
| RasPi case Top | 1 | 2 |
| RasPi case Bottom | 1 | |
| Arducam base mount and Wrist mount | 1 | Compatible with this camera |
| Webcam base mount, gripper insert, and wrist mount | 1 | Compatible with this camera |
Printing Parameters
The STL files provided are ready to print on many FDM printers. Below are the tested and suggested settings though others may work.
- Material: PLA+
- Nozzle Diameter and Precision: 0.2mm nozzle diameter at 0.2mm layer height
- Infill Density: 15%
- Printing Speed: 150 mm/s
- If needed, upload G-code (slice file) to printer and print
Install LeRobot
On your Raspberry Pi:
1. Install Miniconda
mkdir -p ~/miniconda3
wget https://repo.anaconda.com/miniconda/Miniconda3-latest-Linux-aarch64.sh -O ~/miniconda3/miniconda.sh
bash ~/miniconda3/miniconda.sh -b -u -p ~/miniconda3
rm ~/miniconda3/miniconda.sh
2. Restart shell
Copy paste in your shell: source ~/.bashrc or for Mac: source ~/.bash_profile or source ~/.zshrc if you're using zshell
3. Create and activate a fresh conda environment for lerobot
conda create -y -n lerobot python=3.10
Then activate your conda environment (do this each time you open a shell to use lerobot!):
conda activate lerobot
4. Clone LeRobot
git clone https://github.com/huggingface/lerobot.git ~/lerobot
5. Install ffmpeg in your environment
When using miniconda, install ffmpeg in your environment:
conda install ffmpeg -c conda-forge
6. Install LeRobot with dependencies for the feetech motors
cd ~/lerobot && pip install -e ".[lekiwi]"
Install LeRobot on laptop(PC)
If you already have install LeRobot on your laptop you can skip this step, otherwise please follow along as we do the same steps we did on the Pi.
We use the Command Prompt (cmd) quite a lot. If you are not comfortable using the cmd or want to brush up using the command line you can have a look here: Command line crash course
On your computer:
1. Install Miniconda
2. Restart shell
Copy paste in your shell: source ~/.bashrc or for Mac: source ~/.bash_profile or source ~/.zshrc if you're using zshell
3. Create and activate a fresh conda environment for lerobot
conda create -y -n lerobot python=3.10
Then activate your conda environment (do this each time you open a shell to use lerobot!):
conda activate lerobot
4. Clone LeRobot
git clone https://github.com/huggingface/lerobot.git ~/lerobot
5. Install ffmpeg in your environment
When using miniconda, install ffmpeg in your environment:
conda install ffmpeg -c conda-forge
6. Install LeRobot with dependencies for the feetech motors
cd ~/lerobot && pip install -e ".[lekiwi]"
Assembly
Assemble Lekiwi
video tutorial
The following is a photo tutorial
You can refer official assemble tutorial.
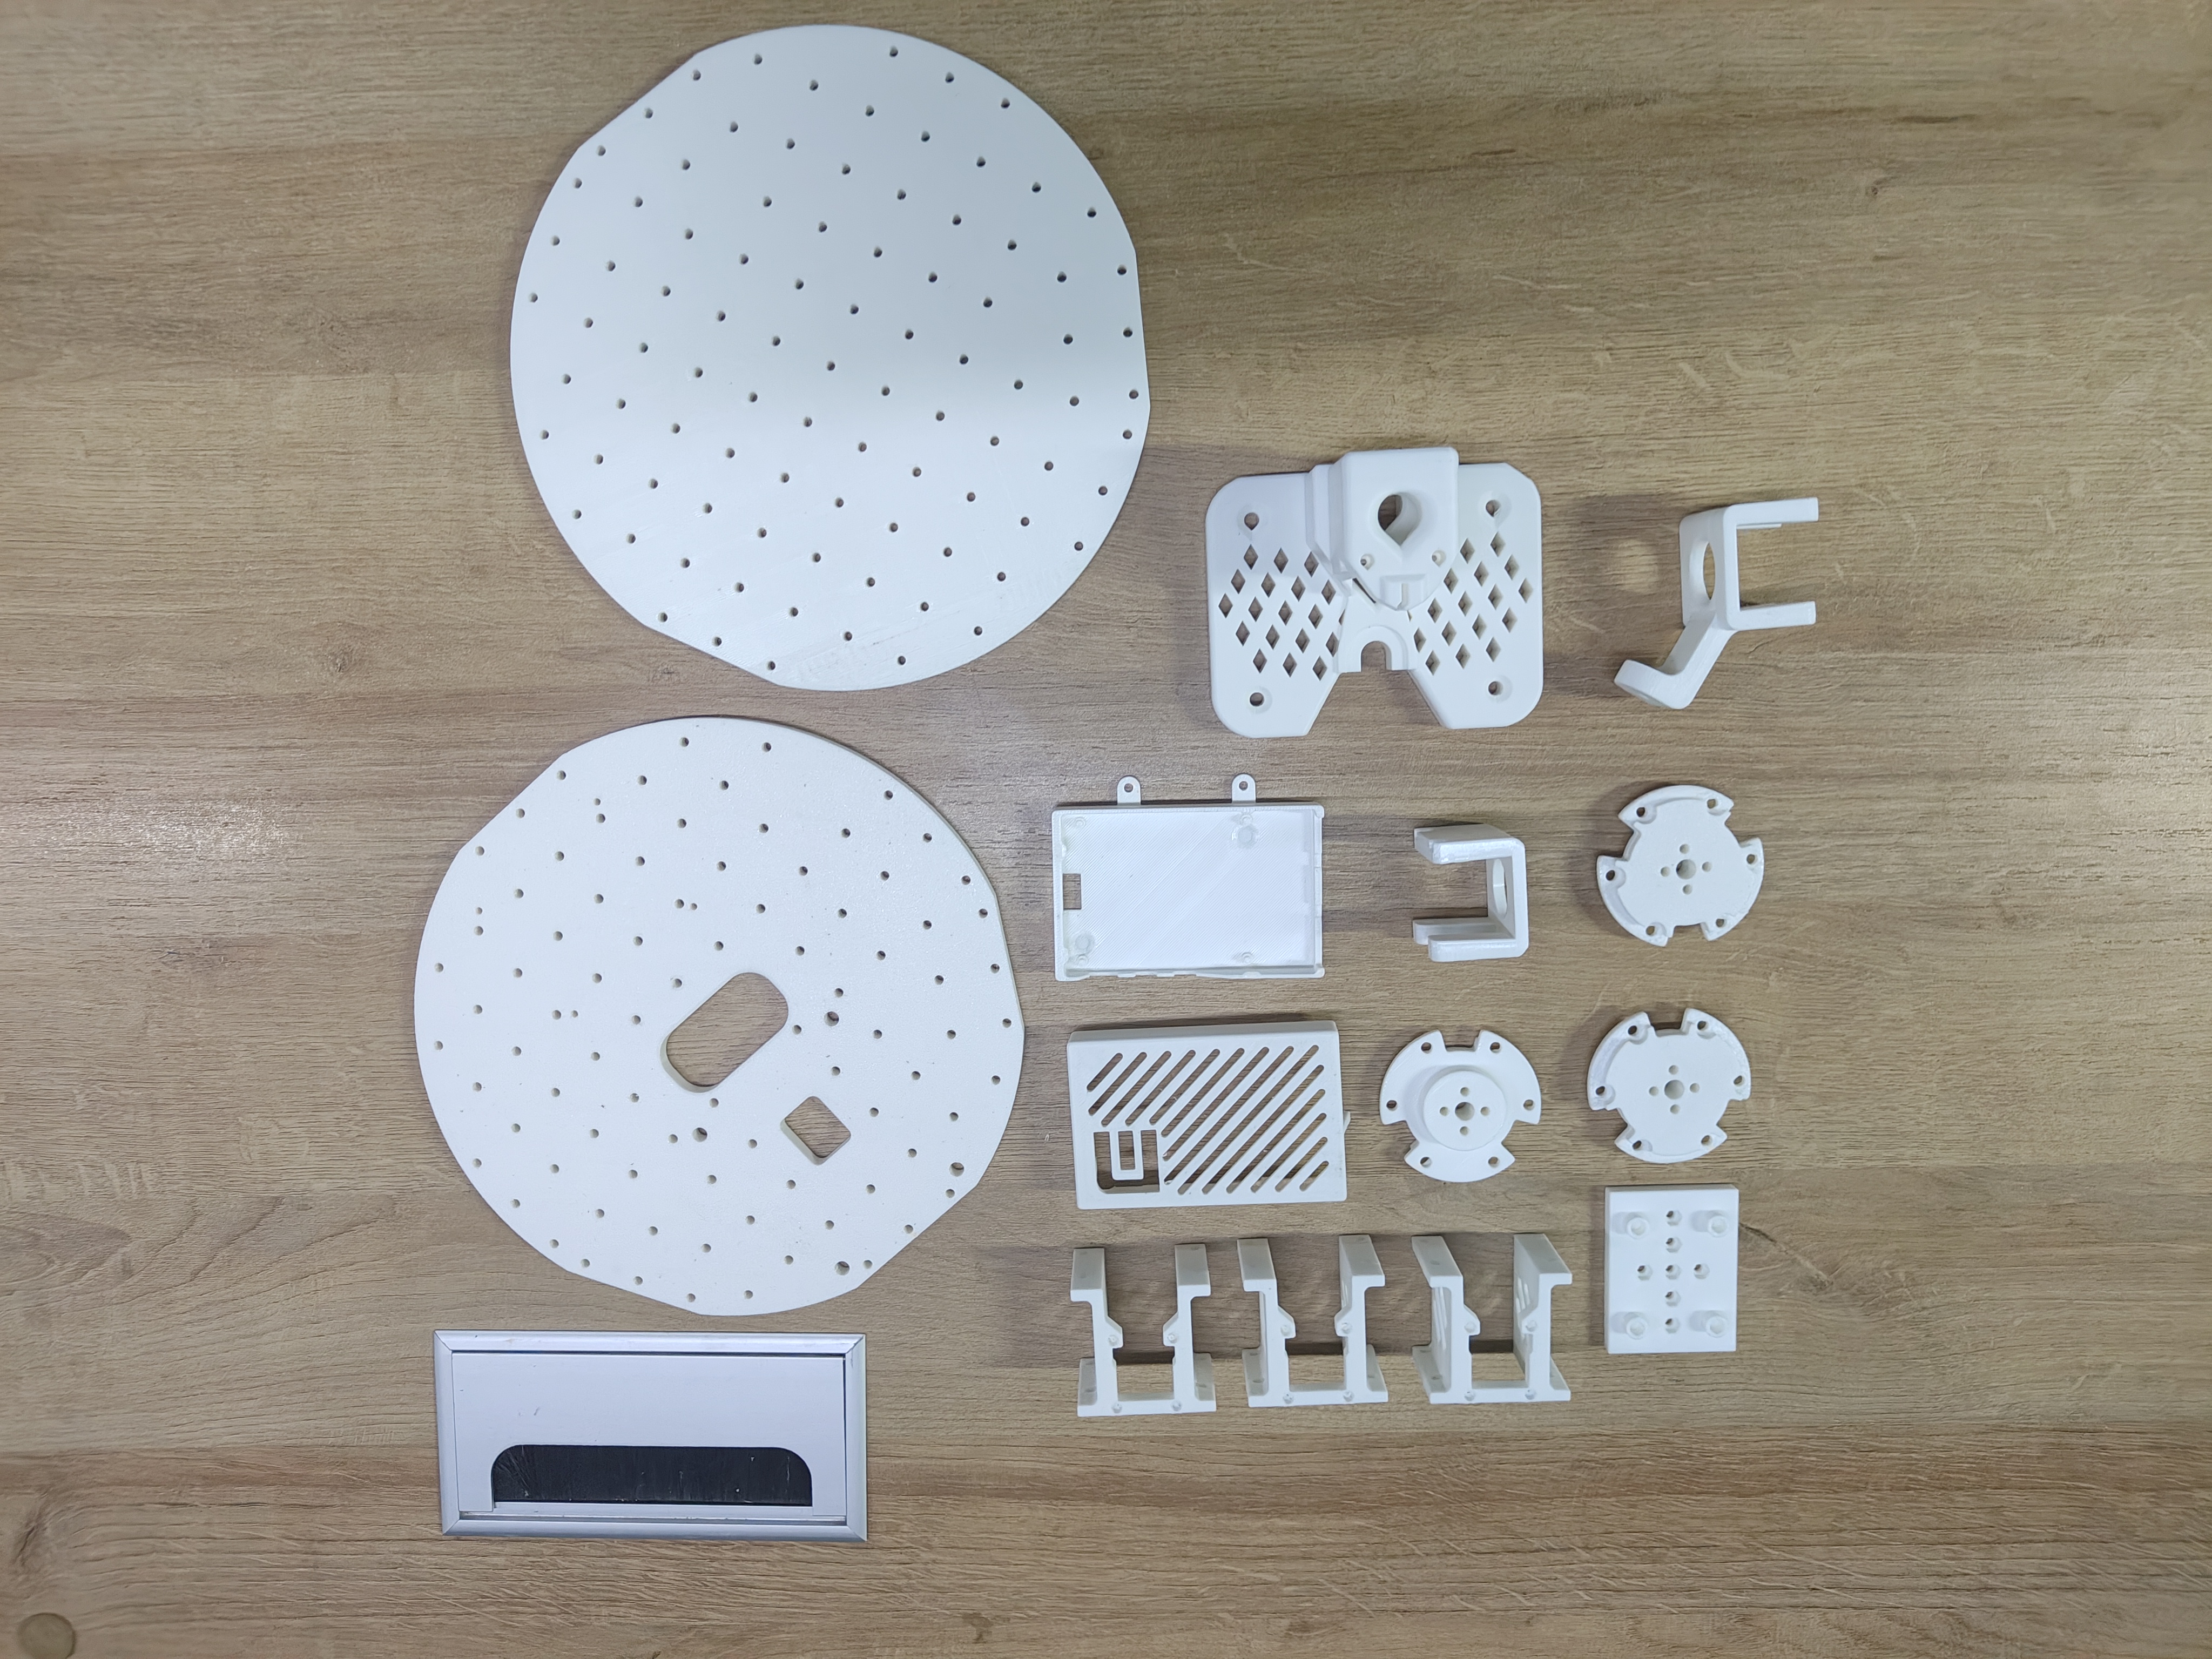
Upon receiving the printed parts, all printed components are as shown below.
A. Attach the drive motor to the motor mount using 12 m2x6 tap screws.
| Step 1 | Step 2 |
|---|---|
 |  |
B. Screw the drive motor mount onto the bottom base plate using 12 m3x16 machine screws.
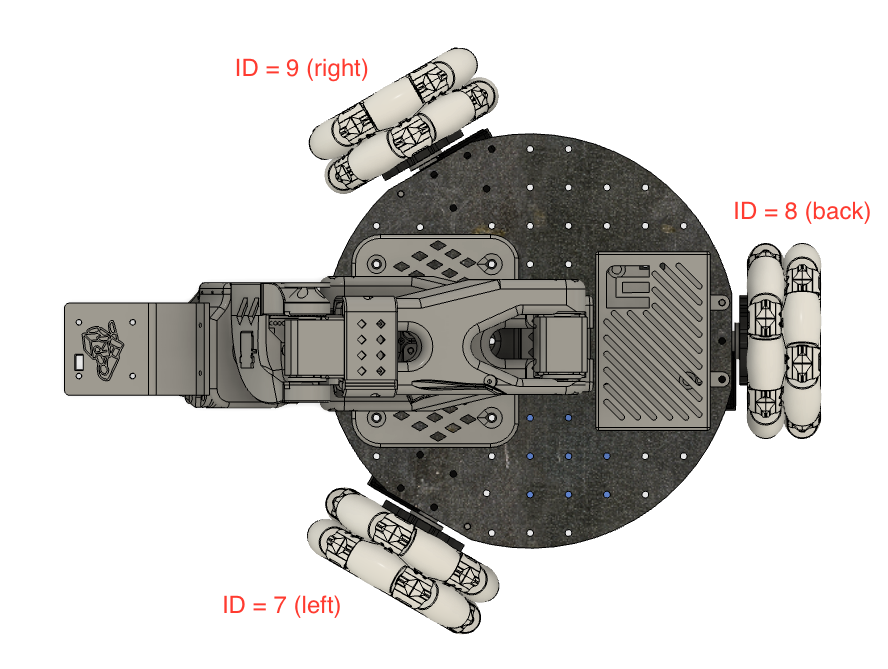
Remember the ID arrangement: 8 represents the rear wheel, while 7 and 9 correspond to the left front and right front wheels respectively.
| Step 1 | Step 2 |
|---|---|
 |  |
C. Attach the wheel hub to the omniwheel.
Step 1 and Step 2: Remove the three screws.
| Step 1 | Step 2 |
|---|---|
 |  |
Step 3 and Step 4: Attach the wheel hub to the omniwheel using 9 m4x18 machine screws.
| Step 3 | Step 4 |
|---|---|
 |  |
D. Attach the servo horn to the wheel hub using 6 m3x16 machine screws.
| Step 1 | Step 2 | Step 3 |
|---|---|---|
 |  |  |
E. Attach the servo horn to the drive motor using 3 m3x10 machine screw.
| Step 1 | Step 2 | Step 3 |
|---|---|---|
 |  |  |
H. Add the servo driver and connect all circuits.
| Step 1 | Step 2 | Step 3 | Step 4 |
|---|---|---|---|
 |  |  |  |
| Step 5 | Step 6 | Step 7 | Step 8 |
|---|---|---|---|
 |  |  |  |
The Power IN connects directly to the power supply, like Step8, while the USB-C port provides 5V power to the Raspberry Pi.
For the additional 2-pin terminals (5V & 12V):
- If using a 7.4V SO10x robotic arm, power the Servo Motors Board via the 5V output.
- If using a 12V robotic arm, power the Servo Motors Board directly from the DC power splitter, like Step 8.
I. You can now proceed to mount the Raspberry Pi onto the vehicle's second-layer top plate. Before doing so, connect both the USB-C power cable and USB-C servo motor communication cable, then route them out through the top panel of the vehicle.
Step 1 Connect the power cable to your Raspberry Pi and route it through the center opening of the top panel.
 |  |  |
Step 2 Among the three servo motors in the chassis, one servo has only one cable connected. If you need to install the SO10x robotic arm, please:Remove the ID1 cable from the robotic arm. Connect it to the chassis motor. Route it through the top panel as a reserved cable
 |  |  |
Step 3 Now you can connect the USB-C from the servo driver board to the USB port on the Raspberry Pi.
 |  |
J. Now you need to secure the Raspberry Pi and the remaining parts of the top plate using 12 M3×16 screws.
 |  |  |
K. Now you can install the USB camera and Follower Arm using 1 M3x16 and 4 M5×25 screws
 |  |  |
|  |  |
And ensure both the servo control cable and USB camera are connected to the Raspberry Pi.
|
Check the circuit connections; after assembly, the Lekiwi should be connected to the development board (Raspberry Pi / Jetson). The leader arm should be connect to your PC.
| Lekiwi --> Raspberry Pi / Jetson |
| Leader arm --> PC |
Configure the motors
Leader arm
To find the port for each bus servo adapter, run this script:
lerobot-find-port
Example output:
Finding all available ports for the MotorBus.
['/dev/tty.usbmodem575E0032081']
Remove the USB cable from your MotorsBus and press Enter when done.

[...Disconnect corresponding leader or follower arm and press Enter...]

The port of this MotorsBus is /dev/tty.usbmodem575E0032081
Reconnect the USB cable.
Example output when identifying the port (e.g., /dev/tty.usbmodem575E0031751 on Mac, or possibly /dev/ttyACM0 on Linux):
Example output when identifying the port (e.g., /dev/tty.usbmodem575E0032081, or possibly /dev/ttyACM1 on Linux):
Finding all available ports for the MotorBus.
['/dev/tty.usbmodem575E0032081']
Remove the USB cable from your MotorsBus and press Enter when done.
Remember to remove the usb, then Press Enter, otherwise the interface will not be detected.
Troubleshooting: On Linux, you might need to give access to the USB ports by running:
sudo chmod 666 /dev/ttyACM0
sudo chmod 666 /dev/ttyACM1
Lekiwi
You should follow the previous command to find the correct USB and setup motors.
The instructions for configuring the motors can be found in the SO101 docs (Same as leader arm). Besides the ids for the arm motors, we also need to set the motor ids for the mobile base. These need to be in a specific order to work. Below an image of the motor ids and motor mounting positions for the mobile base. Note that we only use one Motor Control board on LeKiwi. This means the motor ids for the wheels are 7, 8 and 9.
You can run this command to setup motors for LeKiwi. It will first setup the motors for arm (id 6..1) and then setup motors for wheels (9,8,7).
lerobot-setup-motors \
    --robot.type=lekiwi \
    --robot.port=/dev/tty.usbmodem58760431551 # <- paste here the port found at previous step
Calibration
Now we have to calibrate the leader arm and the follower arm. The wheel motors don’t have to be calibrated. The calibration process is very important because it allows a neural network trained on one robot to work on another.
Calibrate follower arm (on mobile base)
Make sure the arm is connected to the Raspberry Pi and run this script or API example (on the Raspberry Pi via SSH) to launch calibration of the follower arm:
lerobot-calibrate \
    --robot.type=lekiwi \
    --robot.id=my_awesome_kiwi # <- Give the robot a unique name
We unified the calibration method for most robots, thus, the calibration steps for this SO100 arm are the same as the steps for the Koch and SO101. First, we have to move the robot to the position where each joint is in the middle of its range, then we press Enter. Secondly, we move all joints through their full range of motion. A video of this same process for the SO101 as reference can be found here.
Wired version
If you have the wired LeKiwi version, please run all commands on your laptop.
Calibrate leader arm
Then, to calibrate the leader arm (which is attached to the laptop/pc). Run the following command of API example on your laptop:
lerobot-calibrate \
    --teleop.type=so100_leader \
    --teleop.port=/dev/tty.usbmodem58760431551 \ # <- The port of your robot
    --teleop.id=my_awesome_leader_arm # <- Give the robot a unique name
Teleoperate LeKiwi
If you're using a Mac, you might need to give Terminal permission to access your keyboard. Go to System Preferences > Security & Privacy > Input Monitoring and check the box for Terminal.
To teleoperate SSH into your Raspberry Pi, and run conda activate lerobot and this script:
python -m lerobot.robots.lekiwi.lekiwi_host --robot.id=my_awesome_kiwi
Then on your laptop, also run conda activate lerobot and run the API example, make sure you set the correct remote_ip and port in examples/lekiwi/teleoperate.py.

python examples/lekiwi/teleoperate.py
You should see on your laptop something like this: [INFO] Connected to remote robot at tcp://172.17.133.91:5555 and video stream at tcp://172.17.133.91:5556. Now you can move the leader arm and use the keyboard (w,a,s,d) to drive forward, left, backwards, right. And use (z,x) to turn left or turn right. You can use (r,f) to increase and decrease the speed of the mobile robot. There are three speed modes, see the table below:
| Speed Mode | Linear Speed (m/s) | Rotation Speed (deg/s) |
|---|---|---|
| Fast | 0.4 | 90 |
| Medium | 0.25 | 60 |
| Slow | 0.1 | 30 |
| Key | Action |
|---|---|
| W | Move forward |
| A | Move left |
| S | Move backward |
| D | Move right |
| Z | Turn left |
| X | Turn right |
| R | Increase speed |
| F | Decrease speed |
If you use a different keyboard you can change the keys for each command in the LeKiwiRobotConfig.
Wired version
If you have the wired LeKiwi version please run all commands including both these teleoperation commands on your laptop.
Troubleshoot communication
If you are having trouble connecting to the Mobile SO100, follow these steps to diagnose and resolve the issue.
1. Verify IP Address Configuration
Make sure that the correct ip for the Pi is set in the configuration file. To check the Raspberry Pi's IP address, run (on the Pi command line):
hostname -I
2. Check if Pi is reachable from laptop/pc
Try pinging the Raspberry Pi from your laptop:
ping <your_pi_ip_address>
If the ping fails:
- Ensure the Pi is powered on and connected to the same network.
- Check if SSH is enabled on the Pi.
3. Try SSH connection
If you can't SSH into the Pi, it might not be properly connected. Use:
ssh <your_pi_user_name>@<your_pi_ip_address>
If you get a connection error:
-
Ensure SSH is enabled on the Pi by running:
sudo raspi-configThen navigate to: Interfacing Options -> SSH and enable it.
4. Same config file
Make sure the configuration file on both your laptop/pc and the Raspberry Pi is the same.
Record a dataset
Once you're familiar with teleoperation, you can record your first dataset with LeKiwi.
We use the Hugging Face hub features for uploading your dataset. If you haven’t previously used the Hub, make sure you can login via the cli using a write-access token, this token can be generated from the Hugging Face settings.
Add your token to the CLI by running this command:
huggingface-cli login --token ${HUGGINGFACE_TOKEN} --add-to-git-credential
Then store your Hugging Face repository name in a variable:
HF_USER=$(huggingface-cli whoami | head -n 1)
echo $HF_USER
Now you can record a dataset. To record episodes and upload your dataset to the hub, execute this API example tailored for LeKiwi. Make sure to first adapt the remote_ip, repo_id, port and task in the script. If you would like to run the script for longer you can increase NB_CYCLES_CLIENT_CONNECTION.
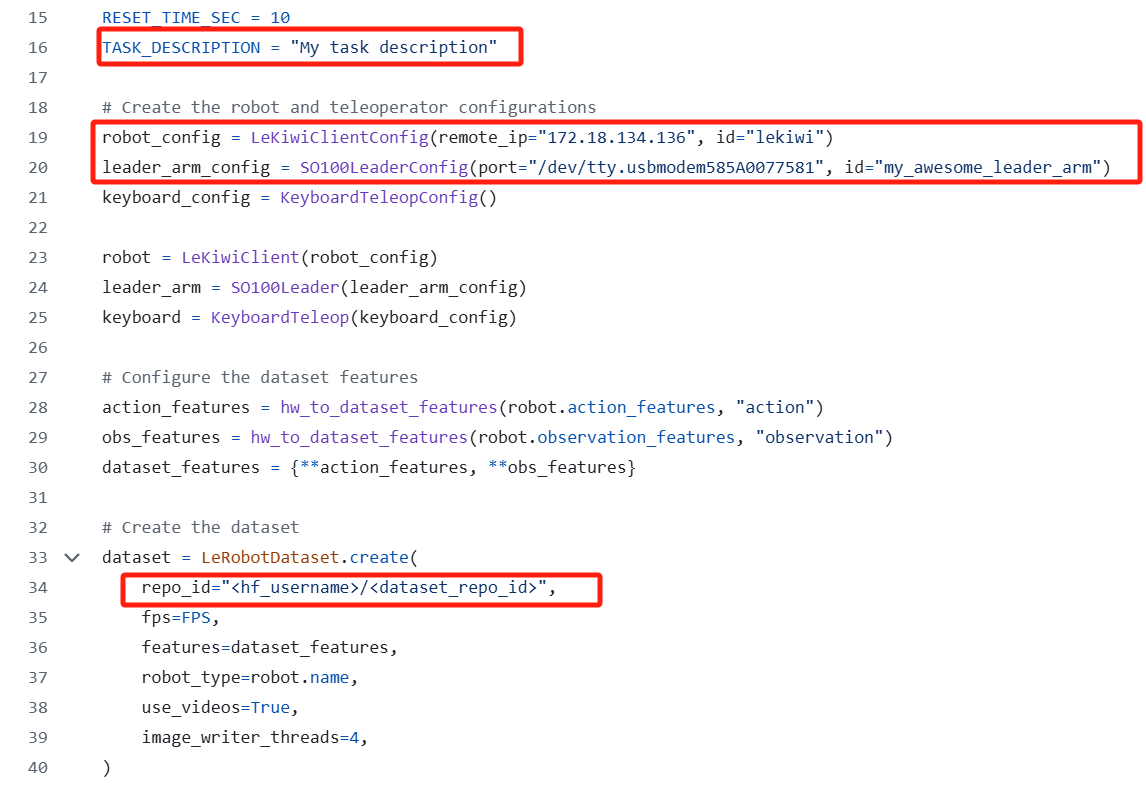
python examples/lekiwi/record.py
Dataset upload
Locally, your dataset is stored in this folder: ~/.cache/huggingface/lerobot/{repo-id}. At the end of data recording, your dataset will be uploaded on your Hugging Face page (e.g. https://huggingface.co/datasets/cadene/so101_test) that you can obtain by running:
echo https://huggingface.co/datasets/${HF_USER}/so101_test
Your dataset will be automatically tagged with LeRobot for the community to find it easily, and you can also add custom tags (in this case tutorial for example).
You can look for other LeRobot datasets on the hub by searching for LeRobot tags.
Tips for gathering data
Once you’re comfortable with data recording, you can create a larger dataset for training. A good starting task is grasping an object at different locations and placing it in a bin. We suggest recording at least 50 episodes, with 10 episodes per location. Keep the cameras fixed and maintain consistent grasping behavior throughout the recordings. Also make sure the object you are manipulating is visible on the camera’s. A good rule of thumb is you should be able to do the task yourself by only looking at the camera images.
In the following sections, you’ll train your neural network. After achieving reliable grasping performance, you can start introducing more variations during data collection, such as additional grasp locations, different grasping techniques, and altering camera positions.
Avoid adding too much variation too quickly, as it may hinder your results.
If you want to dive deeper into this important topic, you can check out the blog post we wrote on what makes a good dataset.
Troubleshooting
On Linux, if the left and right arrow keys and escape key don’t have any effect during data recording, make sure you’ve set the $DISPLAY environment variable. See pynput limitations.
Wired version
If you have the wired LeKiwi version please run all commands including both these record dataset commands on your laptop.
Replay an episode
To replay an episode run the API example below, make sure to change remote_ip, port, LeRobotDatasetId and episode index. The file is under that path examples/lekiwi/replay.py.
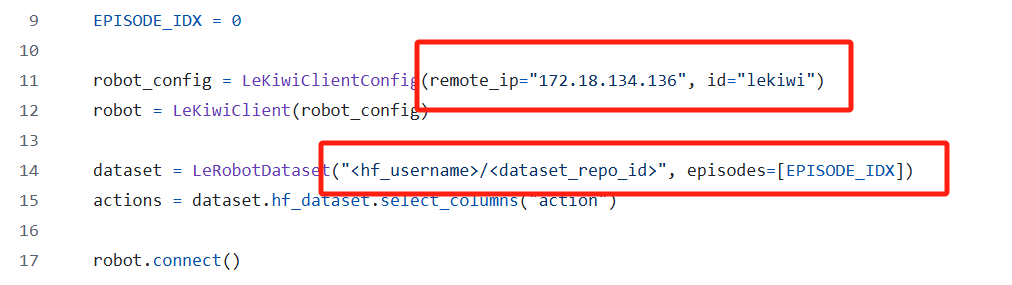
Execute the following command:
python examples/lekiwi/replay.py
Train a policy
To train a policy to control your robot, use the python lerobot/scripts/train.py script. A few arguments are required. Here is an example command:
lerobot-train \
  --dataset.repo_id=${HF_USER}/lekiwi_test \
  --policy.type=act \
  --output_dir=outputs/train/act_lekiwi_test \
  --job_name=act_lekiwi_test \
  --policy.device=cuda \
  --wandb.enable=true # You can choose false if you don't need wandb
Let's explain it:
- We provided the dataset as argument with
--dataset.repo_id=${HF_USER}/lekiwi_test. - We provided the policy with
policy.type=act. This loads configurations fromconfiguration_act.py. Importantly, this policy will automatically adapt to the number of motor states, motor actions and cameras of your robot (e.g.laptopandphone) which have been saved in your dataset. - We provided
policy.device=cudasince we are training on a Nvidia GPU, but you could usepolicy.device=mpsto train on Apple silicon. - We provided
wandb.enable=trueto use Weights and Biases for visualizing training plots. This is optional but if you use it, make sure you are logged in by runningwandb login.
Training should take several hours. You will find checkpoints in outputs/train/act_lekiwi_test/checkpoints.
Evaluate your policy
To evaluate your policy run the evaluate.py API example, make sure to change remote_ip, port, model..
Path is examples/lekiwi/evaluate.py.
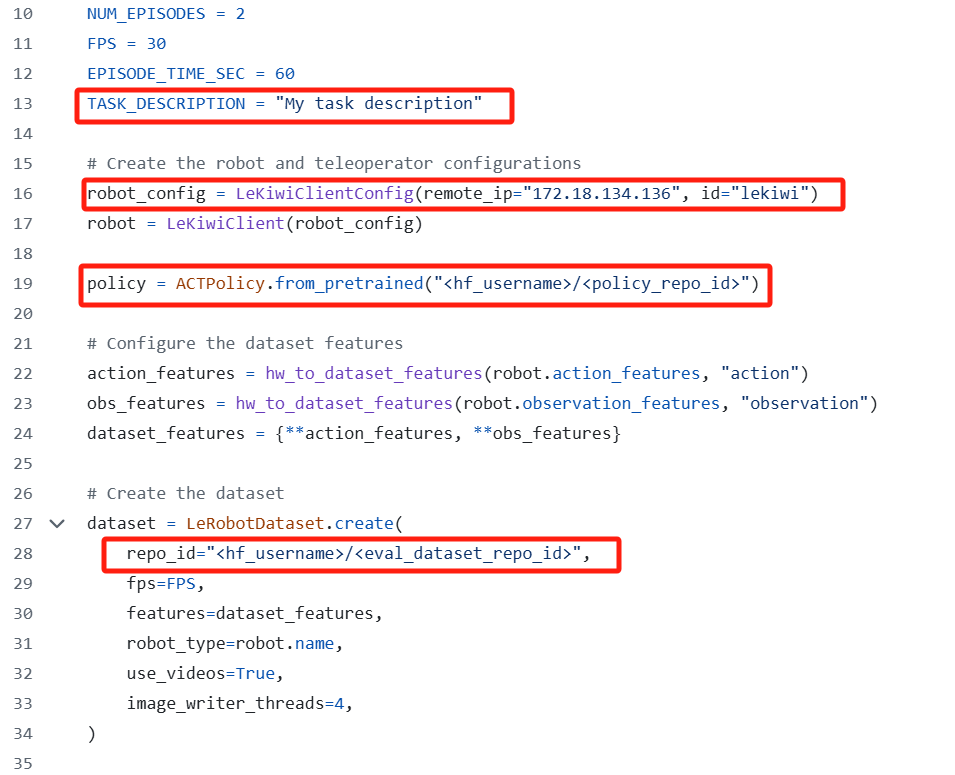
python examples/lekiwi/evaluate.py
As you can see, it's almost the same command as previously used to record your training dataset. Two things changed:
- There is an additional
policyargument which indicates the path to your policy checkpoint with (e.g.outputs/train/eval_act_lekiwi_test/checkpoints/last/pretrained_model). You can also use the model repository if you uploaded a model checkpoint to the hub (e.g.${HF_USER}/act_lekiwi_test). - The name of dataset begins by
evalto reflect that you are running inference (e.g.${HF_USER}/eval_act_lekiwi_test).
Help 🙋
For hardware issues, please contact customer service. For usage questions, join Discord.
Tech Support & Product Discussion
Thank you for choosing our products! We are here to provide you with different support to ensure that your experience with our products is as smooth as possible. We offer several communication channels to cater to different preferences and needs.