Getting started with StarAI Robot Arm with LeRobot
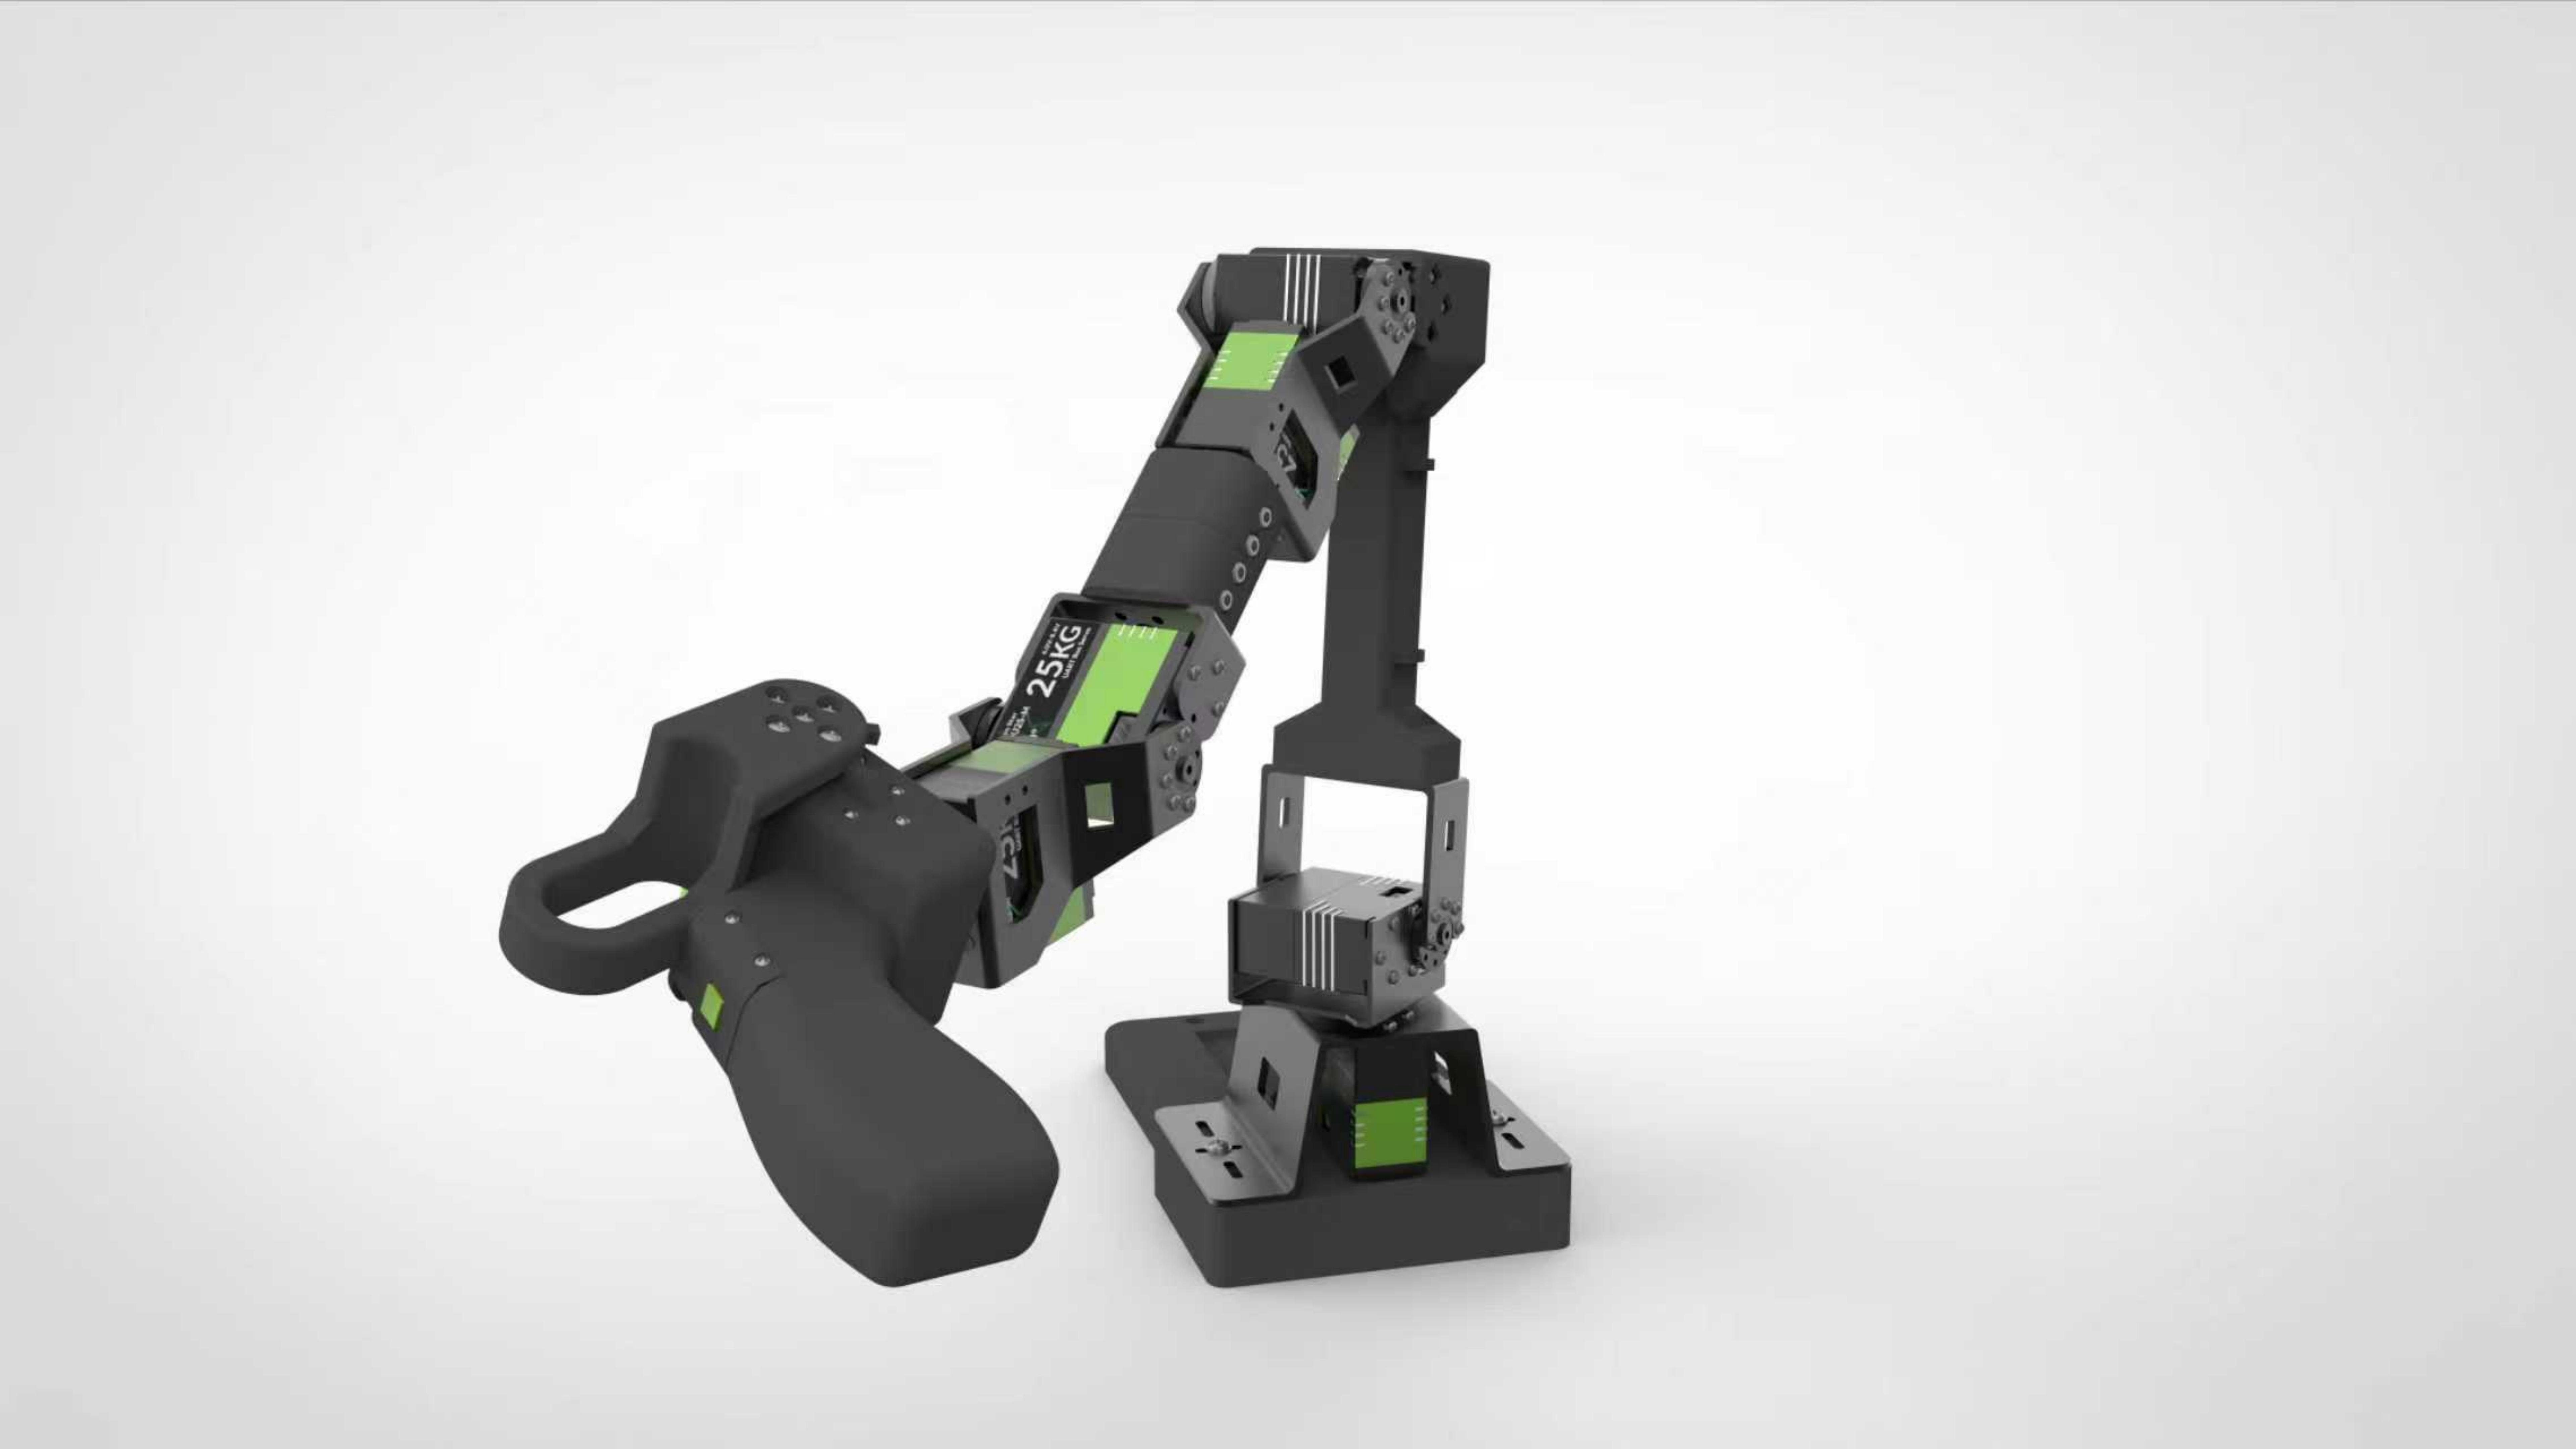
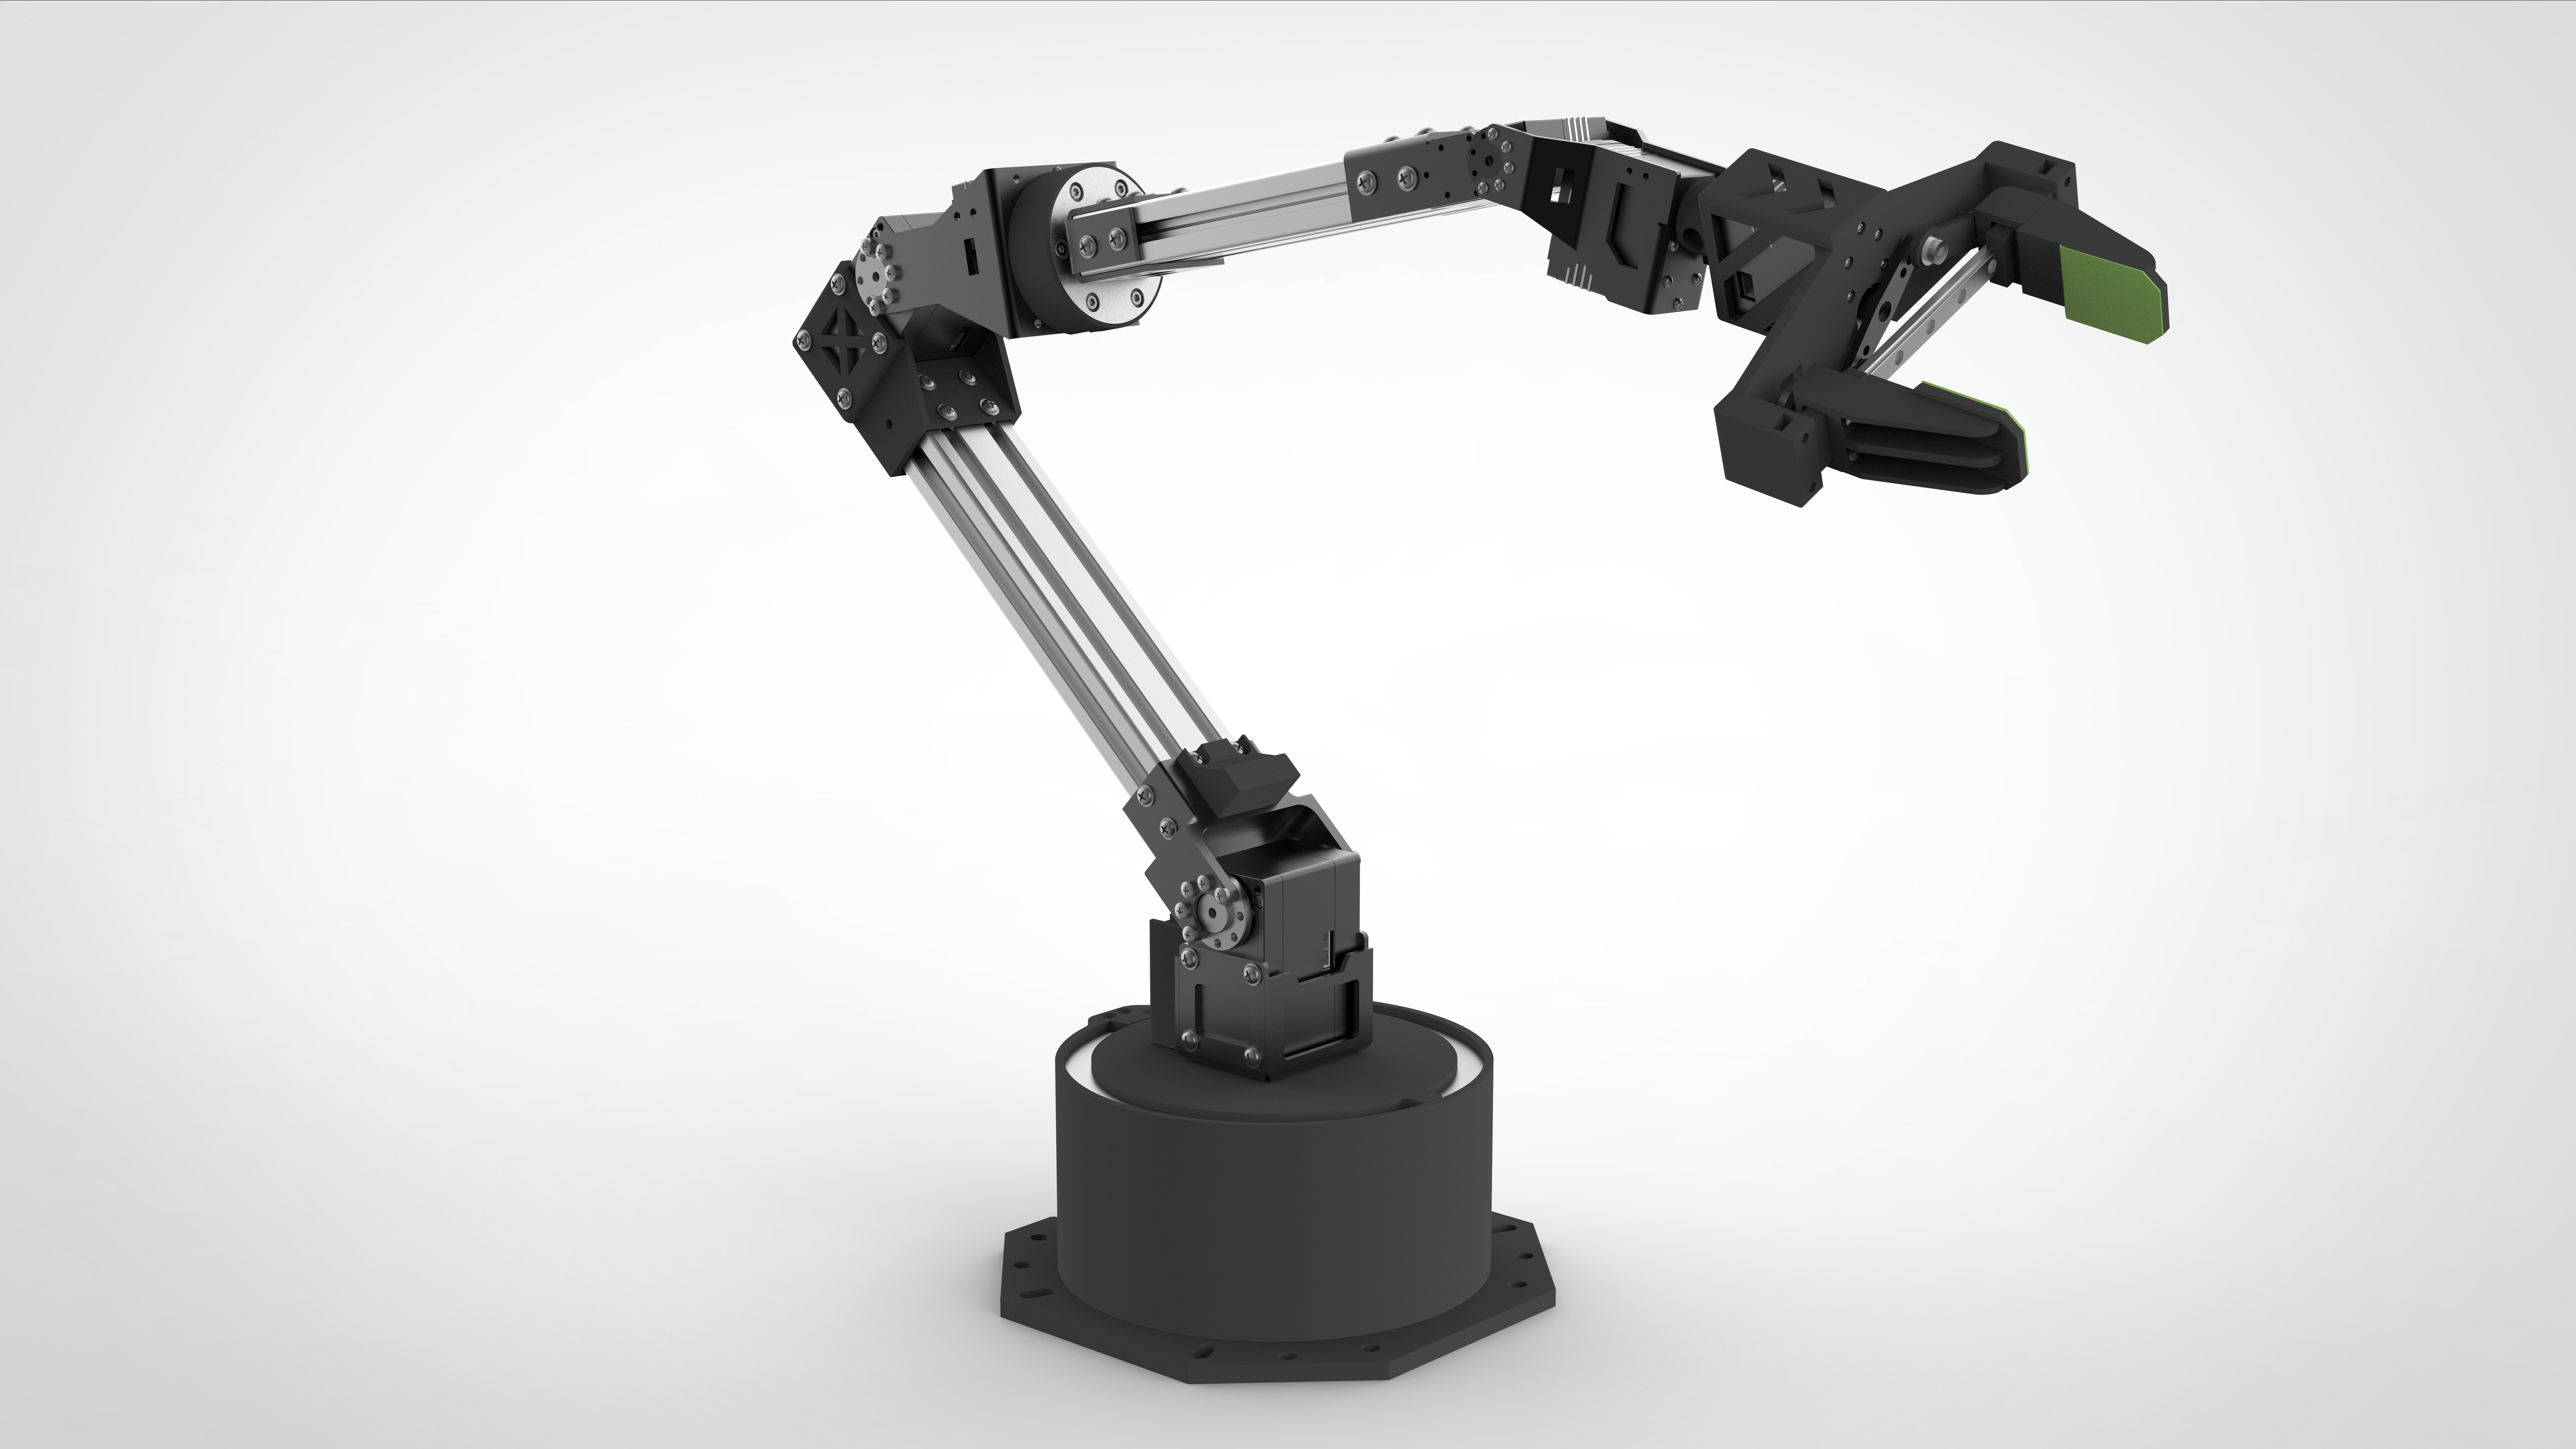
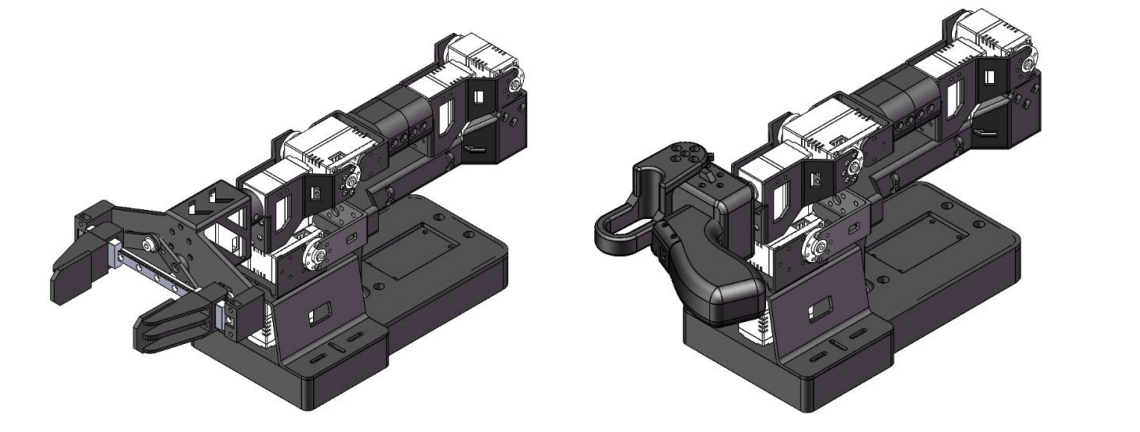
| Follower Viola | Leader Violin | Follower Cello |
|---|---|---|
 |  |  |
Products Introduction
- Open-Source & Developer-Friendly It is an open-source, developer-friendly 6+1 DoF robotic arm solution from Fishion Star Technology Limited.
- Integration with LeRobot Designed for integration with LeRobot Platform , which provides PyTorch models, datasets, and tools for imitation learning in real-world robotic tasks — including data collection, simulation, training, and deployment.
- Comprehensive Learning Resources Provides comprehensive open-source learning resources like assembly and calibration guides, and example custom grasping tasks to assist users in quickly getting started and developing robotic applications.
- Compatible with Nvidia Supports deployment on the reComputer Mini J4012 Orin NX 16GB platform.
Main Features
- Ready to Go — No Assembly Required. Just Unbox and Dive into the World of AI.
- 6+1 Degrees of Freedom and a 470mm Reach — Built for Versatility and Precision.
- Powered by Dual Brushless Bus Servos — Smooth, Silent, and Strong with up to 300g Payload.
- Parallel Gripper with 66mm Maximum Opening — Modular Fingertips for Quick-Replace Flexibility.
- Exclusive Hover Lock Technology — Instantly Freeze Leader Arm at Any Position with a Single Press.
Specifications
| Item | Follower Arm | Viola | Leder Arm |Violin | Follower Arm |Cello |
|---|---|---|---|
| Degrees of Freedom | 6+1 | 6+1 | 6+1 |
| Reach | 470mm | 470mm | 670mm |
| Repeatability | 2mm | - | 2mm |
| Working Payload | 300g (with 70% Reach) | - | 750g (with 70% Reach) |
| Servos | RX8-U50H-M x2 RA8-U25H-M x4 RA8-U26H-M x1 | RX8-U50H-M x2 RA8-U25H-M x4 RA8-U26H-M x1 | RX18-U100H-M x3 RX8-U50H-M x3 RX8-U51H-M x1 |
| Parallel Gripper Ki | ✅ | - | ✅ |
| Wrist Rotate | Yes | Yes | Yes |
| Hold at any Position | Yes | Yes (with handle button) | Yes |
| Wrist Camera Mount | Provides reference 3D printing files | Provides reference 3D printing files | |
| Works with LeRobot | ✅ | ✅ | ✅ |
| Works with ROS 2 | ✅ | ✅ | ✅ |
| Works with MoveIt2 | ✅ | ✅ | ✅ |
| Works with Gazebo | ✅ | ✅ | ✅ |
| Communication Hub | UC-01 | UC-01 | UC-01 |
| Power Supply | 12V10A/120w XT30 | 12V10A/120w XT30 | 12V25A/300w XT60 |
For more information about servo motors, please visit the following link.
Initial environment setup
For Ubuntu x86:
- Ubuntu 22.04
- CUDA 12+
- Python 3.10
- Torch 2.6
For Jetson Orin:
- Jetson JetPack 6.0+
- Python 3.10
- Torch 2.6
Installation and Debugging
Install LeRobot
Environments such as pytorch and torchvision need to be installed based on your CUDA.
- Install Miniconda: For Jetson:
wget https://repo.anaconda.com/miniconda/Miniconda3-latest-Linux-aarch64.sh
chmod +x Miniconda3-latest-Linux-aarch64.sh
./Miniconda3-latest-Linux-aarch64.sh
source ~/.bashrc
Or, For X86 Ubuntu 22.04:
mkdir -p ~/miniconda3
cd miniconda3
wget https://repo.anaconda.com/miniconda/Miniconda3-latest-Linux-x86_64.sh -O ~/miniconda3/miniconda.sh
bash ~/miniconda3/miniconda.sh -b -u -p ~/miniconda3
rm ~/miniconda3/miniconda.sh
source ~/miniconda3/bin/activate
conda init --all
- Create and activate a fresh conda environment for lerobot
conda create -y -n lerobot python=3.10 && conda activate lerobot
- Clone Lerobot:
git clone https://github.com/Seeed-Projects/lerobot.git ~/lerobot
- When using miniconda, install ffmpeg in your environment:
conda install ffmpeg -c conda-forge
This usually installs ffmpeg 7.X for your platform compiled with the libsvtav1 encoder. If libsvtav1 is not supported (check supported encoders with ffmpeg -encoders), you can:
- [On any platform] Explicitly install ffmpeg 7.X using:
conda install ffmpeg=7.1.1 -c conda-forge
- [On Linux only] Install ffmpeg build dependencies and compile ffmpeg from source with libsvtav1, and make sure you use the corresponding ffmpeg binary to your install with which ffmpeg.
- Install LeRobot:
cd ~/lerobot && pip install -e .
sudo apt remove brltty
For Jetson Jetpack devices (please make sure to install Pytorch-gpu and Torchvision from step 5 before executing this step):
conda install -y -c conda-forge "opencv>=4.10.0.84"  # Install OpenCV and other dependencies through conda, this step is only for Jetson Jetpack 6.0+
conda remove opencv   # Uninstall OpenCV
pip3 install opencv-python==4.10.0.84  # Then install opencv-python via pip3
conda install -y -c conda-forge ffmpeg
conda uninstall numpy
pip3 install numpy==1.26.0  # This should match torchvision
6.Install Fashionstar Motor Dependencies:
pip install lerobot_teleoperator_bimanual_leader
pip install lerobot_robot_bimanual_follower
- Check Pytorch and Torchvision
Since installing the lerobot environment via pip will uninstall the original Pytorch and Torchvision and install the CPU versions of Pytorch and Torchvision, you need to perform a check in Python.
import torch
print(torch.cuda.is_available())
If the printed result is False, you need to reinstall Pytorch and Torchvision according to the official website tutorial.
If you are using a Jetson device, install Pytorch and Torchvision according to this tutorial.
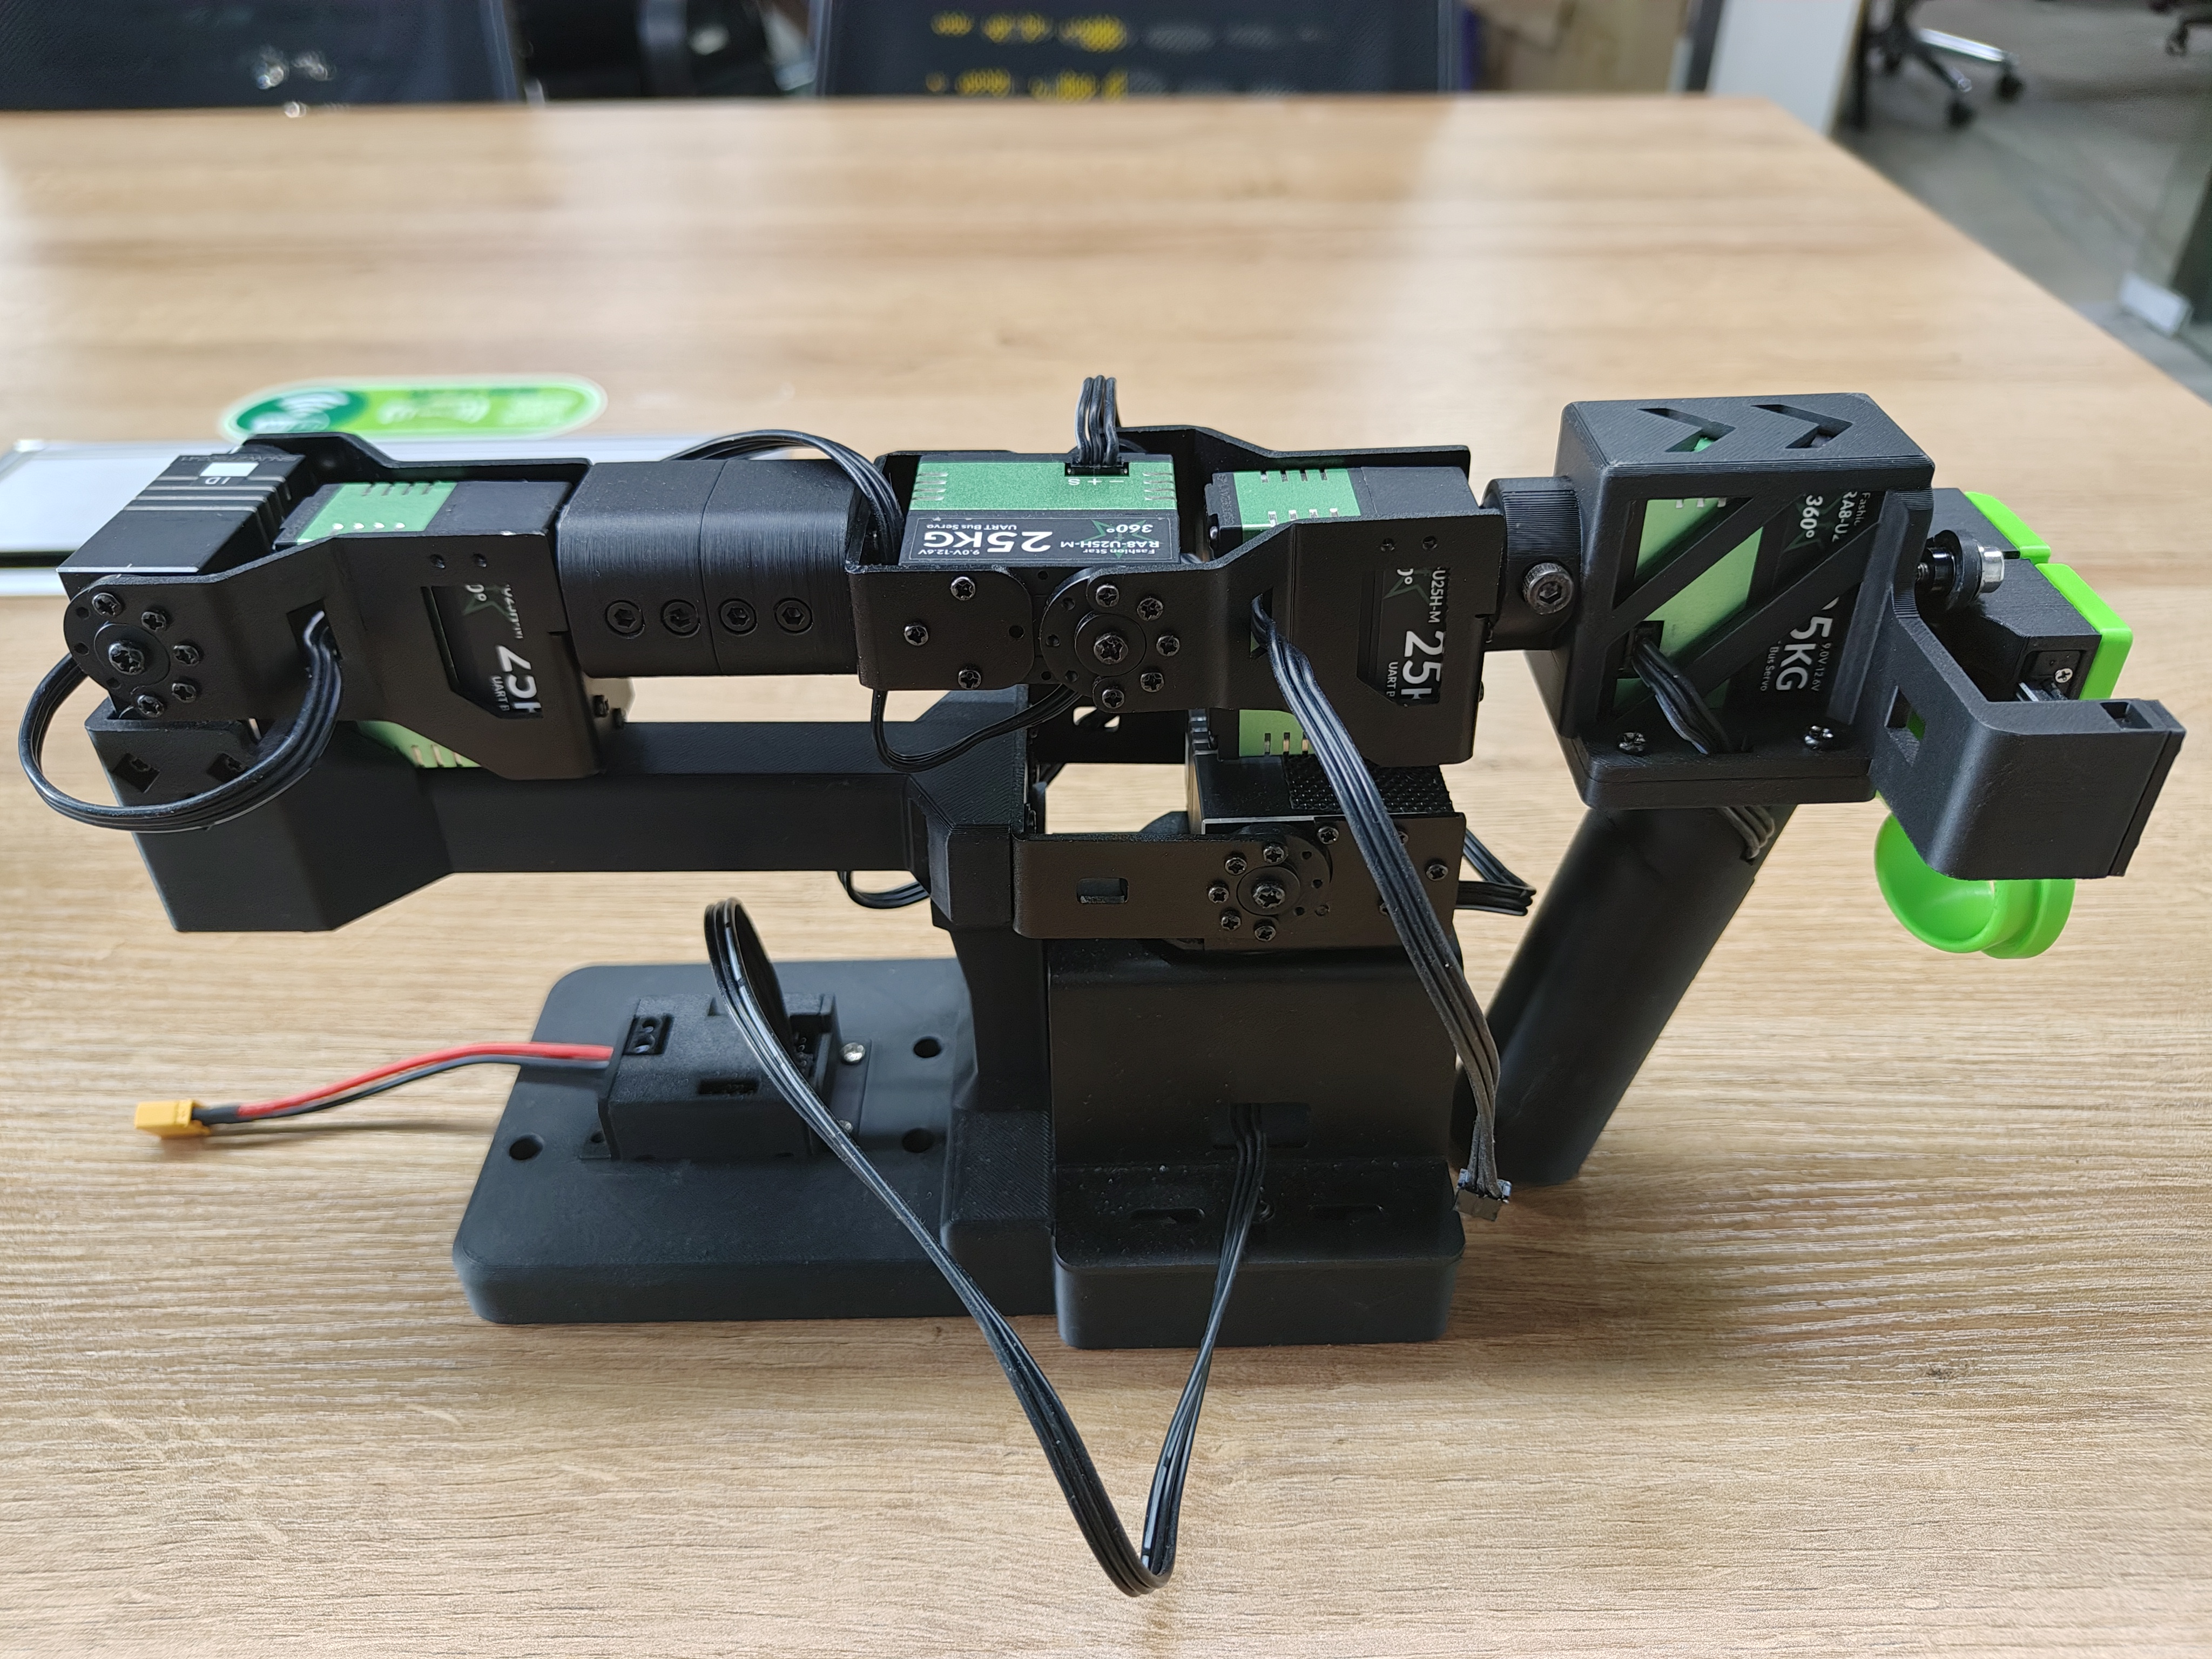
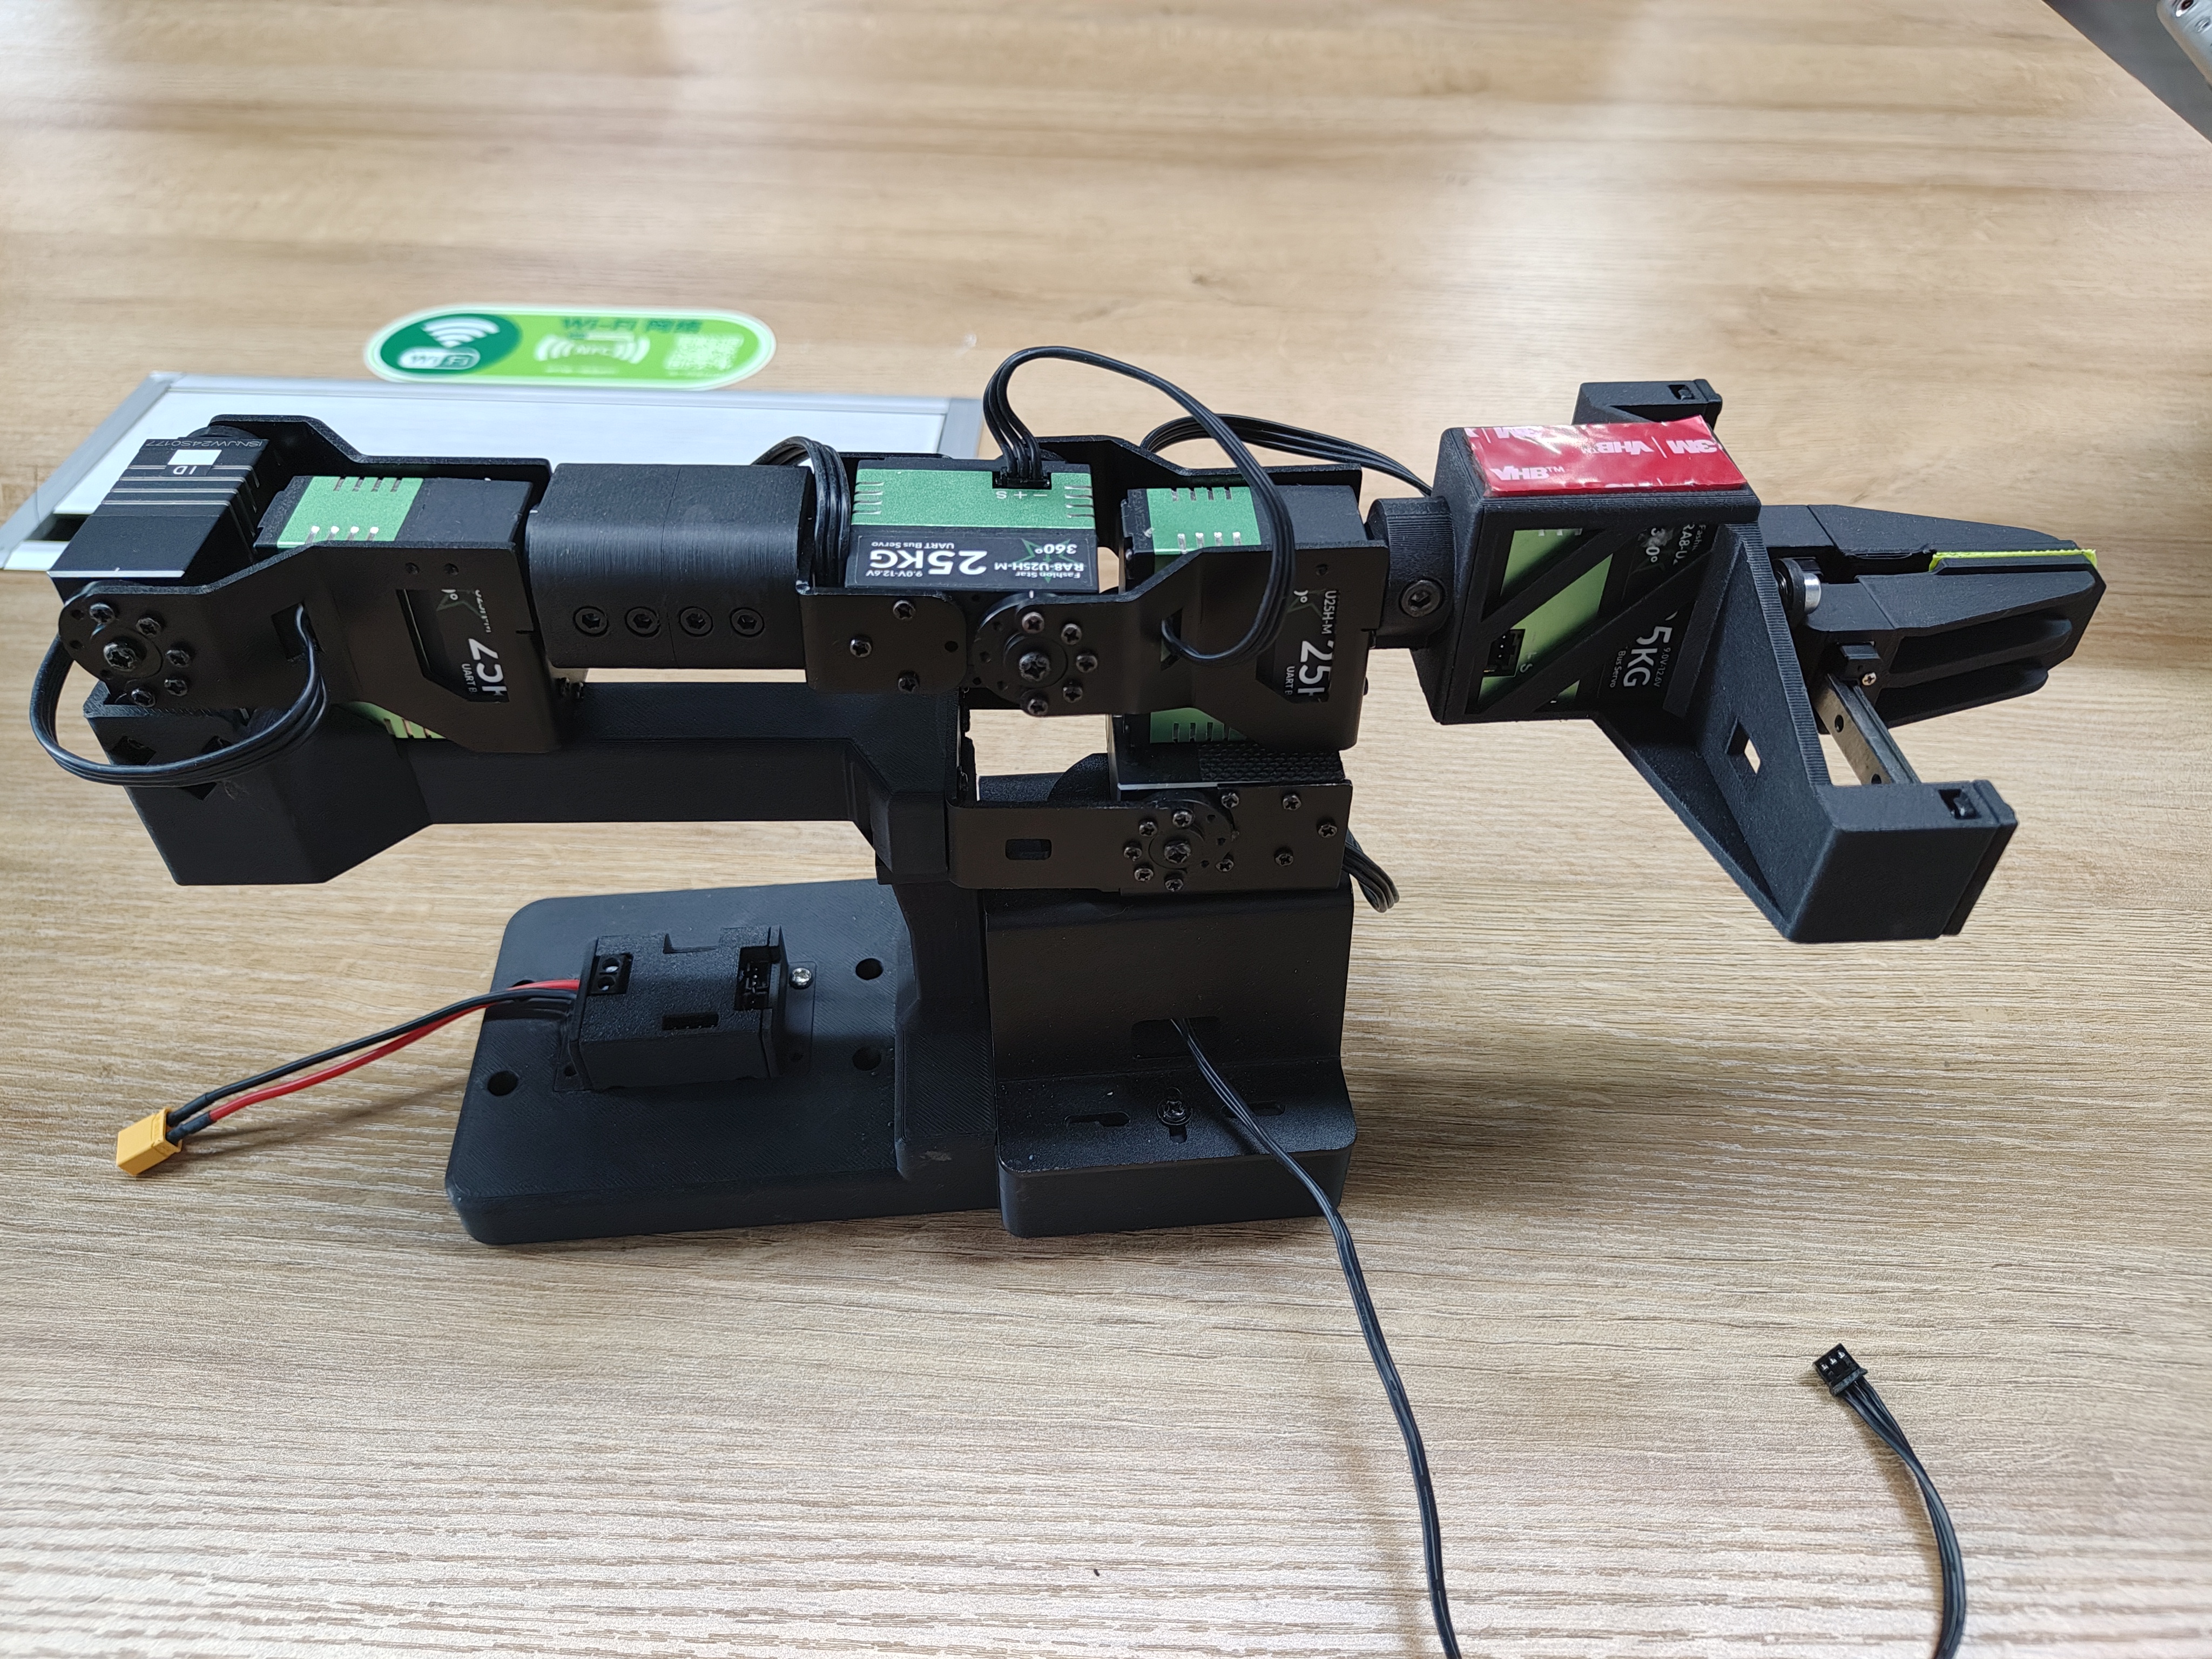
Unboxing the Robotic Arm
Robotic Arm Kit Includes
- Leader arm
- Follower arm
- Controller (handle)
- Parallel gripper
- Installation tools (screws, hex wrench)
- C-clamp ×2
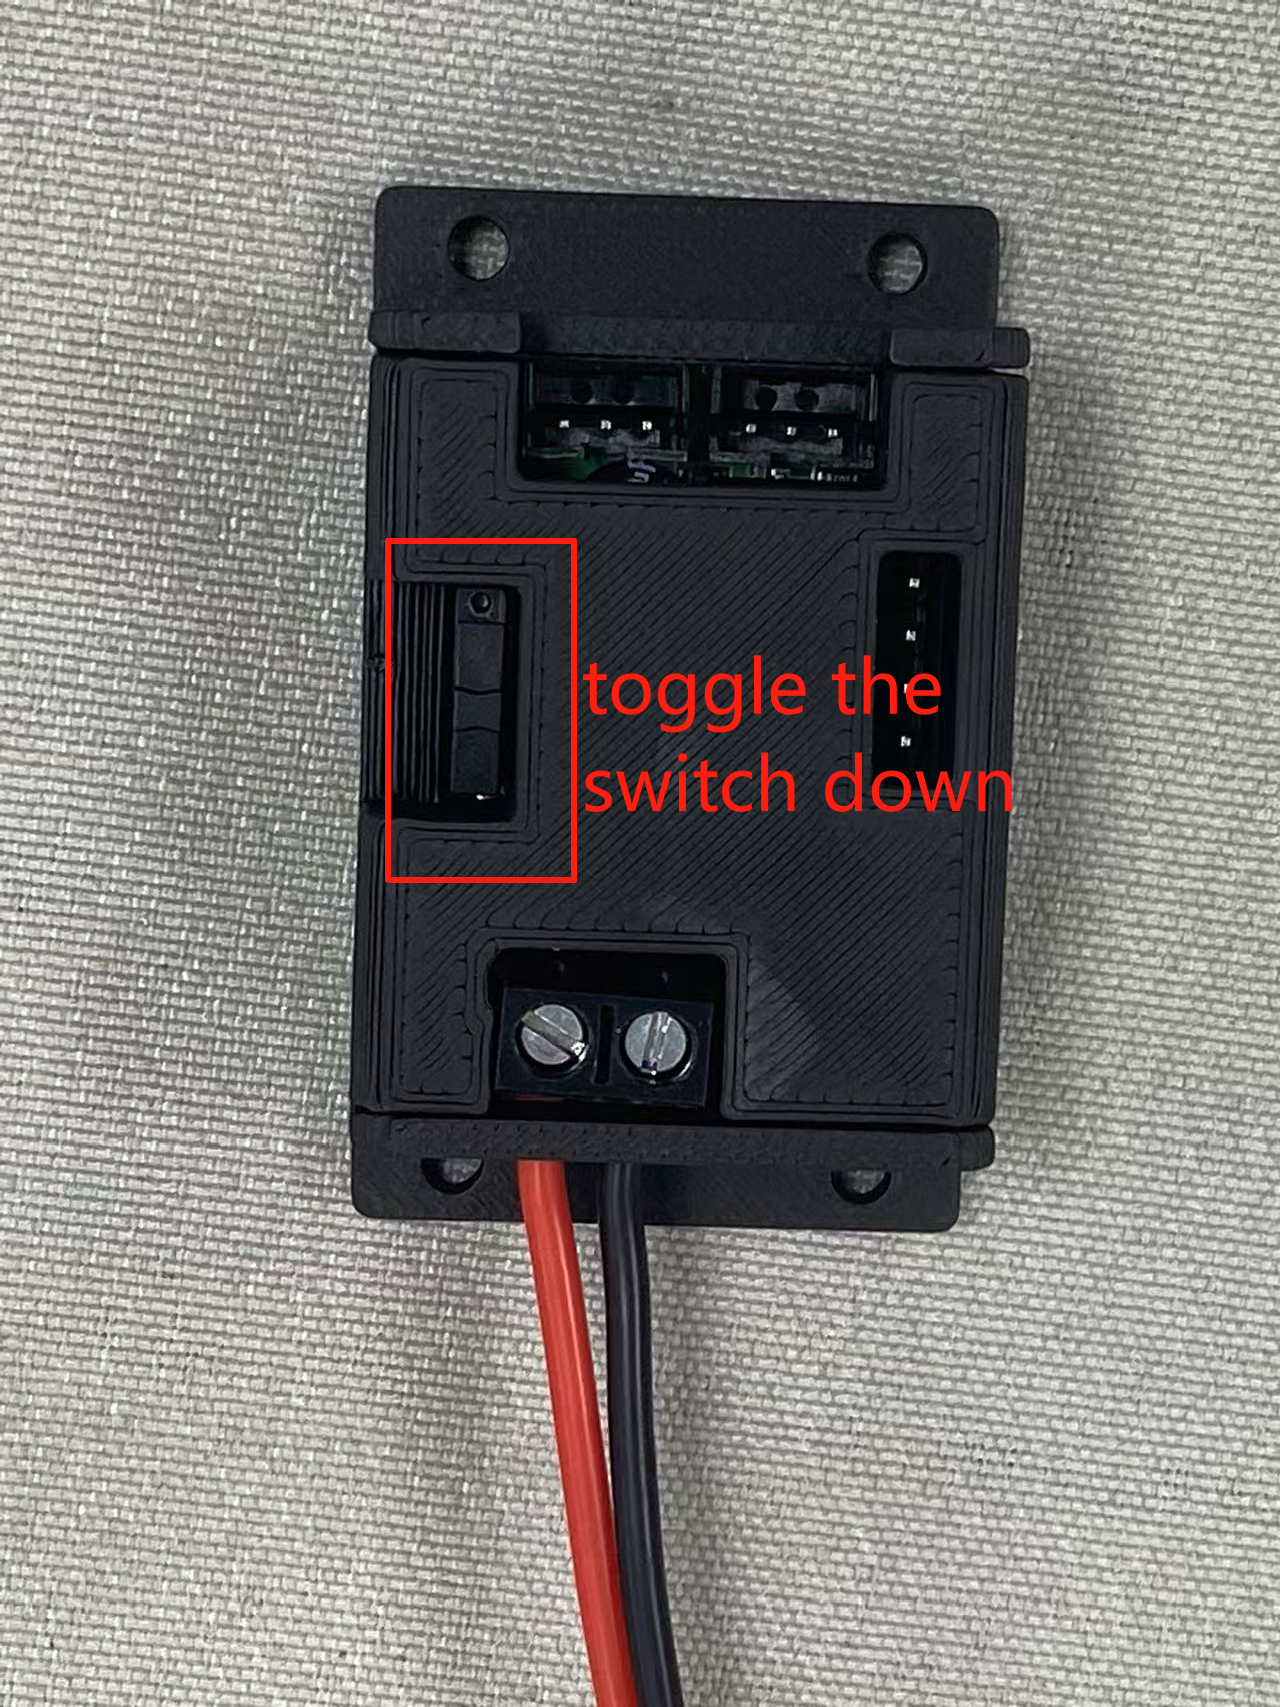
- UC-01 debuging board ×2
UC-01 debuging board switch:
Configure Arm Port
Enter the ~/lerobot directory:
cd ~/lerobot
Run the following command in the terminal to find USB ports associated to your arms:
lerobot-find-port
Remember to remove the usb, otherwise the interface will not be detected.
For example:
- Example output when identifying the leader arm's port (e.g.,
/dev/tty.usbmodem575E0031751on Mac, or possibly/dev/ttyUSB0on Linux): - Example output when identifying the follower arm's port (e.g.,
/dev/tty.usbmodem575E0032081on Mac, or possibly/dev/ttyUSB1on Linux):
If the ttyUSB0 serial port cannot be identified, try the following solutions:
List all USB ports.
lsusb

Once identified, check the information of the ttyusb.
sudo dmesg | grep ttyUSB

The last line indicates a disconnection because brltty is occupying the USB. Removing brltty will resolve the issue.
sudo apt remove brltty

Finally,use chmod command.
sudo chmod 777 /dev/ttyUSB*
You might need to give access to the USB ports by running:
sudo chmod 666 /dev/ttyUSB*
Calibrate
For videos covering the StarAI Robotic Arm from unboxing to teleoperation, you may refer to:
Move the robotic arm to the initial position of the robotic arm (as shown in the figure below) and place it in standby mode, then reconnect the power supply.
For the initial position of the new version of the robotic arm, special attention should be paid to ensuring that the servos of Joints 3, 4, and 5 strictly align with the positions in the figure.
| New Violin Leader Arm | Old Violin Leader Arm | Viola Follower Arm | Cello Follower Arm |
|---|---|---|---|
 |  |  |  |
For examples:
| Violin Leader Arm | Viola Follower Arm |
|---|---|
 |  |
Taking PC (Linux) and Jetson board as examples, the first USB device inserted will be mapped to ttyUSB0, and the second USB device inserted will be mapped to ttyUSB1.
Please pay attention to the mapping interfaces of the leader and follower before running the code.
Leader Robotic Arm
Connect the leader to /dev/ttyUSB0, or modify the --teleop.port parameter, and then execute:
lerobot-calibrate --teleop.type=lerobot_teleoperator_violin --teleop.port=/dev/ttyUSB0 --teleop.id=my_awesome_staraiviolin_arm
After startup, you will see the encoder values of each joint. You need to manually calibrate each joint one by one: rotate each joint to its maximum and minimum positions. For joints without limit stops, the rotation range must not exceed 180° clockwise or 180° counterclockwise. After calibrating all joints, press Enter to save the settings.
Follower Robotic Arm
Connect the follower to /dev/ttyUSB1, or modify the --teleop.port parameter, and then execute:
Viola:
lerobot-calibrate --robot.type=lerobot_robot_viola --robot.port=/dev/ttyUSB1 --robot.id=my_awesome_staraiviola_arm
Cello:
lerobot-calibrate --robot.type=lerobot_robot_cello --robot.port=/dev/ttyUSB1 --robot.id=my_awesome_staraicello_arm
After startup, you will see the encoder values of each joint. You need to manually calibrate each joint one by one: rotate each joint to its maximum and minimum positions. For joints without limit stops, the rotation range must not exceed 180° clockwise or 180° counterclockwise. After calibrating all joints, press Enter to save the settings.
The calibration files will be saved to the following paths: ~/.cache/huggingface/lerobot/calibration/robots and ~/.cache/huggingface/lerobot/calibration/teleoperators.
Dual-Arm Calibration Setup
Tutorial
Leader Robotic Arm
Connect left_arm_port to /dev/ttyUSB0 and right_arm_port to /dev/ttyUSB2, or modify the --teleop.left_arm_port and --teleop.right_arm_port parameters, and then execute:
lerobot-calibrate --teleop.type=lerobot_teleoperator_bimanual_leader --teleop.left_arm_port=/dev/ttyUSB0 --teleop.right_arm_port=/dev/ttyUSB2 --teleop.id=bi_starai_violin_leader
After startup, you will see the encoder values of each joint. You need to manually calibrate each joint one by one: rotate each joint to its maximum and minimum positions. For joints without limit stops, the rotation range must not exceed 180° clockwise or 180° counterclockwise. After calibrating all joints, press Enter to save the settings.
Follower Robotic Arm
Connect left_arm_port to /dev/ttyUSB1 and right_arm_port to /dev/ttyUSB3, or modify the --robot.left_arm_port and --robot.right_arm_port parameters, and then execute:
Vioa:
lerobot-calibrate --robot.type=lerobot_robot_bimanual_follower --robot.arm_name=starai_viola --robot.left_arm_port=/dev/ttyUSB1 --robot.right_arm_port=/dev/ttyUSB3 --robot.id=bi_starai_viola_follower
Cello:
lerobot-calibrate --robot.type=lerobot_robot_bimanual_follower --robot.arm_name=starai_cello --robot.left_arm_port=/dev/ttyUSB1 --robot.right_arm_port=/dev/ttyUSB3 --robot.id=bi_starai_cello_follower
After startup, you will see the encoder values of each joint. You need to manually calibrate each joint one by one: rotate each joint to its maximum and minimum positions. For joints without limit stops, the rotation range must not exceed 180° clockwise or 180° counterclockwise. After calibrating all joints, press Enter to save the settings.
The difference between single-arm and dual-arm setups lies in the --teleop.type and --robot.type parameters. Additionally, dual-arm setups require separate USB ports for the left and right arms, totaling four USB ports: --teleop.left_arm_port, --teleop.right_arm_port, --robot.left_arm_port, and --robot.right_arm_port.
If using a dual-arm setup, you need to manually modify the robotic arm file types --teleop.type and --robot.type, as well as the USB ports --teleop.left_arm_port, --teleop.right_arm_port, --robot.left_arm_port, and --robot.right_arm_port, to adapt to teleoperation, data collection, training, and evaluation commands.
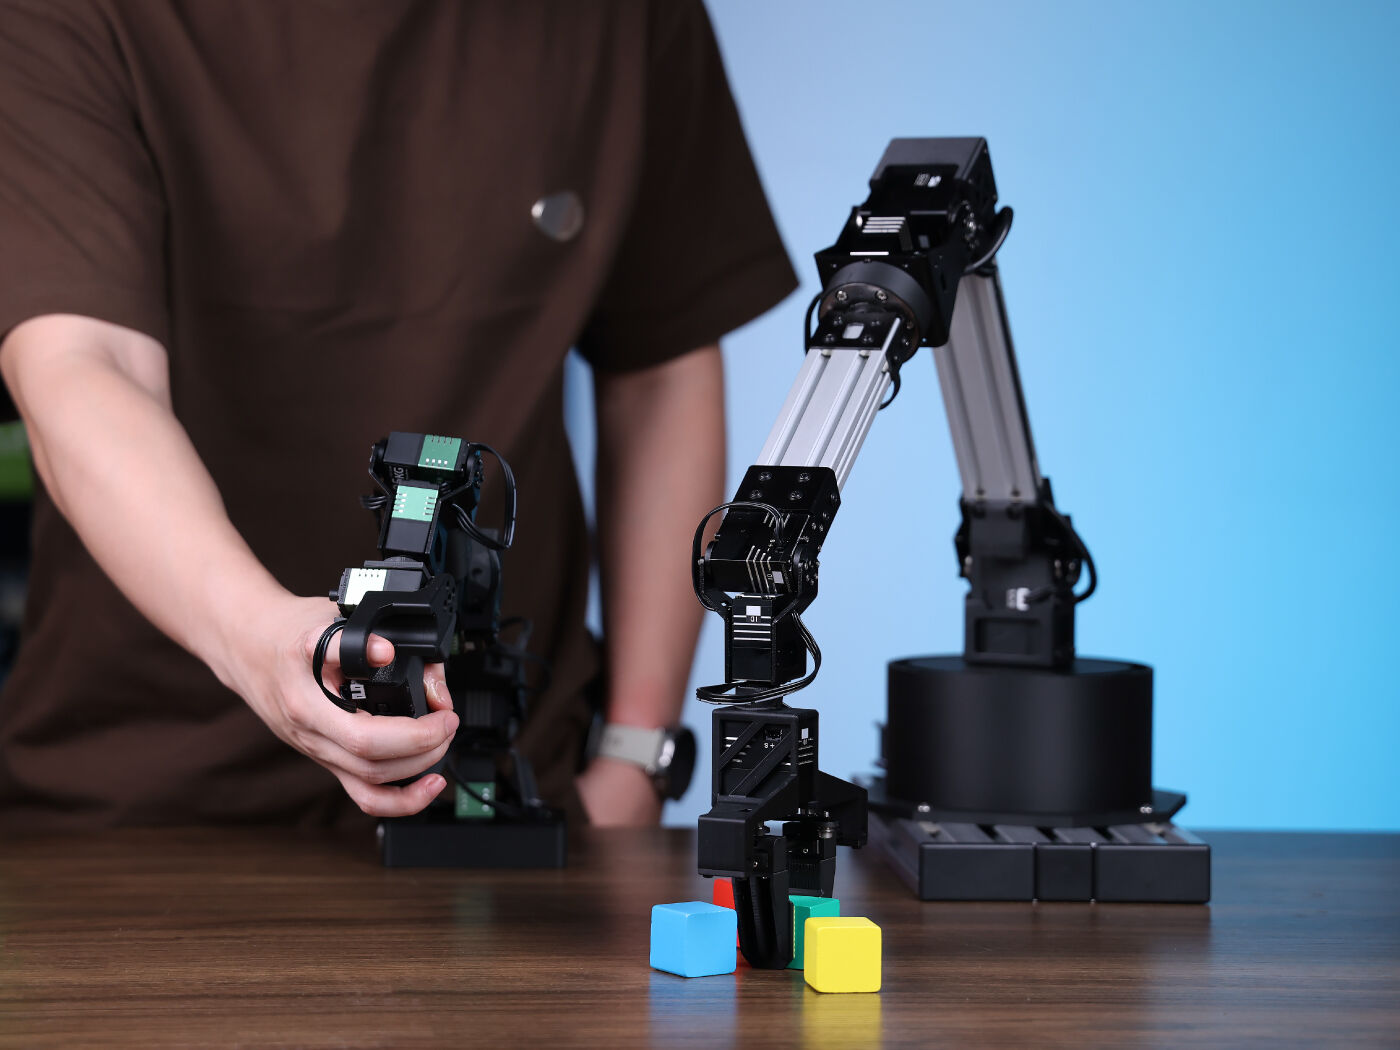
Teleoperate
Move the arm to the position shown in the diagram and set it to standby.
| Violin Leader Arm | Viola Follower Arm |
|---|---|
| |
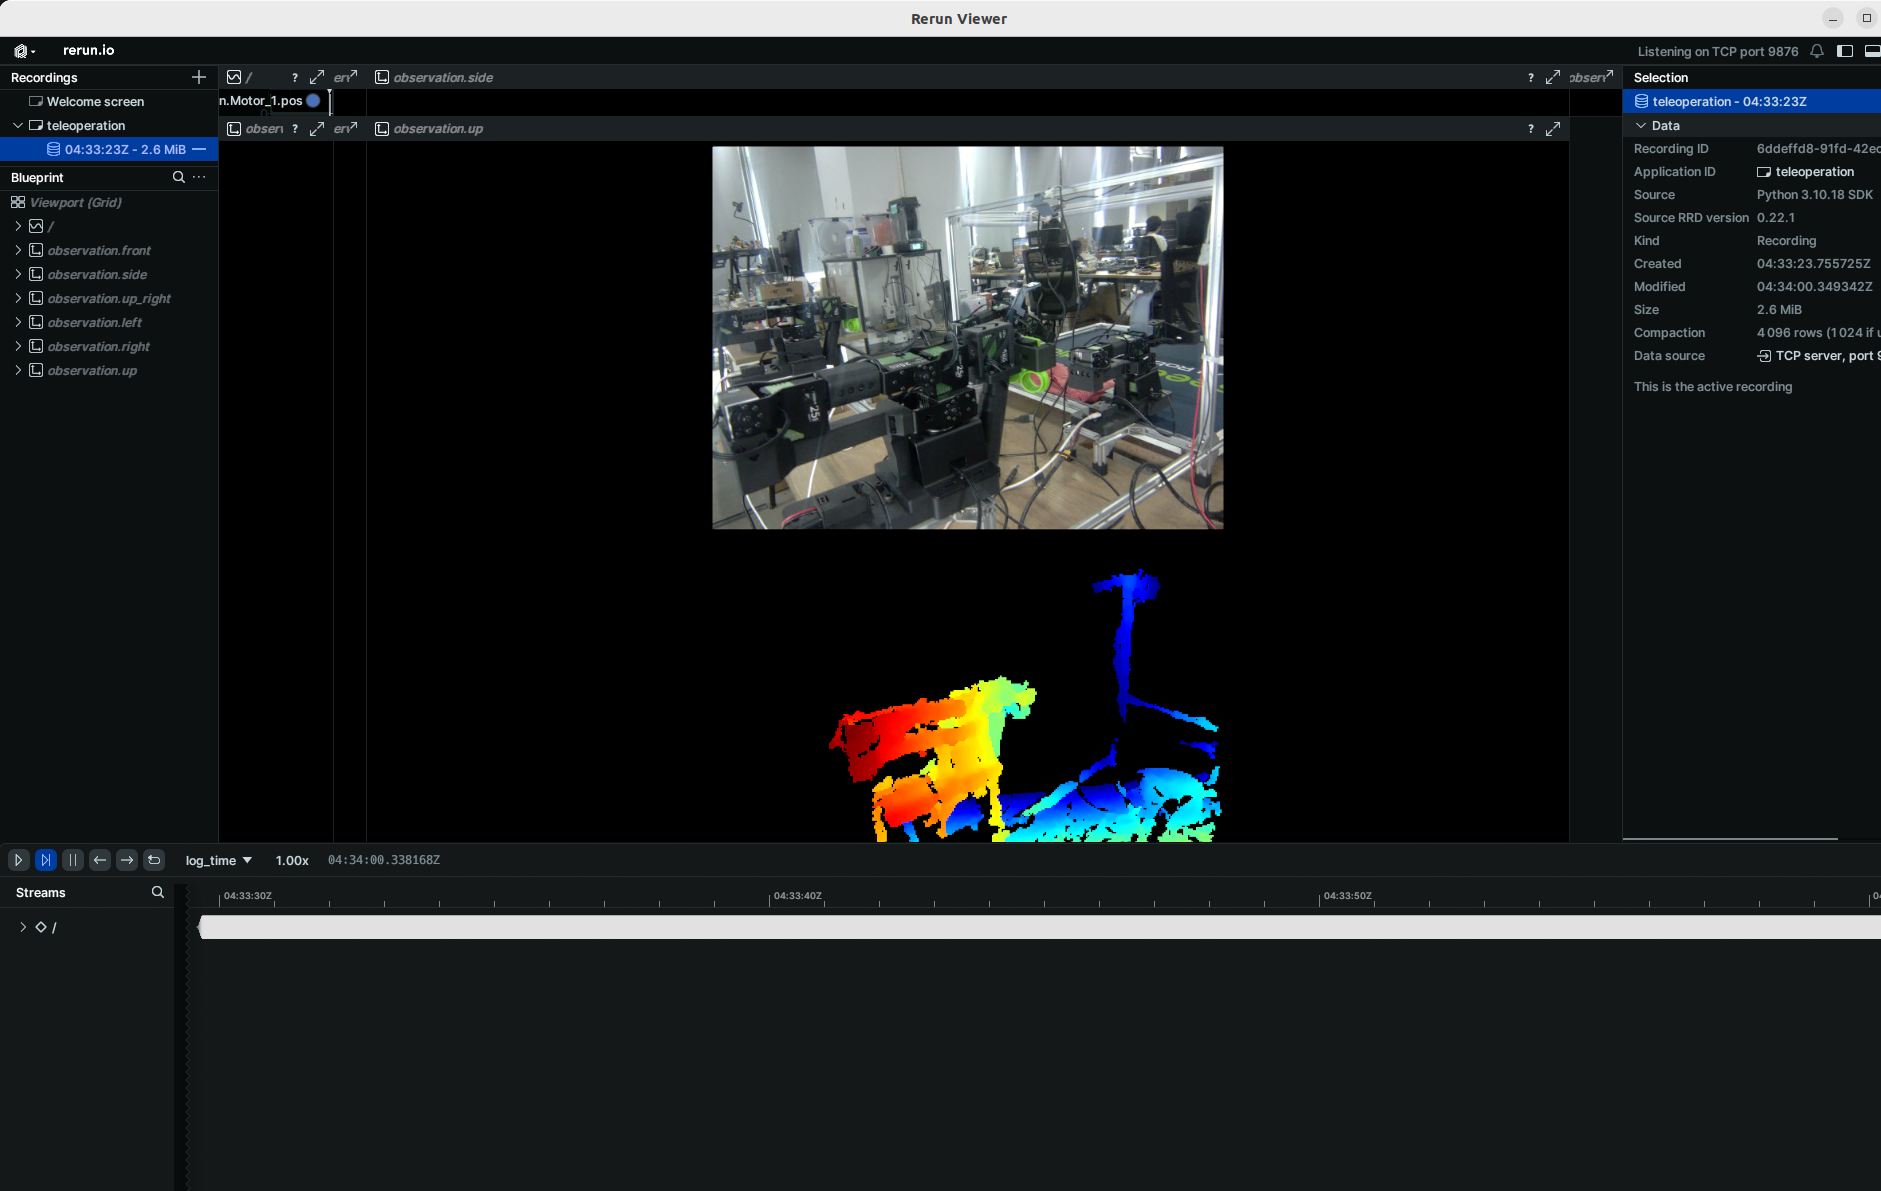
Then you are ready to teleoperate your robot (It won't display the cameras)! Run this simple script :
Violin&Viola:
lerobot-teleoperate \
    --robot.type=lerobot_robot_viola \
    --robot.port=/dev/ttyUSB1 \
    --robot.id=my_awesome_staraiviola_arm \
    --teleop.type=lerobot_teleoperator_violin \
    --teleop.port=/dev/ttyUSB0 \
    --teleop.id=my_awesome_staraiviolin_arm
Violin&Cello:
lerobot-teleoperate \
    --robot.type=lerobot_robot_cello \
    --robot.port=/dev/ttyUSB1 \
    --robot.id=my_awesome_staraicello_arm \
    --teleop.type=lerobot_teleoperator_violin \
    --teleop.port=/dev/ttyUSB0 \
    --teleop.id=my_awesome_staraiviolin_arm
Dual-Arm
Violin&Viola:
lerobot-teleoperate \
    --robot.type=lerobot_robot_bimanual_follower \
    --robot.arm_name=starai_viola \
    --robot.left_arm_port=/dev/ttyUSB1 \
    --robot.right_arm_port=/dev/ttyUSB3 \
    --robot.id=bi_starai_viola_follower \
    --teleop.type=lerobot_teleoperator_bimanual_leader \
    --teleop.left_arm_port=/dev/ttyUSB0 \
    --teleop.right_arm_port=/dev/ttyUSB2 \
    --teleop.id=bi_starai_violin_leader
Violin&Cello:
lerobot-teleoperate \
    --robot.type=lerobot_robot_bimanual_follower \
    --robot.arm_name=starai_cello \
    --robot.left_arm_port=/dev/ttyUSB1 \
    --robot.right_arm_port=/dev/ttyUSB3 \
    --robot.id=bi_starai_cello_follower \
    --teleop.type=lerobot_teleoperator_bimanual_leader \
    --teleop.left_arm_port=/dev/ttyUSB0 \
    --teleop.right_arm_port=/dev/ttyUSB2 \
    --teleop.id=bi_starai_violin_leader
The remote operation command will automatically detect the following parameters:
- Identify any missing calibrations and initiate the calibration procedure.
- Connect the robot and the remote operation device and start the remote operation.
After the program starts, the Hover Lock Technology remains functional.
Add cameras
If using the Orbbec Gemini2 Depth Camera

- 🚀 Step 1: Install the Orbbec SDK Dependent Environment
-
Clone the
pyorbbecrepositorycd ~/
git clone https://github.com/orbbec/pyorbbecsdk.git -
Download and install the corresponding .whl file for the SDK
Go to pyorbbecsdk Releases,
select and install based on your Python version. For example:pip install pyorbbecsdk-x.x.x-cp310-cp310-linux_x86_64.whl -
Install dependencies in the
pyorbbecdirectorycd ~/pyorbbecsdk
pip install -r requirements.txtForce downgrade the
numpyversion to1.26.0pip install numpy==1.26.0
Red error messages can be ignored.
- Clone the Orbbec SDK into the
~/lerobot/src/camerasdirectory
cd ~/lerobot/src/cameras
git clone https://github.com/ZhuYaoHui1998/orbbec.git
- Modify utils.py and init.py
- Find
utils.pyin the~/lerobot/src/lerobot/camerasdirectory, and add the following code at line 40:
elif cfg.type == "orbbec":
            from .orbbec.camera_orbbec import OrbbecCamera

            cameras[key] = OrbbecCamera(cfg)
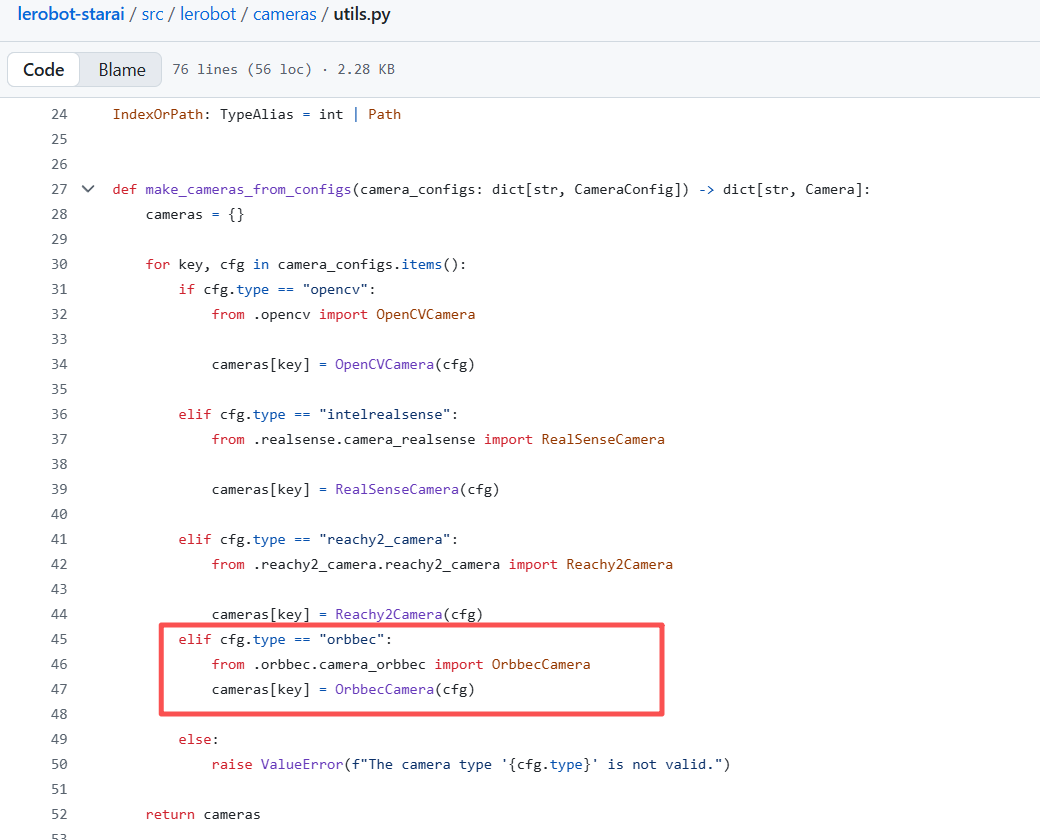
- Find
__init__.pyin the~/lerobot/src/lerobot/camerasdirectory, and add the following code at line 18:
from .orbbec.configuration_orbbec import OrbbecCameraConfig

- 🚀 Step 2: Function Call and Examples
In all the following examples, replace starai_viola with the actual model of the robotic arm you are using (e.g., so100 / so101).
We have added the focus_area hyperparameter. Since depth data that is too far away is meaningless for the robotic arm (it cannot reach or grasp objects), depth data less than or greater than the focus_area will be displayed in black. The default focus_area is (20, 600).
Currently, the only supported resolution is width: 640, height: 880.
Violin&Viola:
lerobot-teleoperate \
    --robot.type=lerobot_starai_viola \
    --robot.port=/dev/ttyUSB1 \
    --robot.id=my_awesome_staraiviola_arm \
    --robot.cameras="{ up: {type: orbbec, width: 640, height: 880, fps: 30, focus_area:[60,300]}}" \
    --teleop.type=starai_violin \
    --teleop.port=/dev/ttyUSB0 \
    --teleop.id=my_awesome_staraiviolin_arm \
    --display_data=true
Violin&Cello:
lerobot-teleoperate \
    --robot.type=lerobot_starai_cello \
    --robot.port=/dev/ttyUSB1 \
    --robot.id=my_awesome_staraicello_arm \
    --robot.cameras="{ up: {type: orbbec, width: 640, height: 880, fps: 30, focus_area:[60,300]}}" \
    --teleop.type=starai_violin \
    --teleop.port=/dev/ttyUSB0 \
    --teleop.id=my_awesome_staraiviolin_arm \
    --display_data=true
For subsequent tasks such as data collection, training, and evaluation, the process is the same as that for regular RGB commands. You only need to replace the relevant part in the regular RGB command with:
--robot.cameras="{ front: {type: orbbec, width: 640, height: 880, fps: 30, focus_area:(20,600)}}" \
You can also add an additional monocular RGB camera afterward.
After inserting your two USB cameras, run the following script to check the port numbers of the cameras. It is important to remember that the camera must not be connected to a USB Hub; instead, it should be plugged directly into the device. The slower speed of a USB Hub may result in the inability to read image data.
lerobot-find-cameras opencv # or realsense for Intel Realsense cameras
The terminal will print out the following information. For example, the laptop camera is index 2, and the USB camera is index 4.
--- Detected Cameras ---
Camera #0:
  Name: OpenCV Camera @ /dev/video2
  Type: OpenCV
  Id: /dev/video2
  Backend api: V4L2
  Default stream profile:
    Format: 0.0
    Width: 640
    Height: 480
    Fps: 30.0
--------------------
Camera #1:
  Name: OpenCV Camera @ /dev/video4
  Type: OpenCV
  Id: /dev/video4
  Backend api: V4L2
  Default stream profile:
    Format: 0.0
    Width: 640
    Height: 360
    Fps: 30.0
--------------------

Finalizing image saving...
Image capture finished. Images saved to outputs/captured_images
You can find the images captured by each camera in the outputs/images_from_opencv_cameras directory and verify the port index information corresponding to cameras at different positions.
After confirming the external cameras, replace the camera information below with your actual camera information, and you will be able to display the cameras on your computer during remote operation:
Violin&Viola:
lerobot-teleoperate \
    --robot.type=lerobot_robot_viola \
    --robot.port=/dev/ttyUSB1 \
    --robot.id=my_awesome_staraiviola_arm \
    --robot.cameras="{ up: {type: opencv, index_or_path: /dev/video2, width: 640, height: 480, fps: 30, fourcc: "MJPG"},front: {type: opencv, index_or_path: /dev/video4, width: 640, height: 480, fps: 30, fourcc: "MJPG"}}" \
    --teleop.type=lerobot_teleoperator_violin \
    --teleop.port=/dev/ttyUSB0 \
    --teleop.id=my_awesome_staraiviolin_arm \
    --display_data=true
Images in the fourcc: "MJPG" format are compressed. You can try higher resolutions, and you may also attempt the YUYV format. However, the latter will reduce the image resolution and FPS, leading to lag in the robotic arm's operation. Currently, under the MJPG format, it can support 3 cameras at a resolution of 1920*1080 while maintaining 30FPS. That said, connecting 2 cameras to a computer via the same USB HUB is still not recommended.
Violin&Cello:
lerobot-teleoperate \
    --robot.type=lerobot_robot_cello \
    --robot.port=/dev/ttyUSB1 \
    --robot.id=my_awesome_staraicello_arm \
    --robot.cameras="{ up: {type: opencv, index_or_path: /dev/video2, width: 640, height: 480, fps: 30, fourcc: "MJPG"},front: {type: opencv, index_or_path: /dev/video4, width: 640, height: 480, fps: 30, fourcc: "MJPG"}}" \
    --teleop.type=lerobot_teleoperator_violin \
    --teleop.port=/dev/ttyUSB0 \
    --teleop.id=my_awesome_staraiviolin_arm \
    --display_data=true
Images in the fourcc: "MJPG" format are compressed. You can try higher resolutions, and you may also attempt the YUYV format. However, the latter will reduce the image resolution and FPS, leading to lag in the robotic arm's operation. Currently, under the MJPG format, it can support 3 cameras at a resolution of 1920*1080 while maintaining 30FPS. That said, connecting 2 cameras to a computer via the same USB HUB is still not recommended.
Dual-Arm
Violin&Viola:
lerobot-teleoperate \
    --robot.type=lerobot_robot_bimanual_follower \
    --robot.arm_name=starai_viola \
    --robot.left_arm_port=/dev/ttyUSB1 \
    --robot.right_arm_port=/dev/ttyUSB3 \
    --robot.id=bi_starai_viola_follower \
    --robot.cameras="{ up: {type: opencv, index_or_path: /dev/video2, width: 640, height: 480, fps: 30, fourcc: "MJPG"},front: {type: opencv, index_or_path: /dev/video4, width: 640, height: 480, fps: 30, fourcc: "MJPG"}}" \
    --teleop.type=lerobot_teleoperator_bimanual_leader \
    --teleop.left_arm_port=/dev/ttyUSB0 \
    --teleop.right_arm_port=/dev/ttyUSB2 \
    --teleop.id=bi_starai_violin_leader \
    --display_data=true
Violin&Cello:
lerobot-teleoperate \
    --robot.type=lerobot_robot_bimanual_follower \
    --robot.arm_name=starai_cello \
    --robot.left_arm_port=/dev/ttyUSB1 \
    --robot.right_arm_port=/dev/ttyUSB3 \
    --robot.id=bi_starai_cello_follower \
    --robot.cameras="{ up: {type: opencv, index_or_path: /dev/video2, width: 640, height: 480, fps: 30, fourcc: "MJPG"},front: {type: opencv, index_or_path: /dev/video4, width: 640, height: 480, fps: 30, fourcc: "MJPG"}}" \
    --teleop.type=lerobot_teleoperator_bimanual_leader \
    --teleop.left_arm_port=/dev/ttyUSB0 \
    --teleop.right_arm_port=/dev/ttyUSB2 \
    --teleop.id=bi_starai_violin_leader \
    --display_data=true
Images in the fourcc: "MJPG" format are compressed. You can try higher resolutions, and you may also attempt the YUYV format. However, the latter will reduce the image resolution and FPS, leading to lag in the robotic arm's operation. Currently, under the MJPG format, it can support 3 cameras at a resolution of 1920*1080 while maintaining 30FPS. That said, connecting 2 cameras to a computer via the same USB HUB is still not recommended.
If you find bug like this.
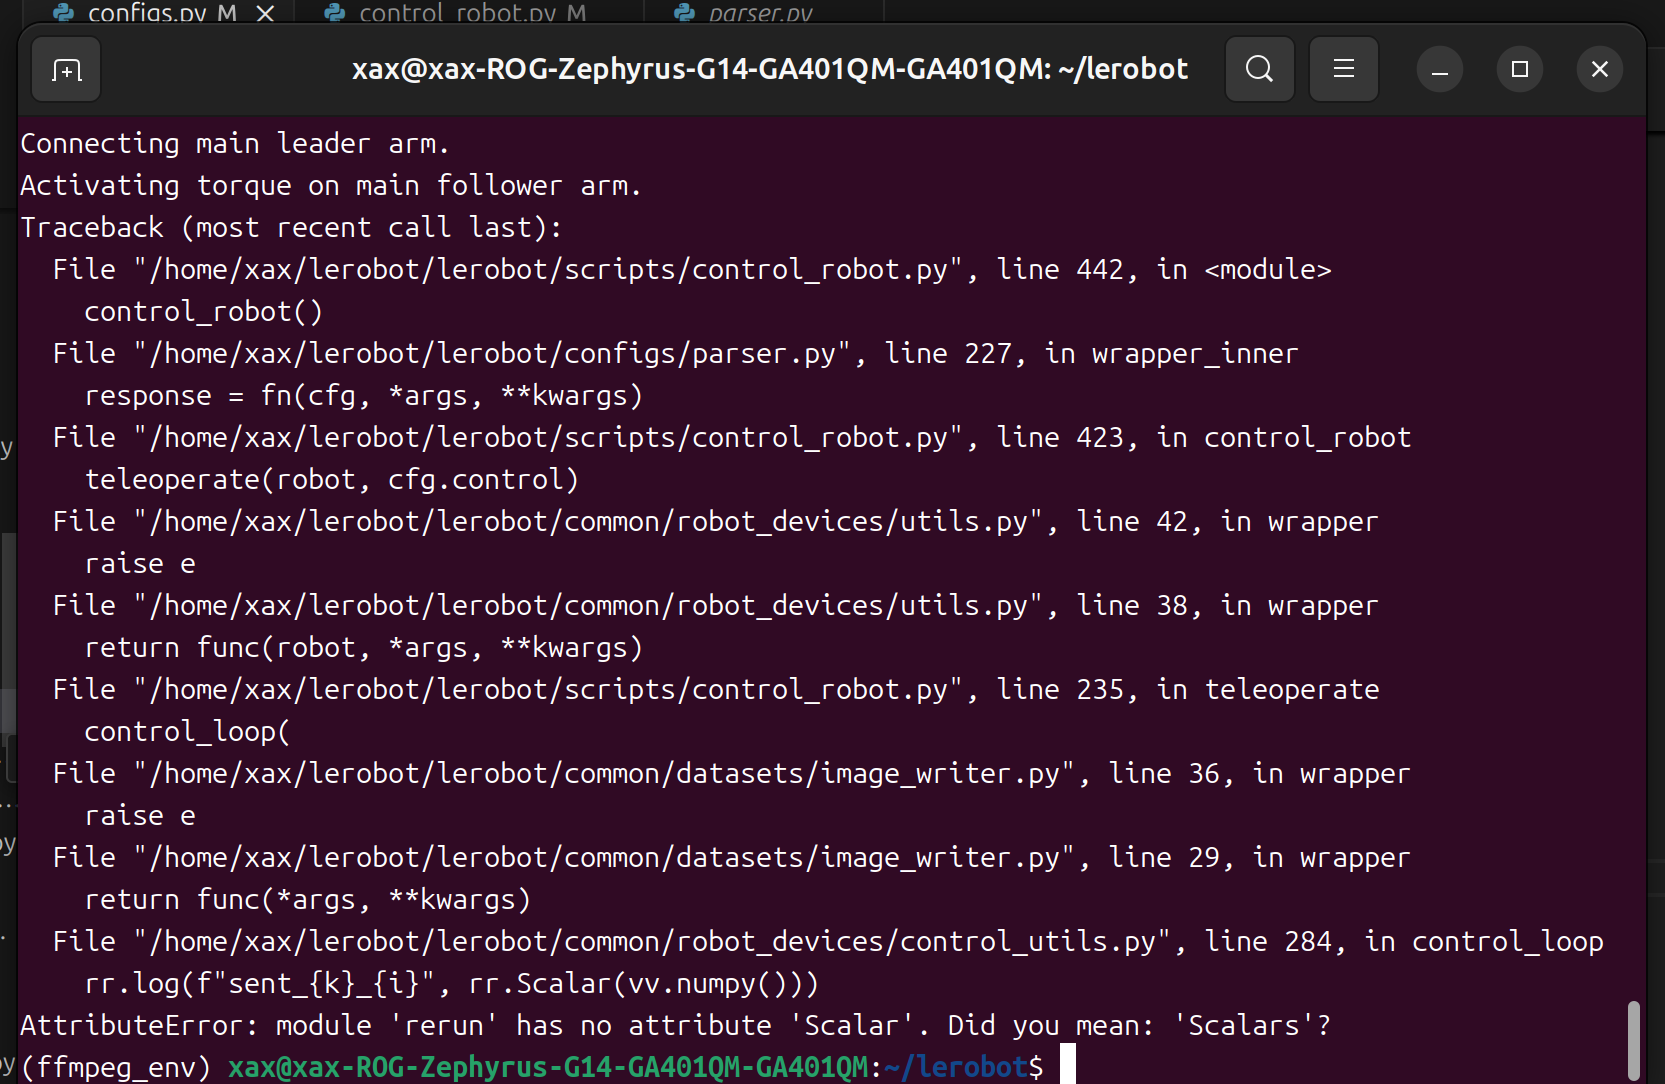
You can downgrade the rerun version to resolve the issue.
pip3 install rerun-sdk==0.23
Record the dataset
Once you're familiar with teleoperation, you can record your first dataset.
If you want to use the Hugging Face hub features for uploading your dataset and you haven't previously done it, make sure you've logged in using a write-access token, which can be generated from the Hugging Face settings:
huggingface-cli login --token ${HUGGINGFACE_TOKEN} --add-to-git-credential
Store your Hugging Face repository name in a variable to run these commands:
HF_USER=$(huggingface-cli whoami | head -n 1)
echo $HF_USER
Record 10 episodes and upload your dataset to the hub:
Violin&Viola:
lerobot-record \
    --robot.type=lerobot_robot_viola \
    --robot.port=/dev/ttyUSB1 \
    --robot.id=my_awesome_staraiviola_arm \
    --robot.cameras="{ up: {type: opencv, index_or_path: /dev/video2, width: 640, height: 480, fps: 30, fourcc: "MJPG"},front: {type: opencv, index_or_path: /dev/video4, width: 640, height: 480, fps: 30, fourcc: "MJPG"}}" \
    --teleop.type=lerobot_teleoperator_violin \
    --teleop.port=/dev/ttyUSB0 \
    --teleop.id=my_awesome_staraiviolin_arm \
    --display_data=true \
    --dataset.repo_id=starai/record-test \
    --dataset.episode_time_s=30 \
    --dataset.reset_time_s=30 \
    --dataset.num_episodes=10 \
    --dataset.push_to_hub=True \
    --dataset.single_task="Grab the black cube"
Violin&Cello:
lerobot-record \
    --robot.type=lerobot_robot_cello \
    --robot.port=/dev/ttyUSB1 \
    --robot.id=my_awesome_staraicello_arm \
    --robot.cameras="{ up: {type: opencv, index_or_path: /dev/video2, width: 640, height: 480, fps: 30, fourcc: "MJPG"},front: {type: opencv, index_or_path: /dev/video4, width: 640, height: 480, fps: 30, fourcc: "MJPG"}}" \
    --teleop.type=lerobot_teleoperator_violin \
    --teleop.port=/dev/ttyUSB0 \
    --teleop.id=my_awesome_staraiviolin_arm \
    --display_data=true \
    --dataset.repo_id=starai/record-test \
    --dataset.episode_time_s=30 \
    --dataset.reset_time_s=30 \
    --dataset.num_episodes=10 \
    --dataset.push_to_hub=True \
    --dataset.single_task="Grab the black cube"
Dual-Arm
Violin&Viola:
lerobot-record \
    --robot.type=lerobot_robot_bimanual_follower \
    --robot.arm_name=starai_viola \
    --robot.left_arm_port=/dev/ttyUSB1 \
    --robot.right_arm_port=/dev/ttyUSB3 \
    --robot.id=bi_starai_viola_follower \
    --teleop.type=lerobot_teleoperator_bimanual_leader \
    --teleop.left_arm_port=/dev/ttyUSB0 \
    --teleop.right_arm_port=/dev/ttyUSB2 \
    --teleop.id=bi_starai_violin_leader \
    --robot.cameras="{ up: {type: opencv, index_or_path: /dev/video2, width: 640, height: 480, fps: 30, fourcc: "MJPG"},front: {type: opencv, index_or_path: /dev/video4, width: 640, height: 480, fps: 30, fourcc: "MJPG"}}" \
    --display_data=true \
    --dataset.repo_id=starai/record-test_bi_arm \
    --dataset.episode_time_s=30 \
    --dataset.reset_time_s=30 \
    --dataset.num_episodes=10 \
    --dataset.push_to_hub=True \
    --dataset.single_task="Grab the black cube"
Violin&Cello:
lerobot-record \
    --robot.type=lerobot_robot_bimanual_follower \
    --robot.arm_name=starai_cello \
    --robot.left_arm_port=/dev/ttyUSB1 \
    --robot.right_arm_port=/dev/ttyUSB3 \
    --robot.id=bi_starai_cello_follower \
    --teleop.type=lerobot_teleoperator_bimanual_leader \
    --teleop.left_arm_port=/dev/ttyUSB0 \
    --teleop.right_arm_port=/dev/ttyUSB2 \
    --teleop.id=bi_starai_violin_leader \
    --robot.cameras="{ up: {type: opencv, index_or_path: /dev/video2, width: 640, height: 480, fps: 30, fourcc: "MJPG"},front: {type: opencv, index_or_path: /dev/video4, width: 640, height: 480, fps: 30, fourcc: "MJPG"}}" \
    --display_data=true \
    --dataset.repo_id=starai/record-test_bi_arm \
    --dataset.episode_time_s=30 \
    --dataset.reset_time_s=30 \
    --dataset.num_episodes=10 \
    --dataset.push_to_hub=True \
    --dataset.single_task="Grab the black cube"
To differentiate between single-arm and dual-arm setups, the --dataset.repo_id here is named starai/record-test_bi_arm.
If you do not want to use the Hugging Face Hub dataset upload feature, you can choose --dataset.push_to_hub=false. Also, replace --dataset.repo_id=${HF_USER}/starai with a custom local folder name, for example, --dataset.repo_id=starai/record-test. The data will be stored in ~/.cache/huggingface/lerobot under the system's home directory.
Not uploading to Hub:
Violin&Viola:
lerobot-record \
    --robot.type=lerobot_robot_viola \
    --robot.port=/dev/ttyUSB1 \
    --robot.id=my_awesome_staraiviola_arm \
    --robot.cameras="{ up: {type: opencv, index_or_path: /dev/video2, width: 640, height: 480, fps: 30, fourcc: "MJPG"},front: {type: opencv, index_or_path: /dev/video4, width: 640, height: 480, fps: 30, fourcc: "MJPG"}}" \
    --teleop.type=lerobot_teleoperator_violin \
    --teleop.port=/dev/ttyUSB0 \
    --teleop.id=my_awesome_staraiviolin_arm \
    --display_data=true \
    --dataset.repo_id=starai/record-test \
    --dataset.episode_time_s=30 \
    --dataset.reset_time_s=30 \
    --dataset.num_episodes=10 \
    --dataset.push_to_hub=False \
    --dataset.single_task="Grab the black cube"
Violin&Cello:
lerobot-record \
    --robot.type=lerobot_robot_cello \
    --robot.port=/dev/ttyUSB1 \
    --robot.id=my_awesome_staraicello_arm \
    --robot.cameras="{ up: {type: opencv, index_or_path: /dev/video2, width: 640, height: 480, fps: 30, fourcc: "MJPG"},front: {type: opencv, index_or_path: /dev/video4, width: 640, height: 480, fps: 30, fourcc: "MJPG"}}" \
    --teleop.type=lerobot_teleoperator_violin \
    --teleop.port=/dev/ttyUSB0 \
    --teleop.id=my_awesome_staraiviolin_arm \
    --display_data=true \
    --dataset.repo_id=starai/record-test \
    --dataset.episode_time_s=30 \
    --dataset.reset_time_s=30 \
    --dataset.num_episodes=10 \
    --dataset.push_to_hub=False \
    --dataset.single_task="Grab the black cube"
Dual-Arm
Violin&Viola:
lerobot-record \
    --robot.type=lerobot_robot_bimanual_follower \
    --robot.arm_name=starai_viola \
    --robot.left_arm_port=/dev/ttyUSB1 \
    --robot.right_arm_port=/dev/ttyUSB3 \
    --robot.id=bi_starai_viola_follower \
    --teleop.type=lerobot_teleoperator_bimanual_leader \
    --teleop.left_arm_port=/dev/ttyUSB0 \
    --teleop.right_arm_port=/dev/ttyUSB2 \
    --teleop.id=bi_starai_violin_leader \
    --robot.cameras="{ up: {type: opencv, index_or_path: /dev/video2, width: 640, height: 480, fps: 30, fourcc: "MJPG"},front: {type: opencv, index_or_path: /dev/video4, width: 640, height: 480, fps: 30, fourcc: "MJPG"}}" \
    --display_data=true \
    --dataset.repo_id=starai/record-test_bi_arm \
    --dataset.episode_time_s=30 \
    --dataset.reset_time_s=30 \
    --dataset.num_episodes=10 \
    --dataset.push_to_hub=False \
    --dataset.single_task="Grab the black cube"
Violin&Cello:
lerobot-record \
    --robot.type=lerobot_robot_bimanual_follower \
    --robot.arm_name=starai_cello \
    --robot.left_arm_port=/dev/ttyUSB1 \
    --robot.right_arm_port=/dev/ttyUSB3 \
    --robot.id=bi_starai_cello_follower \
    --teleop.type=lerobot_teleoperator_bimanual_leader \
    --teleop.left_arm_port=/dev/ttyUSB0 \
    --teleop.right_arm_port=/dev/ttyUSB2 \
    --teleop.id=bi_starai_violin_leader \
    --robot.cameras="{ up: {type: opencv, index_or_path: /dev/video2, width: 640, height: 480, fps: 30, fourcc: "MJPG"},front: {type: opencv, index_or_path: /dev/video4, width: 640, height: 480, fps: 30, fourcc: "MJPG"}}" \
    --display_data=true \
    --dataset.repo_id=starai/record-test_bi_arm \
    --dataset.episode_time_s=30 \
    --dataset.reset_time_s=30 \
    --dataset.num_episodes=10 \
    --dataset.push_to_hub=False \
    --dataset.single_task="Grab the black cube"
To differentiate between single-arm and dual-arm setups, the --dataset.repo_id here is named starai/record-test_bi_arm.
recordprovides a set of tools for capturing and managing data during robot operations:
1. Data Storage
- Data is stored in the
LeRobotDatasetformat and saved to disk during the recording process.
2. Checkpointing and Resuming
- Checkpoints are automatically created during recording.
- If an issue occurs, you can resume by rerunning the same command with
--resume=true. When resuming recording, you must set--dataset.num_episodesto the additional number of episodes to record, not the target total number of episodes in the dataset! - To start recording from scratch, manually delete the dataset directory.
3. Recording Parameters
Set the data recording workflow using command-line parameters:
Parameter Description
- warmup-time-s: The initialization time.
- episode-time-s: The duration for each data collection session.
- reset-time-s: The preparation time between each data collection.
- num-episodes: The expected number of data sets to collect.
- push-to-hub: Determines whether to upload the data to HuggingFace Hub.
4. Keyboard Controls During Recording
Use keyboard shortcuts to control the data recording workflow:
- Press right arrow key (→): Prematurely stop the current episode or reset the time, then move to the next one.
- Press left arrow key (←): Cancel the current episode and re-record it.
- Press ESC: Immediately stop the session, encode the video, and upload the dataset.
If keyboard not work, you may need install other version of pynput.
pip install pynput==1.6.8
Replay an episode
Now try to replay the first episode on your robot:
Viola:
lerobot-replay \
    --robot.type=lerobot_robot_viola \
    --robot.port=/dev/ttyUSB1 \
    --robot.id=my_awesome_staraiviola_arm \
    --dataset.repo_id=starai/record-test \
    --dataset.episode=1 # choose the episode you want to replay
Cello:
lerobot-replay \
    --robot.type=lerobot_robot_cello \
    --robot.port=/dev/ttyUSB1 \
    --robot.id=my_awesome_staraicello_arm \
    --dataset.repo_id=starai/record-test \
    --dataset.episode=1 # choose the episode you want to replay
Dual-Arm
Viola:
lerobot-replay \
    --robot.type=lerobot_robot_bimanual_follower \
    --robot.arm_name=starai_viola \
    --robot.left_arm_port=/dev/ttyUSB1 \
    --robot.right_arm_port=/dev/ttyUSB3 \
    --robot.id=bi_starai_viola_follower \
    --dataset.repo_id=starai/record-test_bi_arm \
    --dataset.episode=0 # choose the episode you want to replay
Cello:
lerobot-replay \
    --robot.type=lerobot_robot_bimanual_follower \
    --robot.arm_name=starai_cello \
    --robot.left_arm_port=/dev/ttyUSB1 \
    --robot.right_arm_port=/dev/ttyUSB3 \
    --robot.id=bi_starai_cello_follower \
    --dataset.repo_id=starai/record-test_bi_arm \
    --dataset.episode=0 # choose the episode you want to replay
Train and Evaluate Policy
ACT
Refer to ACT
Train
Viola:
lerobot-train \
  --dataset.repo_id=starai/record-test \
  --policy.type=act \
  --output_dir=outputs/train/act_viola_test \
  --job_name=act_viola_test \
  --policy.device=cuda \
  --wandb.enable=False \
  --policy.repo_id=starai/my_policy \
  --steps=200000
Cello:
lerobot-train \
  --dataset.repo_id=starai/record-test \
  --policy.type=act \
  --output_dir=outputs/train/act_cello_test \
  --job_name=act_cello_test \
  --policy.device=cuda \
  --wandb.enable=False \
  --policy.repo_id=starai/my_policy \
  --steps=200000
Dual-Arm
Viola:
lerobot-train \
  --dataset.repo_id=starai/record-test_bi_arm \
  --policy.type=act \
  --output_dir=outputs/train/act_bi_viola_test \
  --job_name=act_bi_viola_test \
  --policy.device=cuda \
  --wandb.enable=False \
  --policy.repo_id=starai/my_policy \
  --steps=200000
Cello:
lerobot-train \
  --dataset.repo_id=starai/record-test_bi_arm \
  --policy.type=act \
  --output_dir=outputs/train/act_bi_cello_test \
  --job_name=act_bi_cello_test \
  --policy.device=cuda \
  --wandb.enable=False \
  --policy.repo_id=starai/my_policy \
  --steps=200000
policy.typesupports inputdiffusion,pi0,pi0fast- We provide the dataset as a parameter:
dataset.repo_id=starai/record-test. - We will load the configuration from
configuration_act.py. Importantly, this policy will automatically adapt to the robot's motor states, motor actions, and the number of cameras, and will be saved in your dataset. - We provide
wandb.enable=trueto use Weights and Biases for visualizing training charts. This is optional, but if you use it, make sure you have logged in by runningwandb login.
Evaluate
Run the following command to record 10 evaluation episodes:
Viola:
lerobot-record  \
  --robot.type=lerobot_robot_viola \
  --robot.port=/dev/ttyUSB1 \
  --robot.cameras="{ up: {type: opencv, index_or_path: /dev/video2, width: 640, height: 480, fps: 30, fourcc: "MJPG"},front: {type: opencv, index_or_path: /dev/video4, width: 640, height: 480, fps: 30, fourcc: "MJPG"}}" \
  --robot.id=my_awesome_staraiviola_arm \
  --display_data=false \
  --dataset.repo_id=starai/eval_record-test \
  --dataset.single_task="Put lego brick into the transparent box" \
  --policy.path=outputs/train/act_viola_test/checkpoints/last/pretrained_model
  # <- Teleop optional if you want to teleoperate in between episodes \
  # --teleop.type=lerobot_teleoperator_violin \
  # --teleop.port=/dev/ttyUSB0 \
  # --teleop.id=my_awesome_leader_arm \
Cello:
lerobot-record  \
  --robot.type=lerobot_robot_cello \
  --robot.port=/dev/ttyUSB1 \
  --robot.cameras="{ up: {type: opencv, index_or_path: /dev/video2, width: 640, height: 480, fps: 30, fourcc: "MJPG"},front: {type: opencv, index_or_path: /dev/video4, width: 640, height: 480, fps: 30, fourcc: "MJPG"}}" \
  --robot.id=my_awesome_staraicello_arm \
  --display_data=false \
  --dataset.repo_id=starai/eval_record-test \
  --dataset.single_task="Put lego brick into the transparent box" \
  --policy.path=outputs/train/act_viola_test/checkpoints/last/pretrained_model
  # <- Teleop optional if you want to teleoperate in between episodes \
  # --teleop.type=lerobot_teleoperator_violin \
  # --teleop.port=/dev/ttyUSB0 \
  # --teleop.id=my_awesome_leader_arm \
Dual-Arm
Viola:
lerobot-record  \
    --robot.type=lerobot_robot_bimanual_follower \
    --robot.arm_name=starai_viola \
    --robot.left_arm_port=/dev/ttyUSB1 \
    --robot.right_arm_port=/dev/ttyUSB3 \
    --robot.cameras="{ up: {type: opencv, index_or_path: /dev/video0, width: 640, height: 480, fps: 30, fourcc: "MJPG"},front: {type: opencv, index_or_path: /dev/video2, width: 640, height: 480, fps: 30, fourcc: "MJPG"}}" \
    --robot.id=bi_starai_viola_follower \
    --display_data=false \
    --dataset.repo_id=starai/eval_record-test_bi_arm \
    --dataset.single_task="test" \
    --policy.path=outputs/train/act_bi_viola_test/checkpoints/last/pretrained_model
Cello:
lerobot-record  \
    --robot.type=lerobot_robot_bimanual_follower \
    --robot.arm_name=starai_cello \
    --robot.left_arm_port=/dev/ttyUSB1 \
    --robot.right_arm_port=/dev/ttyUSB3 \
    --robot.cameras="{ up: {type: opencv, index_or_path: /dev/video0, width: 640, height: 480, fps: 30, fourcc: "MJPG"},front: {type: opencv, index_or_path: /dev/video2, width: 640, height: 480, fps: 30, fourcc: "MJPG"}}" \
    --robot.id=bi_starai_cello_follower \
    --display_data=false \
    --dataset.repo_id=starai/eval_record-test_bi_arm \
    --dataset.single_task="test" \
    --policy.path=outputs/train/act_bi_cello_test/checkpoints/last/pretrained_model
As you can see, this is almost the same as the command previously used to record the training dataset, with a few changes:
-
The
--policy.pathparameter, which indicates the path to your trained policy weights file (for example,outputs/train/act_viola_test/checkpoints/last/pretrained_model). If you have uploaded your model weights to the Hub, you can also use the model repository (for example,${HF_USER}/starai). -
The name of the evaluation dataset
dataset.repo_idstarts witheval_. This operation will record videos and data specifically for the evaluation phase, which will be saved in a folder starting witheval_, such asstarai/eval_record-test. -
If you encounter
File exists: 'home/xxxx/.cache/huggingface/lerobot/xxxxx/starai/eval_xxxx'during the evaluation phase, please delete the folder starting witheval_and run the program again. -
When encountering
mean is infinity. You should either initialize with stats as an argument or use a pretrained model, please ensure that the keywords such asupandfrontin the--robot.camerasparameter are strictly consistent with those used during the data collection phase.
SmolVLA
Refer to SmolVLA
pip install -e ".[smolvla]"
Train
lerobot-train \
  --policy.path=lerobot/smolvla_base \ # <- Use pretrained fine-tuned model
  --dataset.repo_id=${HF_USER}/mydataset \
  --batch_size=64 \
  --steps=20000 \
  --output_dir=outputs/train/my_smolvla \
  --job_name=my_smolvla_training \
  --policy.device=cuda \
  --wandb.enable=true
Evaluate
lerobot-record \
  --robot.type=starai_viola \
  --robot.port=/dev/ttyUSB1 \
  --robot.id=my_awesome_staraiviola_arm \
  --robot.cameras="{ up: {type: opencv, index_or_path: /dev/video2, width: 1280, height: 720, fps: 30, fourcc: "MJPG"},front: {type: opencv, index_or_path: /dev/video4, width: 1280, height: 720, fps: 30, fourcc: "MJPG"}}" \
  --dataset.single_task="Grasp a lego block and put it in the bin." \ # <- Use the same task description you used in your dataset recording
  --dataset.repo_id=${HF_USER}/eval_DATASET_NAME_test \
  --dataset.episode_time_s=50 \
  --dataset.num_episodes=10 \
  # <- Teleop optional if you want to teleoperate in between episodes \
  # --teleop.type=so100_leader \
  # --teleop.port=/dev/ttyACM0 \
  # --teleop.id=my_red_leader_arm \
  --policy.path=HF_USER/FINETUNE_MODEL_NAME # <- Use your fine-tuned model
Libero
Refer to Libero
LIBERO is a benchmark designed to study lifelong robot learning. The idea is that robots won’t just be pretrained once in a factory, they’ll need to keep learning and adapting with their human users over time. This ongoing adaptation is called lifelong learning in decision making (LLDM), and it’s a key step toward building robots that become truly personalized helpers.
LIBERO includes five task suites:
-
LIBERO-Spatial (libero_spatial) – tasks that require reasoning about spatial relations.
-
LIBERO-Object (libero_object) – tasks centered on manipulating different objects.
-
LIBERO-Goal (libero_goal) – goal-conditioned tasks where the robot must adapt to changing targets.
-
LIBERO-90 (libero_90) – 90 short-horizon tasks from the LIBERO-100 collection.
-
LIBERO-Long (libero_10) – 10 long-horizon tasks from the LIBERO-100 collection.
Together, these suites cover 130 tasks, ranging from simple object manipulations to complex multi-step scenarios. LIBERO is meant to grow over time, and to serve as a shared benchmark where the community can test and improve lifelong learning algorithms.
Train
lerobot-train \
  --policy.type=smolvla \
  --policy.repo_id=${HF_USER}/libero-test \
  --dataset.repo_id=HuggingFaceVLA/libero \
  --env.type=libero \
  --env.task=libero_10 \
  --output_dir=./outputs/ \
  --steps=100000 \
  --batch_size=4 \
  --eval.batch_size=1 \
  --eval.n_episodes=1 \
  --eval_freq=1000 \
Evaluating
To Install LIBERO, after following LeRobot official instructions, just do: pip install -e ".[libero]"
Single-suite evaluation
lerobot-eval \
  --policy.path="your-policy-id" \
  --env.type=libero \
  --env.task=libero_object \
  --eval.batch_size=2 \
  --eval.n_episodes=3
-
--env.taskpicks the suite (libero_object, libero_spatial, etc.). -
--eval.batch_sizecontrols how many environments run in parallel. -
--eval.n_episodessets how many episodes to run in total.
Multi-suite evaluation
lerobot-eval \
  --policy.path="your-policy-id" \
  --env.type=libero \
  --env.task=libero_object,libero_spatial \
  --eval.batch_size=1 \
  --eval.n_episodes=2
- Pass a comma-separated list to
--env.taskfor multi-suite evaluation.
Pi0
Refer to Pi0
pip install -e ".[pi]"
Train
lerobot-train \
  --policy.type=pi0 \
  --dataset.repo_id=seeed/eval_test123 \
  --job_name=pi0_training \
  --output_dir=outputs/pi0_training \
  --policy.pretrained_path=lerobot/pi0_base \
  --policy.compile_model=true \
  --policy.gradient_checkpointing=true \
  --policy.dtype=bfloat16 \
  --steps=20000 \
  --policy.device=cuda \
  --batch_size=32 \
  --wandb.enable=false
Evalute
lerobot-record \
  --robot.type=starai_viola \
  --robot.port=/dev/ttyUSB1 \
  --robot.id=my_awesome_staraiviola_arm \
    --robot.cameras="{ up: {type: opencv, index_or_path: /dev/video0, width: 640, height: 480, fps: 30, fourcc: "MJPG"},front: {type: opencv, index_or_path: /dev/video2, width: 640, height: 480, fps: 30, fourcc: "MJPG"}}" \
  --dataset.single_task="Grasp a lego block and put it in the bin." \ # <- Use the same task description you used in your dataset recording
  --robot.id=my_awesome_staraiviola_arm \
  --display_data=false \
  --dataset.repo_id=seeed/eval_test123 \
  --policy.path=outputs/pi0_training/checkpoints/last/pretrained_model
Pi0.5
Refer to Pi0.5
pip install -e ".[pi]"
Train
lerobot-train \
    --dataset.repo_id=seeed/eval_test123 \
    --policy.type=pi05 \
    --output_dir=outputs/pi05_training \
    --job_name=pi05_training \
    --policy.pretrained_path=lerobot/pi05_base \
    --policy.compile_model=true \
    --policy.gradient_checkpointing=true \
    --wandb.enable=false \
    --policy.dtype=bfloat16 \
    --steps=3000 \
    --policy.device=cuda \
    --batch_size=32
Evaluate
lerobot-record \
  --robot.type=starai_viola \
  --robot.port=/dev/ttyUSB1 \
  --robot.id=my_awesome_staraiviola_arm \
    --robot.cameras="{ up: {type: opencv, index_or_path: /dev/video0, width: 640, height: 480, fps: 30, fourcc: "MJPG"},front: {type: opencv, index_or_path: /dev/video2, width: 640, height: 480, fps: 30, fourcc: "MJPG"}}" \
  --dataset.single_task="Grasp a lego block and put it in the bin." \ # <- Use the same task description you used in your dataset recording
  --robot.id=my_awesome_staraiviola_arm \
  --display_data=false \
  --dataset.repo_id=seeed/eval_test123 \
  --policy.path=outputs/pi05_training/checkpoints/last/pretrained_model
GR00T N1.5
Refer to GR00T N1.5
Resume training from a specific checkpoint.
Viola:
lerobot-train \
  --config_path=outputs/train/act_viola_test/checkpoints/last/pretrained_model/train_config.json \
  --resume=true \
  --steps=400000
Cello:
lerobot-train \
  --config_path=outputs/train/act_cello_test/checkpoints/last/pretrained_model/train_config.json \
  --resume=true \
  --steps=400000
FAQ
-
If you are using the tutorial in this document, please
git clonethe recommended GitHub repository:https://github.com/servodevelop/lerobot.git. -
If teleoperation works normally but teleoperation with a Camera does not display the image interface, please refer to here.
-
If you encounter a libtiff issue during dataset teleoperation, please update the libtiff version.
conda install libtiff==4.5.0 # for Ubuntu 22.04, use libtiff==4.5.1 -
After installing LeRobot, it may automatically uninstall the GPU version of PyTorch, so you need to manually install torch-gpu.
-
For Jetson, please first install PyTorch and Torchvision before running
conda install -y -c conda-forge ffmpeg, otherwise, there will be a version mismatch issue when compiling torchvision. -
Training 50 episodes of ACT data on a 3060 8GB laptop takes approximately 6 hours, while training 50 episodes on a 4090 or A100 computer takes about 2-3 hours.
-
During data collection, ensure the stability of the camera position and angle, as well as the environmental lighting, and minimize the unstable background and pedestrians captured by the camera. Otherwise, significant changes in the deployment environment may cause the robotic arm to fail to grasp objects normally.
-
The
num-episodesin the data collection command should ensure sufficient data collection and should not be manually paused midway. This is because the mean and variance of the data are calculated only after data collection is completed, which is necessary for training. -
If the program prompts that it cannot read the USB camera image data, please ensure that the USB camera is not connected through a Hub. The USB camera must be directly connected to the device to ensure fast image transmission rates.
Citation
StarAI Robot Arm ROS2 Moveit2: star-arm-moveit2
lerobot-starai github: lerobot-starai
STEP: STEP
URDF: URDF
Huggingface Project: Lerobot
ACT or ALOHA: Learning Fine-Grained Bimanual Manipulation with Low-Cost Hardware
VQ-BeT: VQ-BeT: Behavior Generation with Latent Actions
Diffusion Policy: Diffusion Policy
TD-MPC: TD-MPC
Tech Support & Product Discussion
Thank you for choosing our products! We are here to provide you with different support to ensure that your experience with our products is as smooth as possible. We offer several communication channels to cater to different preferences and needs.