Wio-E5 LoRaWAN Relay Function Guide

LoRaWAN® is a mark used under license from the LoRa Alliance®. The LoRa® Mark is a trademark of Semtech Corporation or its subsidiaries.
Applicable Hardware: Wio-E5 LoRa® Module
Firmware: Custom Firmware (Please inquiry before order)
Document Version: V1.0
Server Support: ChirpStack / The Things Network (TTN)
Click Here to download the Wio-E5 LoRaWAN Relay Function Firmware.
1. Overview
The Wio-E5 Relay function is based on the LoRaWAN Relay Specification, allowing devices in areas without direct gateway coverage to access the LoRaWAN network through a Relay Master device.
Core Concepts
| Role | Description | Network Connection |
|---|---|---|
| Relay Master | Acts as a bridge device, listening to and forwarding packets from the Slave to the actual gateway | Direct connection to LoRaWAN network (OTAA) |
| Relay Slave | Located in signal blind spots, accesses the network indirectly via the Master | Indirect connection via Master |
| WOR (Wake-on-Radio) | Slave periodically sends wake-up frames, Master listens and responds | - |
Workflow Highlights
- CAD Detection: Master opens Channel Activity Detection window every 1 second to listen for the Slave
- Time Synchronization: After initial communication, the Slave synchronizes time with the Master, reducing preamble symbols from 259 to 15, significantly lowering power consumption and channel occupancy
- RXR Window: Slave uses the third receive window (RX Window 3) to receive downstream data
2. Prerequisites
2.1 Hardware List
- Wio-E5 Module × 2 (one as Master, one as Slave)
- LoRaWAN Gateway (e.g., SenseCAP M2 Multi-Platform)
- USB-to-Serial Tool (Baud Rate: 9600)
- Computer with serial debugging tool installed (e.g., XCOM, Putty)
2.2 Server Environment Selection
| Phase | Recommended Platform | Notes |
|---|---|---|
| Testing | ChirpStack | Native Relay support, Web UI for device binding |
| Production | TTN | Requires TTN CLI tool configuration. TTN currently accepts relay messages but lacks complete Relay management UI |
3. Device Configuration (AT Commands)
All AT commands must be entered via serial tool with baud rate set to 9600, terminated by carriage return (<CR><LF>).
3.1 Relay Slave Configuration
# 1. Set to OTAA mode
AT+MODE=OTAA

# 2. Set frequency band (EU868 example)
AT+DR=EU868

# 3. Set channels (0-2)
AT+CH=NUM,0-2

# 4. Enable Slave mode (Critical)
AT+STDRELAY=MODE,SLAVE

# 5. Get device ID information (record DevEUI and AppEUI)
AT+ID

# 6. Set AppKey (generated on server side)
AT+KEY=APPKEY,"your_app_key_here"
3.2 Relay Master Configuration
# 1. Basic network settings (same as Slave)
AT+MODE=OTAA
AT+DR=EU868
AT+CH=NUM,0-2

# 2. Initially disable Relay mode (enabled via server downlink)
AT+STDRELAY=MODE,OFF

# 3. Set AppKey
AT+KEY=APPKEY,"your_app_key_here"

# 4. Enable debug logs (to observe forwarding process)
AT+LOG=DEBUG
4. Server Configuration (ChirpStack)
4.1 Register Gateway and Application
- Register Gateway: Gateways → Add gateway → Enter Gateway EUI
- Create Application: Applications → Add application → Enter name (e.g., relay-app)
4.2 Create Device Profiles
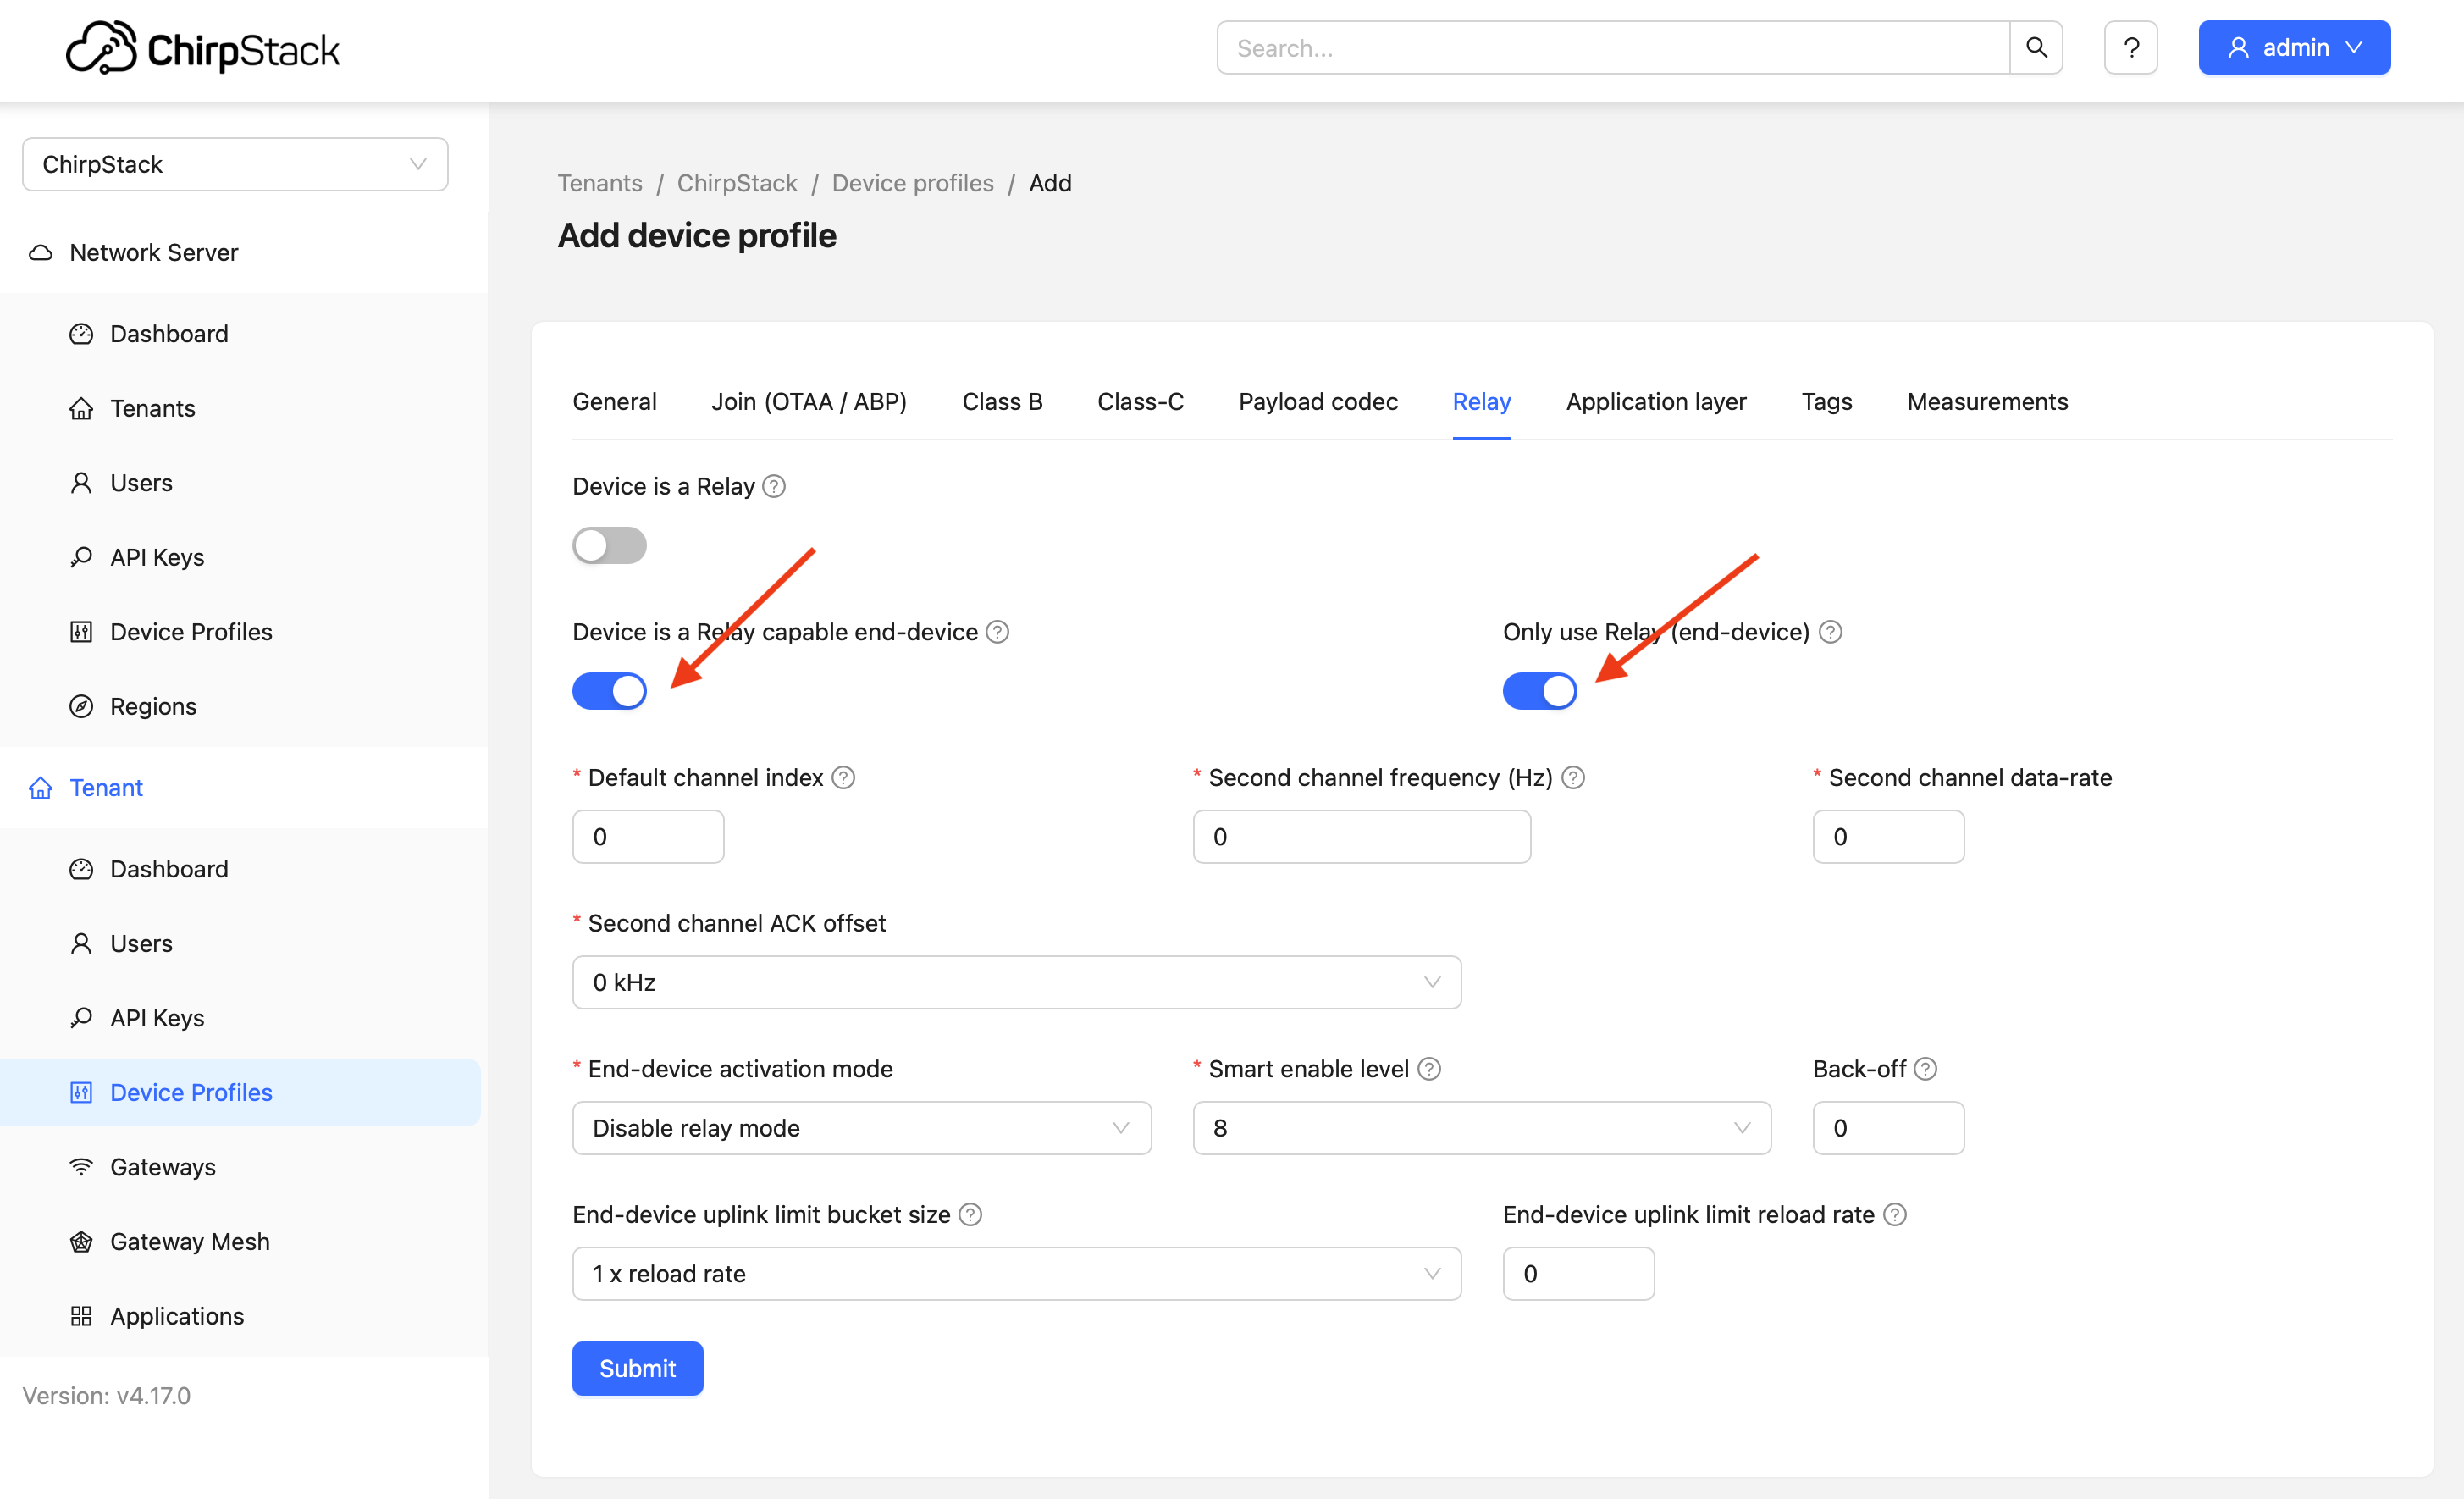
Slave Profile
- General: Select Region (EU868), LoRaWAN 1.0.4
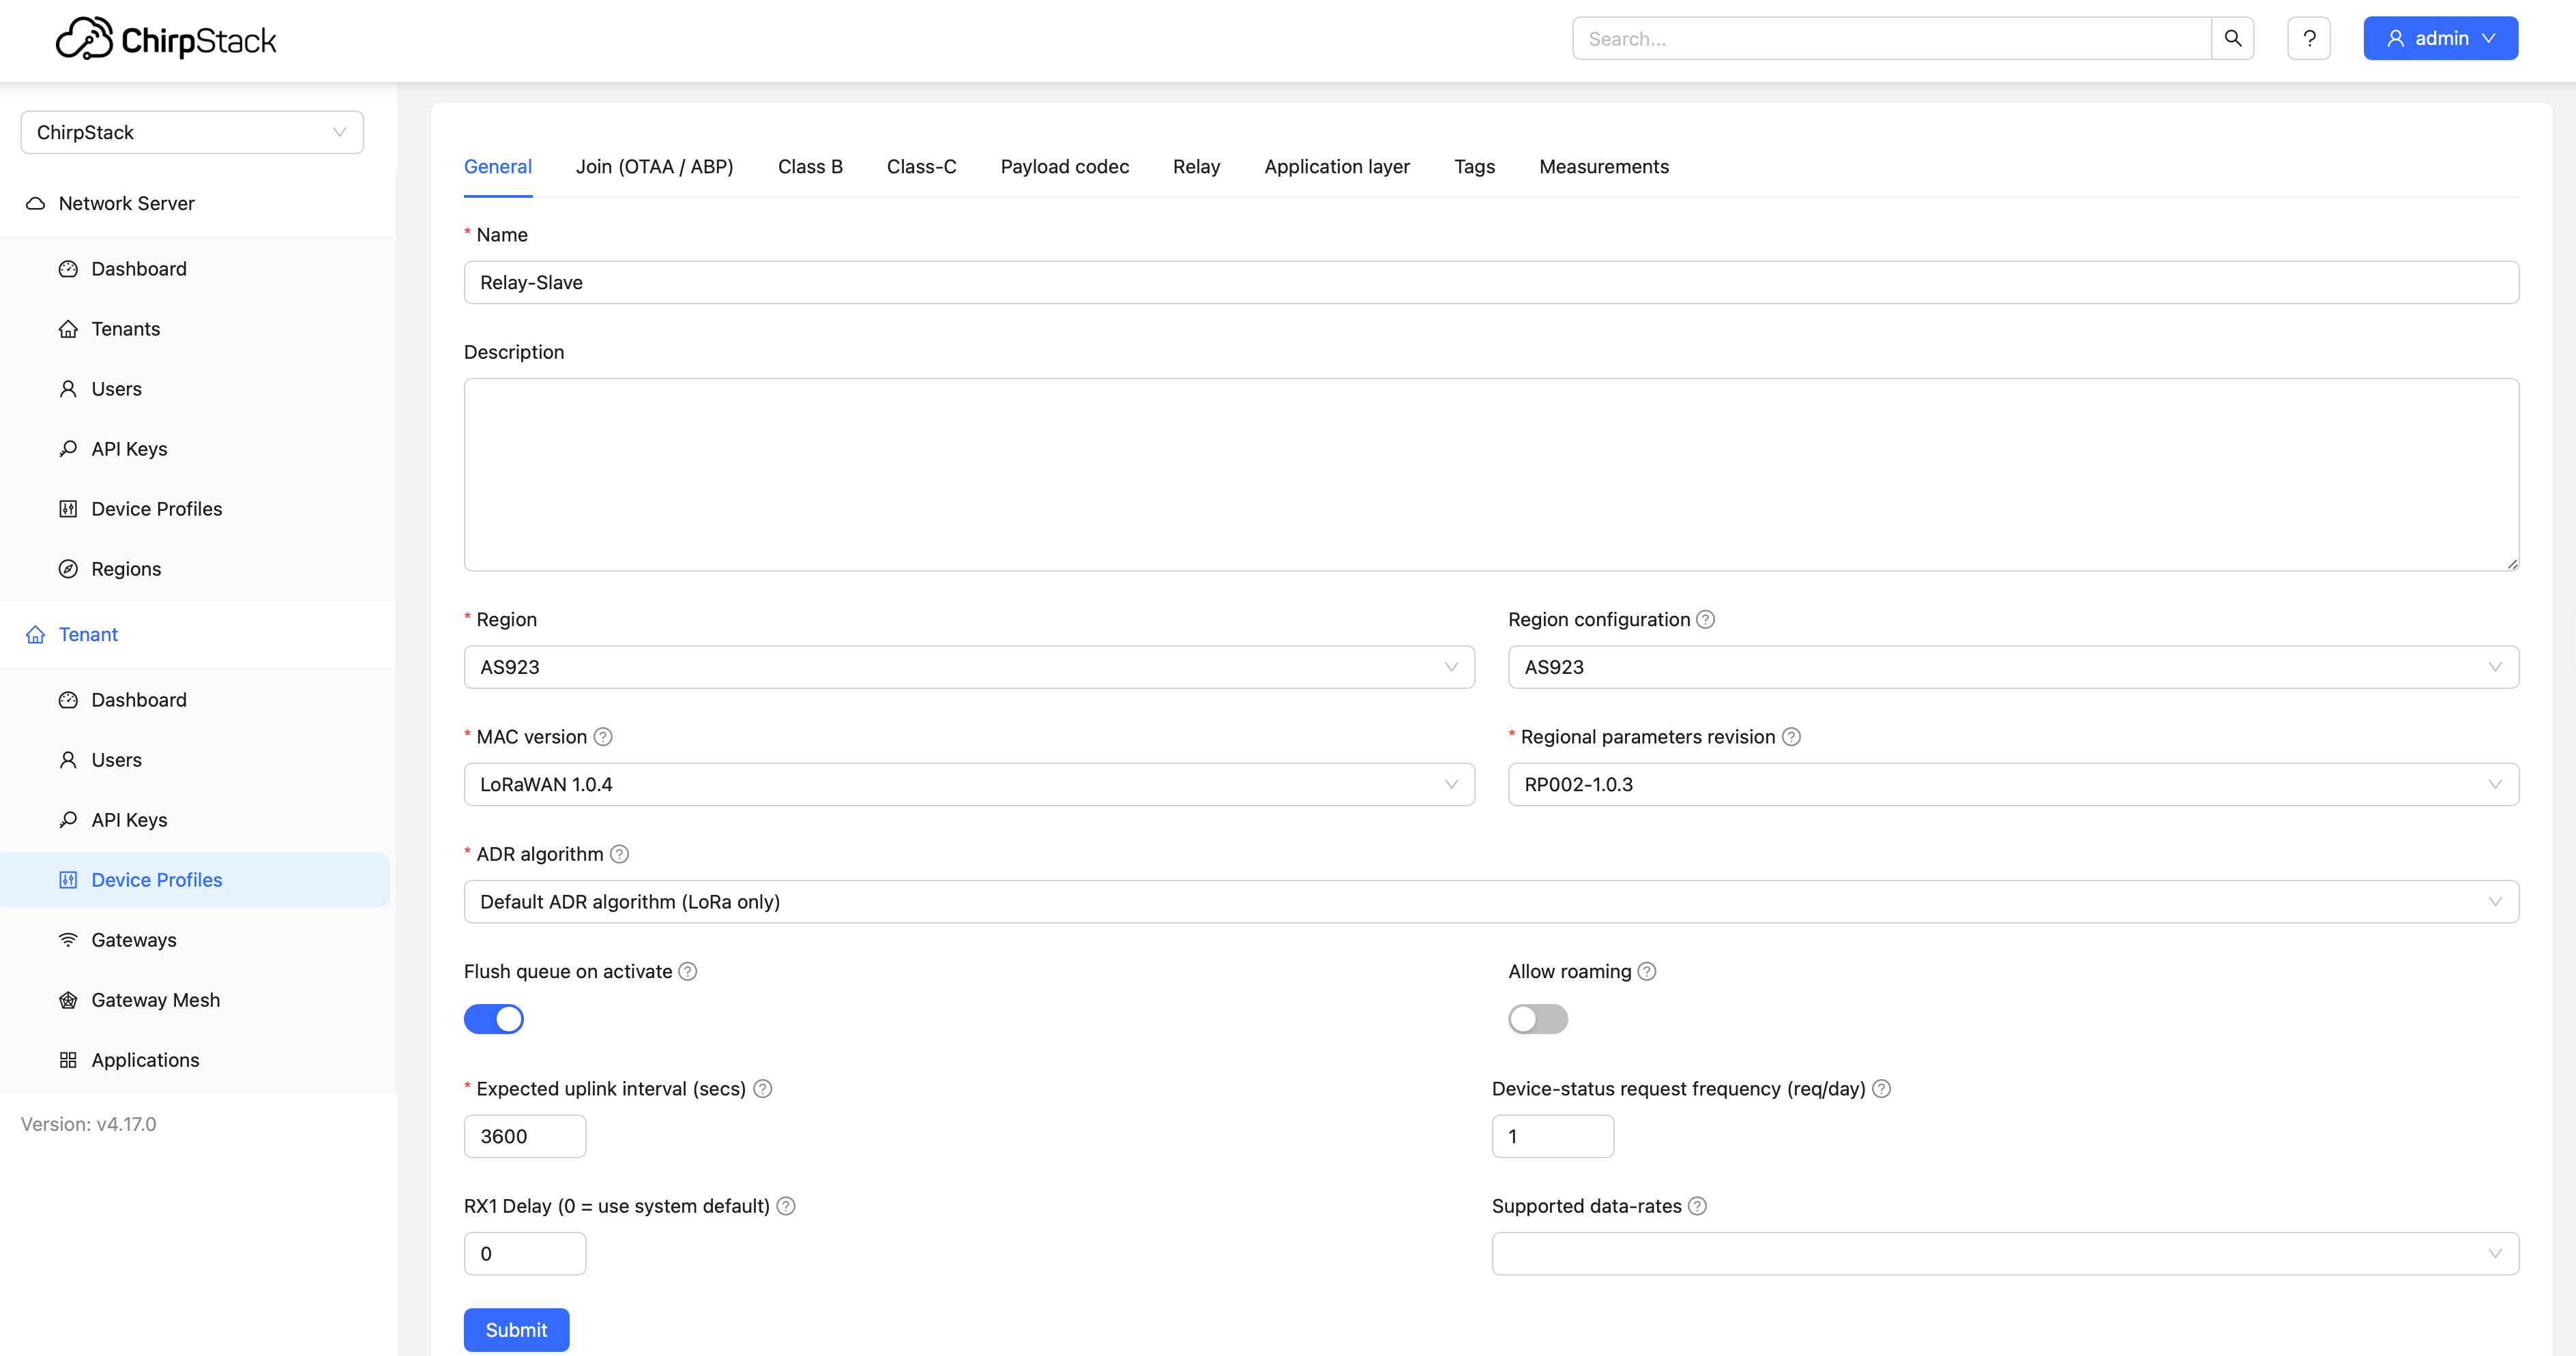
- Relay Tab:
- Device is a Relay ❌
- Device is a Relay capable end-device ✅
- Only use Relay ✅
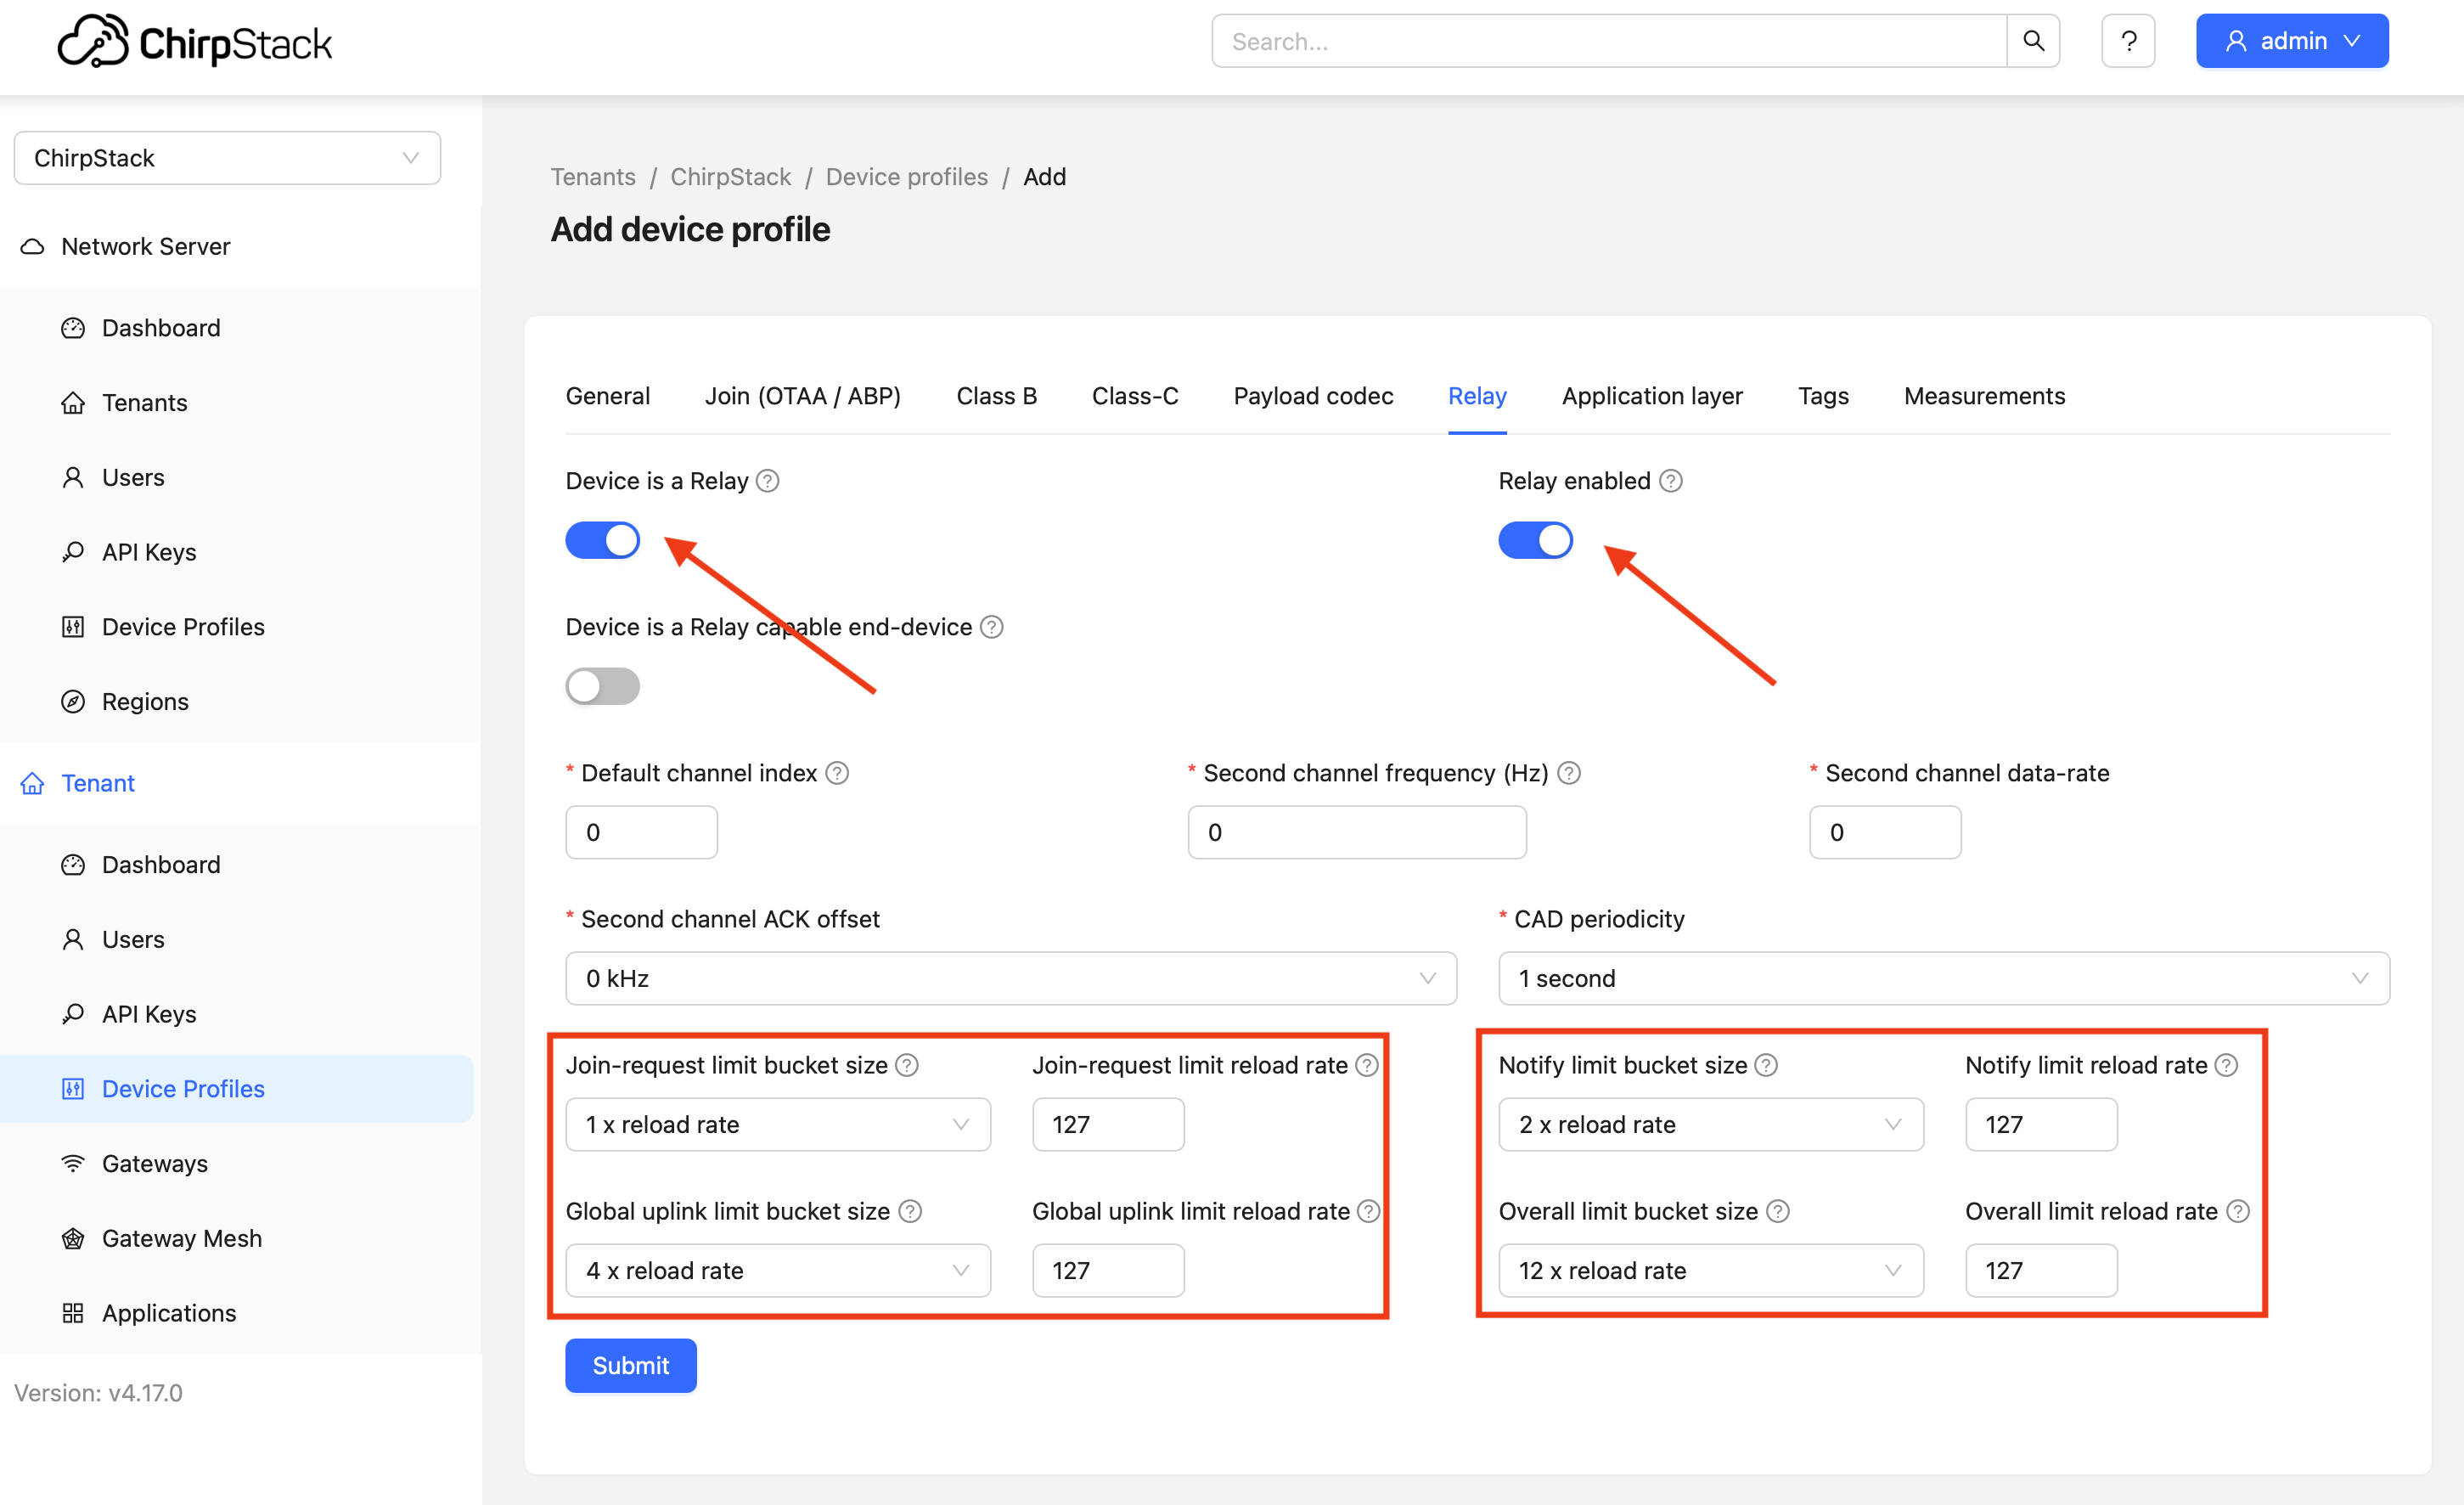
Master Profile
- General: Same as above

- Relay Tab:
- Device is a Relay ✅
- Relay enabled ✅
- Device is a Relay capable end-device ❌
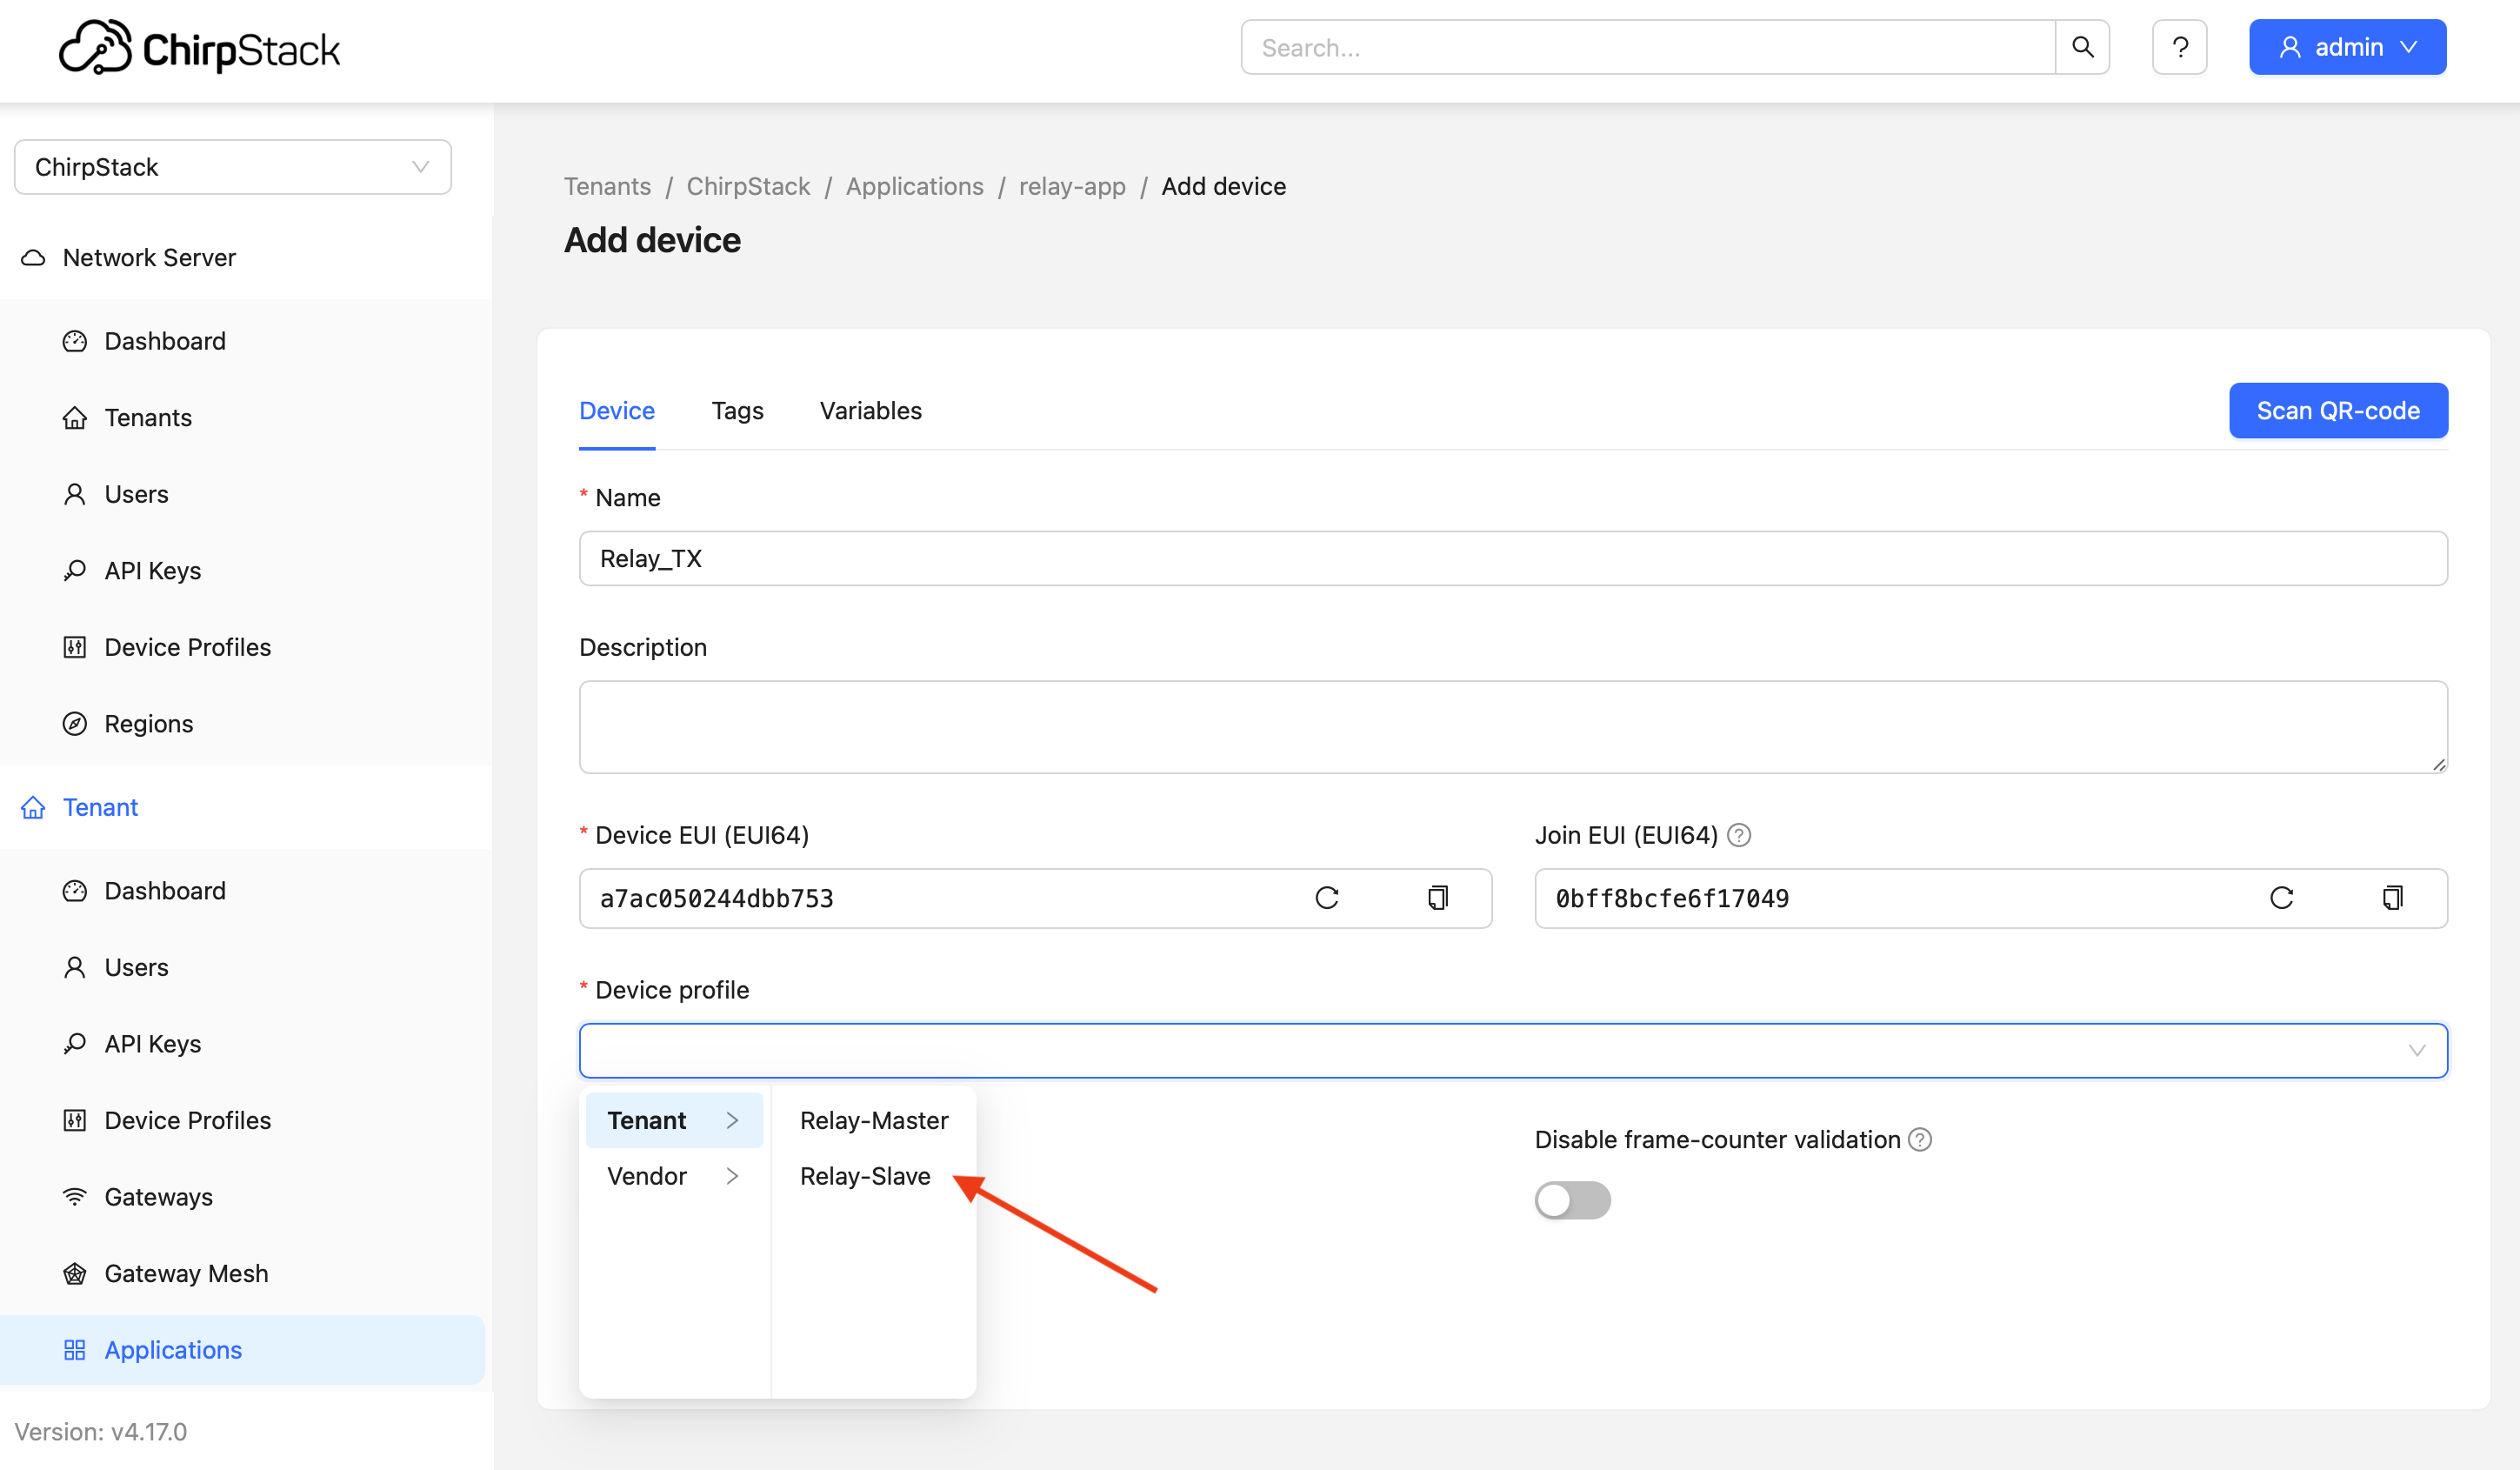
4.3 Register Devices and Bind
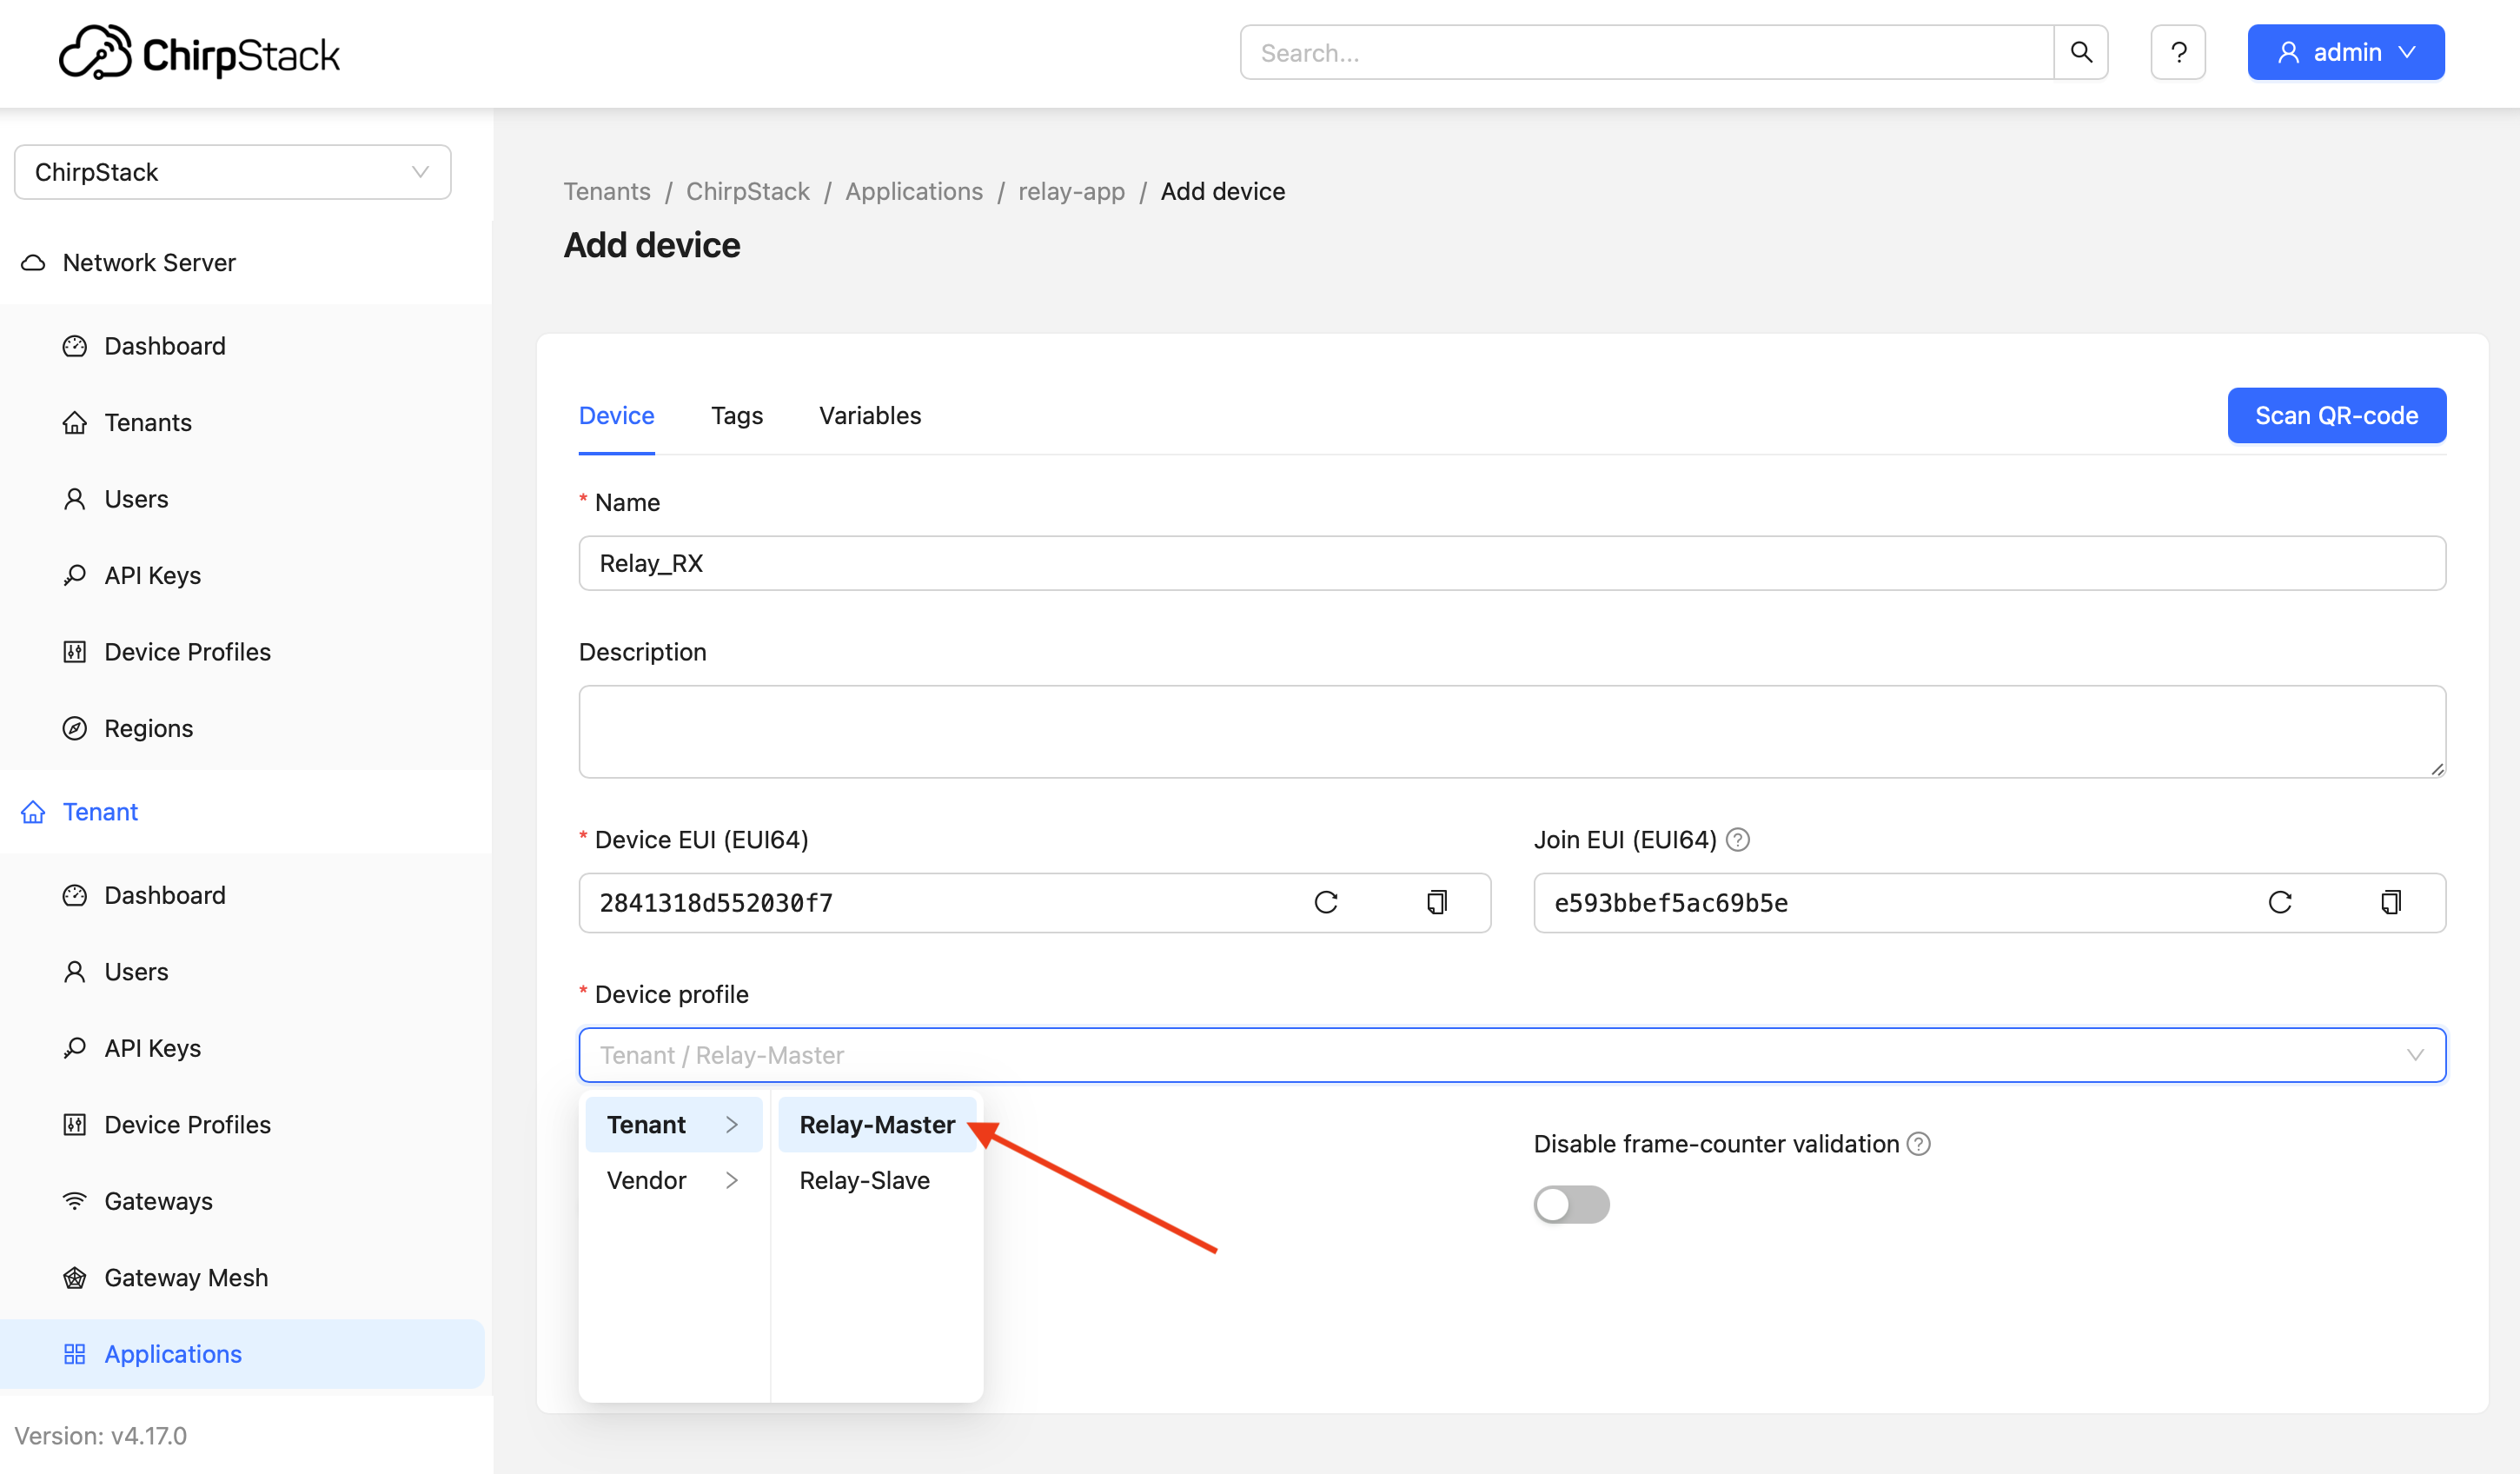
Step 1: Register Slave Device
- Go to relay-app → Devices → Add
- Fill in: Device EUI, Join EUI, select Slave Device Profile
- Enter AppKey in OTAA Keys
Step 2: Register Master Device
- Same as above, select Master Device Profile
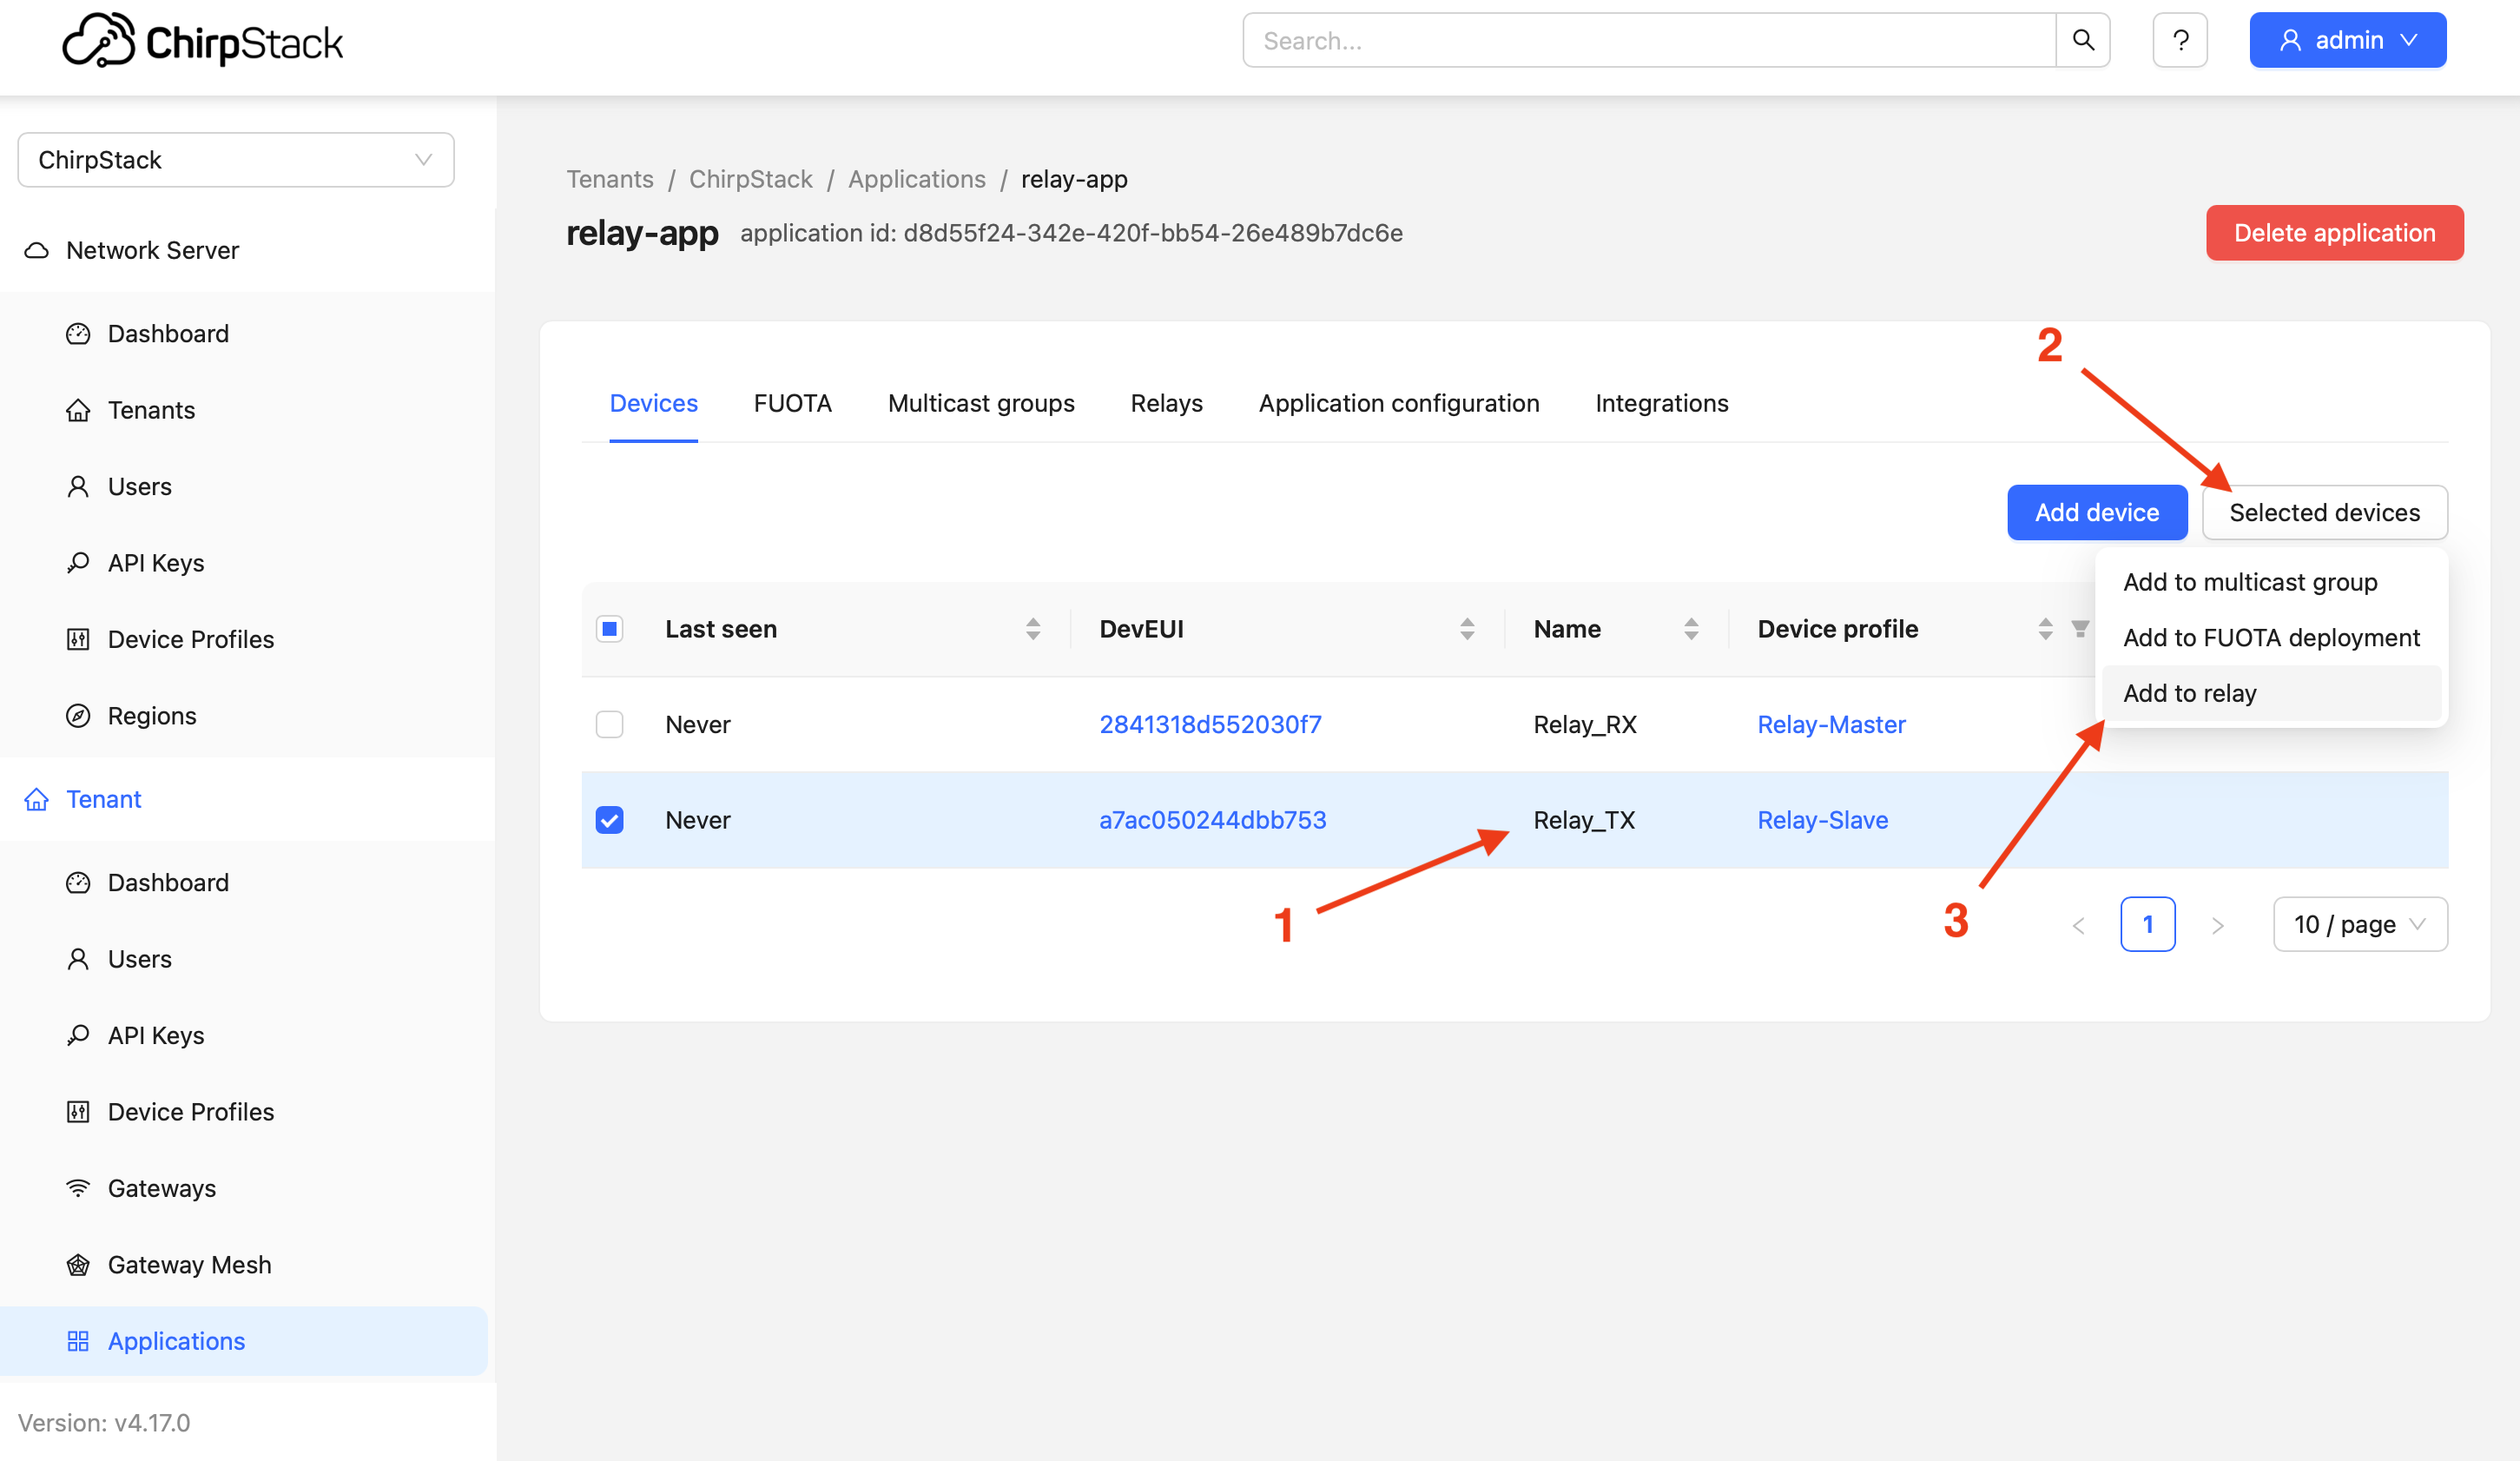
Step 3: Bind Relationship (Critical)
- Enter device list in relay-app
- Select Slave device → Click Selected devices → Add to relay
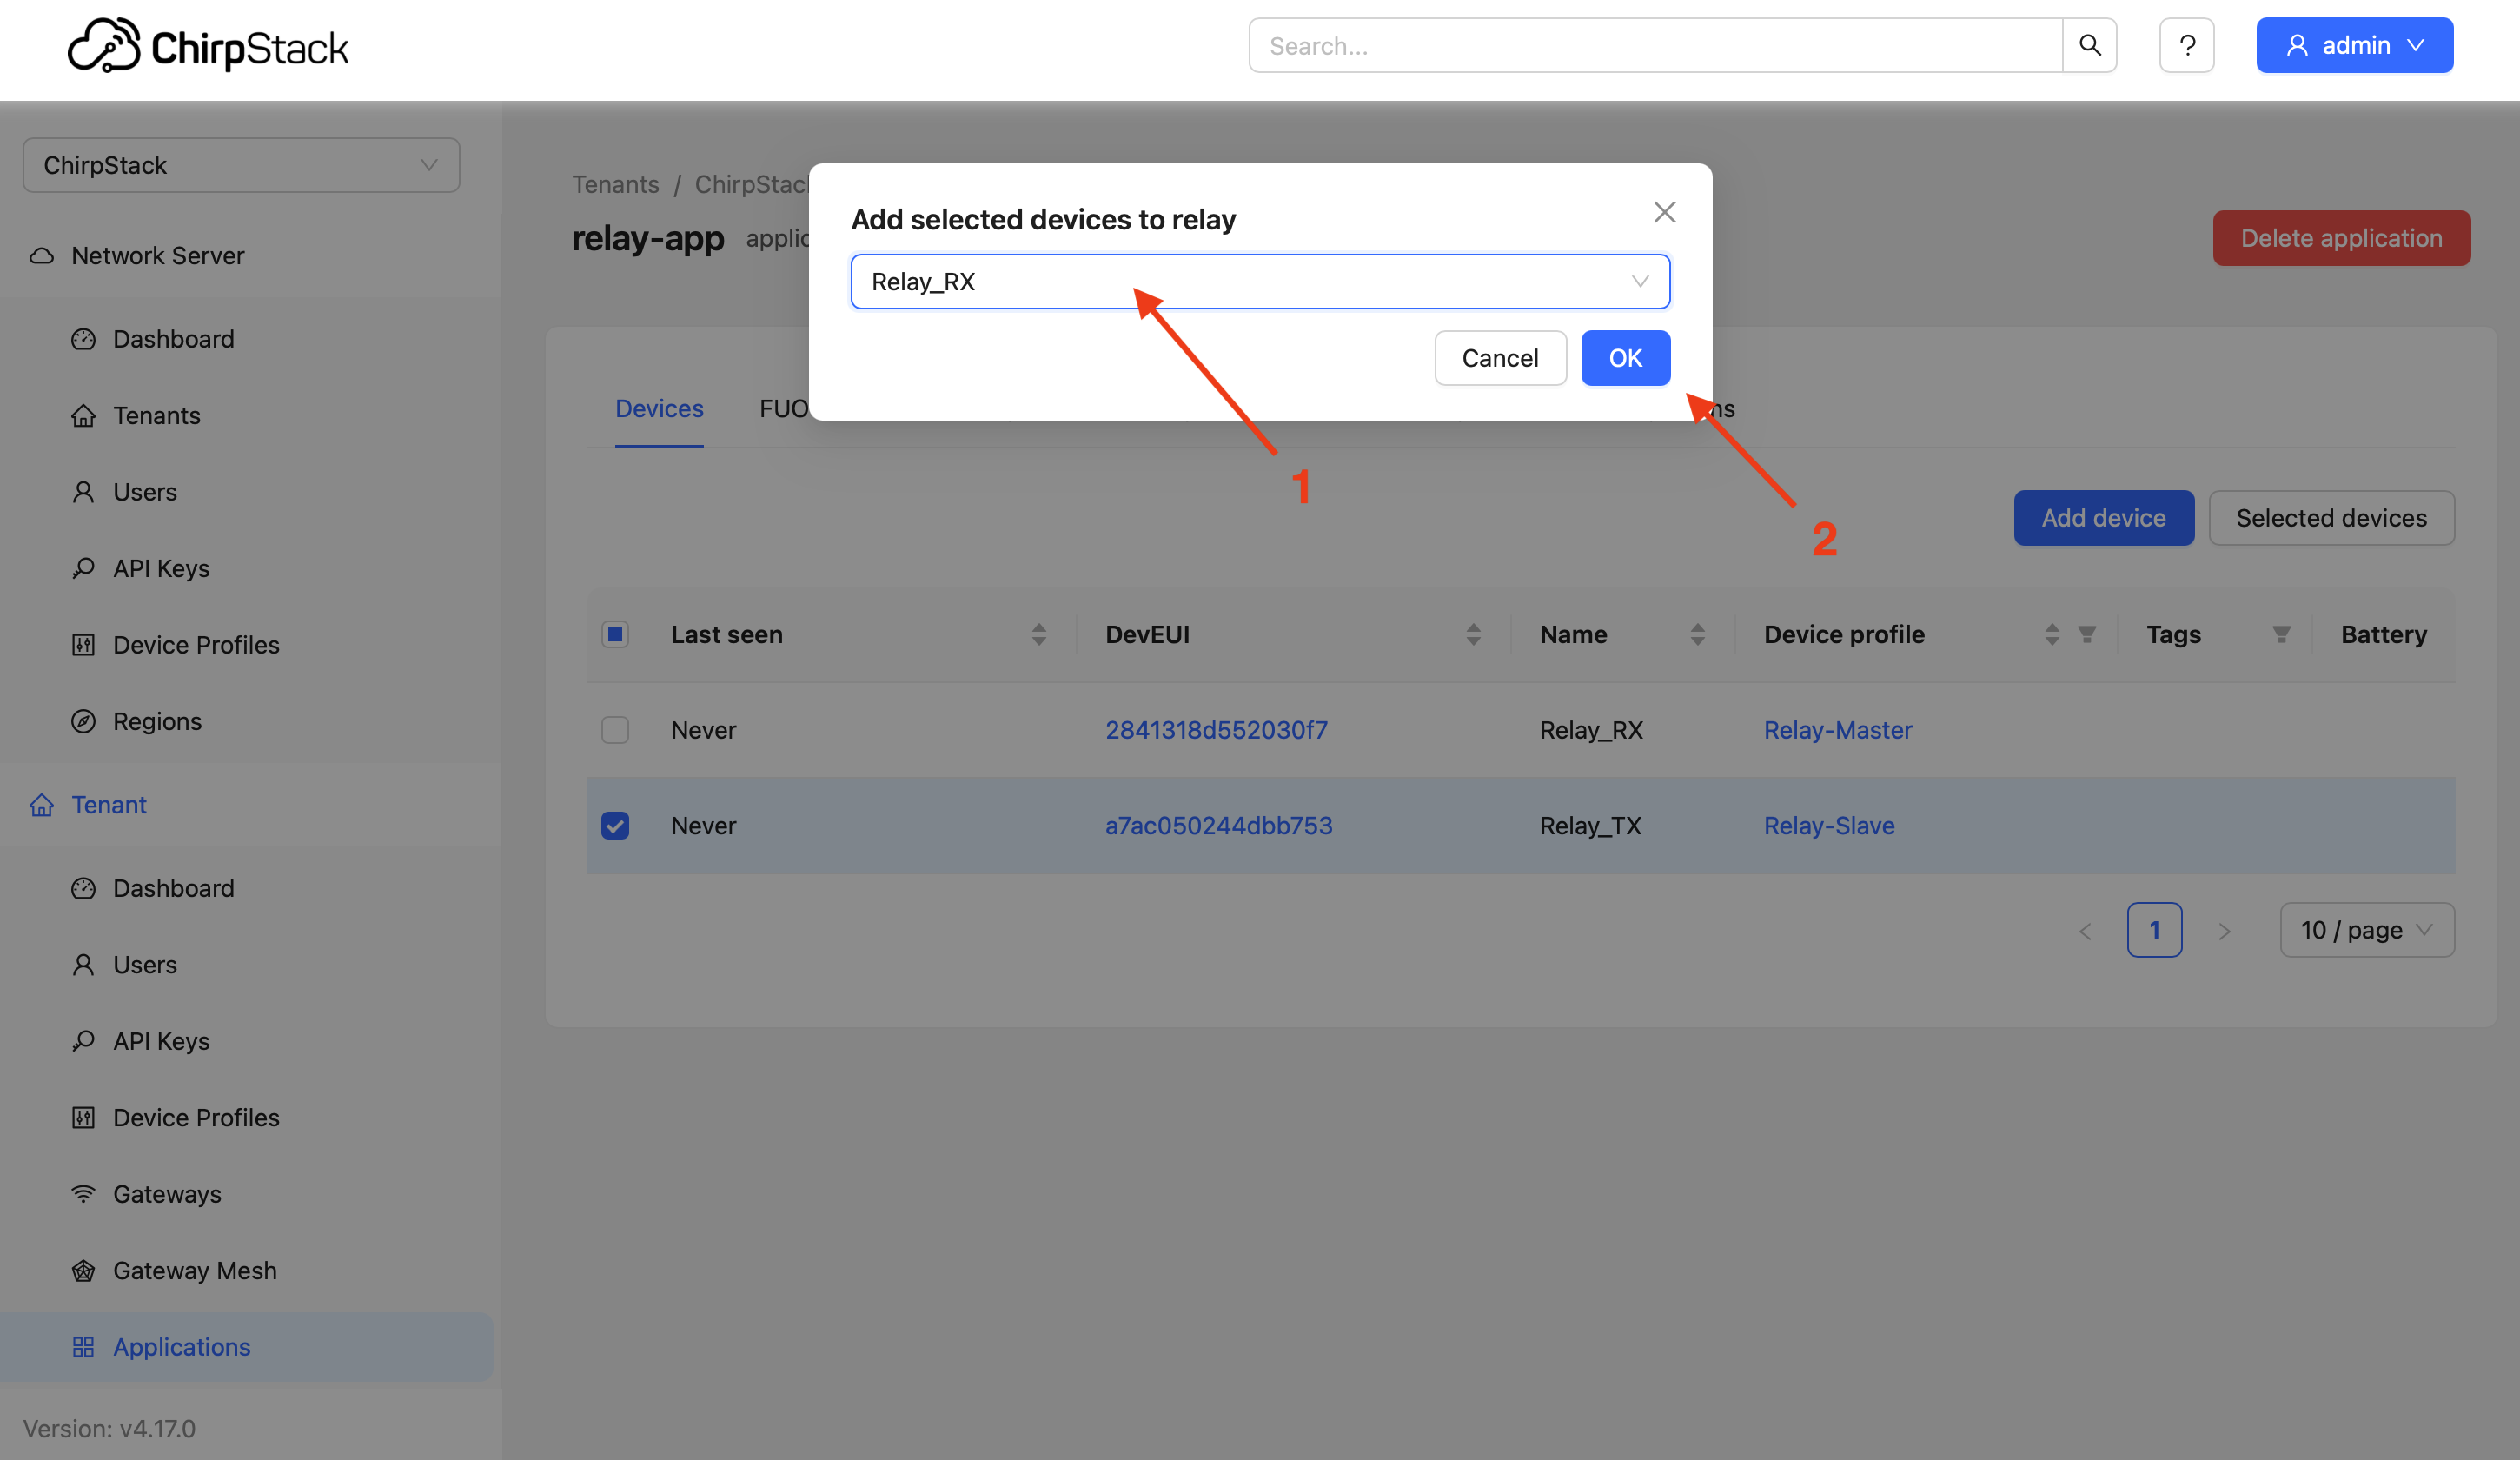
- Select corresponding Master device as relay host in popup
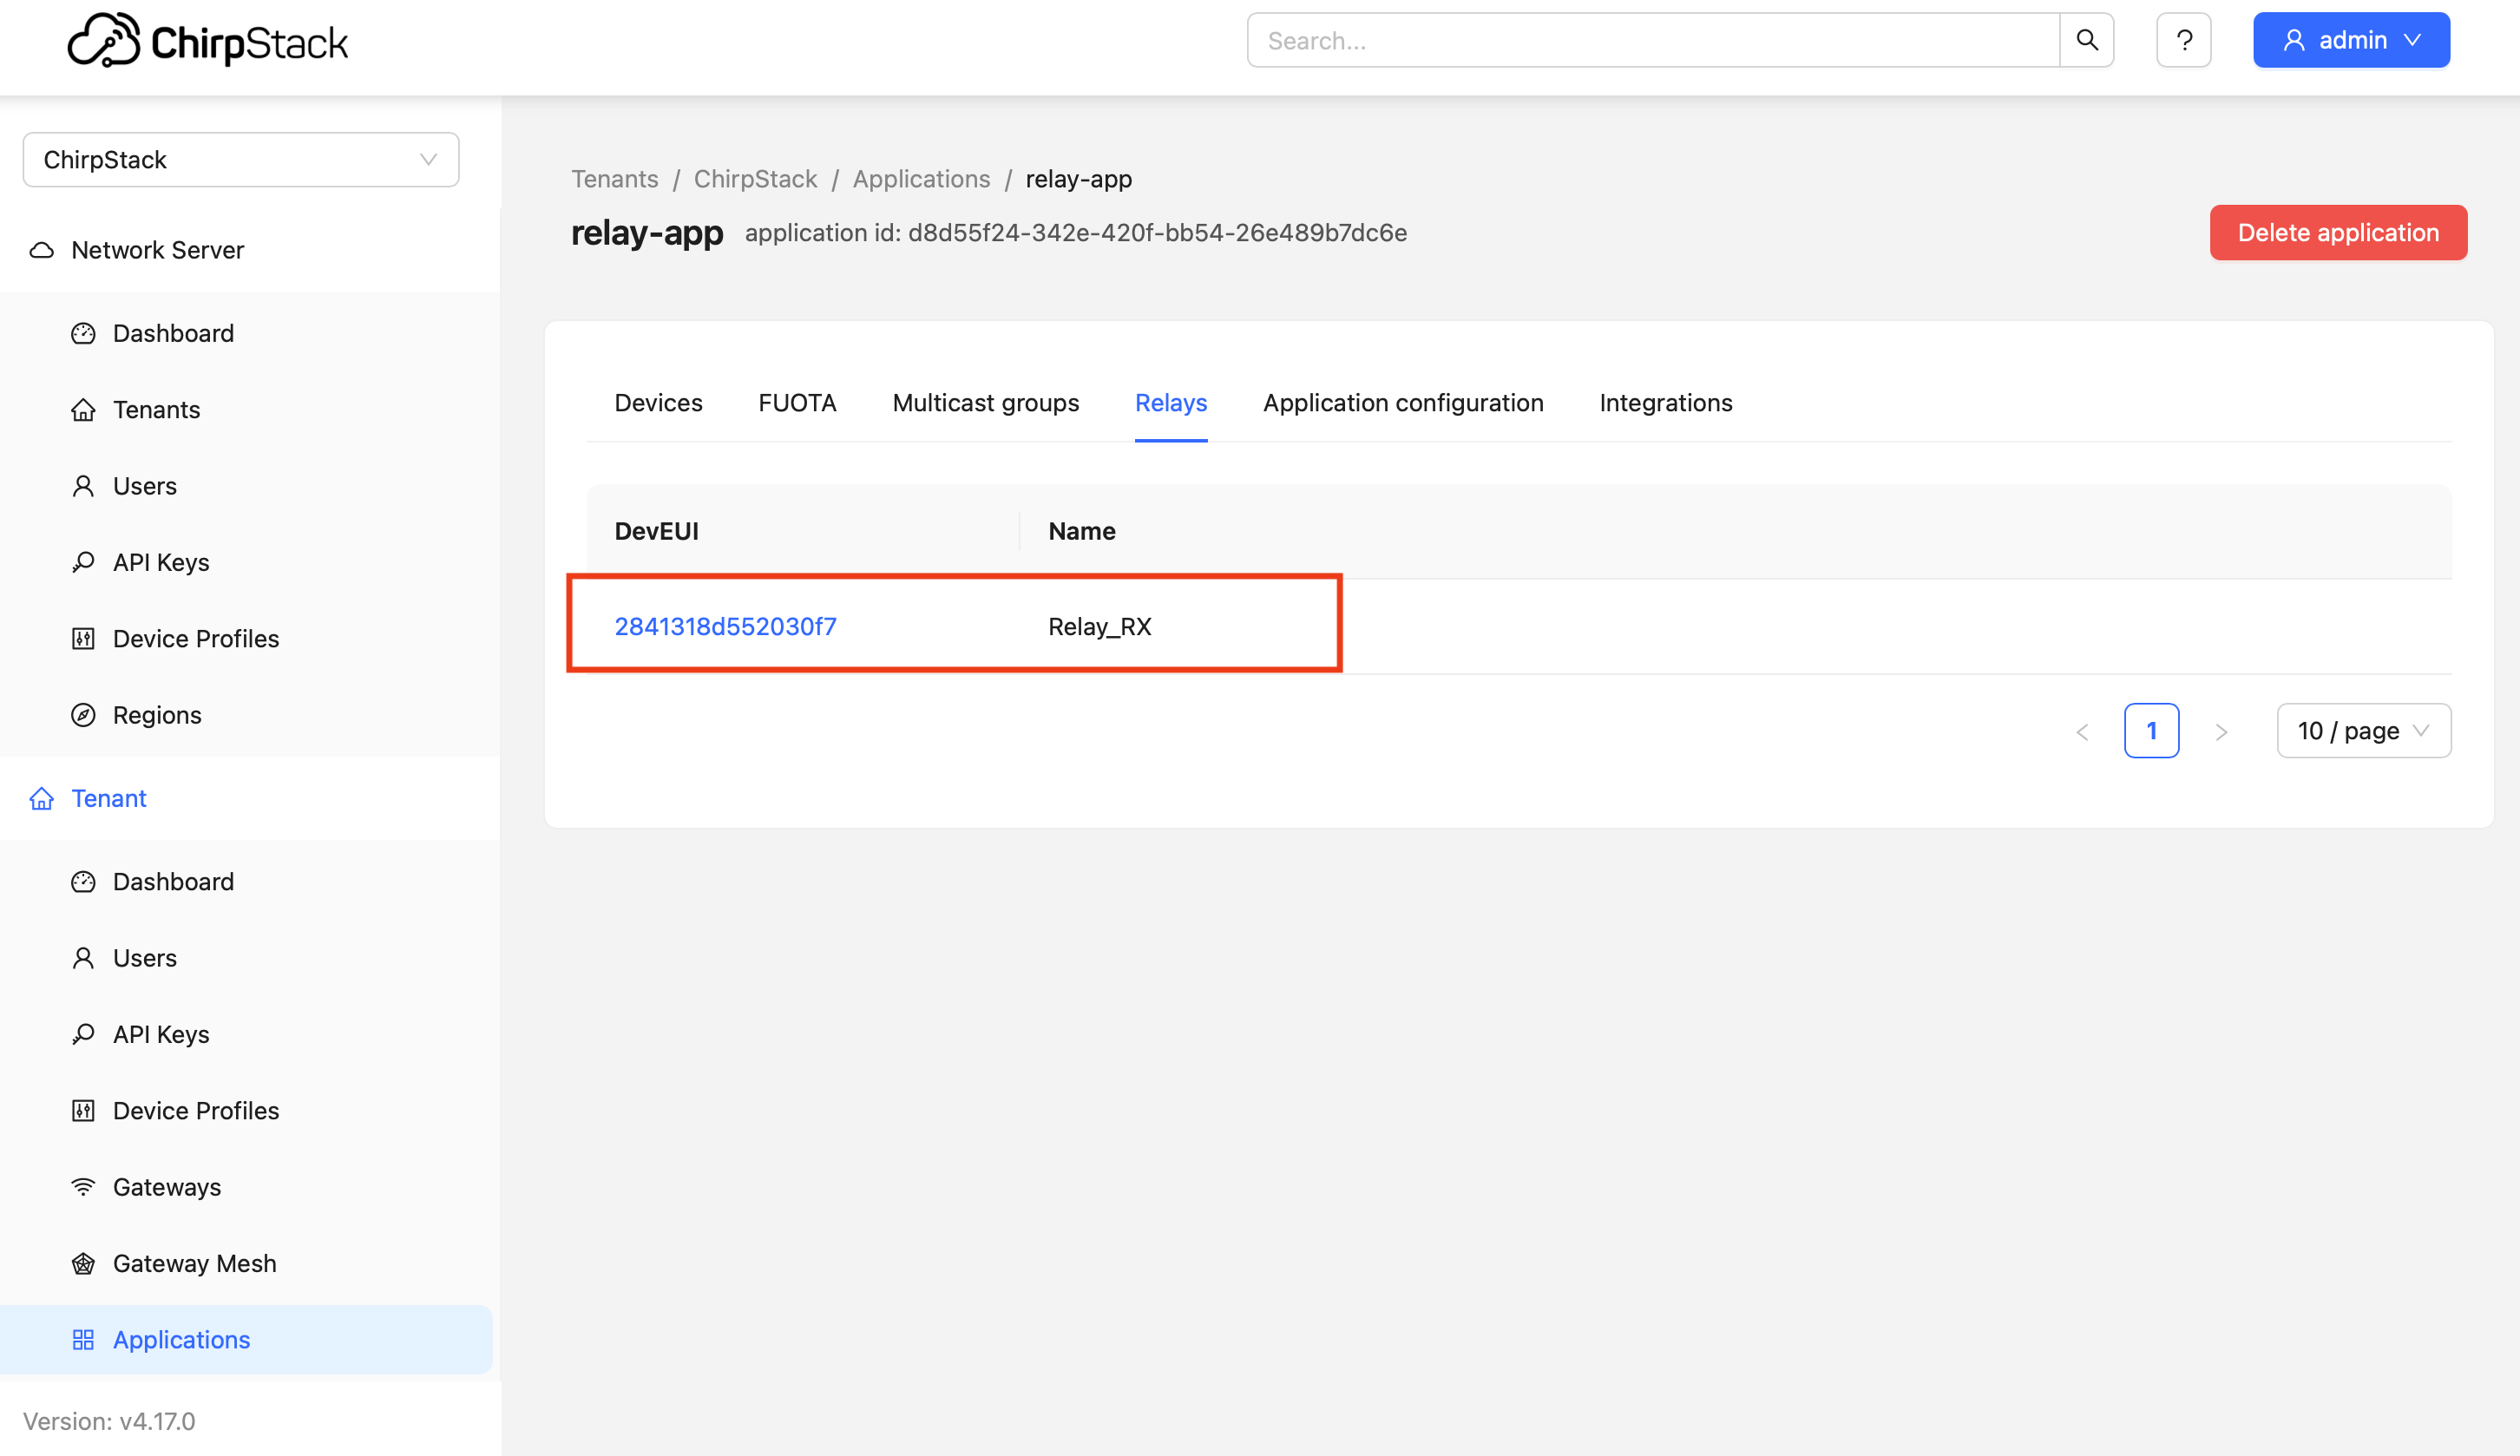
- Verify: Go to Relays tab, should see Slave listed under Master
5. Server Configuration (TTN)
TTN requires Command Line Interface (CLI) for Relay configuration. Web UI only supports basic device registration.
5.1 Basic Registration
- Register Gateway:
Gateways→Register gateway→ Enter EUI and Frequency Plan - Application:
Applications→Add application→ Set ID (relay-app) - Register Devices:
- Slave: Set ID (relay-tx), enter
DevEUI/JoinEUI/AppKey - Master: Set ID (relay-rx), enter
DevEUI/JoinEUI/AppKey
- Slave: Set ID (relay-tx), enter
5.2 CLI Configuration (Windows Example)
# 1. Download and configure CLI (version 3.32.2+)
ttn-lw-cli.exe use "eu1.cloud.thethings.network"

# 2. Login to TTN (opens browser for authorization)
ttn-lw-cli.exe login

# 3. Enable Relay Master (serving mode)
ttn-lw-cli.exe relays create relay-app relay-rx --mode.serving

# 4. Enable Relay Slave and associate with Master (always via Master)
ttn-lw-cli.exe relays create relay-app relay-tx \
  --mode.served.mode.always \
  --mode.served.serving-device-id relay-rx

# 5. Create uplink forwarding rule (index 0)
ttn-lw-cli.exe relays uplink-forwarding-rules create relay-app relay-rx 0 --device-id relay-tx
For more information, please refer to the TTN Official Documentation.
6. Validation Testing
6.1 Start Relay Master
Open the serial port tool and select the corresponding serial port with a baud rate of 9600 to monitor Log.
# 1. Turn on log output:
AT+LOG=DEBUG

# 2. Reset device
AT+RESET

# 3. The Relay Master is turned on and off by the server downlink control, turn off the Relay mode first
AT+STDRELAY=MODE,OFF

# 4. Join network (observe logs until +JOIN:Done)
AT+JOIN

# 5. Trigger uplink to receive Relay Config MAC command from server
AT+MSG

# Logs should show:
# +LOG: DEBUG ... MACCMD, RX, 0219010350FF00010640002000000042400043007F07
# Then CAD window opens every 1 second:
# +LOG: DEBUG 211708 LORA   CAD, 865100000, SF9, 125KHz
At this point, the Relay Master is ready to wake up and forward using the Relay Slave.
6.2 Start Relay Slave
# 1. Ensure Slave mode is set
AT+STDRELAY=MODE,SLAVE

# 2. Reset and enable logs
AT+RESET
AT+LOG=DEBUG

# 3. Attempt network join (via Master forwarding)
AT+MODE=OTAA
AT+JOIN

# Logs should show:
# +JOIN: Network joined
# +JOIN: NetID 000000 DevAddr 00:C9:F4:5F
# +JOIN: Done
6.3 Time Sync and Optimization Verification
# Set retry count to 1
AT+RETRY=1

# Send confirmed packet (first time)
AT+CMSGHEX=AA

# +LOG: DEBUG 872489 LORA   TX, 865100000, SF9, 125KHz, 259, 22
# +LOG: DEBUG 872490 LORA   TX, 015FF4C90054066CFF01006A3A2EA8
# Observe: WOR_ACK received, preamble length ~259

# At this point, WOR_ACK will be received and time synchronization will be performed, and the number of subsequent preamble derived from the calculation will be greatly reduced.

# Send again (synchronized)
AT+CMSGHEX=AA

# +LOG: DEBUG 141852 LORA   TX, 865100000, SF9, 125KHz, 15, 22
# Observe: Preamble reduced to ~15, latency decreased
7. Important Notes
-
Server Selection: Currently TTN only supports Relay configuration via CLI. ChirpStack offers complete Web UI support. Recommended to use ChirpStack for testing.
-
Power Optimization: After time sync, Slave WOR frame preamble reduces from 259 to 15, significantly lowering power consumption. Recommended for stable deployments.
-
Firmware Requirement: Ensure Wio-E5 firmware supports AT+STDRELAY command set.
-
Range Testing: Maintain distance between Slave and Master (e.g., 50-500 meters) during testing to verify relay forwarding effectiveness.