Make DIY BSP from Orin Nano DevKit to reComputer Classic / Super
This guide shows how to clone a full development environment from an NVIDIA Jetson Orin Nano Developer Kit, swap in Seeed reComputer board firmware, build a Hybrid BSP, and complete the flash.
Two target boards are supported:
- reComputer Classic (J4011/J4012, board config
recomputer-orin-j401) - reComputer Super (board config
recomputer-orin-super-j401)
Both share the same core idea—keep the DevKit's full APP, regenerate the target board's QSPI—but differ in pinmux, camera overlay, and disk layout details. Differences are presented in tabs below; shared steps are written once.
This flow has been validated with JetPack 6.2 / L4T 36.4.3, Orin Nano 8GB (SKU 0005).
Related docs:
- Creating a Custom BSP Package from Jetson Development Environment
- Migrate /home Data from Jetson Orin Nano Developer Kit to reComputer
- Flash JetPack to a Selected Product
What You Are Building
| Goal | Artifact | Purpose |
|---|---|---|
| A. Same-carrier clone | mfi_jetson-orin-nano-devkit-nvme.tar.gz | Reflash DevKit with a full environment clone |
| B. Target Bundle | mfi_recomputer-orin-j401.tar.gz (Classic)mfi_recomputer-orin-super-j401.tar.gz (Super) | Flash target board: target board-level QSPI + DevKit full APP (including /home) |
| C. Safe fallback | Official BSP + migrate /home only | Use when Hybrid results are abnormal |
Do not flash the DevKit mfi_jetson-orin-nano-devkit-nvme package directly onto the target board.
Do not treat editing a single .dtb inside the mfi directory as board adaptation.
Do not flash a Classic Hybrid bundle onto Super, or vice versa—their pinmux and camera overlays differ.
Prerequisites
Hardware
- Source: Orin Nano Developer Kit (this example uses module SKU 0005 = Orin Nano 8GB, NVMe boot)
- Target: Seeed reComputer Classic J4011/J4012 or reComputer Super (module should ideally also be 0005)
- Host: Ubuntu 22.04 x86_64, USB Type-C cable (flash port)
- Disk: reserve ≥ 100GB free space (backup + dual mfi + snapshots)
The reComputer Classic series has insufficient cooling to support MAXN Super mode. If you flash JetPack 6.2 onto a Classic device, do not enable MAXN.
Host Dependencies
sudo apt-get update -y
sudo apt-get install -y \
  build-essential flex bison libssl-dev \
  sshpass abootimg nfs-kernel-server \
  libxml2-utils qemu-user-static
Before backup/flash:
sudo systemctl stop udisks2.service
sudo service nfs-kernel-server start
lsusb | grep 0955:7523   # must show NVIDIA Corp. APX
Board Comparison
| Item | DevKit | reComputer Classic | reComputer Super |
|---|---|---|---|
| board-name | jetson-orin-nano-devkit-nvme | recomputer-orin-j401 | recomputer-orin-super-j401 |
| Config file | p3768-0000-p3767-0000-a0-nvme.conf | recomputer-orin-j401.conf | recomputer-orin-super-j401.conf |
| Pinmux | NVIDIA DevKit (DP) | Classic HDMI | Super HDMI |
| Camera overlay | NVIDIA dynamic | Seeed dual IMX219 | Seeed quad IMX219 |
| SKU0005 main DTB | ...-0005-nv(-super).dtb | Still uses tegra234-p3768-0000+p3767-0005-nv-super.dtb | |
| Final mfi | DevKit only | Classic only | Super only |
Example backup board_spec:
3767-300-0005-V.2-1-1-jetson-orin-nano-devkit-nvme-
1. Prepare the Linux_for_Tegra Workspace
Download the Seeed L4T working package from the table in Creating a Custom BSP Package from Jetson Development Environment (JetPack 6.2 / L4T 36.4.3 plus in this example).
sudo tar xpf L4T_36.4.3_plus.tar.gz
# Adjust the archive name to match your download

cd Linux_for_Tegra/
sudo ./apply_binaries.sh
cd ..

export ARCH=arm64
export CROSS_COMPILE="$PWD/aarch64--glibc--stable-2022.08-1/bin/aarch64-buildroot-linux-gnu-"
export PATH="$PWD/aarch64--glibc--stable-2022.08-1/bin:$PATH"
export INSTALL_MOD_PATH="$PWD/Linux_for_Tegra/rootfs/"

cd Linux_for_Tegra/source
./nvbuild.sh
./do_copy.sh
./nvbuild.sh -i
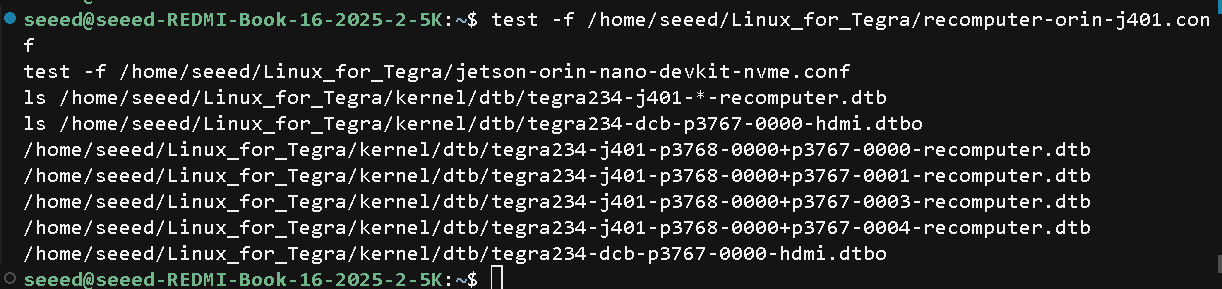
Verification:
- reComputer Classic
- reComputer Super
test -f Linux_for_Tegra/recomputer-orin-j401.conf
test -f Linux_for_Tegra/jetson-orin-nano-devkit-nvme.conf
ls Linux_for_Tegra/kernel/dtb/tegra234-j401-*-recomputer.dtb
ls Linux_for_Tegra/kernel/dtb/tegra234-dcb-p3767-0000-hdmi.dtbo
cd Linux_for_Tegra
test -f recomputer-orin-super-j401.conf
test -f jetson-orin-nano-devkit-nvme.conf
test -f kernel/dtb/tegra234-dcb-p3767-0000-hdmi.dtbo
test -f kernel/dtb/tegra234-p3767-camera-p3768-imx219-quad-seeed.dtbo
2. Back Up the Full DevKit Environment
2.1 Put the Source Device in Recovery Mode
Connect the DevKit flash port to the host with a USB Type-C data cable and enter Recovery mode. On the host, lsusb should show 0955:7523 APX.
For Recovery mode steps, see: Flash JetPack to a Selected Product
During backup the device may briefly switch to 0955:7035 (Linux for Tegra / initrd). That is normal.
2.2 Backup Command
cd Linux_for_Tegra
sudo ./tools/backup_restore/l4t_backup_restore.sh \
  -e nvme0n1 -b -c jetson-orin-nano-devkit-nvme
Do not use the target board name for the first backup when the source is a DevKit. That will corrupt board_spec and later baselines.
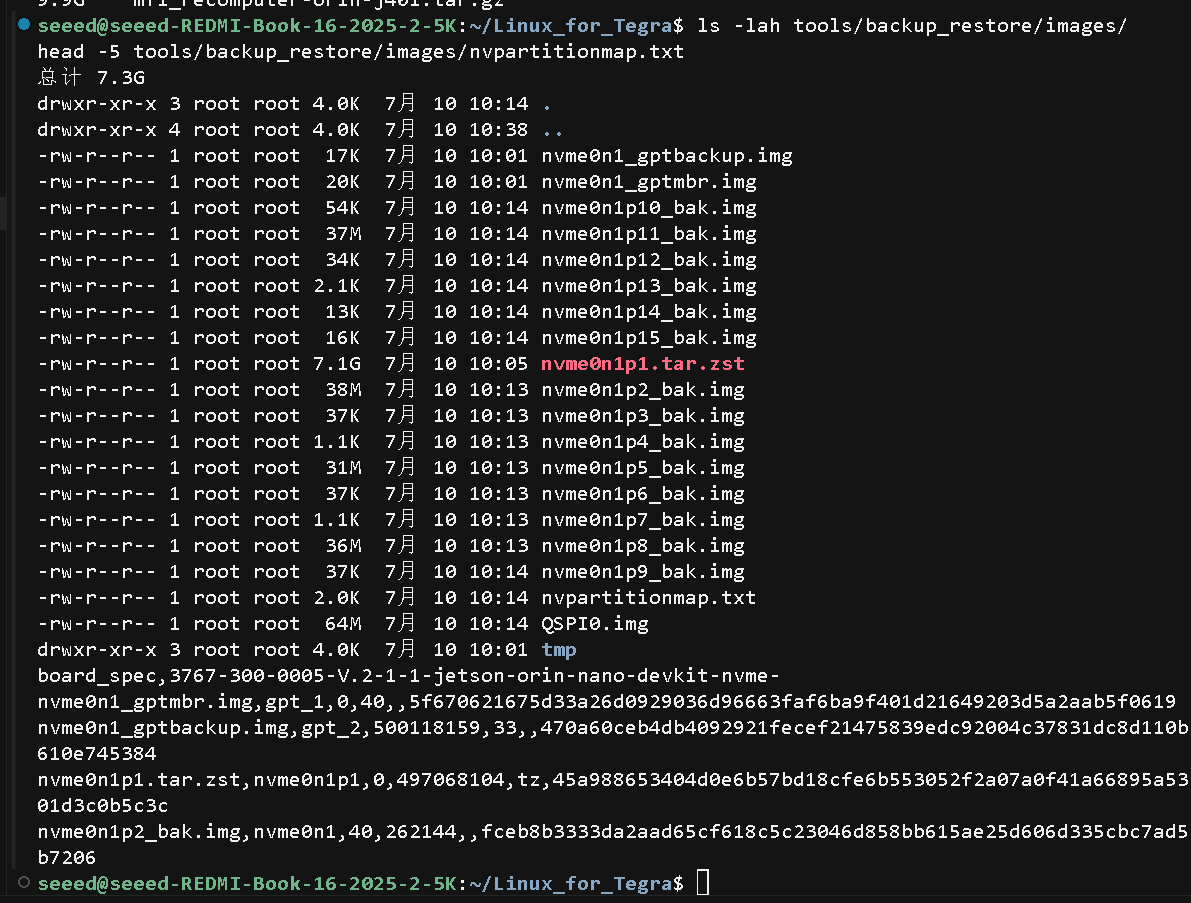
2.3 Verification
ls -lah tools/backup_restore/images/
head -5 tools/backup_restore/images/nvpartitionmap.txt
You should see:
board_speccontainsjetson-orin-nano-devkit-nvmenvme0n1p1.tar.zst(or the later converted large APP) is GB-scaleQSPI0.imgexists (this is DevKit QSPI; Hybrid must not reuse it as target board QSPI)
Recommended: snapshot immediately:
sudo cp -a tools/backup_restore/images ~/backup_images_dk_sku0005
3. Build DevKit Same-Carrier DIY BSP (Optional)
Put the device back into APX. On the host, lsusb should show 0955:7523 APX:
cd Linux_for_Tegra
sudo ./tools/kernel_flash/l4t_initrd_flash.sh \
  --use-backup-image --no-flash --network usb0 --massflash 5 \
  jetson-orin-nano-devkit-nvme internal
Artifacts:
mfi_jetson-orin-nano-devkit-nvme/mfi_jetson-orin-nano-devkit-nvme.tar.gz

For DevKit reflash only. Do not flash the target board with this package.
Its APP can be used as the data source for the Hybrid bundle, but its QSPI cannot be reused.
4. Required Reading: The QSPI Trap
With --use-backup-image, convert_backup_image_to_initrd_flash places:
| Backup content | Destination |
|---|---|
| NVMe / APP | tools/kernel_flash/images/external/ |
Source QSPI0.img | tools/kernel_flash/images/internal/ |
Therefore:
| Wrong approach | Result |
|---|---|
Only edit mfi/.../rootfs or one .dtb | Ineffective (what actually flashes is bak / QSPI) |
DevKit backup, then directly swap target board name + --use-backup-image | Still flashes DevKit QSPI (DP pinmux); HDMI/USB may be wrong |
Change conf, then --flash-only | --flash-only does not rebuild images from conf |
What really differs on the target board is HDMI pinmux + DCB/camera overlay in the board conf:
- reComputer Classic
- reComputer Super
Key contents of recomputer-orin-j401.conf:
PINMUX_CONFIG="tegra234-mb1-bct-pinmux-p3767-hdmi-a03.dtsi"
PMC_CONFIG="tegra234-mb1-bct-padvoltage-p3767-hdmi-a03.dtsi"
OVERLAY_DTB_FILE+=",tegra234-dcb-p3767-0000-hdmi.dtbo,tegra234-p3767-camera-p3768-imx219-dual-seeed.dtbo"
DCE_OVERLAY_DTB_FILE="tegra234-dcb-p3767-0000-hdmi.dtbo"
Key contents of recomputer-orin-super-j401.conf:
PINMUX_CONFIG="recomputer-super-orin-j401-pinmux-p3767-hdmi-a03.dtsi";
PMC_CONFIG="recomputer-super-orin-j401-padvoltage-p3767-hdmi-a03.dtsi";
OVERLAY_DTB_FILE+=",tegra234-dcb-p3767-0000-hdmi.dtbo,tegra234-p3767-camera-p3768-imx219-quad-seeed.dtbo";
DCE_OVERLAY_DTB_FILE="tegra234-dcb-p3767-0000-hdmi.dtbo";
For SKU 0005, the main DTB filename is still NVIDIA's *-0005-nv-super.dtb. Do not force-switch to *-0000-recomputer.dtb (that path is for NX 16GB).
5. Hybrid BSP: Build the Target Bundle
Core idea:
- APP: keep using the DevKit backup (full user environment)
- QSPI: regenerate with the target board conf (without
--use-backup-image) - Assemble into the target board mfi
DevKit backup APP  ──►  external/ (nvme0n1p1_bak.img, etc.)
Target conf new QSPI ──►  internal/ (QSPI shards, not DevKit monolithic QSPI0.img)
                     └──► mfi_recomputer-orin-<target>(.tar.gz)
5.1 Prepare APP-only (Remove DevKit QSPI)
cd Linux_for_Tegra
sudo cp -a ~/backup_images_dk_sku0005 \
  tools/backup_restore/images_app_only
sudo rm -f tools/backup_restore/images_app_only/QSPI0.img
sudo sed -i '/qspi/Id' tools/backup_restore/images_app_only/nvpartitionmap.txt
Convert APP-only into initrd flash external images (use the backup tool's convert step, or reuse the large APP already under tools/kernel_flash/images/external/ from the DevKit mfi pack step).
5.2 Generate Target Board QSPI
Device must be in APX. Module parameters should match the backup (this example: 3767 / 0005 / 300 / V.2):
- reComputer Classic
- reComputer Super
cd Linux_for_Tegra
sudo BOARDID=3767 BOARDSKU=0005 FAB=300 BOARDREV=V.2 CHIP_SKU=00:00:00:D5 \
  ./tools/kernel_flash/l4t_initrd_flash.sh \
  --external-device nvme0n1p1 \
  -c tools/kernel_flash/flash_l4t_t234_nvme.xml \
  -p "-c bootloader/generic/cfg/flash_t234_qspi.xml --no-systemimg" \
  --no-flash --massflash 5 --showlogs --network usb0 \
  recomputer-orin-j401 internal
Logs should show HDMI pinmux, e.g. tegra234-mb1-bct-pinmux-p3767-hdmi-a03.
First create an alias that inherits the Super board configuration but explicitly uses an NVMe root:
cd Linux_for_Tegra
cat > recomputer-orin-super-j401-nvme.conf <<'EOF'
source "${LDK_DIR}/recomputer-orin-super-j401.conf";
EOF
cd Linux_for_Tegra
sudo BOARDID=3767 BOARDSKU=0005 FAB=300 BOARDREV=V.2 \
  CHIP_SKU=00:00:00:D5 \
  ./tools/kernel_flash/l4t_initrd_flash.sh \
  --external-device nvme0n1p1 \
  -c tools/kernel_flash/flash_l4t_t234_nvme.xml \
  -p "-c bootloader/generic/cfg/flash_t234_qspi.xml --no-systemimg" \
  --no-flash --massflash 5 --showlogs --network usb0 \
  recomputer-orin-super-j401-nvme external
Do not use internal as the final rootdev in this NVMe scenario. In the validated setup, that generated an MB2 configuration with SDCARD instance: 0, and boot stopped at Busy Spin when no SD card existed.
The log should contain:
recomputer-super-orin-j401-pinmux-p3767-hdmi-a03.dtsi
tegra234-p3767-camera-p3768-imx219-quad-seeed.dtbo
Recommended: save the new QSPI internal:
- reComputer Classic
- reComputer Super
sudo cp -a tools/kernel_flash/images/internal ~/j401_qspi_internal_save
The QSPI internal (SKU 0005 / L4T 36.4.3) generated in this guide is available for direct download:
wget -O j401_qspi_internal_save.tar.gz \
  https://files.seeedstudio.com/wiki/reComputer-Jetson/FAQ/dk-to-classic/j401_qspi_internal_save.tar.gz
mkdir -p Linux_for_Tegra/tools/kernel_flash/images/internal
tar xpf j401_qspi_internal_save.tar.gz -C Linux_for_Tegra/tools/kernel_flash/images/internal/
Place the downloaded files into Linux_for_Tegra/tools/kernel_flash/images/internal/ to skip the QSPI generation step above.
Reuse prerequisites: target board is reComputer Classic J4011/J4012, module SKU 0005, L4T 36.4.3. If any condition does not match, regenerate QSPI per this section.
sudo cp -a tools/kernel_flash/images/internal ~/super_j401_qspi_internal_save
Verify that the Super internal/flash.idx exists and that the monolithic DevKit QSPI0.img is absent:
test -f mfi_recomputer-orin-super-j401/tools/kernel_flash/images/internal/flash.idx
test ! -f mfi_recomputer-orin-super-j401/tools/kernel_flash/images/internal/QSPI0.img
The Super QSPI internal (SKU 0005 / L4T 36.4.3) generated in this guide is available for direct download:
wget -O super_j401_qspi_internal_save.tar.gz \
  https://files.seeedstudio.com/wiki/reComputer-Jetson/FAQ/dk-to-super/super_j401_qspi_internal_save.tar.gz
mkdir -p Linux_for_Tegra/tools/kernel_flash/images/internal
tar xpf super_j401_qspi_internal_save.tar.gz -C Linux_for_Tegra/tools/kernel_flash/images/internal/
Place the downloaded files into Linux_for_Tegra/tools/kernel_flash/images/internal/ to skip the QSPI generation step above.
Reuse prerequisites: target board is reComputer Super, module SKU 0005, L4T 36.4.3. If any condition does not match, regenerate QSPI per this section.
5.3 Assemble mfi
- reComputer Classic
- reComputer Super
The final directory should satisfy:
| Path | Content |
|---|---|
mfi_recomputer-orin-j401/recomputer-orin-j401.conf | Present |
.../tools/kernel_flash/images/internal/ | New J401 QSPI (no DevKit monolithic QSPI0.img, or hash differs from DevKit; flash.idx is often multi-line shards) |
.../tools/kernel_flash/images/external/nvme0n1p1_bak.img | GB-scale APP |
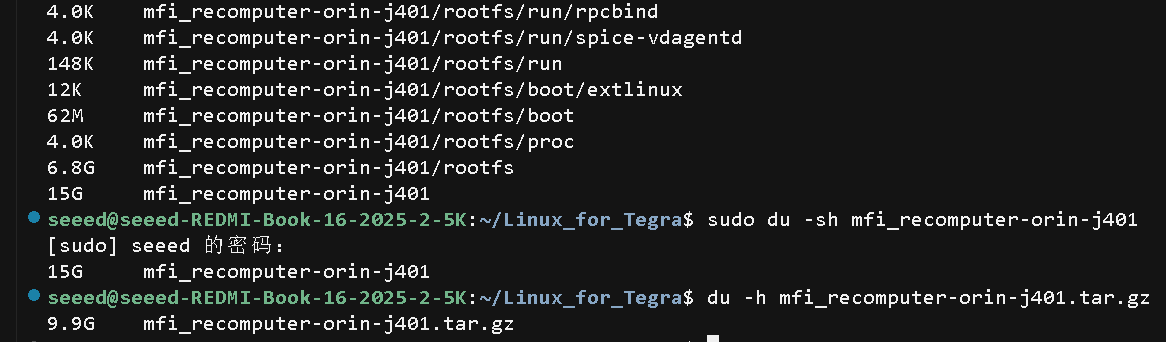
Optional archive:
cd Linux_for_Tegra
sudo tar czf mfi_recomputer-orin-j401.tar.gz mfi_recomputer-orin-j401
Do not unconditionally copy the entire DevKit mfi external/ directory.
If the source DevKit uses a 256GB drive and the target Super uses 128GB, the source GPT fails at partprobe with "GPT is larger than device storage".
The validated target drive was 128035676160 bytes. We used the standard flash_l4t_t234_nvme.xml external layout of 102400000000 bytes and replaced only the APP payload:
cd Linux_for_Tegra

# Use the standard external images generated for the current Super workspace:
sudo cp -a tools/kernel_flash/images/external/. \
  mfi_recomputer-orin-super-j401/tools/kernel_flash/images/external/

# Reuse only the DevKit APP content:
sudo cp -a \
  mfi_jetson-orin-nano-devkit-nvme/tools/kernel_flash/images/external/nvme0n1p1_bak.img* \
  mfi_recomputer-orin-super-j401/tools/kernel_flash/images/external/

sudo tee \
  mfi_recomputer-orin-super-j401/tools/kernel_flash/images/external/flash.cfg \
  >/dev/null <<'EOF'
APP_ext=nvme0n1p1_bak.img
external_device=nvme0n1p1
EOF
Verify:
test -f mfi_recomputer-orin-super-j401/recomputer-orin-super-j401.conf
test -f mfi_recomputer-orin-super-j401/tools/kernel_flash/images/external/nvme0n1p1_bak.img
test ! -f mfi_recomputer-orin-super-j401/tools/kernel_flash/images/internal/QSPI0.img
All three conditions must hold:
internal/contains newly generated Super QSPI;- the external GPT is smaller than the physical target disk;
APP_extpoints to the DevKitnvme0n1p1_bak.img.
Before archiving, also check three consistency requirements—see Tech Note A.
Archive:
cd Linux_for_Tegra
sudo tar czf mfi_recomputer-orin-super-j401.tar.gz \
  mfi_recomputer-orin-super-j401
sudo gzip -t mfi_recomputer-orin-super-j401.tar.gz
sha256sum mfi_recomputer-orin-super-j401.tar.gz \
  > mfi_recomputer-orin-super-j401.tar.gz.sha256
The final coherent archive built in this validation is 12,822,619,478 bytes, passes gzip -t, and has this SHA-256:
fb1d502d9e869d67226eaf71bbe2462fab4e2f1dacf8a6e7fa59057c66a2e845
6. Flash to the Target Board
6.1 Put Target in APX
lsusb → 0955:7523 NVIDIA Corp. APX
6.2 Flash Command
If the extracted directory already exists locally, do not run tar xpf again:
- reComputer Classic
- reComputer Super
cd Linux_for_Tegra/mfi_recomputer-orin-j401
sudo ./tools/kernel_flash/l4t_initrd_flash.sh \
  --flash-only --massflash 1 --network usb0 --showlogs
cd Linux_for_Tegra/mfi_recomputer-orin-super-j401
sudo ./tools/kernel_flash/l4t_initrd_flash.sh \
  --flash-only --massflash 1 --network usb0 --showlogs
Only when another PC has only the .tar.gz:
- reComputer Classic
- reComputer Super
sudo tar xpf mfi_recomputer-orin-j401.tar.gz
cd mfi_recomputer-orin-j401
sudo ./tools/kernel_flash/l4t_initrd_flash.sh \
  --flash-only --massflash 1 --network usb0 --showlogs
sudo tar xpf mfi_recomputer-orin-super-j401.tar.gz
cd mfi_recomputer-orin-super-j401
sudo ./tools/kernel_flash/l4t_initrd_flash.sh \
  --flash-only --massflash 1 --network usb0 --showlogs
If /mnt/external/...: Permission denied appears while writing recovery or APP, this is an NFS permission issue—see Tech Note B.
6.3 Normal Messages During Flash
| Log | Meaning |
|---|---|
p3768-0000-p3767-0000-a0.conf: No such file or directory | Common with --flash-only; images are prebuilt, continue |
rpcbind already running | Safe to ignore |
blockdev: cannot open /dev/mmcblk0boot0 | Orin Nano has no such partition; usually harmless |
RCM-boot + SSH ready | Normal flash entry |
DTB ...-0005-nv-super.dtb | Correct for SKU0005 |
Multiple internal lines + Starting to flash to qspi | Flashing target board QSPI |
tar ... zstd ... nvme0n1p1_bak.img | Restoring APP (longest step; may take tens of minutes) |
Successfully flash the qspi | QSPI flash complete |
Successfully flash the external device | External device flash complete |
Flashing success / Flash is successful | Flash succeeded |
Do not power off or unplug until you see a successful completion message.
7. Post-Flash Checks
Release the Recovery button or jumper and power-cycle after a successful flash. If lsusb still reports 0955:7523 APX, the device remains in Recovery and has not booted Linux.
After a normal boot, run:
cat /proc/device-tree/model
ls /boot/kernel_tegra234*.dtb
ls /boot/*.dtbo | grep -E 'hdmi|imx219' || true

# Whether peripherals actually work (more important than model / dtbo filenames)
xrandr 2>/dev/null | head -20
lsusb | head
ip -br link
ls /boot/*.dtbo 2>/dev/null | head -40
sudo dmesg | grep -iE 'dtb|overlay|hdmi|tegra234' | tail -30

# Whether the original DevKit user environment survived (CUDA example)
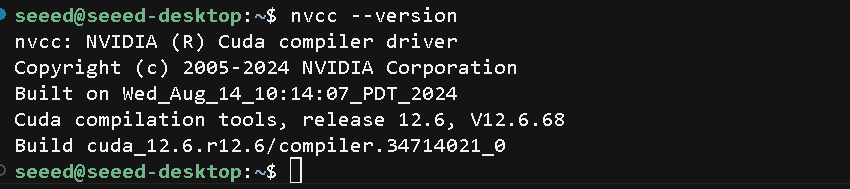
nvcc --version
Without sudo, dmesg may report Operation not permitted. That is a permissions issue; use sudo.
How to Interpret Results (SKU 0005)
1) /proc/device-tree/model still shows DevKit — normal for SKU 0005
Example:
NVIDIA Jetson Orin Nano Engineering Reference Developer Kit Super
Reason: the target board conf for SKU 0005 selects NVIDIA's tegra234-p3768-0000+p3767-0005-nv-super.dtb. It does not switch to tegra234-j401-*-recomputer.dtb, so the model string still looks like the official DevKit. Do not conclude "flashed the wrong DevKit bundle" from this line alone.
2) DTB filenames under /boot
Commonly visible:
/boot/kernel_tegra234-p3768-0000+p3767-0000-nv.dtb
/boot/kernel_tegra234-p3768-0000+p3767-0005-nv.dtb
You may not see a *-0005-nv-super.dtb filename; the actual boot DTB is often chosen by UEFI/QSPI. The /boot listing is reference only.
3) Empty grep hdmi|imx219 — not a failure by itself
After Hybrid flash, /boot/*.dtbo often still contains the generic overlay list from the DevKit backup. You may not see tegra234-dcb-p3767-0000-hdmi.dtbo or Seeed camera overlays. Seeed HDMI/camera settings mostly take effect through the new target board QSPI / UEFI overlay path.
4) Judge by "does it work?"
| Check | Healthy example |
|---|---|
| USB | Hubs, mouse, Bluetooth, USB Ethernet enumerated (lsusb shows multiple devices) |
| Wired Ethernet | Classic: enP8p1s0 etc. are UP; Super: see Tech Note C |
| Wi‑Fi | wlP1p1s0 is UP |
| Display | Desktop works; or xrandr has output |
| User environment | Original DevKit users, software, and data remain |
| CUDA | nvcc --version works (this example 12.6), indicating APP clone is intact |
- reComputer Classic
- reComputer Super
Classic should focus on validating the dual camera configuration (imx219-dual-seeed).
On device: model / DTB

On device: CUDA installed on the original DevKit still works
Super should focus on validating the quad-camera configuration required by Super (imx219-quad-seeed). The absence of an imx219-quad-seeed.dtbo filename under /boot is not a failure by itself because the overlay may be applied through QSPI/UEFI.
Validated results:
- The system reached the Ubuntu login screen with
display-manageractive; - HDMI, USB keyboard/mouse, Bluetooth, and Wi-Fi worked;
- The cloned DevKit APP and CUDA 12.6 were retained;
- The quad-camera overlay and four IMX219/I2C configuration nodes were present.
When to Edit extlinux.conf
Only if HDMI / USB / boot is abnormal, try adding under LABEL primary in /boot/extlinux/extlinux.conf:
FDT /boot/kernel_tegra234-p3768-0000+p3767-0005-nv-super.dtb
(If that file is missing under /boot, try ...-0005-nv.dtb, or copy from BSP kernel/dtb/ first.)
sudo reboot
If still abnormal, use Section 8 fallback.
8. Fallback (Official Path)
If Hybrid flash leaves partitions/UEFI/peripherals abnormal:
- Flash the official target board BSP per Seeed's flow (do not flash the DevKit mfi).
- Extract
/homefrom backup (nvme0n1p1.tar.zst) or follow Migrate /home Data from Jetson Orin Nano Developer Kit to reComputer. - Restore
/homeon the target board, then reinstall system-level software as needed (/usr,/etc, Docker, etc. need separate handling).
Pros: cleanest board firmware. Cons: not a full / disk clone.
9. Key Paths Quick Reference
| Type | Path (under Linux_for_Tegra/) |
|---|---|
| DK mfi | mfi_jetson-orin-nano-devkit-nvme.tar.gz |
| Classic Bundle mfi | mfi_recomputer-orin-j401.tar.gz |
| Super Bundle mfi | mfi_recomputer-orin-super-j401.tar.gz |
| Classic conf | recomputer-orin-j401.conf |
| Super conf | recomputer-orin-super-j401.conf |
| HDMI DCB | kernel/dtb/tegra234-dcb-p3767-0000-hdmi.dtbo |
| Classic dual IMX219 | kernel/dtb/tegra234-p3767-camera-p3768-imx219-dual-seeed.dtbo |
| Super quad IMX219 | kernel/dtb/tegra234-p3767-camera-p3768-imx219-quad-seeed.dtbo |
| J401 DTB | kernel/dtb/tegra234-j401-p3768-0000+p3767-*-recomputer.dtb |
| SKU0005 DTB | kernel/dtb/tegra234-p3768-0000+p3767-0005-nv-super.dtb |
10. Flow Overview
[Host] Extract L4T + apply_binaries + nvbuild
          │
          ▼
[DevKit APX] backup -c jetson-orin-nano-devkit-nvme
          │
          ├─► (optional) --use-backup-image → mfi_jetson-orin-nano-devkit-nvme
          │
          ├─► snapshot backup_images_dk_sku0005
          │         │
          │         ├─ APP-only (remove QSPI)
          │         └─► external APP
          │
          └─► [APX] target board conf → generate QSPI
                    │           │
                    │           ├─ Classic: recomputer-orin-j401 internal
                    │           └─ Super:   recomputer-orin-super-j401-nvme external
                    │
                    ▼
              assemble mfi_recomputer-orin-<target>
                    │
                    ▼
              [target APX] --flash-only
                    │
                    ▼
              check display/USB/NVMe/user environment
11. FAQ
Q: Both the directory and .tar.gz exist—do I still need to extract?
A: No. If mfi_recomputer-orin-* directory exists, cd into it and run --flash-only.
Q: Target board module is not 0005?
A: Change BOARDSKU, pick the matching DTB per p3767_super_overlay in the target board conf, then regenerate QSPI.
Q: I only want to keep /home, not clone the whole disk?
A: Use Section 8 fallback. It is simpler and more reliable.
Q: Can I rename and flash the Classic Hybrid bundle onto Super?
A: No. Their pinmux and camera overlays differ. Regenerate the corresponding QSPI.
Q: Why not use --use-backup-image directly?
A: It may also reuse the DevKit QSPI0.img. Hybrid should reuse only the APP.
Q: What if source and target drive capacities differ? (Super)
A: Generate GPT for the target drive and replace only the APP payload. The expanded APP must fit the new APP partition.
Q: Why does the DIY BSP wiki example use recomputer-orin-j401?
A: That example assumes source and target are both Seeed boards. When the source is an official DevKit, backup must first use jetson-orin-nano-devkit-nvme, then follow this Hybrid tutorial to adapt to the target board.
Tech Notes
Tech Note A. Super First-Boot Consistency
Check three consistency requirements before archiving:
root=PARTUUID=...inboot.imgmust match the APP partition unique GUID in the external GPT;- the
/boot/efiUUID in the DevKit APP/etc/fstabmust match the FAT UUID of the newesp.img; - if the cloned DevKit kernel crashes in
lan743xon the Super LAN7430, preinstall:
/etc/modprobe.d/blacklist-lan743x-super-hybrid.conf
blacklist lan743x
install lan743x /bin/false
The first two mismatches prevent root mounting or enter maintenance mode. Changing the live PARTUUID with sgdisk in a repair initrd is a recovery measure, not a reproducible build step. Regenerate GPT and boot.img together, then patch the APP before creating the final archive.
Tech Note B. NFS Permission Denied
If /mnt/external/...: Permission denied appears while writing recovery or APP, ensure that the NFS client can traverse every parent directory in the mfi path.
For example, if the user home directory mode is 750, temporarily use 751 during flashing and restore it immediately afterward:
sudo chmod 751 /home/$USER
# Re-enter APX and flash
sudo chmod 750 /home/$USER
Mode 751 adds traversal permission only; it does not allow other users to list the directory. Do not use 777.
Tech Note C. Super lan743x Wired Ethernet Limitation
The cloned DevKit RT kernel used in this test triggered a kernel Oops while loading lan743x for the Super LAN7430. The final Hybrid BSP blacklists lan743x (see Tech Note A item 3), so onboard wired Ethernet is temporarily unavailable; Wi-Fi is not affected.
This is a source APP/kernel driver compatibility limitation, not a Super QSPI or pinmux failure. Port or upgrade a compatible driver and run stress tests before relying on wired Ethernet in production.
Tech Support & Product Discussion
Thank you for choosing our products! We are here to provide you with different support to ensure that your experience with our products is as smooth as possible. We offer several communication channels to cater to different preferences and needs.