Matter Development Framework Overview
This article is the fourth tutorial in the Seeed Studio XIAO ESP32 Development Matter series. If you have not read the previous tutorials, we recommend that you read them first to check that your device is and has been configured as required.
Embark on an illuminating journey into the world of Matter development with our comprehensive tutorial. Through the lens of the quintessential light example, we'll shed light on the fundamental concepts and knowledge that form the bedrock of Matter development. From clusters and attributes to commands and beyond, this tutorial will equip you with the tools to navigate the Matter framework with confidence. Get ready to flip the switch on your Matter development skills and let's dive into the brilliant world of connected devices!
Tutorial Outline
- Understanding the Light Example
- Device Initialisation
- Create Matter Node
- Sets the Attribute of the Endpoint
- Create Endpoint & Auto Match Cluster
- Setting up the Matter device for the first time with default values
- Data updates and deferred persistence
In this section, we will focus on the light example provided in ESP-Matter, which describes in detail the basic concepts of clusters, attributes and commands in the Matter development framework. By reading this article, you will be able to gain a better understanding of the structure and awareness of the Matter development framework.
Understanding the Light Example
First, let's look at the file directories in the ESP-Matter environment and what they do.
- esp-matter/
   - components/
      - esp_matter
      - esp_matter_bridge
      - esp_matter_console
      - esp_matter_controller
      - esp_matter_rainmaker
      - esp_matter_thread_br
   - connectedhomeip/
   - device_hal/
      - button_driver
      - device
      - led_driver
   - docs/
   - examples/
   - tools/
      - mfg_tool
   CMakeLists.txt
   RELEASE_NOTES.md
   export.sh
   install.sh
   requirements.txt
   ...
esp-matter: This is the root directory of the entire Matter development framework.
components: This directory contains various components and is the core of the Matter framework.
- esp_matter: This is the implementation of the Matter protocol stack on ESP32, including the data model, application layer logic, etc.
- esp_matter_bridge: This component is responsible for bridging ESP devices to other non-ESP devices, achieving interoperability.
- esp_matter_console: This is an interactive console based on REPL, used for debugging and controlling Matter devices.
- esp_matter_controller: This component implements the functionality of a Matter controller, capable of controlling other Matter devices.
- esp_matter_rainmaker: This component integrates with Espressif's RainMaker cloud platform, enabling cloud control.
- esp_matter_thread_br: This component implements the Thread Border Router functionality, used for creating Thread networks.
connectedhomeip: This is the upstream open-source project of the Matter protocol stack, from which ESP Matter syncs its code.
device_hal: This directory contains the hardware abstraction layer drivers.
- button_driver: Button driver.
- device: Device abstraction, defining generic device interfaces.
- led_driver: LED driver.
docs: This is where ESP-Matter development documents and API reference manuals are stored.
examples: Various example codes demonstrating how to use the Matter framework for development.
tools: Contains various development tool scripts.
- mfg_tool: Tool for generating manufacturer certificates.
CMakeLists.txt: CMake build script, defining the compilation rules for the project.
RELEASE_NOTES.md: Release notes, recording the changes in each version.
export.sh: Export script, used to export Matter-related environment variables.
install.sh: Installation script, used to install the dependencies and toolchains required for Matter development.
requirements.txt: Python dependencies list, specifying the Python libraries needed to run the Matter development framework.
This directory structure reflects the modular design philosophy of the Matter development framework. The core protocol stack, hardware abstraction, application components, auxiliary tools, and other parts each have their own responsibilities while being organically combined, providing developers with a complete Matter development environment.
Taking examples/light as an example, the structure of the example provided by ESP-Matter is as follows:
- light/
   - main/
      - CMakeLists.txt
      - app_driver.cpp
      - app_main.cpp
      - app_priv.h
      - idf_components.yml
   CMakeLists.txt
   README.md
   partitions.csv
   sdkconfig.defaults
   ...
-
main: This subdirectory contains the main application code and configuration files.
- CMakeLists.txt: The CMake build script for the main application.
- app_driver.cpp: The driver code for the light application.
- app_main.cpp: The main entry point of the light application.
- app_priv.h: A header file containing private declarations for the light application.
- idf_components.yml: A configuration file for the ESP-IDF components used in the light application.
-
CMakeLists.txt: The top-level CMake build script for the light example.
-
README.md: A readme file providing information and instructions for the light example.
-
partitions.csv: A file defining the partition table for the light example.
-
sdkconfig.defaults: Default configuration settings for the light example.
Device Initialisation
Next, we go into light's code to deepen our understanding of Matter's development process through a combination of code analysis and theory. The following code is in manin/app_main.cpp.
app_driver_handle_t light_handle = app_driver_light_init();
app_driver_handle_t button_handle = app_driver_button_init();
app_reset_button_register(button_handle);
app_driver_handle_t light_handle = app_driver_light_init();: This line initializes the light driver and returns a handle to the light driver instance.
app_driver_handle_t button_handle = app_driver_button_init();: Similar to the light initialization, this line initializes the button driver.
app_reset_button_register(button_handle);: This line registers the button for a specific functionality, to handle reset operations.
Take the app_driver_light_init() function as an example, the following program initialises all the light bulbs, but only uses the first one (set to the default colour and brightness values). This is also the reason why the example programme can only use one light bulb.
// app_driver.cpp
app_driver_handle_t app_driver_light_init()
{
#if CONFIG_BSP_LEDS_NUM > 0
    /* Initialize led */
    led_indicator_handle_t leds[CONFIG_BSP_LEDS_NUM];
    ESP_ERROR_CHECK(bsp_led_indicator_create(leds, NULL, CONFIG_BSP_LEDS_NUM));
    led_indicator_set_hsv(leds[0], SET_HSV(DEFAULT_HUE, DEFAULT_SATURATION, DEFAULT_BRIGHTNESS));

    return (app_driver_handle_t)leds[0];
#else
    return NULL;
#endif
}
Create Matter Node
The next step in the main line of code for Matter device configuration is to create a Matter Node. the code is as follows:
node::config_t node_config;

// node handle can be used to add/modify other endpoints.
node_t *node = node::create(&node_config, app_attribute_update_cb, app_identification_cb);
ABORT_APP_ON_FAILURE(node != nullptr, ESP_LOGE(TAG, "Failed to create Matter node"));
The Matter data model is a standardized way of representing and organizing data within the Matter ecosystem. It defines a common language and structure for devices, attributes, and interactions, enabling interoperability and seamless communication among Matter-compatible devices.
The following diagram shows a simplistic view of how this can be represented in the Matter’s data model.
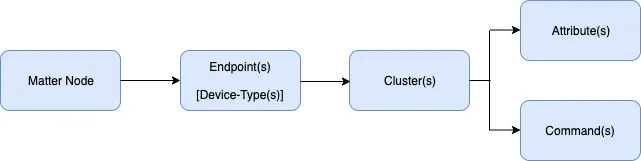
Matter Node: A Matter Node represents a physical device or a logical entity within the Matter ecosystem. It is the top-level component of the Matter data model. Each Matter Node has a unique identifier and can contain one or more Endpoints.
- A Matter Node represents a physical device in the Matter ecosystem.
- It's like a house that can contain multiple Endpoints (rooms).
- Each Matter Node has its own unique identifier for recognition and addressing within the network.
Sets the Attribute of the Endpoint
Once the Matter Node has been created, it is necessary to set default values for the properties of the Endpoints.
extended_color_light::config_t light_config;
light_config.on_off.on_off = DEFAULT_POWER;
light_config.on_off.lighting.start_up_on_off = nullptr;
light_config.level_control.current_level = DEFAULT_BRIGHTNESS;
light_config.level_control.lighting.start_up_current_level = DEFAULT_BRIGHTNESS;
light_config.color_control.color_mode = (uint8_t)ColorControl::ColorMode::kColorTemperature;
light_config.color_control.enhanced_color_mode = (uint8_t)ColorControl::ColorMode::kColorTemperature;
light_config.color_control.color_temperature.startup_color_temperature_mireds = nullptr;
-
light_config.on_off.on_off = DEFAULT_POWER;- Sets the initial on/off state of the endpoint to
DEFAULT_POWER. DEFAULT_POWERis a predefined constant representing the default power state (e.g.,truefor on,falsefor off).
- Sets the initial on/off state of the endpoint to
-
light_config.on_off.lighting.start_up_on_off = nullptr;- Sets the start-up on/off state of the endpoint to
nullptr. - When the device restarts or power cycles, if this value is
nullptr, it means to use the last on/off state. - If set to a non-
nullptrvalue, it indicates to use the specified on/off state.
- Sets the start-up on/off state of the endpoint to
-
light_config.level_control.current_level = DEFAULT_BRIGHTNESS;- Sets the initial brightness level of the endpoint to
DEFAULT_BRIGHTNESS(64). DEFAULT_BRIGHTNESSis a predefined constant representing the default brightness level (e.g., a value between 0 and 254).
- Sets the initial brightness level of the endpoint to
-
light_config.level_control.lighting.start_up_current_level = DEFAULT_BRIGHTNESS;- Sets the start-up brightness level of the endpoint to
DEFAULT_BRIGHTNESS(64). - When the device restarts or power cycles, if this value is non-
nullptr, it means to use the specified brightness level. - If set to
nullptr, it indicates to use the last brightness level.
- Sets the start-up brightness level of the endpoint to
-
light_config.color_control.color_mode = (uint8_t)ColorControl::ColorMode::kColorTemperature;- Sets the color mode of the endpoint to
ColorControl::ColorMode::kColorTemperature. - This means the endpoint uses color temperature mode, where the color of the light is controlled by adjusting the color temperature.
(uint8_t)is a type cast that converts the enum value to an unsigned 8-bit integer.
- Sets the color mode of the endpoint to
-
light_config.color_control.enhanced_color_mode = (uint8_t)ColorControl::ColorMode::kColorTemperature;- Sets the enhanced color mode of the endpoint to
ColorControl::ColorMode::kColorTemperature. - The enhanced color mode provides more color control options, but here it is also set to color temperature mode.
- Sets the enhanced color mode of the endpoint to
-
light_config.color_control.color_temperature.startup_color_temperature_mireds = nullptr;- Sets the start-up color temperature of the endpoint to
nullptr. - When the device restarts or power cycles, if this value is
nullptr, it means to use the last color temperature setting. - If set to a non-
nullptrvalue, it indicates to use the specified color temperature value.
- Sets the start-up color temperature of the endpoint to
Attributes in Matter are like properties or characteristics of a device. They store information about the device's state, such as whether it's on or off, its brightness level, or its color temperature. These attributes are organized into groups called Clusters, which are related to specific functions of the device.
Attributes make it easier for different devices and apps to communicate and work together seamlessly. By having a standard way to represent and access device properties, Matter simplifies the development of smart home systems and ensures that devices from various brands can interact with each other efficiently.
esp_matter_endpoint.h is an important header file in the ESP Matter SDK that defines constants, data types, and functions related to endpoints. In Matter, endpoints represent the logical interfaces of a device, and each endpoint contains a set of attributes and commands that describe and control specific functionalities of the device.
namespace extended_color_light {
typedef struct config {
    cluster::descriptor::config_t descriptor;
    cluster::identify::config_t identify;
    cluster::groups::config_t groups;
    cluster::scenes_management::config_t scenes_management;
    cluster::on_off::config_t on_off;
    cluster::level_control::config_t level_control;
    cluster::color_control::config_t color_control;
} config_t;

uint32_t get_device_type_id();
uint8_t get_device_type_version();
endpoint_t *create(node_t *node, config_t *config, uint8_t flags, void *priv_data);
esp_err_t add(endpoint_t *endpoint, config_t *config);
} /* extended_color_light */
Create Endpoint & Auto Match Cluster
In the above, we first mentioned two terms that are important in Matter, Endpoints and Clusters.
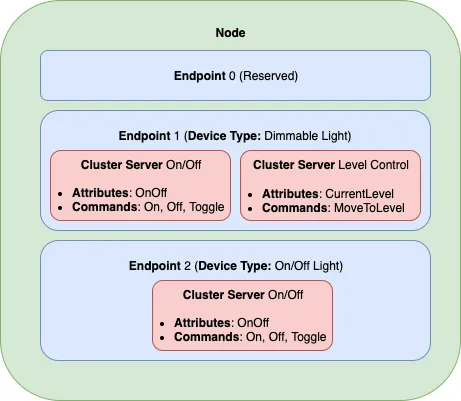
Endpoint(s) [Device-Type(s)]: An Endpoint is a logical representation of a specific functionality or service within a Matter Node. It encapsulates a set of capabilities and behaviors related to a particular device type. A Matter Node can have multiple Endpoints, each representing a different device type. Device-Type(s) define the specific characteristics and functionality of an Endpoint. Matter defines a set of standard device types, such as light bulbs, thermostats, door locks, and more. Each device type has a unique identifier and a predefined set of clusters, attributes, and commands associated with it.
- An Endpoint is a logical component within a Matter Node, representing a specific functionality or service of the device.
- Just like rooms in a house, each Endpoint has its own dedicated purpose, such as a bedroom, kitchen, or living room.
- Each Endpoint is associated with a specific device type, like a light bulb, thermostat, or door lock.
- A Matter Node can have multiple Endpoints, each representing a different device type and functionality.
Cluster(s): Clusters are logical groupings of related attributes and commands within an Endpoint. They represent a specific functionality or feature of a device. Clusters provide a way to organize and categorize the capabilities of an Endpoint. For example, the "On/Off Cluster" contains attributes and commands related to turning a device on or off, while the "Level Control Cluster" deals with controlling the brightness or level of a device.
- A Cluster is a logical grouping within an Endpoint, containing related attributes and commands.
- It's like the furniture or devices in a room, such as lights, televisions, or air conditioners, each with their own attributes and operations.
- Each Cluster represents a specific functionality or feature of the device.
- For example, the "On/Off Cluster" contains attributes and commands related to the on/off state of the device, while the "Level Control Cluster" contains attributes and commands for adjusting the brightness or level of the device.
- An Endpoint can have multiple Clusters, each responsible for different functionalities.
In summary, a Matter Node is like a house, containing multiple Endpoints (rooms). Each Endpoint is like a room, representing a specific functionality or service of the device. Clusters are like the furniture or devices in each room, containing related attributes and commands for control and interaction.
This hierarchical organization allows devices to clearly describe their functionalities and characteristics, making it easier for applications and other devices to interact with and control them. By standardizing device types, Clusters, attributes, and commands, Matter enables interoperability and compatibility between devices from different manufacturers.
In the code, after setting the Attributes, an Endpoint is finally created by the following snippet. And it automatically matches the Cluster of the set attribute.
endpoint_t *endpoint = extended_color_light::create(node, &light_config, ENDPOINT_FLAG_NONE, light_handle);
ABORT_APP_ON_FAILURE(endpoint != nullptr, ESP_LOGE(TAG, "Failed to create extended color light endpoint"));
How is auto-matching clustering achieved? Let's take an example of a snippet that sets an attribute.
light_config.level_control.lighting.start_up_current_level = DEFAULT_BRIGHTNESS;
light_config.level_control is an Attribute defined in Endpoint (esp_matter_endpoint.h). And light_config.level_control.lighting is a Attribute defined in Cluster (esp_matter_cluster). With this setting, the system can automatically match the Cluster corresponding to the Attribute without the need for developers to set them manually.
Setting up the Matter device for the first time with default values
Once the above Attributes, Clusters and Endpoints have been configured, we can start booting the Matter appliance. The steps and methodology for startup are as follows.
light_endpoint_id = endpoint::get_id(endpoint);
ESP_LOGI(TAG, "Light created with endpoint_id %d", light_endpoint_id);

/* Matter start */
err = esp_matter::start(app_event_cb);
ABORT_APP_ON_FAILURE(err == ESP_OK, ESP_LOGE(TAG, "Failed to start Matter, err:%d", err));

/* Starting driver with default values 使用默认值启动驱动程序 */
app_driver_light_set_defaults(light_endpoint_id);
As you can see, the function to set the defaults is app_driver_light_set_defaults(), and we need to pass in an endpoint ID as a parameter. And we need to be concerned about how to get the value of a certain cluster, a certain attribute, and how to set the default cluster, attribute value. The secrets are shown in the app_driver.cpp.
esp_err_t err = ESP_OK;
void *priv_data = endpoint::get_priv_data(endpoint_id);
led_indicator_handle_t handle = (led_indicator_handle_t)priv_data;
node_t *node = node::get();
endpoint_t *endpoint = endpoint::get(node, endpoint_id);
cluster_t *cluster = NULL;
attribute_t *attribute = NULL;
esp_matter_attr_val_t val = esp_matter_invalid(NULL);

/* Setting brightness */
cluster = cluster::get(endpoint, LevelControl::Id);
attribute = attribute::get(cluster, LevelControl::Attributes::CurrentLevel::Id);
attribute::get_val(attribute, &val);
err |= app_driver_light_set_brightness(handle, &val);
-
Obtaining a Cluster:
- To obtain a cluster, you first need to get a pointer to the endpoint using the
endpoint::get(node, endpoint_id)function, wherenodeis a pointer to the node andendpoint_idis the ID of the endpoint. - Once you have the endpoint pointer, you can get a pointer to the desired cluster using the
cluster::get(endpoint, LevelControl::Id)function, specifying the endpoint and the cluster ID (LevelControl::Idin this case).
- To obtain a cluster, you first need to get a pointer to the endpoint using the
-
Getting a Specific Attribute:
- After obtaining the cluster pointer, you can get a pointer to a specific attribute within that cluster using the
attribute::get(cluster, LevelControl::Attributes::CurrentLevel::Id)function. - In this example, we are retrieving the
CurrentLevelattribute from theLevelControlcluster.
- After obtaining the cluster pointer, you can get a pointer to a specific attribute within that cluster using the
-
Retrieving the Attribute's Value:
- To retrieve the current value of an attribute, you need to declare a variable of type
esp_matter_attr_val_tto store the attribute value. - In the code snippet, the variable
valis initialized withesp_matter_invalid(NULL). - Then, you can use the
attribute::get_val(attribute, &val)function to fetch the current value of the attribute and store it in thevalvariable.
- To retrieve the current value of an attribute, you need to declare a variable of type
-
Setting the Brightness of a Light:
- To set the brightness of a light, you need to have a handle to the LED indicator associated with the endpoint.
- In the code snippet, the LED indicator handle is obtained by casting the private data pointer (
priv_data) to the appropriate type (led_indicator_handle_t). - Finally, you can call the
app_driver_light_set_brightness(handle, &val)function to set the brightness of the LED indicator. - The
handleparameter is the LED indicator handle, and&valis a pointer to theesp_matter_attr_val_tvariable containing the desired brightness value.
Here's a summary of the steps:
- Get the endpoint pointer using
endpoint::get(node, endpoint_id). - Get the cluster pointer using
cluster::get(endpoint, LevelControl::Id). - Get the attribute pointer using
attribute::get(cluster, LevelControl::Attributes::CurrentLevel::Id). - Retrieve the attribute's current value using
attribute::get_val(attribute, &val). - Set the brightness of the light using
app_driver_light_set_brightness(handle, &val), wherehandleis the LED indicator handle associated with the endpoint.
By following these steps, you can obtain the necessary pointers to the cluster and attribute, retrieve the current value of the attribute, and set the brightness of the light accordingly.
Data updates and deferred persistence
In the code of app_driver.cpp, the values of the attributes are updated by using the app_driver_attribute_update() function.
if (endpoint_id == light_endpoint_id) {
   led_indicator_handle_t handle = (led_indicator_handle_t)driver_handle;
   if (cluster_id == OnOff::Id) {
      if (attribute_id == OnOff::Attributes::OnOff::Id) {
            err = app_driver_light_set_power(handle, val);
      }
   } else if (cluster_id == LevelControl::Id) {
      if (attribute_id == LevelControl::Attributes::CurrentLevel::Id) {
            err = app_driver_light_set_brightness(handle, val);
      }
   } else if (cluster_id == ColorControl::Id) {
      if (attribute_id == ColorControl::Attributes::CurrentHue::Id) {
            err = app_driver_light_set_hue(handle, val);
      } else if (attribute_id == ColorControl::Attributes::CurrentSaturation::Id) {
            err = app_driver_light_set_saturation(handle, val);
      } else if (attribute_id == ColorControl::Attributes::ColorTemperatureMireds::Id) {
            err = app_driver_light_set_temperature(handle, val);
      }
   }
}
The code snippet defines a function named app_driver_attribute_update that takes several parameters, including the driver handle (driver_handle), endpoint ID (endpoint_id), cluster ID (cluster_id), attribute ID (attribute_id), and a pointer to the attribute value (val).
The purpose of this function is to update the attribute values of a light endpoint based on the received data. It follows a specific logic to determine which attribute of the light endpoint needs to be updated.
Here's a step-by-step breakdown of the data update logic:
-
The function first checks if the
endpoint_idmatches thelight_endpoint_id. This ensures that the update is intended for the light endpoint. -
If the
endpoint_idmatches, the function casts thedriver_handleto the appropriate type (led_indicator_handle_t) to obtain the handle for the LED indicator associated with the light endpoint. -
The function then checks the
cluster_idto determine which cluster the attribute belongs to. It supports three clusters:OnOff,LevelControl, andColorControl. -
Depending on the
cluster_id, the function further checks theattribute_idto identify the specific attribute within that cluster. -
Based on the
cluster_idandattribute_id, the function calls the corresponding setter function to update the attribute value:- If the
cluster_idisOnOff::Idand theattribute_idisOnOff::Attributes::OnOff::Id, it callsapp_driver_light_set_power(handle, val)to set the power state of the light. - If the
cluster_idisLevelControl::Idand theattribute_idisLevelControl::Attributes::CurrentLevel::Id, it callsapp_driver_light_set_brightness(handle, val)to set the brightness level of the light. - If the
cluster_idisColorControl::Id, it checks theattribute_idfurther:- If the
attribute_idisColorControl::Attributes::CurrentHue::Id, it callsapp_driver_light_set_hue(handle, val)to set the hue of the light. - If the
attribute_idisColorControl::Attributes::CurrentSaturation::Id, it callsapp_driver_light_set_saturation(handle, val)to set the saturation of the light. - If the
attribute_idisColorControl::Attributes::ColorTemperatureMireds::Id, it callsapp_driver_light_set_temperature(handle, val)to set the color temperature of the light.
- If the
- If the
Overall, this function acts as a central point for updating the attribute values of a light endpoint. It receives the necessary information (endpoint ID, cluster ID, attribute ID, and attribute value) and dispatches the update to the appropriate setter function based on the cluster and attribute IDs.
By organizing the logic in this way, the code becomes more modular and easier to maintain. It allows for updating different attributes of the light endpoint (power state, brightness, hue, saturation, color temperature) through a single function, simplifying the process of updating the light's characteristics based on the received data.
But not all attributes are updated in real time. Code that marks those attributes that are likely to change frequently, as deferred persistence, can improve performance, as well as reduce the number of writes to non-volatile memory and extend the life of the device.
/* Mark deferred persistence for some attributes that might be changed rapidly */
cluster_t *level_control_cluster = cluster::get(endpoint, LevelControl::Id);
attribute_t *current_level_attribute = attribute::get(level_control_cluster, LevelControl::Attributes::CurrentLevel::Id);
attribute::set_deferred_persistence(current_level_attribute);

cluster_t *color_control_cluster = cluster::get(endpoint, ColorControl::Id);
attribute_t *current_x_attribute = attribute::get(color_control_cluster, ColorControl::Attributes::CurrentX::Id);
attribute::set_deferred_persistence(current_x_attribute);
Defining your own data model
This section demonstrates creating standard endpoints, clusters, attributes, and commands that are defined in the Matter specification.
Endpoints
The device can be customized by editing the endpoint/device_type creating in the app_main.cpp of the example. Examples:
- on_off_light:
   on_off_light::config_t light_config;
   endpoint_t *endpoint = on_off_light::create(node, &light_config, ENDPOINT_FLAG_NONE);
- temperature_sensor:
    esp_matter::endpoint::temperature_sensor::config_t temperature_sensor_config;
    endpoint_t *endpoint = temperature_sensor::create(node, &temperature_sensor_config, ENDPOINT_FLAG_NONE, NULL);
- fan:
   fan::config_t fan_config;
   endpoint_t *endpoint = fan::create(node, &fan_config, ENDPOINT_FLAG_NONE);
- door_lock:
   door_lock::config_t door_lock_config;
   endpoint_t *endpoint = door_lock::create(node, &door_lock_config, ENDPOINT_FLAG_NONE);
- window_covering_device:
   window_covering_device::config_t window_covering_device_config(static_cast<uint8_t>(chip::app::Clusters::WindowCovering::EndProductType::kTiltOnlyInteriorBlind));
   endpoint_t *endpoint = window_covering_device::create(node, &window_covering_config, ENDPOINT_FLAG_NONE);
The window_covering_device config_t structure includes a constructor that allows specifying an end product type different than the default one, which is "Roller shade".
Once a config_t instance has been instantiated, its end product type cannot be modified.
- pump
   pump::config_t pump_config(1, 10, 20);
   endpoint_t *endpoint = pump::create(node, &pump_config, ENDPOINT_FLAG_NONE);
The pump config_t structure includes a constructor that allows specifying maximum pressure, maximum speed and maximum flow values. If they aren't set, they will be set to null by default.
Once a config_t instance has been instantiated, these three values cannot be modified.
Clusters
Additional clusters can also be added to an endpoint. Examples:
- on_off:
   on_off::config_t on_off_config;
   cluster_t *cluster = on_off::create(endpoint, &on_off_config, CLUSTER_FLAG_SERVER, on_off::feature::lighting::get_id());
- temperature_measurement:
   temperature_measurement::config_t temperature_measurement_config;
   cluster_t *cluster = temperature_measurement::create(endpoint, &temperature_measurement_config, CLUSTER_FLAG_SERVER);
- window_covering:
   window_covering::config_t window_covering_config(static_cast<uint8_t>(chip::app::Clusters::WindowCovering::EndProductType::kTiltOnlyInteriorBlind));
   cluster_t *cluster = window_covering::create(endpoint, &window_covering_config, CLUSTER_FLAG_SERVER);
The window_covering config_t structure includes a constructor that allows specifying an end product type different than the default one, which is "Roller shade".
Once a config_t instance has been instantiated, its end product type cannot be modified.
- pump_configuration_and_control:
   pump_configuration_and_control::config_t pump_configuration_and_control_config(1, 10, 20);
   cluster_t *cluster = pump_configuration_and_control::create(endpoint, &pump_configuration_and_control_config, CLUSTER_FLAG_SERVER);
The pump_configuration_and_control config_t structure includes a constructor that allows specifying maximum pressure, maximum speed and maximum flow values. If they aren't set, they will be set to null by default.
Once a config_t instance has been instantiated, these three values cannot be modified.
Attributes and Commands
Additional attributes and commands can also be added to a cluster. Examples:
- attribute: on_off:
   bool default_on_off = true;
   attribute_t *attribute = on_off::attribute::create_on_off(cluster, default_on_off);
- attribute: cluster_revision:
   uint16_t default_cluster_revision = 1;
   attribute_t *attribute = global::attribute::create_cluster_revision(cluster, default_cluster_revision);
- command: toggle:
command_t *command = on_off::command::create_toggle(cluster);
- command: move_to_level:
command_t *command = level_control::command::create_move_to_level(cluster);
Features
Optional features which are applicable to a cluster can also be added.
- feature: taglist: Descriptor cluster:
   cluster_t* cluster = cluster::get(endpoint, Descriptor::Id);
   descriptor::feature::taglist::add(cluster);
Adding custom data model fields
This section demonstrates creating custom endpoints, clusters, attributes, and commands that are not defined in the Matter specification and can be specific to the vendor.
Endpoints
Non-Standard endpoint can be created, without any clusters.
- Endpoint create:
endpoint_t *endpoint = endpoint::create(node, ENDPOINT_FLAG_NONE);
Clusters
Non-Standard/Custom clusters can also be created:
- Cluster create:
   uint32_t custom_cluster_id = 0x131bfc00;
   cluster_t *cluster = cluster::create(endpoint, custom_cluster_id, CLUSTER_FLAG_SERVER);
Attributes and Commands
Non-Standard/Custom attributes can also be created on any cluster:
- Attribute create:
   uint32_t custom_attribute_id = 0x0;
   uint16_t default_value = 100;
   attribute_t *attribute = attribute::create(cluster, custom_attribute_id, ATTRIBUTE_FLAG_NONE, esp_matter_uint16(default_value);
- Command create:
   static esp_err_t command_callback(const ConcreteCommandPath &command_path, TLVReader &tlv_data, void
   *opaque_ptr)
   {
      ESP_LOGI(TAG, "Custom command callback");
      return ESP_OK;
   }

   uint32_t custom_command_id = 0x0;
   command_t *command = command::create(cluster, custom_command_id, COMMAND_FLAG_ACCEPTED, command_callback);
The Matter data model organizes these components in a hierarchical manner. A Matter Node contains one or more Endpoints, each representing a specific device type. Each Endpoint consists of multiple Clusters, which group related attributes and commands. Attributes store the state and configuration of a cluster, while commands are used to interact with and control the device.
By structuring the data model in this way, Matter enables interoperability and standardization across devices from different manufacturers. Developers can use the defined device types, clusters, attributes, and commands to create applications that can seamlessly control and communicate with Matter-compatible devices.
The Matter data model provides a common language and framework for devices to describe their capabilities and interact with each other, allowing for a more unified and consistent smart home experience.
Tech Support & Product Discussion
Thank you for choosing our products! We are here to provide you with different support to ensure that your experience with our products is as smooth as possible. We offer several communication channels to cater to different preferences and needs.