Bring Voice AI to Your Business System (MCP)
Overview
This guide demonstrates how to use the Model Context Protocol (MCP) to bridge Voice AI with your existing software ecosystem. By wrapping your REST APIs as MCP tools, you enable SenseCAP Watcher to interact directly with your business logic —- whether it's a Warehouse Management System (WMS), CRM, ERP, or a custom IT dashboard.
| Smart Spatial Interaction |
|---|
 |
Smart Spatial Interaction
Voice to API: Transform Intent into Action. Don't build a new app from scratch. Simply expose your existing WMS endpoints to the Watcher to enable immediate voice control for your workforce.
True Hands-Free Productivity
Operators can query stock or log shipments while wearing gloves or driving forklifts. Keep eyes on the task and hands on the wheel for maximum safety and efficiency.
Zero-Latency Data Synchronization
Eliminate the lag of paper records. Voice commands trigger direct API calls to your ERP, ensuring inventory data is synchronized the instant an item moves.
Universal System Interoperability
Whether you run SAP, Oracle, or a custom SQL backend, if your system has an API, Watcher controls it. No need to migrate legacy systems to adopt AI.
Architecture
Understanding the data flow is essential before writing code. The integration follows a bridge pattern where the MCP Server acts as a secure gateway between the AI and your internal network.

Key Components:
- Watcher Device: Captures natural language intent (e.g., "Check stock") and sends it to the cloud.
- MCP Endpoint (Cloud): A secure tunnel provided by SenseCraft that forwards the intent to your local environment.
- MCP Server (Local Bridge): A lightweight Python script running on your machine. It translates the AI intent into specific code functions.
- Backend API: Your existing business application (FastAPI, Flask, etc.) that executes the actual logic.
- Infrastructure: Database or other services your backend relies on.
Universal Integration Scenarios:
While this guide uses a Warehouse System as a reference implementation, the architecture applies universally:
| Industry | Voice Command | Underlying System Action |
|---|---|---|
| Logistics | "Stock in 50 units." | POST /api/inventory/add |
| Sales (CRM) | "Update deal status to Closed." | PUT /api/deals/{id}/status |
| IT Ops | "Restart the staging server." | POST /api/servers/restart |
Demo 1: Voice-Controlled Warehouse
We will simulate a business environment by running a mock Warehouse Backend and an MCP Bridge on your local machine. This demo enables:
- 🗣️ Inventory Check: "How many Xiaozhi Standard units do we have?"
- 🗣️ Data Entry: "Stock in 5 units of Watcher Xiaozhi."
- 🗣️ Business Insight: "What's today's inventory summary?"
Prerequisites
- Hardware: SenseCAP Watcher, Computer with Docker support
- Software: Docker or Docker Desktop (includes Docker Compose), Git
- Account: SenseCraft AI Platform account
Ensure your SenseCAP Watcher is configured with Xiaozhi AI via SenseCraft AI Device Center.

Step 1: Deploy the Warehouse System
We use Docker for deployment to ensure a consistent environment across all platforms (Windows, macOS, Linux).
1. Clone the repository:
git clone https://github.com/suharvest/warehouse_system.git
cd warehouse_system
2. Start with Docker Compose:
docker-compose -f docker-compose.prod.yml up -d
This single command will:
- Build and start the warehouse application server (port 2125)
- Create a persistent volume for your database
3. Verify the deployment:
Wait about 30 seconds for the container to start, then check:
docker-compose -f docker-compose.prod.yml ps
You should see the warehouse-prod container running.
- Web UI: Open
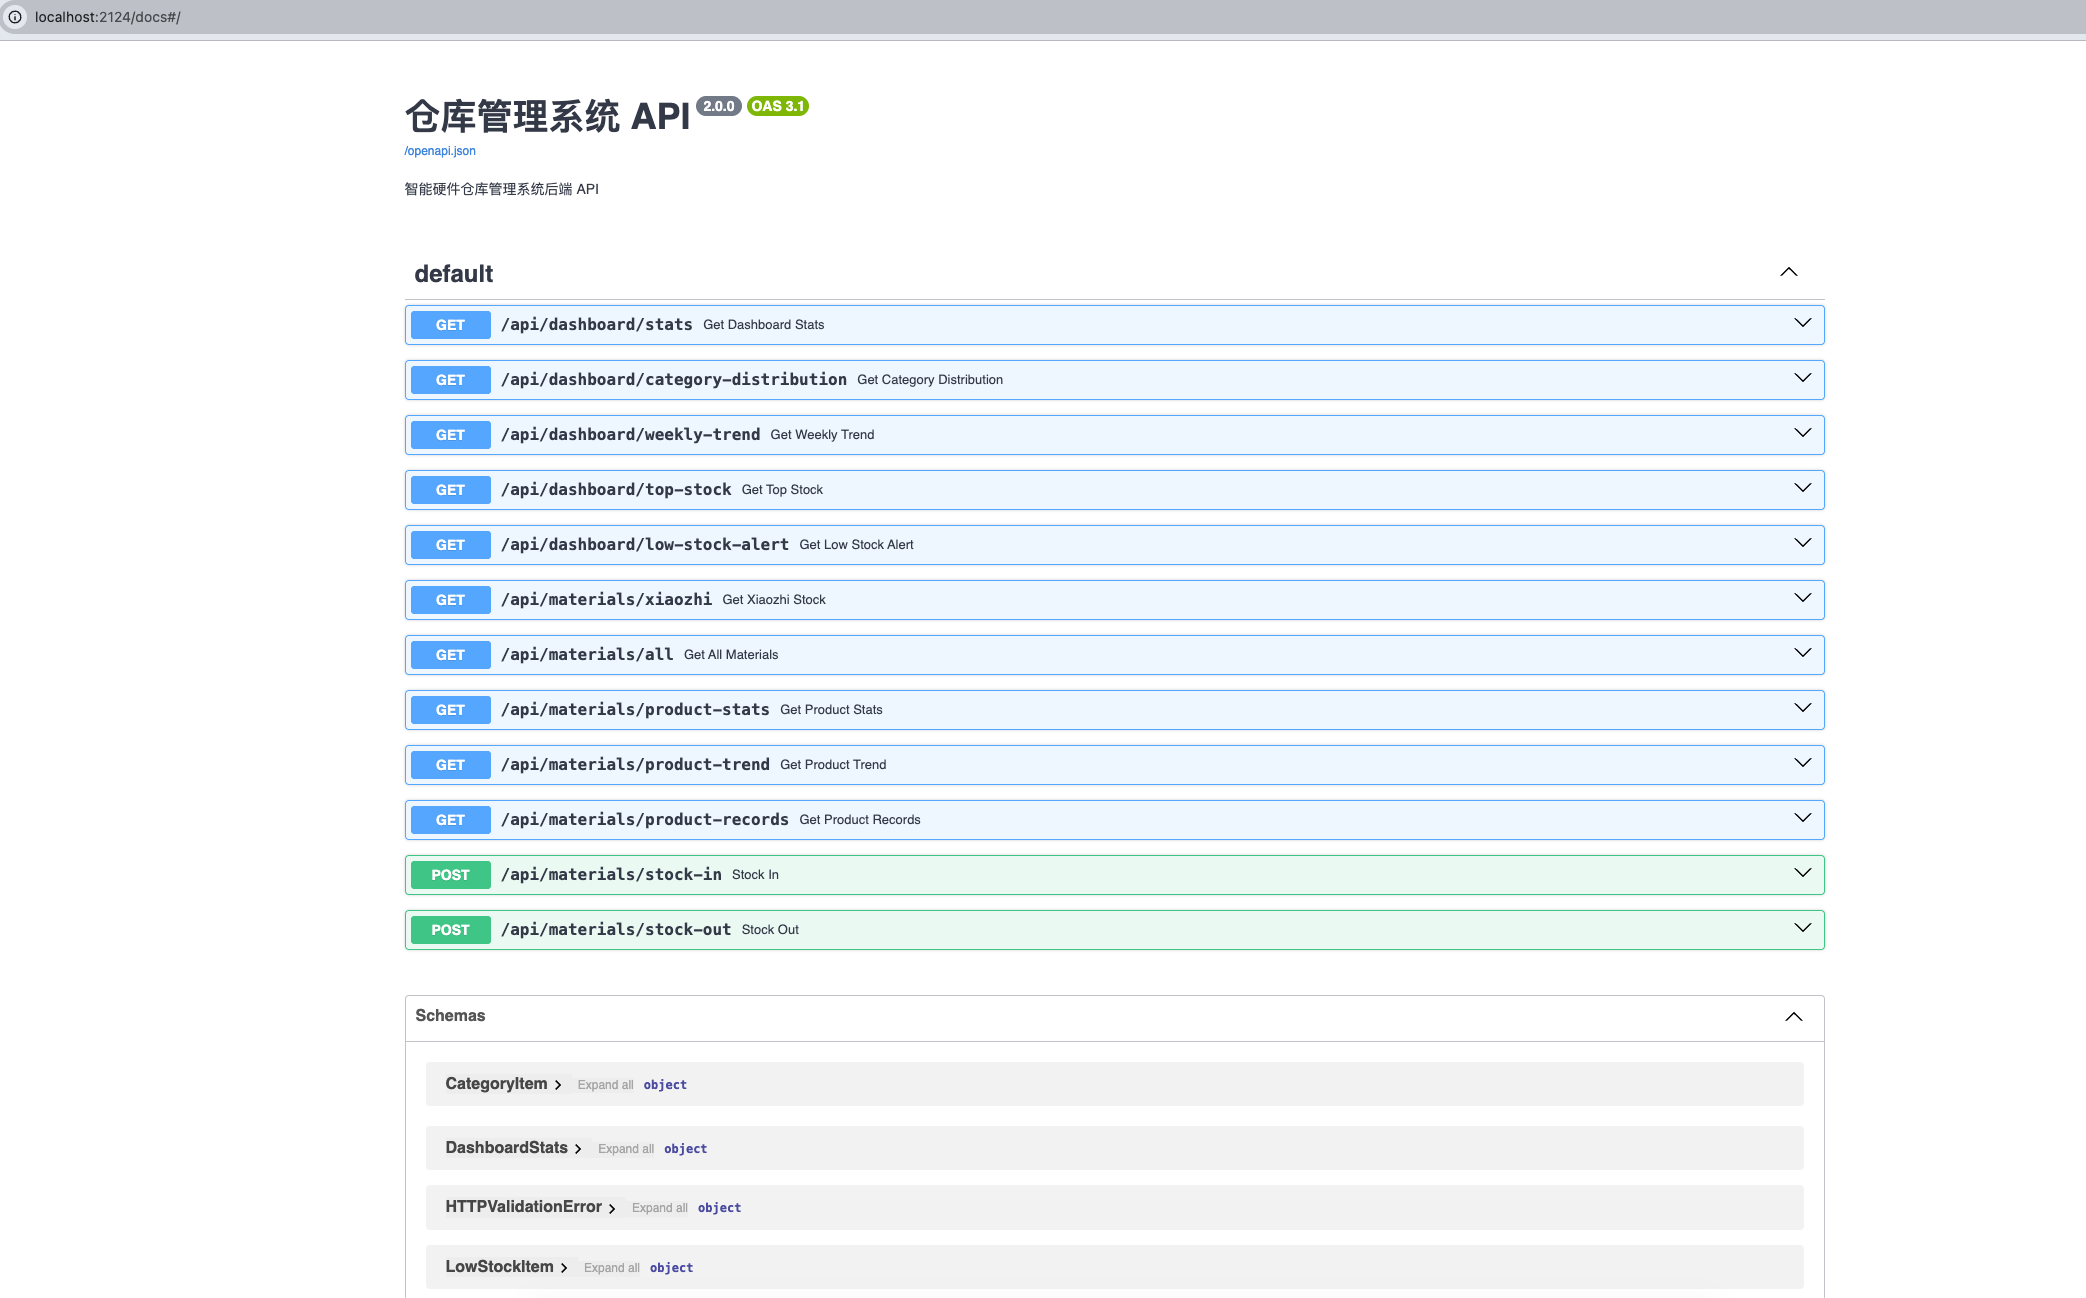
http://localhost:2125in your browser - API Documentation: Open
http://localhost:2125/docsto view the Swagger UI
Step 2: Initial System Setup
The warehouse system includes user authentication and API key management for security. You need to set this up before connecting MCP.
1. Create Admin Account:
Open http://localhost:2125 in your browser. On first visit, you'll see a registration form:
- Enter your desired username (e.g.,
admin) - Enter a password (e.g.,
admin123) - Click Register
The first registered user automatically becomes the administrator.
2. Login and Navigate to User Management:
After registration, log in with your credentials. Click on the User Management tab in the navigation.
3. Create an API Key:
In the User Management section, find the API Key Management area:
- Enter a descriptive name for the key (e.g.,
MCP Bridge) - Click Create API Key
- Important: Copy the generated API key immediately! It will only be shown once.
The API key looks like: wh_xxxxxxxxxxxxxxxxxxxx
The API key is only displayed once when created. Store it securely - you'll need it in the next step.
Step 3: Configure MCP Bridge
Now, we connect the backend to the AI. The bridge code resides in the mcp/ directory.
The MCP bridge uses uv as its Python environment manager. Install it with:
- Linux/macOS
- Windows (PowerShell)
curl -LsSf https://astral.sh/uv/install.sh | sh
irm https://astral.sh/uv/install.ps1 | iex
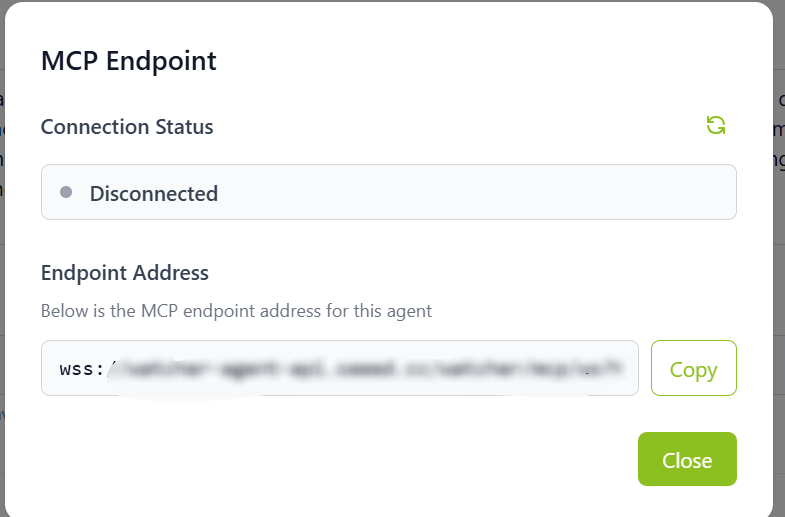
1. Get MCP Endpoint:
Obtain your MCP Endpoint Address (wss://...) from the SenseCraft AI Platform -> Watcher Agent -> Configuration.
2. Configure API Key:
Open a terminal and navigate to the mcp folder:
cd mcp

# Copy the example config file
cp config.yml.example config.yml
Edit config.yml with your API key from Step 2:
The default api_base_url in config.yml.example is http://localhost:2124/api (the local development port). Since we deployed with docker-compose.prod.yml which uses port 2125, you must update it accordingly.
# Backend API address (change from default 2124 to 2125 for Docker deployment)
api_base_url: "http://localhost:2125/api"

# API key authentication (from User Management -> API Key Management)
auth:
  type: api_key
  key: "wh_your-api-key-here"
3. Start the MCP Bridge:
- Linux/macOS
- Windows (PowerShell)
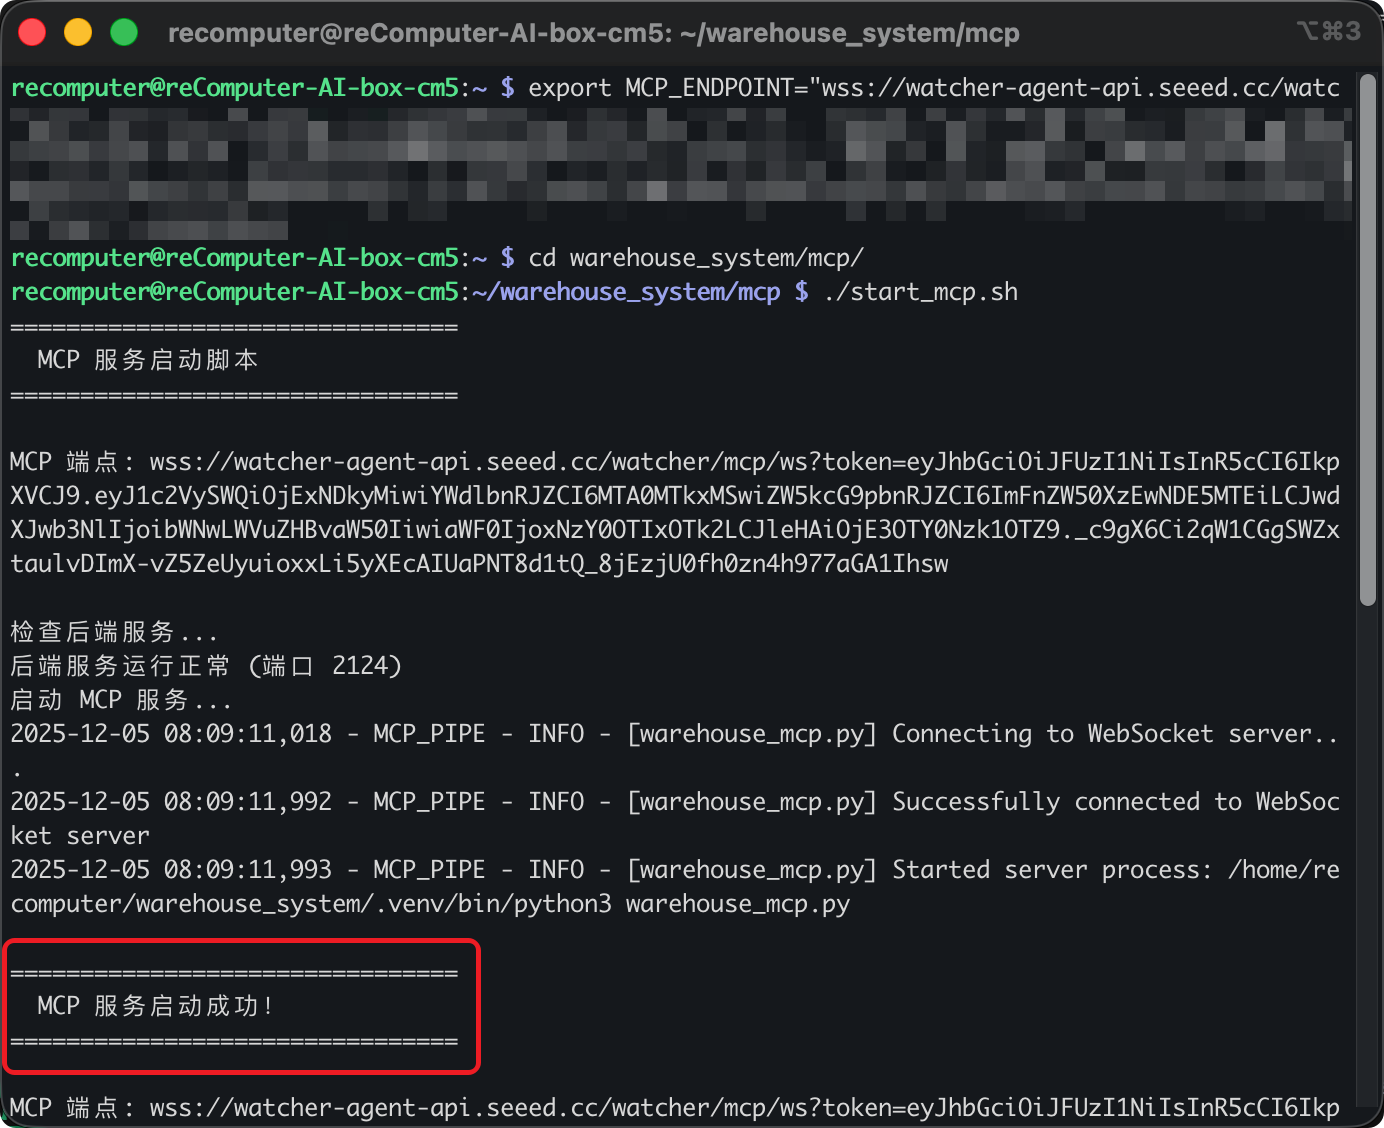
# Set the MCP Endpoint (replace with your actual address)
export MCP_ENDPOINT="wss://your-endpoint-address"

# Start the Bridge
./start_mcp.sh
# Set the MCP Endpoint (replace with your actual address)
$env:MCP_ENDPOINT="wss://your-endpoint-address"

# Start the Bridge
./start_mcp.ps1
If successful, you will see: MCP 服务启动成功! (MCP Service Started Successfully)
Step 4: Verification
Everything is connected. Now, use the SenseCAP Watcher to interact with your local system.
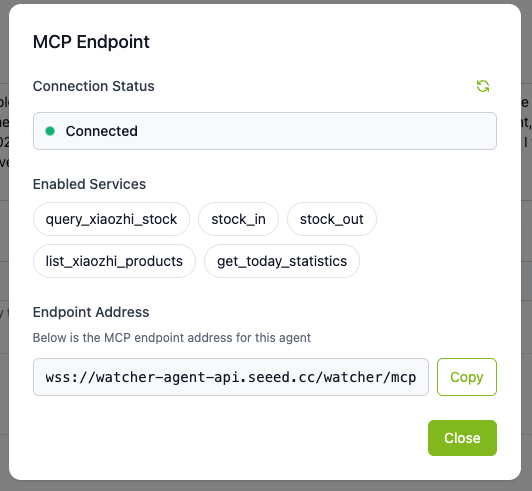
Now we can test the integration using your Watcher device!
Example Voice Commands
| Voice Command | Expected Action |
|---|---|
| "Query the stock of Xiaozhi Standard Version" | Calls query_stock tool |
| "How many Xiaozhi Professional Version do we have?" | Calls query_stock with professional version |
| "Stock in 5 units of Watcher Xiaozhi Standard Version" | Calls stock_in tool with quantity=5 |
| "Stock out 3 Xiaozhi units for sales" | Calls stock_out tool with quantity=3 |
| "What's today's inventory summary?" | Calls get_today_statistics tool |
| "List all Xiaozhi products" | Calls search tool with entity_type="material" |
What happens behind the scenes?
| Component | Action |
|---|---|
| Watcher | Sends voice audio to cloud. |
| MCP Bridge | Receives intent, determines tool is query_stock. |
| System | Executes GET /materials/product-stats with API key authentication. |
| Result | Watcher speaks: "Current stock is 150 units." |
Expected Responses
Query Stock:
"The stock query was successful. Watcher Xiaozhi Standard Version currently has 150 units in stock at location A-01-01. Stock status is normal."
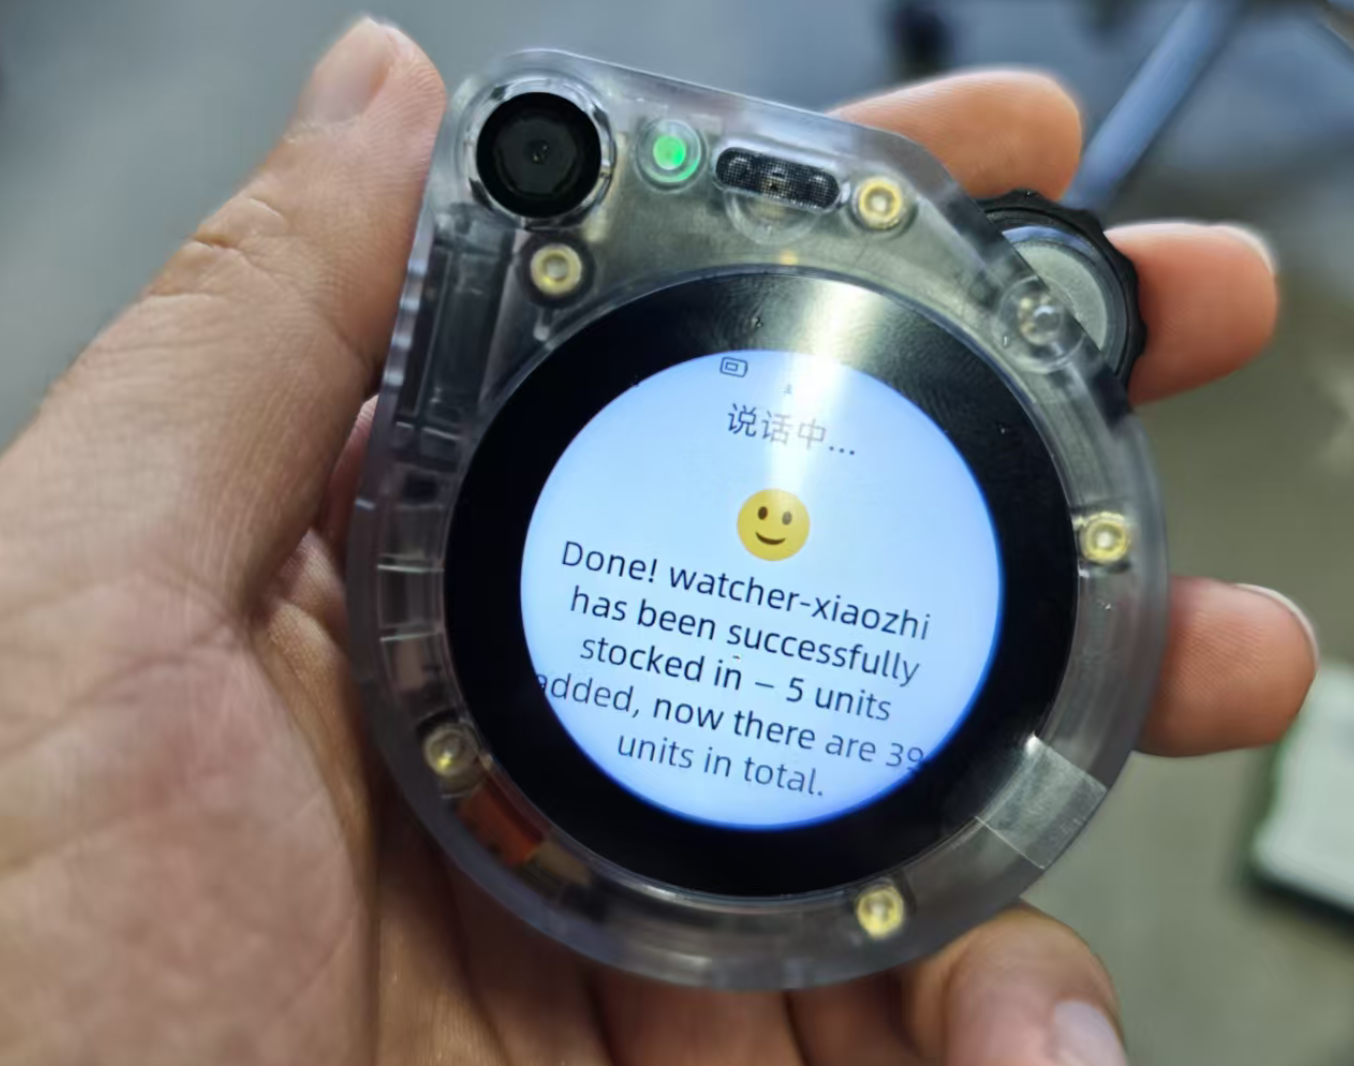
Stock In:
"Successfully added 5 units of Watcher Xiaozhi Standard Version. Previous quantity was 150, new quantity is 155."
Customizing for Your System
The warehouse demo is just a starting point. The MCP bridge uses a Provider plugin architecture — you don't need to modify any existing code. Instead, you create a new Provider to adapt the bridge to your own backend system.
How It Works
The bridge has a clean separation of concerns:
warehouse_mcp.py— Defines 6 fixed MCP tools (query_stock,stock_in,stock_out,search,resolve_name,get_today_statistics). You don't need to modify this file.providers/base.py— Abstract base class defining the interface (6 methods).providers/default.py— Default implementation for the demo warehouse backend.- Your custom provider — A new
.pyfile inproviders/that adapts the 6 methods to your system's API.
1. Create a Custom Provider
Create a new file mcp/providers/my_erp.py:
from .base import BaseProvider

class MyERPProvider(BaseProvider):
    """Adapter for My ERP System."""

    PROVIDER_NAME = "my_erp"

    def query_stock(self, product_name, show_batches=False):
        # Call your ERP's inventory API
        return self.http_get(f"/inventory/query", params={"sku": product_name})

    def stock_in(self, product_name, quantity, reason, operator, fuzzy,
                 location=None, contact_id=None, variant=None):
        return self.http_post("/inventory/receive", {
            "sku": product_name, "qty": quantity, "note": reason
        })

    def stock_out(self, product_name, quantity, reason, operator, fuzzy,
                  variant=None):
        return self.http_post("/inventory/ship", {
            "sku": product_name, "qty": quantity, "note": reason
        })

    def search(self, query, entity_type, category, status, contact_type,
               fuzzy, include_batches=False, max_results=0):
        return self.http_get("/search", params={"q": query, "type": entity_type})

    def resolve_name(self, text, entity_type="all"):
        return self.http_get("/fuzzy-match", params={"q": text})

    def get_today_statistics(self):
        return self.http_get("/dashboard/today")
The base class (BaseProvider) provides built-in http_get() and http_post() helpers with automatic auth header injection and error handling — so your provider code stays minimal.
Just drop the .py file into mcp/providers/. The bridge automatically discovers and registers all BaseProvider subclasses — no manual registration needed.
2. Configure via config.yml
If you haven't already, create config.yml from the template first:
cd mcp
cp config.yml.example config.yml
Then switch to your provider and point to your real server — no code changes required:
# Switch to your custom provider
provider: "my_erp"

# Your production API address
api_base_url: "http://192.168.50.10:8080/api/v1"

# Authentication (supports api_key, bearer, basic)
auth:
  type: api_key
  key: "your-production-api-key"
You can also override settings using environment variables: WAREHOUSE_API_URL, WAREHOUSE_API_KEY, and WAREHOUSE_PROVIDER.
Supported Authentication Methods
The base class supports multiple auth types out of the box via config.yml:
# API Key (default)
auth:
  type: api_key
  header: X-API-Key    # optional, defaults to X-API-Key
  key: "your-key"

# Bearer Token
auth:
  type: bearer
  token: "your-bearer-token"

# Basic Auth
auth:
  type: basic
  username: "admin"
  password: "secret"
For custom authentication (e.g., HMAC signing), override the get_auth_headers() method in your provider.
Best Practices for Provider Development
Return Value Format
The return value is read by the AI to generate a spoken response. Keep it concise (typically under 1024 bytes).
# Good — concise
return {
    "success": True,
    "quantity": 150,
    "message": "Stock query successful"
}

# Bad — too verbose
return {
    "success": True,
    "full_product_details": {...},
    "complete_history": [...]
}
Error Handling
The base class http_get() / http_post() already handle connection errors and HTTP status codes. For additional business logic errors, return a structured error dict:
return {
    "success": False,
    "error": "Product not found",
    "message": "No matching product in the ERP system."
}
Logging
MCP uses standard I/O (stdio) for communication. Using print() will corrupt the protocol data stream. Always use a logger:
import logging
logger = logging.getLogger("WarehouseMCP")
logger.info(f"Querying stock for: {product_name}")
3. Deploy for Production
The demo runs in your local terminal. For long-term 24/7 operation:
- Dockerize: Package the
mcp/folder into a Docker container to ensure environment stability. - Background Service: Instead of running
./start_mcp.shin an open terminal, usesystemd(Linux) orNSSM(Windows) to run the script as a background service. - Network: Ensure the machine running the MCP Bridge has stable internet access to connect to the SenseCraft Cloud (
wss://...).
Troubleshooting
❌ Docker Containers Not Starting
- Symptom:
docker-compose psshows containers in "Exited" state. - Solution:
- Check Docker Desktop is running
- View logs:
docker-compose -f docker-compose.prod.yml logs - Ensure port 2125 is not in use
- Try rebuilding:
docker-compose -f docker-compose.prod.yml up -d --build
❌ API Key Invalid (401 Unauthorized)
- Symptom: MCP bridge logs show
401 Unauthorizedor "Invalid API Key". - Solution:
- Verify the API key in
mcp/config.ymlis correct - Check the API key is still active in User Management
- Ensure there are no extra spaces or quotes around the key
- Try creating a new API key
- Verify the API key in
❌ Backend Service Not Running
- Symptom: AI responds with "Cannot connect to backend service".
- Solution:
- Check the container is running:
docker-compose -f docker-compose.prod.yml ps - Verify backend health:
curl http://localhost:2125/api/dashboard/stats - Check logs:
docker-compose -f docker-compose.prod.yml logs
- Check the container is running:
❌ MCP Connection Timeout
- Symptom: The script hangs at "Connecting to WebSocket server..." indefinitely.
- Solution:
- Verify your
MCP_ENDPOINTis correct (check for typos). - Ensure the URL starts with
wss://(Secure WebSocket). - Check your internet connection (outbound traffic to SenseCraft Cloud).
- Verify your
❌ Tool Not Recognized
- Symptom: You speak a command, but the AI says "I don't know how to do that" or doesn't trigger the tool.
- Solution:
- Check Naming: Use clear, English descriptive names for functions.
- Check Docstrings: Make sure the docstring explicitly describes the intent (e.g., "Use this to check stock").
- Restart: You must restart the MCP server script after any code change.
❌ Connection Limit Exceeded
- Symptom: Error log shows "Maximum connections reached".
- Solution:
- Each Endpoint has a connection limit. Ensure you don't have multiple terminals running the script simultaneously.
- Close other connections and wait a few minutes before retrying.
❌ Connection Refused / WebSocket 443 Blocked
Symptom:
You see [WinError 1225] Connection refused or the script hangs at Connecting to WebSocket server..., even with the correct Endpoint URL.
Cause: Corporate Firewall Blocking. Many office networks (or VPNs) strictly block WebSocket (wss://) traffic or non-standard protocols, even on port 443.
Quick Solutions:
-
📱 The "Hotspot Test" (Recommended) Disconnect from the office network/VPN and connect your computer to a Mobile Hotspot (4G/5G).
- If it works: Your office network is blocking the connection.
-
🔧 Configure Proxy If your company requires a proxy, set it before running:
- Windows:
$env:HTTPS_PROXY="http://your-proxy:port" - Mac/Linux:
export HTTPS_PROXY="http://your-proxy:port"
- Windows:
-
🛡️ Whitelist Ask IT to allow WebSocket (WSS) traffic for:
*.seeed.cc.
Resources
- MCP Endpoint Setup Guide - Learn how to create and manage MCP endpoints.
- Warehouse System Repository - Full source code, including Provider examples.
- FastMCP Documentation - Dive deeper into advanced tool definitions.