Object Tracking with reComputer Jetson and PX4
Introduction
reComputer Mini is a tiny AI computer powered by NVIDIA Jetson Orin Nano/Orin NX module,delivering up to 100 TOPS AI performance. Thanks to its compact design, it is highly suitable for being installed on drones to handle some AI tasks.This Wiki will show you how to use reComputer and px4 to achieve real-time target tracking on drone.

Prerequisites
- reComputer series of products
- PX4 flight controller
- Jetson Pack 6.2 and ROS 2 Humble have been installed
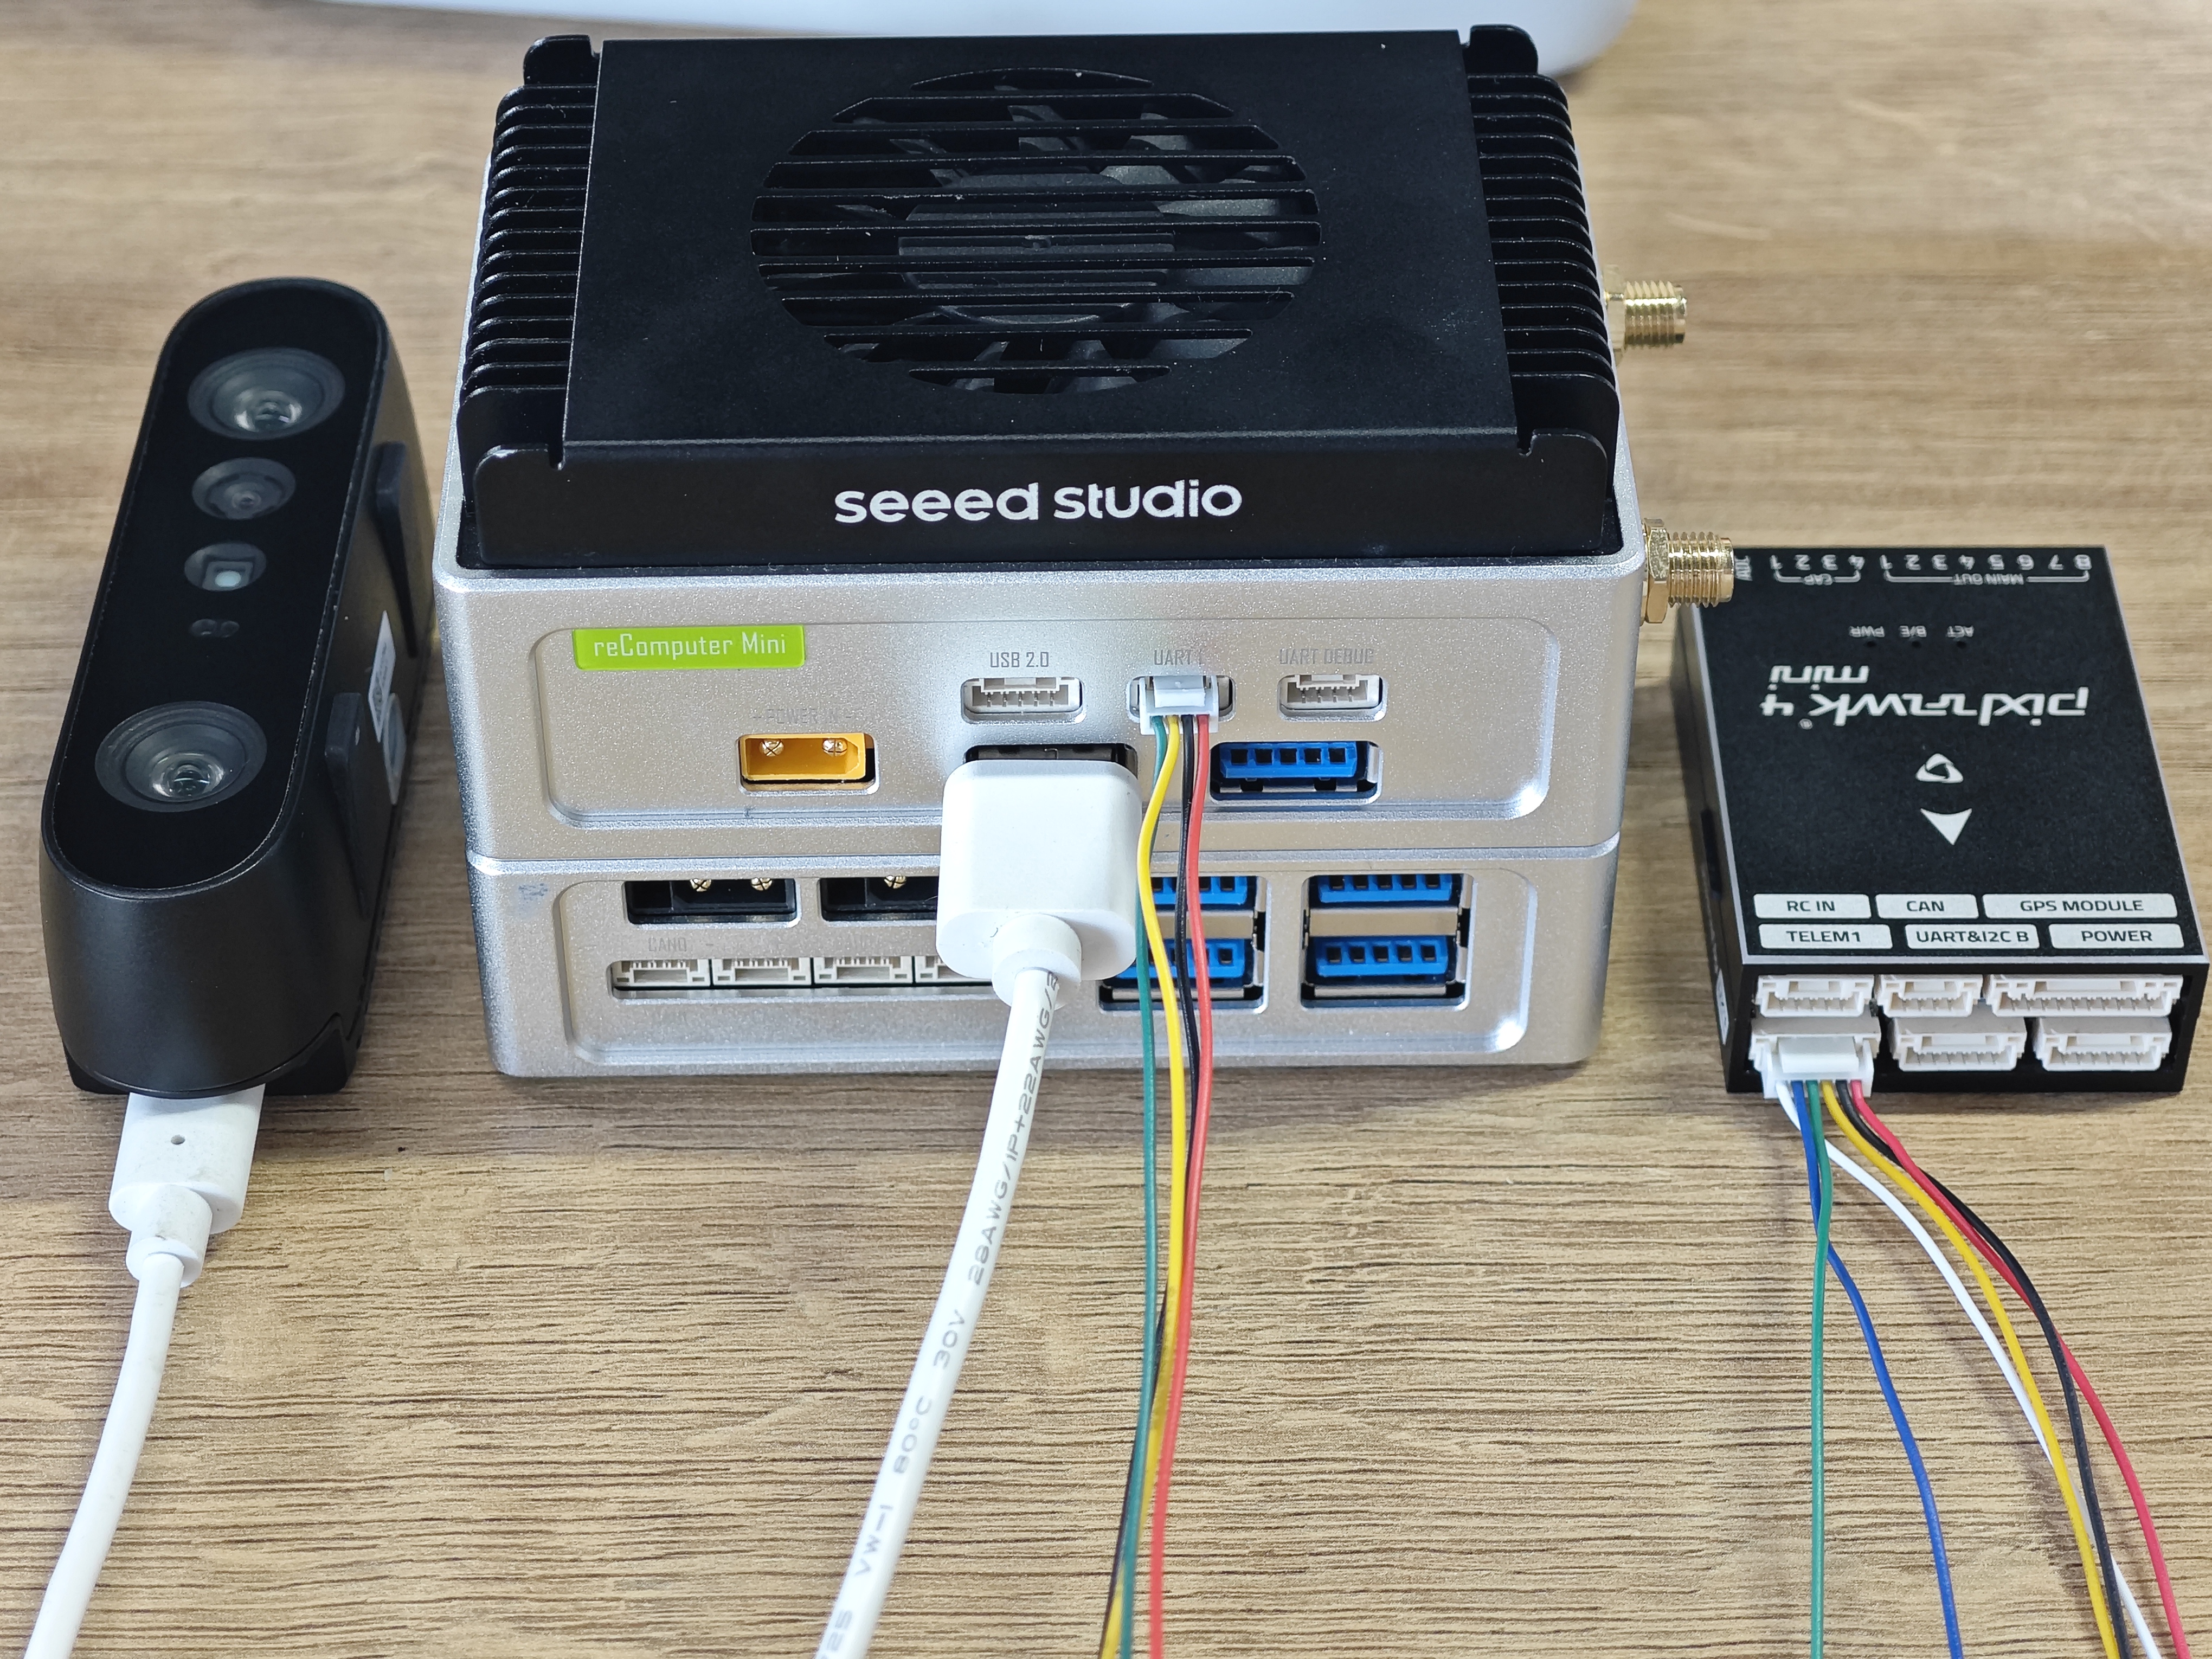
- Orbbec Gemini 2 3D Camera
Configure the PX4 communication environment of ROS2
To implement the state monitoring of the drone on Jetson, please first refer to this wiki to configure the ROS2 communication environment for PX4.
Set up the Gemini 2 Python SDK
The Orbbec Gemini 2 is a high-precision RGB-D 3D camera that captures synchronized depth and color data for applications like robotics, 3D scanning, and computer vision.
Step 1. Install dependencies and clone the repository:
sudo apt-get install python3-dev python3-venv python3-pip python3-opencv
#install pybind11
pip install pybind11
#clone the repository
git clone https://github.com/orbbec/pyorbbecsdk.git
#Install the necessary packages
cd pyorbbecsdk
pip install -r requirements.txt
Step 2. Build and install the project:
mkdir build && cd build
#Build the project
cmake \
  -Dpybind11_DIR=`pybind11-config --cmakedir` \
  -DPython3_EXECUTABLE=/usr/bin/python3.10 \
  -DPython3_INCLUDE_DIR=/usr/include/python3.10 \
  -DPython3_LIBRARY=/usr/lib/aarch64-linux-gnu/libpython3.10.so \
  ..
make -j4
sudo make install
#apply the python SDK
pip install wheel
python setup.py bdist_wheel
pip install dist/*.whl
#Configure udev_rules
export PYTHONPATH=$PYTHONPATH:$(pwd)/install/lib/
sudo bash ./scripts/install_udev_rules.sh
sudo udevadm control --reload-rules && sudo udevadm trigger
Read the topics published by px4 in ROS2
Connect the PX4 controller to the UART1 serial port of Jetson
Open one terminal and start the Agent on the jetson:
cd /path/to/Micro-XRCE-DDS-Agent/build
./MicroXRCEAgent serial --dev /dev/ttyTHS1 -b 921600
By using the following command and opening another terminal, you can see the status topic published by px4:
ros2 topic list | grep "/fmu/out/"
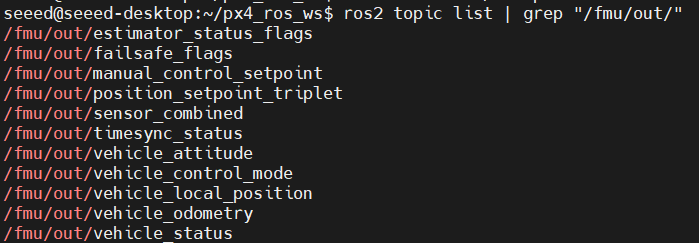
By reading the content of the following topics, you can obtain the basic status information of the drone:
- /fmu/out/failsafe_flags -> Indicators of current failsafe conditions.
- /fmu/out/sensor_combined -> Synchronized raw IMU, magnetometer, and barometer data.
- /fmu/out/timesync_status -> Status of time synchronization with external sources.
- /fmu/out/vehicle_attitude -> Current vehicle orientation as a quaternion.
- /fmu/out/vehicle_control_mode -> Current active control and navigation modes.
- /fmu/out/vehicle_local_position -> Position and velocity in the local NED frame.
- /fmu/out/vehicle_odometry -> Full 6-DoF pose and velocity data.
- /fmu/out/vehicle_status -> Overall vehicle state, mode, and readiness.
Quickly configure the object detection environment
Step 1. According to your Jetpack version, you can refer to this wiki for installing PyTorch and Torchvision.
Step 2. Install the necessary dependencies and packages:
sudo apt-get update
sudo apt-get -y install libcusparselt0 libcusparselt-dev
pip install ultralytics
pip install https://github.com/ultralytics/assets/releases/download/v0.0.0/onnxruntime_gpu-1.20.0-cp310-cp310-linux_aarch64.whl
pip install numpy==1.23.5
Step 3. Download the YOLOv11n pre-trained model:
wget -O yolo11n.pt https://github.com/ultralytics/assets/releases/download/v8.3.0/yolo11n.pt
Step 4. Export engine model for using tensorrt inference:
yolo export model=/path/to/yolo11n.pt format=engine device=0 half=True dynamic=True
Install the ROS2 package for target tracking
cd /path/to/your/work_space/src

git clone https://github.com/zibochen6/ROS2-package-for-target-tracking.git

cd ..
# build the package
colcon build
Before running the detection node, you need to move the previously generated engine model file to the /ROS2-package-for-target-tracking/models directory. Additionally, you must clone the px4_msgs and px4_ros_com packages(refer to this wiki) in the src directory of your workspace.
Your src directory structure should be as follows:
└── src
    ├── detect
    ├── px4_msgs
    └── px4_ros_com
To run the ROS2 package for normal operation of target tracking, you need to open a terminal and start the MicroXRCEAgent:
./MicroXRCEAgent serial --dev /dev/ttyTHS1 -b 921600

# Open another terminal and run the detection node
cd /path/to/your/work_space
source install/setup.bash
ros2 run detect detect
The above video presents an example of achieving target tracking on a drone. It locates the target through target detection and uses the ByteTrack target tracking algorithm to precisely track the specific target. At the same time, depth images are used to estimate the distance between the drone and the target.
Tech Support & Product Discussion
Thank you for choosing our products! We are here to provide you with different support to ensure that your experience with our products is as smooth as possible. We offer several communication channels to cater to different preferences and needs.