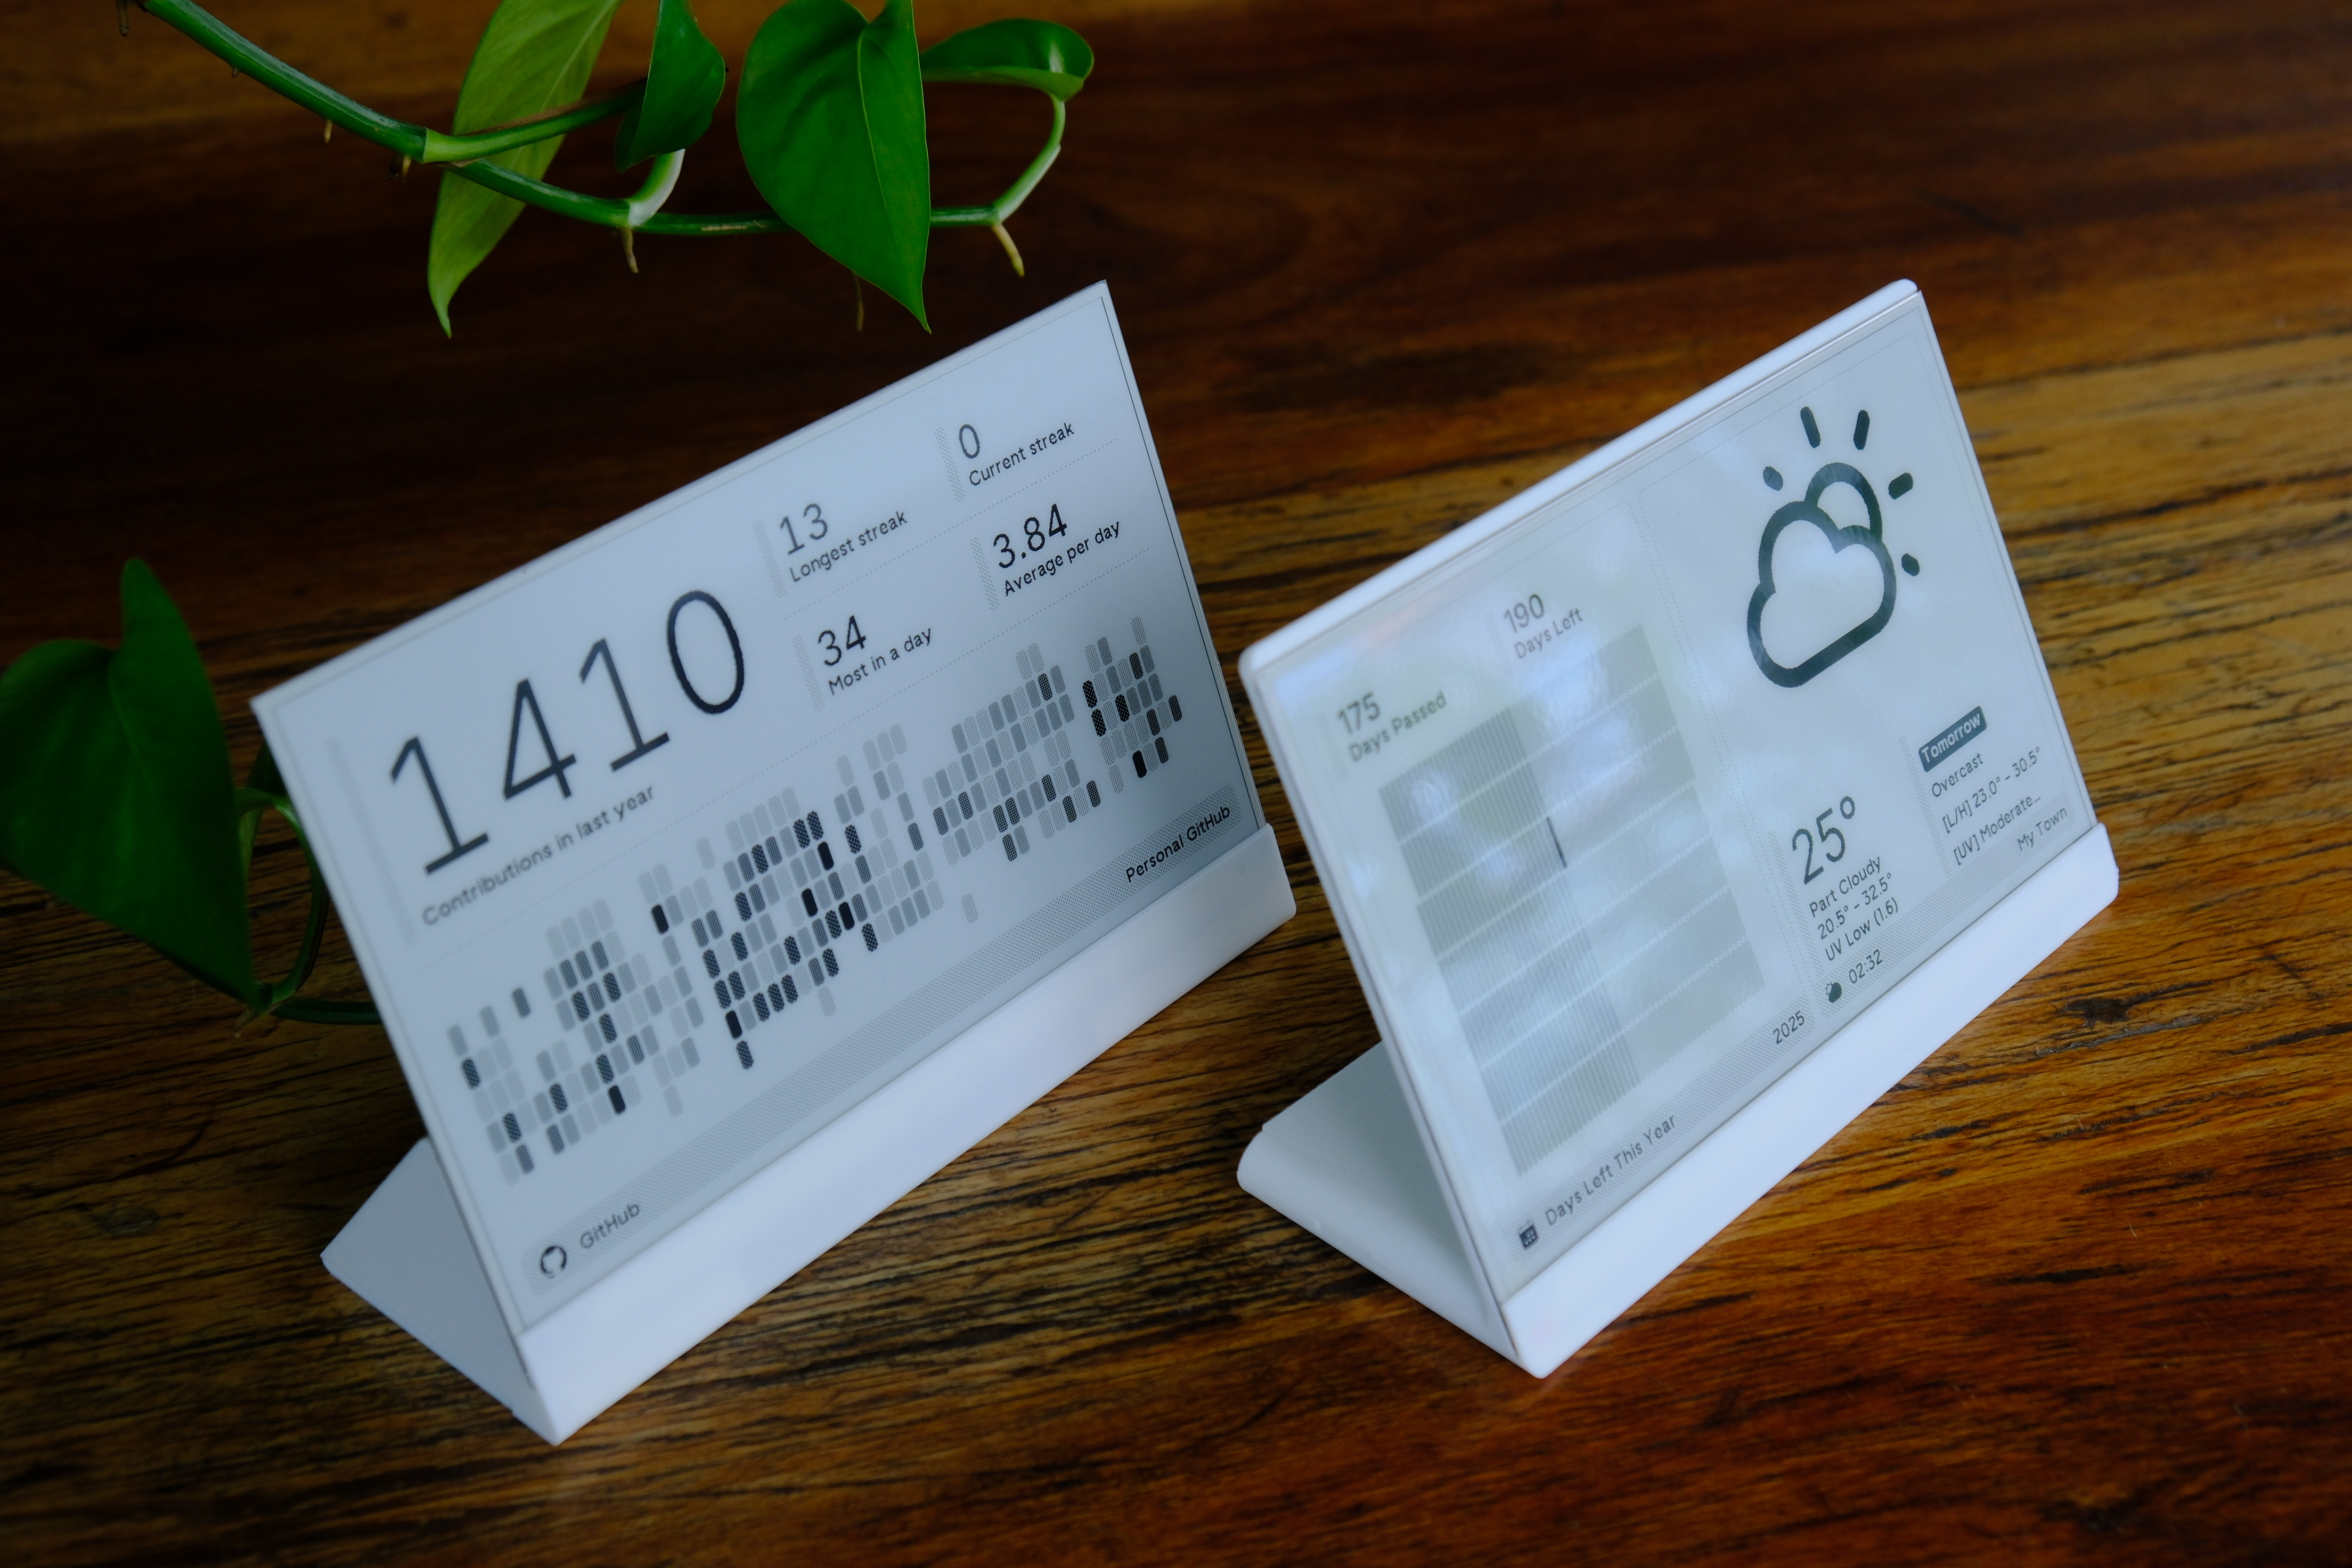
ESPHome Cookbook: TRMNL 7.5" (OG) DIY Kit
This page is the TRMNL DIY Kit-specific ESPHome cookbook. The shared boilerplate — picking a flashing path, the generic YAML skeleton, connecting to Home Assistant — lives in Work with ESPHome. Skim that first if you're new to ESPHome on Seeed ePaper. Looking for the TRMNL cloud dashboard workflow instead (no YAML, plug-in based)? See Work with TRMNL.
Introduction to Home Assistant
Home Assistant is a powerful open-source home automation platform that allows you to control and monitor your smart home devices from a single, unified interface. It acts as the central hub for your smart home, enabling you to automate routines, monitor sensors, and create a more intelligent living space.

Why Home Assistant?
-
Local Control: Unlike many cloud-based solutions, Home Assistant runs locally on your network, ensuring your data stays private and your automations work even without internet access.
-
Extensive Device Support: Home Assistant integrates with thousands of different smart home devices and services, making it highly versatile and future-proof.
-
Powerful Automation: Create sophisticated automation rules that can respond to various triggers like time, device states, sensor readings, and more.
-
Customizable Dashboard: Design your own user interface to display the information that matters most to you.
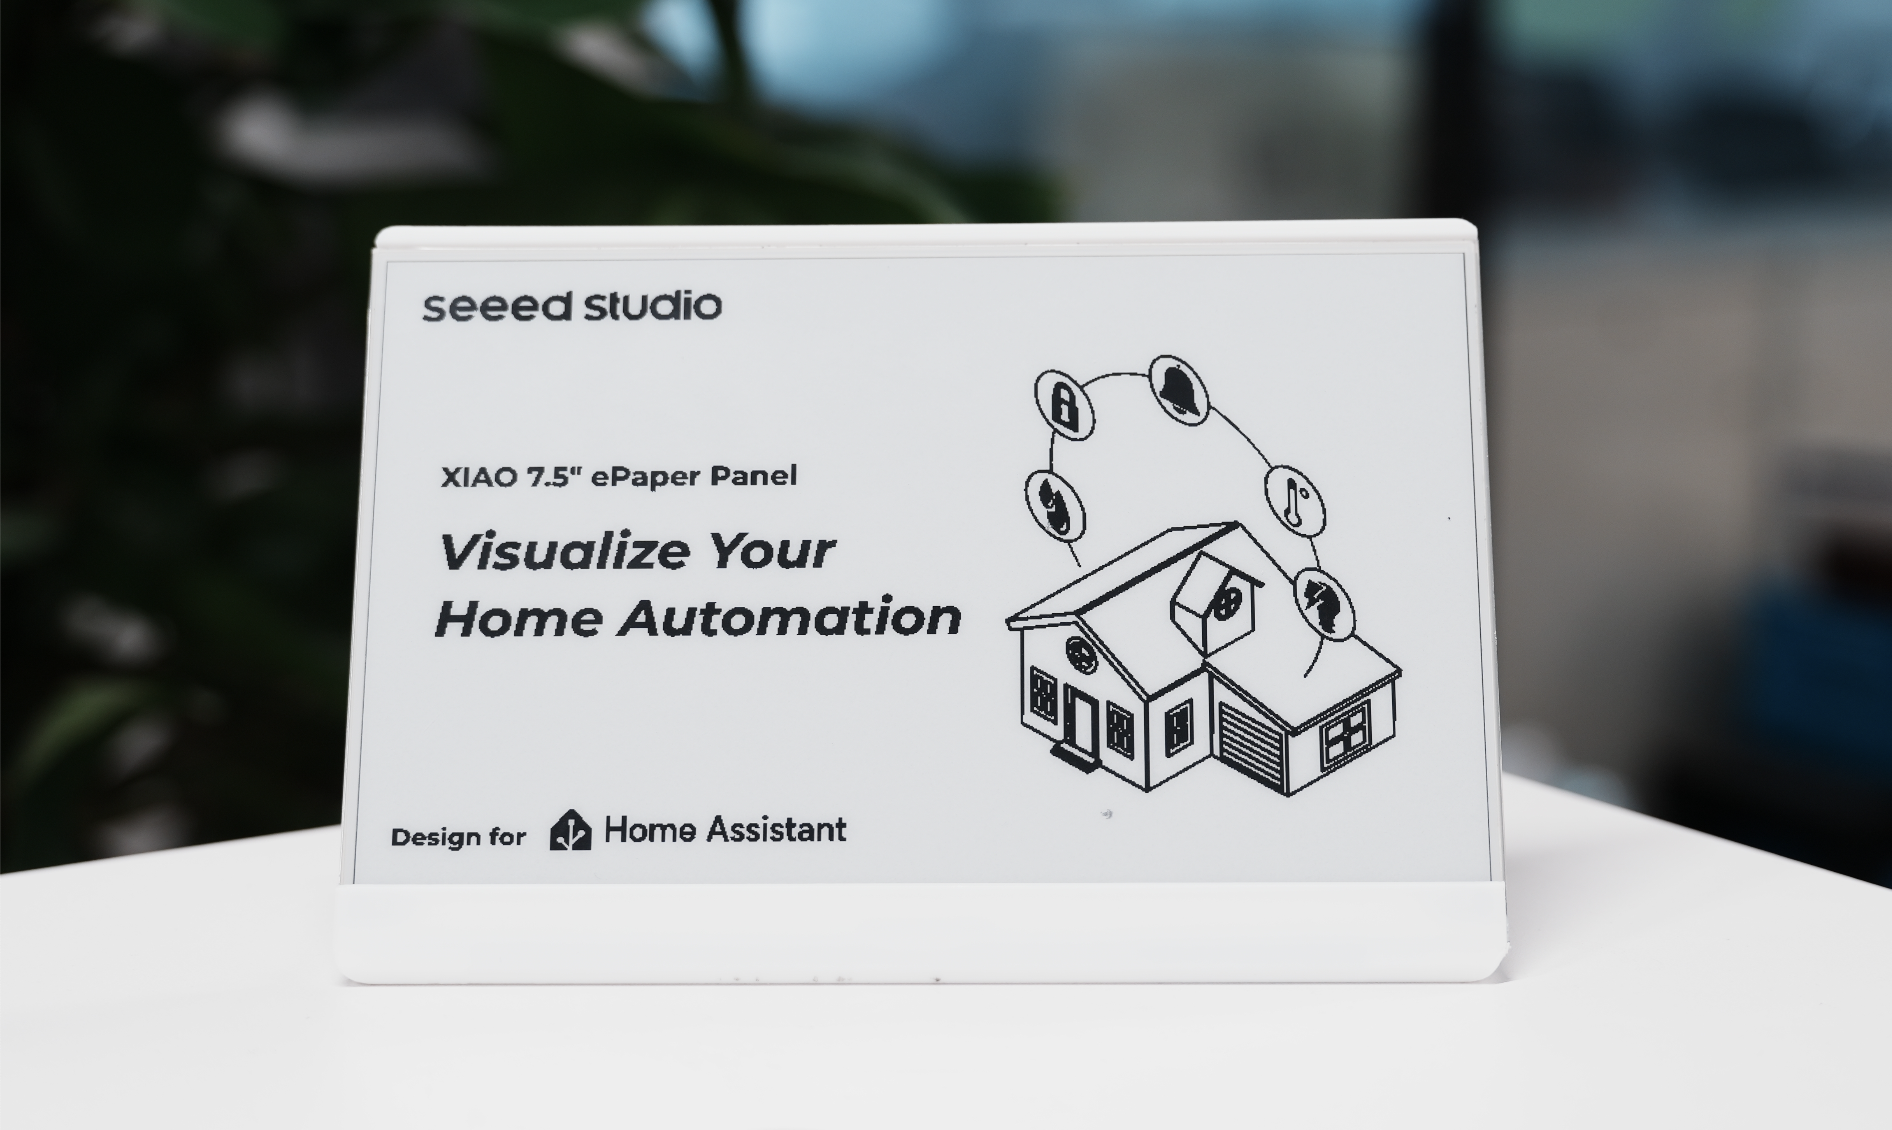
Why TRMNL 7.5inch(OG) DIY Kit with Home Assistant?
The TRMNL 7.5inch(OG) DIY Kit is an excellent companion for Home Assistant for several reasons:
-
Energy Efficiency: The e-paper display only consumes power when updating content, making it perfect for displaying persistent information like weather forecasts, calendar events, or system status.
-
Clear Visibility: Unlike LCD screens, e-paper displays are easily readable in any lighting condition, including direct sunlight, making them ideal for wall-mounted home control panels.
-
Long Battery Life: Combined with deep sleep mode, the display can operate for months on a single battery charge while still providing valuable information at a glance.
-
Flexible Integration: Through ESPHome, the display seamlessly integrates with Home Assistant, allowing you to show any data from your smart home system in an elegant, always-visible format.
These advantages make the TRMNL 7.5inch(OG) DIY Kit an ideal choice for creating an energy-efficient, always-on information display for your Home Assistant setup.
ESPHome Integration
ESPHome is an open-source firmware creation tool specifically designed for ESP8266/ESP32 devices. It allows you to create custom firmware using simple YAML configuration files, which can then be flashed to your device. For the TRMNL 7.5inch(OG) DIY Kit, ESPHome serves as the essential middleware that enables communication between the device and Home Assistant.
The system works by converting your YAML configuration into fully-featured firmware that runs on your ESP device. This firmware handles all the complex tasks of connecting to your network, communicating with Home Assistant, and controlling the ePaper display. When combined with Home Assistant, ESPHome provides a robust platform for creating sophisticated home automation displays and controls.
Let's explore how to set it up and make the most of this versatile display.
Getting Started
Before the tutorial content of this article begins, you may need to have the following hardware ready.
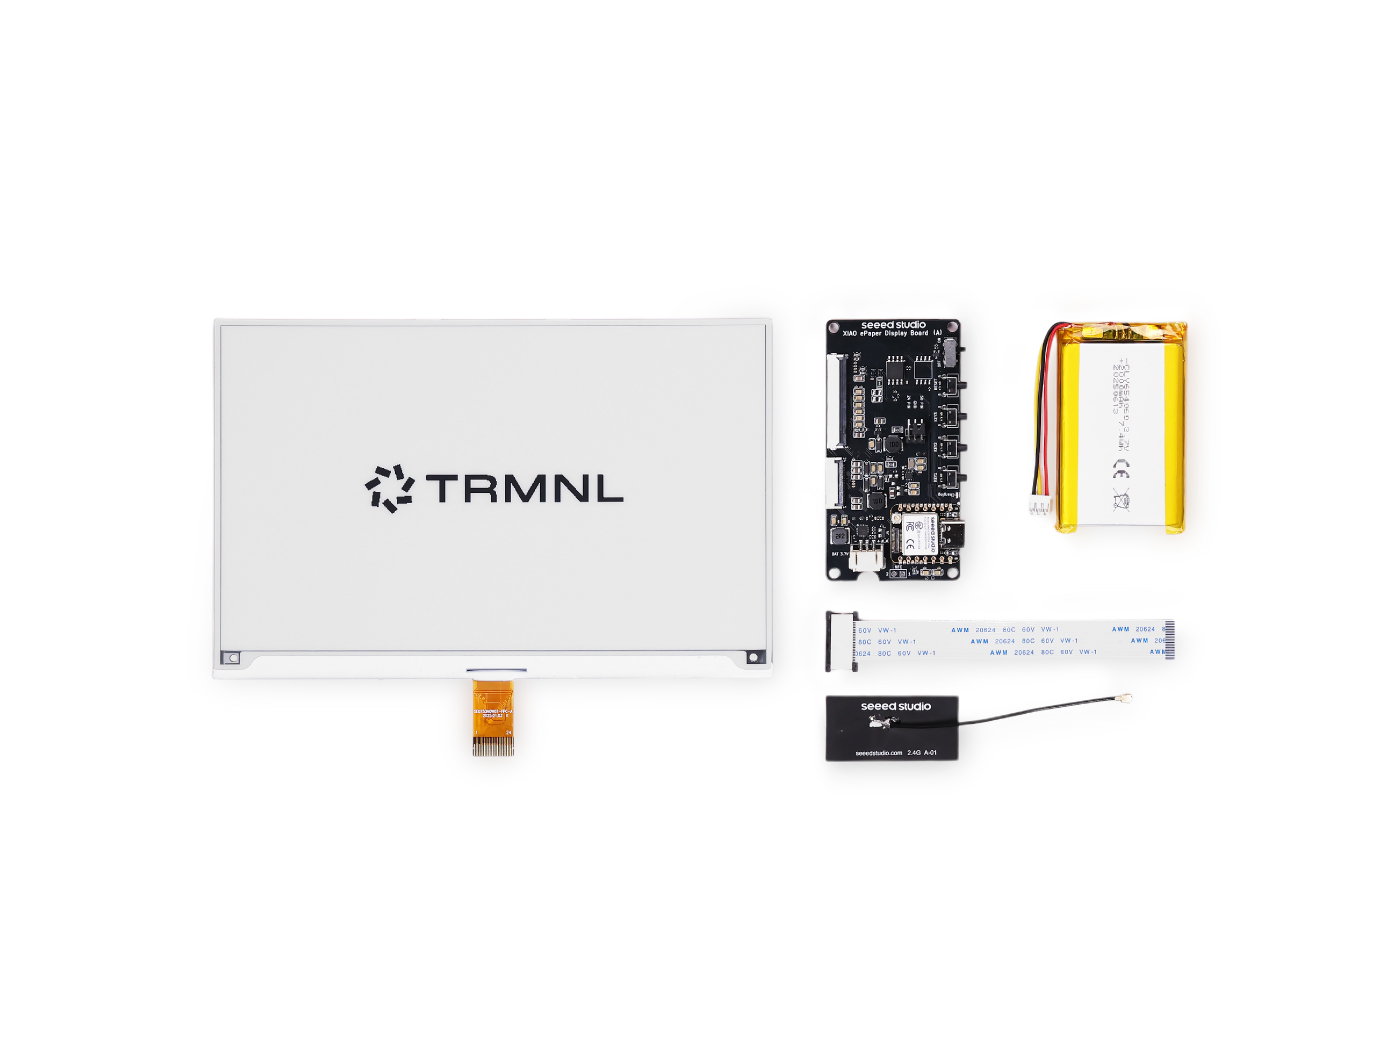
Materials Required
| TRMNL 7.5inch(OG) DIY Kit | Home Assistant Green |
|---|---|
 |  |
Home Assistant Green is the easiest and most privacy-focused way to automate your home. It offers an effortless setup and allows you to control all the smart devices with just one system, where all the data is stored locally by default. This board benefits from the thriving Home Assistant ecosystem and it will be improved every month by open source.
We recommend using Home Assistant Green as the Home Assistant host for this tutorial, or you can use any Home Assistant host with a Supervisor.
We have also written how to install Home Assistant for some of Seeed Studio products, please refer to them.
- Getting Started with Home Assistant on ODYSSEY-X86
- Getting Started with Home Assistant on reTerminal
- Getting Started with Home Assistant on LinkStar H68K/reRouter CM4
If you are not using a Seeed Studio product, you can also check and learn how to install Home Assistant for other products on the official Home Assistant website.
Equipment Installation
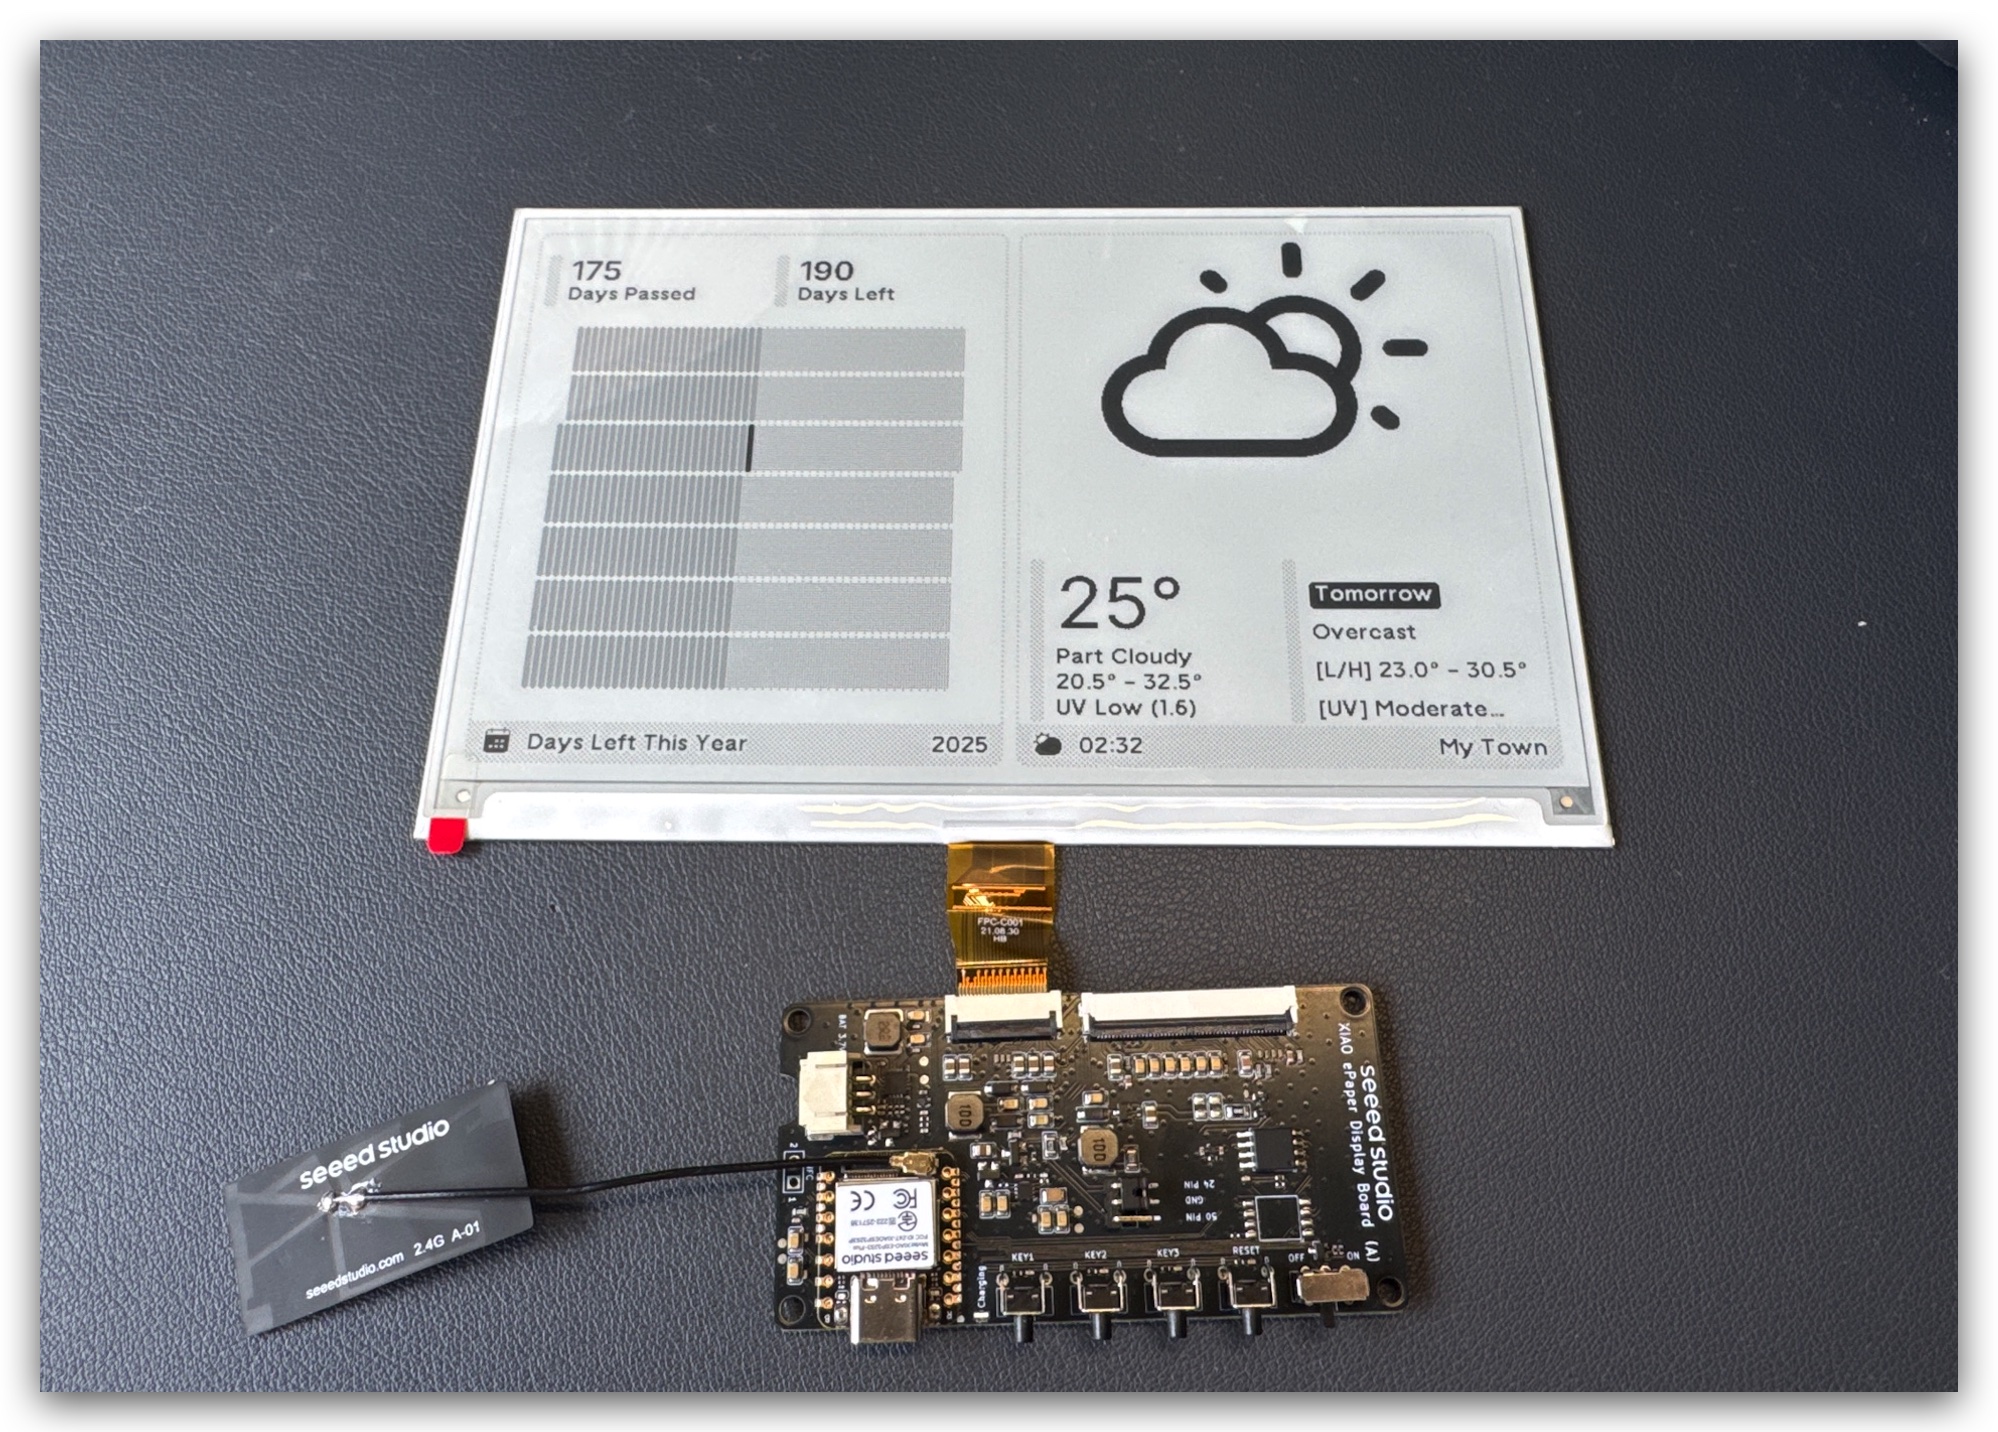
Step 1. Connect Display to Driver Board
Align the FPC cable with the connector on the XIAO ePaper Display Board, then secure the latch to ensure a firm connection.
The metal side of the FPC cable should face upwards, otherwise, no content will be displayed.
Please follow the installation tutorial below, many people get it wrong.
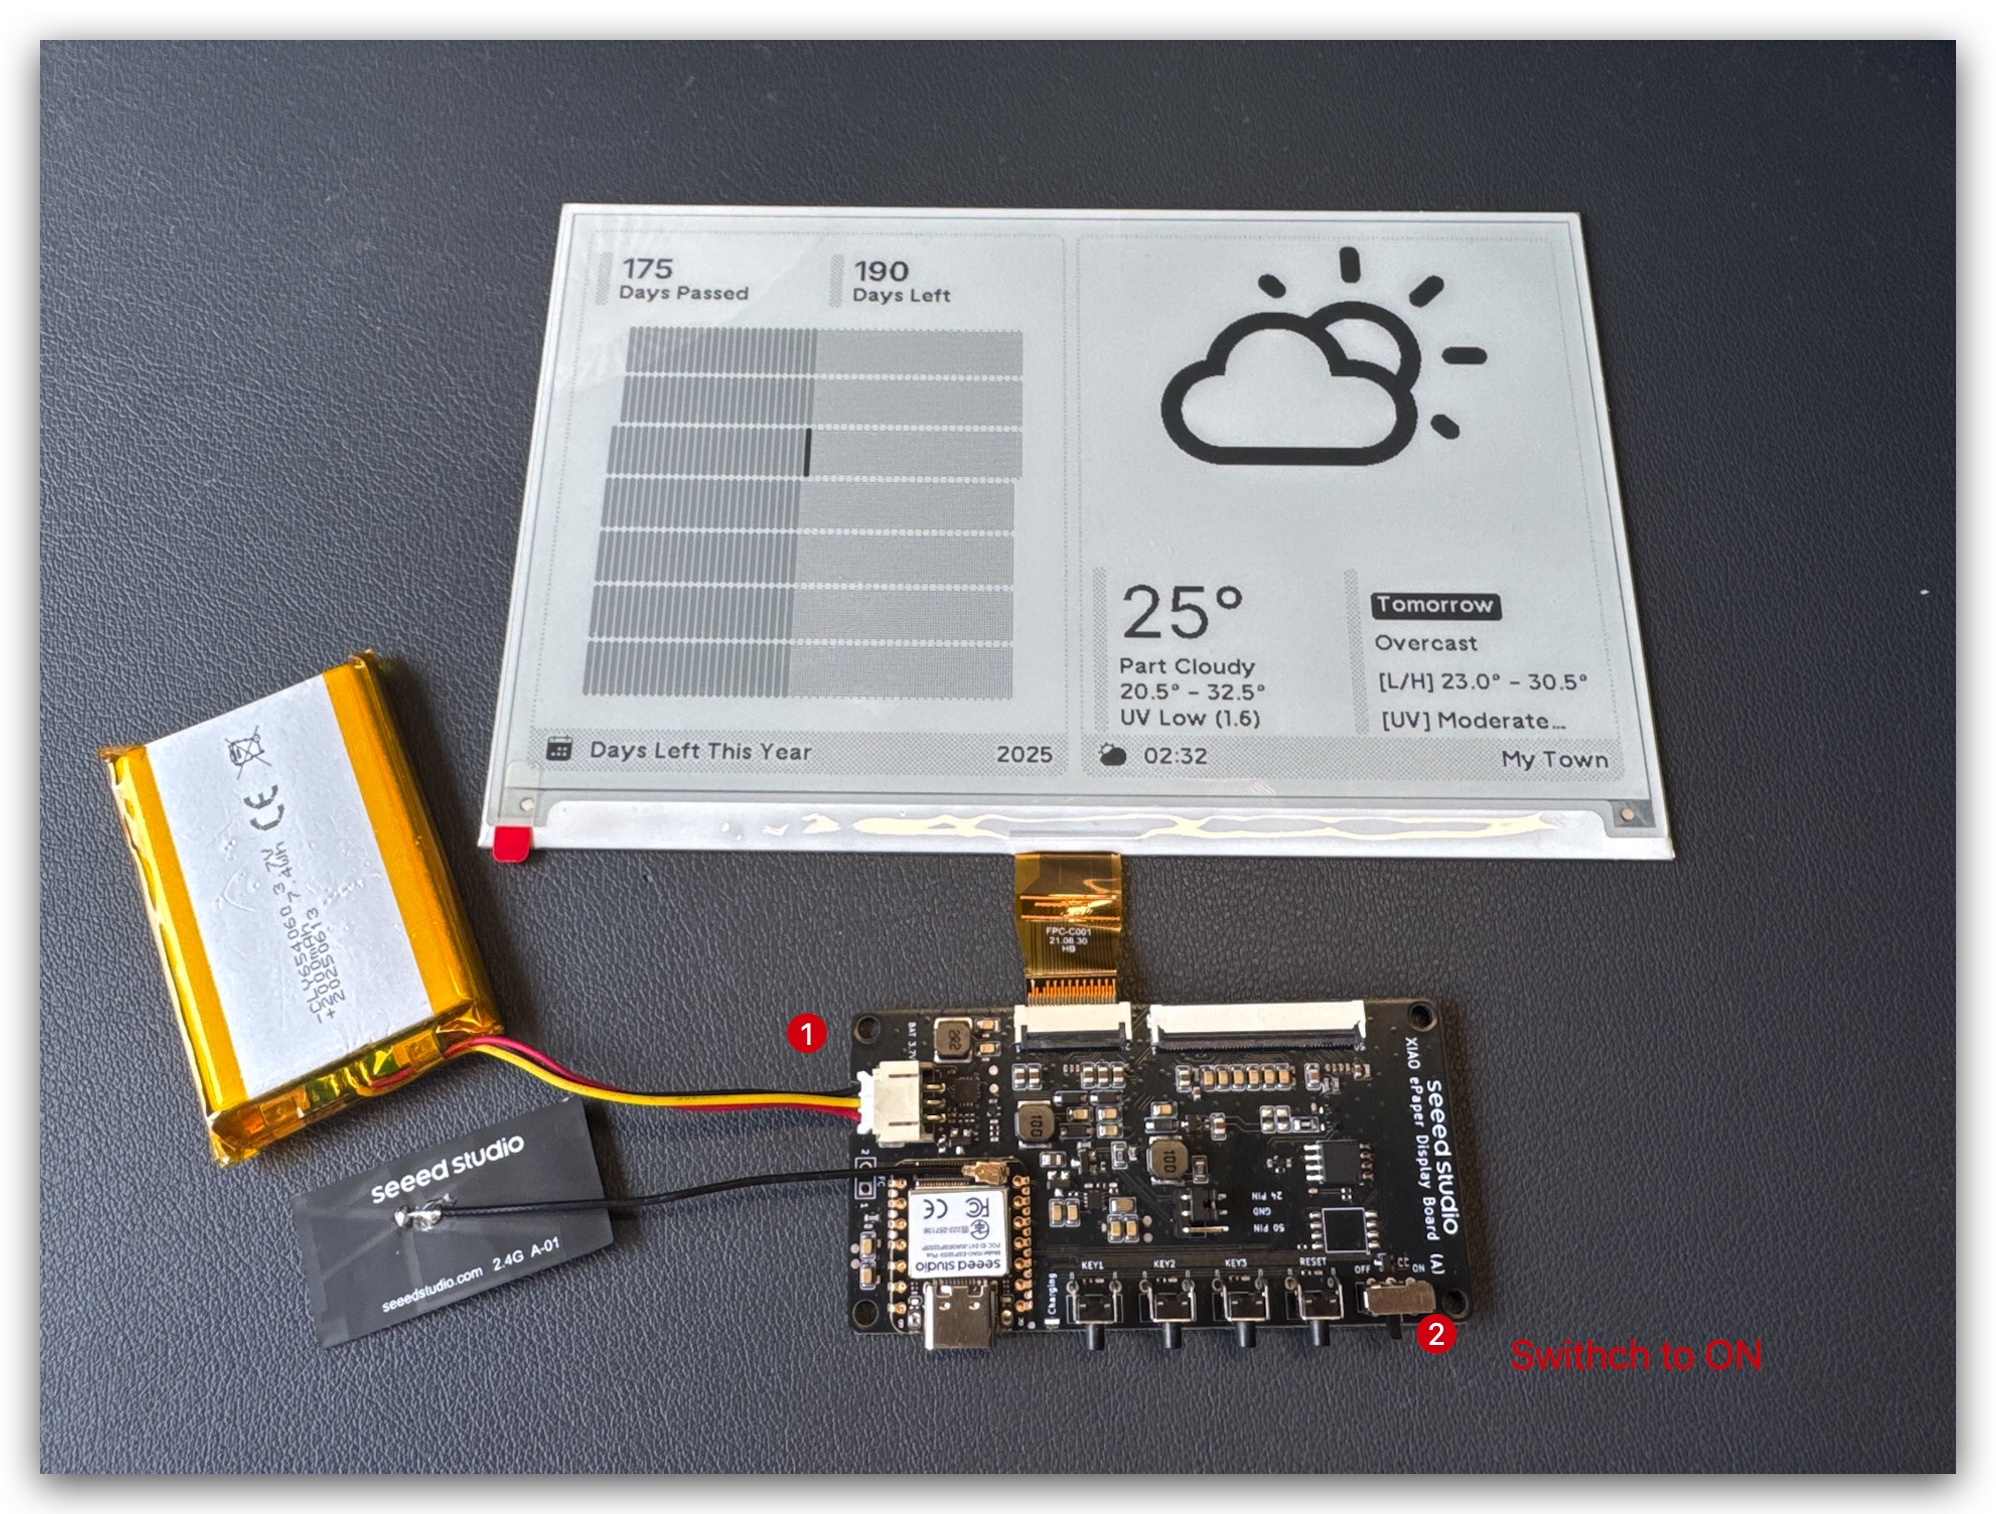
Step 2. Attach Battery
Connect the battery cable to the JST connector on the driver board, ensuring correct polarity (red wire to +, black to -).
Step 3. Enclosure Assembly (Optional)
Please note that the screen's flexible cable is very fragile. Be careful when operating. If it gets damaged, the entire screen will stop working.
Print open-source enclosure parts from Resource part and assemble the components inside.
First, assemble driver board and battery.
Test TRMNL kit if it works well.
Plug the screen into the case and make the FPC able out.
Connect FPC extension cable and assemble the whole case.
L-Shape enclosure is very similar.
If your TRMNL kit far away from your router, you can move the antenna outside the case. It would have better performance.
Step 1. Install ESPHome
If you have already installed ESPHome, you can skip this step.
Go to Settings -> Add-ons -> ADD-ON STORE


Search ESPHome and click on it. Click on INSTALL and START.
If you can't find ESPHome in the add-on store, make sure you're using a Home Assistant installation that supports add-ons (like Home Assistant OS or supervised installations). For other installation types (like Home Assistant Container), you may need to run the ESPHome Device Builder independently using Docker. See the official ESPHome documentation for more details.

And then, ESPHome Builder will appear at the sidebar.

Step 2. Add a new device
Go to ESPHome and click on NEW DEVICE.

Give the device a name you like and select ESP32-S3 for chip type, then click on SKIP.

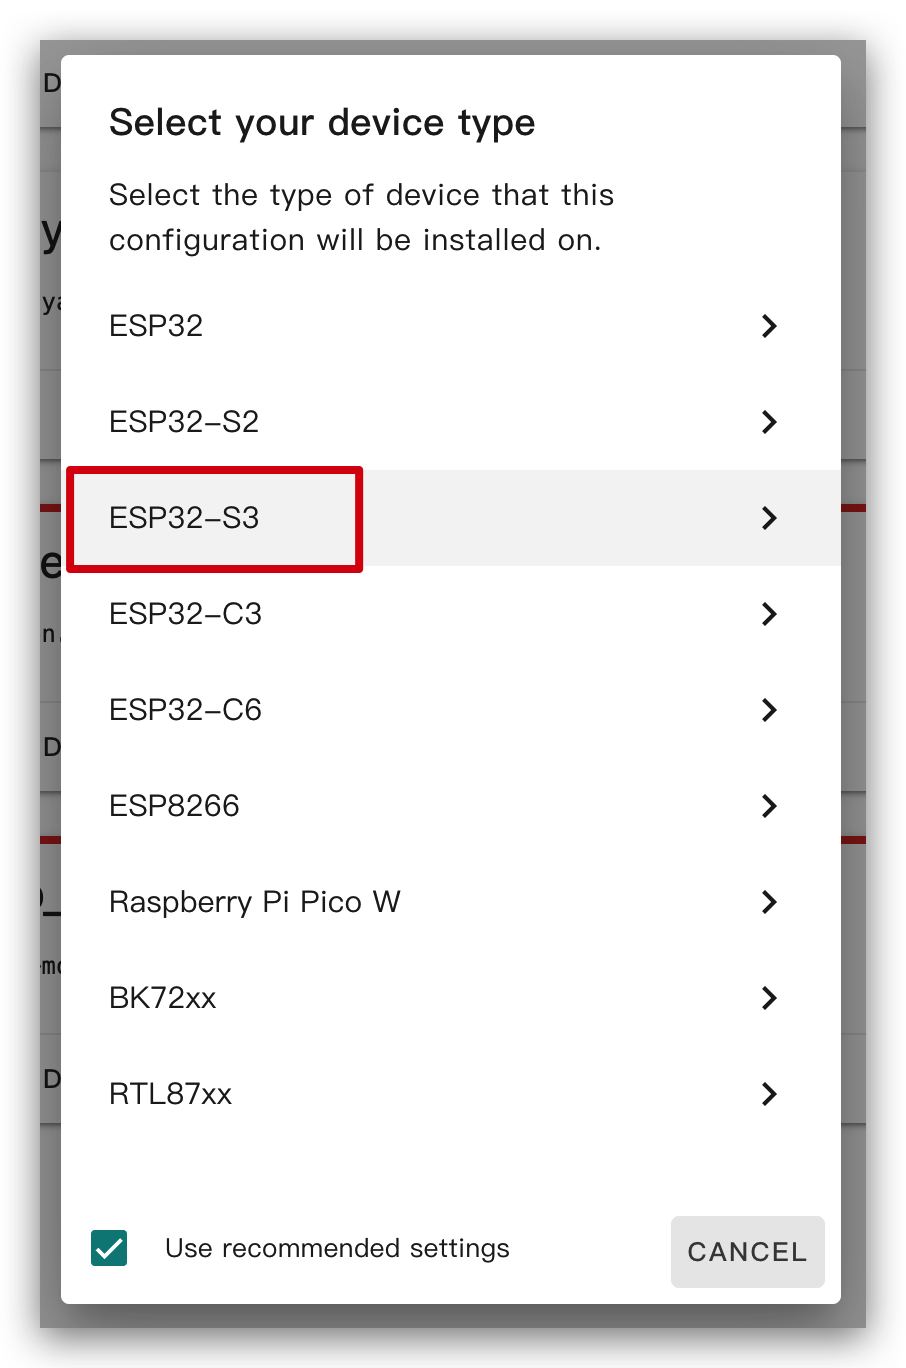

After you create a new device, click EDIT.

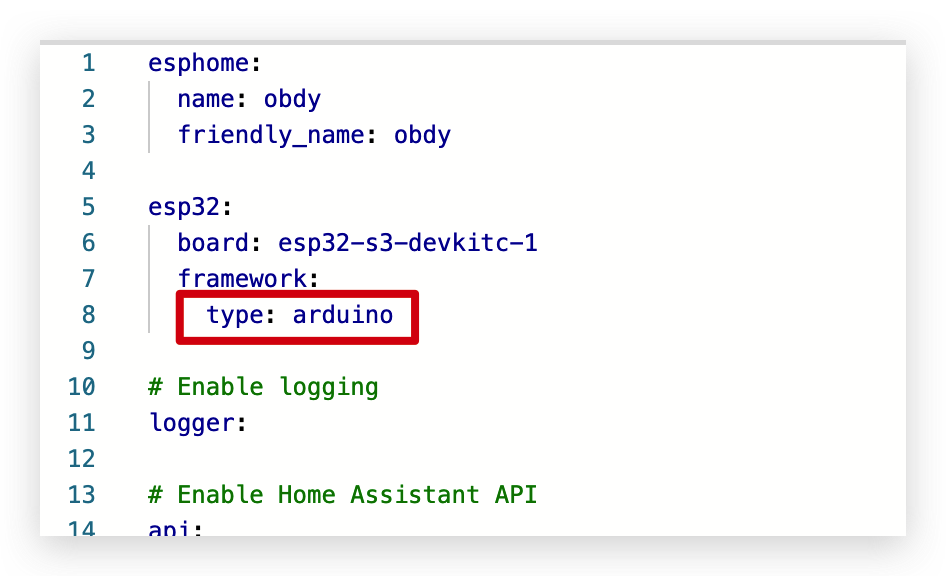
Inside the default generated code, the framework of esp32 may be esp-idf, which we need to change to arduino.
Step 3. Install firmware
This is a very basic example and will show "Hello World!" on the display.
The main purpose is to show you different ways to install firmware to the device.
Now you can copy the code below and paste it after captive_portal as shown below.
# define font to display words
font:
  - file: "gfonts://Inter@700"
    id: font1
    size: 24

# define SPI interface
spi:
  clk_pin: GPIO7
  mosi_pin: GPIO9

display:
  - platform: waveshare_epaper
    model: 7.50inv2
    cs_pin: GPIO44
    dc_pin: GPIO10
    reset_pin: GPIO38
    busy_pin:
      number: GPIO4
      inverted: true
    update_interval: 30s
    lambda: |-
      it.print(0, 0, id(font1), "Hello World!");
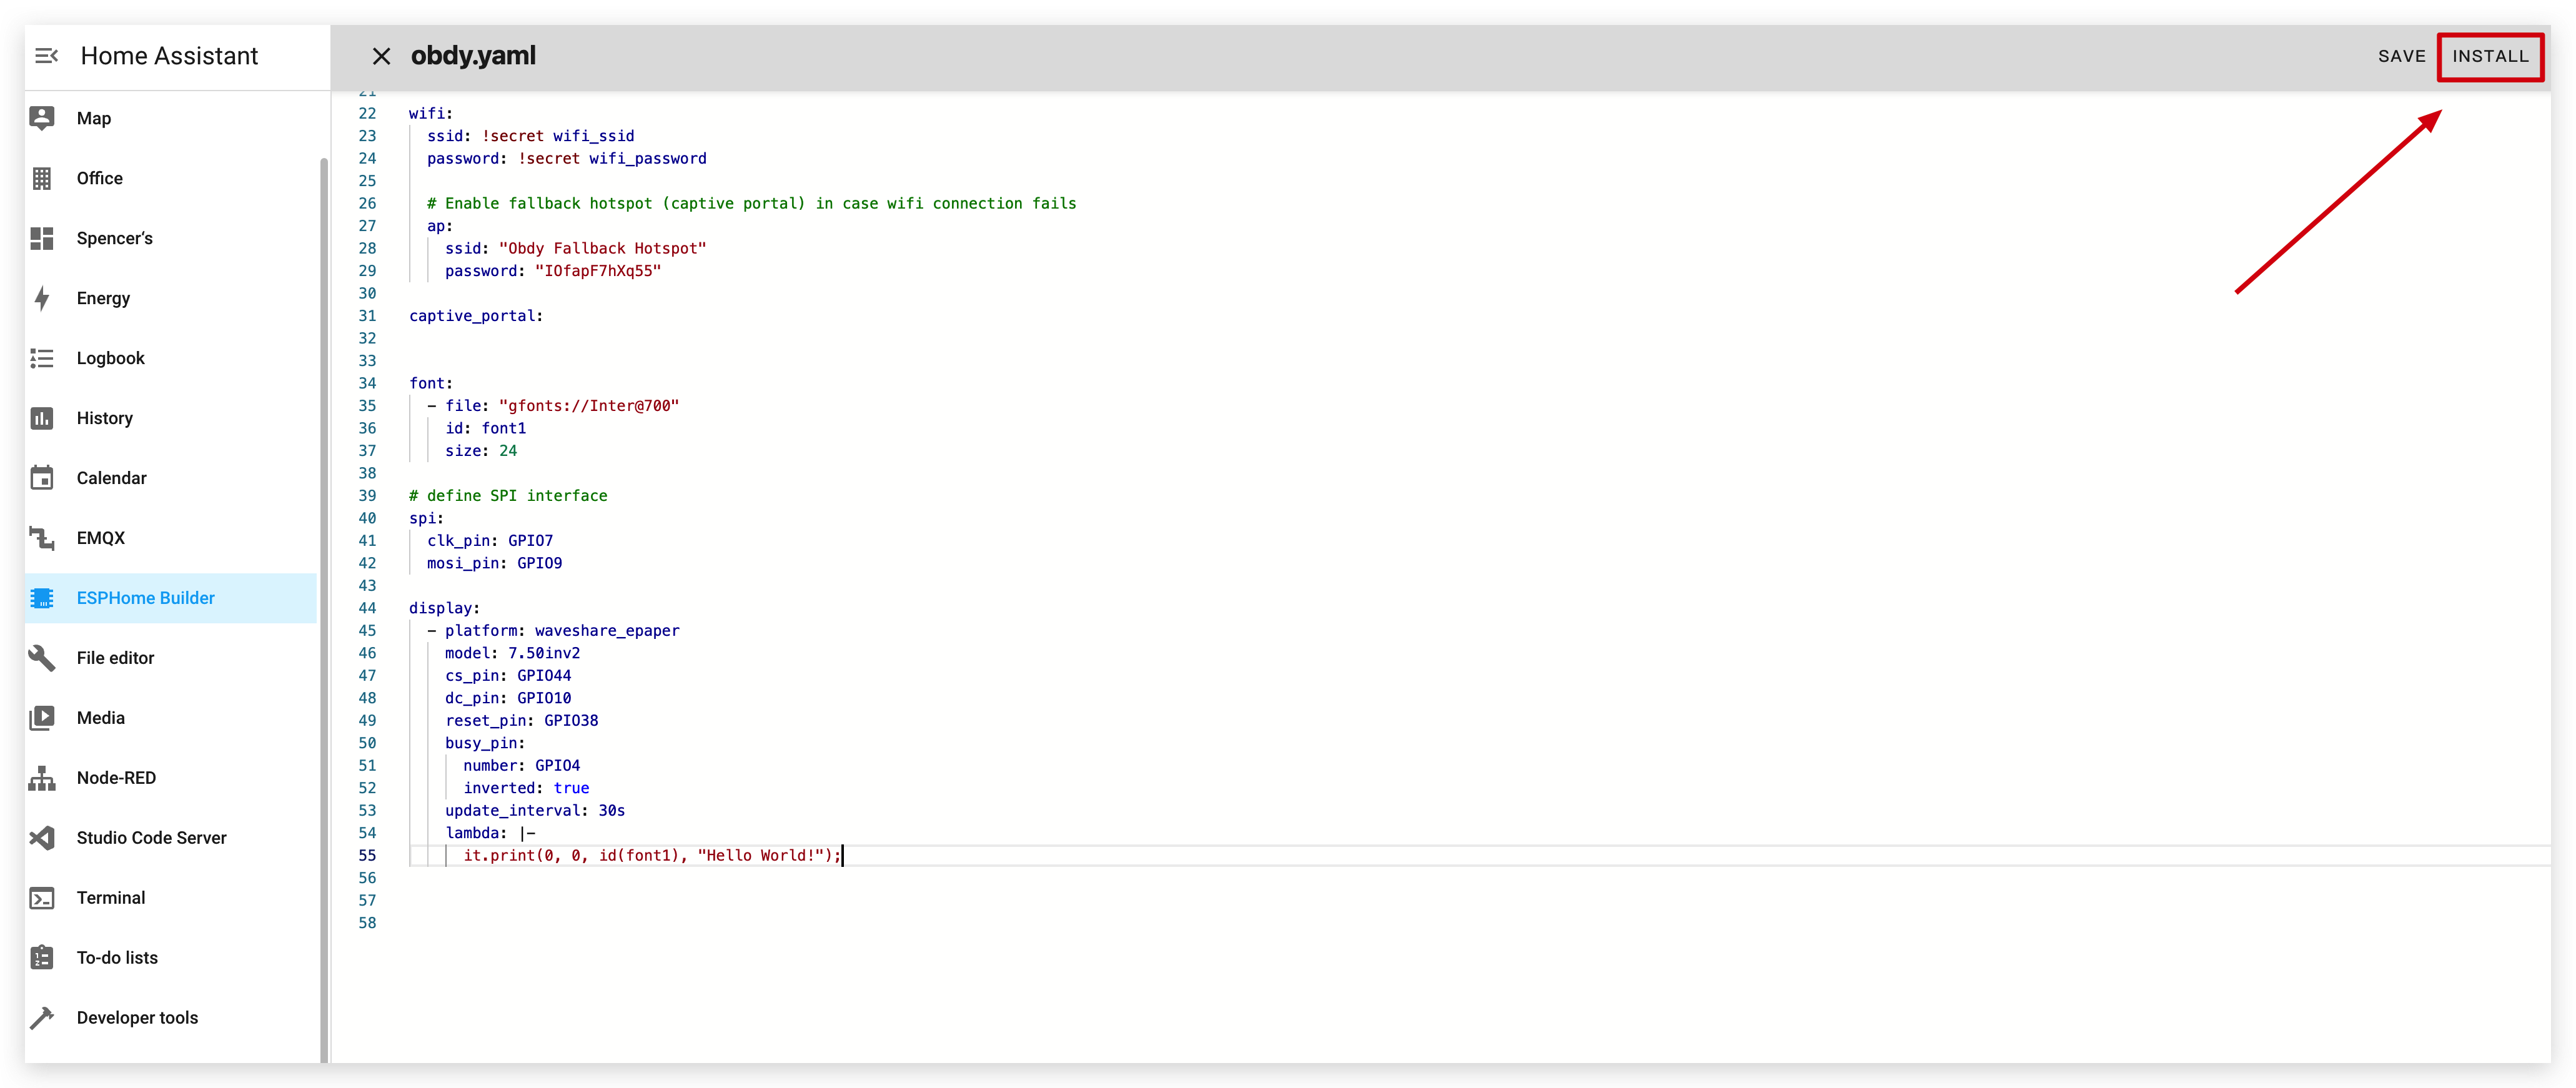
Click INSTALL to install the code to the device and you will see the following image.
- Install through browser
- Install through host
- Install through Wi-Fi
If your Home Assistant Host (Raspberry PI/Green/Yellow etc.) is far away from you, we recommend using this method. You can install it with the computer you have on hand.
First, you need to click Manual download to download the compiled firmware.

Open this website where we will upload the firmware to the ePaper panel.

Go back to ESPHome to download the firmware.

Select Factory format.

Use USB cable to connect the ePaper panel to your computer and click CONNECT.

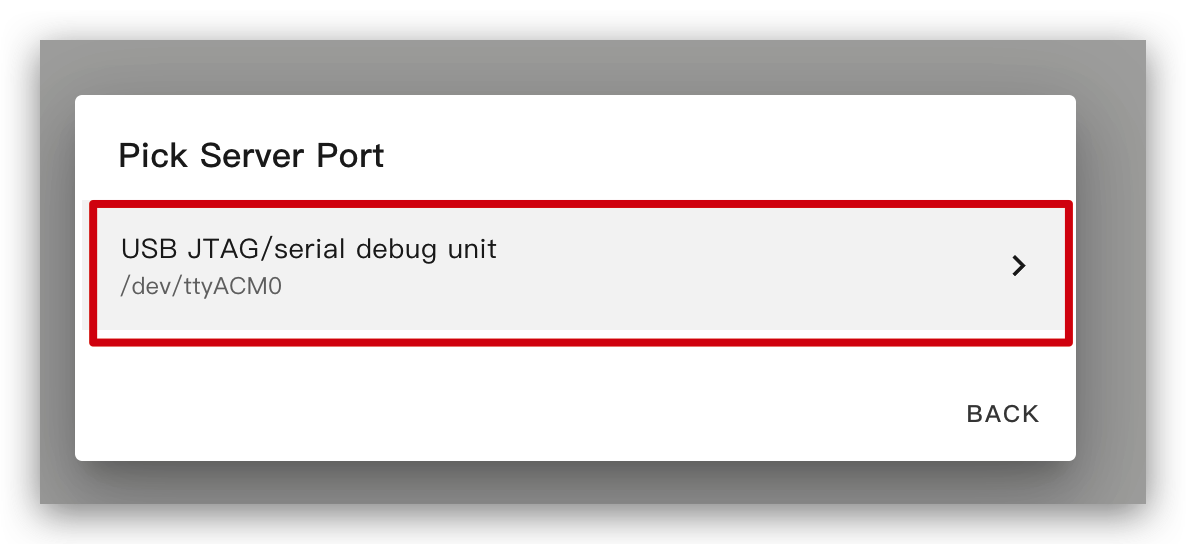
Select usbmodemxxx(Windows is COMxxx) and click connect. Encountered a problem? Click here.

Click INSTALL and select the firmware you just downloaded.

Wait a moment and you will see 'Hello world!' on the display ~


If your Home Assistant Host (Raspberry PI/Green/Yellow etc.) is nearby, we recommend using this method as it is simpler.
Before you install the code to the device, you need to use USB cable to connect this device to your Raspberry Pi or HA Green(Yellow) etc which is running Home Assistant.
Click the options following the image to install the code to the device. Haven't found port when device in deep sleep mode?

Wait a moment and you will see the feedback like the following image. It means the code is running successfully.

This is the simplest way, but on the premise that when installing the program for the first time, you should first upload the program to the ePaper Panel using the method on the left. After that, you can upload it via wifi. Also, make sure your YAML configuration includes properly configured ota and api sections with valid encryption keys for this method to work.
In this way, you don't need to connect the ePaper panel to anything, just make sure it is online.
Click the option and then the firmware will be installed to ePaper penal automatically.

Wait a moment and you will see the feedback like the following image. If it fails, it may be due to a weak signal. Please move the device closer to your router. Encountered a problem? Click here.

Basic usages
1. Display shape
This example will show shape on the display.
You can copy the code below and paste it to captive_portal part as the following image.
spi:
  clk_pin: GPIO7
  mosi_pin: GPIO9

display:
  - platform: waveshare_epaper
    model: 7.50inv2
    cs_pin: GPIO44
    dc_pin: GPIO10
    reset_pin: GPIO38
    busy_pin:
      number: GPIO4
      inverted: true
    update_interval: 5min
    lambda: |-
      it.rectangle(10, 10, 100, 50);
      it.rectangle(150, 10, 50, 50);
      it.circle(250, 35, 25);

      it.filled_rectangle(10, 80, 100, 50);
      it.filled_rectangle(150, 80, 50, 50);
      it.filled_circle(250, 105, 25);
When you see the feedback like the following image, it means the code is running successfully.
You can also click here to see more usages.

2. Display information in HA
This example will show the information in HA on the display.
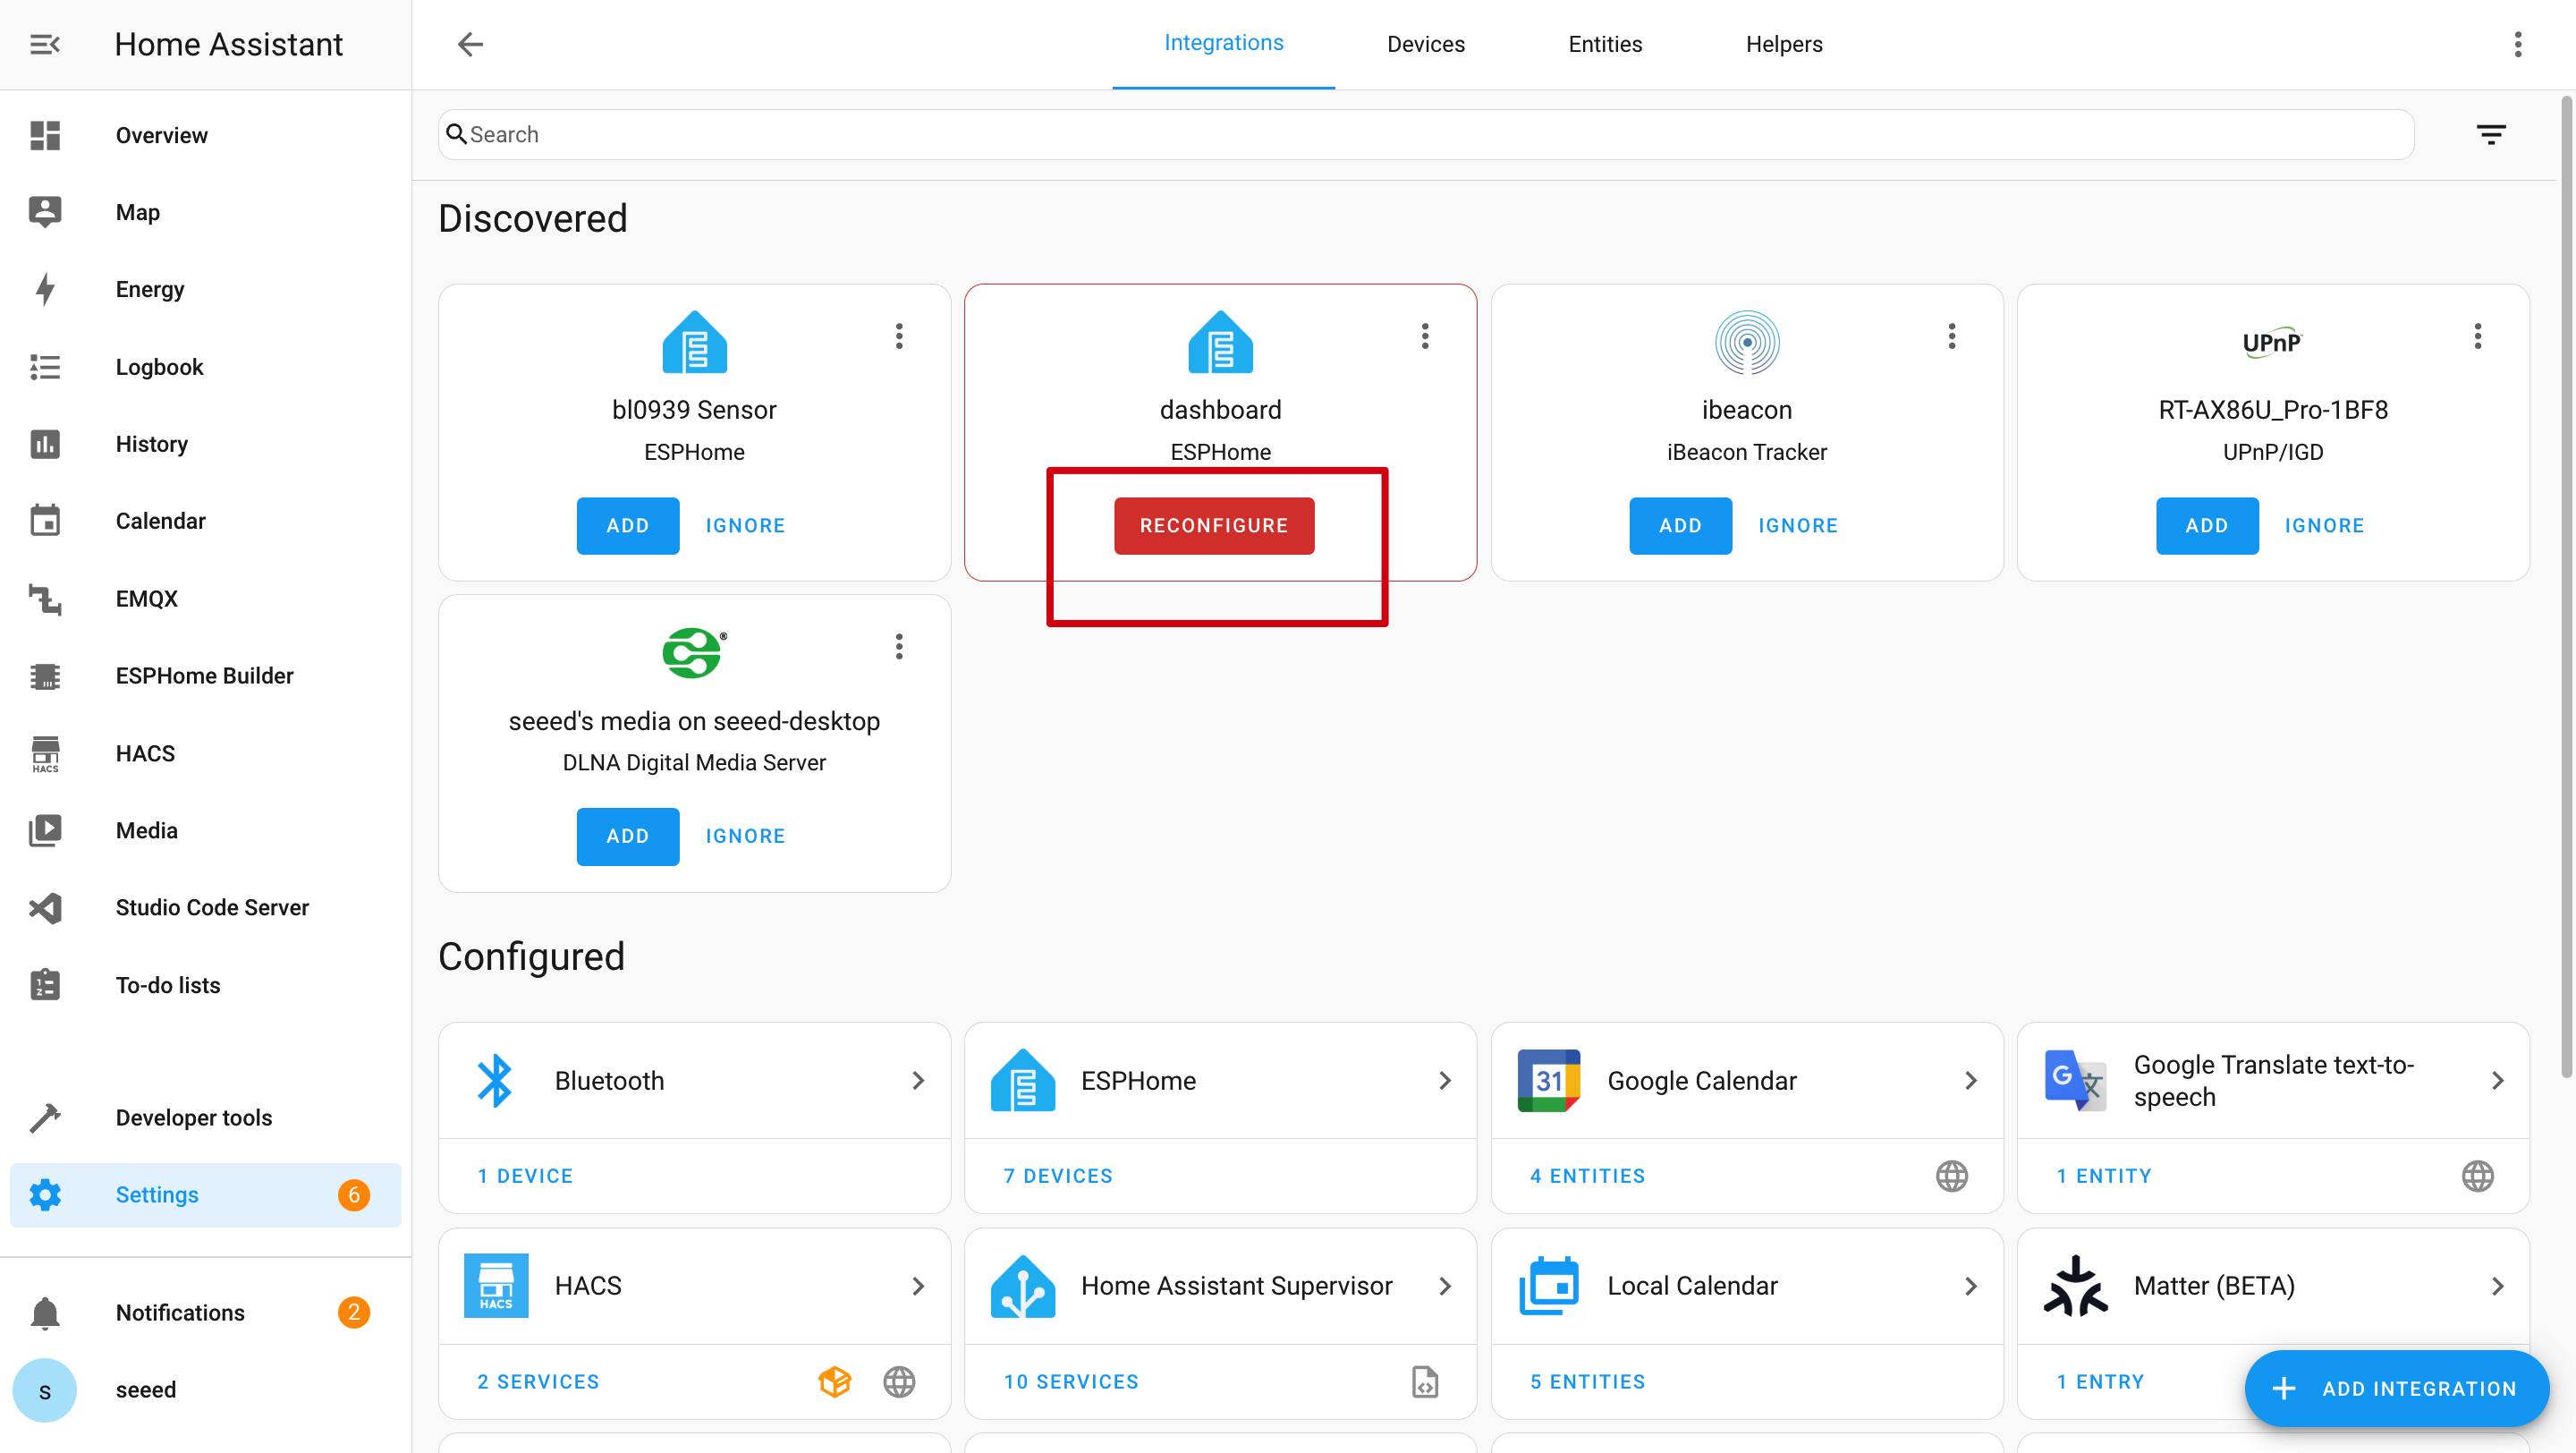
First of all, you need to add this device to HA. Otherwise, you can't get the information from HA.
If HA don't show the device, you should run above demo first. After running above demo, you can see the device in HA.

And then, click SUBMIT and FINISH.


After installing ESPHome and adding a new device, you can copy the code below and paste it after captive_portal as shown below.
# Define font to show info
font:
  - file: "gfonts://Inter@700"
    id: myFont
    size: 24

# Get info from HA, as string format
text_sensor:
  - platform: homeassistant
    entity_id: weather.forecast_home
    id: myWeather
    internal: true
  - platform: homeassistant
    entity_id: weather.forecast_home
    id: myTemperature
    attribute: "temperature"
    internal: true

# Get info from HA, as float format
sensor:
  - platform: homeassistant
    entity_id: weather.forecast_home
    id: myPressure
    attribute: "pressure"
    internal: true

# Display info via SPI
spi:
  clk_pin: GPIO7
  mosi_pin: GPIO9

display:
  - platform: waveshare_epaper
    model: 7.50inv2
    cs_pin: GPIO44
    dc_pin: GPIO10
    reset_pin: GPIO38
    busy_pin:
      number: GPIO4
      inverted: true
    update_interval: 30s
    lambda: |-
      //print info in log
      ESP_LOGD("epaper", "weather: %s", id(myWeather).state.c_str());
      ESP_LOGD("epaper", "temperature: %s", id(myTemperature).state.c_str());
      ESP_LOGD("epaper", "pressure: %.1f", id(myPressure).state);
      //display info in epaper screen
      it.printf(100, 100, id(myFont), "%s", id(myWeather).state.c_str());
      it.printf(100, 150, id(myFont), "%s", id(myTemperature).state.c_str());
      it.printf(100, 200, id(myFont), "%.1f", id(myPressure).state);
Install those codes to your device.

The function of the code is to get weather, temperature and pressure from HA and display them on the display.

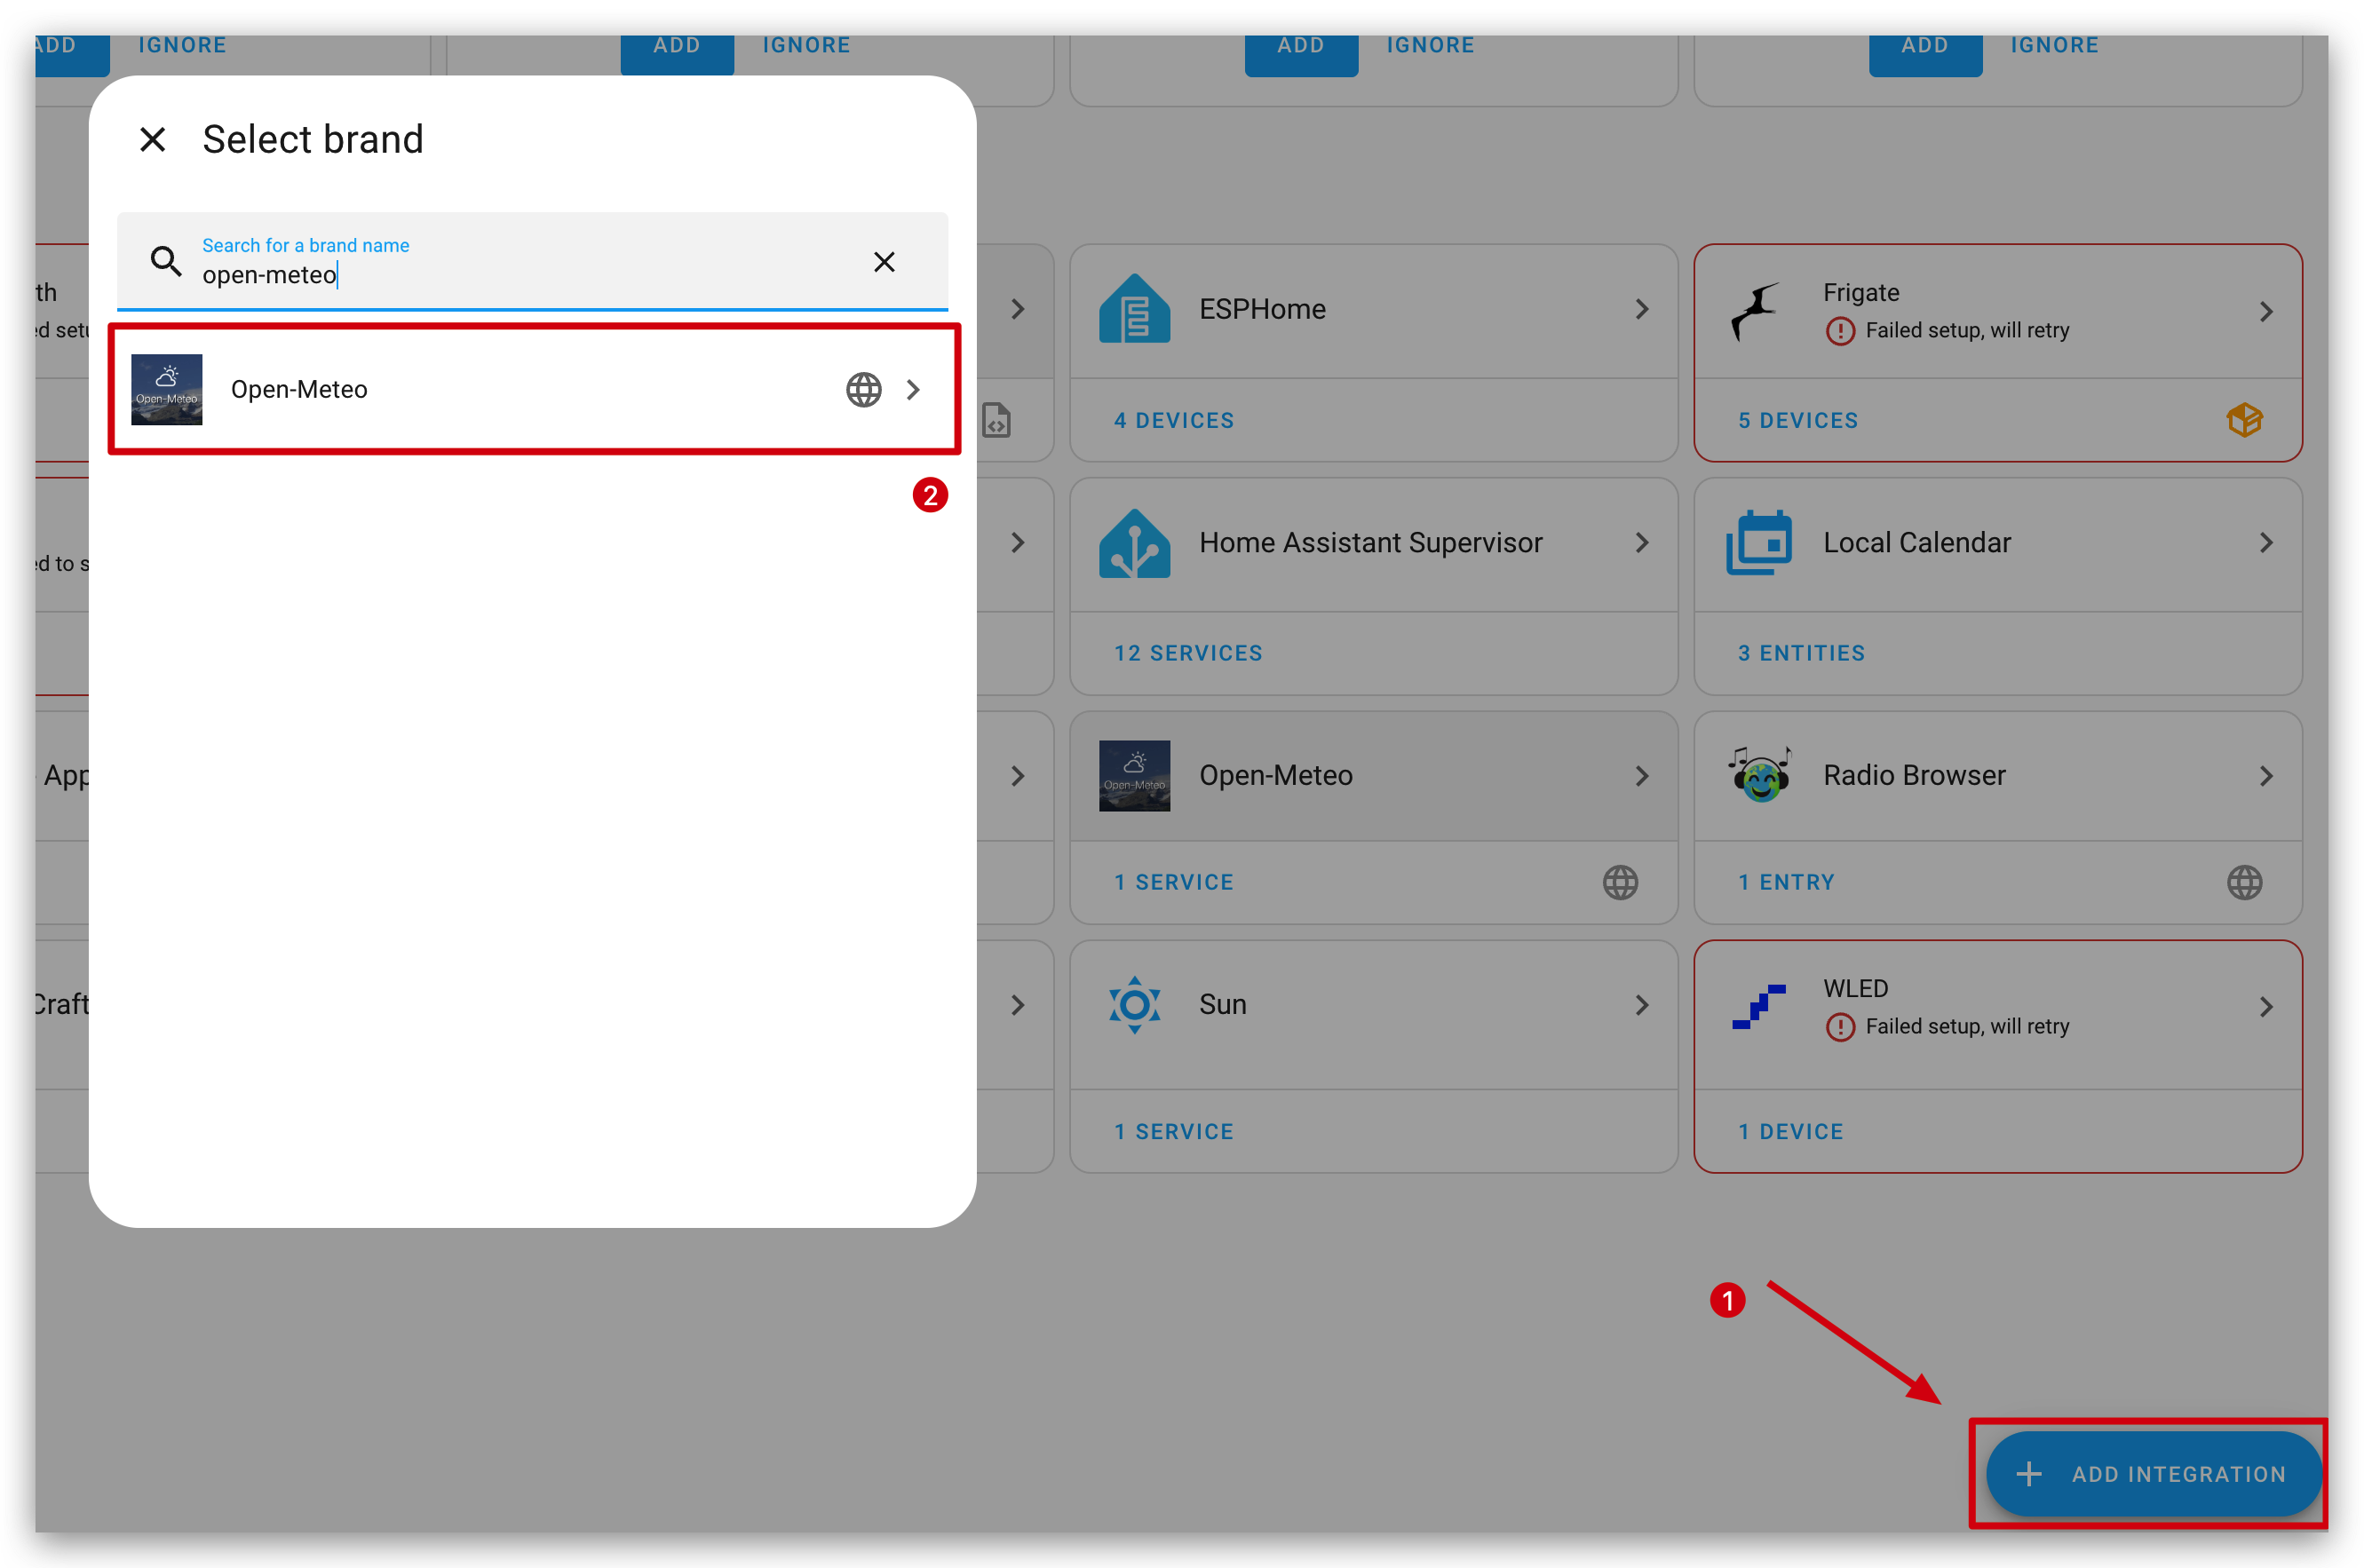
If you find that your Home Assistant doesn't have a weather-related component, you can download an integration called Open-Meteo from within the integration.
When you see the feedback like the following image, it means the code is running successfully.


3. Display icon
This example will show icon on the display.
First, we need to install a File Editor add-on. Search Studio Code Server and click on it. Click on INSTALL and START.


And then, create a new folder call fonts and download this file and put it into fonts folder.

You can copy the code below and paste it after captive_portal as shown below.
font:
  - file: 'fonts/materialdesignicons-webfont.ttf'  #here is the directory to save ttf file
    id: font_mdi_large
    size: 200        # big size icon
    glyphs: &mdi-weather-glyphs
      - "\U000F0595" # weather cloudy
      - "\U000F0592" # weather hail
  - file: 'fonts/materialdesignicons-webfont.ttf'
    id: font_mdi_medium   # small size icon
    size: 40
    glyphs: *mdi-weather-glyphs

spi:
  clk_pin: GPIO7
  mosi_pin: GPIO9

display:
  - platform: waveshare_epaper
    model: 7.50inv2
    cs_pin: GPIO44
    dc_pin: GPIO10
    reset_pin: GPIO38
    busy_pin:
      number: GPIO4
      inverted: true
    update_interval: 30s
    lambda: |-
      it.printf(100, 200, id(font_mdi_medium), TextAlign::CENTER, "\U000F0595");
      it.printf(400, 200, id(font_mdi_large), TextAlign::CENTER, "\U000F0592");
When you see the feedback like the following image, it means the code is running successfully.

If you want to use other icons, you can click the below button to explore more.
Select a icon you want.

Copy the code and paste it to captive_portal part as the following image.


4. Display image
This example will show any images you like on the display.
Like the previous example, we need to install Studio Code Server and create a new folder call image to save the image.
And then put a image into image folder. You can click the below button to download an image to have a try.

You can copy the code below and paste it after captive_portal as shown below.
image:
  - file: /config/esphome/image/wifi.jpg    # the path where you save the image, png or jpg format
    id: myImage
    type: BINARY
    resize: 800x480    # how big you want to show, the biggest size should be as same as ePaper Penal pixel(800x480)
    invert_alpha: true   # invert color

spi:
  clk_pin: GPIO7
  mosi_pin: GPIO9

display:
  - platform: waveshare_epaper
    model: 7.50inv2
    cs_pin: GPIO44
    dc_pin: GPIO10
    reset_pin: GPIO38
    busy_pin:
      number: GPIO4
      inverted: true
    update_interval: 30s
    lambda: |-
      it.image(0, 0, id(myImage));
When you see the feedback like the following image, it means the code is running successfully.

Demo 1. Take the Home Assistant dashboard as a screenshot
This example will show the screenshot of HA on the display.
First, you need to install an screenshot Add-on Puppet, click here to install.

Please note that the version should be higher than or equal to 1.11.4. After installation, go to Configuration page. We need to create a access_token for this add-on.

See next step to create a token and paste here.

Go to the bottom of Security page and create a token, and then copy and paste it to Puppet add-on.

Remember to restart the Puppet add-on.

Starting the add-on will launch a new server on port 10000. Any path you request will return a screenshot of that page. You will need to specify the viewport size you want.
For example, to get a 1000px x 1000px screenshot of your default dashboard, fetch:
# http://192.168.1.191:10000/lovelace/0?viewport=1000x1000(My address)

http://homeassistant.local:10000/lovelace/0?viewport=1000x1000
To reduce the color palette for E Ink® displays, you can add the eink parameter. The value represents the number of colors (including black) to use. For example, for a 2-color E Ink® display:
http://homeassistant.local:10000/lovelace/0?viewport=1000x1000&eink=2
If you are using eink=2, you can also invert the colors by adding the invert parameter:
http://homeassistant.local:10000/lovelace/0?viewport=1000x1000&eink=2&invert
Besides, you can also screenshot other page, for example To-do lists page in HA:
http://192.168.1.191:10000/todo?viewport=800x480&eink=2&invert
You can take a look the effect of the screenshot by input this link in your browser.

Copy the code below and paste it after esp32:
# Enable PSRAM support since online_image requires more than the available RAM capacity
psram:
  mode: octal
  speed: 80MHz
You can copy the code below and paste it after captive_portal as shown below.
http_request:
  verify_ssl: false
  timeout: 10s
  watchdog_timeout: 15s

online_image:
  - id: dashboard_image
    format: PNG
    type: BINARY
    buffer_size: 30000
    url: http://192.168.1.191:10000/todo?viewport=800x480&eink=2&invert #change this link to your screenshot link
    update_interval: 30s
    on_download_finished:
      - delay: 0ms
      - component.update: main_display

spi:
  clk_pin: GPIO7
  mosi_pin: GPIO9

display:
  - platform: waveshare_epaper
    id: main_display
    model: 7.50inv2
    cs_pin: GPIO44
    dc_pin: GPIO10
    reset_pin: GPIO38
    busy_pin:
      number: GPIO4
      inverted: true
    update_interval: never
    lambda: |-
      it.image(0, 0, id(dashboard_image));
When you see the feedback like the following image, it means the code is running successfully.

Demo2. Deep sleep mode
During deep sleep mode, you can't upload code to the device directly. You need to enter the download mode.Click here jump to Q3.
This example will show how to use deep sleep mode to save power. Update info every 6 hours.
You can copy the code below and paste it after captive_portal as shown below.
globals:
  - id: sleep_counter
    type: int
    restore_value: yes  # key parameter, to use RTC storage
    initial_value: '0'

# Here is deep sleep part
deep_sleep:
  id: deep_sleep_1
  run_duration: 30s  # Device wake up and run 30s (enough to display)
  sleep_duration: 3min  # deep sleep for 3min

interval:
  - interval: 29s  # run this command before the end of run_duration
    then:
      - logger.log: "Entering deep sleep now..."

font:
  - file: "gfonts://Inter@700"
    id: font1
    size: 24

spi:
  clk_pin: GPIO7
  mosi_pin: GPIO9

display:
  - platform: waveshare_epaper
    model: 7.50inv2
    cs_pin: GPIO44
    dc_pin: GPIO10
    reset_pin: GPIO38
    busy_pin:
      number: GPIO4
      inverted: true
    update_interval: 3min
    lambda: |-
      id(sleep_counter) += 1;
      ESP_LOGD("main", "Wakeup count: %d", id(sleep_counter));
      it.printf(100, 100, id(font1), "Wakeup count: %d", id(sleep_counter));
You'll see a counter. It will increment by one every time it wakes up.

Demo 3. Comprehensive example
For you to understand better, we strongly recommend that you run the basic usages above first.
This example demonstrates a comprehensive ESPHome configuration for the TRMNL 7.5-inch e-paper DIY kit. The YAML code integrates multiple features to create a smart, interactive display panel that works seamlessly with Home Assistant.
Purpose and Functionality:
-
The configuration enables the device to connect to Wi-Fi and Home Assistant, supporting both API and OTA updates for easy management.
-
It sets up the e-paper display to show different types of information on two switchable pages, controlled by physical buttons.
-
The device reads battery voltage, calculates the battery percentage, and displays a corresponding battery icon and value.
-
Weather conditions and temperature are fetched from Home Assistant and displayed with appropriate icons and units.
-
The current time and date are also shown, synchronized with Home Assistant.
This example showcases how to combine sensor readings, Home Assistant data, and user input to build a feature-rich, always-on smart display using ESPHome and the TRMNL 7.5-inch e-paper kit.
Click here to preview the full code
esphome:
  name: obdy
  friendly_name: obdy
  on_boot:
    priority: 600
    then:
      - output.turn_on: bsp_battery_enable
      - delay: 200ms
      - component.update: battery_voltage
      - component.update: battery_level

esp32:
  board: esp32-s3-devkitc-1
  framework:
    type: arduino

# Enable PSRAM support since online_image requires more than the available RAM capacity
psram:
  mode: octal
  speed: 80MHz

# Enable logging
logger:

# Enable Home Assistant API
api:
  encryption:
    key: "j0V30kuJ6Zdij9SU6Ee+7ruwid+7SQOxtinjld2PRc0="

ota:
  - platform: esphome
    password: "db786195ae6f9748f5b57ea9bd1d4161"

wifi:
  ssid: !secret wifi_ssid
  password: !secret wifi_password

  # Enable fallback hotspot (captive portal) in case wifi connection fails
  ap:
    ssid: "Obdy Fallback Hotspot"
    password: "IOfapF7hXq55"

captive_portal:

# Deep-sleep, wake by GPIO4
# deep_sleep:
#   id: deep_sleep_1
#   run_duration: 1min
#   sleep_duration: 60min
#   wakeup_pin: GPIO4
#   wakeup_pin_mode: INVERT_WAKEUP

spi:
  clk_pin: GPIO7
  mosi_pin: GPIO9

# Fonts
font:
  - file: "gfonts://Inter@700"
    id: small_font
    size: 24
  - file: "gfonts://Inter@700"
    id: mid_font
    size: 36
  - file: "gfonts://Inter@700"
    id: big_font
    size: 180
  - file: "gfonts://Inter@700"
    id: time_font
    size: 96      # for the big time display
  - file: 'fonts/materialdesignicons-webfont.ttf'
    id: font_bat_icon
    size: 24
    glyphs:
      - "\U000F007A"  # mdi-battery-10
      - "\U000F007B"  # mdi-battery-20
      - "\U000F007C"  # mdi-battery-30
      - "\U000F007D"  # mdi-battery-40
      - "\U000F007E"  # mdi-battery-50
      - "\U000F007F"  # mdi-battery-60
      - "\U000F0080"  # mdi-battery-70
      - "\U000F0081"  # mdi-battery-80
      - "\U000F0082"  # mdi-battery-90
      - "\U000F0079"  # mdi-battery
  - file: "fonts/materialdesignicons-webfont.ttf" # <-- 替换成你的字体文件路径
    id: weather_icon_font
    size: 100
    glyphs:
      - "\U000F0599" # weather-sunny
      - "\U000F0595" # weather-partly-cloudy
      - "\U000F0F2F" # weather-cloudy
      - "\U000F0597" # weather-rainy
      - "\U000F0598" # weather-snowy
      - "\U000F059B" # weather-windy
      - "\U000F0594" # weather-fog
      - "\U000F0596" # weather-lightning

globals:
  - id: page_index
    type: int
    restore_value: true
    initial_value: '0'
  - id: battery_glyph
    type: std::string
    restore_value: no
    initial_value: "\"\\U000F0079\""   # default full battery

sensor:
  - platform: adc
    pin: GPIO1
    name: "Battery Voltage"
    id: battery_voltage
    update_interval: 60s
    attenuation: 12db
    filters:
      - multiply: 2.0
  - platform: template
    name: "Battery Level"
    id: battery_level
    unit_of_measurement: "%"
    icon: "mdi:battery"
    device_class: battery
    state_class: measurement
    lambda: 'return id(battery_voltage).state;'
    update_interval: 60s
    on_value:
      then:
        - lambda: |-
            int pct = int(x);
            if (pct <= 10)      id(battery_glyph) = "\U000F007A";
            else if (pct <= 20) id(battery_glyph) = "\U000F007B";
            else if (pct <= 30) id(battery_glyph) = "\U000F007C";
            else if (pct <= 40) id(battery_glyph) = "\U000F007D";
            else if (pct <= 50) id(battery_glyph) = "\U000F007E";
            else if (pct <= 60) id(battery_glyph) = "\U000F007F";
            else if (pct <= 70) id(battery_glyph) = "\U000F0080";
            else if (pct <= 80) id(battery_glyph) = "\U000F0081";
            else if (pct <= 90) id(battery_glyph) = "\U000F0082";
            else                id(battery_glyph) = "\U000F0079";
    filters:
      - calibrate_linear:
          - 4.15 -> 100.0
          - 3.96 -> 90.0
          - 3.91 -> 80.0
          - 3.85 -> 70.0
          - 3.80 -> 60.0
          - 3.75 -> 50.0
          - 3.68 -> 40.0
          - 3.58 -> 30.0
          - 3.49 -> 20.0
          - 3.41 -> 10.0
          - 3.30 -> 5.0
          - 3.27 -> 0.0
      - clamp:
          min_value: 0
          max_value: 100

output:
  - platform: gpio
    pin: GPIO6
    id: bsp_battery_enable

binary_sensor:
  - platform: gpio    # Next page KEY1
    pin:
      number: GPIO2
      mode: INPUT_PULLUP
      inverted: true
    id: key1
    name: "Key1"
    on_press:
      then:
        - lambda: |-
            id(page_index) = (id(page_index) + 1) % 2;
            id(epaper_display).update();

  - platform: gpio     # Prev page KEY2
    pin:
      number: GPIO3
      mode: INPUT_PULLUP
      inverted: true
    id: key2
    name: "Key2"
    on_press:
      then:
        - lambda: |-
            id(page_index) = (id(page_index) - 1 + 2) % 2;
            id(epaper_display).update();

  # - platform: gpio
  #   pin:
  #     number: GPIO5       # KEY3
  #     mode: INPUT_PULLUP
  #     inverted: true
  #   id: key2
  #   name: "Key2"
  #   on_press:
  #     then:

# Home Assistant time
time:
  - platform: homeassistant
    id: ha_time

text_sensor:
  - platform: homeassistant
    entity_id: weather.home
    id: myWeather
  - platform: homeassistant
    entity_id: weather.home
    id: temp
    attribute: "temperature"

display:
  - platform: waveshare_epaper
    id: epaper_display
    model: 7.50inv2
    cs_pin: GPIO44
    dc_pin: GPIO10
    reset_pin: GPIO38
    busy_pin:
      number: GPIO4
      inverted: true
    update_interval: never
    lambda: |-
      // ----------  PAGE 0  ----------
      if (id(page_index) == 0) {
        // Screen dimension constants for easy adjustment
        const int scr_w = 800;
        const int scr_h = 480;
        const int center_x = scr_w / 2; // Center X-coordinate of the screen (400)

        // --- Top-right: Battery Info ---
        // Display the battery icon using an icon font
        it.printf(scr_w - 130, 13, id(font_bat_icon), "%s", id(battery_glyph).c_str());
        // Display the battery percentage text
        it.printf(scr_w - 100, 10, id(small_font), "%.0f%%", id(battery_level).state);

        // --- Draw the vertical separator line ---
        // Draw a vertical line in the middle to separate left and right areas
        it.filled_rectangle(center_x, 100, 2, 280);

        // ==================================================
        //                    LEFT AREA: WEATHER INFO
        // ==================================================
        // Calculate the center X-coordinate of the left area for alignment
        const int left_center_x = center_x / 2; // 200

        // 1. Display the title "Weather" at the top of the left area
        it.printf(left_center_x, 110, id(mid_font), TextAlign::TOP_CENTER, "Weather");

        // 2. Get the weather condition and select the corresponding icon
        std::string weather_condition = id(myWeather).state;
        std::string weather_icon = "\U000F0599"; // Default icon (sunny), as a fallback for unknown states

        if (weather_condition == "partlycloudy") {
          weather_icon = "\U000F0595"; // weather-partly-cloudy
        } else if (weather_condition == "cloudy") {
          weather_icon = "\U000F0F2F"; // weather-cloudy
        } else if (weather_condition == "rainy") {
          weather_icon = "\U000F0597"; // weather-rainy
        } else if (weather_condition == "snowy") {
          weather_icon = "\U000F0598"; // weather-snowy
        } else if (weather_condition == "windy") {
          weather_icon = "\U000F059B"; // weather-windy
        } else if (weather_condition == "fog") {
          weather_icon = "\U000F0594"; // weather-fog
        } else if (weather_condition == "lightning") {
          weather_icon = "\U000F0596"; // weather-lightning
        }
        // Display the weather icon in the center of the left area
        it.printf(left_center_x, 240, id(weather_icon_font), TextAlign::CENTER, "%s", weather_icon.c_str());

        // 3. Display the weather condition text below the icon
        it.printf(left_center_x, 400, id(mid_font), TextAlign::BOTTOM_CENTER, "%s", weather_condition.c_str());


        // ==================================================
        //                    RIGHT AREA: TEMPERATURE INFO
        // ==================================================
        // Calculate the center X-coordinate of the right area for alignment
        const int right_center_x = center_x + (center_x / 2); // 600

        // 1. Display the title "Temperature" at the top of the right area
        it.printf(right_center_x, 110, id(mid_font), TextAlign::TOP_CENTER, "Temperature");

        // 3. Display the temperature reading below the icon, with one decimal place
        float temp_c = stof(id(temp).state);
        double temp_f = temp_c * 9.0 / 5.0 + 32.0;
        it.printf(right_center_x, 250, id(mid_font), TextAlign::CENTER, "%.0f°F", temp_f);
        it.printf(right_center_x, 380, id(mid_font), TextAlign::CENTER, "%.1f°C", temp_c);
      }
      // ----------  PAGE 1  ----------
      else{
        // Battery top-right
        it.printf(670, 13, id(font_bat_icon), "%s", id(battery_glyph).c_str());
        it.printf(700, 10, id(small_font), "%.0f%%", id(battery_level).state);

        auto now = id(ha_time).now();
        struct tm timeinfo = now.to_c_tm();

        // centering time HH:MM
        char timeStr[6];
        strftime(timeStr, sizeof(timeStr), "%H:%M", &timeinfo);
        it.printf(400, 180, id(time_font), TextAlign::CENTER, timeStr);

        // Date: Day of week
        const char *weekday[] = {"Sun","Mon","Tue","Wed","Thu","Fri","Sat"};
        const char *wday = weekday[timeinfo.tm_wday];

        // Date: month - day
        char dateStr[12];
        strftime(dateStr, sizeof(dateStr), "%b %d", &timeinfo);  // e.g. Jun 15

        // Day of the week + date below the time
        it.printf(400, 280, id(mid_font), TextAlign::CENTER, "%s, %s", wday, dateStr);
      }
When you see the feedback like the following image, it means the code is running successfully.

FAQ
Q1: Why is there no data?
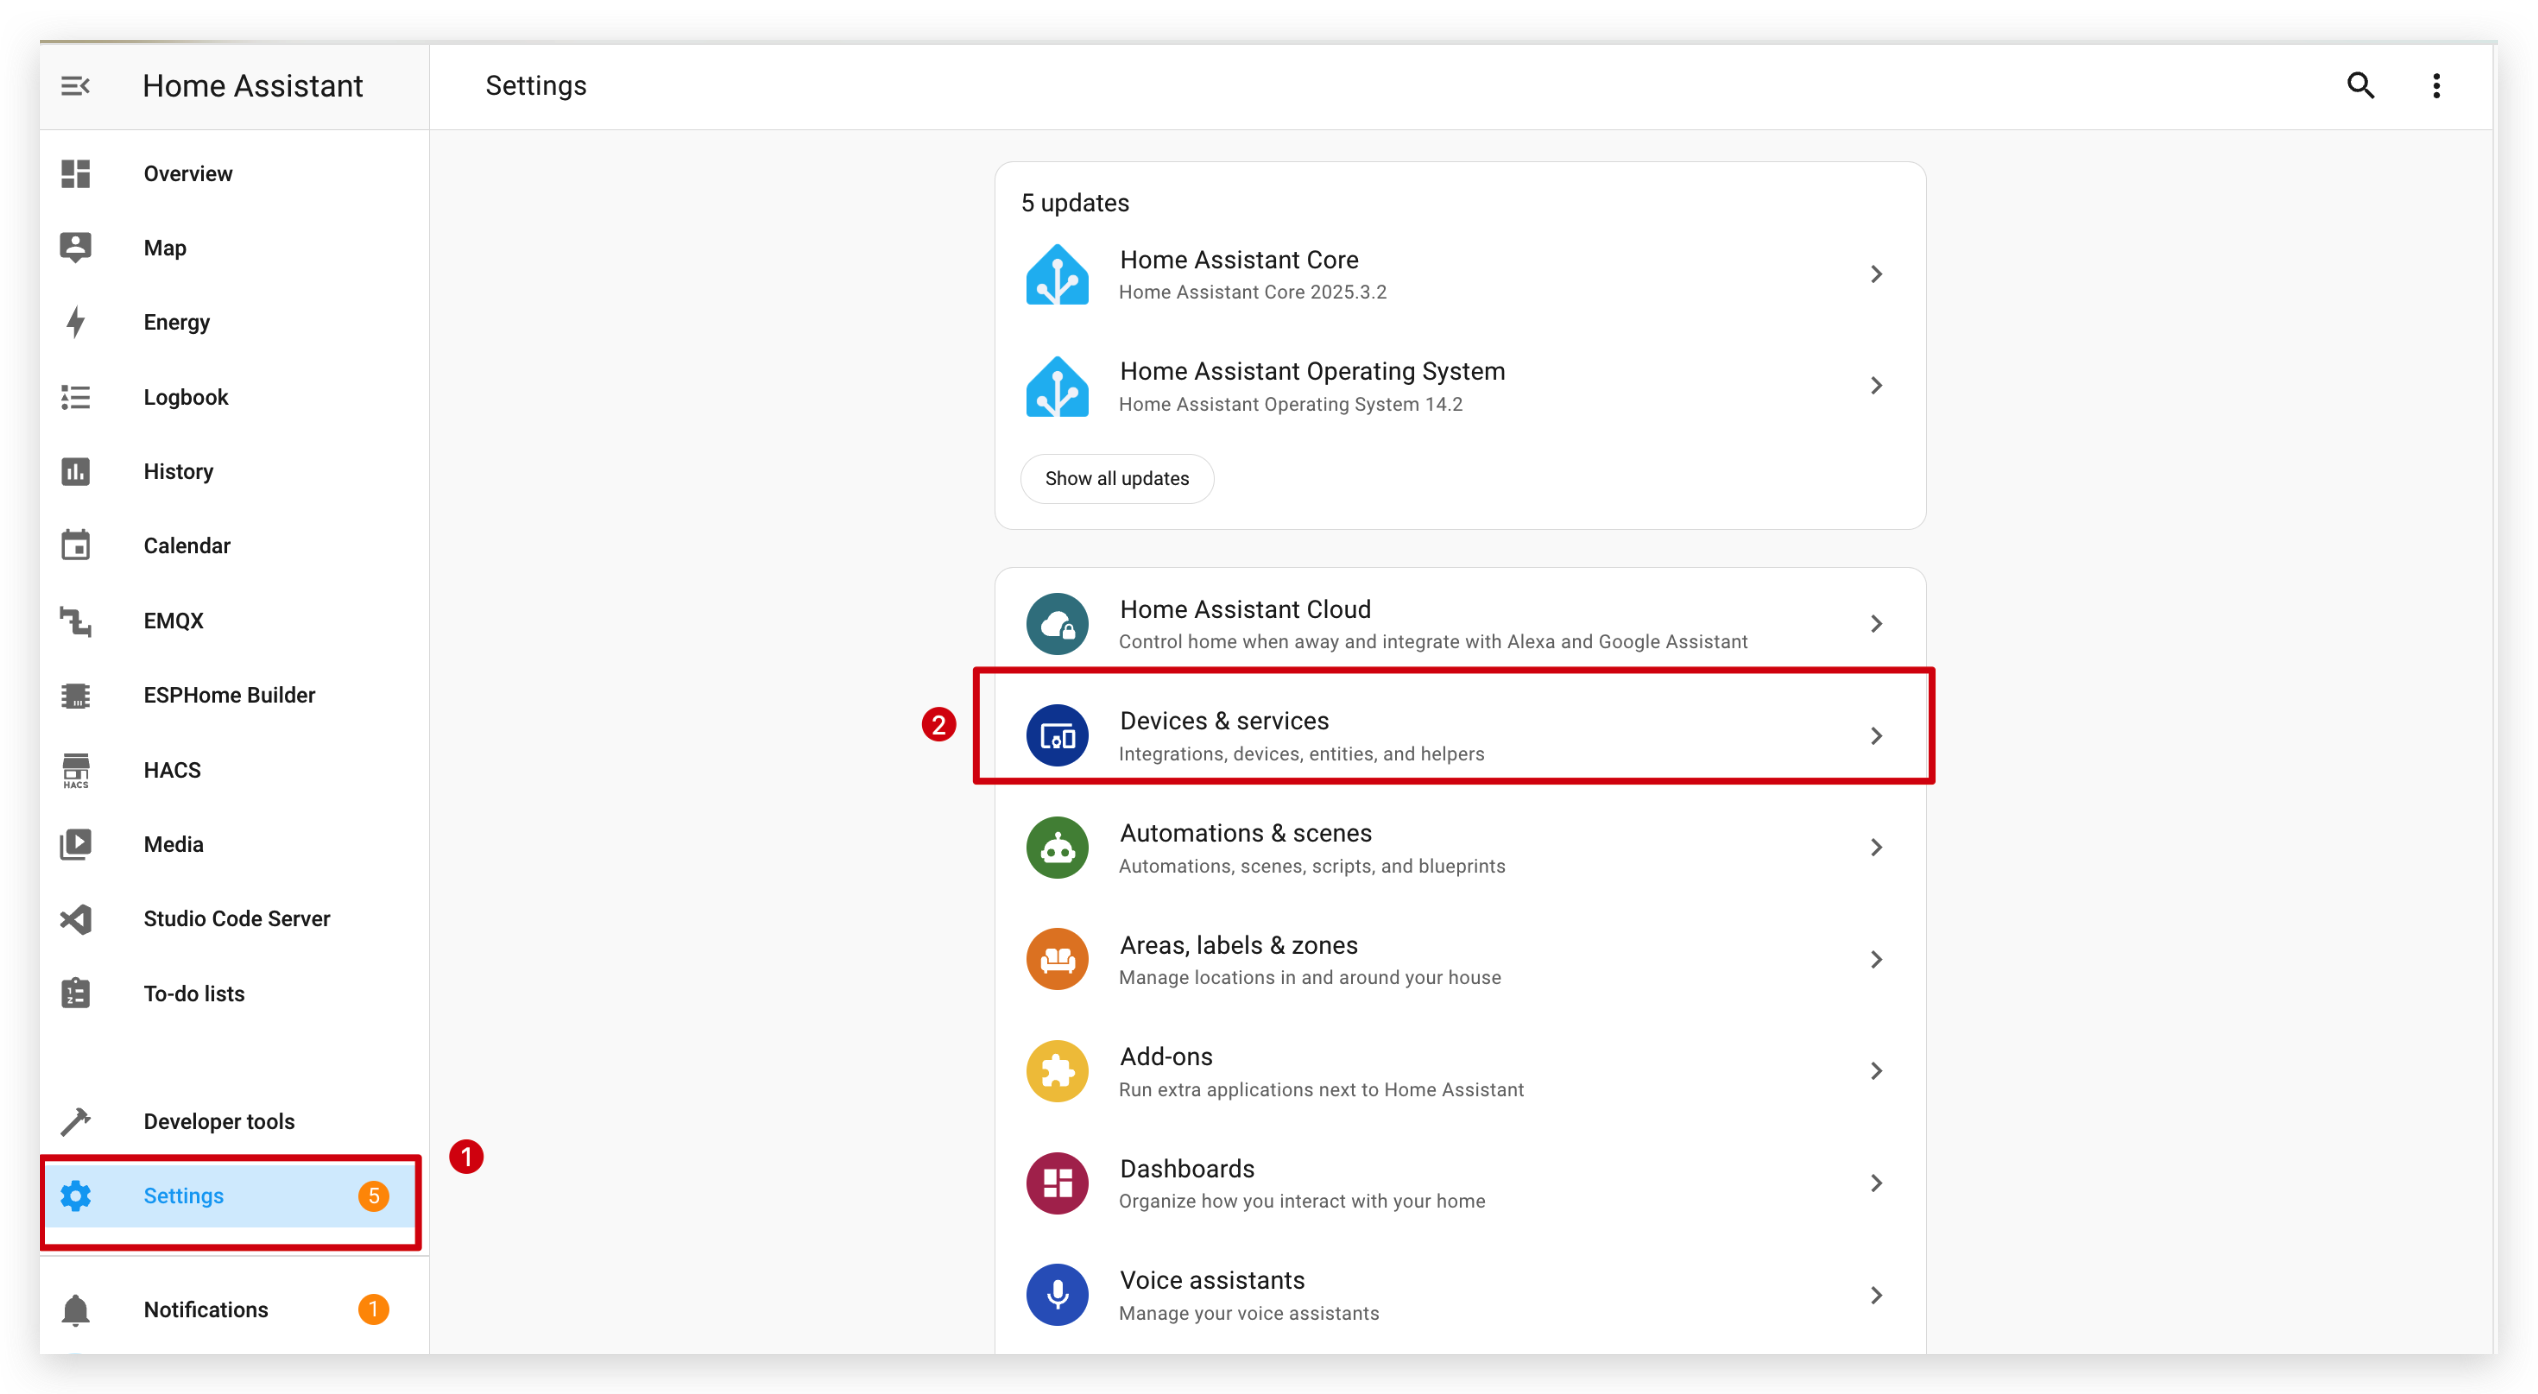
In this case, you should go to Settings -> Devices & Services -> Integrations to RECONGFIGURE device. Haven't found your ePaper Penal? Try to reboot HA.
Q2: Why can't I get those data in Home Assistant?
In this case, you should go to Settings -> Devices & Services -> Integrations to ADD your device to HA.
Q3: How can I upload a new program when device in deep sleep mode?


When the device is in deep sleep mode, you can't upload a new program directly.
-
First, make sure the device is turned on. Then, press and hold the Boot button located next to the USB-C port on the XIAO ESP32-S3 Plus.
-
While holding the Boot button, press the Reset button once, then release the Boot button.
-
After that, turn off the battery switch and unplug the power cable.
-
Finally, replug the cable and upload a new program.
Q4: TRMNL 7.5inch(OG) DIY Kit can't connect to you computer?

Try unplugging and replugging it several times, or just install the driver according to the prompts.
Q5: Wi-Fi upload program failed?

In this case, you epaper penal is offline or in deep sleep mode. Please get it online or wake it up.
Tech Support & Product Discussion
Thank you for choosing our products! We are here to provide you with different support to ensure that your experience with our products is as smooth as possible. We offer several communication channels to cater to different preferences and needs.