Deploying OpenRemote on reComputer R1x Manage IoT Devices at the Edge
Introduction
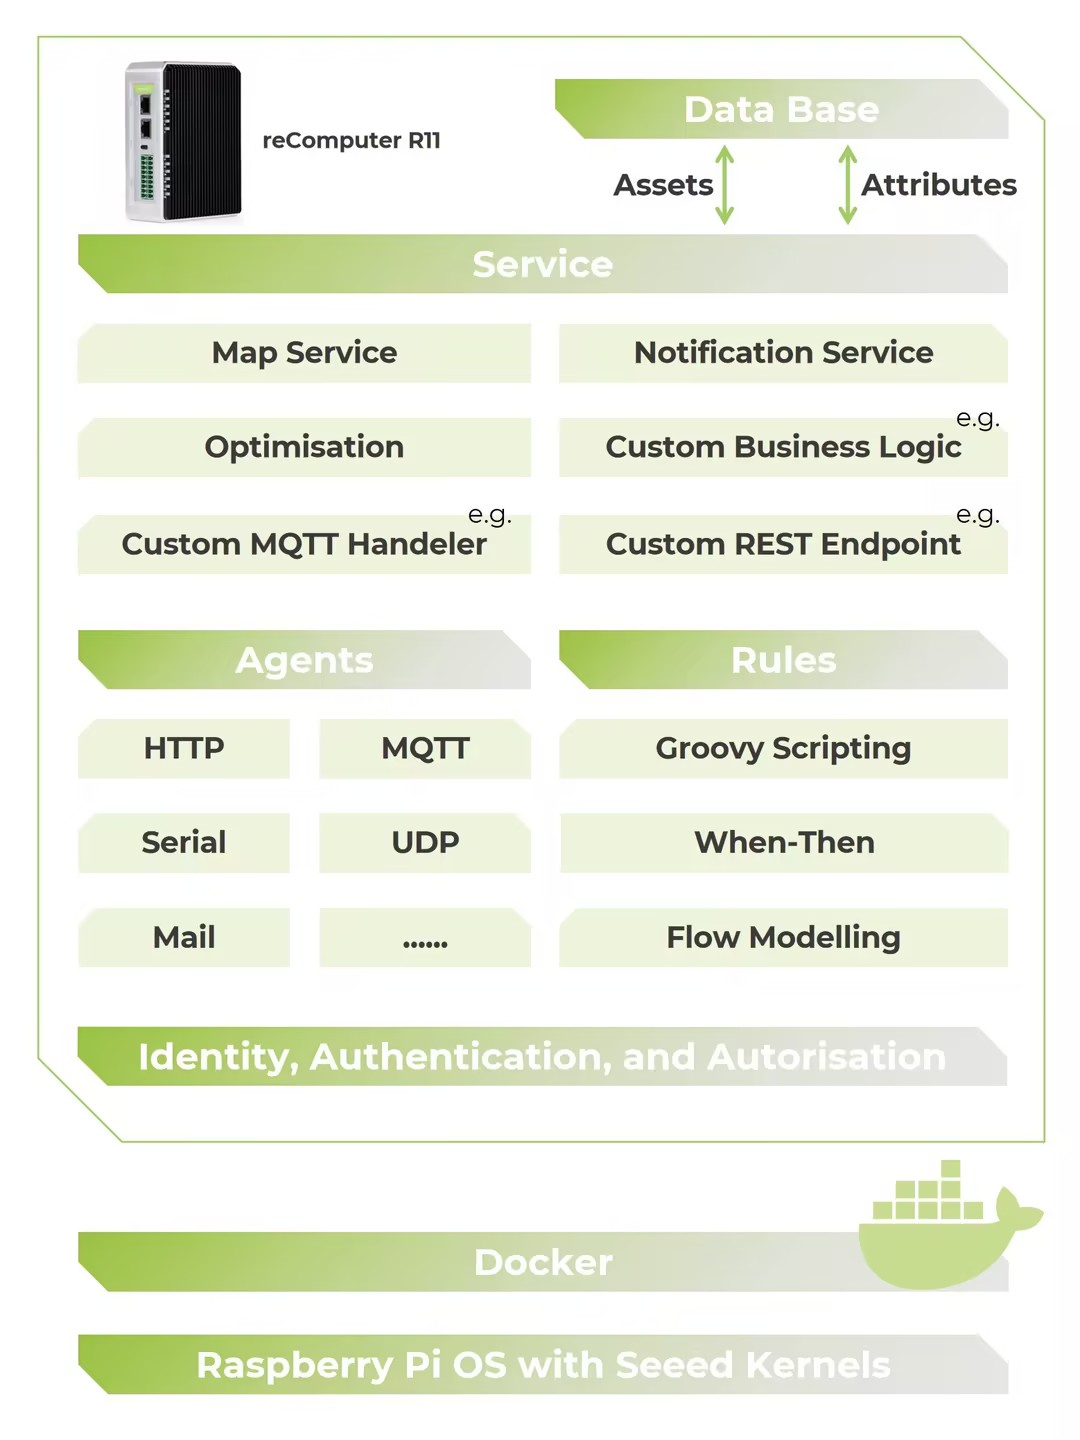
OpenRemote is an open-source IoT platform designed to simplify the connection and management of networked devices. At the heart of the system is the Manager, a headless Java application that acts as an IoT context broker, capturing and managing the asset states in real-time. Through dynamic asset modeling, you can represent various components of your environment—such as buildings, rooms, and sensors—tailoring it to your specific needs. Rules written in Groovy, JavaScript, or JSON trigger actions based on asset state changes or event sequences. These rules can, for example, notify users when certain thresholds are met, like when humidity rises in a room. The platform supports networked devices via Agents, which interface with third-party APIs and service protocols, and can be co-located with the manager or installed on edge gateways. By deploying OpenRemote on Raspberry Pi-powered Recomputer R1000 and R1100 devices, you can manage your IoT ecosystem at the edge, providing efficient, localized control over your devices.

Installing Docker and Docker-Compose
Follow these steps to install Docker and Docker-Compose on your Ubuntu system:
1. Update System Packages
First, update the package list and upgrade the installed packages to ensure your system is up-to-date.
sudo apt update
sudo apt upgrade
2. Install Docker
Next, download and install Docker using the official installation script. This will automatically install Docker and all its dependencies.
curl -fsSL https://get.docker.com -o get-docker.sh
sudo sh get-docker.sh
3. Add Your User to the Docker Group
By default, Docker requires root privileges. To run Docker commands without sudo, add your user to the Docker group:
sudo usermod -aG docker ${USER}
After running this command, log out and log back in, or reboot your system for the changes to take effect.
4. Reboot System
Reboot your system to ensure that the changes take effect and your user is added to the Docker group.
sudo reboot
5. Test Docker Installation
After rebooting, verify Docker installation by running the hello-world image, which will confirm that Docker is working correctly.
docker run hello-world
6. Install Docker-Compose
Finally, install Docker-Compose, which is a tool for defining and running multi-container Docker applications. To install it, run:
sudo apt install docker-compose
Installing OpenRemote on Recomputer R1000 / R1100
1. Download the Docker Compose File
Fetch the official docker-compose.yml file directly from the OpenRemote repository:
wget https://raw.githubusercontent.com/openremote/openremote/master/docker-compose.yml
2. Navigate to the Directory
Change into the directory where the YAML file is located:
cd /path/to/yaml
3. Pull Docker Images
Download the required Docker images:
docker-compose pull
4. Start OpenRemote
Run OpenRemote using Docker Compose:
docker-compose -p openremote up
This will launch the OpenRemote Manager and supporting services.
5. Access OpenRemote
Once started, you can log in to the OpenRemote Manager with the default credentials:
- Username:
admin - Password:
secret
You now have OpenRemote running on your Recomputer R1000 / R1100 as an edge IoT platform to manage and control your connected devices.
Working with HTTP Protocol
Follow these steps to integrate OpenWeatherMap API with OpenRemote on your Recomputer R1000 / R1100. This guide covers how to create an Agent for the weather data, link it to an asset, and set up the configuration.
Obtain OpenWeatherMap API Key
To use the OpenWeatherMap API, you need a free API key. Register for a free account at OpenWeatherMap and obtain your API key.
Create the Agent
Create the HTTP API Agent
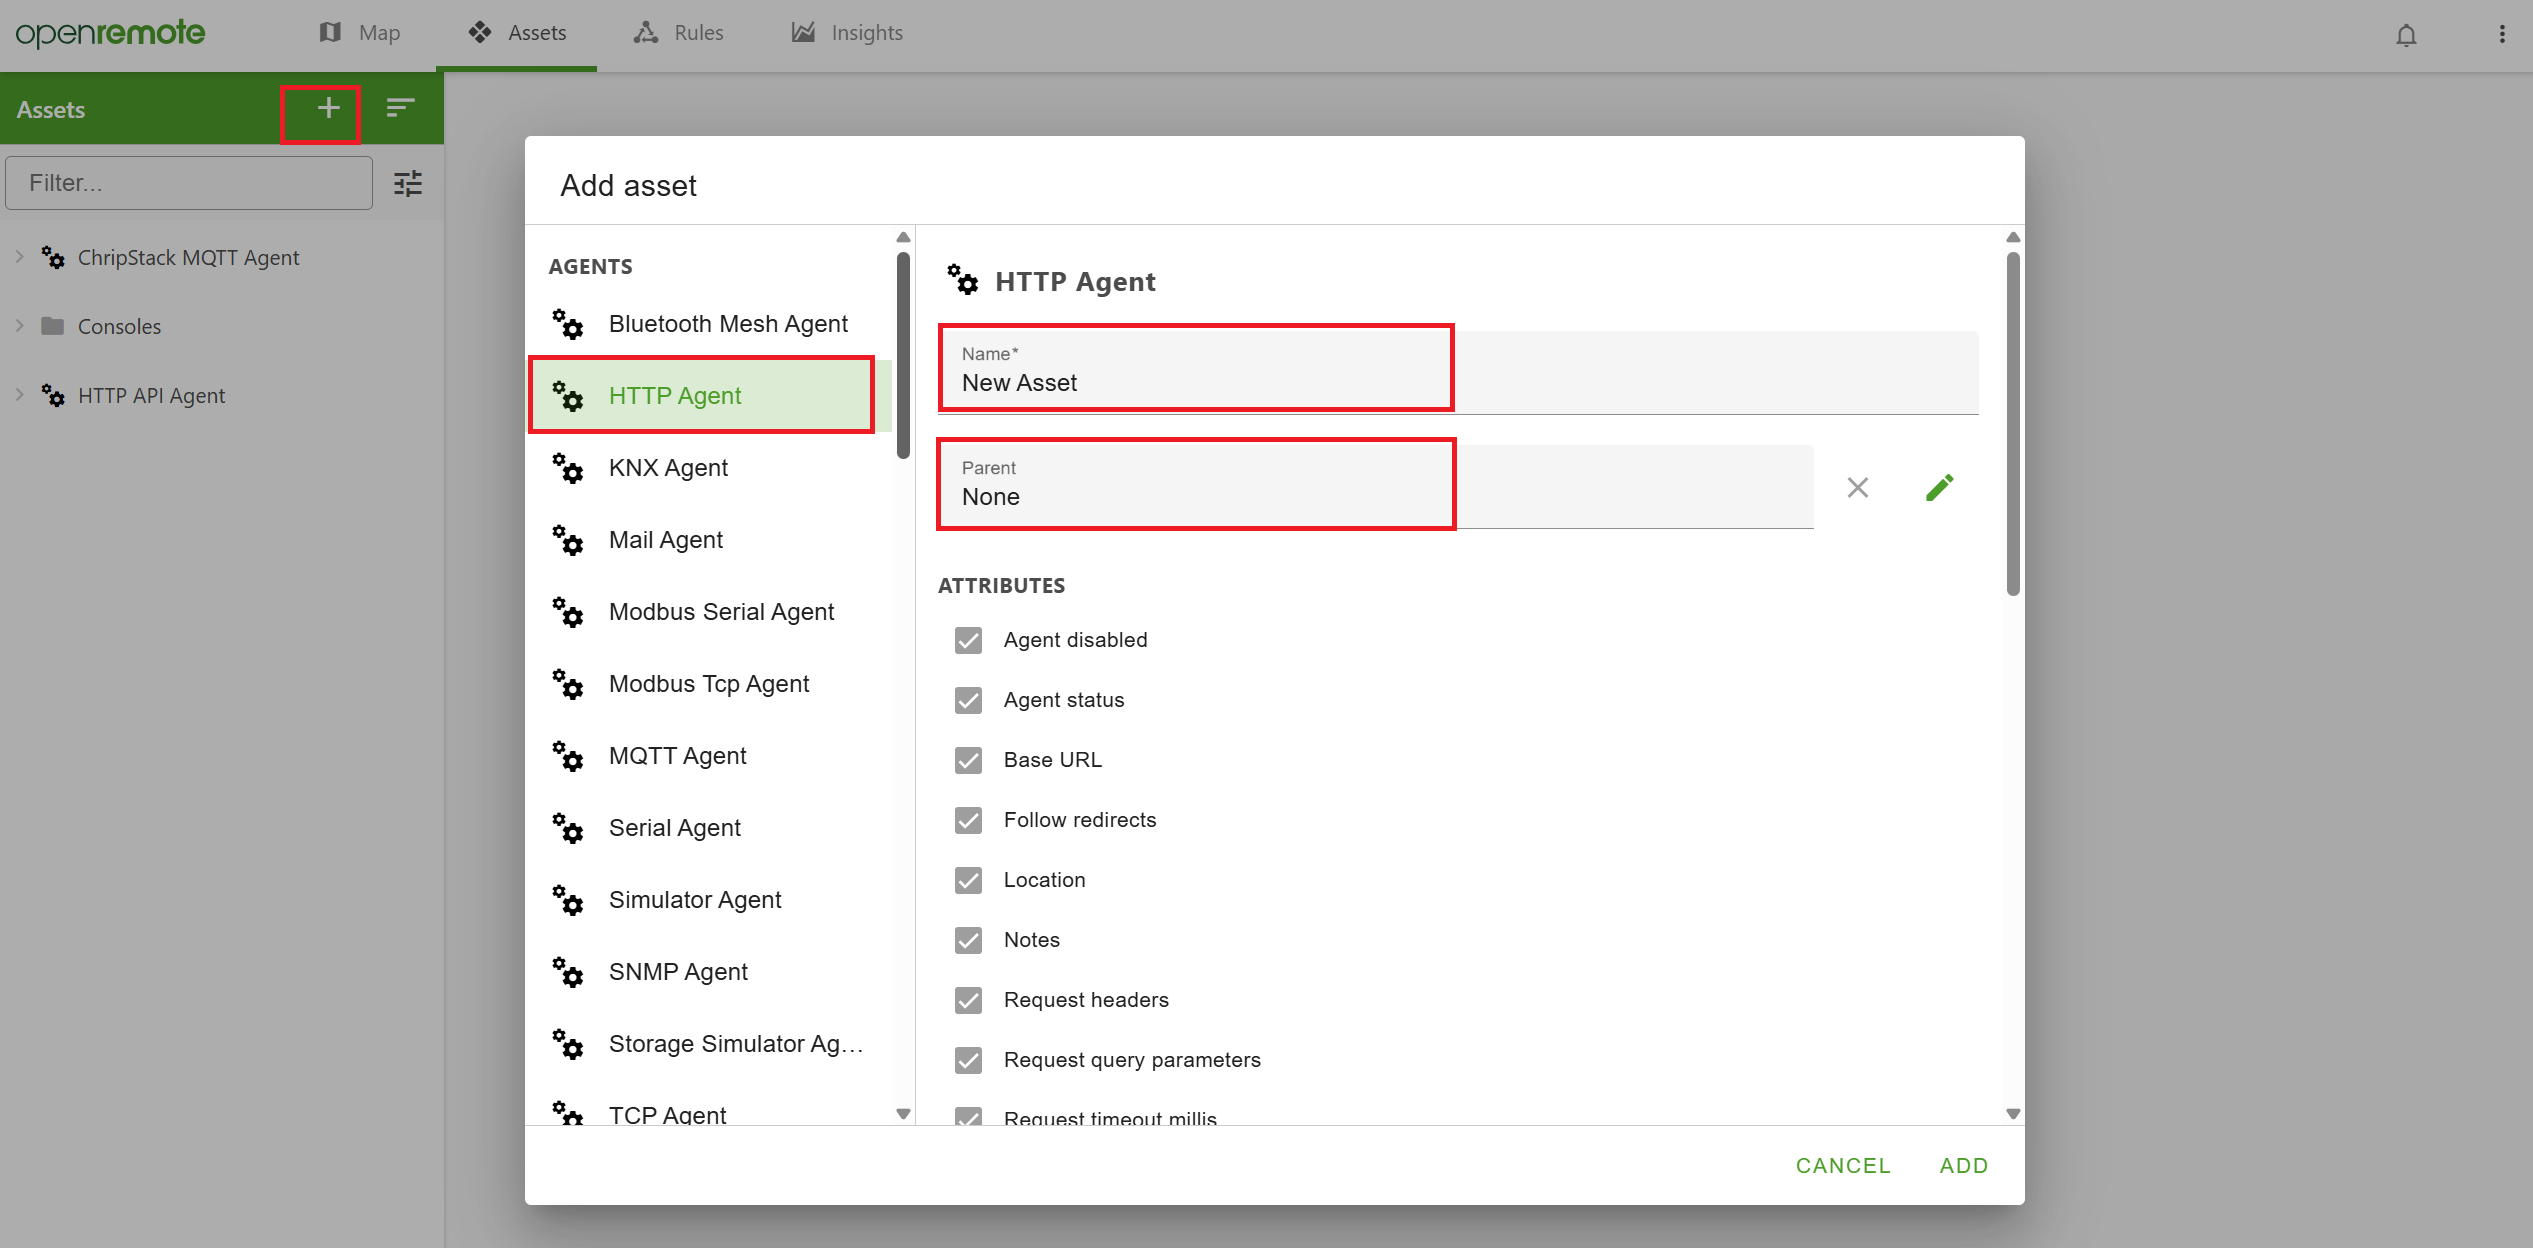
- Navigate to the Assets page.
- Click the + icon at the top of the asset list on the left to add a new Agent or Asset.
- In the dialog that appears, select HTTP Agent from the list.
- Name:
HTTP API Agent - Click Add.
The agent is now created with pre-configured attributes. You will need to configure it to connect to the OpenWeatherMap API.
Configure the HTTP API Agent
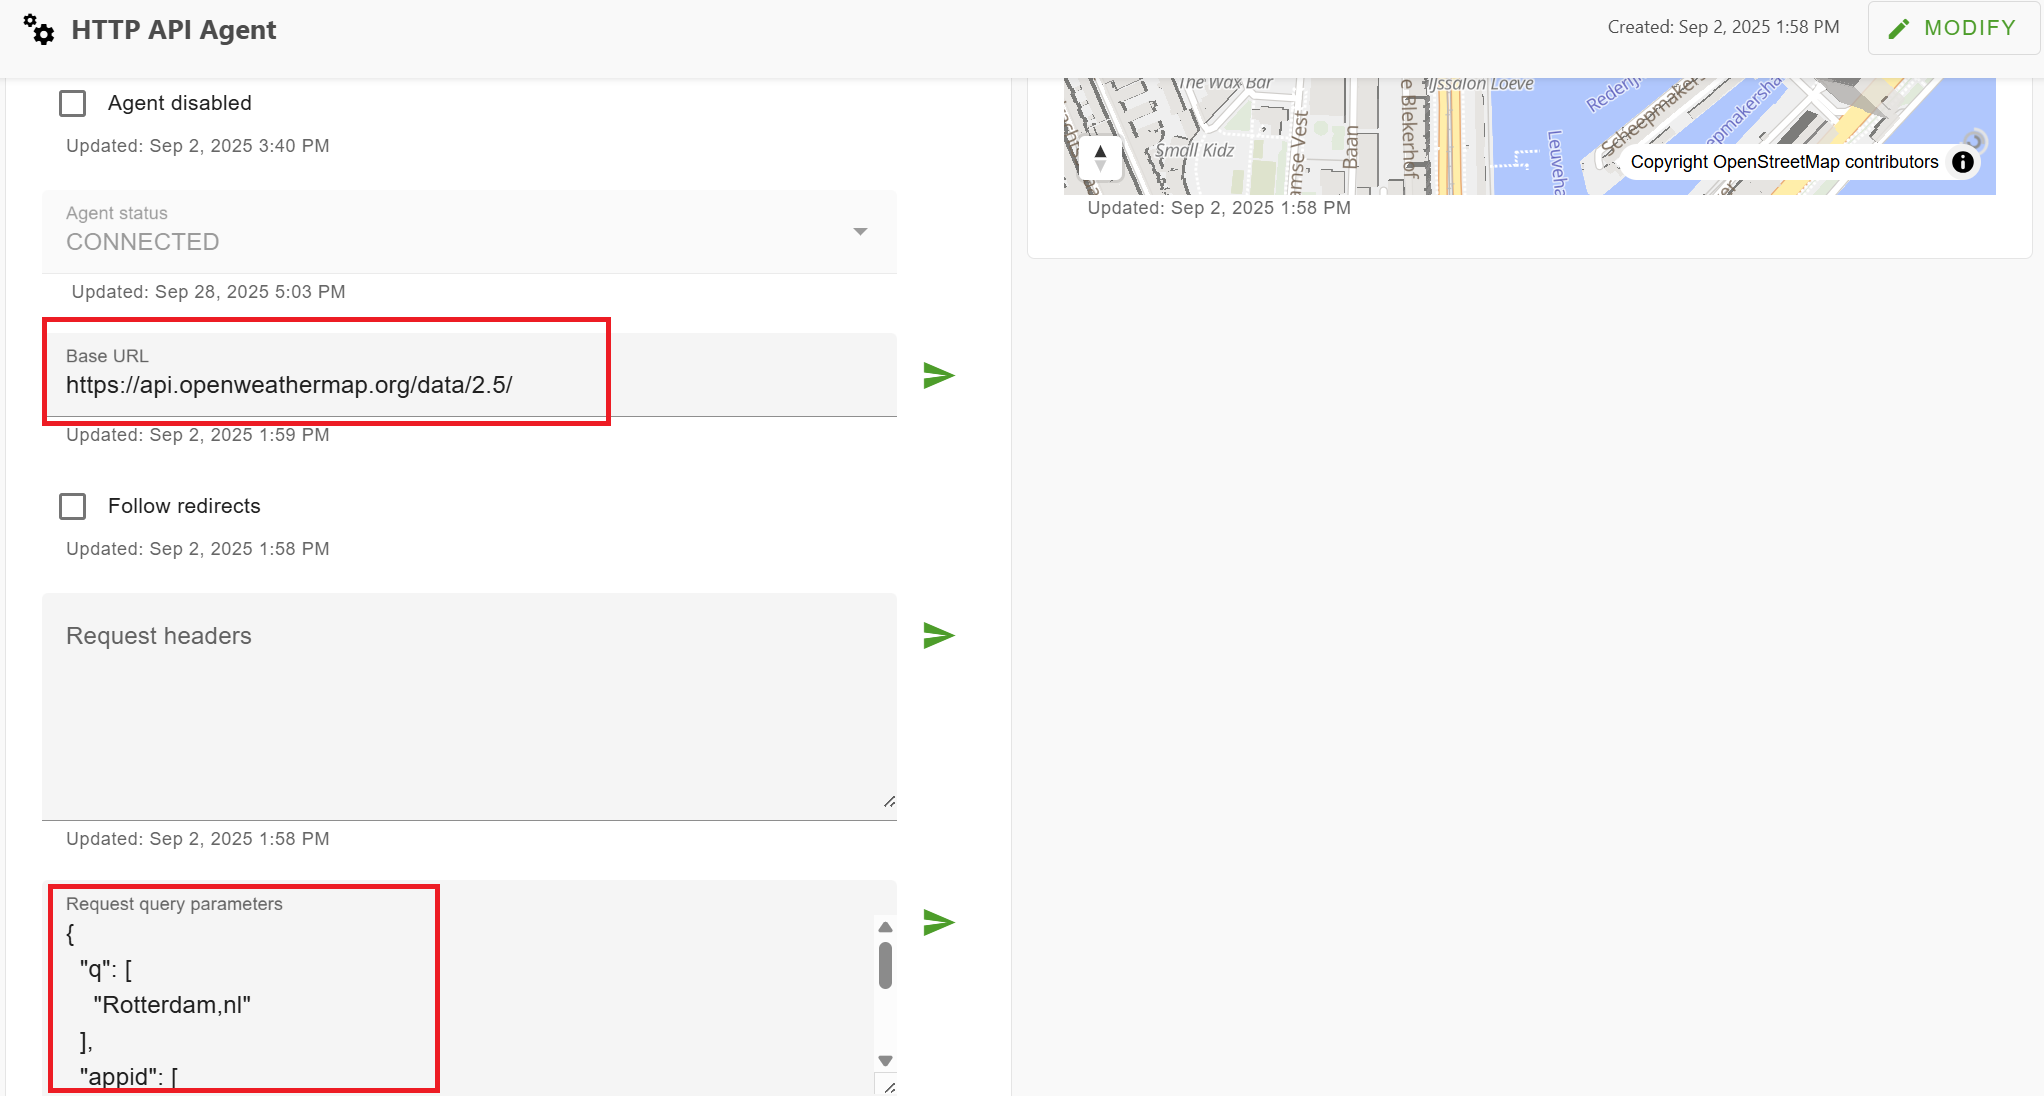
Now that the HTTP API Agent is created, configure it with the following details:
-
Base URI:
https://api.openweathermap.org/data/2.5/
(Don't forget to send the value by clicking the send button on the right or pressing Enter.) -
Request Query Parameters:
Input the API key from your OpenWeatherMap account and set the parameters as follows:
{
   "appid": ["YOUR_API_KEY"],
   "q": ["Rotterdam,nl"],
   "units": ["metric"]
}
Click Save to confirm the configuration.
Create the Weather Asset
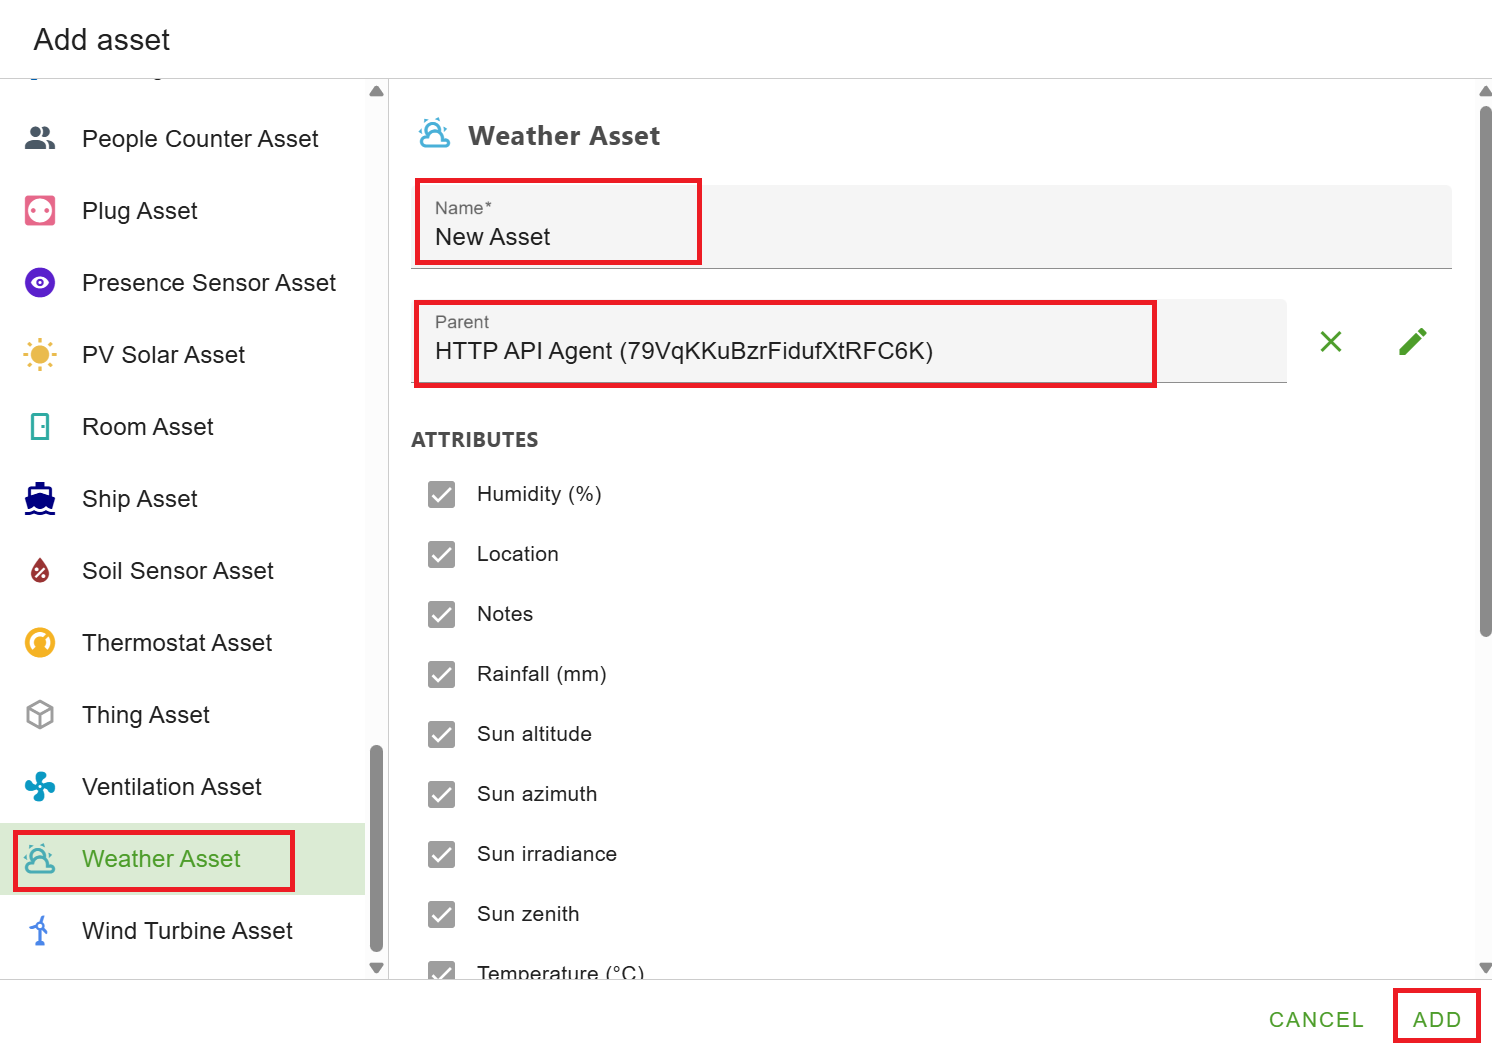
Add a New Weather Asset
- Click the + icon to add an asset.
- Select Weather Asset from the list.
- Name:
Weather Rotterdam - Click Add.
The weather asset will now appear in the list as a child of the HTTP API Agent. You can change its parent if desired.
Add the Agent Links
Modify Asset Configuration Go to Modify Mode by clicking the toggle at the top of the asset page. In this mode, you can alter the attributes of an asset and configure its settings.
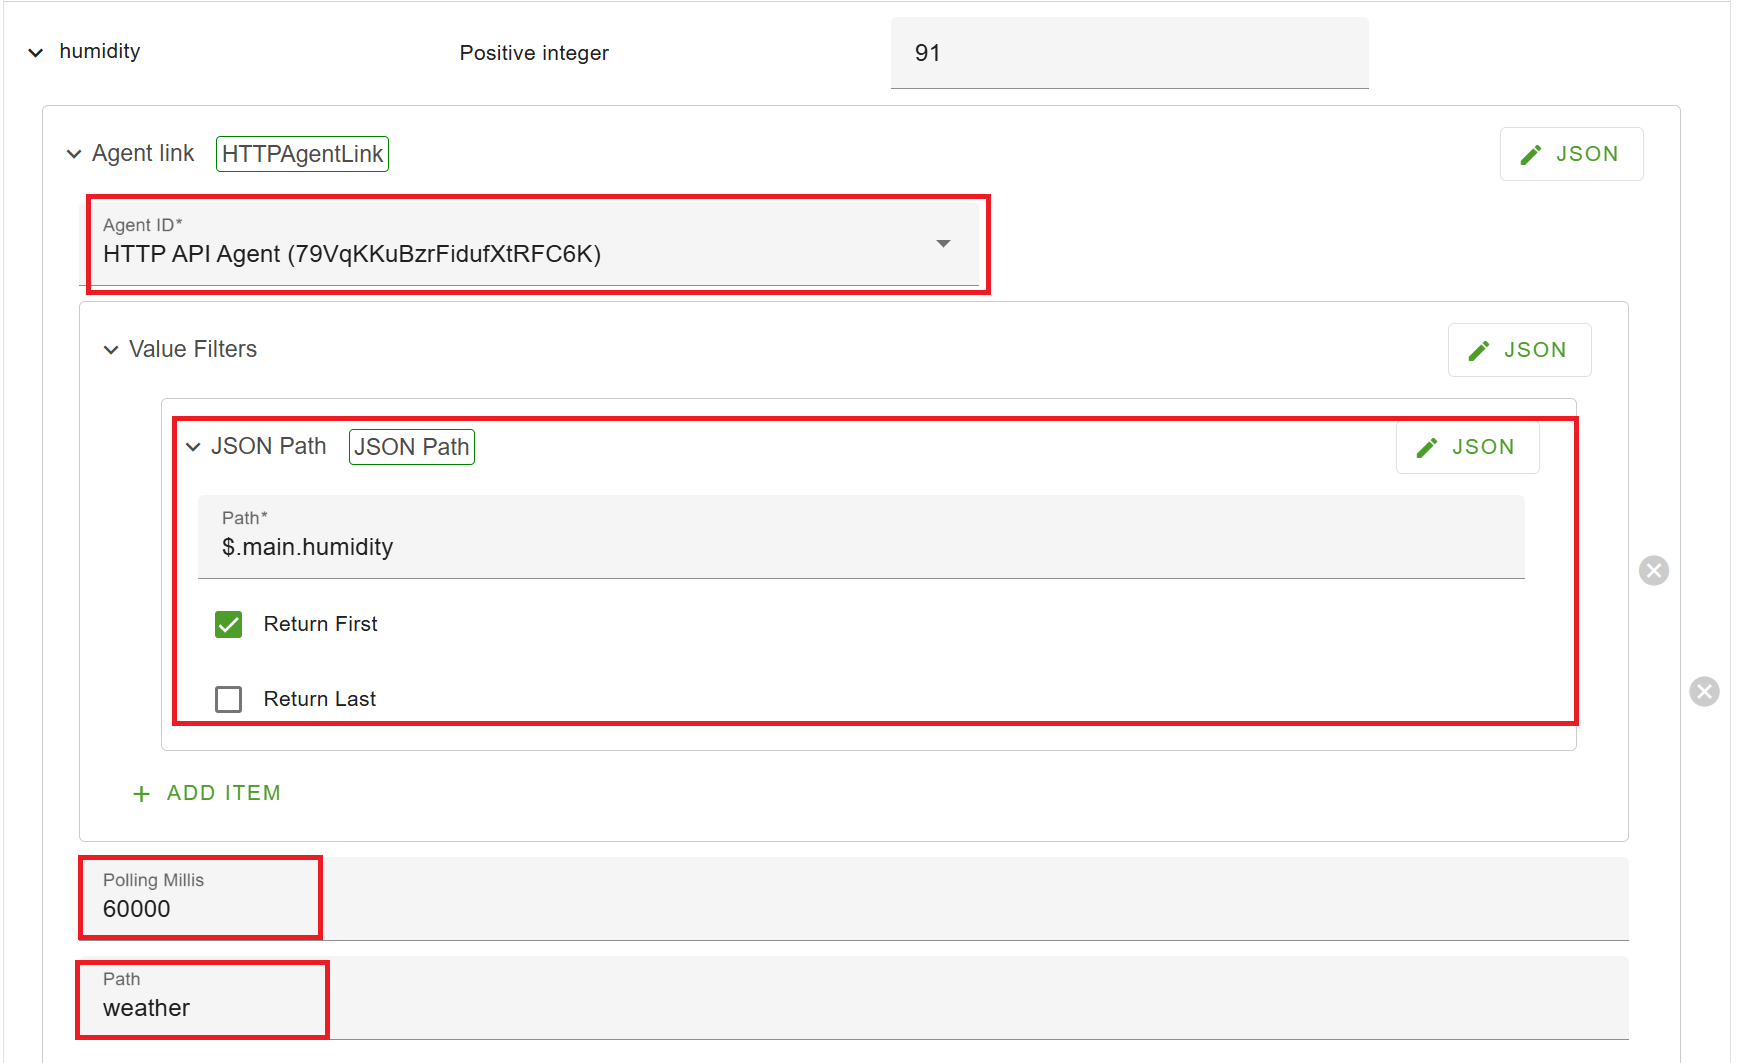
Setup the Humidity Attribute
-
Expand the humidity attribute.
-
Click Add configuration item and select Agent link.
-
Select the HTTP API Agent.
-
Add the following parameters:
- Polling millis:
60000(poll every minute) - Path:
weather - Value filters:
JsonPathFilter-2 - Path (JSON):
$.main.humidity
- Polling millis:
Setup the Temperature Attribute
-
Expand the temperature attribute.
-
Click Add configuration item and select Agent link.
-
Select the HTTP API Agent.
-
Add the following parameters:
- Polling millis:
60000(poll every minute) - Path:
weather - Value filters:
JsonPathFilter-2 - Path (JSON):
$.main.temp
- Polling millis:
Click Save at the top right to apply these changes.
View Live Weather Data
Once you’ve added the attributes, switch to View Mode to see the live weather data. You now have the current temperature and humidity for Rotterdam linked to the weather asset.

MQTT Agent with ChirpStack LoRaWAN Gateway Integration
This tutorial will guide you through the process of integrating an MQTT Agent with ChirpStack and configuring it on your OpenRemote manager for use with devices like the Dragino LHT65 and SenseCap S210x sensors. Before proceeding, ensure you have installed ChirpStack on your ReComputer R1X device and paired a device (e.g., SenseCap S210X). For ChirpStack installation details, refer to the official ChirpStack LoRa Gateway on ReComputer R1X guide.
Prerequisites
- OpenRemote Manager UI running.
- ChirpStack LoRaWAN Gateway installed on your ReComputer R1X device.
- A LoRaWAN device SenseCap S210X.
Create the OpenRemote MQTT Agent
-
Log in to the OpenRemote Manager UI:
Open your browser and go to OpenRemote Manager UI -
Navigate to the Assets Page:
On the left side of the page, click on the Assets tab. -
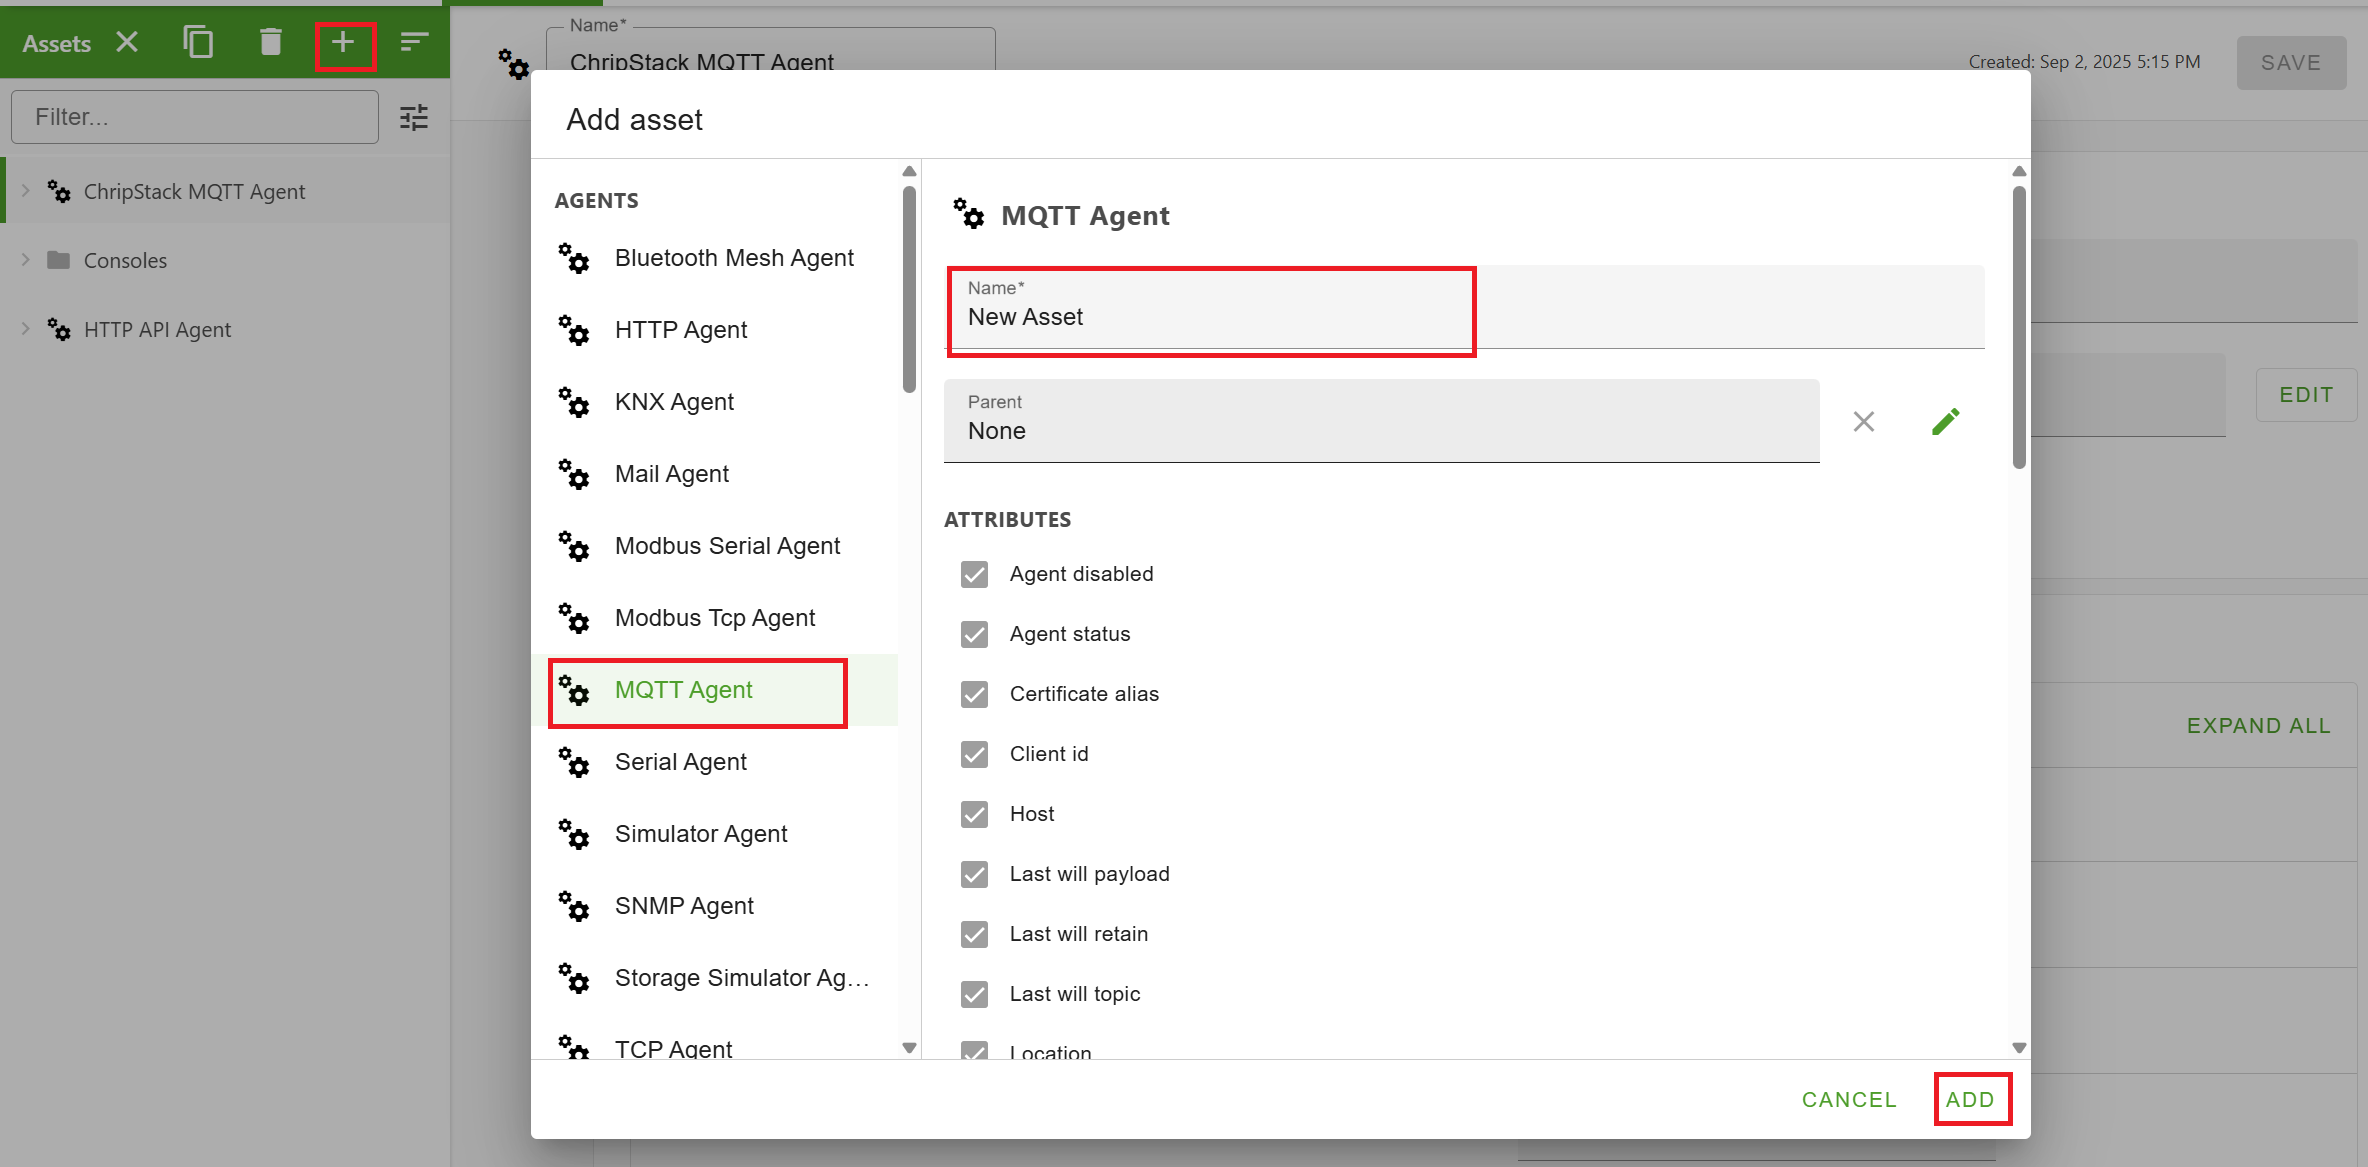
Create a new MQTT Agent:
- Click the + button in the asset tree on the left.
- In the Add asset dialog, select MQTT Agent from the list of asset types.
- Name the asset ChirpStack MQTT Agent.
- Click ADD to create the asset.
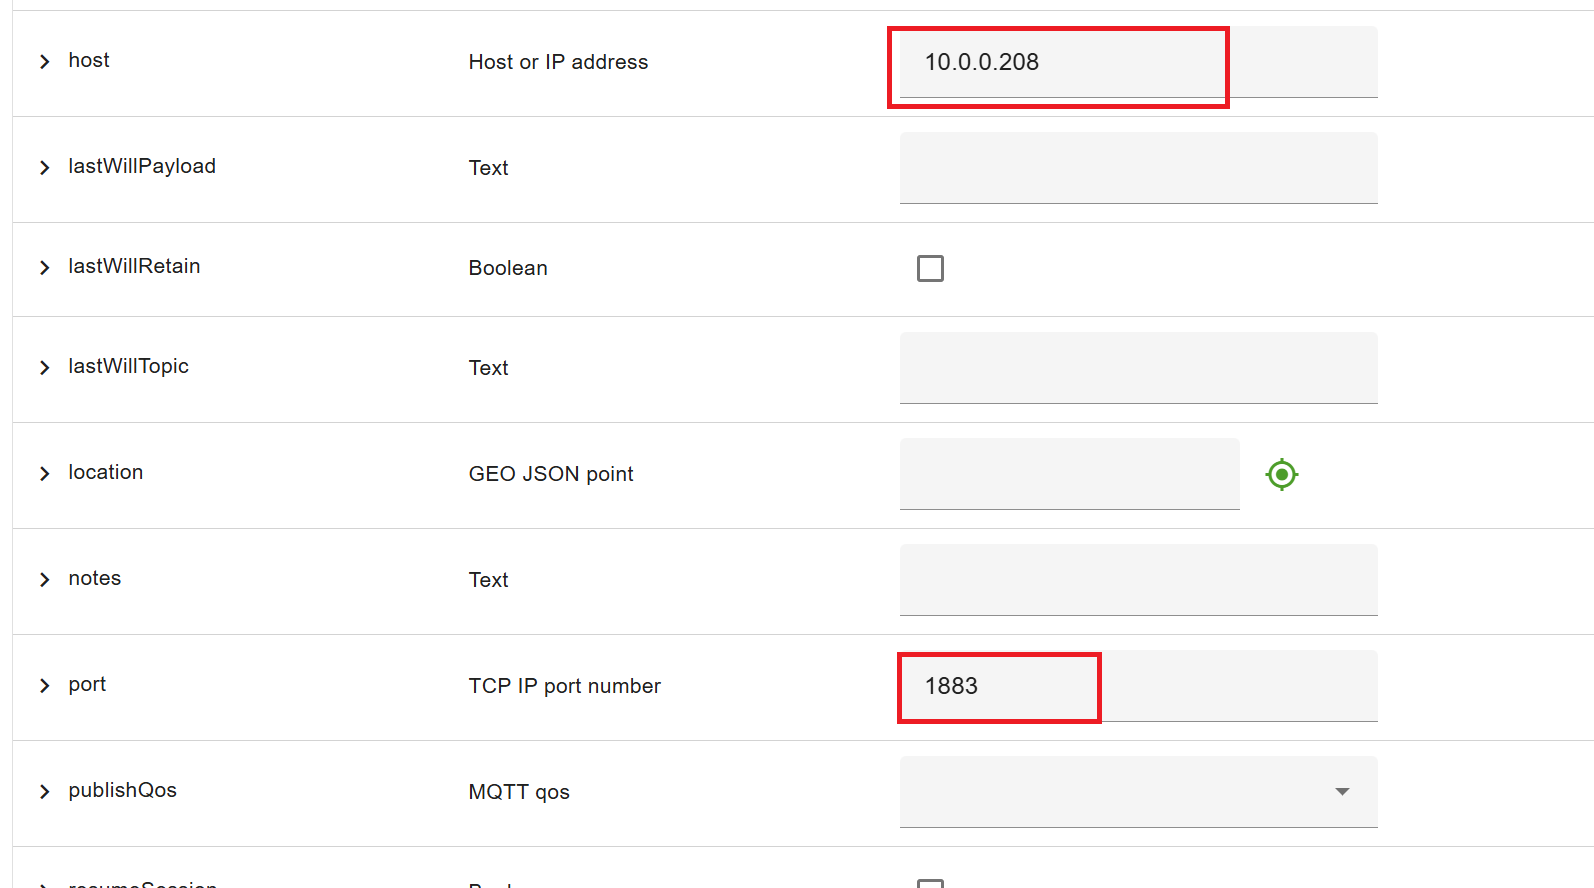
- Configure the MQTT Agent:
- Click Modify to edit the asset configuration.
- Set the following attributes:
- Host: The IP address of your ChirpStack server (e.g.,
10.0.0.208). - Port:
1883(default MQTT port).
- Host: The IP address of your ChirpStack server (e.g.,
- Click SAVE to save your changes.
Create the OpenRemote LoRaWAN Device Asset
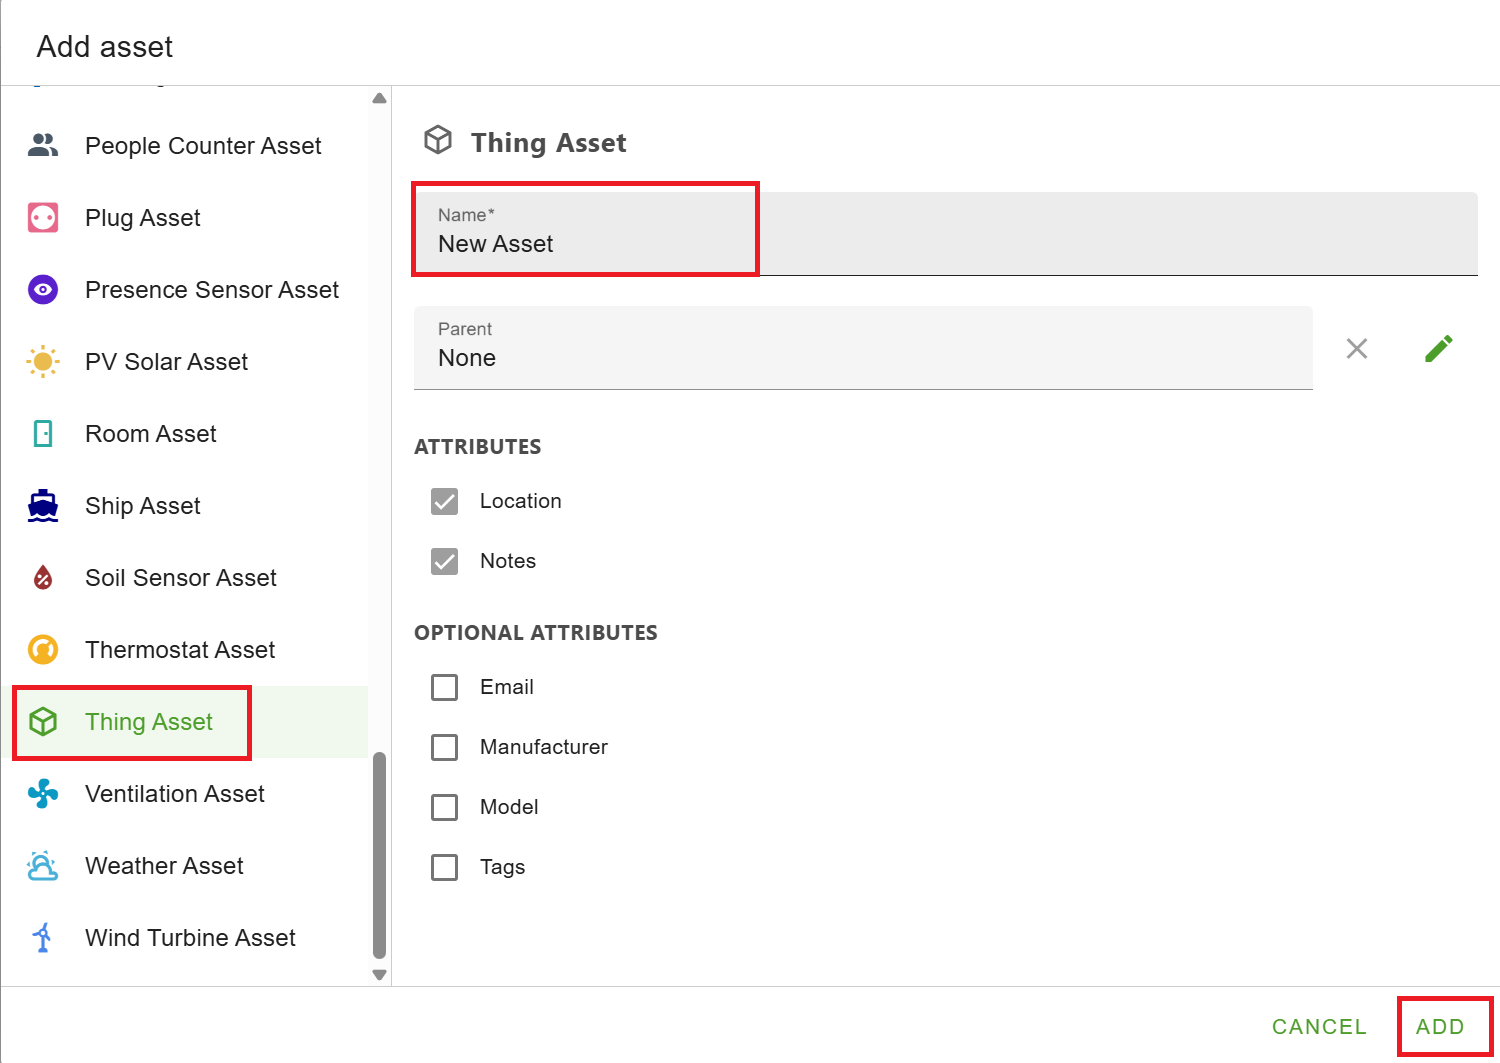
- Add a new LoRaWAN Device:
- In the Assets page, click + in the asset tree on the left.
- In the Add asset dialog, select Thing Asset.
- Name the asset S2101 (or your specific device name).
- Click ADD to create the asset.
-
Modify the Device Asset:
- Click Modify to edit the asset configuration.
-
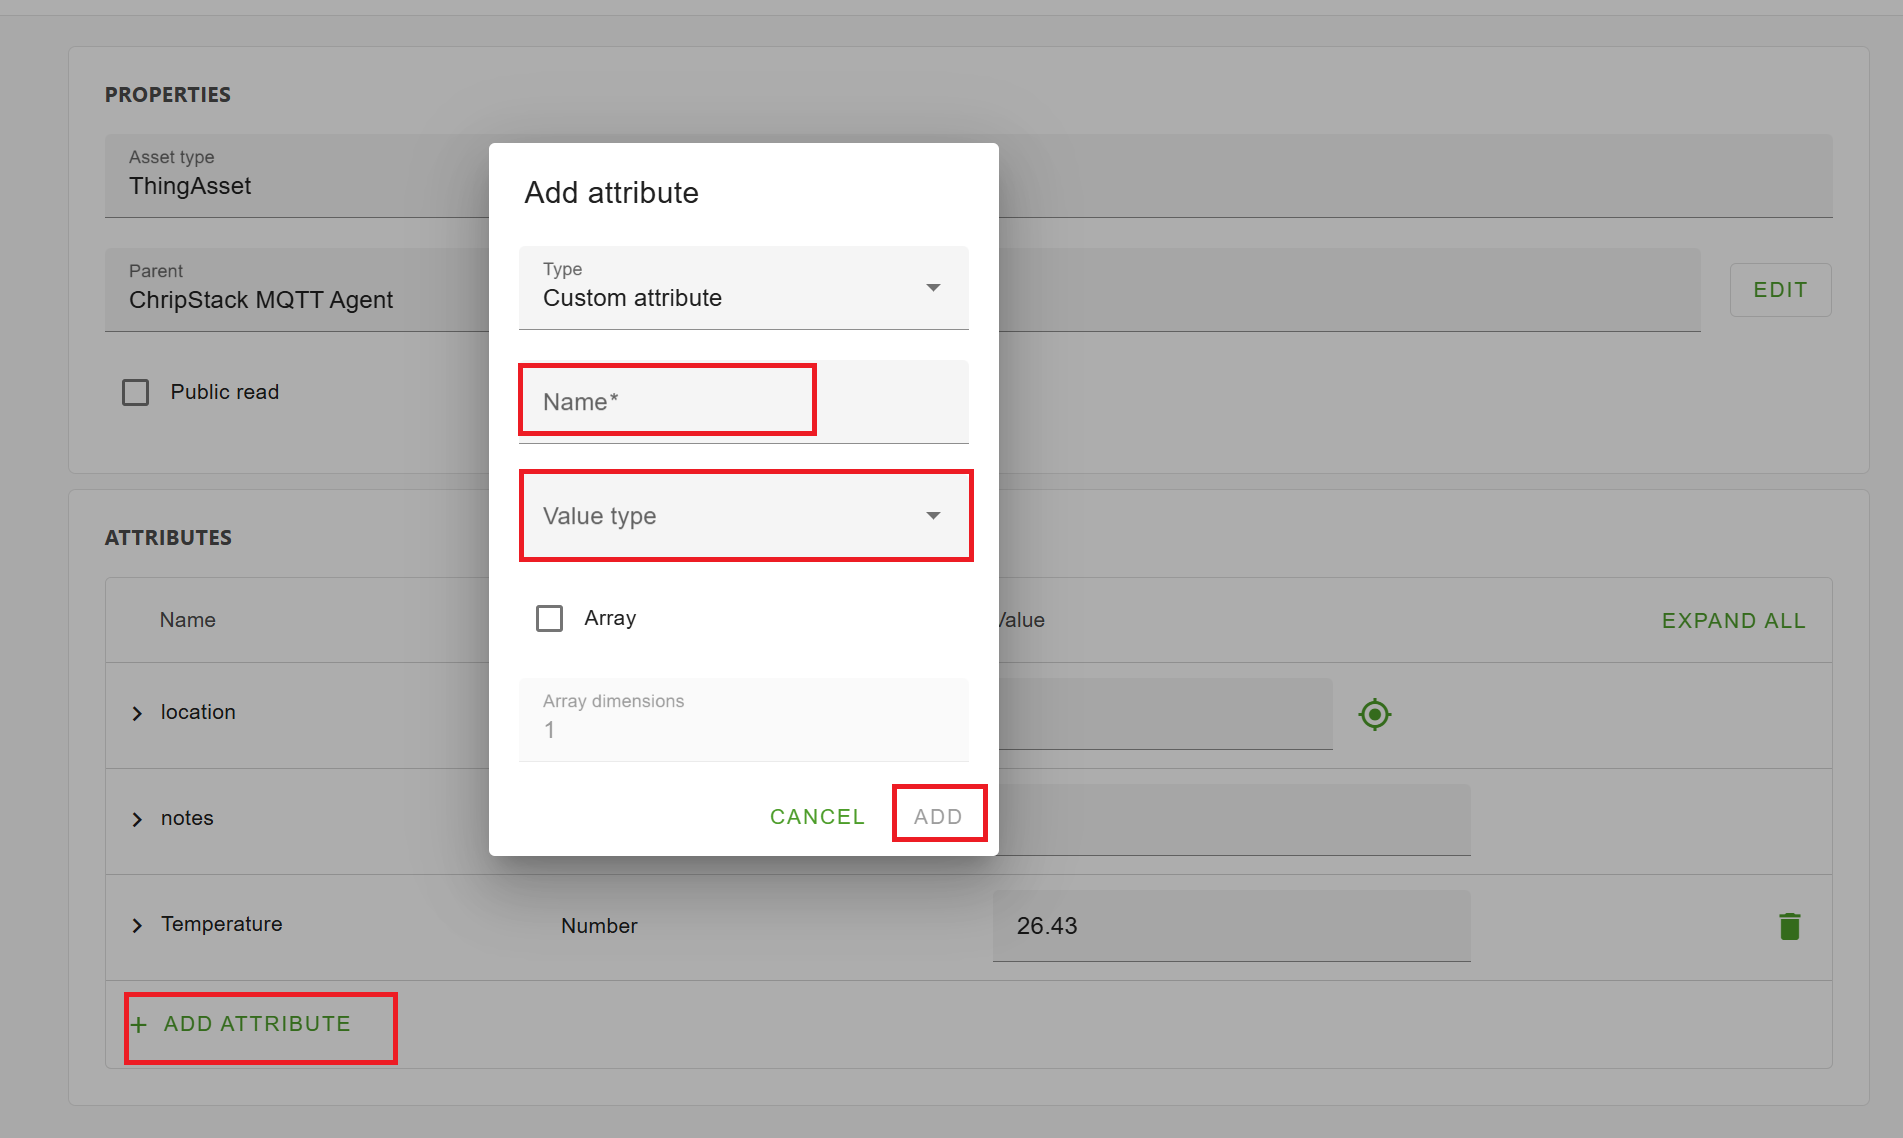
Add a Custom Attribute for Temperature:
- Click ADD ATTRIBUTE to add a new attribute.
- In the Add attribute dialog, configure the following:
- Type: Custom attribute
- Name: Temperature
- Value type: Number
- Click ADD to save the attribute.
- Add Configuration Items for MQTT Agent:
- Expand the Temperature attribute and click ADD CONFIGURATION ITEMS.
- In the Add configuration items dialog, configure as follows:
- Select: Agent link
- Click ADD to create the link to the MQTT Agent.
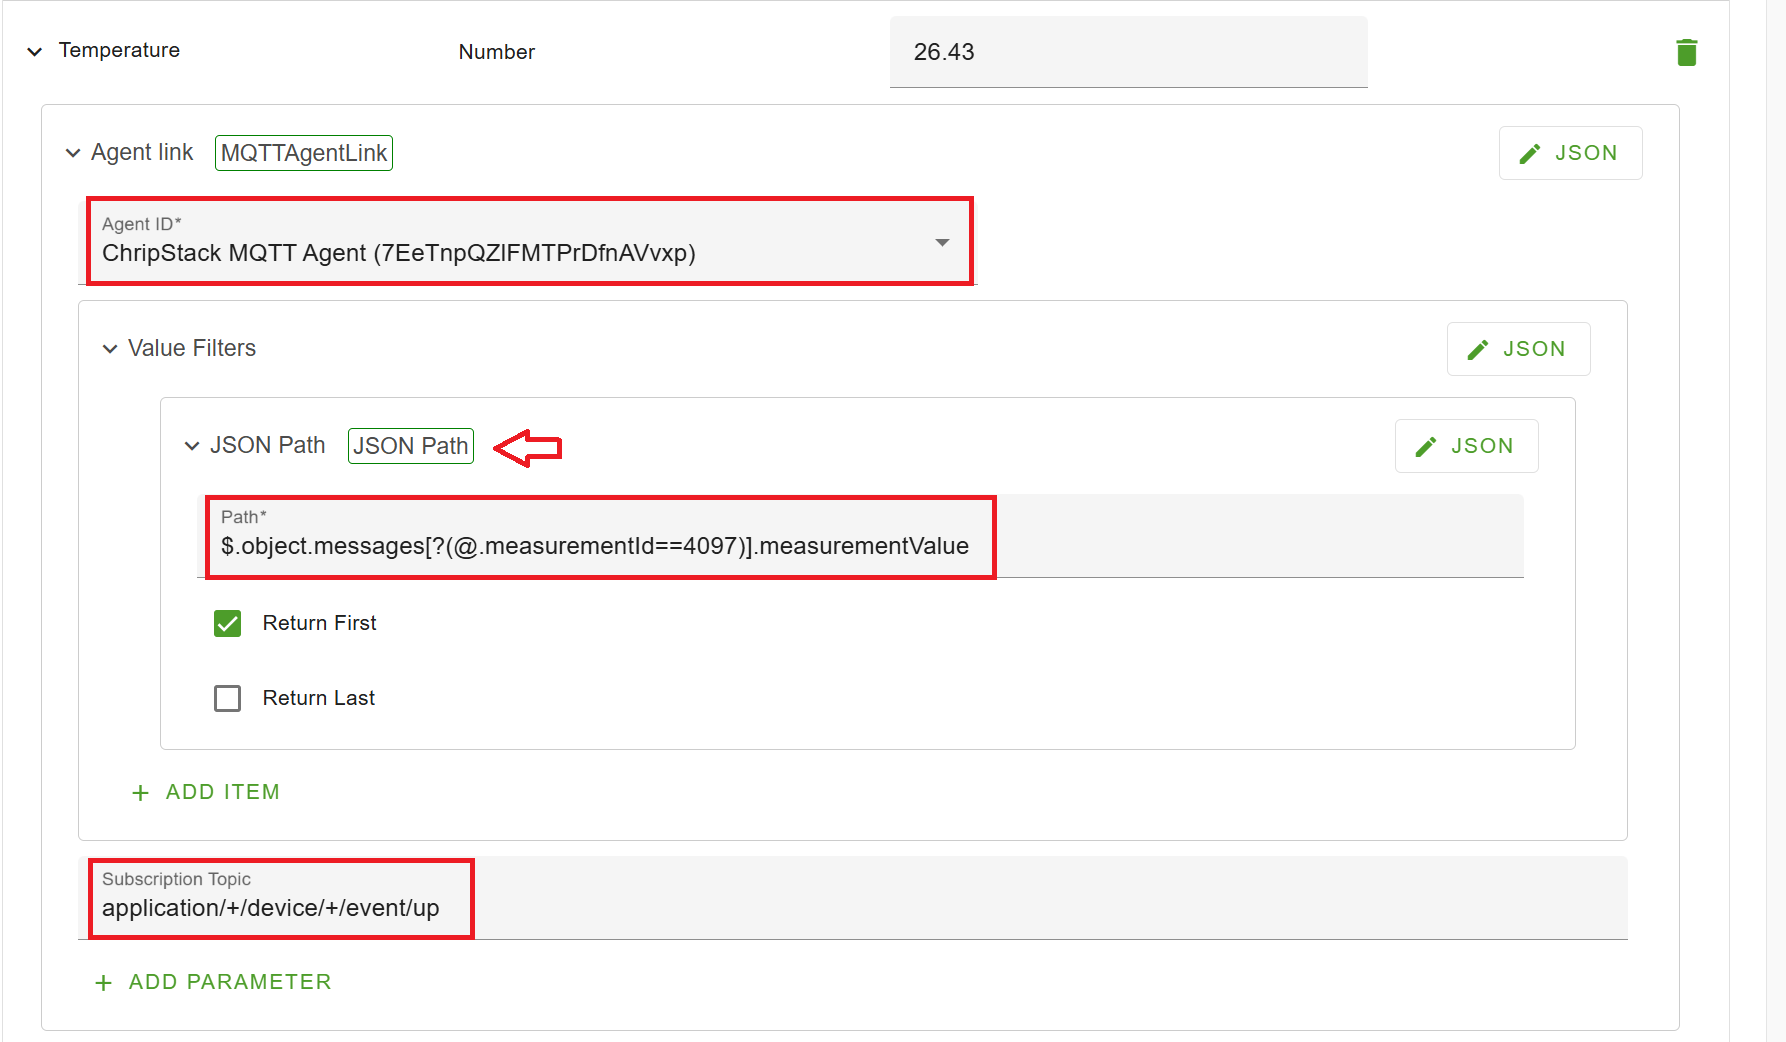
- Expand the Agent link configuration item and set the Agent ID:
- Agent ID: ChirpStack MQTT Agent.
- Click ADD to save the Agent link.
Configure MQTT Subscription for Sensor Data
-
Add a Parameter for MQTT Topic:
- Click ADD PARAMETER to add a new configuration item.
- In the Add parameter dialog, select Subscription Topic and click ADD.
-
Configure the MQTT Subscription Topic:
-
Edit the Subscription Topic field with the following ChirpStack MQTT topic format:
application/+/device/+/event/up -
This topic will subscribe to incoming sensor data from the LoRaWAN device.
-
-
Add Value Filters:
- Click ADD to add a new Value Filters parameter.
- Expand the Value Filters section and click ADD ITEM.
- In the Add item dialog, select JSON Path and click ADD.
-
Configure the JSON Path for Sensor Data:
-
Expand the newly created JSON Path item and set the Path to:
$.object.messages[?(@.measurementId==4097)].measurementValue -
This is an example for the SenseCap S2101 data decoder. Adjust the path as necessary for your specific device.
-
Enable the Return First option.
-
-
Save Configuration:
- Once all configurations are set, click SAVE to finalize the setup.
Test the Integration
-
Check MQTT Communication:
Ensure that the MQTT Agent is connected to the ChirpStack server and that the topicapplication/+/device/+/event/upis receiving data. -
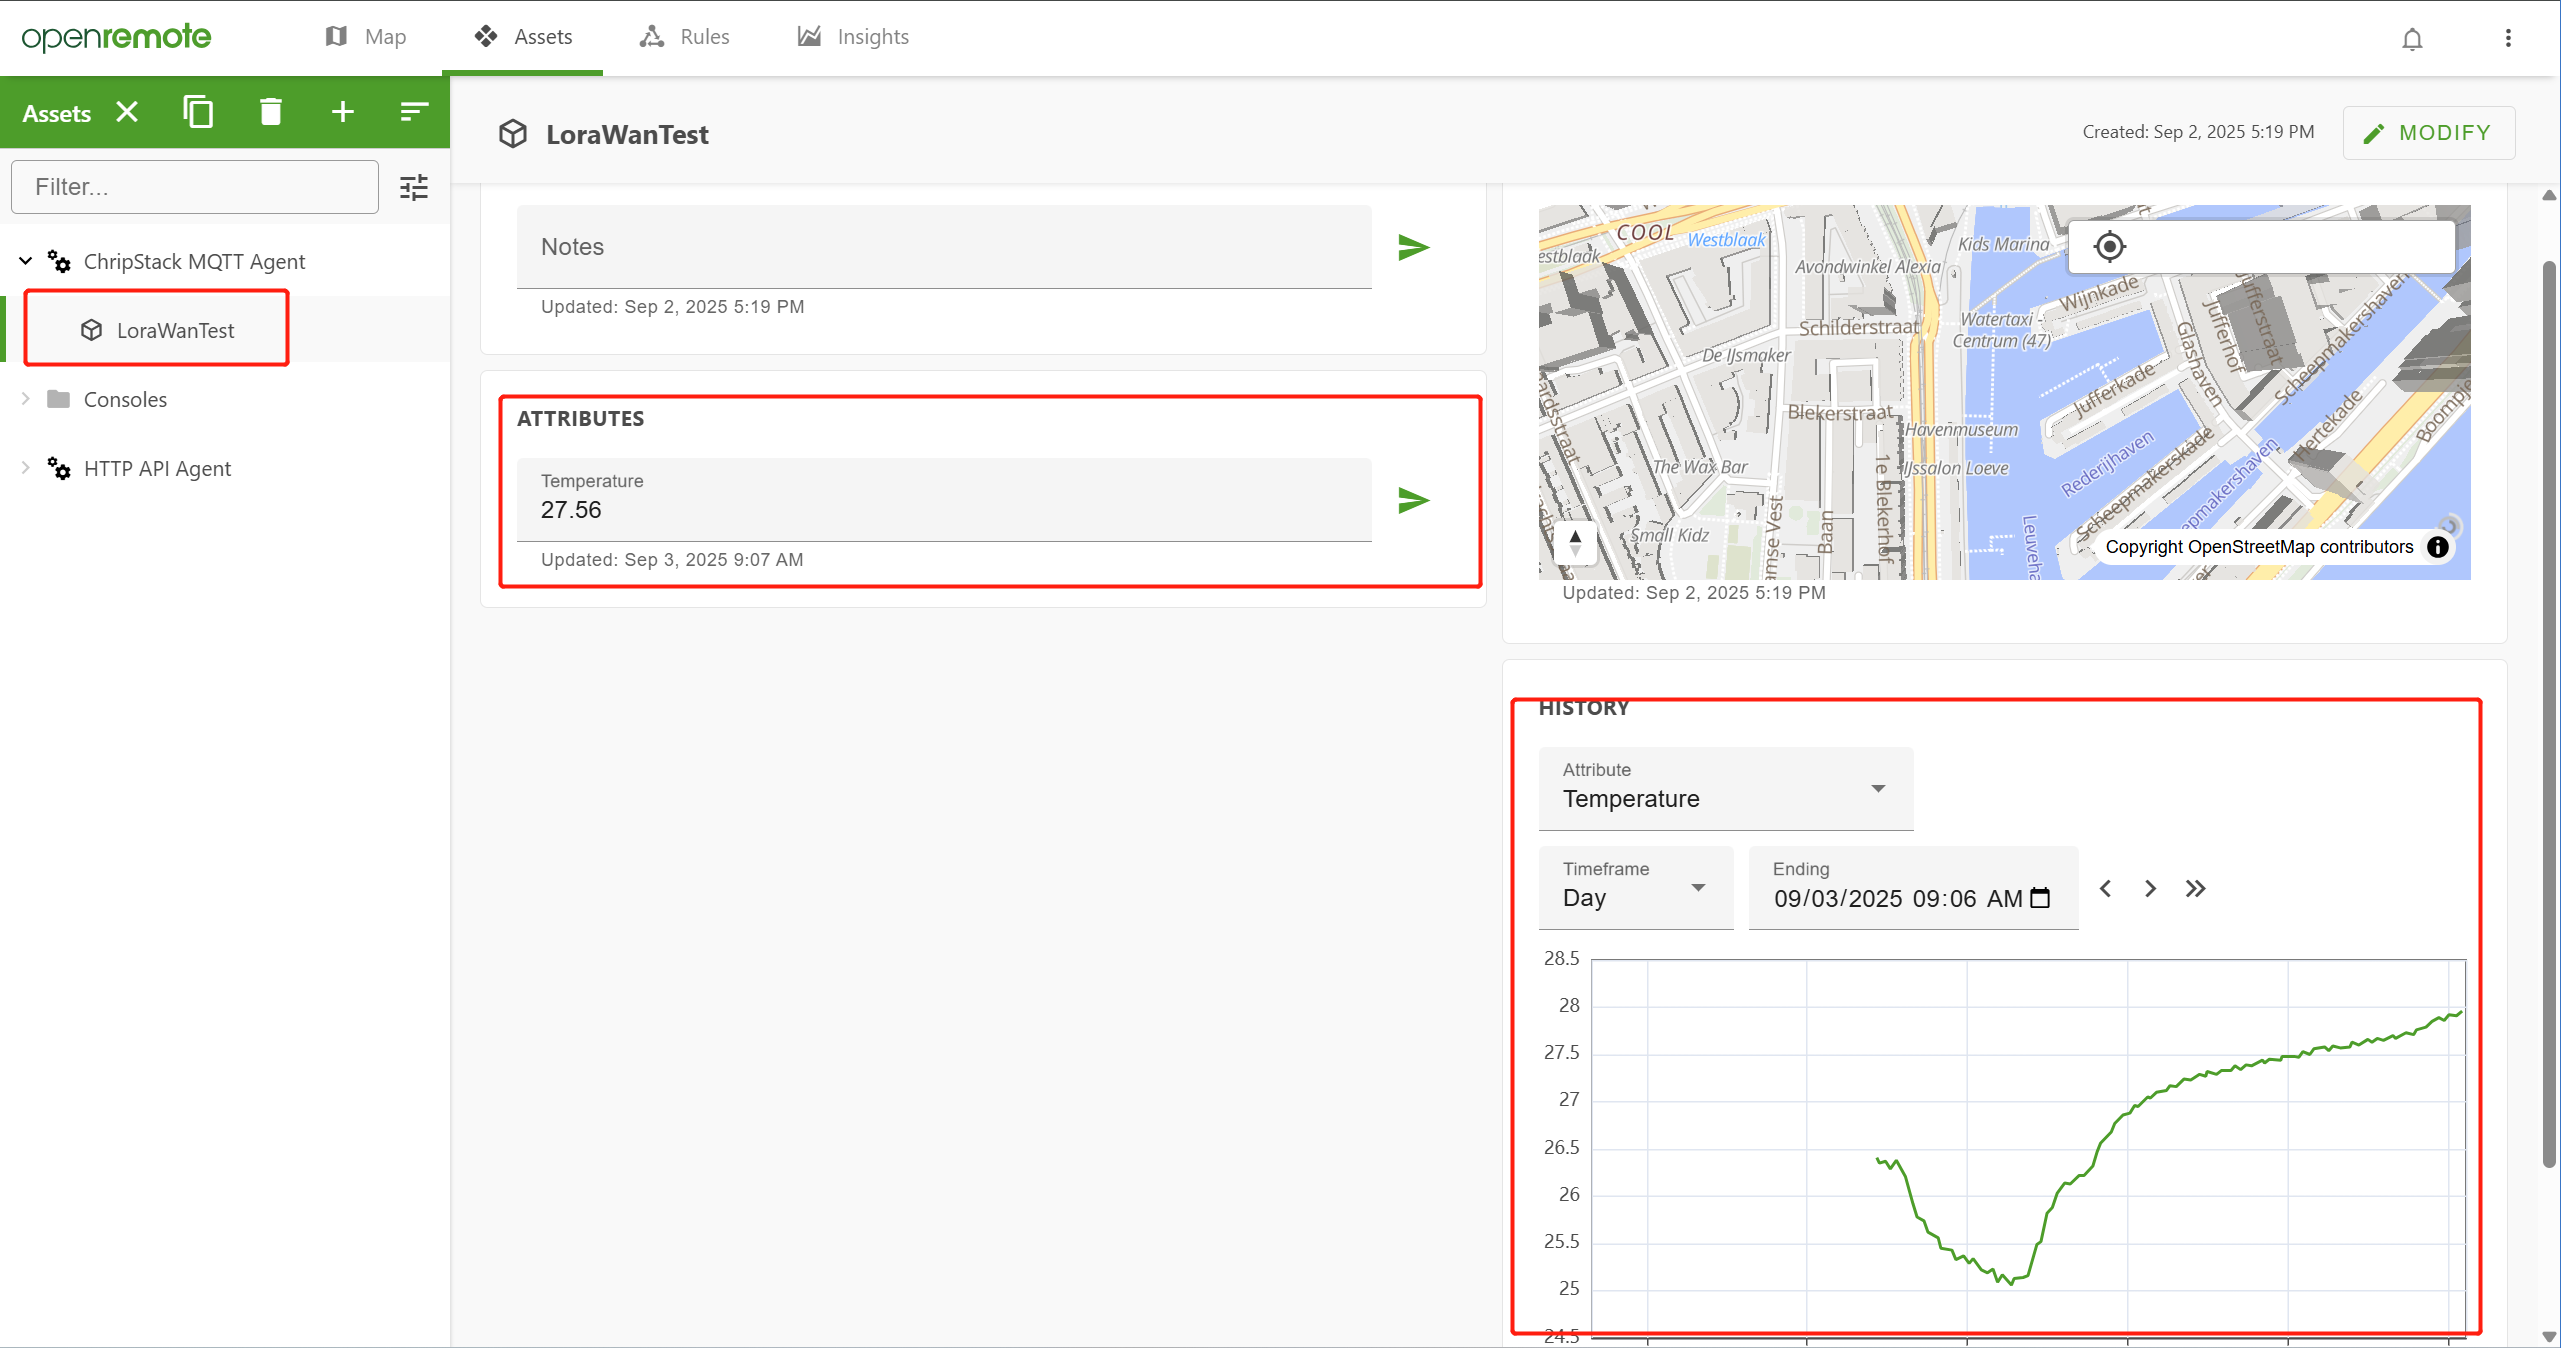
Monitor the Temperature:
The SenseCap S2101 (or your configured device) should now send temperature readings, and the OpenRemote manager will display these values under the Temperature attribute.
Demo
Tech Support & Product Discussion
Thank you for choosing our products! We are here to provide you with different support to ensure that your experience with our products is as smooth as possible. We offer several communication channels to cater to different preferences and needs.