Projetos com Grove Beginner Kit for Arduino
Projeto 1: Alarme de Intrusão
Visão geral
Este wiki apresenta como fazer um alarme de intrusão.
Função
- O sensor de movimento PIR pode detectar pessoas na área e então o alarme é acionado.
Componentes necessários
Conexão de Hardware
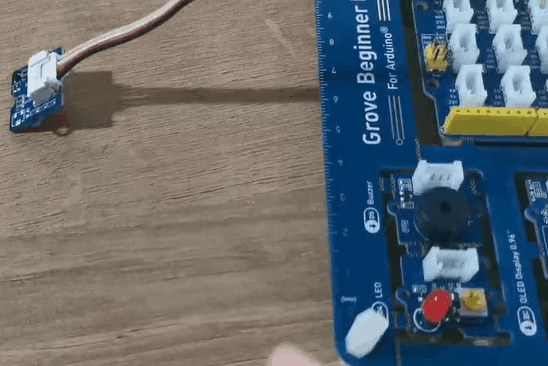
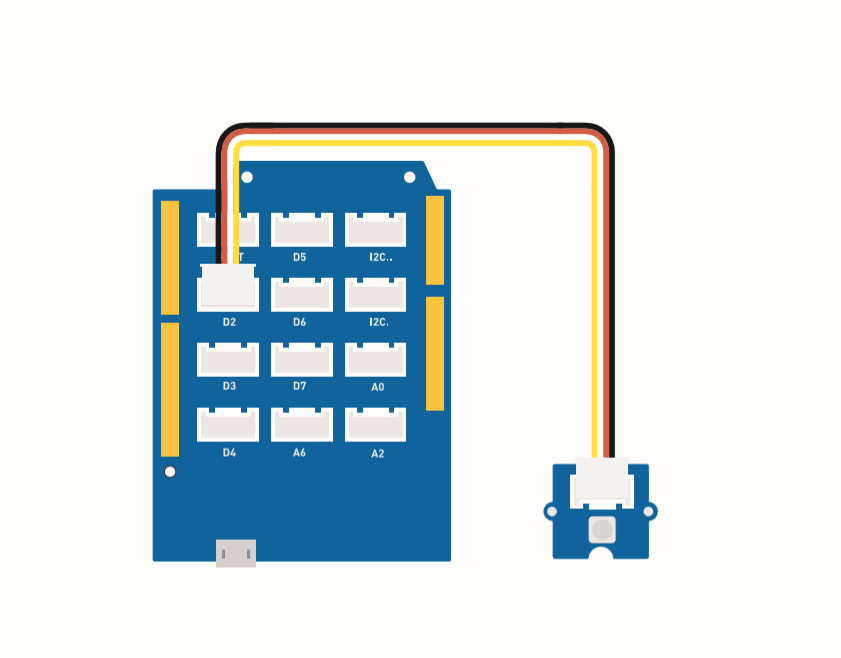
Siga a mesma linha de cor para conectar cada sensor na placa, conecte o cabo Grove do sensor de movimento PIR em D2.
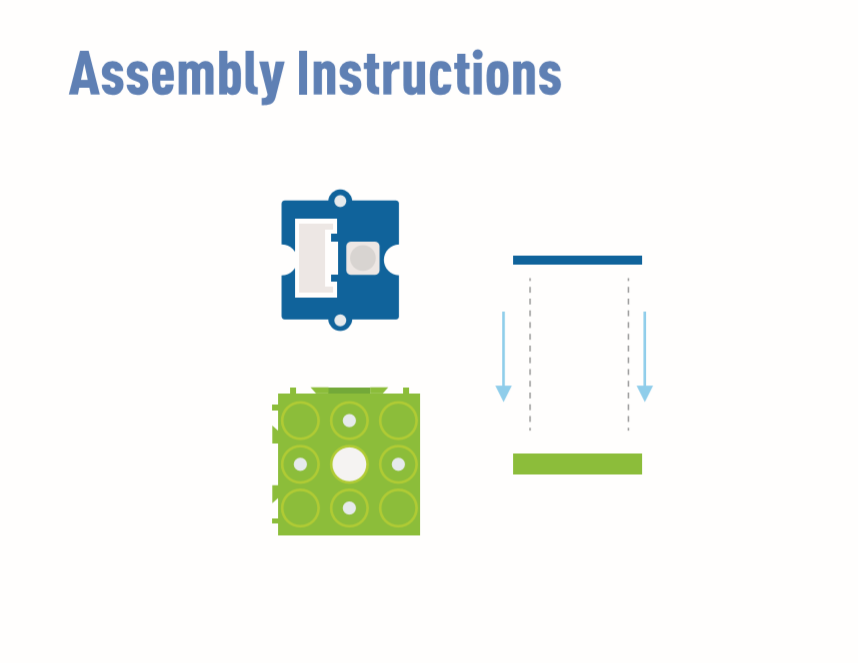
Instruções de montagem
O buzzer (D5) e o LED (D4) estão embutidos na placa.
Instruções para Arduino
Etapa 1. Baixe a Aruidno IDE
Etapa 2. Siga a figura de conexão para conectar todos os sensores na placa.
Etapa 3. Coloque o sensor de movimento Mini PIR no local da detecção.
Etapa 4. Copie o código, cole na Aruino IDE e então faça o upload.
Código
#define PIR_MOTION_SENSOR 2//Use pin 2 to receive the signal from the module

int BuzzerPin = 5;     // set D5 as buzzer
int LED_RAD = 4;       // set D4 as LED

void setup() {
  Serial.begin(9600);
  pinMode(PIR_MOTION_SENSOR, INPUT);
  pinMode(BuzzerPin, OUTPUT);
  pinMode(LED_RAD, OUTPUT);
}

void loop() {

  if (digitalRead(PIR_MOTION_SENSOR)) {
    analogWrite(BuzzerPin, 100);
    digitalWrite(LED_RAD, HIGH);
    delay(3000);
    analogWrite(BuzzerPin, 0);
    digitalWrite(LED_RAD, LOW);
    delay(4000);
  }

}
projeto 2: Ventilador oscilante
Visão geral
Este wiki apresenta como fazer um mini ventilador para colocar no seu quarto e manter o ambiente fresco.
Função
- Ventilador com oscilação automática
Componentes necessários
Conexão de Hardware
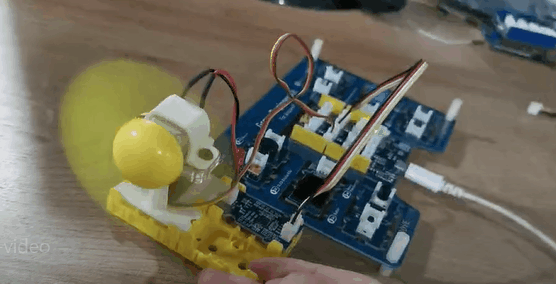
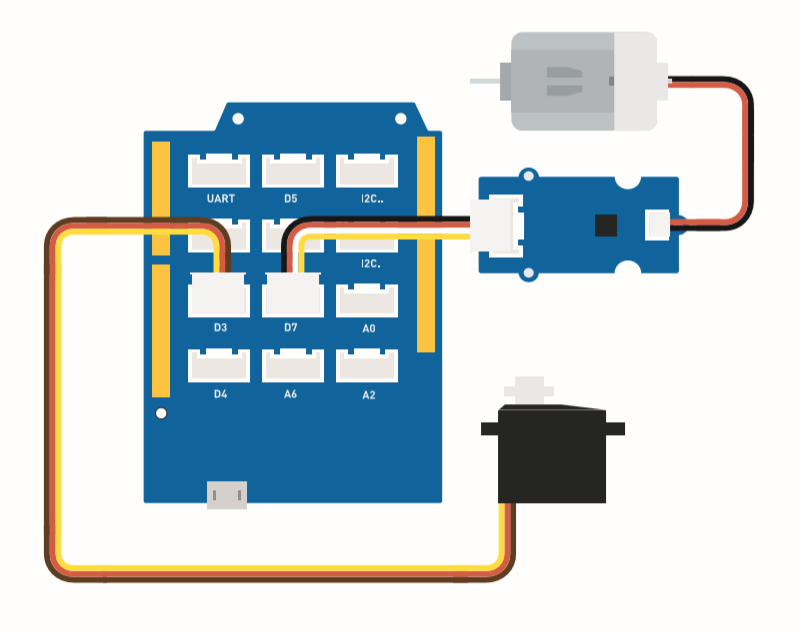
Conecte o cabo Grove do ventilador em D7 e o cabo Grove do servo em D3.
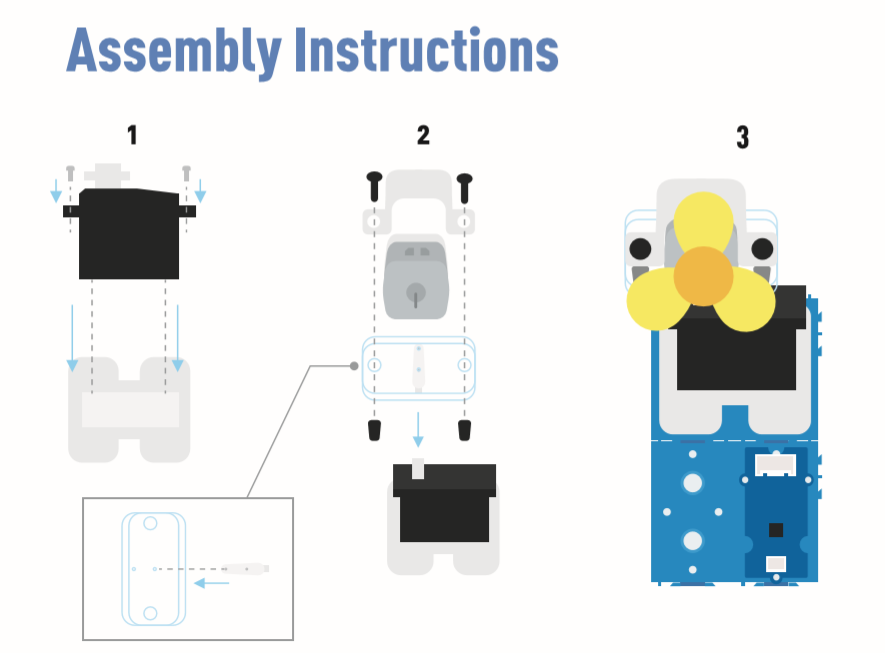
Instruções de montagem
Instruções para Arduino
Etapa 1. Baixe a Aruidno IDE
Etapa 2. Copie o código e cole na Arduino IDE
Etapa 3. Selecione a porta atual: Tools -> Port -> COM (número)
Etapa 4. Faça o upload do código
Coloque o ventilador em uma posição segura.
Código
#include <Servo.h>

Servo myservo;  // create servo object to control a servo

int pos = 0;    // variable to store the servo position
int fanPin = 7;  // set D6 as control switch
int fanState = LOW;

void setup() {
    Serial.begin(9600);
    myservo.attach(3);  // attaches the servo on pin 2 to the servo object
    pinMode(fanPin, OUTPUT);
}

void loop() {

 fanState = HIGH;
 digitalWrite(fanPin, fanState);

   for (pos = 0; pos <= 100; pos += 1) { // goes from 0 degrees to 100 degrees
    // in steps of 1 degree
    myservo.write(pos);              // tell servo to go to position in variable 'pos'
    delay(40);                       // waits 15ms for the servo to reach the position
  }
  for (pos = 100; pos >= 0; pos -= 1) { // goes from 100 degrees to 0 degrees
    myservo.write(pos);              // tell servo to go to position in variable 'pos'
    delay(40);                       // waits 15ms for the servo to reach the position
  }
}
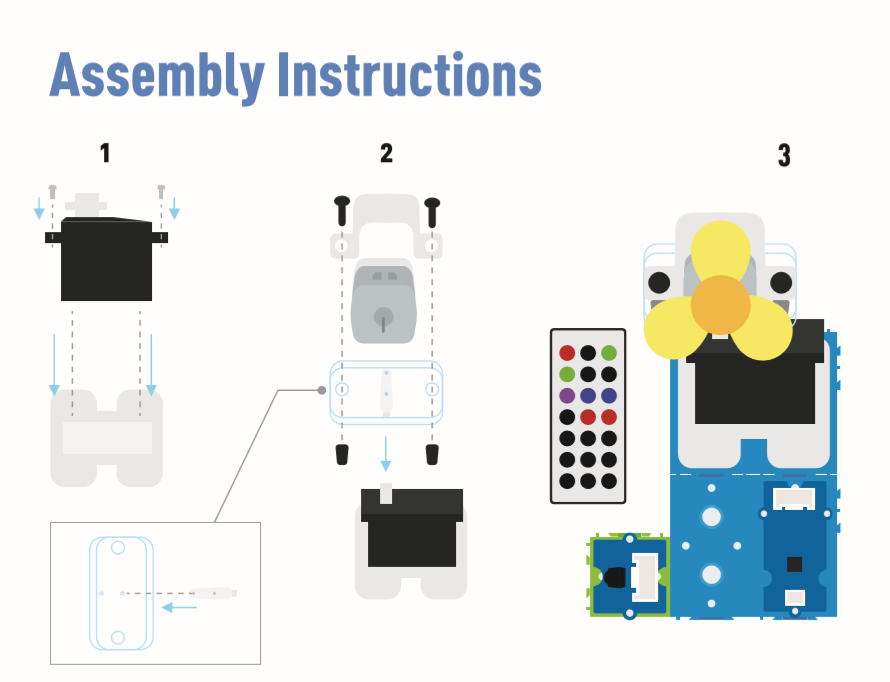
Projeto 3: Ventilador Oscilante com Controle Remoto
Visão geral
Este wiki apresenta como fazer um ventilador oscilante com controle remoto.
Função
-
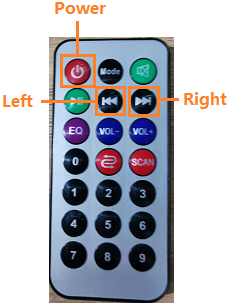
A potência do ventilador é controlada pelo controle remoto.
-
A oscilação do ventilador pode ser controlada por controle remoto.
Componentes necessários
Conexão de Hardware
Siga a mesma linha de cor para conectar cada sensor na placa. Conecte o cabo Grove do ventilador em D7, o cabo Grove do servo em D3 e o cabo Grove do IR em D2.

Esta é a função dos botões do controle.
Instruções de montagem
Instruções para Arduino
Etapa 1. Siga a figura de conexão para conectar todos os sensores na placa.
Etapa 2. Baixe a Aruidno IDE
Etapa 3. Navegue para Sketch -> Include Library -> Manage Libraries, procure por IRremote e então instale.
Etapa 4. Copie o código, cole na Aruino IDE e então faça o upload.
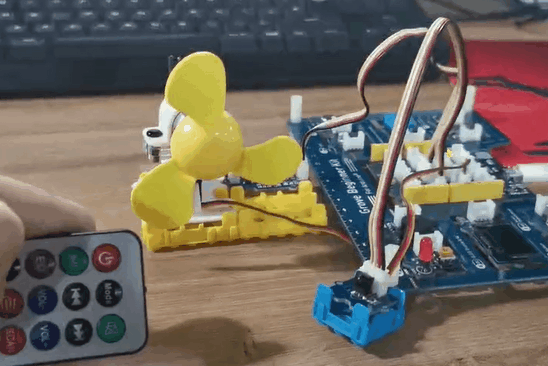
Etapa 5. Coloque o ventilador em uma posição segura e tente pressionar os botões para garantir que ele funcione com segurança.
Consulte Como install library para instalar bibliotecas para Arduino.
Código
#include <IRremote.h>
#include <Servo.h>

Servo myservo;  // create servo object to control a servo
int RECV_PIN = 2; // set pin 2 as IR control

IRrecv irrecv(RECV_PIN);

decode_results results;

int pos = 90;    // variable to store the servo position
int fanPin = 7;  // set D6 as control switch
int fanState = LOW;
int IO = 0;

void setup()
{
  Serial.begin(9600);
  Serial.println("Enabling IRin");  // remind enabling IR
  irrecv.enableIRIn(); // Start the receiver
  Serial.println("Enabled IRin");
  myservo.attach(3);  // attaches the servo on pin 2 to the servo object
  pinMode(fanPin, OUTPUT);

}

//  power_encode 2155829415     left  2155870215  right  2155821255

void loop() {
  if (irrecv.decode(&results)) { //checking IR signal
    if (results.value == 2155829415) {    // Power off/on
      IO++;
      if (IO % 2 == 0) {
        fanState = HIGH;
        digitalWrite(fanPin, fanState);
        delay(100);
      }
      else {
        fanState = LOW;
        digitalWrite(fanPin, fanState);
        delay(100);
      }
    }

    if (results.value == 2155821255 ) {    // fan swing to left
      for (pos; pos <= 89; pos += 1) { // goes from 0 degrees to 90 degrees
        // in steps of 1 degree
        myservo.write(pos);              // tell servo to go to position in variable 'pos'

        delay(40);                       // waits 15ms for the servo to reach the position
        if (irrecv.decode(&results)) {
          irrecv.resume();
          if (results.value == 2155870215)
            break;
        }
      }
    }

    if (results.value == 2155870215 ) {    // fan swing to right
      for (pos; pos >= 1; pos -= 1) { // goes from 90 degrees to 0 degrees
        myservo.write(pos);              // tell servo to go to position in variable 'pos'
        delay(40);                       // waits 15ms for the servo to reach the position

        if (irrecv.decode(&results)) {
          irrecv.resume();
          if (results.value == 2155821255)
            break;
        }
      }
    }
    Serial.println(pos);
    Serial.println(results.value, HEX);
    Serial.println(results.value);
    irrecv.resume();                    //recive next intrustion

  }
  delay(100);
}
Projeto 4: Umidificador Inteligente
Visão geral
Este wiki apresenta como fazer atomização de água para manter a umidade interna normal.
Função
-
Utiliza automaticamente a atomização de água quando a umidade estiver baixa.
-
Exibe a temperatura e a umidade em tempo real.
Componentes necessários
Conexão de Hardware
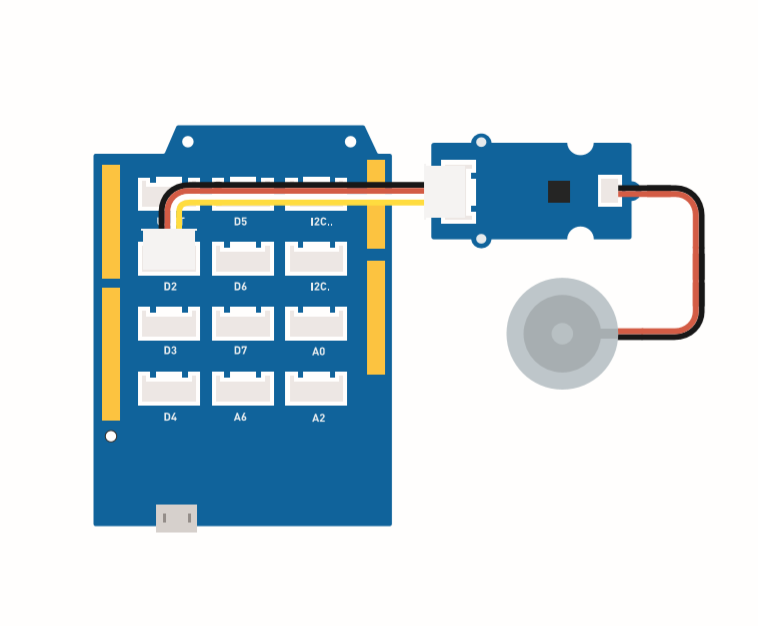
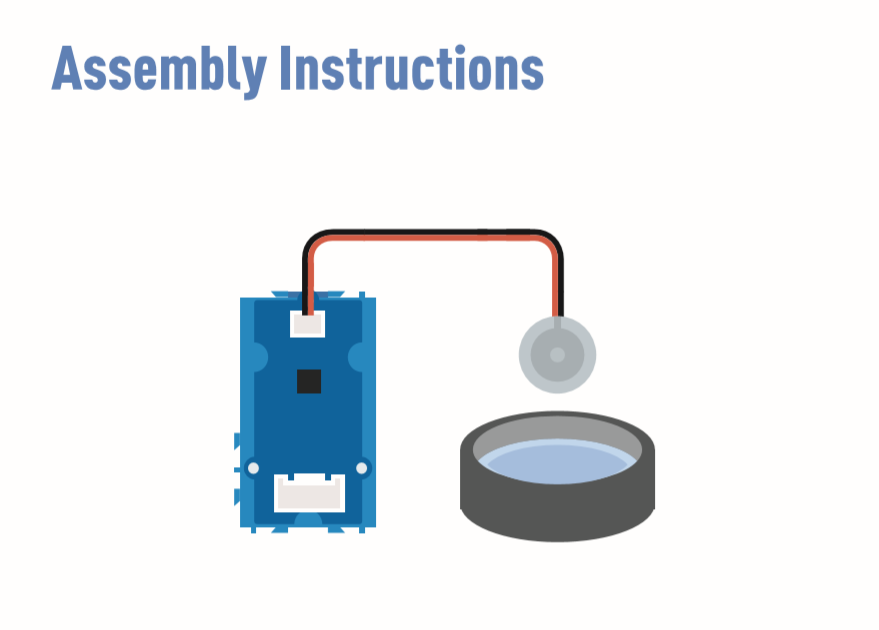
Siga a mesma linha de cor para conectar cada sensor na placa. Conecte o cabo Grove de atomização de água em D2.
Instruções de montagem
Instruções para Arduino
Etapa 1. Siga a figura de conexão para conectar todos os sensores na placa.
Etapa 2 Baixe a Aruidno IDE
Passo 3 Navegue até Sketch -> Include Library -> Manage Libraries, pesquise por U8g2 e instale.
Passo 4 Baixe a biblioteca Grove_Temperature_And_Humidity_Sensor e instale-a
Passo 5. Copie o código, cole na Arduino IDE e faça o upload.
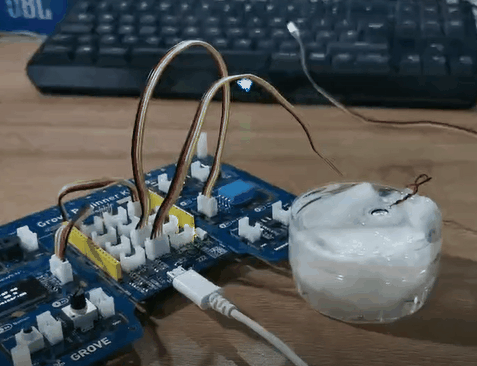
Passo 6. Prepare um recipiente cheio de água e então coloque o atomizador de água na água.
Consulte Como install library para instalar biblioteca para Arduino.
Prepare alguns lenços de papel, coloque-os na água, deixando o atomizador de água flutuar. A função do lenço de papel é conduzir a água até o transdutor e manter a parte superior do transdutor acima da água.
Código
#include <Arduino.h>
#include <U8x8lib.h>

#include "DHT.h"
#define DHTTYPE DHT11   // DHT 11
#define DHTPIN 3     // what pin we're connected to
DHT dht(DHTPIN, DHTTYPE);

#include <Wire.h>

U8X8_SSD1306_128X64_NONAME_HW_I2C u8x8(/* reset=*/ U8X8_PIN_NONE);

void setup(void) {
  Serial.begin(115200);
  u8x8.begin();
  u8x8.setFlipMode(1);
  Wire.begin();
  dht.begin();
  pinMode(2,INPUT);
}

void loop(void) {
  float temp_hum_val[2] = {0};
  int b;
  int c;
  if (!dht.readTempAndHumidity(temp_hum_val)) {
     b = temp_hum_val[0];
     c = temp_hum_val[1];
  }
  else{
    Serial.println("Failed to get temprature and humidity value.");
    }
  u8x8.setFont(u8x8_font_chroma48medium8_r);   // choose a suitable font
  u8x8.setCursor(0, 0);
  u8x8.print("Temp: ");
  u8x8.setCursor(5, 0);
  u8x8.print(c);
  u8x8.setCursor(8, 0);
  u8x8.print("*C");
  u8x8.setCursor(0, 10);
  u8x8.print("Hum: ");
  u8x8.setCursor(5, 10);
  u8x8.print(b);
  u8x8.setCursor(8, 10);
  u8x8.print("%");
  u8x8.setCursor(0, 20);
  u8x8.print("atomizer: ");

  if(b > 70){
  u8x8.setCursor(9, 20);
  u8x8.print("OFF");
  digitalWrite(2, LOW);    // atomization stopped
  }
  if(b <= 70) {
  u8x8.setCursor(9, 20);
  u8x8.print("ON ");
  digitalWrite(2, HIGH);   // atomize
    }
  delay(1000);

}
Projeto 5: Radar Ultrassônico
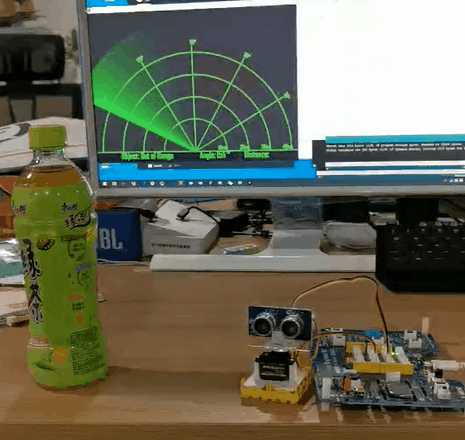
Visão geral
Este wiki apresenta como fazer um Radar Ultrassônico para detectar o objeto e a distância.
Recurso
-
Detectar a distância do objeto
-
Verificar se existe objeto ao redor
Componentes necessários
Conexão de Hardware
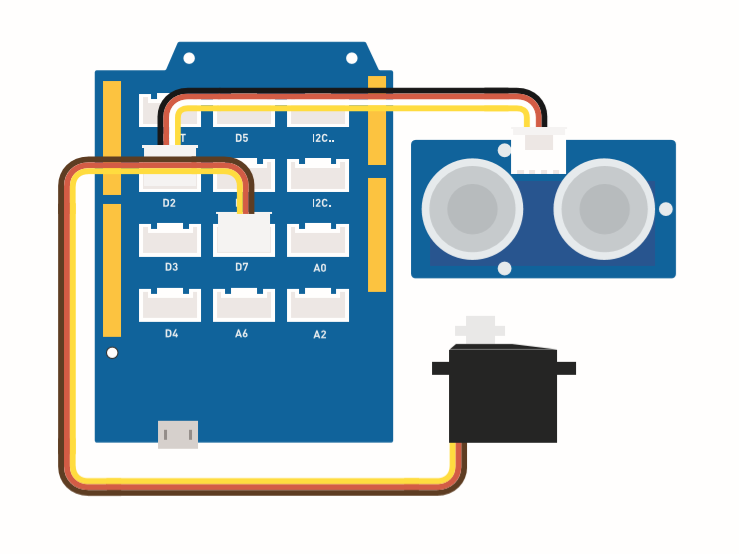
Por favor, siga a figura: conecte o cabo Grove do sensor ultrassônico à porta D2 e conecte o servo à porta D7.
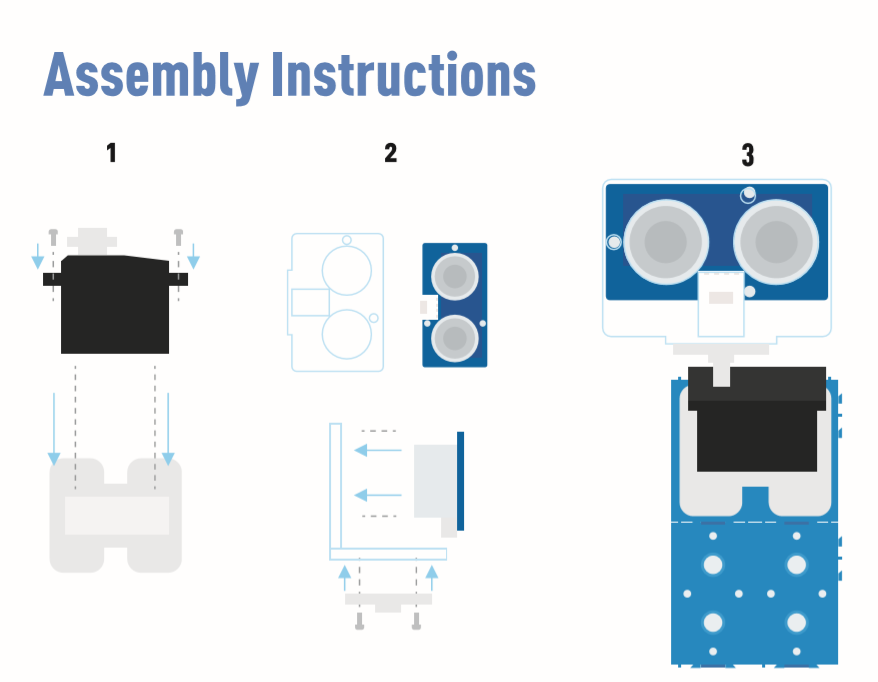
Instruções de montagem
Instruções para Arduino
Passo 1. Siga a conexão para plugar o cabo na porta.
Passo 2. Baixe o Aruidno IDE
Passo 3. Baixe o Processing
Passo 4. Baixe a biblioteca UltrasonicRanger do Github.
Passo 5. Copie o código do Radar, cole na Arduino IDE e faça o upload.
Passo 6. Baixe o Processing para exibir o mapa de varredura do Radar.
Passo 7. Copie o código Radar-Processing e cole no Processing.
Passo 8. Depois que o Servo começar a oscilar, clique em play no software Processing.
Se você não souber como instalar a biblioteca, clique here.
Código do Radar
#include <Servo.h>
#include "Ultrasonic.h"

int distance;
Servo myServo;

Ultrasonic ultrasonic(2);

void setup() {
    Serial.begin(9600);
    myServo.attach(7);
}
void loop() {

    for(int pos = 15; pos <= 165; pos += 1){
        myServo.write(pos);
        delay(30);
        distance = ultrasonic.MeasureInCentimeters();
        Serial.print(pos);
        Serial.print(",");
        Serial.print(distance);
        Serial.print(".");
    }

    for(int pos = 165; pos >= 15; pos -= 1){
        myServo.write(pos);
        delay(30);
        distance = ultrasonic.MeasureInCentimeters();
        Serial.print(pos);
        Serial.print(",");
        Serial.print(distance);
        Serial.print(".");
    }
}
Código Radar-Processing
import processing.serial.*; // imports library for serial communication
import java.awt.event.KeyEvent; // imports library for reading the data from the serial port
import java.io.IOException;
Serial myPort; // defines Object Serial
// defubes variables
String angle="";
String distance="";
String data="";
String noObject;
float pixsDistance;
int iAngle, iDistance;
int index1=0;
int index2=0;
PFont orcFont;
void setup() {

 size (1000, 720); // ***CHANGE THIS TO YOUR SCREEN RESOLUTION***
 smooth();
 myPort = new Serial(this,"COM14", 9600); // starts the serial communication
 myPort.bufferUntil('.'); // reads the data from the serial port up to the character '.'. So actually it reads this: angle,distance.
 orcFont = loadFont("AgencyFB-Bold-48.vlw");
}
void draw() {

  fill(98,245,31);
  textFont(orcFont);
  // simulating motion blur and slow fade of the moving line
  noStroke();
  fill(0,4);
  rect(0, 0, width, height-height*0.065);

  fill(98,245,31); // green color
  // calls the functions for drawing the radar
  drawRadar();
  drawLine();
  drawObject();
  drawText();
}
void serialEvent (Serial myPort) { // starts reading data from the Serial Port
  // reads the data from the Serial Port up to the character '.' and puts it into the String variable "data".
  data = myPort.readStringUntil('.');
  data = data.substring(0,data.length()-1);

  index1 = data.indexOf(","); // find the character ',' and puts it into the variable "index1"
  angle= data.substring(0, index1); // read the data from position "0" to position of the variable index1 or thats the value of the angle the Arduino Board sent into the Serial Port
  distance= data.substring(index1+1, data.length()); // read the data from position "index1" to the end of the data pr thats the value of the distance

  // converts the String variables into Integer
  iAngle = int(angle);
  iDistance = int(distance);
}
void drawRadar() {
  pushMatrix();
  translate(width/2,height-height*0.074); // moves the starting coordinats to new location
  noFill();
  strokeWeight(2);
  stroke(98,245,31);
  // draws the arc lines
  arc(0,0,(width-width*0.0625),(width-width*0.0625),PI,TWO_PI);
  arc(0,0,(width-width*0.27),(width-width*0.27),PI,TWO_PI);
  arc(0,0,(width-width*0.479),(width-width*0.479),PI,TWO_PI);
  arc(0,0,(width-width*0.687),(width-width*0.687),PI,TWO_PI);
  // draws the angle lines
  line(-width/2,0,width/2,0);
  line(0,0,(-width/2)*cos(radians(30)),(-width/2)*sin(radians(30)));
  line(0,0,(-width/2)*cos(radians(60)),(-width/2)*sin(radians(60)));
  line(0,0,(-width/2)*cos(radians(90)),(-width/2)*sin(radians(90)));
  line(0,0,(-width/2)*cos(radians(120)),(-width/2)*sin(radians(120)));
  line(0,0,(-width/2)*cos(radians(150)),(-width/2)*sin(radians(150)));
  line((-width/2)*cos(radians(30)),0,width/2,0);
  popMatrix();
}
void drawObject() {
  pushMatrix();
  translate(width/2,height-height*0.074); // moves the starting coordinats to new location
  strokeWeight(9);
  stroke(255,10,10); // red color
  pixsDistance = iDistance*((height-height*0.1666)*0.025); // covers the distance from the sensor from cm to pixels
  // limiting the range to 40 cms
  if(iDistance<40){
    // draws the object according to the angle and the distance
  line(pixsDistance*cos(radians(iAngle)),-pixsDistance*sin(radians(iAngle)),(width-width*0.505)*cos(radians(iAngle)),-(width-width*0.505)*sin(radians(iAngle)));
  }
  popMatrix();
}
void drawLine() {
  pushMatrix();
  strokeWeight(9);
  stroke(30,250,60);
  translate(width/2,height-height*0.074); // moves the starting coordinats to new location
  line(0,0,(height-height*0.12)*cos(radians(iAngle)),-(height-height*0.12)*sin(radians(iAngle))); // draws the line according to the angle
  popMatrix();
}
void drawText() { // draws the texts on the screen

  pushMatrix();
  if(iDistance>40) {
  noObject = "Out of Range";
  }
  else {
  noObject = "In Range";
  }
  fill(0,0,0);
  noStroke();
  rect(0, height-height*0.0648, width, height);
  fill(98,245,31);
  textSize(25);

  text("10cm",width-width*0.3854,height-height*0.0833);
  text("20cm",width-width*0.281,height-height*0.0833);
  text("30cm",width-width*0.177,height-height*0.0833);
  text("40cm",width-width*0.0729,height-height*0.0833);
  textSize(40);
  text("Object: " + noObject, width-width*0.875, height-height*0.0277);
  text("Angle: " + iAngle +" °", width-width*0.48, height-height*0.0277);
  text("Distance: ", width-width*0.26, height-height*0.0277);
  if(iDistance<40) {
  text("        " + iDistance +" cm", width-width*0.225, height-height*0.0277);
  }
  textSize(25);
  fill(98,245,60);
  translate((width-width*0.4994)+width/2*cos(radians(30)),(height-height*0.0907)-width/2*sin(radians(30)));
  rotate(-radians(-60));
  text("30°",0,0);
  resetMatrix();
  translate((width-width*0.503)+width/2*cos(radians(60)),(height-height*0.0888)-width/2*sin(radians(60)));
  rotate(-radians(-30));
  text("60°",0,0);
  resetMatrix();
  translate((width-width*0.507)+width/2*cos(radians(90)),(height-height*0.0833)-width/2*sin(radians(90)));
  rotate(radians(0));
  text("90°",0,0);
  resetMatrix();
  translate(width-width*0.513+width/2*cos(radians(120)),(height-height*0.07129)-width/2*sin(radians(120)));
  rotate(radians(-30));
  text("120°",0,0);
  resetMatrix();
  translate((width-width*0.5104)+width/2*cos(radians(150)),(height-height*0.0574)-width/2*sin(radians(150)));
  rotate(radians(-60));
  text("150°",0,0);
  popMatrix();
}