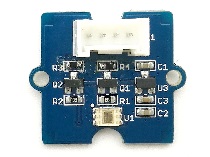
Grove - Digital Light Sensor
Este módulo é baseado no conversor de luz para digital I2C TSL2561 para transformar a intensidade de luz em um sinal digital. Diferente do sensor de luz analógico tradicional, como o Grove - Light Sensor, este módulo digital oferece uma faixa de espectro de luz selecionável graças aos seus dois diodos sensíveis à luz: infravermelho e espectro completo.
Podemos alternar entre três modos de detecção para fazer as leituras: modo infravermelho, espectro completo e modo de luz visível ao ser humano. Quando estiver operando no modo de luz visível, este sensor fornecerá leituras muito próximas da percepção dos seus olhos.

Versão
| Versão do Produto | Alterações | Data de Lançamento |
|---|---|---|
| Grove - Digital Light Sensor V1.1 | Inicial | Out 2015 |
Atualizável para Sensores Industriais
Com o controlador S2110 e o registrador de dados S2100 da SenseCAP, você pode facilmente transformar o Grove em um sensor LoRaWAN®. A Seeed não só ajuda você na prototipagem, mas também oferece a possibilidade de expandir seu projeto com a série SenseCAP de robustos sensores industriais.
Os sensores industriais da série SenseCAP S210x proporcionam uma experiência pronta para uso para sensoriamento ambiental. Consulte o Sensor Sem Fio de Intensidade de Luz S2102, com maior desempenho e robustez para detecção de intensidade luminosa. A série inclui sensores para umidade do solo, temperatura e umidade do ar, intensidade de luz, CO2, EC e uma estação meteorológica 8 em 1. Experimente o mais recente SenseCAP S210x em seu próximo projeto industrial de sucesso.
| Sensor Industrial SenseCAP |
 |
| S2102 Light |
Recursos
- Modos de detecção selecionáveis
- Saída digital de alta resolução de 16 bits em I2C Fast-Mode de 400 kHz
- Ampla faixa dinâmica: 0,1 - 40.000 LUX
- Ampla faixa de temperatura de operação: -40°C a 85°C
- Função de interrupção programável com configurações de limite superior e inferior definidas pelo usuário
- Endereço I2C 0x29
Se você quiser usar múltiplos dispositivos I2C, consulte o Software I2C.
Para mais detalhes sobre os módulos Grove, consulte o Grove System
Especificações
| Itens | Mín | Típico | Máx | Unidade |
|---|---|---|---|---|
| Tensão de alimentação, VDD | 3,3 | 5 | 5,1 | V |
| Temperatura de operação | -30 | \ | 70 | ℃ |
| Tensão baixa de entrada SCL,SDA | -0,5 | \ | 0,8 | V |
| Tensão alta de entrada SCL,SDA | 2,3 | \ | 5,1 | V |
Plataformas Suportadas
| Arduino | Raspberry Pi | |||
|---|---|---|---|---|
As plataformas mencionadas acima como suportadas são uma indicação da compatibilidade de software ou teórica do módulo. Na maioria dos casos, fornecemos apenas biblioteca de software ou exemplos de código para a plataforma Arduino. Não é possível fornecer biblioteca de software / código de demonstração para todas as possíveis plataformas de MCU. Portanto, os usuários precisam escrever sua própria biblioteca de software.
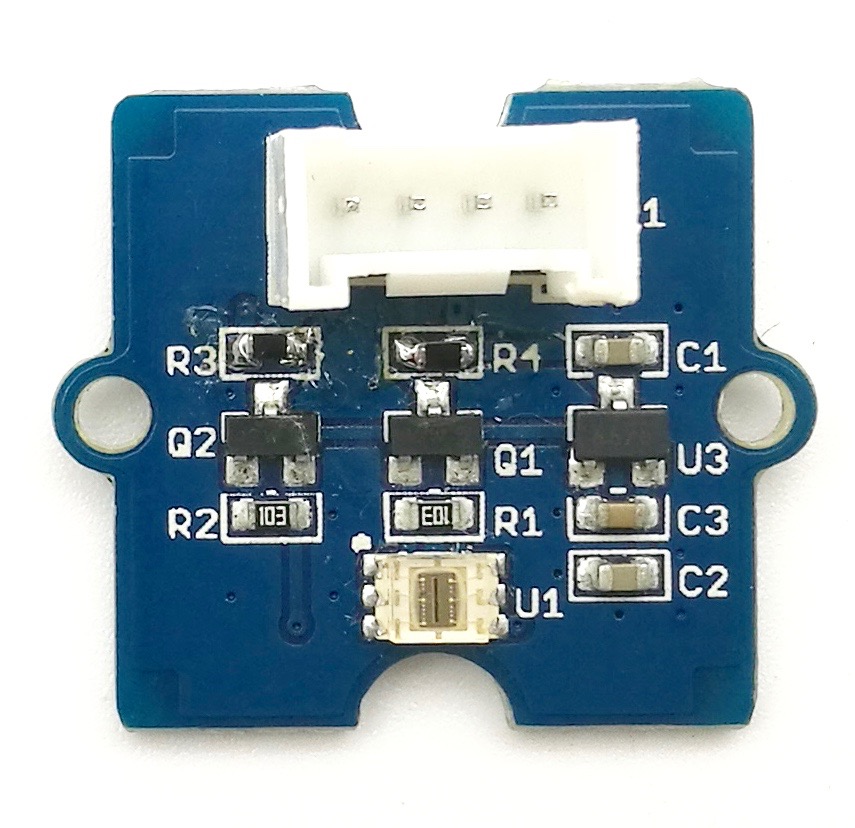
Visão Geral de Hardware
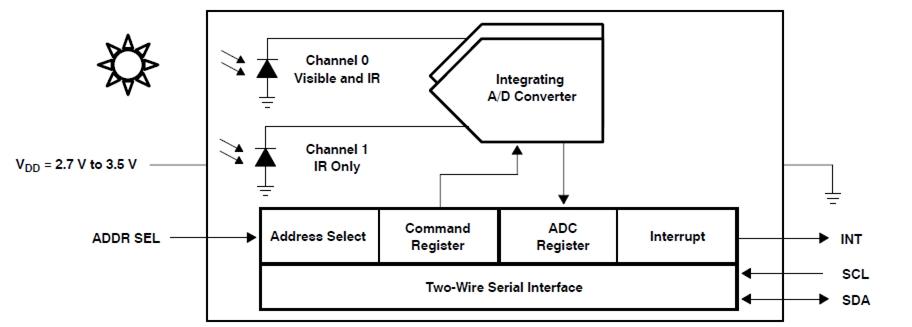
U1: CI TSL2561, conversor de Luz para Digital. Abaixo está o Diagrama de Blocos Funcional.
-
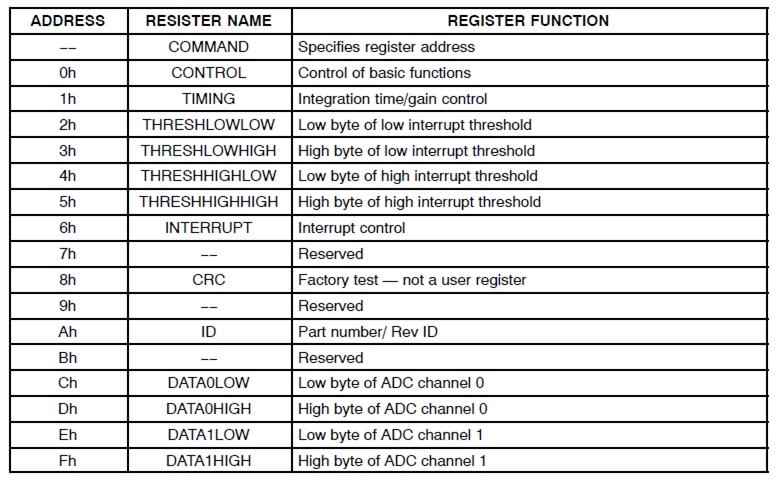
Mapa de Registradores
O TSL2561 é controlado e monitorado por dezesseis registradores (três são reservados) e um registrador de comando acessados através da interface serial. Esses registradores fornecem uma variedade de funções de controle e podem ser lidos para determinar os resultados das conversões do ADC. O conjunto de registradores é resumido como mostrado abaixo.
- Curva de Resposta Espectral
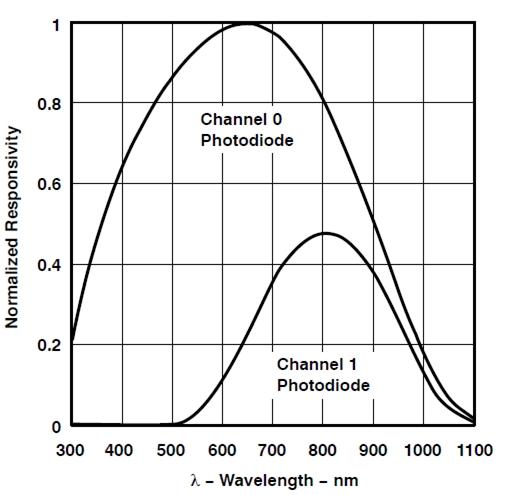
Dois canais do sensor de luz digital possuem características de resposta diferentes. É por isso que você pode escolher seu modo de funcionamento mantendo ambos ligados ou desligando um deles.
U3: CI XC6206MR332, reguladores de tensão positiva.
Q1,Q2: CI BSN20, transistor D-MOS vertical de modo de enriquecimento de canal N.
SCL,SDA: Interface de sinal I2C
Primeiros Passos
Se esta é a primeira vez que você trabalha com Arduino, recomendamos fortemente que veja Getting Started with Arduino antes de começar.
Brincar com Arduino
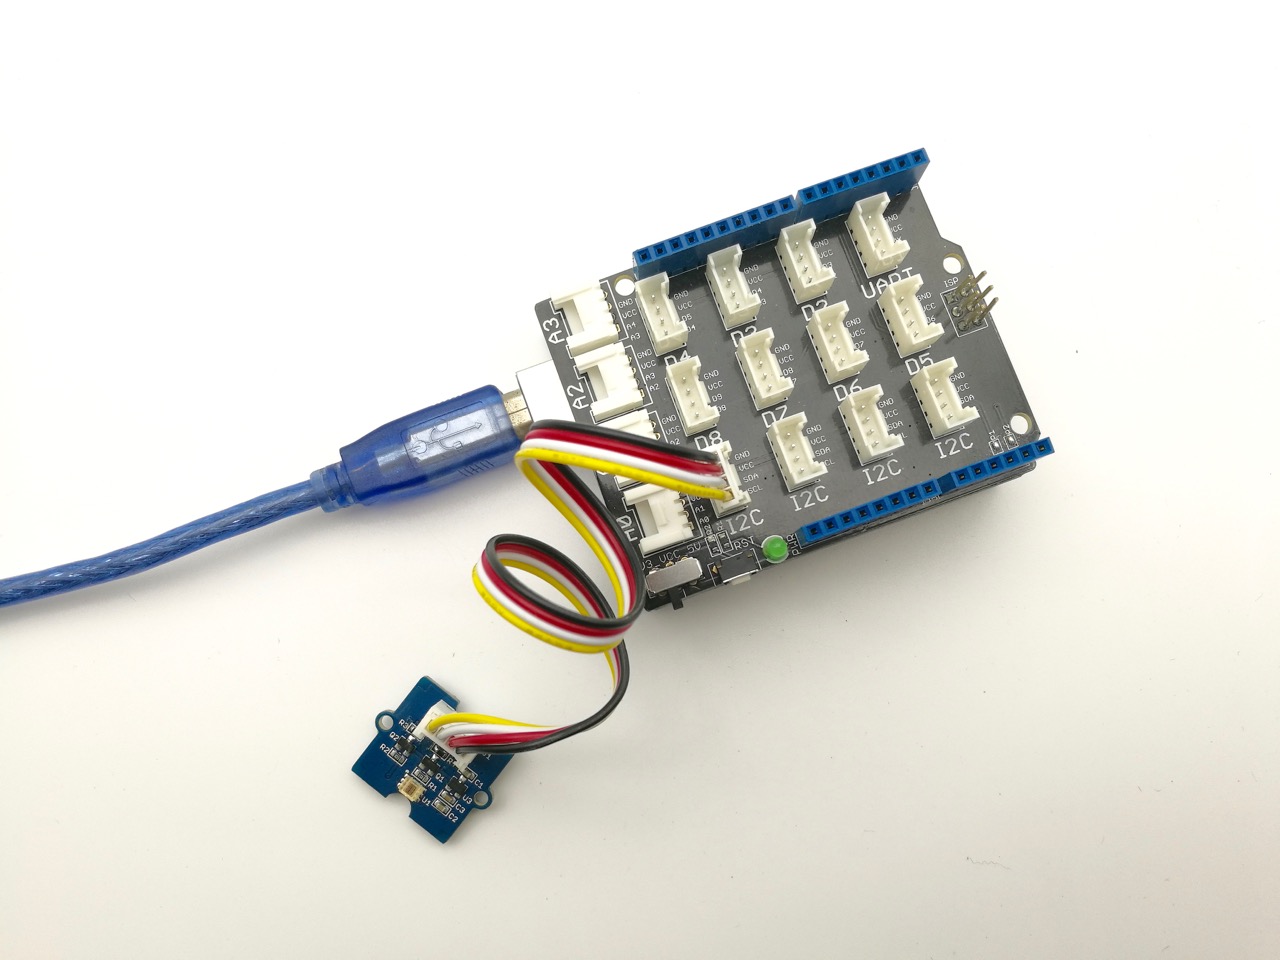
Hardware
- Passo 1. Prepare os itens abaixo:
| Seeeduino V4 | Base Shield | Grove - Digital light sensor |
|---|---|---|
 |  |  |
| Adquira agora | Adquira agora | Adquira agora |
- Passo 2. Conecte o Grove - Digital Light Sensor à porta I2C do Base Shield.
- Passo 3. Conecte o Base Shield ao Arduino.
- Passo 4. Conecte o Arduino ao PC usando um cabo USB.
Software
- Passo 1. Baixe a biblioteca aqui: Digital Light Sensor Library;
- Passo 2. Siga os procedimentos de how to install an arduino library para instalar a biblioteca.
- Passo 3. Abra o código diretamente pelo caminho: File -> Example ->Digital_Light_Sensor->Digital_Light_Sensor.

- Ou copie o código abaixo para a IDE e carregue para o Arduino.
/*
    Digital_Light_Sensor.ino
    A library for TSL2561

    Copyright (c) 2012 seeed technology inc.
    Author     : zhangkun
    Create Time:
    Change Log :

    The MIT License (MIT)

    Permission is hereby granted, free of charge, to any person obtaining a copy
    of this software and associated documentation files (the "Software"), to deal
    in the Software without restriction, including without limitation the rights
    to use, copy, modify, merge, publish, distribute, sublicense, and/or sell
    copies of the Software, and to permit persons to whom the Software is
    furnished to do so, subject to the following conditions:

    The above copyright notice and this permission notice shall be included in
    all copies or substantial portions of the Software.

    THE SOFTWARE IS PROVIDED "AS IS", WITHOUT WARRANTY OF ANY KIND, EXPRESS OR
    IMPLIED, INCLUDING BUT NOT LIMITED TO THE WARRANTIES OF MERCHANTABILITY,
    FITNESS FOR A PARTICULAR PURPOSE AND NONINFRINGEMENT. IN NO EVENT SHALL THE
    AUTHORS OR COPYRIGHT HOLDERS BE LIABLE FOR ANY CLAIM, DAMAGES OR OTHER
    LIABILITY, WHETHER IN AN ACTION OF CONTRACT, TORT OR OTHERWISE, ARISING FROM,
    OUT OF OR IN CONNECTION WITH THE SOFTWARE OR THE USE OR OTHER DEALINGS IN
    THE SOFTWARE.
*/

#include <Wire.h>
#include <Digital_Light_TSL2561.h>
void setup()
{
  Wire.begin();
  Serial.begin(9600);
  TSL2561.init();
}

void loop()
{
  Serial.print("The Light value is: ");
  Serial.println(TSL2561.readVisibleLux());
  delay(1000);
}
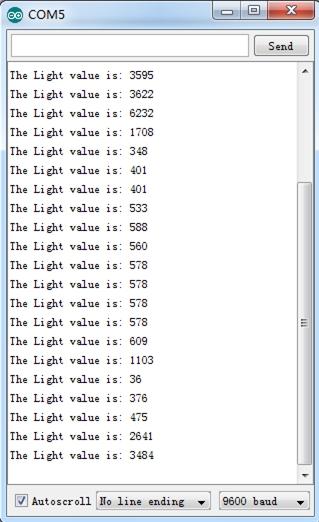
- Passo 4. Abra o monitor serial para monitorar o resultado.
Brincar com Raspberry Pi
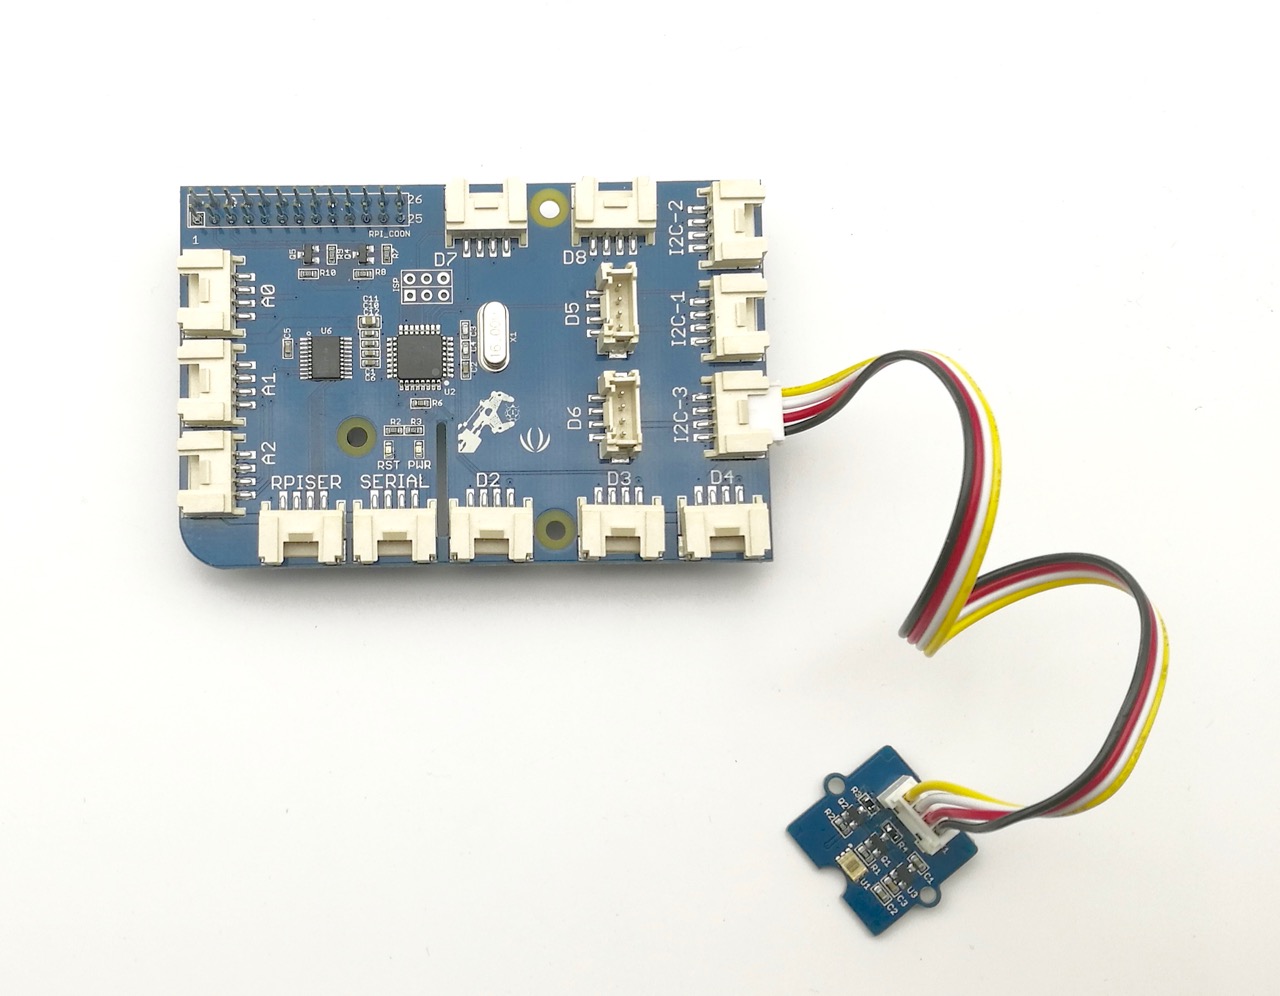
Hardware
- Passo 1. Prepare os itens abaixo:
| Raspberry pi | GrovePi_Plus | Grove - Digital light sensor |
|---|---|---|
 |  | |
| Adquira agora | Adquira agora | Adquira agora |
- Siga as instruções para configurar o ambiente de desenvolvimento.
- Conecte o sensor ao soquete I2C do grovepi+ usando um cabo Grove.
Software
Se você estiver usando Raspberry Pi com Raspberrypi OS >= Bullseye, você deve usar esta linha de comando apenas com Python3.
-
Passo 1. Siga Setting Software para configurar o ambiente de desenvolvimento.
-
Passo 1. Navegue até o diretório de demos:
cd yourpath/GrovePi/Software/Python/grove_i2c_digital_light_sensor/
- Passo 2. Para ver o código
nano grove_i2c_digital_light_sensor.py # "Ctrl+x" to exit #
#!/usr/bin/python
# TSL2561 I2C Light-To-Digital converter library for the Raspberry Pi.
# Datasheet: https://www.adafruit.com/datasheets/TSL2561.pdf
#
# This library is based on the work by Cedric Maion https://github.com/cmaion/TSL2561
#
# Read http://www.dexterindustries.com/topic/greehouse-project/ for the forum discussion about the sensor

from time import sleep
import smbus
from Adafruit_I2C import Adafruit_I2C
import RPi.GPIO as GPIO
from smbus import SMBus

TSL2561_Control = 0x80
TSL2561_Timing = 0x81
TSL2561_Interrupt = 0x86
TSL2561_Channel0L = 0x8C
TSL2561_Channel0H = 0x8D
TSL2561_Channel1L = 0x8E
TSL2561_Channel1H = 0x8F

TSL2561_Address = 0x29 #device address

LUX_SCALE = 14 # scale by 2^14
RATIO_SCALE = 9 # scale ratio by 2^9
CH_SCALE = 10 # scale channel values by 2^10
CHSCALE_TINT0 = 0x7517 # 322/11 * 2^CH_SCALE
CHSCALE_TINT1 = 0x0fe7 # 322/81 * 2^CH_SCALE

K1T = 0x0040 # 0.125 * 2^RATIO_SCALE
B1T = 0x01f2 # 0.0304 * 2^LUX_SCALE
M1T = 0x01be # 0.0272 * 2^LUX_SCALE
K2T = 0x0080 # 0.250 * 2^RATIO_SCA
B2T = 0x0214 # 0.0325 * 2^LUX_SCALE
M2T = 0x02d1 # 0.0440 * 2^LUX_SCALE
K3T = 0x00c0 # 0.375 * 2^RATIO_SCALE
B3T = 0x023f # 0.0351 * 2^LUX_SCALE
M3T = 0x037b # 0.0544 * 2^LUX_SCALE
K4T = 0x0100 # 0.50 * 2^RATIO_SCALE
B4T = 0x0270 # 0.0381 * 2^LUX_SCALE
M4T = 0x03fe # 0.0624 * 2^LUX_SCALE
K5T = 0x0138 # 0.61 * 2^RATIO_SCALE
B5T = 0x016f # 0.0224 * 2^LUX_SCALE
M5T = 0x01fc # 0.0310 * 2^LUX_SCALE
K6T = 0x019a # 0.80 * 2^RATIO_SCALE
B6T = 0x00d2 # 0.0128 * 2^LUX_SCALE
M6T = 0x00fb # 0.0153 * 2^LUX_SCALE
K7T = 0x029a # 1.3 * 2^RATIO_SCALE
B7T = 0x0018 # 0.00146 * 2^LUX_SCALE
M7T = 0x0012 # 0.00112 * 2^LUX_SCALE
K8T = 0x029a # 1.3 * 2^RATIO_SCALE
B8T = 0x0000 # 0.000 * 2^LUX_SCALE
M8T = 0x0000 # 0.000 * 2^LUX_SCALE


K1C = 0x0043 # 0.130 * 2^RATIO_SCALE
B1C = 0x0204 # 0.0315 * 2^LUX_SCALE
M1C = 0x01ad # 0.0262 * 2^LUX_SCALE
K2C = 0x0085 # 0.260 * 2^RATIO_SCALE
B2C = 0x0228 # 0.0337 * 2^LUX_SCALE
M2C = 0x02c1 # 0.0430 * 2^LUX_SCALE
K3C = 0x00c8 # 0.390 * 2^RATIO_SCALE
B3C = 0x0253 # 0.0363 * 2^LUX_SCALE
M3C = 0x0363 # 0.0529 * 2^LUX_SCALE
K4C = 0x010a # 0.520 * 2^RATIO_SCALE
B4C = 0x0282 # 0.0392 * 2^LUX_SCALE
M4C = 0x03df # 0.0605 * 2^LUX_SCALE
K5C = 0x014d # 0.65 * 2^RATIO_SCALE
B5C = 0x0177 # 0.0229 * 2^LUX_SCALE
M5C = 0x01dd # 0.0291 * 2^LUX_SCALE
K6C = 0x019a # 0.80 * 2^RATIO_SCALE
B6C = 0x0101 # 0.0157 * 2^LUX_SCALE
M6C = 0x0127 # 0.0180 * 2^LUX_SCALE
K7C = 0x029a # 1.3 * 2^RATIO_SCALE
B7C = 0x0037 # 0.00338 * 2^LUX_SCALE
M7C = 0x002b # 0.00260 * 2^LUX_SCALE
K8C = 0x029a # 1.3 * 2^RATIO_SCALE
B8C = 0x0000 # 0.000 * 2^LUX_SCALE
M8C = 0x0000 # 0.000 * 2^LUX_SCALE

# bus parameters
rev = GPIO.RPI_REVISION
if rev == 2 or rev == 3:
 bus = smbus.SMBus(1)
else:
 bus = smbus.SMBus(0)
i2c = Adafruit_I2C(TSL2561_Address)

debug = False
cooldown_time = 0.005 # measured in seconds
packageType = 0 # 0=T package, 1=CS package
gain = 0        # current gain: 0=1x, 1=16x [dynamically selected]
gain_m = 1      # current gain, as multiplier
timing = 2      # current integration time: 0=13.7ms, 1=101ms, 2=402ms [dynamically selected]
timing_ms = 0   # current integration time, in ms
channel0 = 0    # raw current value of visible+ir sensor
channel1 = 0    # raw current value of ir sensor
schannel0 = 0   # normalized current value of visible+ir sensor
schannel1 = 0   # normalized current value of ir sensor


def readRegister(address):
 try:
  byteval = i2c.readU8(address)

  sleep(cooldown_time)
  if (debug):
   print("TSL2561.readRegister: returned 0x%02X from reg 0x%02X" % (byteval, address))
  return byteval
 except IOError:
  print("TSL2561.readRegister: error reading byte from reg 0x%02X" % address)
  return -1


def writeRegister(address, val):
 try:
  i2c.write8(address, val)

  sleep(cooldown_time)
  if (debug):
   print("TSL2561.writeRegister: wrote 0x%02X to reg 0x%02X" % (val, address))
 except IOError:

  sleep(cooldown_time)
  print("TSL2561.writeRegister: error writing byte to reg 0x%02X" % address)
  return -1

def powerUp():
 writeRegister(TSL2561_Control, 0x03)

def powerDown():
 writeRegister(TSL2561_Control, 0x00)

def setTintAndGain():
 global gain_m, timing_ms

 if gain == 0:
  gain_m = 1
 else:
  gain_m = 16

 if timing == 0:
  timing_ms = 13.7
 elif timing == 1:
  timing_ms = 101
 else:
  timing_ms = 402
 writeRegister(TSL2561_Timing, timing | gain << 4)

def readLux():
 sleep(float(timing_ms + 1) / 1000)

 ch0_low  = readRegister(TSL2561_Channel0L)
 ch0_high = readRegister(TSL2561_Channel0H)
 ch1_low  = readRegister(TSL2561_Channel1L)
 ch1_high = readRegister(TSL2561_Channel1H)

 global channel0, channel1
 channel0 = (ch0_high<<8) | ch0_low
 channel1 = (ch1_high<<8) | ch1_low

 sleep(cooldown_time)
 if debug:
  print("TSL2561.readVisibleLux: channel 0 = %i, channel 1 = %i [gain=%ix, timing=%ims]" % (channel0, channel1, gain_m, timing_ms))

def readVisibleLux():
 global timing, gain

 powerUp()
 readLux()

 if channel0 < 500 and timing == 0:
  timing = 1
  sleep(cooldown_time)
  if debug:
   print("TSL2561.readVisibleLux: too dark. Increasing integration time from 13.7ms to 101ms")
  setTintAndGain()
  readLux()

 if channel0 < 500 and timing == 1:
  timing = 2
  sleep(cooldown_time)
  if debug:
   print("TSL2561.readVisibleLux: too dark. Increasing integration time from 101ms to 402ms")
  setTintAndGain()
  readLux()

 if channel0 < 500 and timing == 2 and gain == 0:
  gain = 1
  sleep(cooldown_time)
  if debug:
   print("TSL2561.readVisibleLux: too dark. Setting high gain")
  setTintAndGain()
  readLux()

 if (channel0 > 20000 or channel1 > 20000) and timing == 2 and gain == 1:
  gain = 0
  sleep(cooldown_time)
  if debug:
   print("TSL2561.readVisibleLux: enough light. Setting low gain")
  setTintAndGain()
  readLux()

 if (channel0 > 20000 or channel1 > 20000) and timing == 2:
  timing = 1
  sleep(cooldown_time)
  if debug:
   print("TSL2561.readVisibleLux: enough light. Reducing integration time from 402ms to 101ms")
  setTintAndGain()
  readLux()

 if (channel0 > 10000 or channel1 > 10000) and timing == 1:
  timing = 0
  sleep(cooldown_time)
  if debug:
   print("TSL2561.readVisibleLux: enough light. Reducing integration time from 101ms to 13.7ms")
  setTintAndGain()
  readLux()

 powerDown()

 if (timing == 0 and (channel0 > 5000 or channel1 > 5000)) or (timing == 1 and (channel0 > 37000 or channel1 > 37000)) or (timing == 2 and (channel0 > 65000 or channel1 > 65000)):
  # overflow
  return -1

 return calculateLux(channel0, channel1)

def calculateLux(ch0, ch1):
 chScale = 0
 if timing == 0:   # 13.7 msec
  chScale = CHSCALE_TINT0
 elif timing == 1: # 101 msec
  chScale = CHSCALE_TINT1;
 else:           # assume no scaling
  chScale = (1 << CH_SCALE)

 if gain == 0:
  chScale = chScale << 4 # scale 1X to 16X

 # scale the channel values
 global schannel0, schannel1
 schannel0 = (ch0 * chScale) >> CH_SCALE
 schannel1 = (ch1 * chScale) >> CH_SCALE

 ratio = 0
 if schannel0 != 0:
  ratio = (schannel1 << (RATIO_SCALE+1)) / schannel0
 ratio = (ratio + 1) >> 1

 if packageType == 0: # T package
  if ((ratio >= 0) and (ratio <= K1T)):
   b=B1T; m=M1T;
  elif (ratio <= K2T):
   b=B2T; m=M2T;
  elif (ratio <= K3T):
   b=B3T; m=M3T;
  elif (ratio <= K4T):
   b=B4T; m=M4T;
  elif (ratio <= K5T):
   b=B5T; m=M5T;
  elif (ratio <= K6T):
   b=B6T; m=M6T;
  elif (ratio <= K7T):
   b=B7T; m=M7T;
  elif (ratio > K8T):
   b=B8T; m=M8T;
 elif packageType == 1: # CS package
  if ((ratio >= 0) and (ratio <= K1C)):
   b=B1C; m=M1C;
  elif (ratio <= K2C):
   b=B2C; m=M2C;
  elif (ratio <= K3C):
   b=B3C; m=M3C;
  elif (ratio <= K4C):
   b=B4C; m=M4C;
  elif (ratio <= K5C):
   b=B5C; m=M5C;
  elif (ratio <= K6C):
   b=B6C; m=M6C;
  elif (ratio <= K7C):
   b=B7C; m=M7C;

 temp = ((schannel0*b)-(schannel1*m))
 if temp < 0:
  temp = 0;
 temp += (1<<(LUX_SCALE-1))
 # strip off fractional portion
 lux = temp>>LUX_SCALE
 sleep(cooldown_time)
 if debug:
  print("TSL2561.calculateLux: %i" % lux)

 return lux

def init():
 powerUp()
 setTintAndGain()
 writeRegister(TSL2561_Interrupt, 0x00)
 powerDown()

def main():
 init()
 while (True):
  print("Lux: %i [Vis+IR=%i, IR=%i @ Gain=%ix, Timing=%.1fms]" % (readVisibleLux(), channel0, channel1, gain_m, timing_ms))
  sleep(1)

if __name__ == "__main__":
        main()
- Etapa 3. Execute a demonstração.
sudo python3 grove_i2c_digital_light_sensor.py
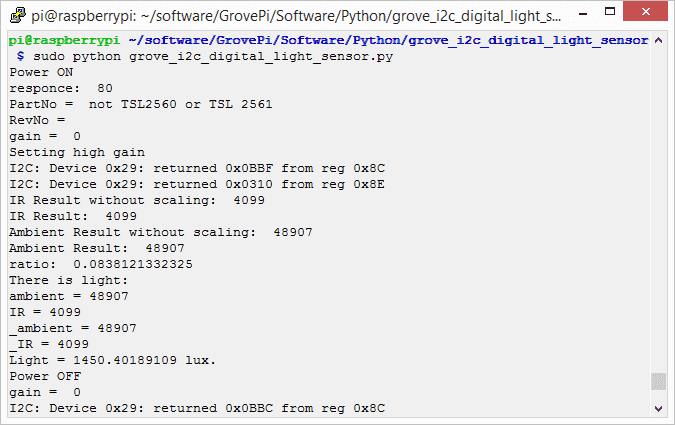
- Etapa 4. Aqui está o resultado.
Visualizador de Esquemático Online
Recursos
- [Eagle] Esquemático do Grove - Digital Light Sensor
- [PDF] Arquivo PDF do Esquemático do Grove - Digital Light Sensor
- [PDF] Arquivo PDF da PCB do Grove - Digital Light Sensor
- [Library] Biblioteca Github Grove-Digital Light
- [Datasheet] TSL2561 Datasheet
Projetos
Seeed LoRa IoTea Solution: Um sistema automático de coleta de informações aplicado a plantações de chá. Faz parte da coleta inteligente de informações agrícolas.
Intel Edison IoT Hydroponic Controller: Um controlador hidropônico habilitado para IoT usando o Intel Edison durante o Boston IoT Hackathon.
COI - Light Transmission Meter: O produto final usa o sensor de luz fornecido no Grove Starter Kit Plus para medir a variação na intensidade da luz.
Suporte Técnico & Discussão de Produto
Obrigado por escolher nossos produtos! Estamos aqui para fornecer diferentes tipos de suporte para garantir que sua experiência com nossos produtos seja a mais tranquila possível. Oferecemos vários canais de comunicação para atender a diferentes preferências e necessidades.