Grove - DS1307 RTC (Relógio de Tempo Real) para Arduino
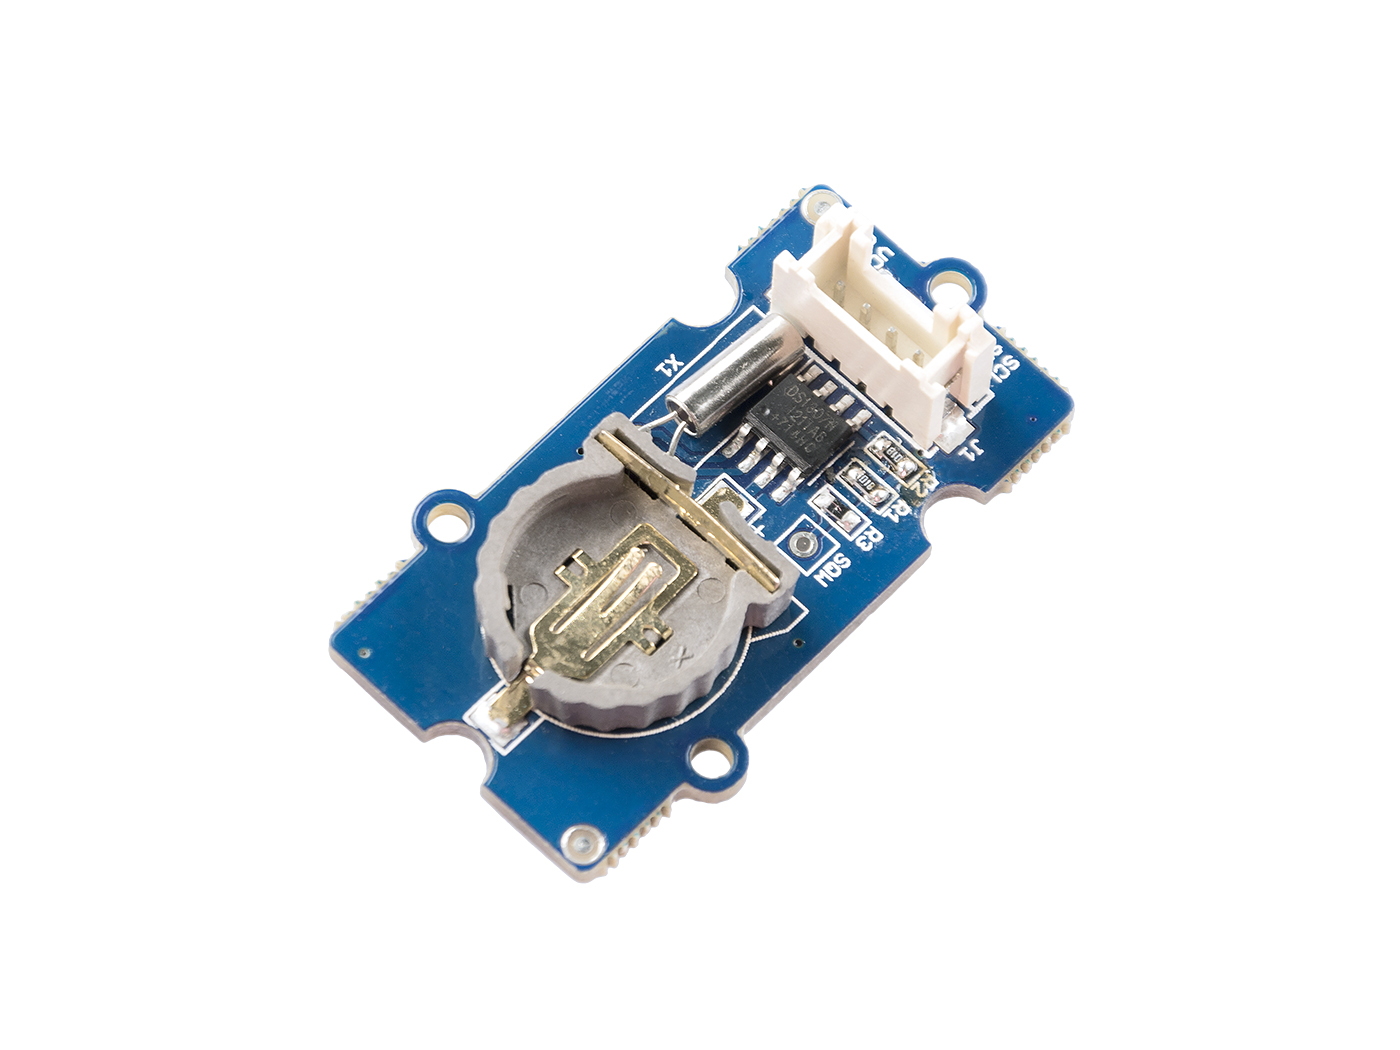
O módulo RTC é baseado no chip de relógio DS1307, que suporta o protocolo I2C. Ele utiliza uma bateria de célula de lítio (CR1225). O relógio/calendário fornece segundos, minutos, horas, dia, data, mês e ano. A data de fim de mês é ajustada automaticamente para meses com menos de 31 dias, incluindo correções para anos bissextos. O relógio funciona nos formatos de 24 horas ou 12 horas com indicador AM/PM. E é válido até 2100. Para obter um desempenho robusto, você deve colocar uma célula de lítio CR1225 de 3 Volts no suporte de bateria. Se você usar apenas a alimentação principal, o módulo poderá não funcionar normalmente, porque o cristal pode não oscilar.

A bateria não está incluída.
Leitura prévia
Uma introdução ao RTC para Arduino é fortemente recomendada antes da leitura, caso você não esteja familiarizado com ele:

Especificações
- Tamanho da PCB: 2,0cm*4,0cm
- Interface: conector de pinos com passo de 2,0mm
- Estrutura de IO: SCL,SDA,VCC,GND
- ROHS: SIM
- VCC:3,3~5,5V
- Nível Alto Lógico de Entrada :2,2~VCC+0,3 V
- Nível Baixo Lógico de Entrada :-0,3~+0,8 V
- Tensão da Bateria:2,0~3,5 V
Para mais detalhes sobre módulos Grove, consulte o Grove System
Plataformas suportadas
| Arduino | Raspberry Pi | |||
|---|---|---|---|---|
As plataformas acima mencionadas como suportadas são uma indicação da compatibilidade teórica ou de software do módulo. Na maioria dos casos, fornecemos apenas biblioteca de software ou exemplos de código para a plataforma Arduino. Não é possível fornecer biblioteca de software / código de demonstração para todas as possíveis plataformas de MCU. Portanto, os usuários precisam escrever sua própria biblioteca de software.
Primeiros passos
Brincar com Arduino
Hardware
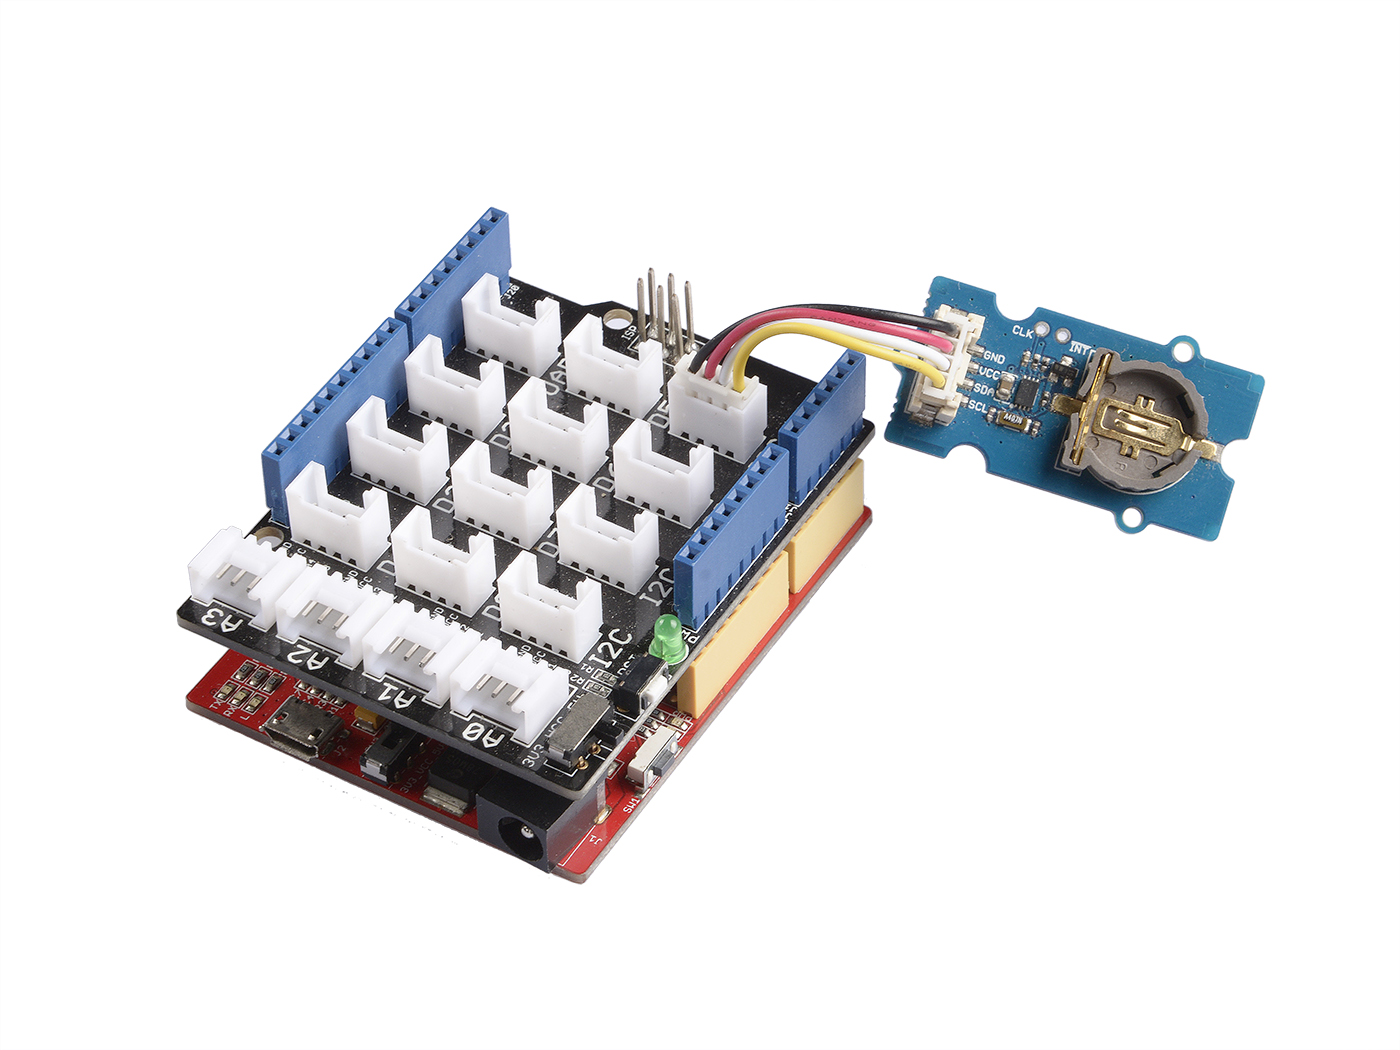
- Passo 1. Prepare os itens abaixo:
| Seeeduino V4.2 | Base Shield | Grove-RTC |
|---|---|---|
 |  |  |
| Adquira agora | Adquira agora | Adquira agora |
- Passo 2. Conecte o Grove-RTC à porta I2C do Grove-Base Shield.
- Passo 3. Conecte o Grove - Base Shield ao Seeeduino.
- Passo 4. Conecte o Seeeduino ao PC via um cabo USB.
Para obter um desempenho robusto, você deve colocar uma célula de lítio CR1225 de 3 Volts no suporte de bateria. Se você usar apenas a alimentação principal, o módulo poderá não funcionar normalmente, porque o cristal pode não oscilar.
Se não tivermos o base shield, também podemos conectar o Grove-RTC diretamente à placa Arduino. Siga a conexão abaixo.
| Seeeduino_v4 | Grove-RTC |
|---|---|
| 5V | VCC |
| GND | GND |
| SDA | SDA |
| SCL | SCL |
Software
Passo 1. Baixe a RTC Library.
Passo 2. Consulte How to install library para instalar a biblioteca para Arduino.
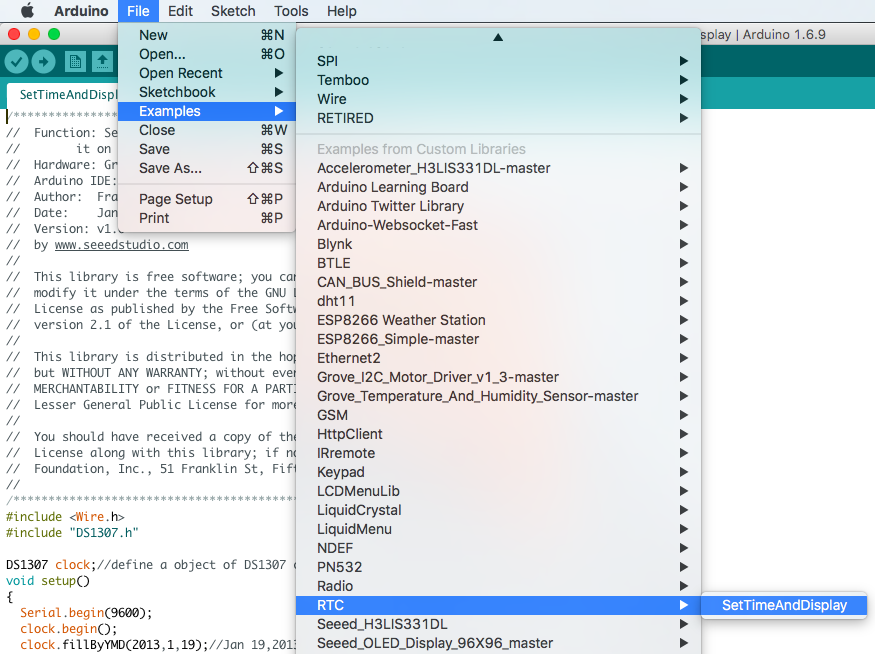
Passo 3. Crie um novo sketch Arduino e cole nele o código abaixo ou abra o código diretamente pelo caminho: File -> Example ->RTC->SetTimeAndDisplay.
#include <Wire.h>
#include "DS1307.h"

DS1307 clock;//define a object of DS1307 class
void setup()
{
    Serial.begin(9600);
    clock.begin();
    clock.fillByYMD(2013,1,19);//Jan 19,2013
    clock.fillByHMS(15,28,30);//15:28 30"
    clock.fillDayOfWeek(SAT);//Saturday
    clock.setTime();//write time to the RTC chip
}
void loop()
{
    printTime();
}
    /*Function: Display time on the serial monitor*/
void printTime()
{
    clock.getTime();
    Serial.print(clock.hour, DEC);
    Serial.print(":");
    Serial.print(clock.minute, DEC);
    Serial.print(":");
    Serial.print(clock.second, DEC);
    Serial.print("  ");
    Serial.print(clock.month, DEC);
    Serial.print("/");
    Serial.print(clock.dayOfMonth, DEC);
    Serial.print("/");
    Serial.print(clock.year+2000, DEC);
    Serial.print(" ");
    Serial.print(clock.dayOfMonth);
    Serial.print("*");
    switch (clock.dayOfWeek)// Friendly printout the weekday
    {
        case MON:
        Serial.print("MON");
        break;
        case TUE:
        Serial.print("TUE");
        break;
        case WED:
        Serial.print("WED");
        break;
        case THU:
        Serial.print("THU");
        break;
        case FRI:
        Serial.print("FRI");
        break;
        case SAT:
        Serial.print("SAT");
        break;
        case SUN:
        Serial.print("SUN");
        break;
    }
    Serial.println(" ");
}
Passo 4. Configure a hora. Altere os argumentos da função para a data/hora atual. Por favor, preste atenção ao formato dos argumentos.
clock.fillByYMD(2013,1,19);//Jan 19,2013
clock.fillByHMS(15,28,30);//15:28 30"
clock.fillDayOfWeek(SAT);//Saturday
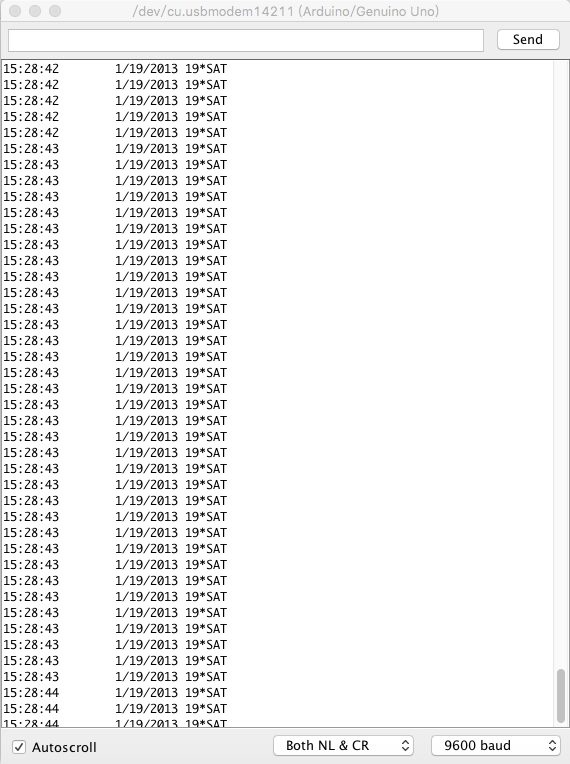
Passo 5. Envie o código e abra o monitor serial para receber os dados do sensor
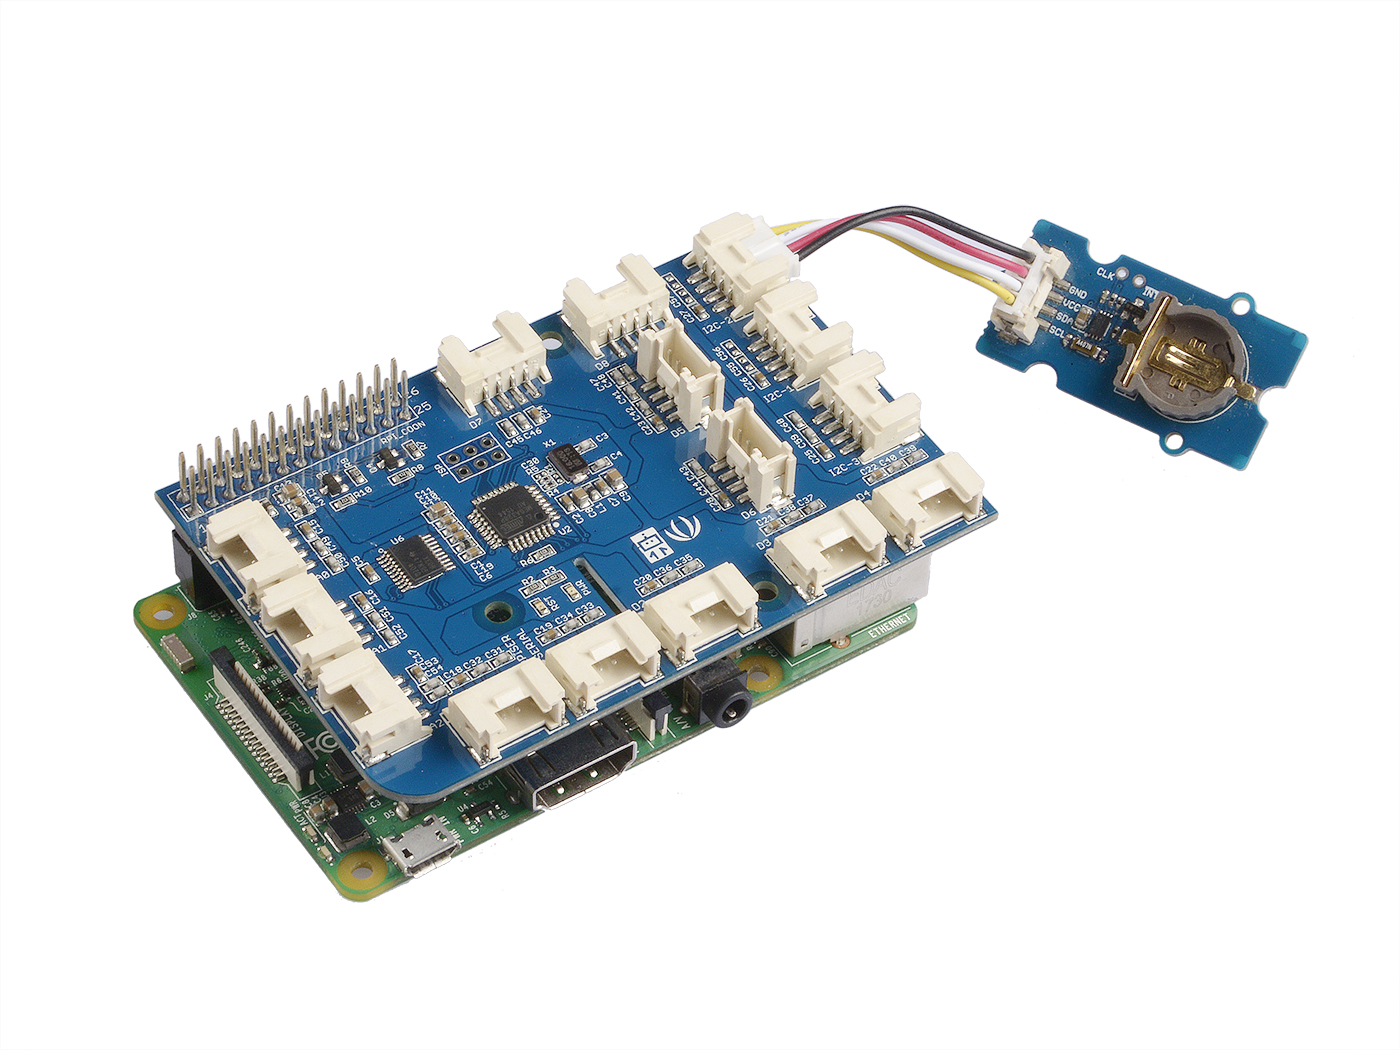
Brincar com Raspberry Pi
Hardware
- Passo 1. Prepare os itens abaixo:
| Raspberry pi | GrovePi_Plus | Grove-RTC |
|---|---|---|
 |  | |
| Adquira agora | Adquira agora | Adquira agora |
- Passo 2. Conecte o GrovePi_Plus ao Raspberry.
- Passo 3. Conecte o Grove-RTC à porta I2C do GrovePi_Plus.
- Passo 4. Conecte o Raspberry ao PC através do cabo USB.
Software
- Passo 1. Siga Setting Software para configurar o ambiente de desenvolvimento.
- Passo 2. Dê um git clone no repositório do Github.
cd ~
git clone https://github.com/DexterInd/GrovePi.git
- Passo 3. Execute os comandos abaixo para usar este sensor
cd ~/GrovePi/Software/Python
python grove_i2c_rtc.py
Aqui está o código
#!/usr/bin/env python
#
# GrovePi Example for using the Grove I2C RTC (https://www.seeedstudio.com/wiki/Grove_-_RTC)
#
# The GrovePi connects the Raspberry Pi and Grove sensors.  You can learn more about GrovePi here:  http://www.dexterindustries.com/GrovePi
#
# Have a question about this example?  Ask on the forums here:  http://forum.dexterindustries.com/c/grovepi
#
'''
## License
The MIT License (MIT)
GrovePi for the Raspberry Pi: an open source platform for connecting Grove Sensors to the Raspberry Pi.
Copyright (C) 2017  Dexter Industries
Permission is hereby granted, free of charge, to any person obtaining a copy
of this software and associated documentation files (the "Software"), to deal
in the Software without restriction, including without limitation the rights
to use, copy, modify, merge, publish, distribute, sublicense, and/or sell
copies of the Software, and to permit persons to whom the Software is
furnished to do so, subject to the following conditions:
The above copyright notice and this permission notice shall be included in
all copies or substantial portions of the Software.
THE SOFTWARE IS PROVIDED "AS IS", WITHOUT WARRANTY OF ANY KIND, EXPRESS OR
IMPLIED, INCLUDING BUT NOT LIMITED TO THE WARRANTIES OF MERCHANTABILITY,
FITNESS FOR A PARTICULAR PURPOSE AND NONINFRINGEMENT. IN NO EVENT SHALL THE
AUTHORS OR COPYRIGHT HOLDERS BE LIABLE FOR ANY CLAIM, DAMAGES OR OTHER
LIABILITY, WHETHER IN AN ACTION OF CONTRACT, TORT OR OTHERWISE, ARISING FROM,
OUT OF OR IN CONNECTION WITH THE SOFTWARE OR THE USE OR OTHER DEALINGS IN
THE SOFTWARE.
'''

import time
import grovepi

# Connect the Grove Real Time Clock to any I2C port eg. I2C-1
# Can be found at I2C address 0x68
# SCL,SDA,VCC,GND

while True:
    try:
        print(grovepi.rtc_getTime())
        time.sleep(.5)

    except IOError:
        print ("Error")
-
Etapa 4. Aqui está o resultado.

Demo 2: Grove_rtc
Você também pode usar esta demonstração para mostrar a hora normalmente. Crie o arquivo grove_rtc.py e copie os códigos abaixo.
    '''
     * Grove-RTC.py
     * Demo for Raspberry Pi
     *
     * Copyright (c) 2014 seeed technology inc.
     * Website    : community.seeedstudio.com/
     * Author     : Lambor
     * Create Time: Nov 2014
     * Change Log :
     *
     * The MIT License (MIT)
     *
     * Permission is hereby granted, free of charge, to any person obtaining a copy
     * of this software and associated documentation files (the "Software"), to deal
     * in the Software without restriction, including without limitation the rights
     * to use, copy, modify, merge, publish, distribute, sublicense, and/or sell
     * copies of the Software, and to permit persons to whom the Software is
     * furnished to do so, subject to the following conditions:
     *
     * The above copyright notice and this permission notice shall be included in
     * all copies or substantial portions of the Software.
     *
     * THE SOFTWARE IS PROVIDED "AS IS", WITHOUT WARRANTY OF ANY KIND, EXPRESS OR
     * IMPLIED, INCLUDING BUT NOT LIMITED TO THE WARRANTIES OF MERCHANTABILITY,
     * FITNESS FOR A PARTICULAR PURPOSE AND NONINFRINGEMENT. IN NO EVENT SHALL THE
     * AUTHORS OR COPYRIGHT HOLDERS BE LIABLE FOR ANY CLAIM, DAMAGES OR OTHER
     * LIABILITY, WHETHER IN AN ACTION OF CONTRACT, TORT OR OTHERWISE, ARISING FROM,
     * OUT OF OR IN CONNECTION WITH THE SOFTWARE OR THE USE OR OTHER DEALINGS IN
     * THE SOFTWARE.
     '''

    #!/usr/bin/python
import time
import smbus


    bus = smbus.SMBus(1)    # 0 = /dev/i2c-0 (port I2C0), 1 = /dev/i2c-1 (port I2C1)

class DS1307():
        def __init__(self):
            self.MON = 1
            self.TUE = 2
            self.WED = 3
            self.THU = 4
            self.FRI = 5
            self.SAT = 6
            self.SUN = 7
            self.DS1307_I2C_ADDRESS = 0x68

            print 'begin'

        def decToBcd(self, val):
            return ( (val/10*16) + (val%10) )

        def bcdToDec(self,  val):
            return ( (val/16*10) + (val%16) )

        def begin(self, news):
            print news

        def startClock(self):
            bus.write_byte(self.DS1307_I2C_ADDRESS, 0x00)
            self.second = bus.read_byte(self.DS1307_I2C_ADDRESS) & 0x7f
            bus.write_byte_data(self.DS1307_I2C_ADDRESS, 0x00, self.second)

            print 'startClock..'

        def stopClock(self):
            bus.write_byte(self.DS1307_I2C_ADDRESS, 0x00)
            self.second = bus.read_byte(self.DS1307_I2C_ADDRESS) | 0x80
            bus.write_byte_data(self.DS1307_I2C_ADDRESS, 0x00, self.second)

            print 'stopClock..'

        def setTime(self):
            data = [self.decToBcd(self.second), self.decToBcd(self.minute), \
                    self.decToBcd(self.hour), self.decToBcd(self.dayOfWeek), \
                    self.decToBcd(self.dayOfMonth), self.decToBcd(self.month), \
                    self.decToBcd(self.year)]

            bus.write_byte(self.DS1307_I2C_ADDRESS, 0x00)
            bus.write_i2c_block_data(self.DS1307_I2C_ADDRESS,0x00,data)

            print 'setTime..'

        def getTime(self):
            bus.write_byte(self.DS1307_I2C_ADDRESS, 0x00)
            data = bus.read_i2c_block_data(self.DS1307_I2C_ADDRESS,0x00)
            #A few of these need masks because certain bits are control bits
            self.second = self.bcdToDec(data[0] & 0x7f)
            self.minute = self.bcdToDec(data[1])
            self.hour = self.bcdToDec(data[2] & 0x3f)  #Need to change this if 12 hour am/pm
            self.dayOfWeek = self.bcdToDec(data[3])
            self.dayOfMonth = self.bcdToDec(data[4])
            self.month = self.bcdToDec(data[5])
            self.year = self.bcdToDec(data[6])

            print 'getTime..'

        def fillByHMS(self, _hour,  _minute,  _second):
            self.hour = _hour
            self.minute = _minute
            self.second = _second

            print 'fillByHMS..'

        def fillByYMD(self, _year,  _month,  _day):
            self.year = _year - 2000
            self.month = _month;
            self.dayOfMonth = _day

            print 'fillByYMD..'

        def fillDayOfWeek(self,  _dow):
            self.dayOfWeek = _dow

            print 'fillDayOfWeek..'

    if __name__ == "__main__":
        clock = DS1307()
        clock.fillByYMD(2015,3,5)
        clock.fillByHMS(12,42,30)
        clock.fillDayOfWeek(clock.THU)
        clock.setTime()
        while True:
            clock.getTime()
            print clock.hour, ":", clock.minute, ":", \
                    clock.second, " ", clock.dayOfMonth, "/", \
                    clock.month, "/", clock.year,"  ", "weekday", \
                    ":", clock.dayOfWeek
            time.sleep(1)
Execute os comandos abaixo para usar este sensor
sudo python grove_rtc.py
Aqui está o resultado.

Schematic Online Viewer
Recursos
- [Eagle] Grove-RTC no formato Eagle
- [PDF] Esquemático do Grove-RTC em formato PDF
- [PDF] PCB do Grove-RTC em formato PDF
- [Biblioteca] Repositório do Github para RTC
- [Datasheet] Datasheet do DS1307
Projetos
Usando um Relógio de Tempo Real com Arduino: Já quis criar um projeto que seja ativado em um horário programado? Usar um Relógio de Tempo Real (RTC) é uma ótima maneira de fazer isso!
Relógio Colorido: Um relógio que mostra seu nível de energia e cumprimenta você quando se aproxima
Suporte Técnico e Discussão de Produto
Obrigado por escolher nossos produtos! Estamos aqui para oferecer diferentes formas de suporte para garantir que sua experiência com nossos produtos seja a mais tranquila possível. Oferecemos vários canais de comunicação para atender diferentes preferências e necessidades.