Projeto FRIGATE NVR com Seeed Odyssey
O que é o Frigate NVR?
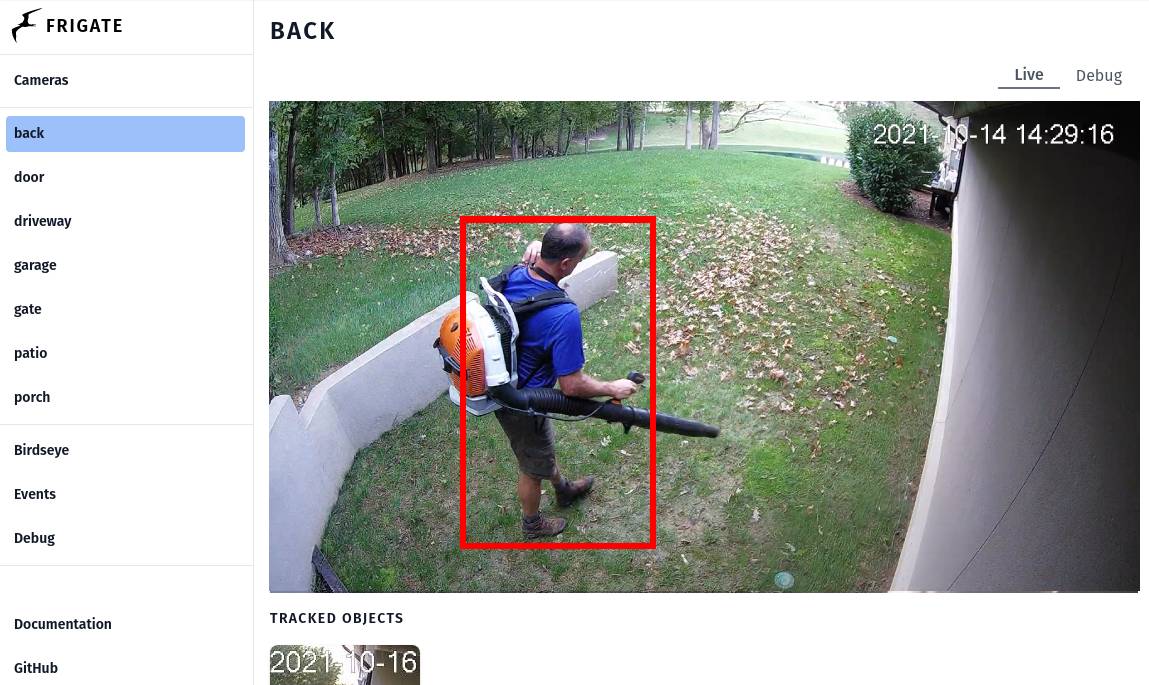
*imagem de demonstração do frigate do site oficial do frigate
"Frigate is an open source NVR built around real-time AI object detection. All processing is performed locally on your own hardware, and your camera feeds never leave your home." -- Frigate NVR
Frigate NVR é um dos projetos de gravador de vídeo em rede mais populares, que adiciona função de IA processada localmente às suas câmeras de segurança; portanto, além de você não ser cobrado uma quantidade absurda de dinheiro por um servidor de inferência em nuvem, seus valiosos dados privados de stream de câmera também não precisarão ser expostos à internet aberta. O Frigate pode processar mais de 100 detecções de objetos por segundo com um único Google Coral TPU a bordo; você pode personalizar as zonas de detecção e máscaras para atender ao seu caso de uso. Ele também pode ser integrado ao Home Assistant e a outras plataformas de automação com o mínimo de esforço de configuração, para fornecer mais recursos de segurança e integrar soluções de Edge AI ao seu patrimônio valioso.
Pré-requisitos
- 1 x Odyssey Blue: Quad Core Celeron J4125 Mini PC with 128GB external SSD
- 1 x Coral USB Accelerator (opcional)
- Stream de câmera(s) RTSP
- Teclado e monitor HDMI
Certifique-se de que o Odyssey Blue esteja conectado à mesma rede ou tenha acesso à sua câmera web RTSP.
Primeiros passos
Neste guia, mostraremos como configurar o ambiente Docker do Frigate para executar detecção de IA local no stream da câmera RTSP no Odyssey Blue da Seeed Studio com o Coral USB Accelerator; para a configuração como add-on do Home Assistant, fique ligado!!
PASSO 1: Certifique-se de que você instalou o Debian 11 no Odyssey Blue
Por favor, faça o download da imagem do sistema operacional Debian 11 e siga este guia de configuração para instalar o sistema operacional Debian 11 no Odyssey Blue.
PASSO 2: Certifique-se de que você instalou o Docker Engine e o Docker Compose no Debian 11
Siga o guia Install Docker Engine on Debian para instalar o Docker Engine e o Docker Compose.
Para verificar se você instalou o Docker com sucesso:
Abra o aplicativo de terminal e digite o seguinte comando:
docker -v
você deverá ver a seguinte saída impressa no terminal:

PASSO 3: Criar o arquivo Docker do frigate
Digite o seguinte comando no aplicativo de terminal para criar o arquivo Docker do frigate com o editor de texto vi:
1 mkdir ~/Documents/frigate
2 cd ~/Documents/frigate
3 vi frigate.yml
Insira as seguintes linhas no arquivo frigate.yml para a configuração do docker-compose do frigate e substitua as partes necessárias de acordo com a configuração do seu ambiente.
version: "3.9"
services:
  frigate:
    container_name: frigate
    privileged: true # this may not be necessary for all setups
    restart: unless-stopped
    image: blakeblackshear/frigate:stable-amd64
    shm_size: "64mb" # update for your cameras based on calculation above
    devices:
      - /dev/bus/usb:/dev/bus/usb # passes the USB Coral, needs to be modified for other versions
      - /dev/apex_0:/dev/apex_0 # passes a PCIe Coral, follow driver instructions here https://coral.ai/docs/m2/get-started/#2a-on-linux
      - /dev/dri/renderD128 # for intel hwaccel, needs to be updated for your hardware
    volumes:
      - /etc/localtime:/etc/localtime:ro
      - /path/to/your/config.yml:/config/config.yml:ro
      - /path/to/your/storage:/media/frigate
      - type: tmpfs # Optional: 1GB of memory, reduces SSD/SD Card wear
        target: /tmp/cache
        tmpfs:
          size: 1000000000
    ports:
      - "5000:5000"
      - "1935:1935" # RTMP feeds
    environment:
      FRIGATE_RTSP_PASSWORD: "password"
Para mais detalhes sobre as opções de configuração do arquivo yaml do docker-compose do frigate, acesse a página de documentação do frigate
No meu caso, meu frigate.yml se parece com isto:
version: "3.7"
services:
  frigate:
    container_name: frigate
    privileged: true # this may not be necessary for all setups
    restart: unless-stopped
    image: blakeblackshear/frigate:stable-amd64
    shm_size: "64mb" # update for your cameras based on calculation above
    devices:
      - /dev/bus/usb:/dev/bus/usb # passes the USB Coral, needs to be modified for other versions
      - /dev/apex_0:/dev/apex_0 # passes a PCIe Coral, follow driver instructions here https://coral.ai/docs/m2/get-started/#2a-on-linux
      - /dev/dri/renderD128 # for intel hwaccel, needs to be updated for your hardware
    volumes:
      - /etc/localtime:/etc/localtime:ro
      - /home/seeed/Documents/frigate/config/config.yml:/config/config.yml:ro
      - /home/seeed/Documents/frigate:/media/frigate
      - type: tmpfs # Optional: 1GB of memory, reduces SSD/SD Card wear
        target: /tmp/cache
        tmpfs:
          size: 1000000000
    ports:
      - "5000:5000"
      - "1935:1935" # RTMP feeds
    environment:
      FRIGATE_RTSP_PASSWORD: "password"
PASSO 4: Criar o arquivo de configuração do frigate
Digite o seguinte comando no aplicativo de terminal para criar uma pasta de configuração:
1 cd ~/Documents/frigate
2 mkdir config/
3 cd config/
Digite o seguinte comando para criar o arquivo de configuração do frigate com o editor de texto vi:
1 vi config.yml
Em seguida, copie as linhas a seguir para a configuração mínima necessária para colocar o frigate em execução:
mqtt:
  host: mqtt.server.com #Please replace with a valid mqtt broker
cameras:
  back:
    ffmpeg:
      inputs:
        - path: rtsp://viewer:{FRIGATE_RTSP_PASSWORD}@10.0.10.10:554/cam/realmonitor?channel=1&subtype=2 #replace with your RTSP camera url
          roles:
            - detect
            - rtmp
    detect:
      width: 1280
      height: 720
Acesse a página de documentação do frigate, seção configuration, para ver todas as opções de configuração
No meu caso, além da seguinte lista de configurações que personalizei de acordo com a minha instalação, todas as demais configurações foram mantidas como padrão:
- MQTT: broker.hivemq.com
- Detector: Coral USB Accelerator
- Câmeras: rtsp://192.168.8.34:8080/unicast
- Objeto rastreado: person, cup (Observação: a lista de rótulos de objetos pode ser encontrada na página de documentação do frigate, seção Objects)
- Gravação: quando Person ou Cup são detectados, a duração da gravação é de 2 s antes da detecção e 2 s após a detecção.
Portanto, meu config.yml se parece com isto:
mqtt:
  host: broker.hivemq.com # using HiveMQ MQTT Broker for testing purpose
detectors:
  # Required: name of the detector
  coral:
    # Required: type of the detector
    # Valid values are 'edgetpu' (requires device property below) and 'cpu'.
    type: edgetpu
    # Optional: device name as defined here: https://coral.ai/docs/edgetpu/multiple-edgetpu/#using-the-tensorflow-lite-python-api
    device: usb
# Optional: model modifications
model:
  # Optional: path to the model (default: automatic based on detector)
  path: /edgetpu_model.tflite
  # Optional: path to the labelmap (default: shown below)
  labelmap_path: /labelmap.txt
  # Required: Object detection model input width (default: shown below)
  width: 320
  # Required: Object detection model input height (default: shown below)
  height: 320
cameras:
  back:
    ffmpeg:
      inputs:
        - path: rtsp://192.168.8.34:8080/unicast
          roles:
            - detect
            - rtmp
# Optional: Detect configuration
# NOTE: Can be overridden at the camera level
detect:
  # Optional: width of the frame for the input with the detect role (default: shown below)
  width: 800
  # Optional: height of the frame for the input with the detect role (default: shown below)
  height: 600
  # Optional: desired fps for your camera for the input with the detect role (default: shown below)
  # NOTE: Recommended value of 5. Ideally, try and reduce your FPS on the camera.
  fps: 8
  # Optional: enables detection for the camera (default: True)
  # This value can be set via MQTT and will be updated in startup based on retained value
  enabled: True
  # Optional: Number of frames without a detection before frigate considers an object to be gone. (default: 5x the frame rate)
  max_disappeared: 25
  # Optional: Configuration for stationary object tracking
  stationary:
    # Optional: Frequency for confirming stationary objects (default: shown below)
    # When set to 0, object detection will not confirm stationary objects until movement is detected.
    # If set to 10, object detection will run to confirm the object still exists on every 10th frame.
    interval: 0
    # Optional: Number of frames without a position change for an object to be considered stationary (default: 10x the frame rate or 10s)
    threshold: 50
    # Optional: Define a maximum number of frames for tracking a stationary object (default: not set, track forever)
    # This can help with false positives for objects that should only be stationary for a limited amount of time.
    # It can also be used to disable stationary object tracking. For example, you may want to set a value for person, but leave
    # car at the default.
    # WARNING: Setting these values overrides default behavior and disables stationary object tracking.
    #          There are very few situations where you would want it disabled. It is NOT recommended to
    #          copy these values from the example config into your config unless you know they are needed.
    max_frames:
      # Optional: Default for all object types (default: not set, track forever)
      default: 3000
      # Optional: Object specific values
      objects:
        person: 1000
# Optional: Object configuration
# NOTE: Can be overridden at the camera level
objects:
  # Optional: list of objects to track from labelmap.txt (default: shown below)
  track:
    - person
    - cup
# Optional: Record configuration
# NOTE: Can be overridden at the camera level
record:
  # Optional: Enable recording (default: shown below)
  # WARNING: If recording is disabled in the config, turning it on via
  #          the UI or MQTT later will have no effect.
  # WARNING: Frigate does not currently support limiting recordings based
  #          on available disk space automatically. If using recordings,
  #          you must specify retention settings for a number of days that
  #          will fit within the available disk space of your drive or Frigate
  #          will crash.
  enabled: True
  # Optional: Number of minutes to wait between cleanup runs (default: shown below)
  # This can be used to reduce the frequency of deleting recording segments from disk if you want to minimize i/o
  expire_interval: 60
  # Optional: Retention settings for recording
  retain:
    # Optional: Number of days to retain recordings regardless of events (default: shown below)
    # NOTE: This should be set to 0 and retention should be defined in events section below
    #       if you only want to retain recordings of events.
    days: 0
    # Optional: Mode for retention. Available options are: all, motion, and active_objects
    #   all - save all recording segments regardless of activity
    #   motion - save all recordings segments with any detected motion
    #   active_objects - save all recording segments with active/moving objects
    # NOTE: this mode only applies when the days setting above is greater than 0
    mode: all
  # Optional: Event recording settings
  events:
    # Optional: Maximum length of time to retain video during long events. (default: shown below)
    # NOTE: If an object is being tracked for longer than this amount of time, the retained recordings
    #       will be the last x seconds of the event unless retain->days under record is > 0.
    max_seconds: 300
    # Optional: Number of seconds before the event to include (default: shown below)
    pre_capture: 2
    # Optional: Number of seconds after the event to include (default: shown below)
    post_capture: 2
    # Optional: Objects to save recordings for. (default: all tracked objects)
    objects:
      - person
      - cup
    # Optional: Restrict recordings to objects that entered any of the listed zones (default: no required zones)
    required_zones: []
    # Optional: Retention settings for recordings of events
    retain:
      # Required: Default retention days (default: shown below)
      default: 10
      # Optional: Mode for retention. (default: shown below)
      #   all - save all recording segments for events regardless of activity
      #   motion - save all recordings segments for events with any detected motion
      #   active_objects - save all recording segments for event with active/moving objects
      #
      # NOTE: If the retain mode for the camera is more restrictive than the mode configured
      #       here, the segments will already be gone by the time this mode is applied.
      #       For example, if the camera retain mode is "motion", the segments without motion are
      #       never stored, so setting the mode to "all" here won't bring them back.
      mode: motion
      # Optional: Per object retention days
      objects:
        person: 2
        cup: 3
ETAPA 5: Inicie o contêiner docker do frigate
1 cd ~/Documents/frigate
2 sudo docker-compose -f frigate.yml up
Para solução de problemas, você pode identificar erros imprimindo o log do docker:
sudo docker logs frigate
ETAPA 6: Visualize o front-end web do frigate
Encontre o endereço IP do seu servidor Odyssey Blue digitando o seguinte comando no terminal:
1 ip a
você deverá ver uma saída semelhante impressa no terminal; você pode encontrar o endereço IP válido de acordo com a sua configuração de conexão:
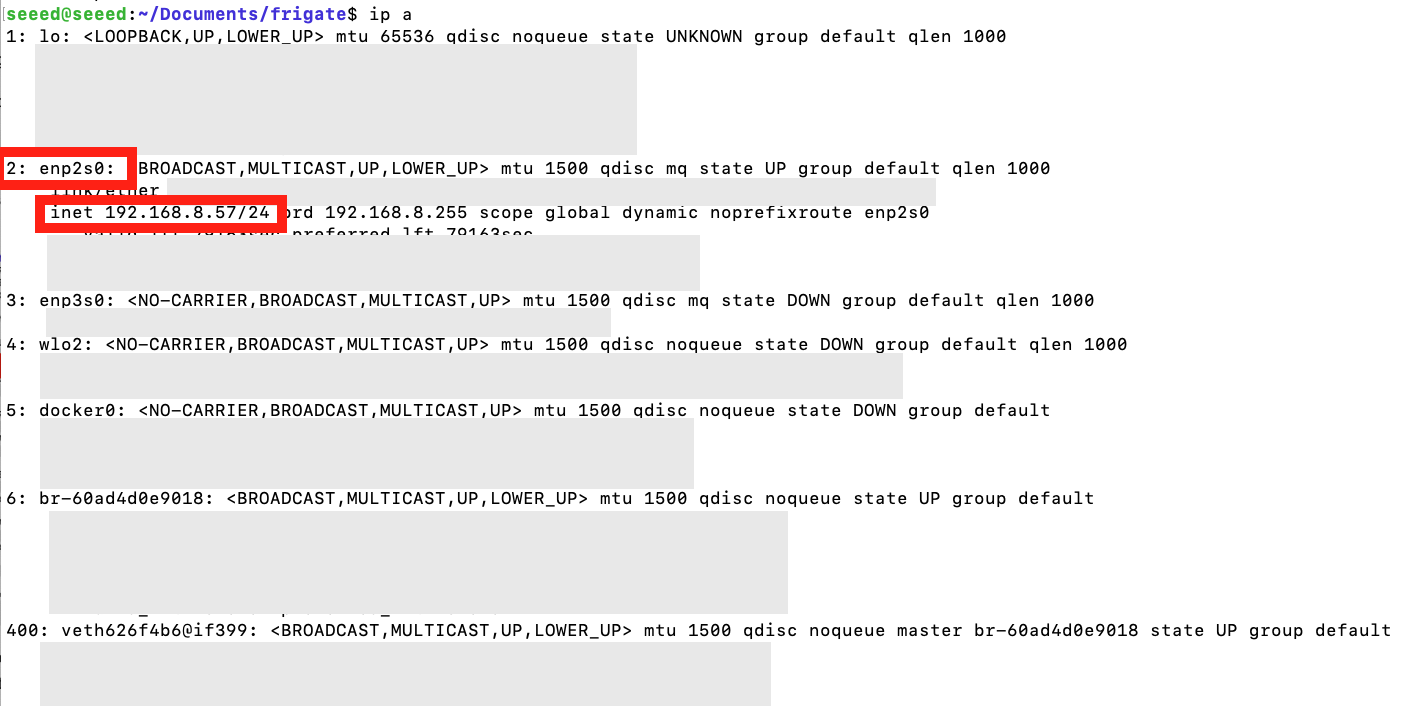
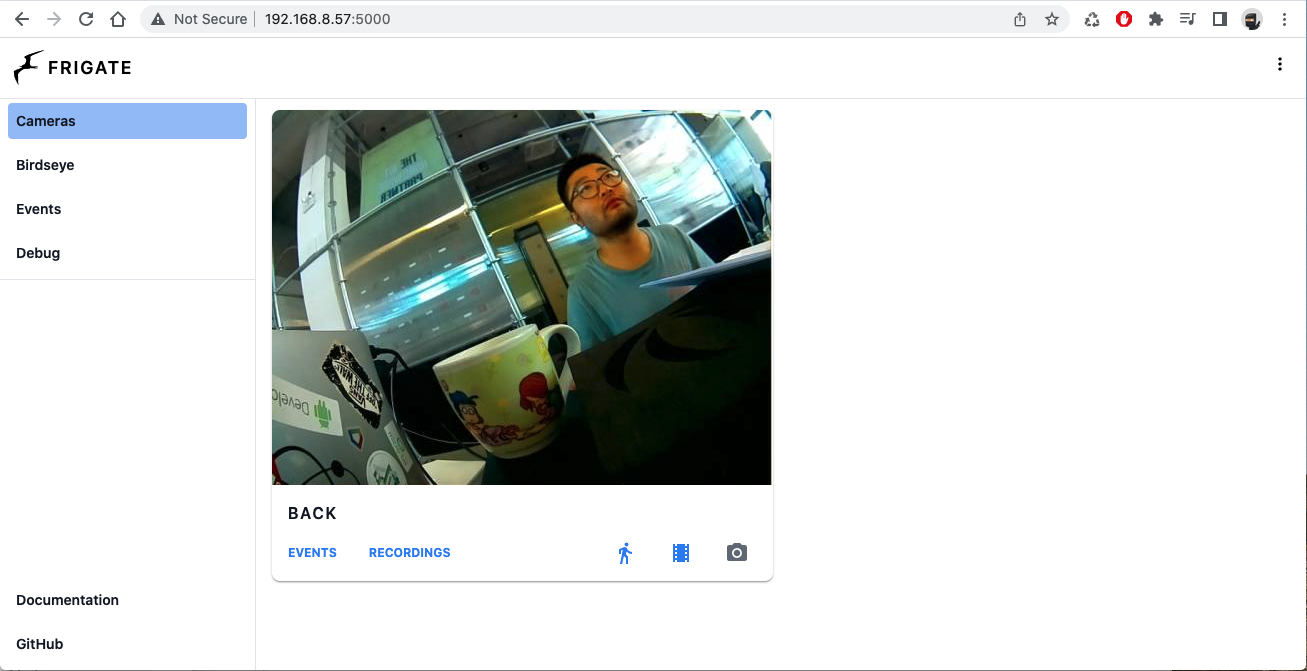
depois de localizar o endereço IP do seu Odyssey Blue, abra o seu navegador web favorito e digite ip-address:5000 na barra de endereços. No meu caso, o endereço IP é 192.168.8.57, portanto a URL que coloco na barra de endereços do navegador é 192.168.8.57:5000; você deverá chegar a uma página inicial semelhante à da imagem abaixo:
Para observar a detecção em tempo real, clique no feed de vídeo e clique em Debug no canto superior direito da visualização principal, depois clique no botão SHOW OPTIONS abaixo do feed em tempo real e marque Bonding Box ou quaisquer outras opções que você queira ver no feed ao vivo.

Divirta-se explorando mais opções no Frigate com o Odyssey Blue. Fique à vontade para conferir outras opções de SBC, como a série reComputer, para adicionar Edge AI às suas aplicações.
Suporte Técnico e Discussão de Produtos
Obrigado por escolher nossos produtos! Estamos aqui para oferecer diferentes formas de suporte para garantir que sua experiência com nossos produtos seja a mais tranquila possível. Disponibilizamos vários canais de comunicação para atender a diferentes preferências e necessidades.