Como usar FreeRTOS para multitarefa no Arduino
O que é RTOS
Um dos componentes mais importantes dos sistemas embarcados atuais é o RTOS, também conhecido como Real-Time Operating System (Sistema Operacional em Tempo Real), que é responsável por tudo, desde o agendamento de tarefas até a execução de aplicações.
O RTOS é projetado para fornecer um modo de execução previsível. Quando o processamento deve atender ao limite de tempo do sistema, utiliza‑se um RTOS. Portanto, em comparação com um GPOS (General Purpose Operating System), o RTOS é geralmente leve e de pequeno porte, e normalmente fornece apenas as funções necessárias para executar tipos específicos de aplicações em um hardware específico. Em alguns casos, os desenvolvedores podem modificar o RTOS existente, reduzi‑lo para fornecer apenas a funcionalidade exigida por uma aplicação específica e/ou personalizar suas características de funcionalidade ou desempenho.
Como o RTOS funciona
O kernel é o componente central do sistema operacional. Sistemas operacionais como o Linux usam um kernel, permitindo que os usuários pareçam acessar o computador ao mesmo tempo. Cada programa em execução é uma tarefa (ou thread) sob o controle do sistema operacional. Se um sistema operacional pode executar várias tarefas dessa maneira, pode‑se dizer que ele é multitarefa.
- Multitarefa
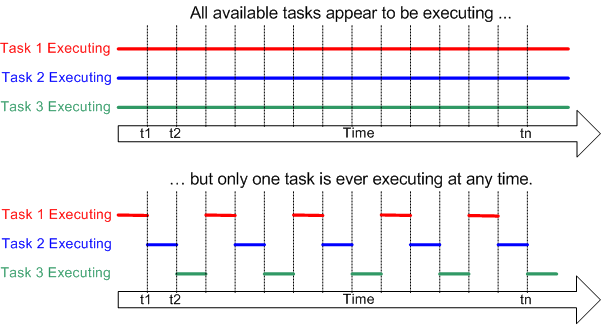
Processadores tradicionais só podem executar uma tarefa por vez, mas um sistema operacional multitarefa pode fazer com que cada tarefa pareça ser executada simultaneamente, alternando rapidamente entre as tarefas. A figura a seguir mostra a relação entre o modo de execução de três tarefas e o tempo.
- Escalonamento
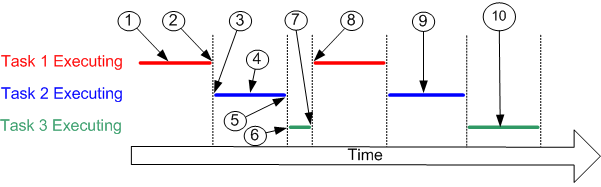
O escalonador é a parte do kernel responsável por decidir qual tarefa executar em qualquer momento específico. O kernel pode pausar e retomar uma tarefa várias vezes durante o ciclo de vida da tarefa.
Uma estratégia de escalonamento é um algoritmo usado pelo escalonador para decidir qual tarefa executar em qualquer ponto no tempo. A estratégia de um sistema multiusuário (não em tempo real) provavelmente dará a cada tarefa uma proporção “justa” do tempo do processador.
Além de ser suspensa involuntariamente pelo kernel, uma tarefa também pode optar por se suspender. Ela fará isso se quiser atrasar (dormir) por um período de tempo ou esperar (bloquear) até que um recurso esteja disponível (como uma porta serial) ou um evento ocorra (como o pressionar de uma tecla).
Referência: FreeRTOS Fundamentals
O que é FreeRTOS
FreeRTOS é uma classe de RTOS projetado para ser pequeno o suficiente para rodar em um microcontrolador – embora seu uso não seja limitado a aplicações com microcontroladores. O FreeRTOS inclui um kernel e um conjunto crescente de bibliotecas de software adequadas para uso em diversos setores e aplicações. Com a ajuda do FreeRTOS, você pode fazer multitarefa em um hardware baseado em microcontrolador!
Para compatibilidade com Arduino, nós portamos o FreeRTOS para o framework Arduino para que você possa usar o FreeRTOS com suas placas Arduino favoritas com facilidade!
Em 2017, a Amazon assumiu a gestão do FreeRTOS, o que o torna confiável e seguro para o mundo embarcado.
Início Rápido com FreeRTOS para Arduino
Instalando as bibliotecas FreeRTOS para Arduino
-
Visite o repositório Seeed_Arduino_FreeRTOS e baixe todo o repositório para o seu disco local.
-
Agora, a biblioteca Seeed_Arduino_FreeRTOS pode ser instalada na IDE Arduino. Abra a IDE Arduino e clique em
sketch->Include Library->Add .ZIP Library, e escolha o arquivoSeeed_Arduino_FreeRTOSque você acabou de baixar.

Esta biblioteca porta o FreeRTOS mais recente (10.2.1) e permite que você crie projetos FreeRTOS na IDE Arduino.
Placas Suportadas
A Seeed_Arduino_FreeRTOS oferece suporte a todas as placas SAMD da Seeed:
- Wio Terminal
- Seeeduino XIAO
- Série Seeeduino Zero:
- Seeeduino LoRaWAN
Exemplos FreeRTOS para Arduino
O FreeRTOS pode ser muito poderoso ao fornecer ao microcontrolador funcionalidade de escalonamento em tempo real, comunicação entre tarefas, primitivas de temporização e sincronização.
Para ajudar você a começar com FreeRTOS facilmente, aqui são fornecidos alguns exemplos para referência. Os exemplos a seguir são compilados e executados no Wio Terminal.
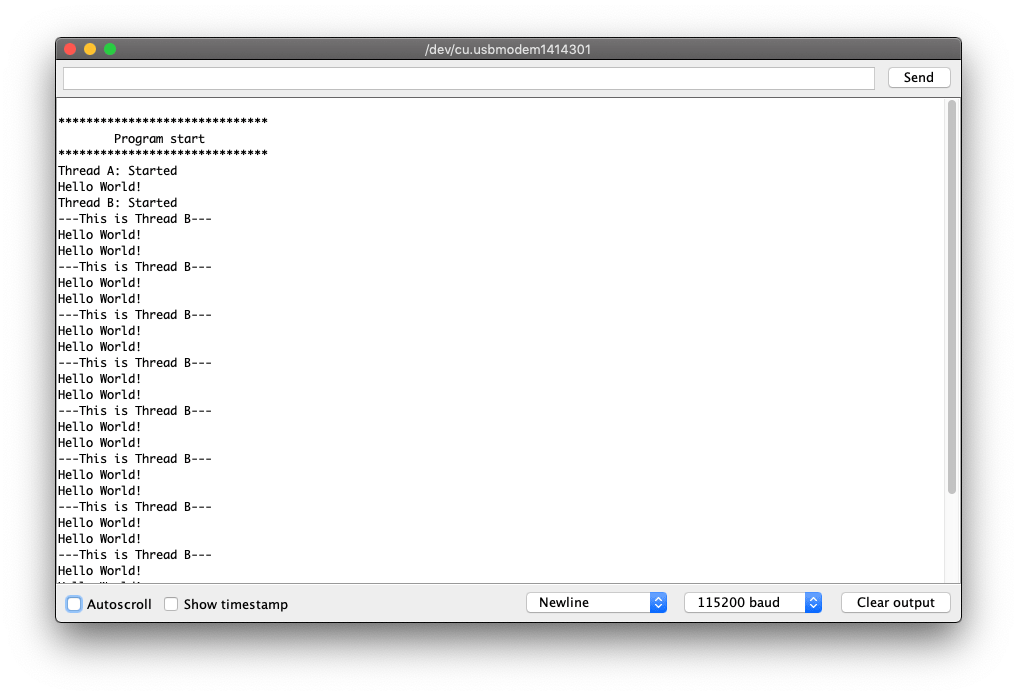
Exemplo Hello World
Este exemplo simplesmente cria duas threads que imprimem strings diferentes no Monitor Serial em taxas diferentes.
#include <Seeed_Arduino_FreeRTOS.h>

TaskHandle_t Handle_aTask;
TaskHandle_t Handle_bTask;

static void ThreadA(void* pvParameters) {
    Serial.println("Thread A: Started");

    while (1) {
        Serial.println("Hello World!");
        delay(1000);
    }
}

static void ThreadB(void* pvParameters) {
    Serial.println("Thread B: Started");

    for (int i = 0; i < 10; i++) {
        Serial.println("---This is Thread B---");
        delay(2000);
    }
    Serial.println("Thread B: Deleting");
    vTaskDelete(NULL);
}

void setup() {

    Serial.begin(115200);

    vNopDelayMS(1000); // prevents usb driver crash on startup, do not omit this
    while(!Serial);  // Wait for Serial terminal to open port before starting program

    Serial.println("");
    Serial.println("******************************");
    Serial.println("        Program start         ");
    Serial.println("******************************");

    // Create the threads that will be managed by the rtos
    // Sets the stack size and priority of each task
    // Also initializes a handler pointer to each task, which are important to communicate with and retrieve info from tasks
    xTaskCreate(ThreadA,     "Task A",       256, NULL, tskIDLE_PRIORITY + 2, &Handle_aTask);
    xTaskCreate(ThreadB,     "Task B",       256, NULL, tskIDLE_PRIORITY + 1, &Handle_bTask);

    // Start the RTOS, this function will never return and will schedule the tasks.
    vTaskStartScheduler();
}

void loop() {
    // NOTHING
}
Exemplo Blink
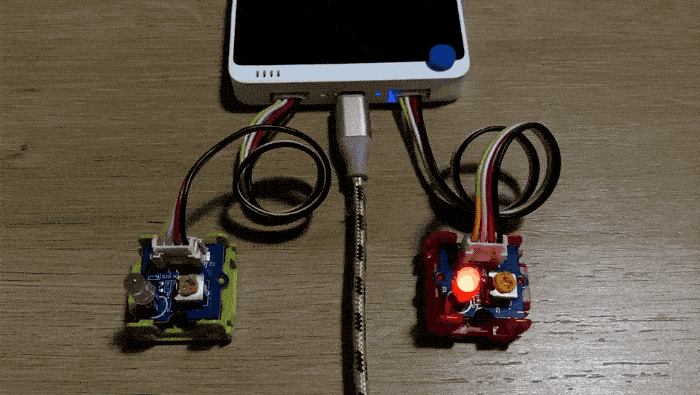
Este exemplo também cria duas threads e gera sinais para acender o LED. Uma serve para simplesmente piscar o LED e a outra para fazer o LED “respirar”.
Certifique‑se de que o LED “Breathing” esteja em um pino PWM.
#include <Seeed_Arduino_FreeRTOS.h>

#define LEDPIN_1 PIN_WIRE_SCL // Left side of Grove Port of Wio Terminal
#define LEDPIN_2 D0 // Right side of Grove Port of Wio Terminal

TaskHandle_t Handle_aTask;
TaskHandle_t Handle_bTask;

// Blinking LED
static void LED_1(void* pvParameters) {
    while (1) {
        digitalWrite(LEDPIN_1, HIGH);
        delay(1000);
        digitalWrite(LEDPIN_1, LOW);
        delay(1000);
    }
}

// Breathing LED
static void LED_2(void* pvParameters) {
    int cnt = 5;
    while (1) {
        for (byte value = 0 ; value < 255; value+=cnt) {
            analogWrite(LEDPIN_2, value);
            delay(20);
        }
        delay(200);
        for (byte value = 255 ; value > 0; value-=cnt) {
            analogWrite(LEDPIN_2, value);
            delay(20);
        }
    }
}

void setup() {
    Serial.begin(115200);

    vNopDelayMS(1000); // prevents usb driver crash on startup, do not omit this
//    while(!Serial);  // Wait for serial terminal to open port before starting program

    pinMode(LEDPIN_1, OUTPUT);
    pinMode(LEDPIN_2, OUTPUT);

    xTaskCreate(LED_1,     "Task A",       256, NULL, tskIDLE_PRIORITY + 2, &Handle_aTask);
    xTaskCreate(LED_2,     "Task B",       256, NULL, tskIDLE_PRIORITY + 1, &Handle_bTask);

    // Start the RTOS, this function will never return and will schedule the tasks.
    vTaskStartScheduler();
}

void loop() {

}
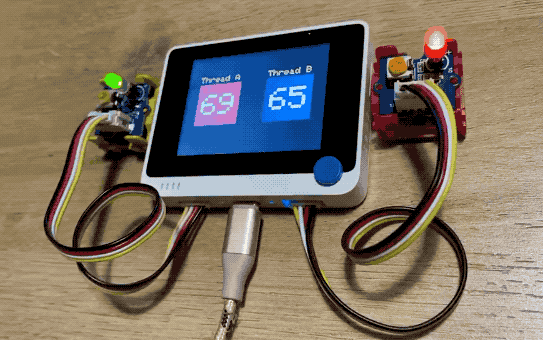
Exemplo de LCD
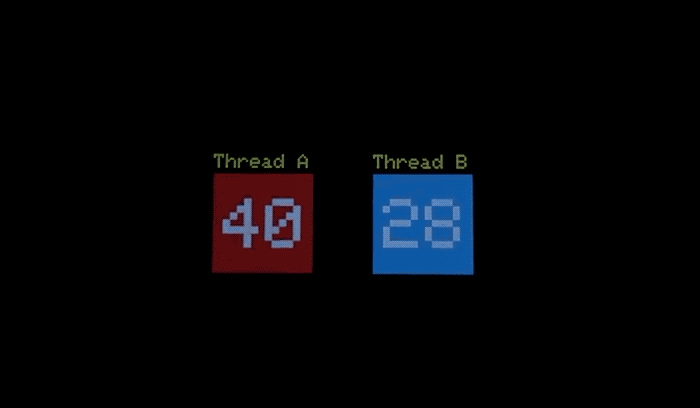
Este exemplo é uma demonstração do FreeRTOS com outras bibliotecas Arduino, como Sprites de LCD no Wio Terminal. Este exemplo cria dois sprites em duas threads para contar números em direções opostas. taskMonitor é uma função usada para monitorar threads e imprimir informações de pilha sobre cada thread.
#include <Seeed_Arduino_FreeRTOS.h>
#include <TFT_eSPI.h>

TaskHandle_t Handle_aTask;
TaskHandle_t Handle_bTask;
TaskHandle_t Handle_monitorTask;

TFT_eSPI tft = TFT_eSPI();
TFT_eSprite img = TFT_eSprite(&tft);
TFT_eSprite img2 = TFT_eSprite(&tft);

static void LCD_TASK_1 (void* pvParameters) {
    Serial.println("Thread A: Started");
    img.createSprite(100, 100);
    img.fillSprite(tft.color565(229,58,64)); // RED
    img.setTextSize(8);
    img.setTextColor(TFT_WHITE);
    for(int i = 0; i < 100; i++) {
        img.drawNumber(i, 10, 25);
        img.pushSprite(30, 70);
        img.fillSprite(tft.color565(229,58,64));
        delay(1000);
        if(i== 99) i = 0;
    }
}

static void LCD_TASK_2 (void* pvParameters) {
    Serial.println("Thread B: Started");
    img2.createSprite(100, 100);
    img2.fillSprite(tft.color565(48,179,222)); // BLUE
    img2.setTextSize(8);
    img2.setTextColor(TFT_WHITE);
    for(int x = 99; x >= 0; x--) {
        img2.drawNumber(x, 10, 25);
        img2.pushSprite(190, 70);
        img2.fillSprite(tft.color565(48,179,222));
        delay(500);
        if(x== 0) x = 99;
    }
}

void taskMonitor(void* pvParameters) {
    int x;
    int measurement;

    Serial.println("Task Monitor: Started");

    // run this task a few times before exiting forever
    for (x = 0; x < 10; ++x) {

        Serial.println("");
        Serial.println("******************************");
        Serial.println("[Stacks Free Bytes Remaining] ");

        measurement = uxTaskGetStackHighWaterMark(Handle_aTask);
        Serial.print("Thread A: ");
        Serial.println(measurement);

        measurement = uxTaskGetStackHighWaterMark(Handle_bTask);
        Serial.print("Thread B: ");
        Serial.println(measurement);

        measurement = uxTaskGetStackHighWaterMark(Handle_monitorTask);
        Serial.print("Monitor Stack: ");
        Serial.println(measurement);

        Serial.println("******************************");

        delay(10000); // print every 10 seconds
    }

    // delete ourselves.
    // Have to call this or the system crashes when you reach the end bracket and then get scheduled.
    Serial.println("Task Monitor: Deleting");
    vTaskDelete(NULL);
}

void setup() {

    Serial.begin(115200);

    vNopDelayMS(1000); // prevents usb driver crash on startup, do not omit this
    while (!Serial) ;  // Wait for Serial terminal to open port before starting program

    tft.begin();
    tft.setRotation(3);
    tft.fillScreen(tft.color565(9,7,7)); // BLACK background
    tft.setTextColor(tft.color565(239,220,5)); // YELLOW text
    tft.setTextSize(2);
    tft.drawString("Thread A", 30, 50);
    tft.drawString("Thread B", 190, 50);

    Serial.println("");
    Serial.println("******************************");
    Serial.println("        Program start         ");
    Serial.println("******************************");

    // Create the threads that will be managed by the rtos
    // Sets the stack size and priority of each task
    // Also initializes a handler pointer to each task, which are important to communicate with and retrieve info from tasks
    xTaskCreate(LCD_TASK_1,     "Task A",       256, NULL, tskIDLE_PRIORITY + 3, &Handle_aTask);
    xTaskCreate(LCD_TASK_2,     "Task B",       256, NULL, tskIDLE_PRIORITY + 2, &Handle_bTask);
    xTaskCreate(taskMonitor, "Task Monitor",    128, NULL, tskIDLE_PRIORITY + 1, &Handle_monitorTask);

    // Start the RTOS, this function will never return and will schedule the tasks.
    vTaskStartScheduler();
}

void loop() {
    //NOTHING
}
FreeRTOS em Cpp Para Arduino
Para mais, também fornecemos Seeed_Arduino_ooFreeRTOS, que é uma coleção de wrappers em C++ encapsulando a funcionalidade do FreeRTOS, e funciona sob o framework do Arduino.
Instalando as Bibliotecas FreeRTOS Cpp para Arduino
-
Visite o repositório Seeed_Arduino_ooFreeRTOS e faça o download de todo o repositório para o seu disco local.
-
Agora a biblioteca Seeed_Arduino_ooFreeRTOS pode ser instalada na IDE do Arduino. Abra a IDE do Arduino e clique em
sketch->Include Library->Add .ZIP Library, e escolha o arquivoSeeed_Arduino_ooFreeRTOSque você acabou de baixar.
Exemplo Blink em Cpp
#include <Seeed_Arduino_ooFreeRTOS.h>
#include "thread.hpp"
#include "ticks.hpp"

using namespace cpp_freertos;

class BlinkThread : public Thread {

public:

  BlinkThread(int i, int delayInSeconds)
    : Thread( 256, 1),
      Id (i),
      DelayInSeconds(delayInSeconds)
  {
    Start();
  };

protected:

  virtual void Run() {
    while (true) {
      Serial.printf("Blink Therad: %d\n\r", Id);
      digitalWrite(LED_BUILTIN, HIGH);   // turn the LED on (HIGH is the voltage level)
      Delay(Ticks::SecondsToTicks(DelayInSeconds));
      digitalWrite(LED_BUILTIN, LOW);    // turn the LED off by making the voltage LOW
      Delay(Ticks::SecondsToTicks(DelayInSeconds));
    }
  };

private:
  int Id;
  int DelayInSeconds;
};


void setup (void)
{

  // start up the serial interface
  Serial.begin(115200);
  Serial.println("Testing FreeRTOS C++ wrappers");
  Serial.println("Simple Tasks");

  // initialize digital pin LED_BUILTIN as an output.
  pinMode(LED_BUILTIN, OUTPUT);

  static BlinkThread p1(1, 3);
  static BlinkThread p2(2, 5);

  Thread::StartScheduler();

  //
  //  We shouldn't ever get here unless someone calls
  //  Thread::EndScheduler()
  //
  Serial.println("Scheduler ended!");

}

void loop()
{
  // Empty. Things are done in Tasks.
}