Uso Avançado de Wi‑Fi
Este wiki apresenta alguns usos avançados da biblioteca de Wi‑Fi, como as bibliotecas HTTPClient, DNSServer e WebServer. Com essas bibliotecas implementadas, você pode desenvolver seus projetos de IoT com APIs simples.
Certifique-se de que você seguiu o Network Overview para atualizar o firmware mais recente e as bibliotecas dependentes.

Certifique-se de que a versão do firmware RTL8720 é >= v2.0.2
Uso do HTTPClient
HTTPClient é usado para fazer requisições HTTP GET, POST e PUT para um servidor web de forma muito fácil. Aqui estão alguns exemplos para você começar!
Exemplo de HTTP GET
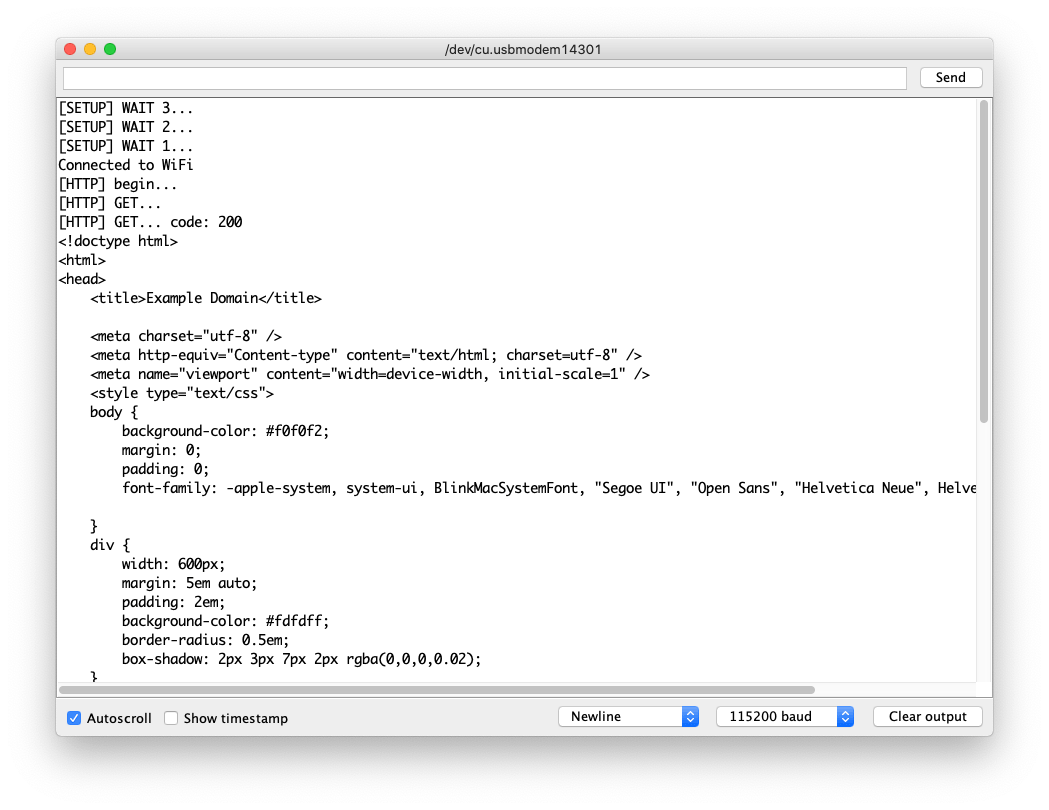
Este é um exemplo de uso do HTTPClient para uma conexão HTTP simples e que imprime a resposta de volta no Serial Monitor.
-
Altere
yourNetworkeyourPasswordpara o SSID e a senha do seu Wi‑Fi. -
Envie o código para o Wio Terminal.
#include <rpcWiFi.h>
#include <HTTPClient.h>

const char* ssid = "yourNetwork";
const char* password =  "yourPassword";

void setup() {

  Serial.begin(115200);
  WiFi.begin(ssid, password);

  while (WiFi.status() != WL_CONNECTED) { //Check for the connection
    delay(500);
    Serial.println("Connecting..");
  }
  Serial.print("Connected to the WiFi network with IP: ");
  Serial.println(WiFi.localIP());
}

void loop() {
    // wait for WiFi connection
    if((WiFi.status() == WL_CONNECTED)) {
        HTTPClient http;
        Serial.print("[HTTP] begin...\n");
        // configure traged server and url
        http.begin("http://www.example.com/index.html"); //HTTP
        Serial.print("[HTTP] GET...\n");
        // start connection and send HTTP header
        int httpCode = http.GET();
        // httpCode will be negative on error
        if(httpCode > 0) {
            // HTTP header has been send and Server response header has been handled
            Serial.printf("[HTTP] GET... code: %d\n", httpCode);
            // file found at server
            if(httpCode == HTTP_CODE_OK) {
                String payload = http.getString();
                Serial.println(payload);
            }
        } else {
            Serial.printf("[HTTP] GET... failed, error: %s\n", http.errorToString(httpCode).c_str());
        }
        http.end();
    }
    delay(5000);
}
Exemplo de HTTPs GET
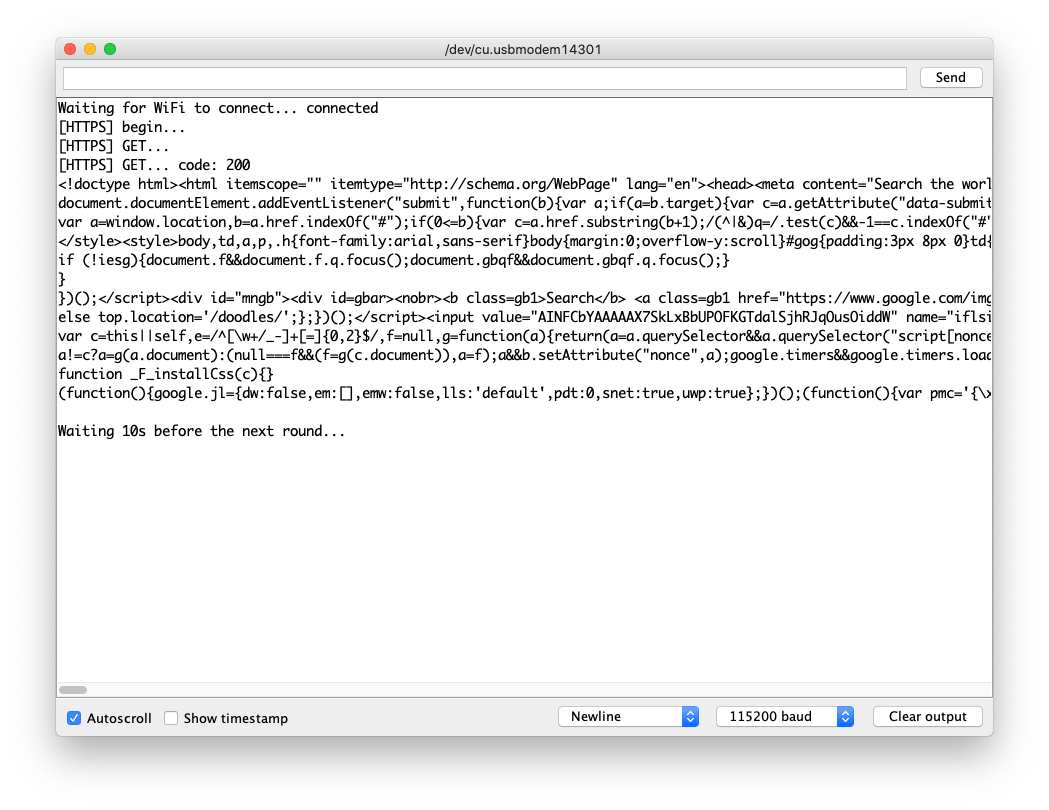
Este é o HTTPs connection usando a biblioteca HTTPClient. Você pode usar isto como referência para enviar requisições HTTPs GET para sites que deseja visitar!
Você pode descobrir o root CA do site seguindo this.
-
Altere
yourNetworkeyourPasswordpara o SSID e a senha do seu Wi‑Fi. -
Envie o código para o Wio Terminal.
#include <rpcWiFi.h>
#include <HTTPClient.h>
#include <WiFiClientSecure.h>

const char* ssid = "yourNetwork";
const char* password =  "yourPassword";

const char* test_root_ca = \
                            "-----BEGIN CERTIFICATE-----\n"
                            "MIIESjCCAzKgAwIBAgINAeO0mqGNiqmBJWlQuDANBgkqhkiG9w0BAQsFADBMMSAw\n"
                            "HgYDVQQLExdHbG9iYWxTaWduIFJvb3QgQ0EgLSBSMjETMBEGA1UEChMKR2xvYmFs\n"
                            "U2lnbjETMBEGA1UEAxMKR2xvYmFsU2lnbjAeFw0xNzA2MTUwMDAwNDJaFw0yMTEy\n"
                            "MTUwMDAwNDJaMEIxCzAJBgNVBAYTAlVTMR4wHAYDVQQKExVHb29nbGUgVHJ1c3Qg\n"
                            "U2VydmljZXMxEzARBgNVBAMTCkdUUyBDQSAxTzEwggEiMA0GCSqGSIb3DQEBAQUA\n"
                            "A4IBDwAwggEKAoIBAQDQGM9F1IvN05zkQO9+tN1pIRvJzzyOTHW5DzEZhD2ePCnv\n"
                            "UA0Qk28FgICfKqC9EksC4T2fWBYk/jCfC3R3VZMdS/dN4ZKCEPZRrAzDsiKUDzRr\n"
                            "mBBJ5wudgzndIMYcLe/RGGFl5yODIKgjEv/SJH/UL+dEaltN11BmsK+eQmMF++Ac\n"
                            "xGNhr59qM/9il71I2dN8FGfcddwuaej4bXhp0LcQBbjxMcI7JP0aM3T4I+DsaxmK\n"
                            "FsbjzaTNC9uzpFlgOIg7rR25xoynUxv8vNmkq7zdPGHXkxWY7oG9j+JkRyBABk7X\n"
                            "rJfoucBZEqFJJSPk7XA0LKW0Y3z5oz2D0c1tJKwHAgMBAAGjggEzMIIBLzAOBgNV\n"
                            "HQ8BAf8EBAMCAYYwHQYDVR0lBBYwFAYIKwYBBQUHAwEGCCsGAQUFBwMCMBIGA1Ud\n"
                            "EwEB/wQIMAYBAf8CAQAwHQYDVR0OBBYEFJjR+G4Q68+b7GCfGJAboOt9Cf0rMB8G\n"
                            "A1UdIwQYMBaAFJviB1dnHB7AagbeWbSaLd/cGYYuMDUGCCsGAQUFBwEBBCkwJzAl\n"
                            "BggrBgEFBQcwAYYZaHR0cDovL29jc3AucGtpLmdvb2cvZ3NyMjAyBgNVHR8EKzAp\n"
                            "MCegJaAjhiFodHRwOi8vY3JsLnBraS5nb29nL2dzcjIvZ3NyMi5jcmwwPwYDVR0g\n"
                            "BDgwNjA0BgZngQwBAgIwKjAoBggrBgEFBQcCARYcaHR0cHM6Ly9wa2kuZ29vZy9y\n"
                            "ZXBvc2l0b3J5LzANBgkqhkiG9w0BAQsFAAOCAQEAGoA+Nnn78y6pRjd9XlQWNa7H\n"
                            "TgiZ/r3RNGkmUmYHPQq6Scti9PEajvwRT2iWTHQr02fesqOqBY2ETUwgZQ+lltoN\n"
                            "FvhsO9tvBCOIazpswWC9aJ9xju4tWDQH8NVU6YZZ/XteDSGU9YzJqPjY8q3MDxrz\n"
                            "mqepBCf5o8mw/wJ4a2G6xzUr6Fb6T8McDO22PLRL6u3M4Tzs3A2M1j6bykJYi8wW\n"
                            "IRdAvKLWZu/axBVbzYmqmwkm5zLSDW5nIAJbELCQCZwMH56t2Dvqofxs6BBcCFIZ\n"
                            "USpxu6x6td0V7SvJCCosirSmIatj/9dSSVDQibet8q/7UK4v4ZUN80atnZz1yg==\n"
                            "-----END CERTIFICATE-----\n";

WiFiClientSecure client;

void setup() {

  Serial.begin(115200);
  WiFi.begin(ssid, password);

  while (WiFi.status() != WL_CONNECTED) { //Check for the connection
    delay(500);
    Serial.println("Connecting..");
  }
  Serial.print("Connected to the WiFi network with IP: ");
  Serial.println(WiFi.localIP());
  client.setCACert(test_root_ca);
}

void loop() {
  if(&client) {
    {
      // Add a scoping block for HTTPClient https to make sure it is destroyed before WiFiClientSecure *client is
      HTTPClient https;
      Serial.print("[HTTPS] begin...\n");
      if (https.begin(client, "https://www.google.com/index.html")) {  // HTTPS
        Serial.print("[HTTPS] GET...\n");
        // start connection and send HTTP header
        int httpCode = https.GET();
        // httpCode will be negative on error
        if (httpCode > 0) {
          // HTTP header has been send and Server response header has been handled
          Serial.printf("[HTTPS] GET... code: %d\n", httpCode);
          // file found at server
          if (httpCode == HTTP_CODE_OK || httpCode == HTTP_CODE_MOVED_PERMANENTLY) {
            String payload = https.getString();
            Serial.println(payload);
          }
        } else {
          Serial.printf("[HTTPS] GET... failed, error: %s\n", https.errorToString(httpCode).c_str());
        }
        https.end();
      } else {
        Serial.printf("[HTTPS] Unable to connect\n");
      }
      // End extra scoping block
    }
  } else {
    Serial.println("Unable to create client");
  }
  Serial.println();
  Serial.println("Waiting 10s before the next round...");
  delay(10000);
}
Exemplo de HTTP POST
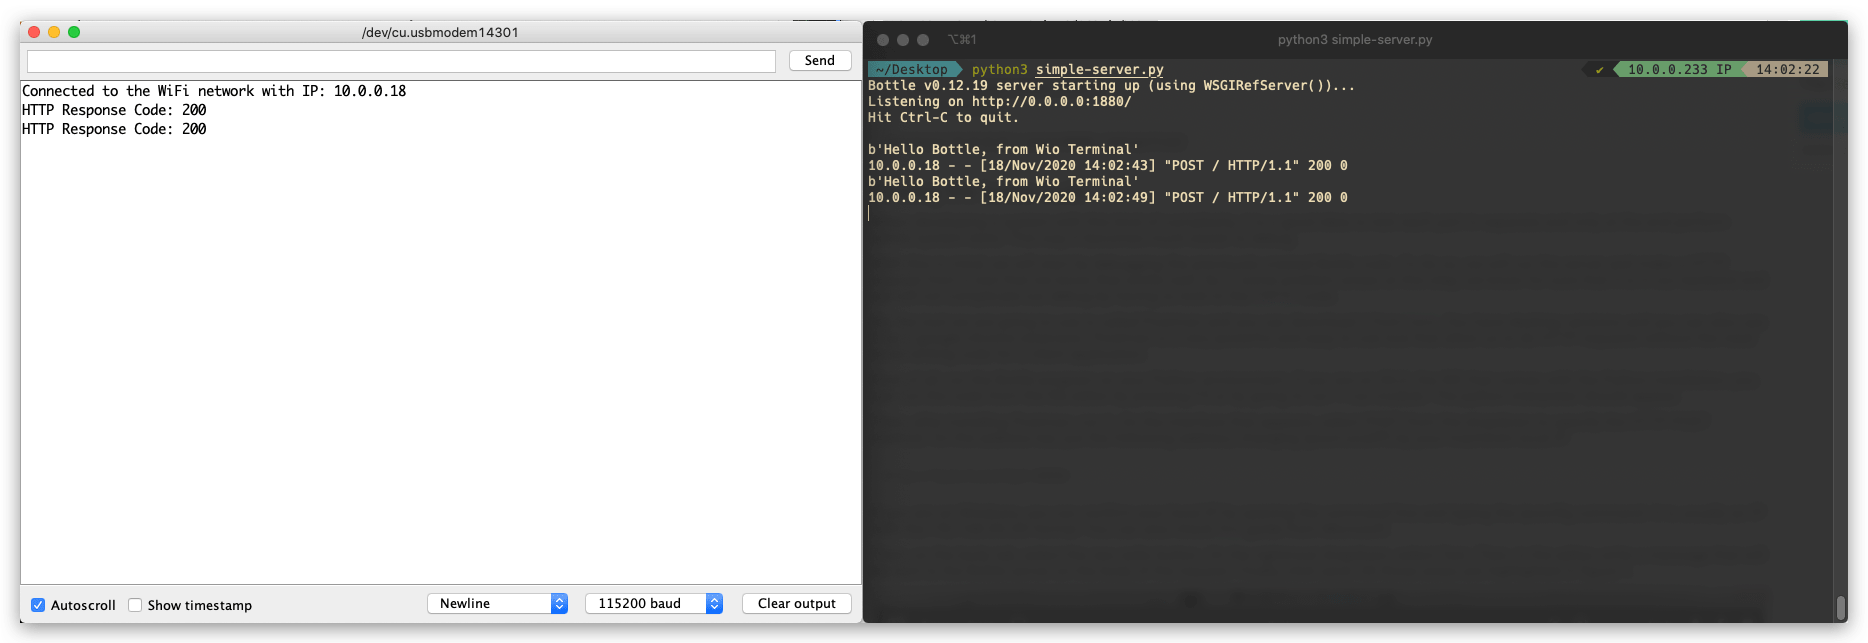
Este é um exemplo de envio de requisição HTTP POST usando o HTTPClient do Wio Terminal para um servidor web. Para esta demonstração, estamos usando Python para configurar um servidor web simples em nosso PC que possa receber e responder a requisições HTTP.
Código do Servidor em Python
Primeiro, precisamos usar pip para instalar a biblioteca bottle necessária no Python. Execute o seguinte no terminal para instalar o bottle:
pip install bottle
Depois de importar o bottle, copie o código a seguir e salve como simple-server.py. Você também pode alterar a porta para outra de sua preferência, mas certifique-se de que ela corresponda ao lado do Arduino.
from bottle import run, request, post

@post('/')
def index():
    data = request.body.read()
    print(data)

run(host='0.0.0.0', port=1880, debug=True)
Código Arduino
-
Altere
yourNetworkeyourPasswordpara o SSID e a senha do seu Wi‑Fi. -
Envie o código para o Wio Terminal.
-
Verifique o Terminal e você verá a mensagem de requisição HTTP recebida do Wio Terminal.
#include <rpcWiFi.h>
#include <HTTPClient.h>

const char* ssid = "yourNetwork";
const char* password =  "yourPassword";

// Change the following IP to your computer's IP running the server, make sure the Port also match
const char* yourLocalIp =  "http://10.0.0.233:1880/";

void setup() {

  Serial.begin(115200);
  WiFi.begin(ssid, password);

  while (WiFi.status() != WL_CONNECTED) { //Check for the connection
    delay(500);
    Serial.println("Connecting..");
  }
  Serial.print("Connected to the WiFi network with IP: ");
  Serial.println(WiFi.localIP());
}

void loop() {

 if(WiFi.status()== WL_CONNECTED){   //Check WiFi connection status

   HTTPClient http;

   http.begin(yourLocalIp);  //Specify destination for HTTP request
   http.addHeader("Content-Type", "text/plain");             //Specify content-type header

   int httpResponseCode = http.POST("Hello Bottle, from Wio Terminal");   //Send the actual POST request

   if(httpResponseCode>0){
    Serial.print("HTTP Response Code: ");
    Serial.println(httpResponseCode);   //Print return code
   }else{
    Serial.print("Error on sending request: ");
    Serial.println(httpResponseCode);
   }

   http.end();  //Free resources

 }else{
    Serial.println("Error in WiFi connection");
 }
  delay(5000);  //Send a request every 5 seconds
}
Uso do WebServer
Com a ajuda da biblioteca WebServer, você pode configurar um servidor web executando no Wio Terminal. Acessando o servidor com um navegador em qualquer computador conectado à mesma rede que o Wio Terminal, você pode controlar hardware a partir da página web, ler o valor de um sensor e muito mais!
Exemplo simples de HelloServer
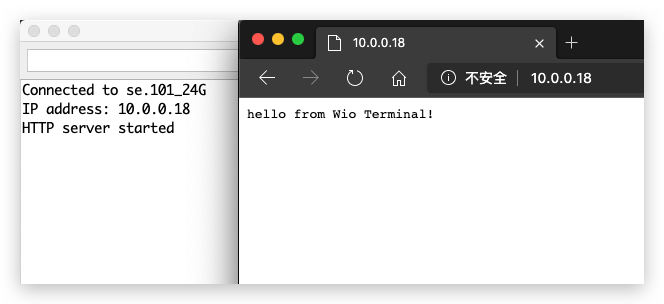
Isso configura um servidor web simples na rede conectada usando o Wio Terminal.
-
Altere
yourNetworkeyourPasswordpara o ssid e a senha do seu Wi-Fi. -
Envie o código para o Wio Terminal.
-
Acesse o servidor web digitando o IP do Wio Terminal a partir da mesma rede usando o navegador.
#include <rpcWiFi.h>
#include <WiFiClient.h>
#include <WebServer.h>

const char *ssid = "yourNetwork";
const char *password = "yourPassword";

WebServer server(80);

const int led = 13;

void handleRoot() {
  digitalWrite(led, 1);
  server.send(200, "text/plain", "hello from Wio Terminal!");
  digitalWrite(led, 0);
}

void handleNotFound() {
  digitalWrite(led, 1);
  String message = "File Not Found\n\n";
  message += "URI: ";
  message += server.uri();
  message += "\nMethod: ";
  message += (server.method() == HTTP_GET) ? "GET" : "POST";
  message += "\nArguments: ";
  message += server.args();
  message += "\n";
  for (uint8_t i = 0; i < server.args(); i++) {
    message += " " + server.argName(i) + ": " + server.arg(i) + "\n";
  }
  server.send(404, "text/plain", message);
  digitalWrite(led, 0);
}

void setup(void) {
  pinMode(led, OUTPUT);
  digitalWrite(led, 0);
  Serial.begin(115200);
  WiFi.mode(WIFI_STA);
  WiFi.begin(ssid, password);

  // Wait for connection
  while (WiFi.status() != WL_CONNECTED) {
    delay(500);
    Serial.print(".");
  }
  Serial.print("Connected to ");
  Serial.println(ssid);
  Serial.print("IP address: ");
  Serial.println(WiFi.localIP());

  server.on("/", handleRoot);

  server.on("/inline", []() {
    server.send(200, "text/plain", "this works as well");
  });

  server.onNotFound(handleNotFound);

  server.begin();
  Serial.println("HTTP server started");
}

void loop(void) {
  server.handleClient();
}
Exemplo de Servidor Web com Autenticação HTTP
Este exemplo configura um servidor web que requer um processo de autenticação, o que pode ser muito útil em alguns casos para fins de segurança.
-
Altere
yourNetworkeyourPasswordpara o ssid e a senha do seu Wi-Fi. -
Envie o código para o Wio Terminal.
-
Acesse o servidor web digitando o IP do Wio Terminal a partir da mesma rede usando o navegador e insira o nome de usuário e senha pré-definidos.
#include <rpcWiFi.h>
#include <WebServer.h>

const char *ssid = "yourNetwork";
const char *password = "yourPassword";

WebServer server(80);

const char* www_username = "admin";
const char* www_password = "password";

void setup() {
  Serial.begin(115200);
  WiFi.mode(WIFI_STA);
  WiFi.begin(ssid, password);
  if (WiFi.waitForConnectResult() != WL_CONNECTED) {
    Serial.println("WiFi Connect Failed! Rebooting...");
    delay(1000);
    NVIC_SystemReset(); // Reset Wio Terminal
  }

  server.on("/", []() {
    if (!server.authenticate(www_username, www_password)) {
      return server.requestAuthentication();
    }
    server.send(200, "text/plain", "Login OK");
  });
  server.begin();

  Serial.print("Open http://");
  Serial.print(WiFi.localIP());
  Serial.println("/ in your browser to see it working");
}

void loop() {
  server.handleClient();
}
Uso do DNSServer
Falamos sobre WebServer, em que usamos o endereço IP para acessá-lo. Mas se você quiser acessá-lo digitando o nome de domínio (como www.google.com), então você precisa usar o DNSServer.
-
Usar DNSServer deve ser sob o modo AP.
-
Introduza a biblioteca correspondente
#include <DNSServer.h>. -
Declare objetos
DNSServer. -
Inicie o servidor DNS usando o método
start(). -
Processe as requisições dos clientes usando o método
processNextRequest(). -
Envie o código para o Wio Terminal e conecte o seu PC ao Wi-Fi
DNSServer example. -
Digite
www.wioterminal.comewww.wioterminal.com/p1.
#include <rpcWiFi.h>
#include <DNSServer.h>
#include <WebServer.h>

IPAddress local_IP(192, 168, 1, 1);
IPAddress gateway(192, 168, 1, 1);
IPAddress subnet(255, 255, 255, 0);

const byte DNS_PORT = 53;

DNSServer dnsServer;
WebServer webserver(80);

void handleRoot()
{
  webserver.send(200, "text/plain", "Root page accessed via domain name");
}

void handleP1()
{
  webserver.send(200, "text/plain", "Page 1 accessed via domain name");
}

void setup()
{
  WiFi.mode(WIFI_AP);
  WiFi.softAPConfig(local_IP, gateway, subnet);
  WiFi.softAP("DNSServer example");

  webserver.on("/", handleRoot);
  webserver.on("/p1", handleP1);

  dnsServer.start(DNS_PORT, "www.wioterminal.com", local_IP); //Start the DNS service, example.com is the registered domain name.
  webserver.begin();
}

void loop()
{
  dnsServer.processNextRequest();
  webserver.handleClient();
}
Uso do mDNS
O que é Multicast DNS (mDNS)?
O protocolo multicast DNS (mDNS) resolve nomes de host para endereços IP em redes pequenas que não incluem um servidor de nomes local. O Multicast DNS é projetado para redes pequenas e tem como objetivo aumentar a sua facilidade de uso. A ideia é que os usuários possam conectar dispositivos em LANs privadas sem quaisquer problemas.
Instalar o Seeed_Arduino_rpcmDNS
-
Visite o repositório Seeed_Arduino_rpcmDNS e baixe todo o repositório para o seu disco local.
-
Agora, a biblioteca Seeed_Arduino_rpcmDNS pode ser instalada no Arduino IDE. Abra o Arduino IDE e clique em
sketch->Include Library->Add .ZIP Library, e escolha o arquivoSeeed_Arduino_rpcmDNSque você acabou de baixar.
Exemplo de Servidor Web mDNS
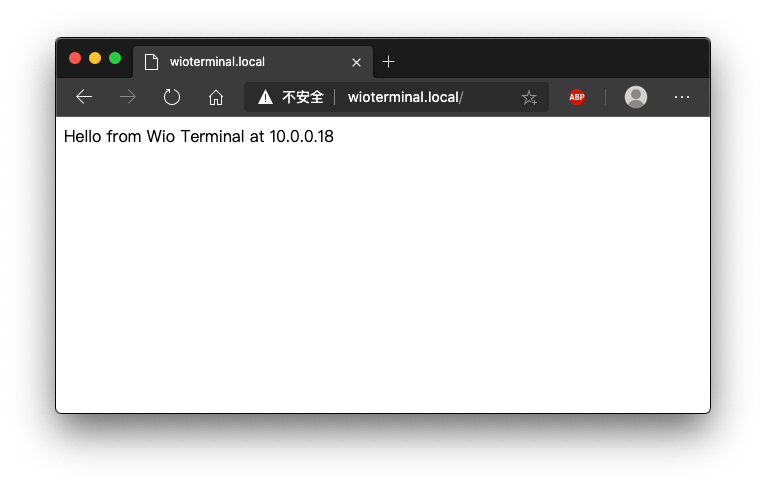
Este é um exemplo que configura um servidor web mDNS no Wio Terminal para que outro dispositivo conectado na mesma rede possa navegar no servidor web em um site definido.
-
Altere
yourNetworkeyourPasswordpara o ssid e a senha do seu Wi-Fi. -
Envie o código para o Wio Terminal.
-
Acesse o servidor web digitando http://WioTerminal.local/ a partir da mesma rede usando o navegador e insira o nome de usuário e senha pré-definidos.
#include <rpcWiFi.h>
#include <RPCmDNS.h>
#include <WiFiClient.h>

const char* ssid     = "yourNetwork";
const char* password = "yourPassword";

// TCP server at port 80 will respond to HTTP requests
WiFiServer server(80);

void setup(void)
{
    Serial.begin(115200);
    while(!Serial){
        ;
    }
    Serial.printf("Setup Start \r\n");
    // Connect to WiFi network
    WiFi.begin(ssid, password);
    Serial.println("");

    // Wait for connection
    while (WiFi.status() != WL_CONNECTED) {
        delay(500);
        Serial.print(".");
    }
    Serial.println("");
    Serial.print("Connected to ");
    Serial.println(ssid);
    Serial.print("IP address: ");
    Serial.println(WiFi.localIP());

    // Set up mDNS responder:
    // - first argument is the domain name, in this example
    //   the fully-qualified domain name is "esp8266.local"
    // - second argument is the IP address to advertise
    //   we send our IP address on the WiFi network
    if (!MDNS.begin("WioTerminal")) {
        Serial.println("Error setting up MDNS responder!");
        while(1) {
            delay(1000);
        }
    }
    Serial.println("mDNS responder started");

    // Start TCP (HTTP) server
    server.begin();
    Serial.println("TCP server started");

    // Add service to MDNS-SD
    MDNS.addService("http", "tcp", 80);

    Serial.printf("Setup Done \r\n");
}

void loop(void)
{
    // Check if a client has connected
    WiFiClient client = server.available();
    if (!client) {
        return;
    }
    Serial.println("");
    Serial.println("New client");
    // Wait for data from client to become available
    while(client.connected() && !client.available()){
        delay(1);
    }
    // Read the first line of HTTP request
    String req = client.readStringUntil('\r');
    // First line of HTTP request looks like "GET /path HTTP/1.1"
    // Retrieve the "/path" part by finding the spaces
    int addr_start = req.indexOf(' ');
    int addr_end = req.indexOf(' ', addr_start + 1);
    if (addr_start == -1 || addr_end == -1) {
        Serial.print("Invalid request: ");
        Serial.println(req);
        return;
    }
    req = req.substring(addr_start + 1, addr_end);
    Serial.print("Request: ");
    Serial.println(req);

    String s;
    if (req == "/")
    {
        IPAddress ip = WiFi.localIP();
        String ipStr = String(ip[0]) + '.' + String(ip[1]) + '.' + String(ip[2]) + '.' + String(ip[3]);
        s = "HTTP/1.1 200 OK\r\nContent-Type: text/html\r\n\r\n<!DOCTYPE HTML>\r\n<html>Hello from Wio Terminal at ";
        s += ipStr;
        s += "</html>\r\n\r\n";
        Serial.println("Sending 200");
    }
    else
    {
        s = "HTTP/1.1 404 Not Found\r\n\r\n";
        Serial.println("Sending 404");
    }
    client.print(s);

    client.stop();
    Serial.println("Done with client");
}
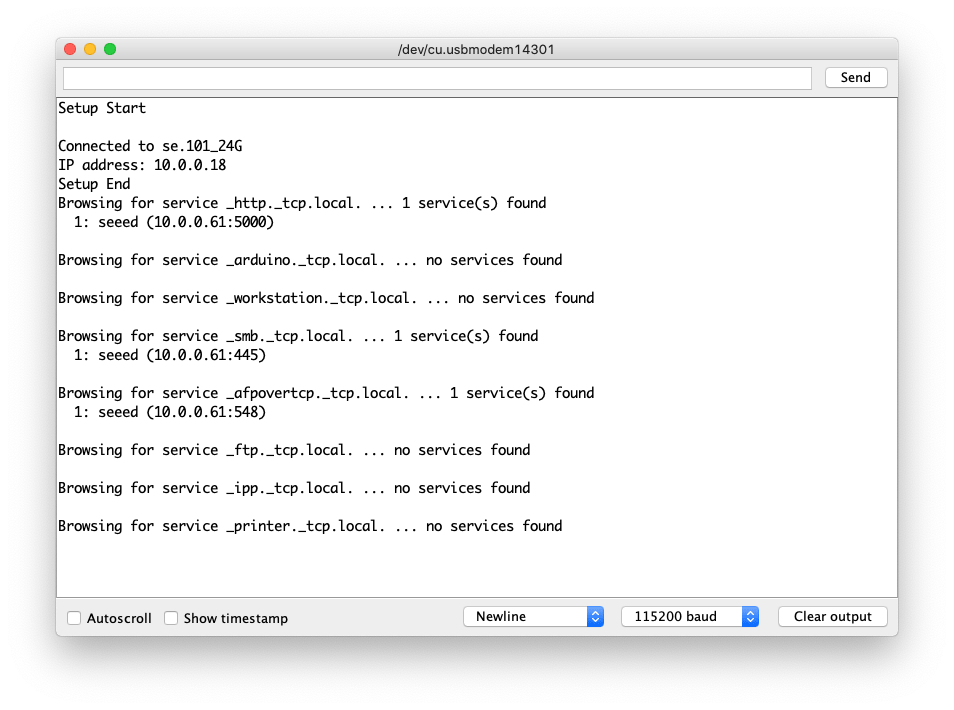
Exemplo mDNS-SD
Este é um exemplo de mDNS-SD (Service Discovery) que permite descobrir serviços na mesma rede.
Sobre descoberta de serviço baseada em DNS
-
Altere
yourNetworkeyourPasswordpara o ssid e a senha do seu Wi-Fi. -
Envie o código para o Wio Terminal.
#include <rpcWiFi.h>
#include <RPCmDNS.h>
#include <WiFiClient.h>

const char* ssid     = "yourNetwork";
const char* password = "yourPassword";

// TCP server at port 80 will respond to HTTP requests
WiFiServer server(80);

void setup(void)
{
    Serial.begin(115200);
    while(!Serial){
        ;
    }
    Serial.printf("Setup Start \r\n");
    // Connect to WiFi network
    WiFi.begin(ssid, password);
    Serial.println("");

    // Wait for connection
    while (WiFi.status() != WL_CONNECTED) {
        delay(500);
        Serial.print(".");
    }
    Serial.println("");
    Serial.print("Connected to ");
    Serial.println(ssid);
    Serial.print("IP address: ");
    Serial.println(WiFi.localIP());

    // Set up mDNS responder:
    // - first argument is the domain name, in this example
    //   the fully-qualified domain name is "esp8266.local"
    // - second argument is the IP address to advertise
    //   we send our IP address on the WiFi network
    if (!MDNS.begin("WioTerminal")) {
        Serial.println("Error setting up MDNS responder!");
        while(1) {
            delay(1000);
        }
    }
    Serial.println("mDNS responder started");

    // Start TCP (HTTP) server
    server.begin();
    Serial.println("TCP server started");

    // Add service to MDNS-SD
    MDNS.addService("http", "tcp", 80);

    Serial.printf("Setup Done \r\n");
}

void loop(void)
{
    // Check if a client has connected
    WiFiClient client = server.available();
    if (!client) {
        return;
    }
    Serial.println("");
    Serial.println("New client");
    // Wait for data from client to become available
    while(client.connected() && !client.available()){
        delay(1);
    }
    // Read the first line of HTTP request
    String req = client.readStringUntil('\r');
    // First line of HTTP request looks like "GET /path HTTP/1.1"
    // Retrieve the "/path" part by finding the spaces
    int addr_start = req.indexOf(' ');
    int addr_end = req.indexOf(' ', addr_start + 1);
    if (addr_start == -1 || addr_end == -1) {
        Serial.print("Invalid request: ");
        Serial.println(req);
        return;
    }
    req = req.substring(addr_start + 1, addr_end);
    Serial.print("Request: ");
    Serial.println(req);

    String s;
    if (req == "/")
    {
        IPAddress ip = WiFi.localIP();
        String ipStr = String(ip[0]) + '.' + String(ip[1]) + '.' + String(ip[2]) + '.' + String(ip[3]);
        s = "HTTP/1.1 200 OK\r\nContent-Type: text/html\r\n\r\n<!DOCTYPE HTML>\r\n<html>Hello from Wio Terminal at ";
        s += ipStr;
        s += "</html>\r\n\r\n";
        Serial.println("Sending 200");
    }
    else
    {
        s = "HTTP/1.1 404 Not Found\r\n\r\n";
        Serial.println("Sending 404");
    }
    client.print(s);

    client.stop();
    Serial.println("Done with client");
}
Uso do WiFiManager
Nós portamos o conhecido WiFi Manager para a plataforma Wio Terminal para que você possa usar seu telefone ou outro dispositivo para configurar as configurações de Wi‑Fi para o seu Wio Terminal!
Instale o Seeed_Arduino_rpcWiFiManager
-
Visite o repositório Seeed_Arduino_rpcWiFiManager e baixe todo o repositório para o seu disco local.
-
Agora, a biblioteca Seeed_Arduino_rpcWiFiManager pode ser instalada no Arduino IDE. Abra o Arduino IDE e clique em
sketch->Include Library->Add .ZIP Library, e escolha o arquivoSeeed_Arduino_rpcWiFiManagerque você acabou de baixar.
Exemplo de Conexão Automática do WiFiManager
Este exemplo é a demonstração do exemplo de conexão automática. Você pode usar o exemplo para definir as configurações de Wi‑Fi para o Wio Terminal.
-
Envie o código para o Wio Terminal.
-
Se o Wio Terminal já tiver se conectado ao Wi‑Fi antes, ele se conectará automaticamente à mesma rede. Se não conseguir se conectar a nenhuma rede Wi‑Fi, ele entrará no modo AP e emitirá um Wi‑Fi. Use seu telefone para se conectar a esse Wi‑Fi e inserir as configurações de Wi‑Fi.
#include <rpcWiFi.h>
#include <DNSServer.h>
#include <WebServer.h>
#include <WiFiManager.h>

void setup() {
    Serial.begin(115200);
    while(!Serial); // wait till Serial is opened

    WiFiManager wifiManager;
    // Uncomment the resetSettings() will wipe out the saved settings
    //wifiManager.resetSettings();

    //Fetches ssid and pass from RTL8720 and tries to connect
    //if it does not connect it starts an access point with the specified name
    //here  "AutoConnectAP"
    //and goes into a blocking loop awaiting configuration
    wifiManager.autoConnect("AutoConnectAP");
    //or use this for auto generated name ESP + ChipID
    //wifiManager.autoConnect();

    //if you get here you have connected to the WiFi
    Serial.println("connected...yeey :)");
    Serial.println(WiFi.localIP());
}

void loop() {
    // put your main code here, to run repeatedly:
}
Suporte Técnico e Discussão de Produtos
se você tiver qualquer problema técnico, envie o problema em nosso fórum. Obrigado por escolher nossos produtos! Estamos aqui para oferecer diferentes tipos de suporte para garantir que sua experiência com nossos produtos seja a mais tranquila possível. Oferecemos vários canais de comunicação para atender a diferentes preferências e necessidades.