Conexão Ethernet para Wio Terminal
Este wiki apresenta como usar o ENC28J60 OVERLAYS HAT for Raspberry Pi no Wio Terminal para obter uma conectividade de rede estável. Este é um exemplo perfeito de uso de uma placa de extensão Raspberry Pi 40 Pi no Wio Terminal.
Hardware necessário
-
Placa adaptadora 40 Pin Pi HAT para Wio Terminal (Ainda não lançada)
Conexão de hardware
Por enquanto, se você quiser testar o software, terá que ligar os cabos individualmente (fly out leads).
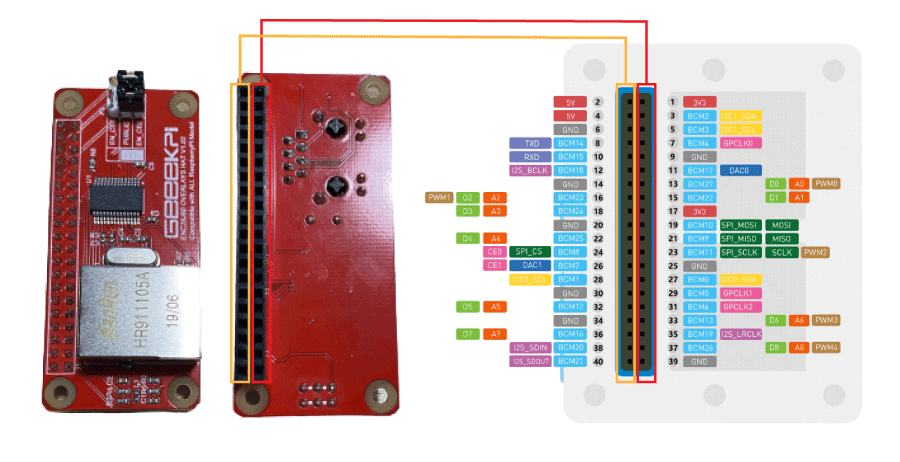
- Conecte o cabo Ethernet ao ENC28J60 Overlays Hat.
Instalando a biblioteca UIPEthernet para Arduino
-
Visite o repositório UIPEthernet e baixe todo o repositório para o seu disco local.
-
Agora a biblioteca pode ser instalada na IDE Arduino. Abra a IDE Arduino e clique em
sketch->Include Library->Add .ZIP Library, e escolha o arquivoUIPEthernetque você acabou de baixar.

Exemplo simples de DHCP
Este exemplo usa simplesmente DHCP para obter automaticamente as configurações de rede do host de rede.

Código de exemplo
#include <UIPEthernet.h>

uint8_t mac[6] = {0x74,0x69,0x69,0x2D,0x30,0x31};

void setup() {
  // put your setup code here, to run once:
  Serial.begin(9600);
  while(!Serial);
  Serial.println(F("[testDHCP]"));

  Serial.print("MAC: ");
  for (byte i = 0; i < 6; ++i) {
    Serial.print(mac[i], HEX);
    if (i < 5)
      Serial.print(':');
  }
  Serial.println();

  if (Ethernet.begin(mac) != 1) {
     Serial.println("Failed to configure Ethernet using DHCP");
     while (true) {
        delay(1); // do nothing, no point running without Ethernet hardware
     }
  }

  Serial.print("My IP: ");
  Serial.println(Ethernet.localIP());
  Serial.print("Netmask: ");
  Serial.println(Ethernet.subnetMask());
  Serial.print("Gateway IP: ");
  Serial.println(Ethernet.gatewayIP());
  Serial.print("DNS: ");
  Serial.println(Ethernet.dnsServerIP());
}

void loop() {
  // put your main code here, to run repeatedly:
}
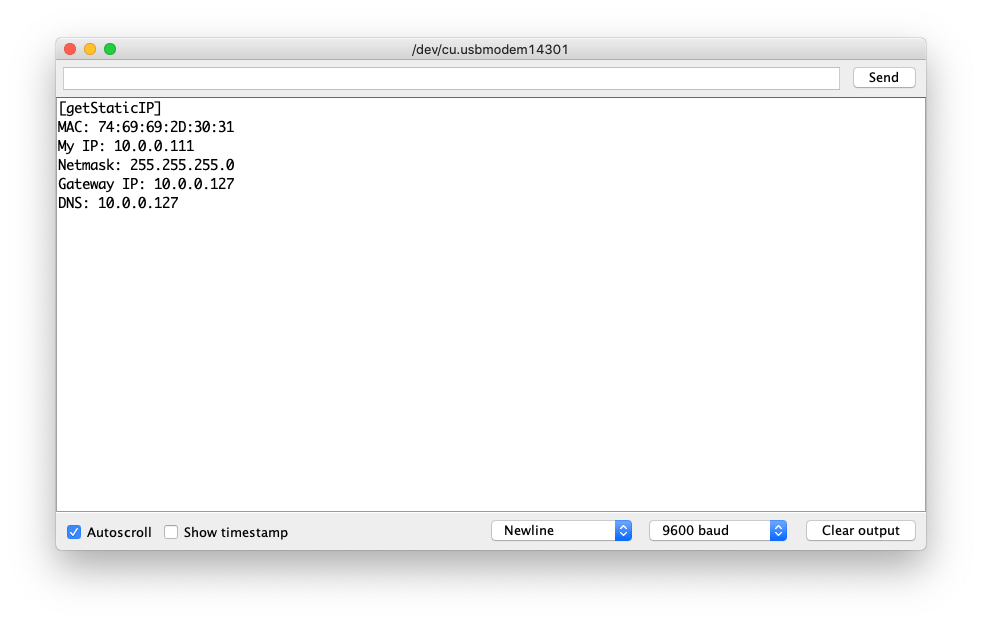
Conectando à rede via IP estático
Em vez de DHCP, você também pode querer usar IP estático para se conectar ao host de rede para diferentes finalidades. Neste exemplo, você pode configurar manualmente como conectar-se à rede definindo IP estático, máscara de rede (Netmask), gateway e DNS.
Código de exemplo
Isso pode ser muito útil quando você precisa conectar o dispositivo a um gateway e DNS específicos (ou seja, roteador/gateway em modo Bypass)
#include <UIPEthernet.h>

// Static Set-up, change the following according to your network
uint8_t mac[6] = {0x74,0x69,0x69,0x2D,0x30,0x31};
IPAddress myIP = {10,0,0,111};
IPAddress myMask = {255,255,255,0};
IPAddress myGatewayIP = {10,0,0,127};
IPAddress myDNS = {10,0,0,127};

void setup() {
  // put your setup code here, to run once:
  Serial.begin(9600);
  while(!Serial);
  Serial.println(F("[getStaticIP]"));

  Serial.print("MAC: ");
  for (byte i = 0; i < 6; ++i) {
    Serial.print(mac[i], HEX);
    if (i < 5)
      Serial.print(':');
  }
  Serial.println();

  Ethernet.begin(mac,myIP, myDNS, myGatewayIP, myMask);

  Serial.print("My IP: ");
  Serial.println(Ethernet.localIP());
  Serial.print("Netmask: ");
  Serial.println(Ethernet.subnetMask());
  Serial.print("Gateway IP: ");
  Serial.println(Ethernet.gatewayIP());
  Serial.print("DNS: ");
  Serial.println(Ethernet.dnsServerIP());
}

void loop() {
  // put your main code here, to run repeatedly:
}
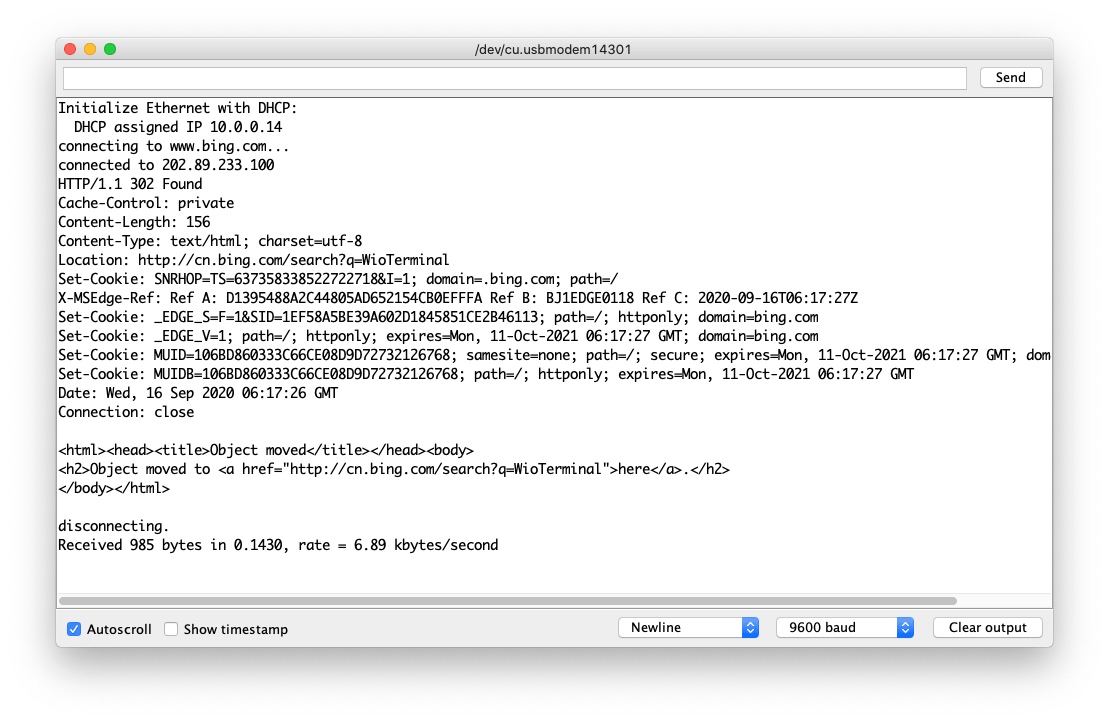
Cliente Web simples
Depois que tivermos a conexão de rede através da Ethernet, podemos usá-la para um cliente TCP. Por exemplo, obter dados da internet (HTTP) ou de um servidor na mesma rede.
Neste exemplo, ele usará primeiro DHCP para configurar; se falhar, então usará IP estático para atribuir. Este exemplo se conecta a www.bing.com e imprime no monitor Serial.
Código de exemplo
#include <UIPEthernet.h>

// Enter a MAC address for your controller below.
byte mac[] = { 0xDE, 0xAD, 0xBE, 0xEF, 0xFE, 0xED };

char server[] = "www.bing.com";

// Set the static IP address to use if the DHCP fails to assign
IPAddress myIP(10, 0, 0, 187);
IPAddress myMask = {255,255,255,0};
IPAddress myGatewayIP = {10,0,0,127};
IPAddress dnsIP(10, 0, 0, 127);

// Initialize the Ethernet client library
// with the IP address and port of the server
// that you want to connect to (port 80 is default for HTTP):
EthernetClient client;

// Variables to measure the speed
unsigned long beginMicros, endMicros;
unsigned long byteCount = 0;
bool printWebData = true;  // set to false for better speed measurement

void setup() {
  // Open serial communications and wait for port to open:
  Serial.begin(9600);
  while (!Serial) {
    ; // wait for serial port to connect. Needed for native USB port only
  }

  // start the Ethernet connection:
  Serial.println("Initialize Ethernet with DHCP:");
  if (Ethernet.begin(mac) == 0) {
    Serial.println("Failed to configure Ethernet using DHCP");
    // Check for Ethernet hardware present
    if (Ethernet.hardwareStatus() == EthernetNoHardware) {
      Serial.println("Ethernet shield was not found.  Sorry, can't run without hardware. :(");
      while (true) {
        delay(1); // do nothing, no point running without Ethernet hardware
      }
    }
    if (Ethernet.linkStatus() == LinkOFF) {
      Serial.println("Ethernet cable is not connected.");
    }
    // try to congifure using IP address instead of DHCP:
    Ethernet.begin(mac,myIP, dnsIP, myGatewayIP, myMask);
  } else {
    Serial.print("  DHCP assigned IP ");
    Serial.println(Ethernet.localIP());
  }
  // give the Ethernet shield a second to initialize:
  delay(1000);
  Serial.print("connecting to ");
  Serial.print(server);
  Serial.println("...");

  // if you get a connection, report back via serial:
  if (client.connect(server, 80)) {
    Serial.print("connected to ");
    Serial.println(client.remoteIP());
    // Make a HTTP request:
    client.println("GET /search?q=WioTerminal HTTP/1.1");
    client.println("Host: www.bing.com");
    client.println("Connection: close");
    client.println();
  } else {
    // if you didn't get a connection to the server:
    Serial.println("connection failed");
  }
  beginMicros = micros();
}

void loop() {
  // if there are incoming bytes available
  // from the server, read them and print them:
  int len = client.available();
  if (len > 0) {
    byte buffer[80];
    if (len > 80) len = 80;
    client.read(buffer, len);
    if (printWebData) {
      Serial.write(buffer, len); // show in the serial monitor (slows some boards)
    }
    byteCount = byteCount + len;
  }

  // if the server's disconnected, stop the client:
  if (!client.connected()) {
    endMicros = micros();
    Serial.println();
    Serial.println("disconnecting.");
    client.stop();
    Serial.print("Received ");
    Serial.print(byteCount);
    Serial.print(" bytes in ");
    float seconds = (float)(endMicros - beginMicros) / 1000000.0;
    Serial.print(seconds, 4);
    float rate = (float)byteCount / seconds / 1000.0;
    Serial.print(", rate = ");
    Serial.print(rate);
    Serial.print(" kbytes/second");
    Serial.println();

    // do nothing forevermore:
    while (true) {
      delay(1);
    }
  }
}
Exemplo de servidor Web
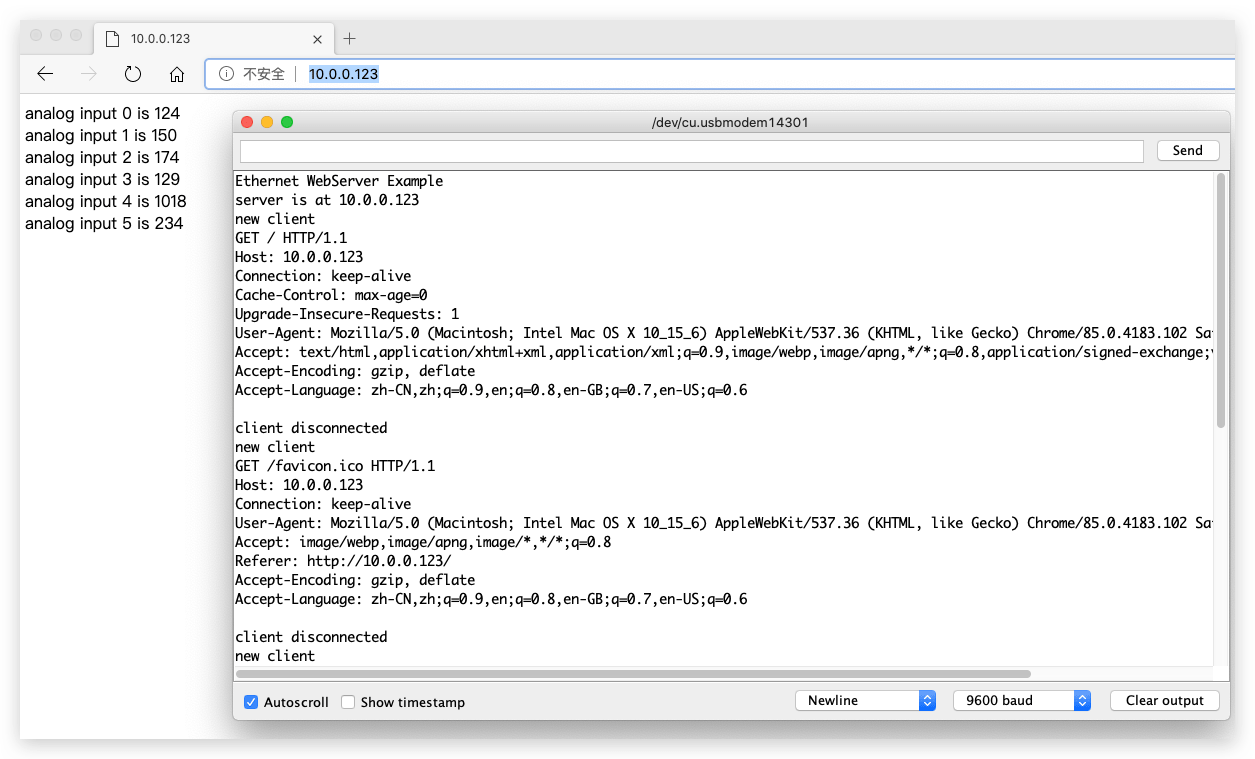
Por outro lado, também configuramos o sistema como um servidor web e permitimos que outros dispositivos na mesma rede se conectem a ele (ou seja, ler os valores do sensor observados no Wio Terminal). Isso pode ser muito útil em alguns casos, pois a estabilidade da Ethernet é muito melhor do que a do Wi-Fi.
Código de exemplo
Este exemplo se configura como servidor Web e configura uma página web simples que imprime leituras de valores de A0 a A5. Você pode acessá-la a partir do seu PC conectado à mesma rede via endereço IP.
#include <UIPEthernet.h>

// Enter a MAC address and IP address for your controller below.
// The IP address will be dependent on your local network:
byte mac[] = {
  0xDE, 0xAD, 0xBE, 0xEF, 0xFE, 0xED
};
IPAddress ip(10, 0, 0, 123);

// Initialize the Ethernet server library
// with the IP address and port you want to use
// (port 80 is default for HTTP):
EthernetServer server(80);

void setup() {
  // Open serial communications and wait for port to open:
  Serial.begin(9600);
  while (!Serial) {
    ; // wait for serial port to connect. Needed for native USB port only
  }
  Serial.println("Ethernet WebServer Example");

  // start the Ethernet connection and the server:
  Ethernet.begin(mac, ip);

  // Check for Ethernet hardware present
  if (Ethernet.hardwareStatus() == EthernetNoHardware) {
    Serial.println("Ethernet shield was not found.  Sorry, can't run without hardware. :(");
    while (true) {
      delay(1); // do nothing, no point running without Ethernet hardware
    }
  }
  if (Ethernet.linkStatus() == LinkOFF) {
    Serial.println("Ethernet cable is not connected.");
  }

  // start the server
  server.begin();
  Serial.print("server is at ");
  Serial.println(Ethernet.localIP());
}

void loop() {
  // listen for incoming clients
  EthernetClient client = server.available();
  if (client) {
    Serial.println("new client");
    // an http request ends with a blank line
    bool currentLineIsBlank = true;
    while (client.connected()) {
      if (client.available()) {
        char c = client.read();
        Serial.write(c);
        // if you've gotten to the end of the line (received a newline
        // character) and the line is blank, the http request has ended,
        // so you can send a reply
        if (c == '\n' && currentLineIsBlank) {
          // send a standard http response header
          client.println("HTTP/1.1 200 OK");
          client.println("Content-Type: text/html");
          client.println("Connection: close");  // the connection will be closed after completion of the response
          client.println("Refresh: 5");  // refresh the page automatically every 5 sec
          client.println();
          client.println("<!DOCTYPE HTML>");
          client.println("<html>");
          // output the value of each analog input pin
          for (int analogChannel = 0; analogChannel < 6; analogChannel++) {
            int sensorReading = analogRead(analogChannel);
            client.print("analog input ");
            client.print(analogChannel);
            client.print(" is ");
            client.print(sensorReading);
            client.println("<br />");
          }
          client.println("</html>");
          break;
        }
        if (c == '\n') {
          // you're starting a new line
          currentLineIsBlank = true;
        } else if (c != '\r') {
          // you've gotten a character on the current line
          currentLineIsBlank = false;
        }
      }
    }
    // give the web browser time to receive the data
    delay(1);
    // close the connection:
    client.stop();
    Serial.println("client disconnected");
  }
}
Teste de Servidor Web
Isto também fornece um sketch simples de teste usando a configuração.
Esta é a captura de tela de ping do servidor web por mais de 10 horas.
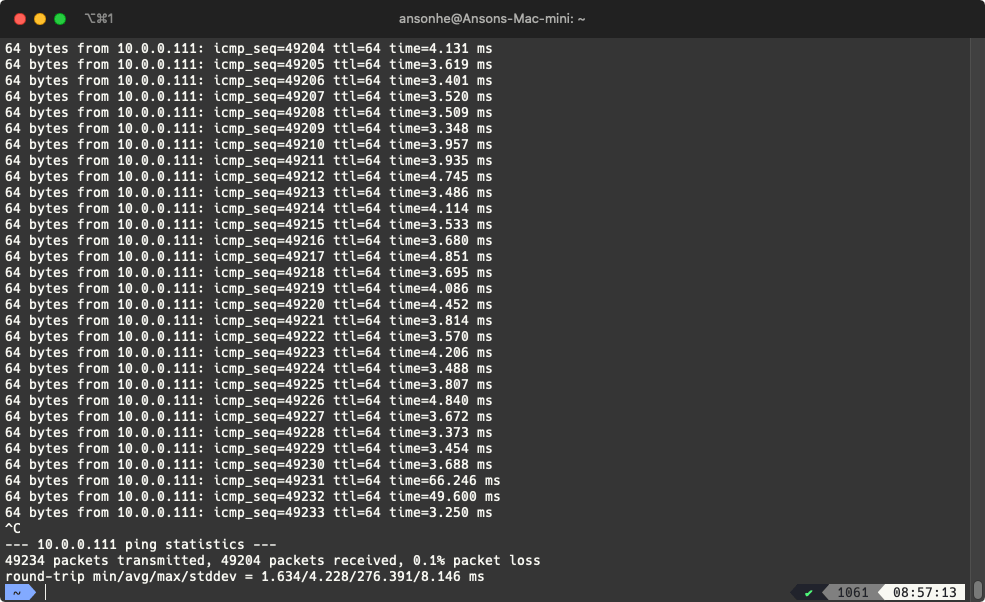
- Na mesma rede, use o seu computador para dar ping no IP do servidor:
#include <UIPEthernet.h>

// Static IP Set-up
uint8_t mac[6] = {0x74,0x69,0x69,0x2D,0x30,0x31};
IPAddress myIP = {10,0,0,111};
EthernetServer server = EthernetServer(80);

void setup() {
  Serial.begin(9600);
  while(!Serial);
  Ethernet.begin(mac, myIP);
  server.begin();

  Serial.print("My IP: ");
  Serial.println(Ethernet.localIP());
  Serial.print("Netmask: ");
  Serial.println(Ethernet.subnetMask());
  Serial.print("Gateway IP: ");
  Serial.println(Ethernet.gatewayIP());
  Serial.print("DNS: ");
  Serial.println(Ethernet.dnsServerIP());
}

void loop() {
  // get client
  EthernetClient client = server.available();
  if(client && client.connected()) {
        // do stuff (snipped but basically parses HTTP and responds with no other processing)
        client.stop();
  }
}
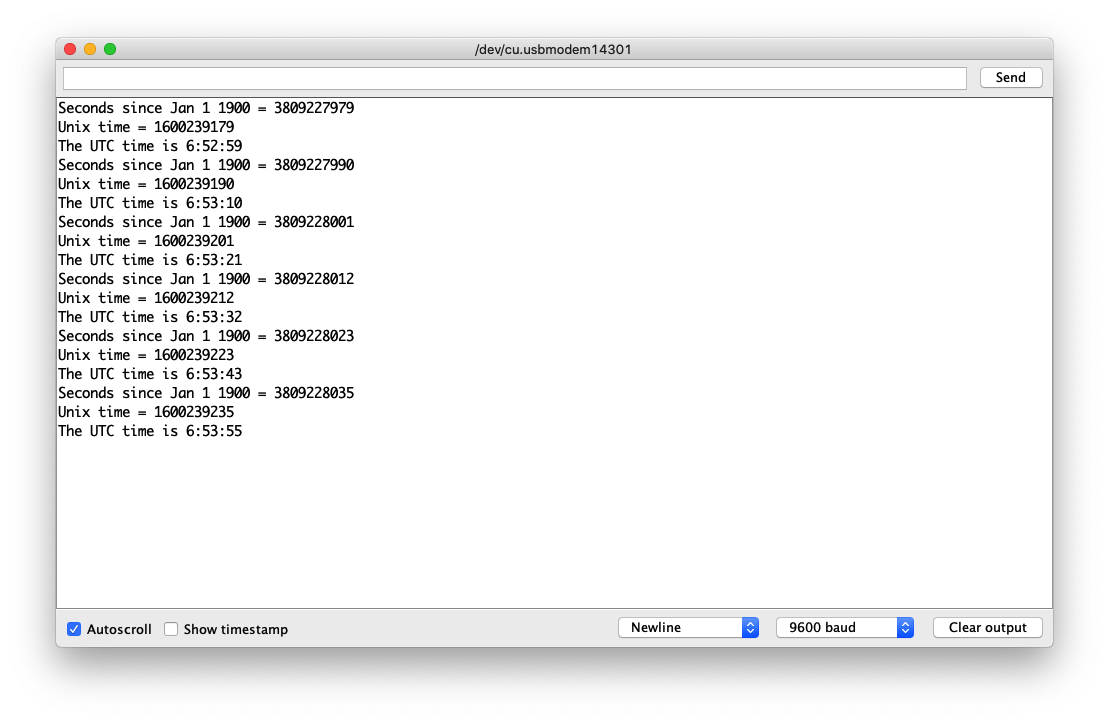
Usando UDP para Hora via NTP
Em algumas situações, o UDP é usado para comunicação de rede. O NTP é o exemplo perfeito disso. Este exemplo simplesmente obtém a hora do servidor NTP time.nist.gov e imprime no monitor Serial.
Código de Exemplo
#include <UIPEthernet.h>

// Enter a MAC address for your controller below.
// Newer Ethernet shields have a MAC address printed on a sticker on the shield
byte mac[] = {
  0xDE, 0xAD, 0xBE, 0xEF, 0xFE, 0xED
};

unsigned int localPort = 8888;       // local port to listen for UDP packets

const char timeServer[] = "time.nist.gov"; // time.nist.gov NTP server

const int NTP_PACKET_SIZE = 48; // NTP time stamp is in the first 48 bytes of the message

byte packetBuffer[NTP_PACKET_SIZE]; //buffer to hold incoming and outgoing packets

// A UDP instance to let us send and receive packets over UDP
EthernetUDP Udp;

void setup() {
  // Open serial communications and wait for port to open:
  Serial.begin(9600);
  while (!Serial) {
    ; // wait for serial port to connect. Needed for native USB port only
  }

  // start Ethernet and UDP
  if (Ethernet.begin(mac) == 0) {
    Serial.println("Failed to configure Ethernet using DHCP");
    // Check for Ethernet hardware present
    if (Ethernet.hardwareStatus() == EthernetNoHardware) {
      Serial.println("Ethernet shield was not found.  Sorry, can't run without hardware. :(");
    } else if (Ethernet.linkStatus() == LinkOFF) {
      Serial.println("Ethernet cable is not connected.");
    }
    // no point in carrying on, so do nothing forevermore:
    while (true) {
      delay(1);
    }
  }
  Udp.begin(localPort);
}

void loop() {
  sendNTPpacket(timeServer); // send an NTP packet to a time server

  // wait to see if a reply is available
  delay(1000);
  if (Udp.parsePacket()) {
    // We've received a packet, read the data from it
    Udp.read(packetBuffer, NTP_PACKET_SIZE); // read the packet into the buffer

    // the timestamp starts at byte 40 of the received packet and is four bytes,
    // or two words, long. First, extract the two words:

    unsigned long highWord = word(packetBuffer[40], packetBuffer[41]);
    unsigned long lowWord = word(packetBuffer[42], packetBuffer[43]);
    // combine the four bytes (two words) into a long integer
    // this is NTP time (seconds since Jan 1 1900):
    unsigned long secsSince1900 = highWord << 16 | lowWord;
    Serial.print("Seconds since Jan 1 1900 = ");
    Serial.println(secsSince1900);

    // now convert NTP time into everyday time:
    Serial.print("Unix time = ");
    // Unix time starts on Jan 1 1970. In seconds, that's 2208988800:
    const unsigned long seventyYears = 2208988800UL;
    // subtract seventy years:
    unsigned long epoch = secsSince1900 - seventyYears;
    // print Unix time:
    Serial.println(epoch);

    // print the hour, minute and second:
    Serial.print("The UTC time is ");       // UTC is the time at Greenwich Meridian (GMT)
    Serial.print((epoch  % 86400L) / 3600); // print the hour (86400 equals secs per day)
    Serial.print(':');
    if (((epoch % 3600) / 60) < 10) {
      // In the first 10 minutes of each hour, we'll want a leading '0'
      Serial.print('0');
    }
    Serial.print((epoch  % 3600) / 60); // print the minute (3600 equals secs per minute)
    Serial.print(':');
    if ((epoch % 60) < 10) {
      // In the first 10 seconds of each minute, we'll want a leading '0'
      Serial.print('0');
    }
    Serial.println(epoch % 60); // print the second
  }
  // wait ten seconds before asking for the time again
  delay(10000);
  Ethernet.maintain();
}

// send an NTP request to the time server at the given address
void sendNTPpacket(const char * address) {
  // set all bytes in the buffer to 0
  memset(packetBuffer, 0, NTP_PACKET_SIZE);
  // Initialize values needed to form NTP request
  // (see URL above for details on the packets)
  packetBuffer[0] = 0b11100011;   // LI, Version, Mode
  packetBuffer[1] = 0;     // Stratum, or type of clock
  packetBuffer[2] = 6;     // Polling Interval
  packetBuffer[3] = 0xEC;  // Peer Clock Precision
  // 8 bytes of zero for Root Delay & Root Dispersion
  packetBuffer[12]  = 49;
  packetBuffer[13]  = 0x4E;
  packetBuffer[14]  = 49;
  packetBuffer[15]  = 52;

  // all NTP fields have been given values, now
  // you can send a packet requesting a timestamp:
  Udp.beginPacket(address, 123); // NTP requests are to port 123
  Udp.write(packetBuffer, NTP_PACKET_SIZE);
  Udp.endPacket();
}
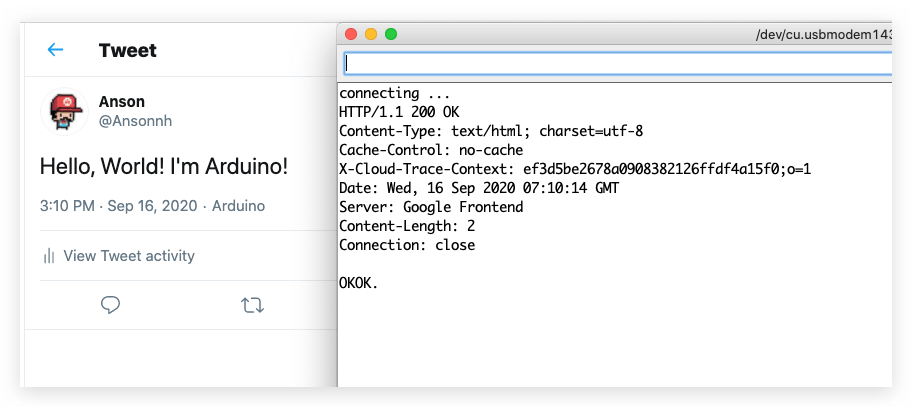
Exemplo de Envio para o Twitter
Este é um exemplo divertido que usa o Wio Terminal para enviar tweets. Ele usa a Tweet Library for Arduino para contornar as conexões diretas via HTTPs.
Instalar a Tweet Library for Arduino
-
Visite o repositório Arduno-Twitter-library e baixe todo o repositório para o seu disco local.
-
Agora, a biblioteca pode ser instalada na IDE Arduino. Abra a IDE Arduino e clique em
sketch->Include Library->Add .ZIP Library, e escolha o arquivoArduno-Twitter-libraryque você acabou de baixar.
Esta é uma solução alternativa para conectar ao Twitter, que pode não ser segura; faça isso por sua própria conta e risco.
Obter o Token
Obtenha um token para publicar uma mensagem usando OAuth clicando aqui.
Por favor, visite http://arduino-tweet.appspot.com/ para mais referências.
Código de Exemplo
- Copie o token que você obteve acima e cole no sketch do Arduino.
/*
 *  Check http://arduino-tweet.appspot.com/ for more reference
 */

#include <UIPEthernet.h>
#include <Twitter.h>

uint8_t mac[6] = {0x74,0x69,0x69,0x2D,0x30,0x31};

// Your Token to Tweet (get it from http://arduino-tweet.appspot.com/)
Twitter twitter("YOUR-TOKEN-HERE");

// Message to post
char msg[] = "Hello, World! I'm Arduino!";

void setup()
{
  delay(1000);
  Ethernet.begin(mac);
  // or you can use DHCP for autoomatic IP address configuration.
  // Ethernet.begin(mac);
  Serial.begin(9600);
  while(!Serial);

  Serial.println("connecting ...");
  if (twitter.post(msg)) {
    // Specify &Serial to output received response to Serial.
    // If no output is required, you can just omit the argument, e.g.
    // int status = twitter.wait();
    int status = twitter.wait(&Serial);
    if (status == 200) {
      Serial.println("OK.");
    } else {
      Serial.print("failed : code ");
      Serial.println(status);
    }
  } else {
    Serial.println("connection failed.");
  }
}

void loop()
{
}