Uso de Bluetooth (biblioteca Seeed nrf52 compatível com mbed)
Seeed Studio XIAO nRF52840 e Seeed Studio XIAO nRF52840 Sense suportam conectividade Bluetooth. Este wiki apresentará as funções básicas de Bluetooth e fornecerá uma demonstração com o Módulo de Detecção de Sono Respiratório de 24GHz, usado pela "Seeed nrf52 mbed-enabled Boards Library".
Primeiros passos
Hardware necessário
- 1 x Seeed Studio XIAO nRF52840 ou Seeed Studio XIAO nRF52840 Sense
- 1 x Smartphone/PC com conectividade Bluetooth
- 1 x Cabo USB Tipo-C
Software necessário
Visão geral da biblioteca Arduino
Se esta é a sua primeira vez usando Arduino, recomendamos fortemente que você consulte Primeiros passos com Arduino.
Para usar a funcionalidade Bluetooth do Seeed Studio XIAO nRF52840, precisamos usar a biblioteca oficial Arduino BLE.
Se você quiser aplicar a demo com o Radar de Respiração de Sono de 24GHz, talvez também precise baixar a biblioteca compatível.
Função
Para uma introdução às funções e ao uso da biblioteca de código ArduinoBLE, consulte o site do Arduino.
Para uma introdução às funções e ao uso da biblioteca de código Seeed 24GHz Sleep Breathing Radar BLE, consulte o Wiki.
Instalação
- Método um (Este método está disponível para ambas as bibliotecas de código acima.)
Como você fez o download da biblioteca zip, abra o Arduino IDE, clique em Sketch > Include Library > Add .ZIP Library. Escolha o arquivo zip que você acabou de baixar e, se a biblioteca for instalada corretamente, você verá Library added to your libraries na janela de aviso. Isso significa que a biblioteca foi instalada com sucesso.

- Método dois (Apenas a biblioteca ArduinoBLE pode ser instalada.)
O gerenciador de bibliotecas foi adicionado a partir das versões 1.5 e superiores (1.6.x) do Arduino IDE. Ele é encontrado no menu 'Sketch' em 'Include Library', 'Manage Libraries...'
Quando você abrir o Library Manager, encontrará uma grande lista de bibliotecas prontas para instalação com um clique. Para encontrar uma biblioteca para o seu produto, pesquise pelo nome do produto ou por uma palavra-chave como 'k type' ou 'digitizer', e a biblioteca desejada deverá aparecer. Clique na biblioteca desejada e o botão 'Install' aparecerá. Clique nesse botão e a biblioteca deverá ser instalada automaticamente. Quando a instalação terminar, feche o Library Manager.
Exemplos de aplicação
Agora que temos nossa biblioteca instalada e entendemos as funções básicas, vamos executar alguns exemplos para nosso Seeed Studio XIAO nRF52840 para ver como ele se comporta.
Passo 1. Inicie o aplicativo Arduino.
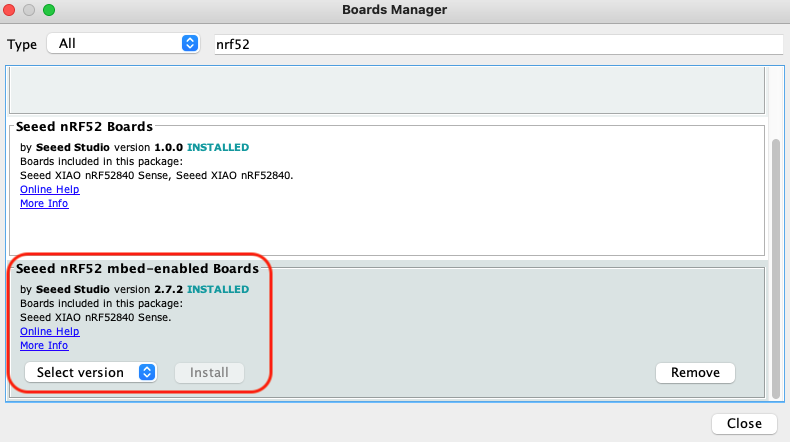
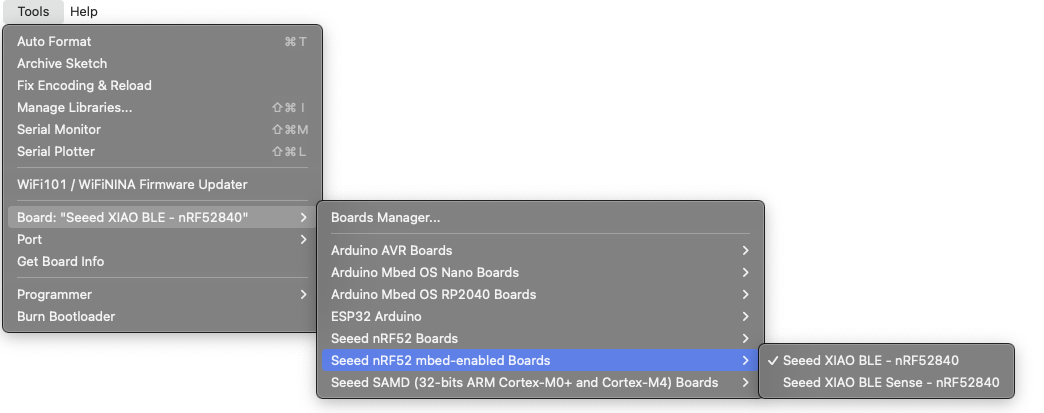
Passo 2. Selecione o modelo da sua placa de desenvolvimento e adicione-o ao Arduino IDE. Aqui estamos usando a "Seeed nrf52 mbed-enabled Boards Library".
Para a instalação das bibliotecas de placas, consulte este tutorial para concluir a instalação.
Demo 1 Controlar o LED embutido usando um smartphone
Neste exemplo, vamos conectar o Seeed Studio XIAO nF52840 (Sense) e um smartphone usando Bluetooth e enviar mensagens do telefone para ligar/desligar o LED vermelho embutido no Seeed Studio XIAO nRF52840 (Sense).
Cole o código abaixo no Arduino IDE e faça o upload para o Seeed Studio XIAO nRF52840.
#include <ArduinoBLE.h>

BLEService ledService("19B10000-E8F2-537E-4F6C-D104768A1214"); // Bluetooth® Low Energy LED Service

// Bluetooth® Low Energy LED Switch Characteristic - custom 128-bit UUID, read and writable by central
BLEByteCharacteristic switchCharacteristic("19B10001-E8F2-537E-4F6C-D104768A1214", BLERead | BLEWrite);

const int ledPin = LED_BUILTIN; // pin to use for the LED

void setup() {
  Serial.begin(9600);
  while (!Serial);

  // set LED pin to output mode
  pinMode(ledPin, OUTPUT);

  // begin initialization
  if (!BLE.begin()) {
    Serial.println("starting Bluetooth® Low Energy module failed!");

    while (1);
  }

  // set advertised local name and service UUID:
  BLE.setLocalName("LED");
  BLE.setAdvertisedService(ledService);

  // add the characteristic to the service
  ledService.addCharacteristic(switchCharacteristic);

  // add service
  BLE.addService(ledService);

  // set the initial value for the characeristic:
  switchCharacteristic.writeValue(0);

  // start advertising
  BLE.advertise();

  Serial.println("BLE LED Peripheral");
}

void loop() {
  // listen for Bluetooth® Low Energy peripherals to connect:
  BLEDevice central = BLE.central();

  // if a central is connected to peripheral:
  if (central) {
    Serial.print("Connected to central: ");
    // print the central's MAC address:
    Serial.println(central.address());

    // while the central is still connected to peripheral:
  while (central.connected()) {
        if (switchCharacteristic.written()) {
          if (switchCharacteristic.value()) {
            Serial.println("LED on");
            digitalWrite(ledPin, LOW); // changed from HIGH to LOW
          } else {
            Serial.println(F("LED off"));
            digitalWrite(ledPin, HIGH); // changed from LOW to HIGH
          }
        }
      }

    // when the central disconnects, print it out:
    Serial.print(F("Disconnected from central: "));
    Serial.println(central.address());
  }
}
A chave para a implementação deste exemplo é o seguinte trecho.
  while (central.connected()) {
        if (switchCharacteristic.written()) {
          if (switchCharacteristic.value()) {
            Serial.println("LED on");
            digitalWrite(ledPin, LOW); // changed from HIGH to LOW
          } else {
            Serial.println(F("LED off"));
            digitalWrite(ledPin, HIGH); // changed from LOW to HIGH
          }
        }
      }
O objetivo deste código é entrar em um julgamento quando o Seeed Studio XIAO nRF52840 é conectado por um dispositivo Bluetooth central.connected() e recebe conteúdo do dispositivo Bluetooth switchCharacteristic.written(). Se o valor da condição for diferente de zero switchCharacteristic.value(), a luz acende; se o valor da condição for 0, a luz apaga.
Abra o monitor serial com taxa de baud de 9600 e o LED deverá estar ligado ou desligado. A saída deverá ser semelhante à imagem abaixo.
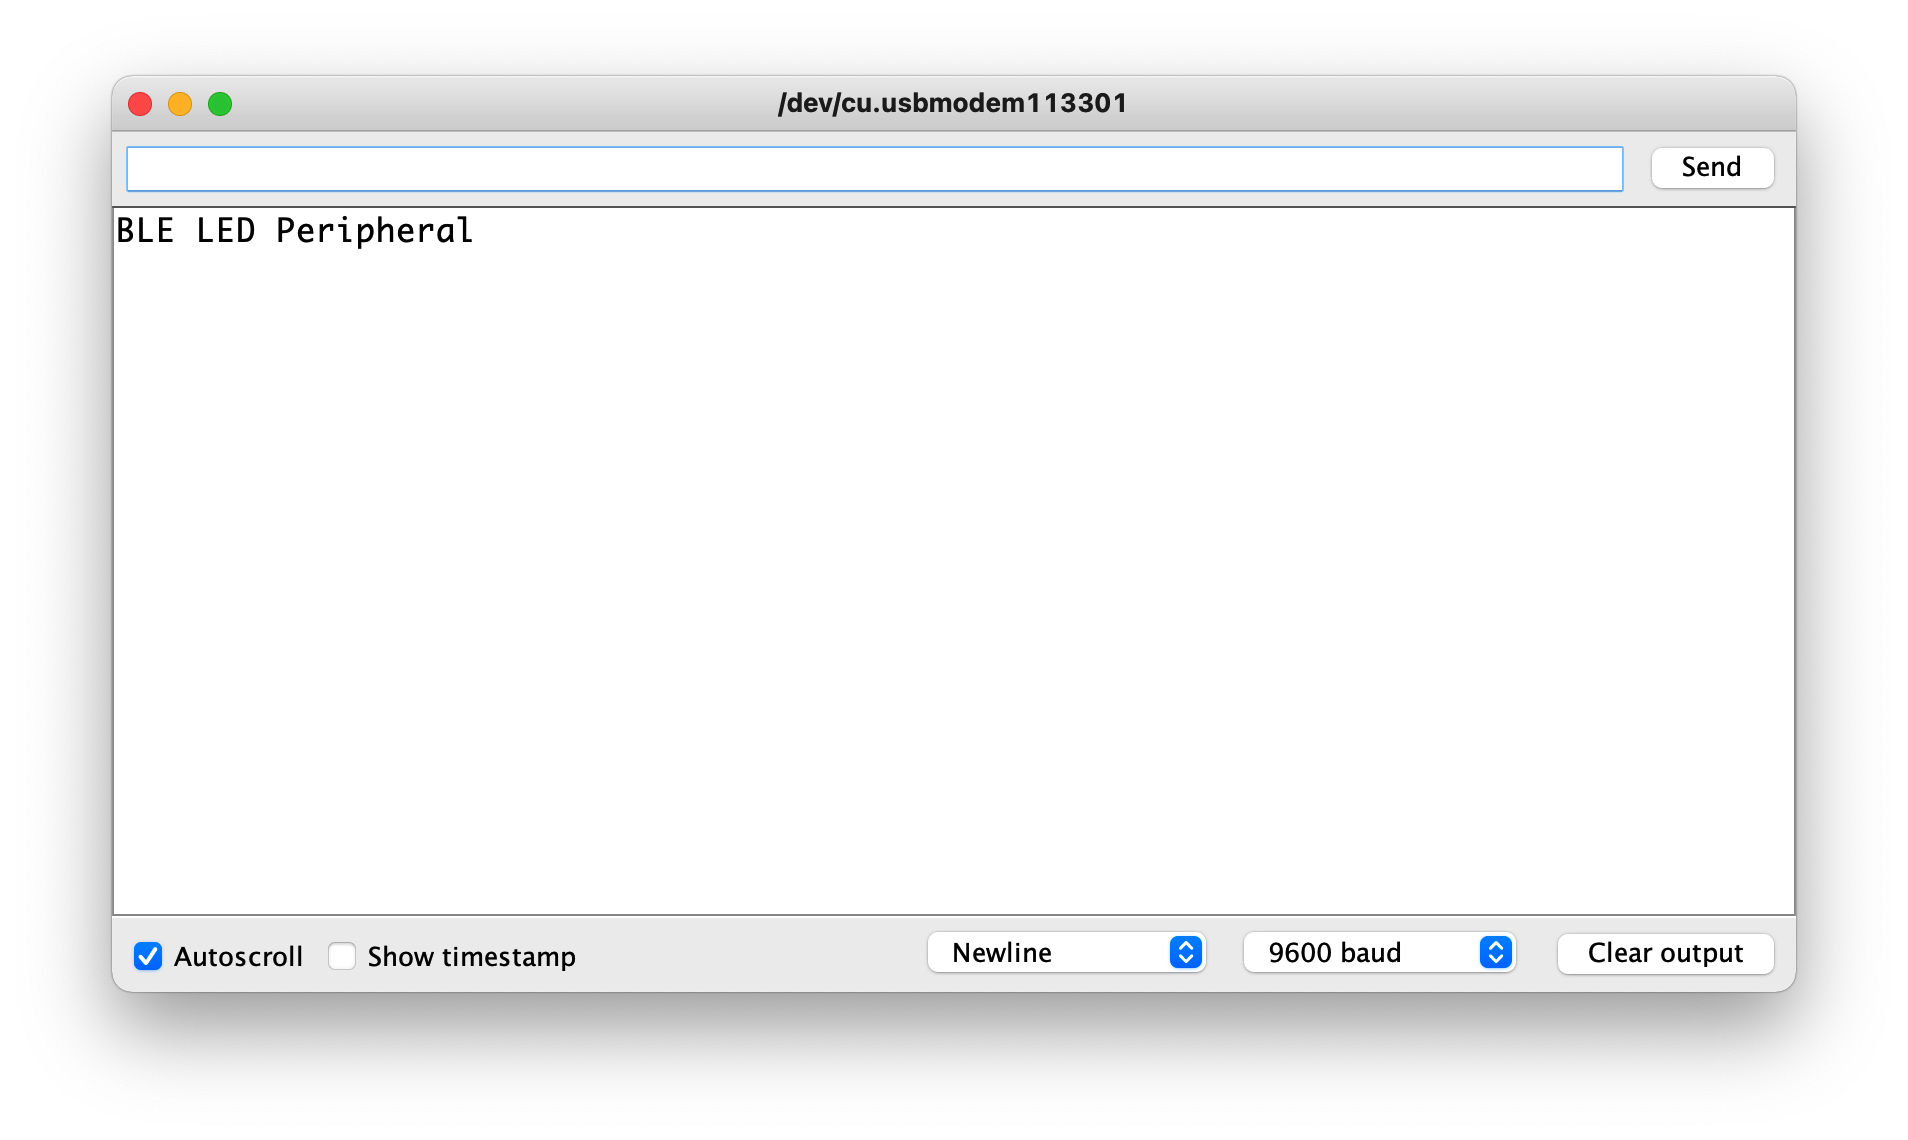
Neste ponto, o controle da luz do Seeed Studio XIAO nRF52840 pode ser concluído usando o aplicativo móvel via Bluetooth, conforme descrito abaixo.
| iPhone | Android | Descrição |
|---|---|---|
 |  | Abra o software, procure por um dispositivo Bluetooth chamado LED e clique em Connect. Alguns dispositivos podem aparecer como Arduino. |
 |  | Vá para a interface Bluetooth do Seeed Studio XIAO nRF52840 e clique no dispositivo para exibir os detalhes do dispositivo. |
 |  | Preencha os dados a serem enviados para o Seeed Studio XIAO nRF52840, envie 1 para acender a luz, envie 0 para apagar a luz. |
 |  | De volta à interface de controle Bluetooth, você pode ver que o valor mudou e a luz vermelha do Seeed Studio XIAO nRF52840 está acesa (ou apagada). |
 | ||
Demo 2 Usar o XIAO BLE para obter dados do Módulo de Detecção de Sono de 24GHz via BLE
Neste exemplo, descreveremos como obter os valores dos sensores e enviar as informações sobre os dados detectados pelos sensores para o dispositivo móvel via Bluetooth com o Seeed Studio XIAO nRF52840.
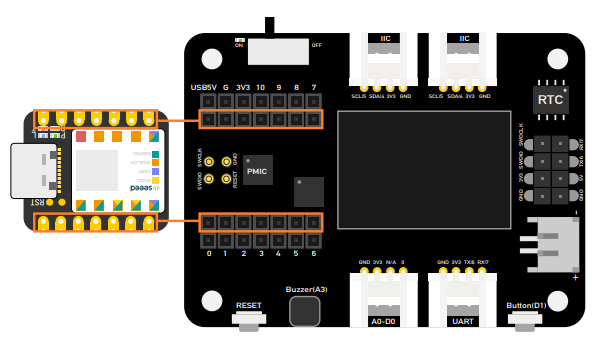
Siga a imagem abaixo para conectar a placa Seeed Studio XIAO nRF52840 e o Módulo de Detecção de Sono Respiratório de 24GHz. Para mais informações, você pode clicar aqui.

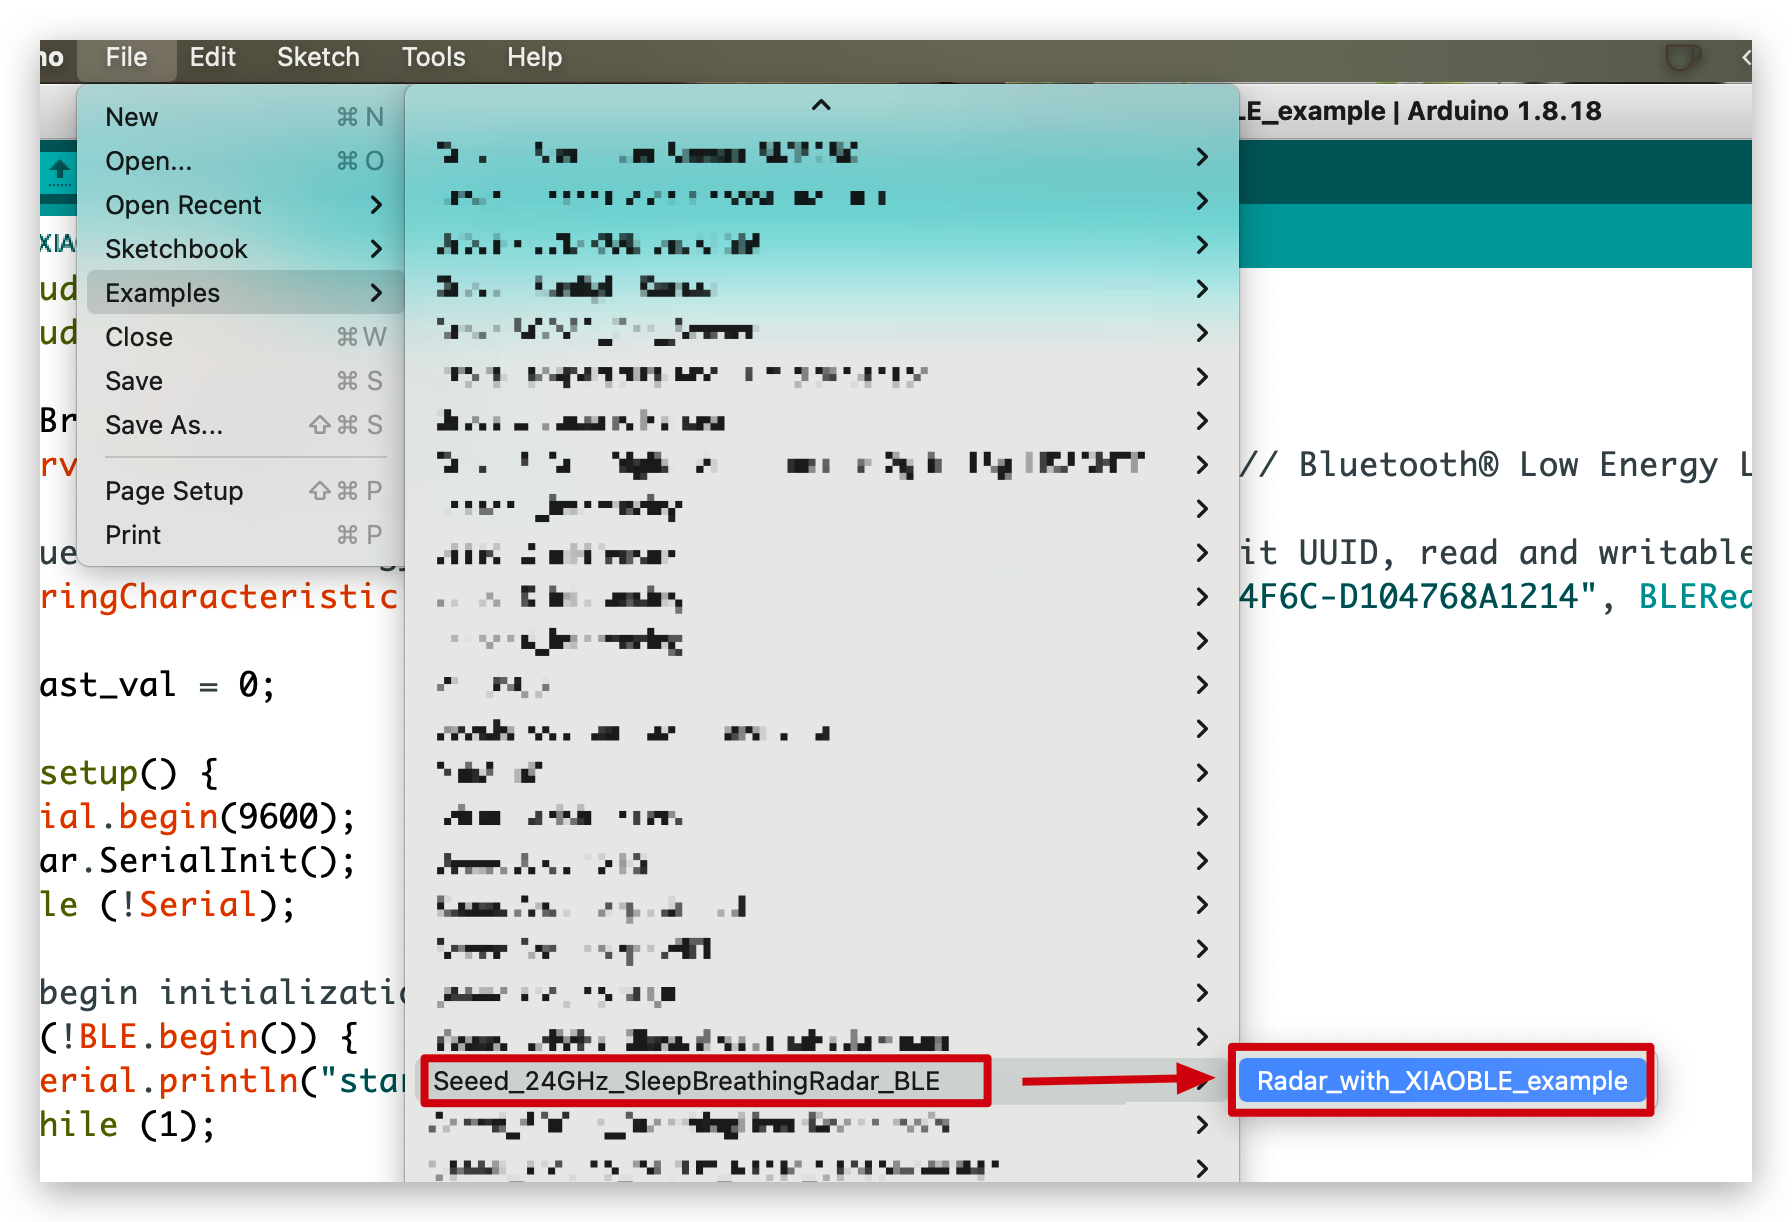
Abra o código de exemplo na biblioteca e faça o upload para o Seeed Studio XIAO nRF52840.
//Radar_with_XIAOBLE_example

#include <ArduinoBLE.h>
#include <sleepbreathingradarBLE.h>

SleepBreathingRadarBLE radar;
BLEService radarService("19B10000-E8F2-537E-4F6C-D104768A1214"); // Bluetooth® Low Energy LED Service

// Bluetooth® Low Energy LED Switch Characteristic - custom 128-bit UUID, read and writable by central
BLEStringCharacteristic switchCharacteristic("19B10001-E8F2-537E-4F6C-D104768A1214", BLERead | BLENotify, 20);

int last_val = 0;

void setup() {
  Serial.begin(9600);
  radar.SerialInit();
  while (!Serial);

  // begin initialization
  if (!BLE.begin()) {
    Serial.println("starting Seeed Studio XIAO nRF52840 with 60GHz radar sensor demo failed!");
    while (1);
  }

  // set advertised local name and service UUID:
  BLE.setLocalName("Seeed Studio XIAO nRF52840");
  BLE.setAdvertisedService(radarService);

  // add the characteristic to the service
  radarService.addCharacteristic(switchCharacteristic);

  // add service
  BLE.addService(radarService);

  // start advertising
  BLE.advertise();

  Serial.println("Seeed Studio XIAO nRF52840 active, waiting for connections...");
}

void loop() {
  // listen for Bluetooth® Low Energy peripherals to connect:
  BLEDevice central = BLE.central();

  // if a central is connected to peripheral:
  if (central) {
    Serial.print("Connected to central: ");
    // print the central's MAC address:
    Serial.println(central.address());

    // while the central is still connected to peripheral:
    while (central.connected()){
       radar.recvRadarBytes();                       //Receive radar data and start processing
       if (radar.newData == true) {                  //The data is received and transferred to the new list dataMsg[]
          byte dataMsg[radar.dataLen+3] = {0x00};
          dataMsg[0] = 0x53;                         //Add the header frame as the first element of the array
          for (byte n = 0; n < radar.dataLen; n++)dataMsg[n+1] = radar.Msg[n];  //Frame-by-frame transfer
          dataMsg[radar.dataLen+1] = 0x54;
          dataMsg[radar.dataLen+2] = 0x43;
          radar.newData = false;                     //A complete set of data frames is saved
          int new_val = radar.Sleep_inf(dataMsg);    //Use radar built-in algorithm to output human motion status
          if(new_val != last_val){
            radar.OutputAssignment(new_val);
            switchCharacteristic.setValue(radar.str);
            last_val = new_val;
          }
        }
    }

    // when the central disconnects, print it out:
      Serial.print(F("Disconnected from central: "));
      Serial.println(central.address());
    }
}
Neste exemplo, a função que envia dados para o dispositivo móvel é setValue(). Se você quiser obter uma exibição em tempo real dos dados, precisa adicionar BLENotify ao código abaixo. O último parâmetro, 20, indica o comprimento máximo de dados que você pode enviar.
BLEStringCharacteristic switchCharacteristic("19B10001-E8F2-537E-4F6C-D104768A1214", BLERead | BLENotify, 20);
Ao abrir o monitor serial com uma taxa de baud de 9600, deve ser exibida a distância entre o sensor e o objeto para o qual ele está apontado, tanto em milímetros quanto em pés. A saída deve se parecer com a imagem abaixo.
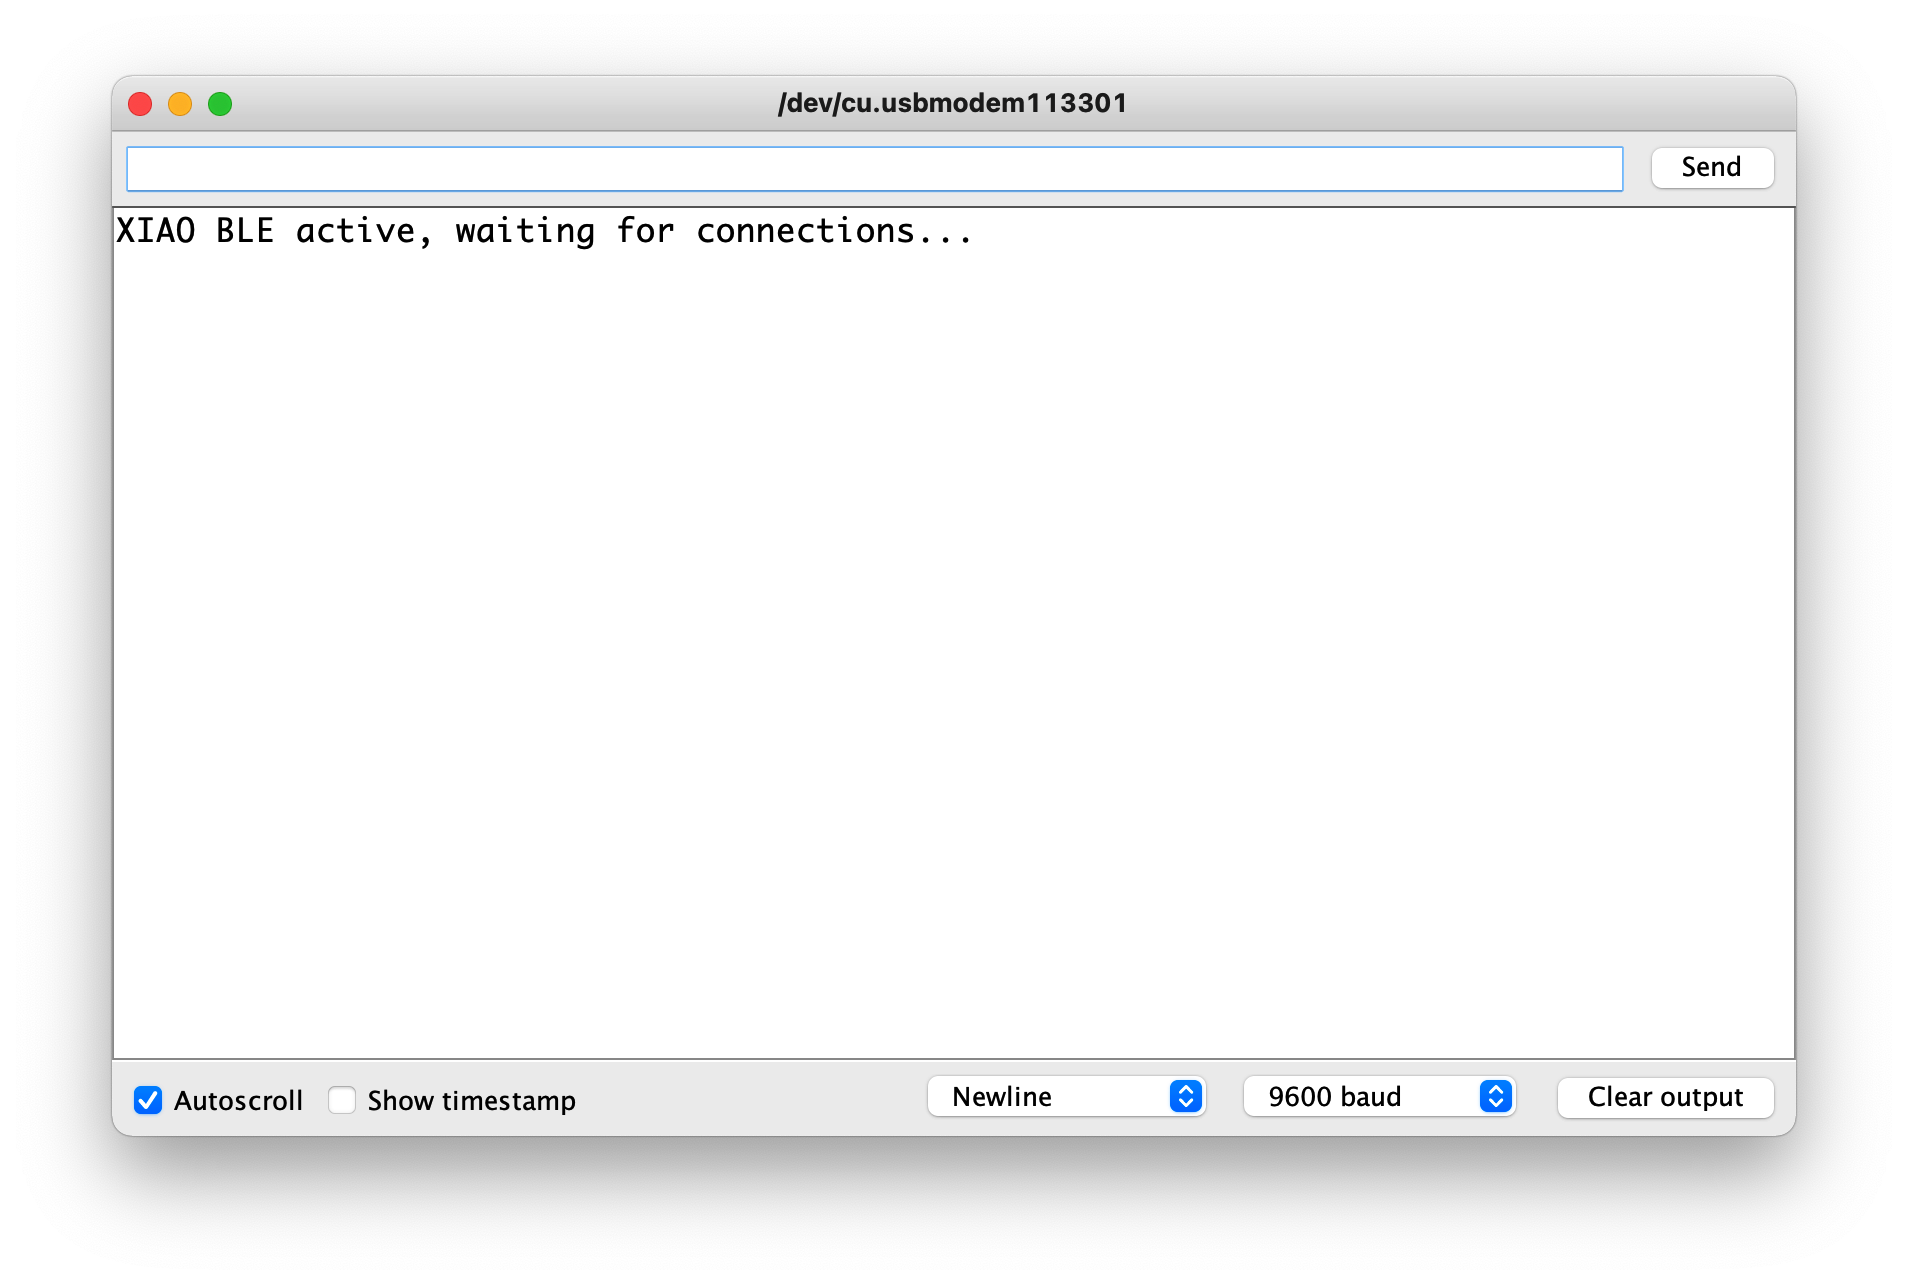
Em seguida, podemos obter os dados em tempo real enviados por Bluetooth seguindo os passos abaixo.
| iPhone | Android | Descrição |
|---|---|---|
|  | Abra o software, procure por um dispositivo Bluetooth chamado Seeed Studio XIAO nRF52840 e clique em Connect. Alguns dispositivos podem aparecer como Arduino. |
| = | | Vá para a interface Bluetooth do Seeed Studio XIAO nRF52840 e clique no dispositivo para exibir os detalhes do dispositivo. |
 |  | Abra os dados de atualização em tempo real do software. |
 |  | Em seguida, sempre que o radar detectar uma mensagem de sono, ela será enviada para o telefone via Bluetooth do Seeed Studio XIAO nRF52840. |
 | ||
Demo 3 Dois XIAO nRF52840 controlam LED via comunicação Bluetooth
Neste exemplo, vamos usar dois XIAO nRF52840, utilizando seus recursos de Bluetooth para se comunicarem. Um dos XIAOs atua como host e é conectado à placa de expansão XIAO, enviando comandos de controle pelos botões da placa de expansão. O outro XIAO atua como escravo.
Antes de começar, prepare o seguinte.
 |  |
| Seeed Studio XIAO Expansion board | 2 x Seeed XIAO BLE nRF52840 Sense |
Selecione um dos XIAO nRF52840, que não precisa ter nenhum dispositivo conectado, e faça o upload diretamente do programa abaixo.
#include <ArduinoBLE.h>

BLEService ledService("19B10000-E8F2-537E-4F6C-D104768A1214"); // Bluetooth® Low Energy LED Service

// Bluetooth® Low Energy LED Switch Characteristic - custom 128-bit UUID, read and writable by central
BLEByteCharacteristic switchCharacteristic("19B10001-E8F2-537E-4F6C-D104768A1214", BLERead | BLEWrite);

const int ledPin = LED_BUILTIN; // pin to use for the LED

void setup() {
  Serial.begin(9600);
  while (!Serial);

  // set LED pin to output mode
  pinMode(ledPin, OUTPUT);

  // begin initialization
  if (!BLE.begin()) {
    Serial.println("starting Bluetooth® Low Energy module failed!");

    while (1);
  }

  // set advertised local name and service UUID:
  BLE.setLocalName("XIAO");
  BLE.setAdvertisedService(ledService);

  // add the characteristic to the service
  ledService.addCharacteristic(switchCharacteristic);

  // add service
  BLE.addService(ledService);

  // set the initial value for the characeristic:
  switchCharacteristic.writeValue(0);

  // start advertising
  BLE.advertise();

  // print address
  Serial.print("Address: ");
  Serial.println(BLE.address());

  Serial.println("XIAO nRF52840 Peripheral");
}

void loop() {
  // listen for Bluetooth® Low Energy peripherals to connect:
  BLEDevice central = BLE.central();

  // if a central is connected to peripheral:
  if (central) {
    Serial.print("Connected to central: ");
    // print the central's MAC address:
    Serial.println(central.address());

    // while the central is still connected to peripheral:
    while (central.connected()) {
      // if the remote device wrote to the characteristic,
      // use the value to control the LED:
      if (switchCharacteristic.written()) {
        if (switchCharacteristic.value()) {   // any value other than 0
          Serial.println("LED on");
          digitalWrite(ledPin, HIGH);         // will turn the LED on
        } else {                              // a 0 value
          Serial.println(F("LED off"));
          digitalWrite(ledPin, LOW);          // will turn the LED off
        }
      }
    }

    // when the central disconnects, print it out:
    Serial.print(F("Disconnected from central: "));
    Serial.println(central.address());
  }
}
O principal objetivo deste programa é fazer do XIAO um dispositivo Bluetooth chamado "XIAO" que possa ser pesquisado e conectado por outros dispositivos Bluetooth. Uma vez conectado, você pode controlar os LEDs no XIAO enviando 0 ou 1 para desligá-los ou ligá-los, respectivamente.
Coloque o Seeed Studio XIAO nRF52840 na placa de expansão.
E, para esse fim, o XIAO com a placa de expansão conectada faz o upload do seguinte procedimento.
#include <ArduinoBLE.h>
#include <U8x8lib.h>
#include <Wire.h>

// variables for button
const int buttonPin = D1;
int oldButtonState = LOW;

void setup() {
  Serial.begin(9600);
  while (!Serial);

  // configure the button pin as input
  pinMode(buttonPin, INPUT_PULLUP);

  // initialize the Bluetooth® Low Energy hardware
  BLE.begin();

  Serial.println("Bluetooth® Low Energy Central - LED control");

  // start scanning for peripherals
  BLE.scanForName("XIAO");
}

void loop() {
  // check if a peripheral has been discovered
  BLEDevice peripheral = BLE.available();
  if (peripheral) {
    // discovered a peripheral, print out address, local name, and advertised service
    Serial.print("Found ");
    Serial.print(peripheral.address());
    Serial.print(" '");
    Serial.print(peripheral.localName());
    Serial.print("' ");
    Serial.print(peripheral.advertisedServiceUuid());
    Serial.println();

    if (peripheral.localName() != "XIAO") {
      return;
    }

    // stop scanning
    BLE.stopScan();

    system_control(peripheral);

    // peripheral disconnected, start scanning again
    BLE.scanForName("XIAO");
  }
  delay(100);
}

void system_control(BLEDevice peripheral) {
  // connect to the peripheral
  Serial.println("Connecting ...");

  if (peripheral.connect()) {
    Serial.println("Connected");
  } else {
    Serial.println("Failed to connect!");
    return;
  }

  // discover peripheral attributes
  Serial.println("Discovering attributes ...");
  if (peripheral.discoverAttributes()) {
    Serial.println("Attributes discovered");
  } else {
    Serial.println("Attribute discovery failed!");
    peripheral.disconnect();
    return;
  }

  // retrieve the LED characteristic
  BLECharacteristic ledCharacteristic = peripheral.characteristic("19b10001-e8f2-537e-4f6c-d104768a1214");

  if (!ledCharacteristic) {
    Serial.println("Peripheral does not have LED characteristic!");
    peripheral.disconnect();
    return;
  } else if (!ledCharacteristic.canWrite()) {
    Serial.println("Peripheral does not have a writable LED characteristic!");
    peripheral.disconnect();
    return;
  }

  while (peripheral.connected()) {
    // while the peripheral is connected
    // read the button pin
    int buttonState = digitalRead(buttonPin);

    if (oldButtonState != buttonState) {
      // button changed
      oldButtonState = buttonState;

      if (buttonState) {
        Serial.println("button pressed");

        // button is pressed, write 0x01 to turn the LED on
        ledCharacteristic.writeValue((byte)0x01);
      } else {
        Serial.println("button released");

        // button is released, write 0x00 to turn the LED off
        ledCharacteristic.writeValue((byte)0x00);
      }
    }
  }

  Serial.println("Peripheral disconnected");
}
Depois de fazer o upload do programa, ligue o monitor serial e o programa começará a procurar um dispositivo Bluetooth próximo com o nome local "XIAO" e se conectará a ele (você precisará esperar de 1 a 3 minutos).
Quando a mensagem de conexão bem-sucedida for exibida no monitor serial, você poderá controlar o acionamento do LED do outro XIAO nRF52840 por meio da tecla D1 da placa de expansão.
Claro, se você não tiver uma placa de expansão, também pode usar seus próprios botões ou outros dispositivos.
E o que mais?
Se você quiser experimentar mais exemplos, você pode navegar até File > Examples > INCOMPATIBLE > ArduinoBLE e conferir todos os exemplos em ArduinoBLE
Suporte Técnico & Discussão de Produtos
Obrigado por escolher nossos produtos! Estamos aqui para fornecer diferentes tipos de suporte para garantir que sua experiência com nossos produtos seja a mais tranquila possível. Oferecemos vários canais de comunicação para atender a diferentes preferências e necessidades.