Rastreador Wi-Fi XIAO ESP32C3 usando MicroPython
Este wiki foi atualizado: https://wiki.seeedstudio.com/pt-br/xiao_esp32c3_with_micropython/
Neste tutorial, fornecerei uma visão geral concisa sobre como utilizar o XIAO ESP32C3 com MicroPython. Além disso, explorarei a aplicação prática de um rastreador de intensidade de sinal Wi-Fi, que se mostra extremamente valioso ao estabelecer uma rede doméstica de alta velocidade e alta qualidade. Consequentemente, seguindo as orientações do rastreador Wi-Fi, podemos otimizar efetivamente o posicionamento do amplificador de sinal Wi-Fi, garantindo uma cobertura de sinal ideal.
Preparação de Hardware
Estou usando o Seeed Studio XIAO ESP32C3 e a Placa de Expansão Base para XIAO como hardware aqui.
| Seeed Studio XIAO ESP32C3 | Placa de Expansão Base para XIAO |
|---|---|
 |  |
Preparação de Software
| Thonny IDE | Esptool |
|---|---|
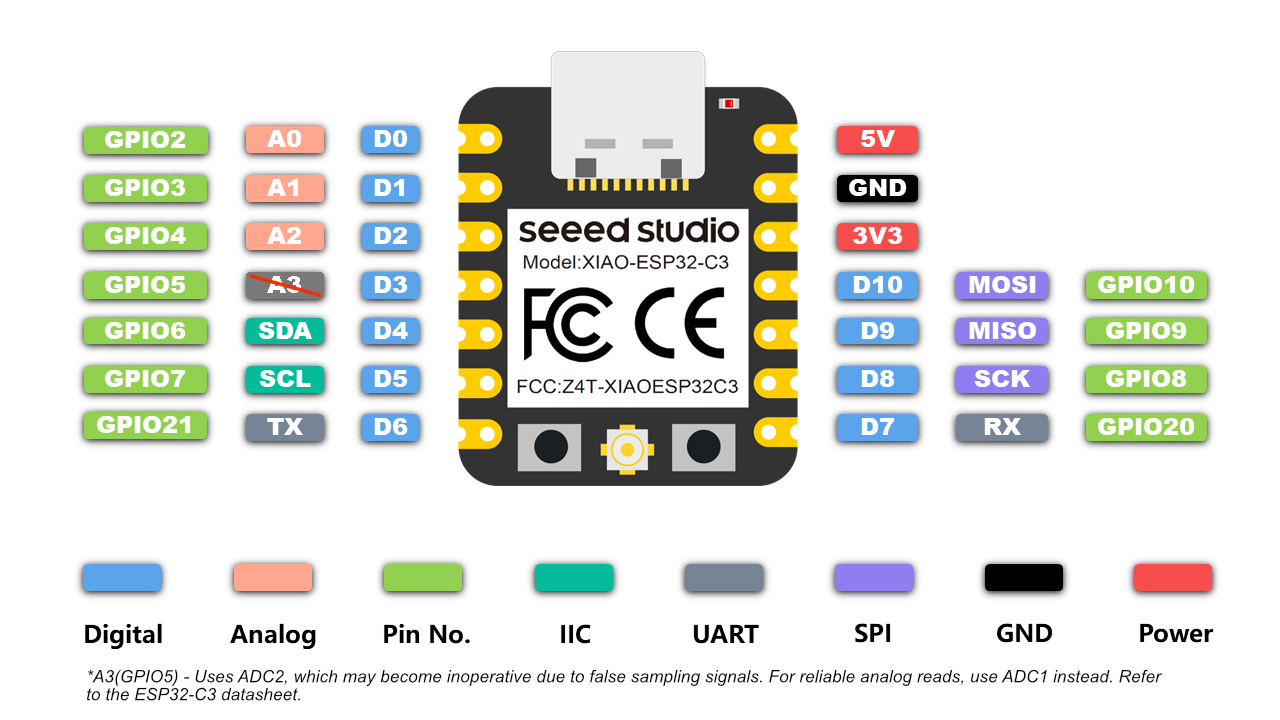
Antes de usar, é necessário que eu declare que o software/firmware que estou usando aqui foi projetado para o chip ESP32C3. Portanto, ao tentar usar um pino, certifique-se de usar a Entrada/Saída de Propósito Geral em vez do pino na placa.
Por exemplo, ao tentar usar o pino na primeira linha à esquerda. Certifique-se de que é GPIO2 em vez de A0 ou D0.
Primeiros Passos
São necessárias duas etapas ("Configuração do MicroPython no PC" e "Configuração do MicroPython no XIAO ESP32C3") para que o XIAO ESP32C3 esteja realmente pronto para ser programado com MicroPython.
Após a configuração, você pode copiar o código passo a passo de cada demonstração para alcançar a conclusão.
Configuração do MicroPython no PC
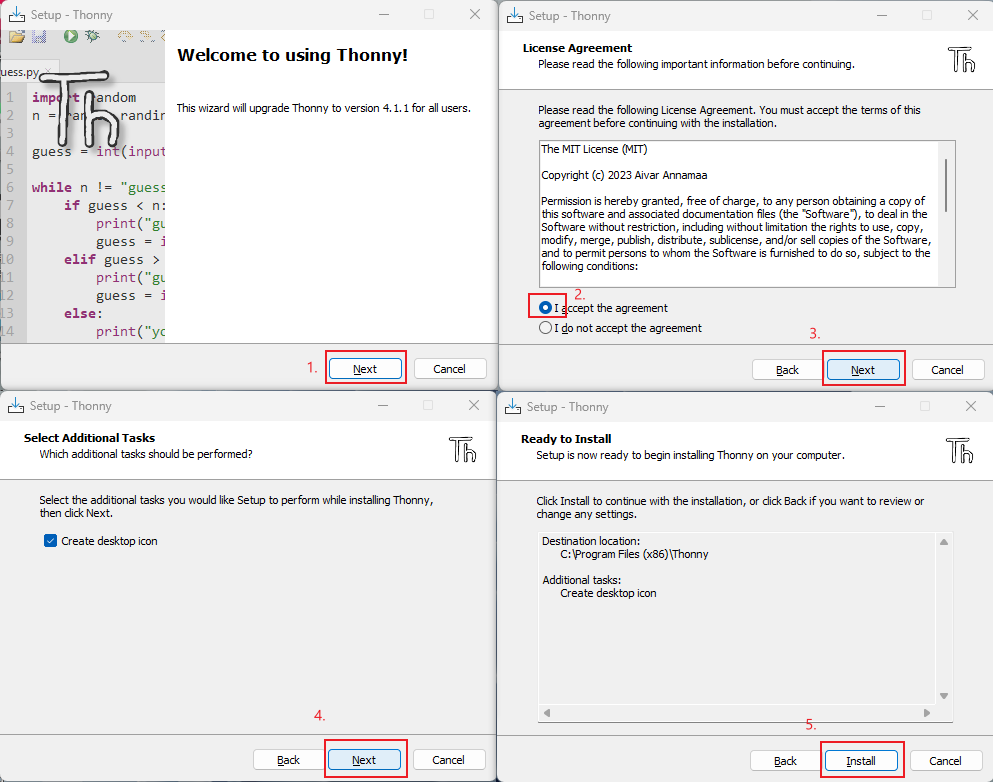
Instalar o Thonny IDE (Windows)
Por favor, siga os passos na imagem
Atualizar o firmware usando esptool
- Abra o local do seu próprio arquivo
git clone https://github.com/espressif/esptool.git
- Download the latest firmware (This Tutorial is v1.20.0 (2023-04-26) .bin)
https://micropython.org/download/esp32c3/
- Coloque o firmware mais recente neste local de arquivo e abra o arquivo no CMD
your own file location\esptool-master\esptool
- Flash the firmware by entering this command in CMD (enter bootloader mode before flashing)
esptool.exe --chip esp32c3 --port COM10 --baud 921600 --before default_reset --after hard_reset --no-stub write_flash --flash_mode dio --flash_freq 80m 0x0 esp32c3-usb-20230426-v1.20.0.bin
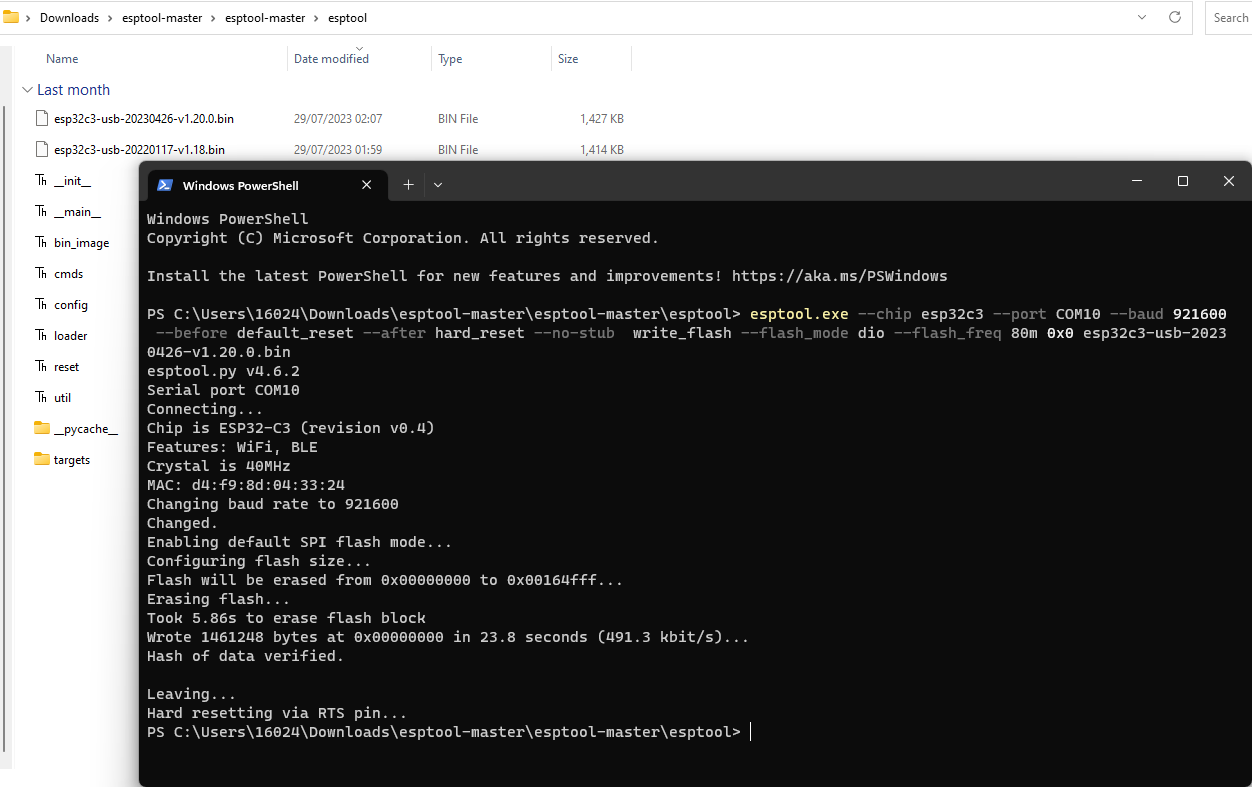
If you use linux, change "esptool.exe" to "esptool.py". Change "COM10" to your own serial port. Change "esp32c3-usb-20230426-v1.20.0.bin" to the latest firmware name you downloaded.
Micropython Setup on XIAO ESP32C3
-
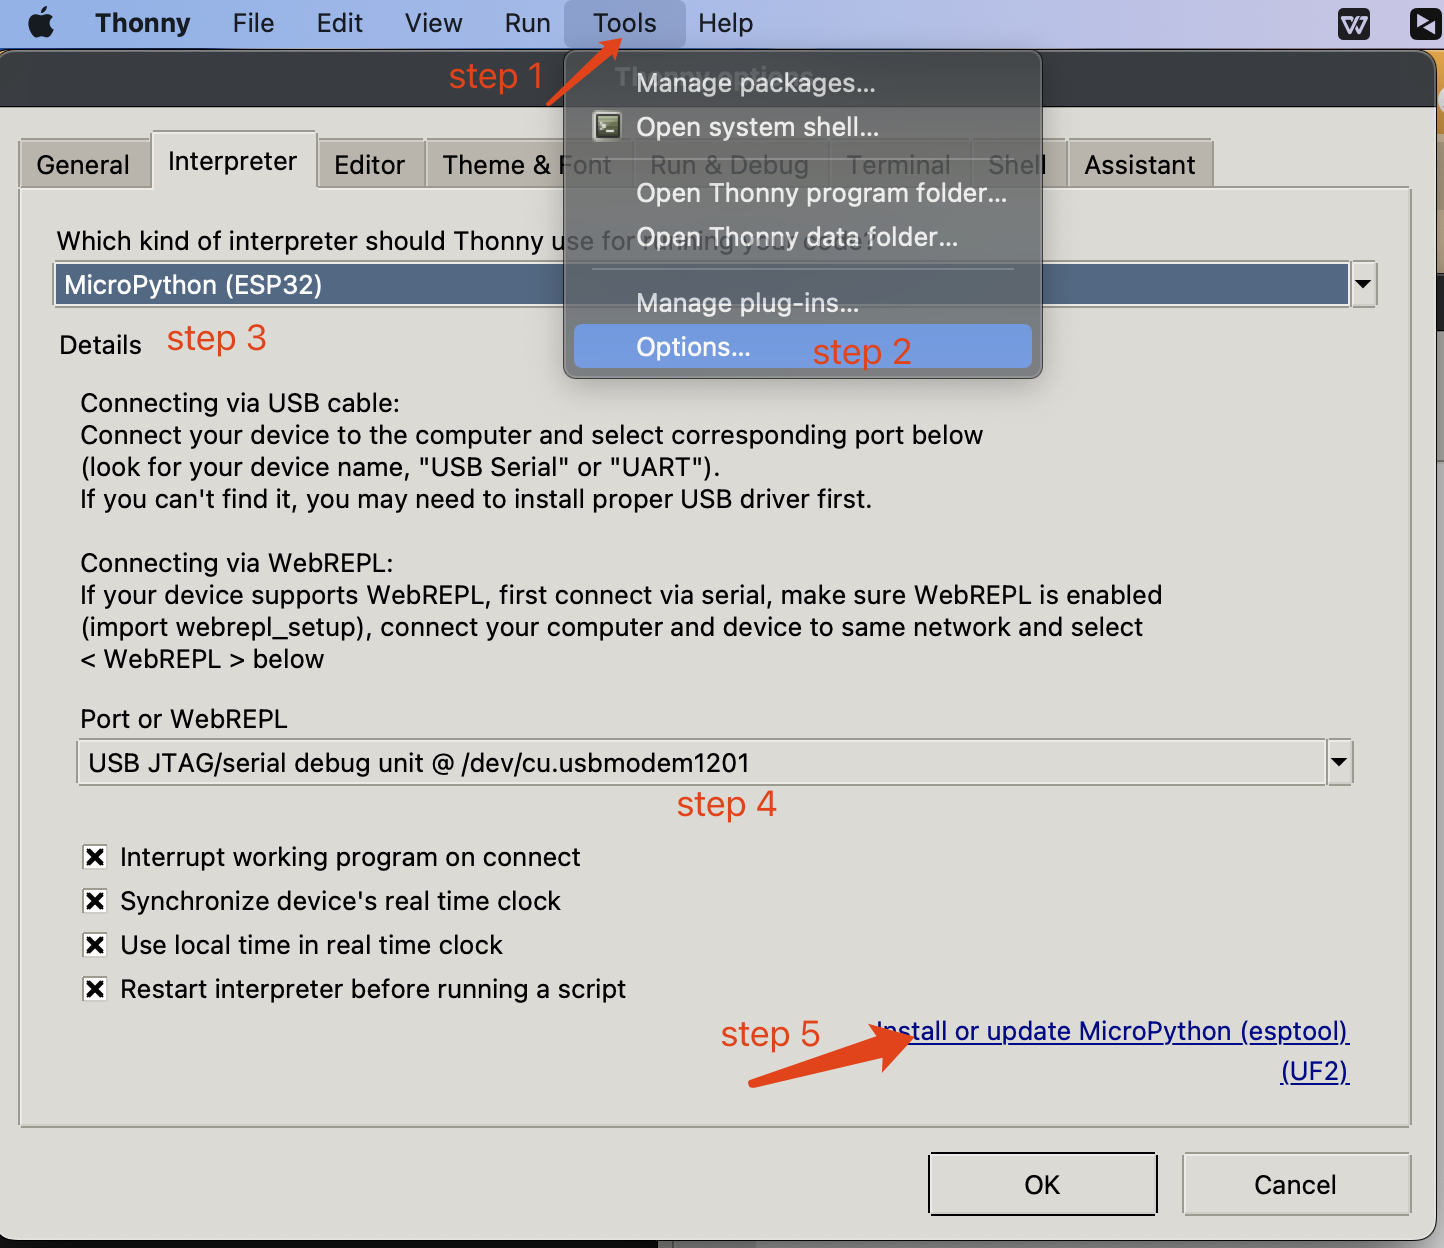
Plug in your XIAO ESP32C3, open Thonny and click right bottom to configure interpreter
-
Select interpreter- Micropython (ESP32) and Port >>> Click OK
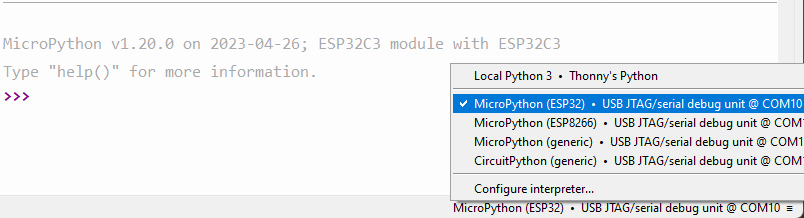
Note: If everything goes well, you will see the output in the shell
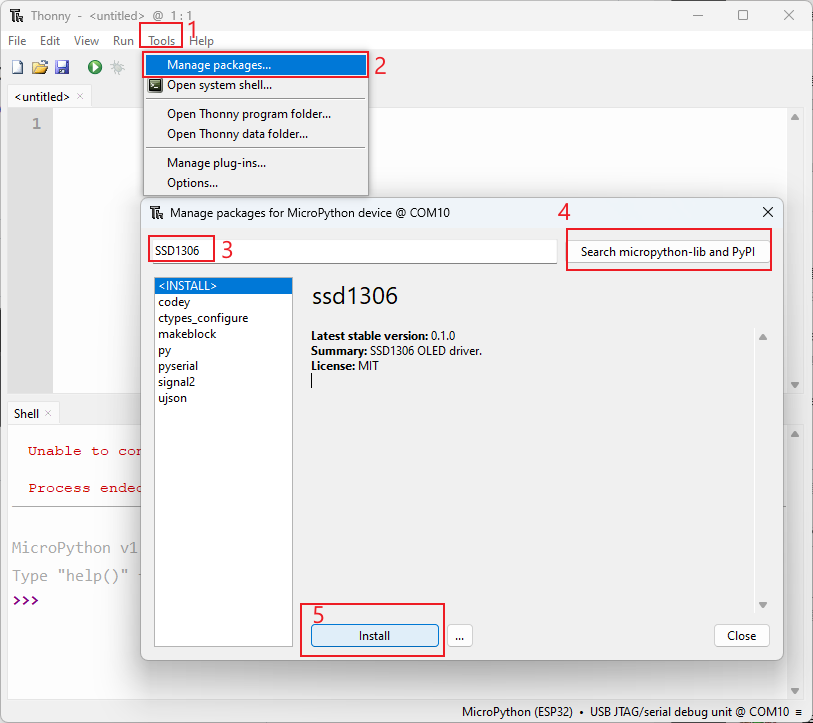
Install required libraries
Click "Tools" >>> Click "Management Packages" >>> Enter Library's name >>> Click "Search micropython-lib and PyPl"
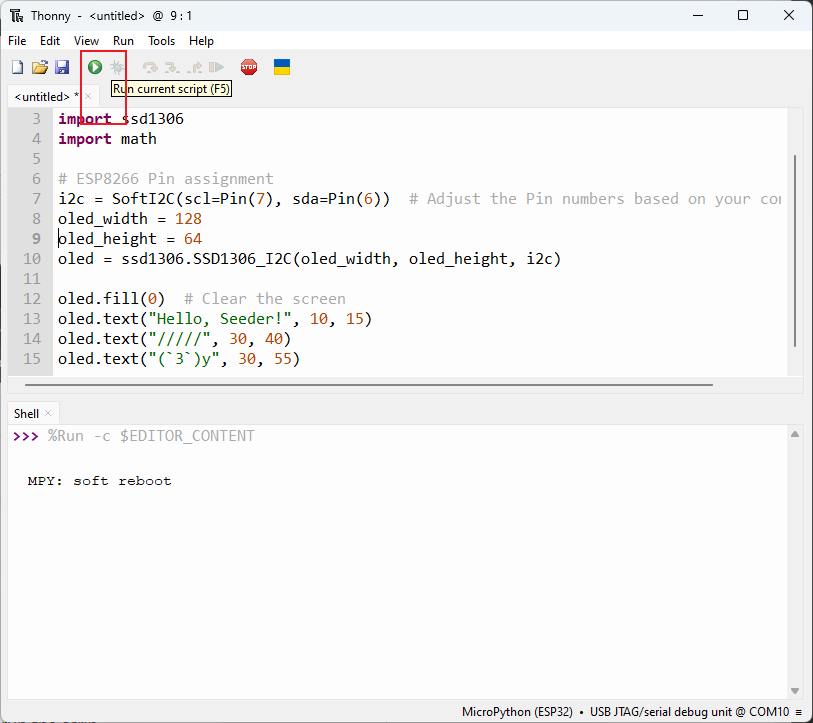
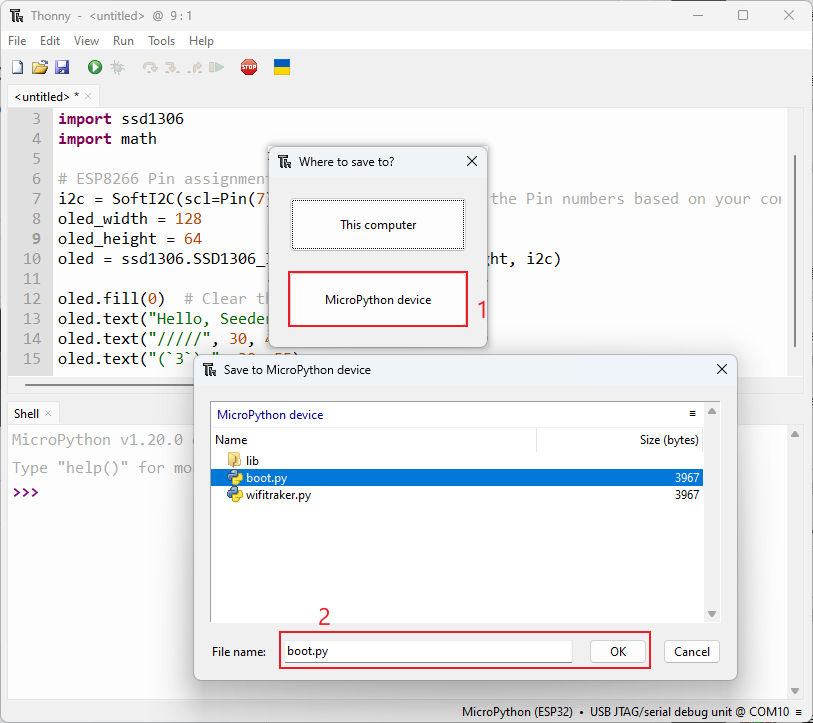
Run the scrip and Flash it to the board
- After you finish coding, click the green button to run the scrip
- Flash the code to the board by save the file to the board as "boot.py"
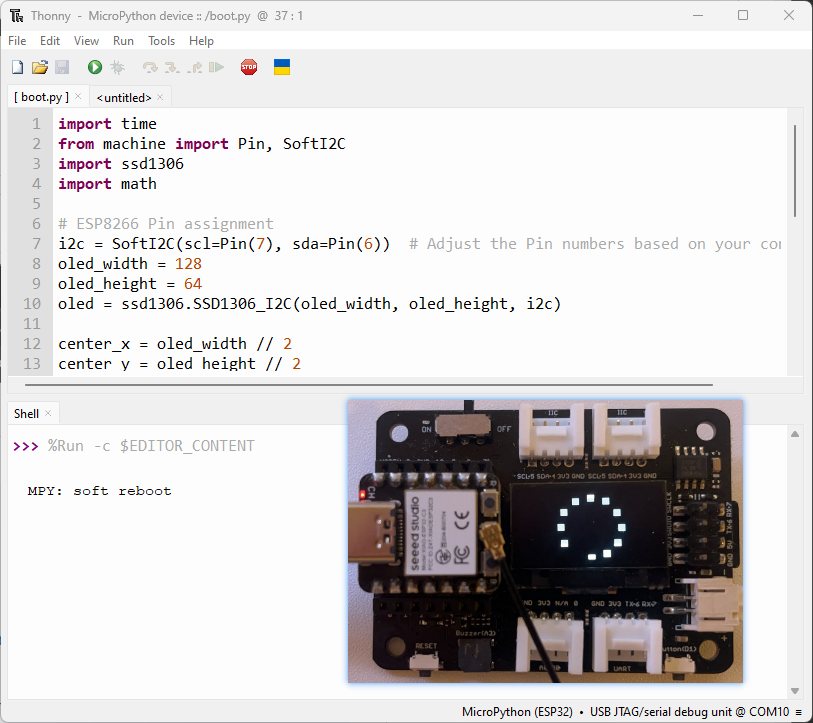
Demo 1: Light an OLED Screen
1. Hello Seeder
import time
from machine import Pin, SoftI2C
import ssd1306
import math
# ESP8266 Pin assignment
i2c = SoftI2C(scl=Pin(7), sda=Pin(6)) # Adjust the Pin numbers based on your connections
oled_width = 128
oled_height = 64
oled = ssd1306.SSD1306_I2C(oled_width, oled_height, i2c)
oled.fill(0) # Clear the screen
oled.text("Hello, Seeder!", 10, 15)
oled.text("/////", 30, 40)
oled.text("(`3`)y", 30, 55)
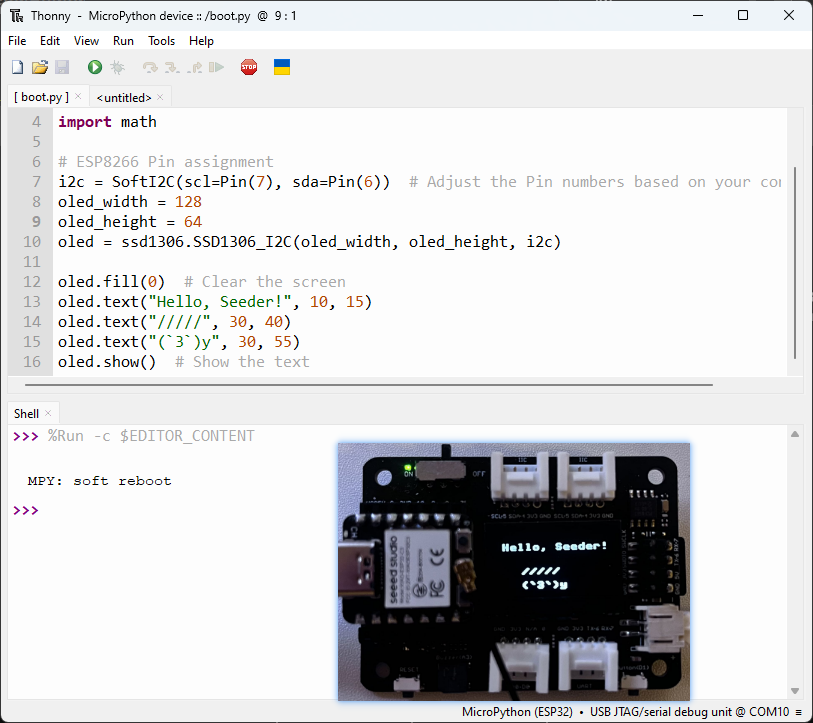
oled.show() # Show the text
2. Loading dynamic effect
import time
from machine import Pin, SoftI2C
import ssd1306
import math

# ESP8266 Pin assignment
i2c = SoftI2C(scl=Pin(7), sda=Pin(6))  # Adjust the Pin numbers based on your connections
oled_width = 128
oled_height = 64
oled = ssd1306.SSD1306_I2C(oled_width, oled_height, i2c)

center_x = oled_width // 2
center_y = oled_height // 2
square_size = 6  # Size of each square
num_squares = 12  # Number of squares
angle_increment = 2 * math.pi / num_squares

while True:
    oled.fill(0)  # Clear the screen

    for i in range(num_squares):
        angle = i * angle_increment
        x = int(center_x + (center_x - square_size-30) * math.cos(angle))
        y = int(center_y + (center_x - square_size-30) * math.sin(angle))

        # Draw all squares
        for j in range(num_squares):
            angle_j = j * angle_increment
            x_j = int(center_x + (center_x - square_size-30) * math.cos(angle_j))
            y_j = int(center_y + (center_x - square_size-30) * math.sin(angle_j))

            oled.fill_rect(x_j, y_j, square_size, square_size, 1)  # Draw the square

        oled.fill_rect(x, y, square_size, square_size, 0)  # Erase the current square
        oled.show()
        time.sleep_ms(100)  # Pause before next iteration
Demo 2: Light a Buzzer
1. Sound
import time
from time import sleep
import machine
from machine import Pin, SoftI2C


# Buzzer settings

buzzer_pin = machine.Pin(5, machine.Pin.OUT)
buzzer = machine.PWM(buzzer_pin)
buzzer.freq(1047)

# Buzzer working

while True:

    buzzer.duty(10)
    time.sleep(1)
    buzzer.duty(0)
    time.sleep(1)
2. Play the Song "He's a pirate"
import machine
import time

# Buzzer settings
buzzer_pin = machine.Pin(5, machine.Pin.OUT)
buzzer = machine.PWM(buzzer_pin)
buzzer.freq(1047)

# Defining frequency of each music note
NOTE_C4 = 262
NOTE_D4 = 294
NOTE_E4 = 330
NOTE_F4 = 349
NOTE_G4 = 392
NOTE_A4 = 440
NOTE_B4 = 494
NOTE_C5 = 523
NOTE_D5 = 587
NOTE_E5 = 659
NOTE_F5 = 698
NOTE_G5 = 784
NOTE_A5 = 880
NOTE_B5 = 988

# Music notes of the song, 0 is a rest/pulse
notes = [
    NOTE_E4, NOTE_G4, NOTE_A4, NOTE_A4, 0,
    NOTE_A4, NOTE_B4, NOTE_C5, NOTE_C5, 0,
    NOTE_C5, NOTE_D5, NOTE_B4, NOTE_B4, 0,
    NOTE_A4, NOTE_G4, NOTE_A4, 0,

    NOTE_E4, NOTE_G4, NOTE_A4, NOTE_A4, 0,
    NOTE_A4, NOTE_B4, NOTE_C5, NOTE_C5, 0,
    NOTE_C5, NOTE_D5, NOTE_B4, NOTE_B4, 0,
    NOTE_A4, NOTE_G4, NOTE_A4, 0,

    NOTE_E4, NOTE_G4, NOTE_A4, NOTE_A4, 0,
    NOTE_A4, NOTE_C5, NOTE_D5, NOTE_D5, 0,
    NOTE_D5, NOTE_E5, NOTE_F5, NOTE_F5, 0,
    NOTE_E5, NOTE_D5, NOTE_E5, NOTE_A4, 0,

    NOTE_A4, NOTE_B4, NOTE_C5, NOTE_C5, 0,
    NOTE_D5, NOTE_E5, NOTE_A4, 0,
    NOTE_A4, NOTE_C5, NOTE_B4, NOTE_B4, 0,
    NOTE_C5, NOTE_A4, NOTE_B4, 0,

    NOTE_A4, NOTE_A4,
    #Repeat of first part
    NOTE_A4, NOTE_B4, NOTE_C5, NOTE_C5, 0,
    NOTE_C5, NOTE_D5, NOTE_B4, NOTE_B4, 0,
    NOTE_A4, NOTE_G4, NOTE_A4, 0,

    NOTE_E4, NOTE_G4, NOTE_A4, NOTE_A4, 0,
    NOTE_A4, NOTE_B4, NOTE_C5, NOTE_C5, 0,
    NOTE_C5, NOTE_D5, NOTE_B4, NOTE_B4, 0,
    NOTE_A4, NOTE_G4, NOTE_A4, 0,

    NOTE_E4, NOTE_G4, NOTE_A4, NOTE_A4, 0,
    NOTE_A4, NOTE_C5, NOTE_D5, NOTE_D5, 0,
    NOTE_D5, NOTE_E5, NOTE_F5, NOTE_F5, 0,
    NOTE_E5, NOTE_D5, NOTE_E5, NOTE_A4, 0,

    NOTE_A4, NOTE_B4, NOTE_C5, NOTE_C5, 0,
    NOTE_D5, NOTE_E5, NOTE_A4, 0,
    NOTE_A4, NOTE_C5, NOTE_B4, NOTE_B4, 0,
    NOTE_C5, NOTE_A4, NOTE_B4, 0,
    #End of Repeat

    NOTE_E5, 0, 0, NOTE_F5, 0, 0,
    NOTE_E5, NOTE_E5, 0, NOTE_G5, 0, NOTE_E5, NOTE_D5, 0, 0,
    NOTE_D5, 0, 0, NOTE_C5, 0, 0,
    NOTE_B4, NOTE_C5, 0, NOTE_B4, 0, NOTE_A4,

    NOTE_E5, 0, 0, NOTE_F5, 0, 0,
    NOTE_E5, NOTE_E5, 0, NOTE_G5, 0, NOTE_E5, NOTE_D5, 0, 0,
    NOTE_D5, 0, 0, NOTE_C5, 0, 0,
    NOTE_B4, NOTE_C5, 0, NOTE_B4, 0, NOTE_A4
]

# Durações (em ms) de cada nota musical da música
# Nota Semínima é 250 ms quando songSpeed = 1.0
durations = [
    125, 125, 250, 125, 125,
    125, 125, 250, 125, 125,
    125, 125, 250, 125, 125,
    125, 125, 375, 125,

    125, 125, 250, 125, 125,
    125, 125, 250, 125, 125,
    125, 125, 250, 125, 125,
    125, 125, 375, 125,

    125, 125, 250, 125, 125,
    125, 125, 250, 125, 125,
    125, 125, 250, 125, 125,
    125, 125, 125, 250, 125,

    125, 125, 250, 125, 125,
    250, 125, 250, 125,
    125, 125, 250, 125, 125,
    125, 125, 375, 375,

    250, 125,
    #Rpeat of First Part
    125, 125, 250, 125, 125,
    125, 125, 250, 125, 125,
    125, 125, 375, 125,

    125, 125, 250, 125, 125,
    125, 125, 250, 125, 125,
    125, 125, 250, 125, 125,
    125, 125, 375, 125,

    125, 125, 250, 125, 125,
    125, 125, 250, 125, 125,
    125, 125, 250, 125, 125,
    125, 125, 125, 250, 125,

    125, 125, 250, 125, 125,
    250, 125, 250, 125,
    125, 125, 250, 125, 125,
    125, 125, 375, 375,
    #End of Repeat

    250, 125, 375, 250, 125, 375,
    125, 125, 125, 125, 125, 125, 125, 125, 375,
    250, 125, 375, 250, 125, 375,
    125, 125, 125, 125, 125, 500,

    250, 125, 375, 250, 125, 375,
    125, 125, 125, 125, 125, 125, 125, 125, 375,
    250, 125, 375, 250, 125, 375,
    125, 125, 125, 125, 125, 500
]

def play_song():
    total_notes = len(notes)
    for i in range(total_notes):
        current_note = notes[i]
        wait = durations[i]
        if current_note != 0:
            buzzer.duty(512)  # Set duty cycle for sound
            buzzer.freq(current_note)  # Set frequency of the note
        else:
            buzzer.duty(0)  # Turn off the sound
        time.sleep_ms(wait)
        buzzer.duty(0)  # Turn off the sound
while True:
    # Play the song
    play_song()
Demo 3: Connect to Wi-fi
1. Connect to Wi-fi

import network
import urequests
import utime as time

# Configurações de rede
wifi_ssid = "Your Own SSID"
wifi_password = "Your Own Password"

def scan_and_connect():
    station = network.WLAN(network.STA_IF)
    station.active(True)

    print("Scanning for WiFi networks, please wait...")
    for ssid, bssid, channel, RSSI, authmode, hidden in station.scan():
        print("* {:s}".format(ssid))
        print("   - Channel: {}".format(channel))
        print("   - RSSI: {}".format(RSSI))
        print("   - BSSID: {:02x}:{:02x}:{:02x}:{:02x}:{:02x}:{:02x}".format(*bssid))
        print()

    while not station.isconnected():
        print("Connecting...")
        station.connect(wifi_ssid, wifi_password)
        time.sleep(10)

    print("Connected!")
    print("My IP Address:", station.ifconfig()[0])


# Executar as funções
scan_and_connect()
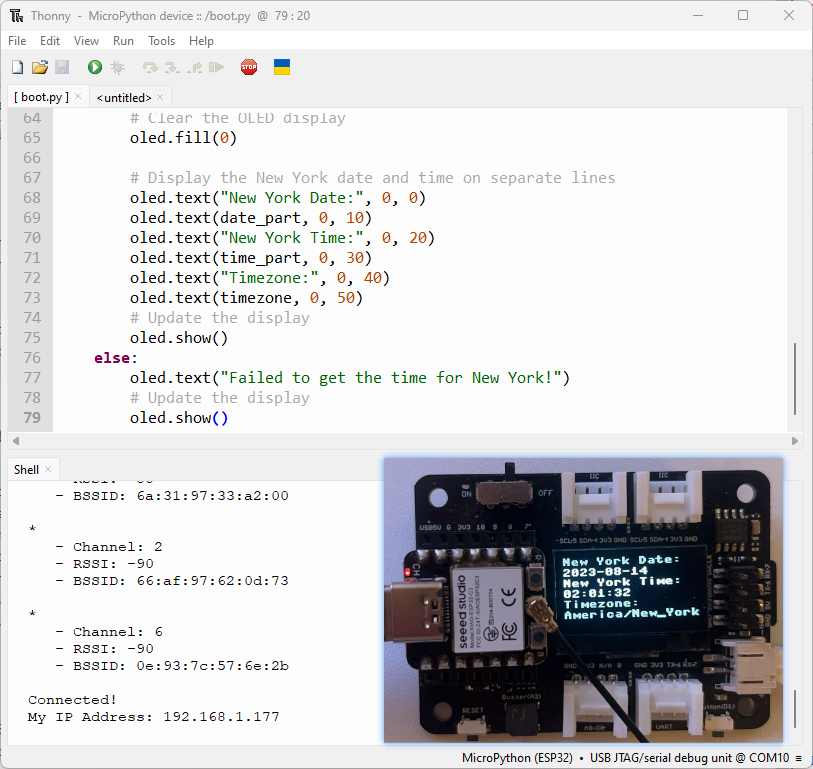
2. Request New York Time online
from machine import Pin, SoftI2C
import ssd1306
from time import sleep
import time
import network
import urequests
import ujson

# Atribuição de pinos do ESP32
# i2c = SoftI2C(scl=Pin(22), sda=Pin(21))

# Atribuição de pinos do ESP8266
i2c = SoftI2C(scl=Pin(7), sda=Pin(6))  # Adjust the Pin numbers based on your connections

oled_width = 128
oled_height = 64
oled = ssd1306.SSD1306_I2C(oled_width, oled_height, i2c)

station = network.WLAN(network.STA_IF)
station.active(True)

# Configurações de rede
wifi_ssid = "Your wifi ssid"
wifi_password = "Your wifi password"
url = "http://worldtimeapi.org/api/timezone/America/New_York"

print("Scanning for WiFi networks, please wait...")
authmodes = ['Open', 'WEP', 'WPA-PSK' 'WPA2-PSK4', 'WPA/WPA2-PSK']
for (ssid, bssid, channel, RSSI, authmode, hidden) in station.scan():
    print("* {:s}".format(ssid))
    print("   - Channel: {}".format(channel))
    print("   - RSSI: {}".format(RSSI))
    print("   - BSSID: {:02x}:{:02x}:{:02x}:{:02x}:{:02x}:{:02x}".format(*bssid))
    print()

# Tentar continuamente conectar ao ponto de acesso WiFi
while not station.isconnected():
    # Tentar conectar ao ponto de acesso WiFi
    print("Connecting...")
    station.connect(wifi_ssid, wifi_password)
    time.sleep(10)

# Exibir detalhes da conexão
print("Connected!")
print("My IP Address:", station.ifconfig()[0])


while True:
    # Realizar requisição HTTP GET em uma web sem SSL
    response = urequests.get(url)
    # Verificar se a requisição foi bem-sucedida
    if response.status_code == 200:
        # Analisar a resposta JSON
        data = ujson.loads(response.text)
        # Extrair o campo "datetime" para Nova York
        ny_datetime = data["datetime"]
        # Dividir os componentes de data e hora
        date_part, time_part = ny_datetime.split("T")
        # Obter apenas as duas primeiras casas decimais do horário
        time_part = time_part[:8]
        # Obter o fuso horário
        timezone = data["timezone"]

        # Limpar o display OLED
        oled.fill(0)

        # Exibir a data e hora de Nova York em linhas separadas
        oled.text("New York Date:", 0, 0)
        oled.text(date_part, 0, 10)
        oled.text("New York Time:", 0, 20)
        oled.text(time_part, 0, 30)
        oled.text("Timezone:", 0, 40)
        oled.text(timezone, 0, 50)
        # Atualizar o display
        oled.show()
    else:
        oled.text("Failed to get the time for New York!")
        # Atualizar o display
        oled.show()
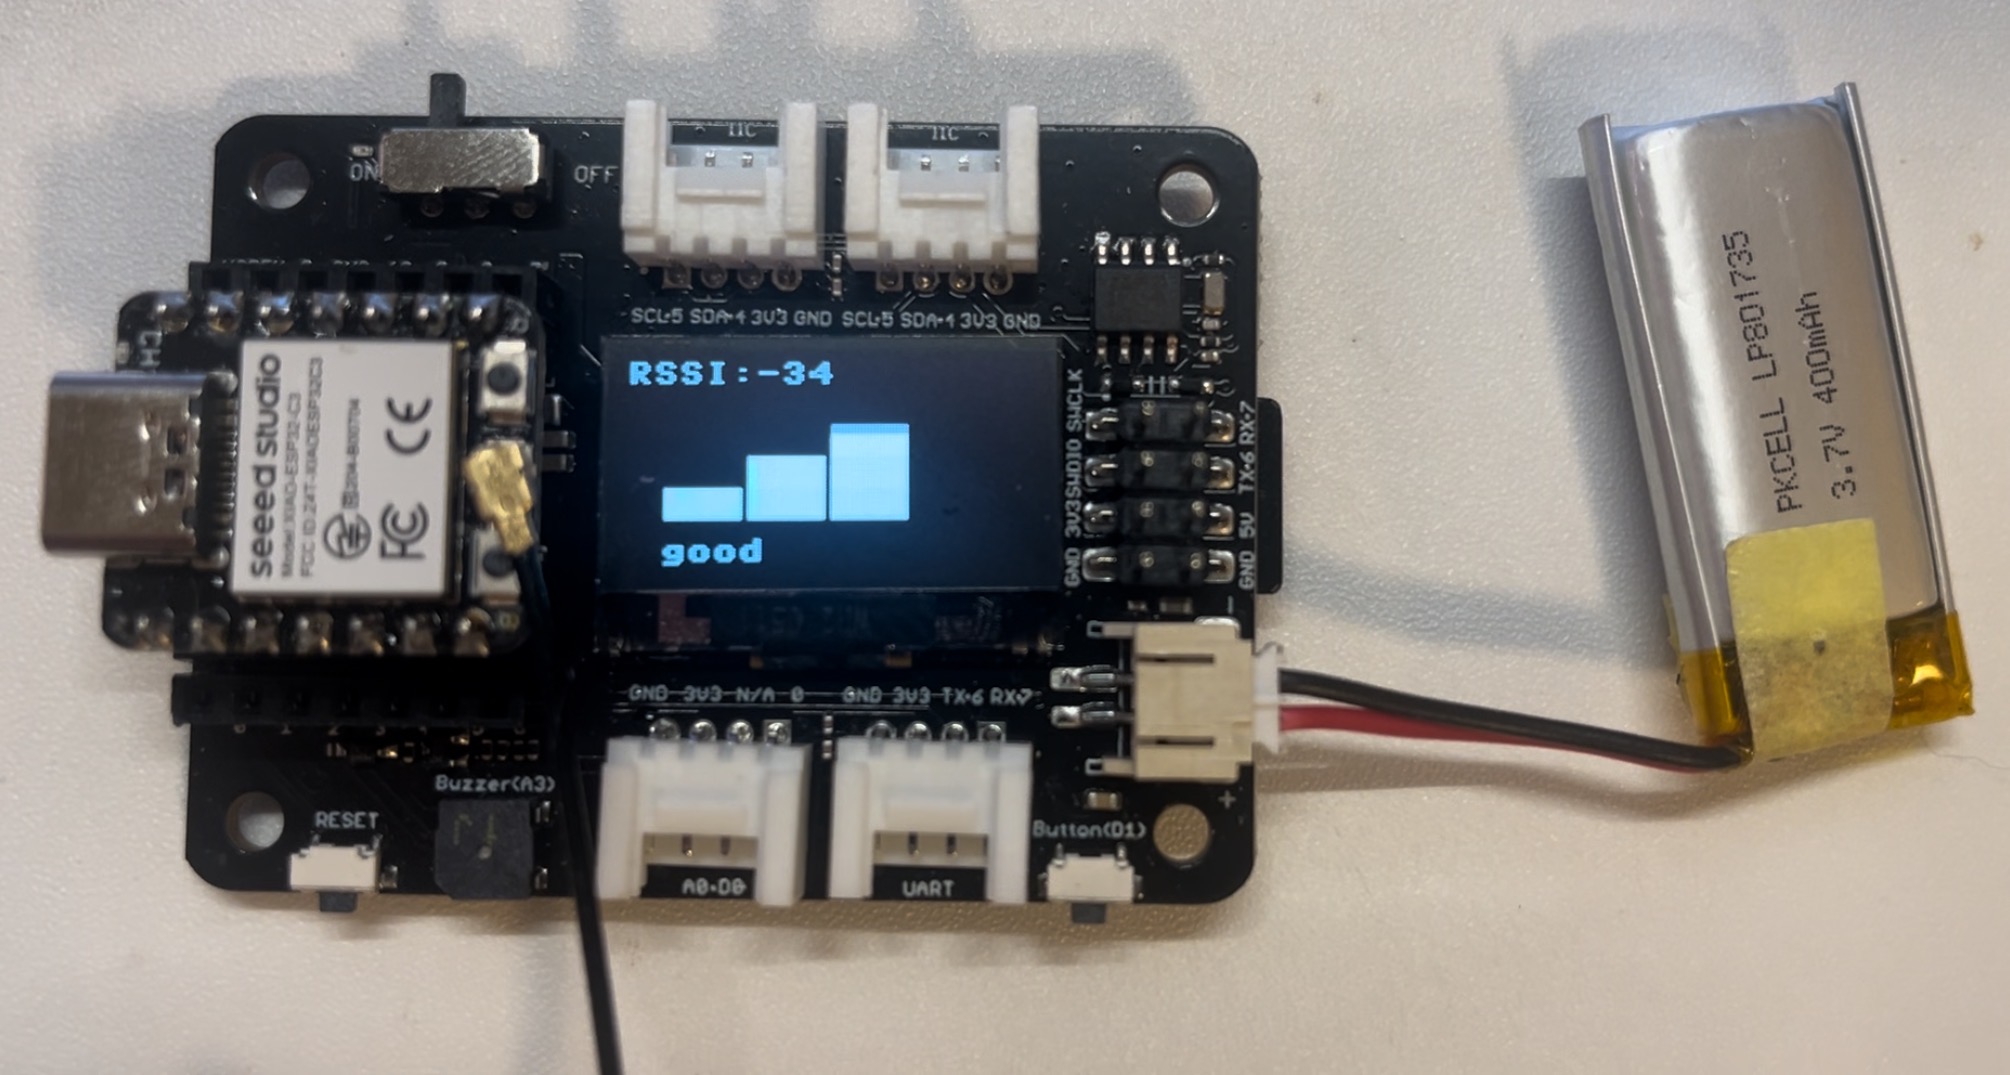
Final: Wi-fi Signal Strength Tracker
This is the main task in this project. Through this code, you can trake your wifi signal at home with such an easy device.
import network
import time
from time import sleep
import machine
from machine import Pin, SoftI2C
import ssd1306
import math

# Atribuição de pinos do ESP32C3
i2c = SoftI2C(scl=Pin(7), sda=Pin(6))  # Adjust the Pin numbers based on your connections
oled_width = 128
oled_height = 64
oled = ssd1306.SSD1306_I2C(oled_width, oled_height, i2c)

# Configurações de rede
wifi_ssid = "Your Own SSID"
wifi_password = "Your Own Password"
machine.freq(160000000)  # Set CPU frequency to 160 MHz (ESP8266 specific)
oled.text("Starting up...", 0, 0)
oled.show()

station = network.WLAN(network.STA_IF)
station.active(True)
station.connect(wifi_ssid, wifi_password)
time.sleep(1)

while not station.isconnected():
    time.sleep(1)

oled.fill(0)
oled.text("Connecting to", 0, 0)
oled.text(wifi_ssid, 0, 20)
oled.show()
time.sleep(2)

oled.fill(0)
ip_address = station.ifconfig()[0]  # Get the IP address
oled.text("Connected! ", 0, 0)
oled.text("IP Address:", 0, 20)
oled.text(ip_address, 0, 40)
oled.show()
time.sleep(2)

# Configurações do buzzer
buzzer_pin = machine.Pin(5, machine.Pin.OUT)
buzzer = machine.PWM(buzzer_pin)
buzzer.freq(1047)
buzzer.duty(0)

center_x = oled_width // 2
center_y = oled_height // 2
square_size = 6  # Size of each square
num_squares = 12  # Number of squares
angle_increment = 2 * math.pi / num_squares

x_pos = [12, 38, 64, 90]
statuses = ["poor", "normal", "good", "excellent"]

def calculate_block_count(rssi):
    # Determinar o número de blocos com base nos valores de RSSI
    if -80 <= rssi < -60:
        return 1
    elif -60 <= rssi < -40:
        return 2
    elif -40 <= rssi < -20:
        return 3
    elif -20 <= rssi <= 10:
        return 4

def draw_blocks(count):
    for i in range(count):
        y_pos = 50 - calculate_block_height(i)
        oled.fill_rect(x_pos[i], y_pos, 24, calculate_block_height(i), 1)
    for i in range(count, 4):  # Clear unused area
        y_pos = 50 - calculate_block_height(i)
        oled.fill_rect(x_pos[i], y_pos, 24, calculate_block_height(i), 0)

def calculate_block_height(index):
    return 10 * (index + 1)

loop_count = 0  # Inicializar contagem de loops

while loop_count < 2:  # Executar o loop 24 vezes
    oled.fill(0)  # Limpar a tela

    for i in range(num_squares):
        angle = i * angle_increment
        x = int(center_x + (center_x - square_size-30) * math.cos(angle))
        y = int(center_y + (center_x - square_size-30) * math.sin(angle))

        # Desenhar todos os quadrados
        for j in range(num_squares):
            angle_j = j * angle_increment
            x_j = int(center_x + (center_x - square_size-30) * math.cos(angle_j))
            y_j = int(center_y + (center_x - square_size-30) * math.sin(angle_j))

            oled.fill_rect(x_j, y_j, square_size, square_size, 1)  # Draw the square

        oled.fill_rect(x, y, square_size, square_size, 0)  # Erase the current square
        oled.show()
        time.sleep_ms(100)  # Pause before next iteration

    loop_count += 1  # Aumentar contagem de loops

oled.fill(0)  # Limpar a tela após finalizar os loops
oled.show()

while True:
    oled.fill(0)
    station = network.WLAN(network.STA_IF)
    time.sleep(0.1)
    rssi = station.status('rssi')
    rssi_duty = 160 + 2 * int(rssi)
    rssi_duty_2 = int(rssi_duty / 2)
    rssi_abs = abs(int(rssi)) / 100

    block_count = calculate_block_count(rssi)
    status = statuses[block_count - 1]  # Get the status text based on block count

    draw_blocks(block_count)

    oled.text(status, 11, 56)

    oled.text("RSSI:", 0, 0)
    oled.text(str(rssi), 40, 0)
    # Update the display
    oled.show()

    buzzer.duty(rssi_duty)
    time.sleep(rssi_abs)
    buzzer.duty(0)
    time.sleep(rssi_abs)
    buzzer.duty(rssi_duty_2)
    time.sleep(rssi_abs)
    buzzer.duty(0)
    time.sleep(rssi_abs)
What's more
- You can also flash firmware into XIAO ESP32C3 using esptool intergated on Thonny which is supportive for MAC OS.
✨ Contributor Project
- This project is supported by the Seeed Studio Contributor Project.
- Thanks Zachary's efforts and your work will be exhibited.
Tech Support & Product Discussion
Thank you for choosing our products! We are here to provide you with different support to ensure that your experience with our products is as smooth as possible. We offer several communication channels to cater to different preferences and needs.