Controle de Voz para Casa Inteligente com Home Assistant
Visão Geral
Converse com ambientes inteligentes com o novo ReSpeaker XMOS XVF3800 com XIAO ESP32S3 para acender ou apagar as luzes, aumentar o som ou até perguntar sobre o clima usando a voz
Neste capítulo usaremos o ReSpeaker XMOS XVF3800 com XIAO ESP32S3 HA Voice Assistant para conectar o Sonoff smart switch e realizar o controle por voz do interruptor de luz.
Hardware Necessário
| ReSpeaker XVF3800 com XIAO ESP32S3 | Dispositivo Home Assistant | Sonoff BASICR2 |
|---|---|---|
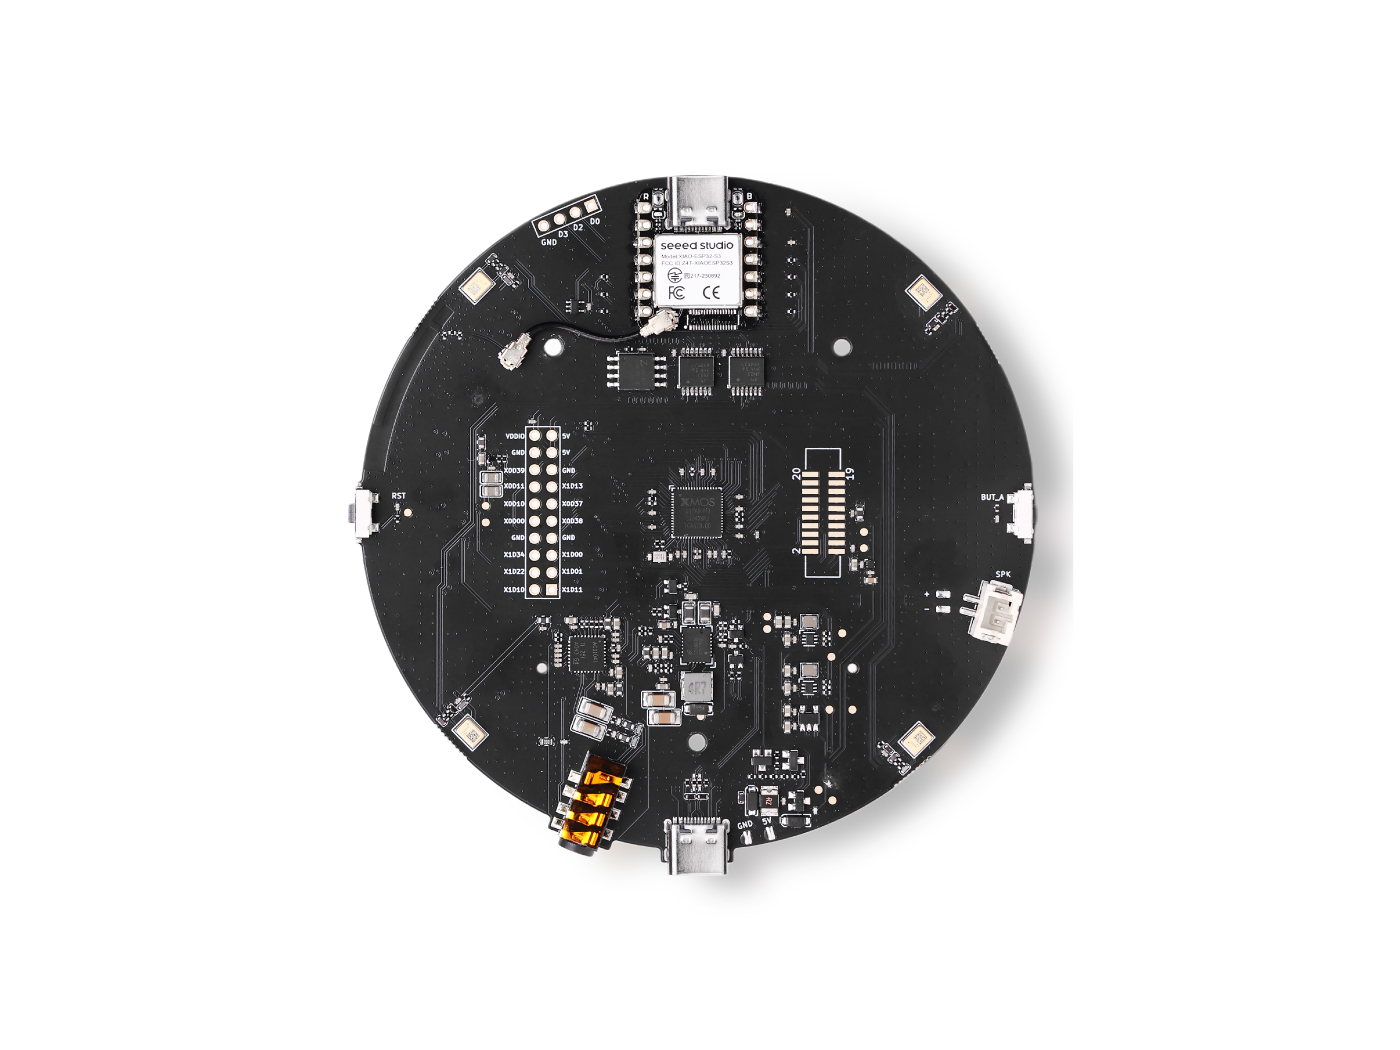 |  |  |
Atualização de Firmware
Para obter a melhor experiência de reprodução, precisamos atualizar o firmware XMOS para Baixe o firmware aqui. No seu computador, conecte o ReSpeaker XMOS XVF3800 com XIAO ESP32S3 e execute o em nosso guia:
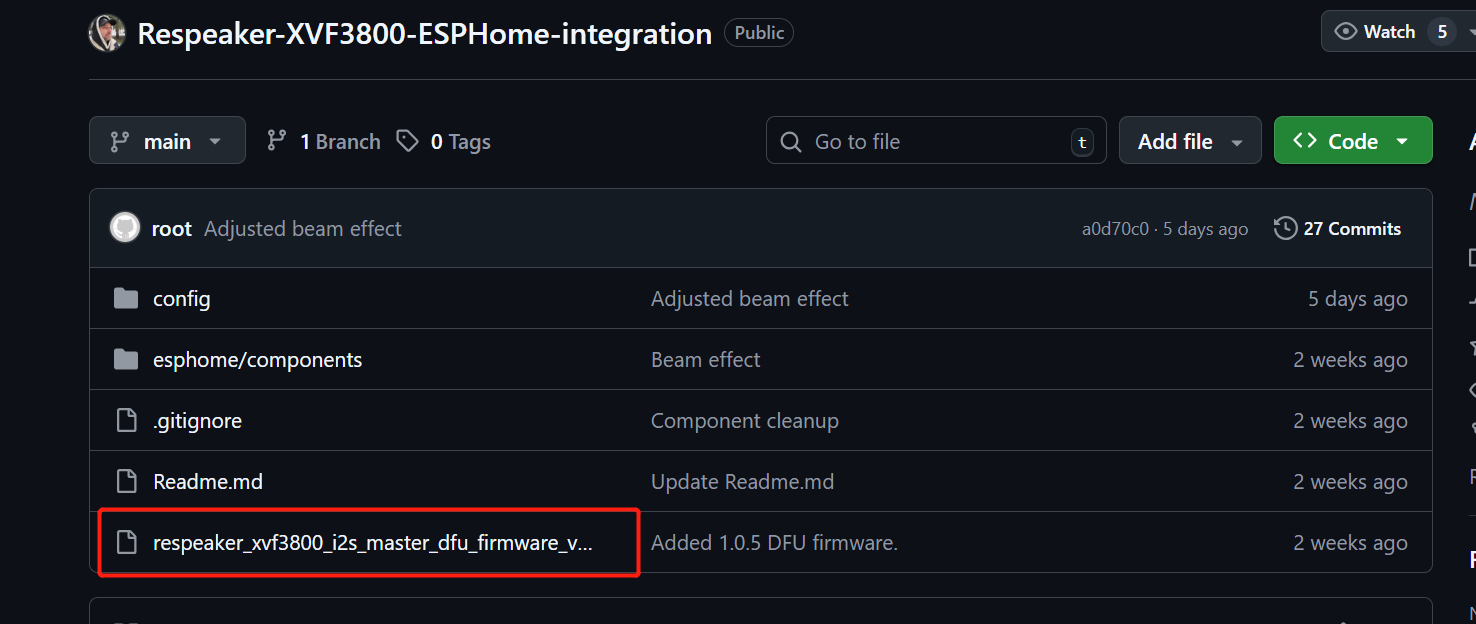
O array de microfones XVF3800 precisa de um MCLK de 12,288 MHz para funcionar, mas o ESPHome (usado no Home Assistant) não pode gerá-lo devido a limitações da API. Este firmware faz com que o XVF3800 atue como mestre I2S, para que ele possa gerar seus próprios clocks sem precisar de MCLK do ESP32. Nosso firmware corrige essa limitação, então o microfone funciona corretamente com o Home Assistant.
Você pode baixar o Firmware a partir Daqui
O guia de instalação está Aqui
Prepare o ReSpeaker XMOS XVF3800 com XIAO ESP32S3
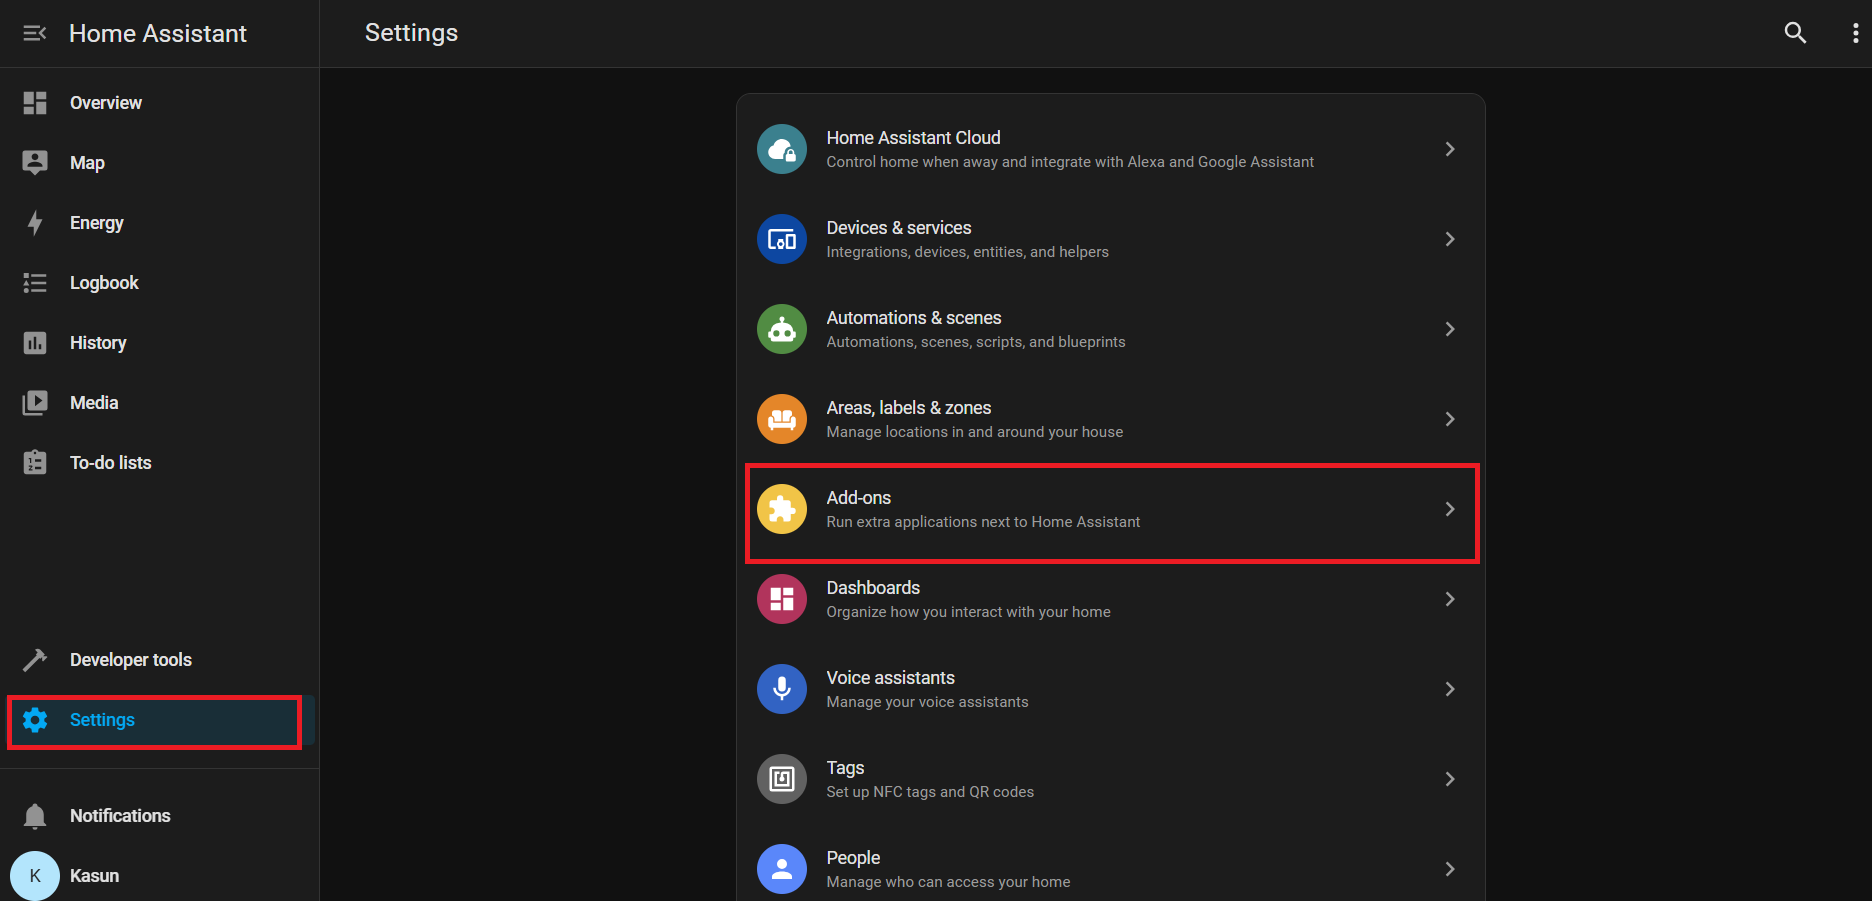
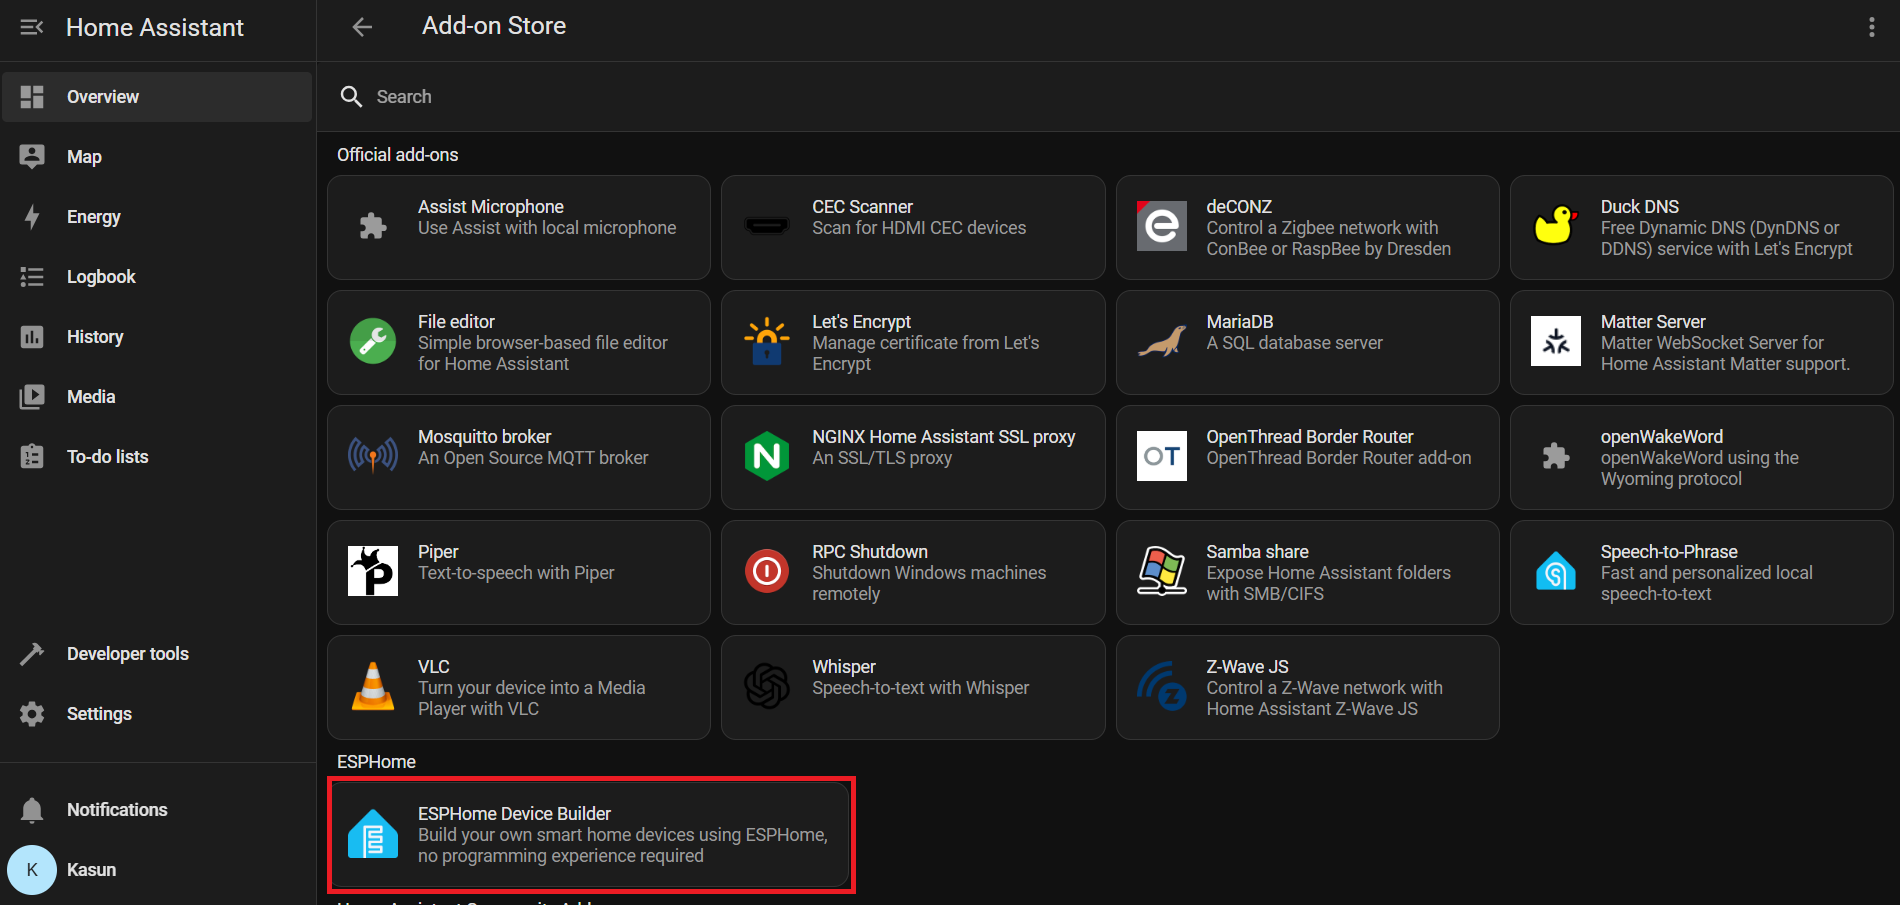
Vá para Home Assistant > Settings > Add-ons.
Clique em Add-on Store (geralmente no canto inferior direito)
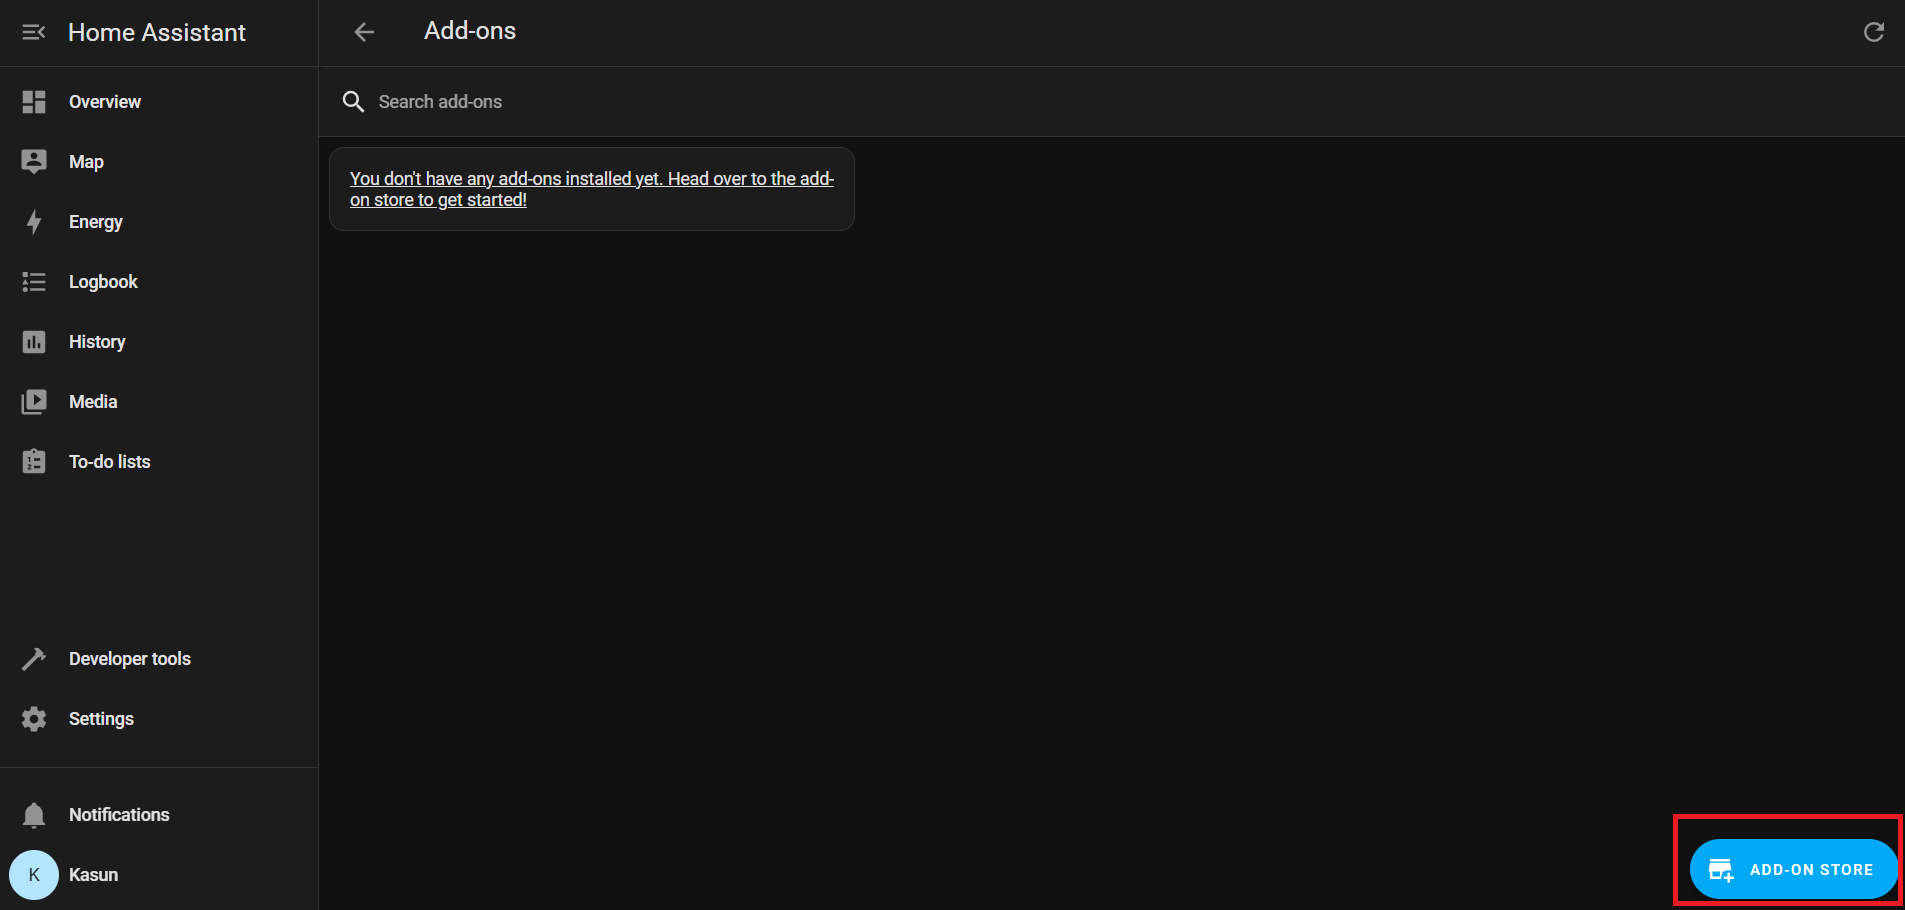
Em Official add-ons, pesquise e instale ESPHome Device Builder.
Após a instalação, clique em Start para executar o add-on ESPHome.
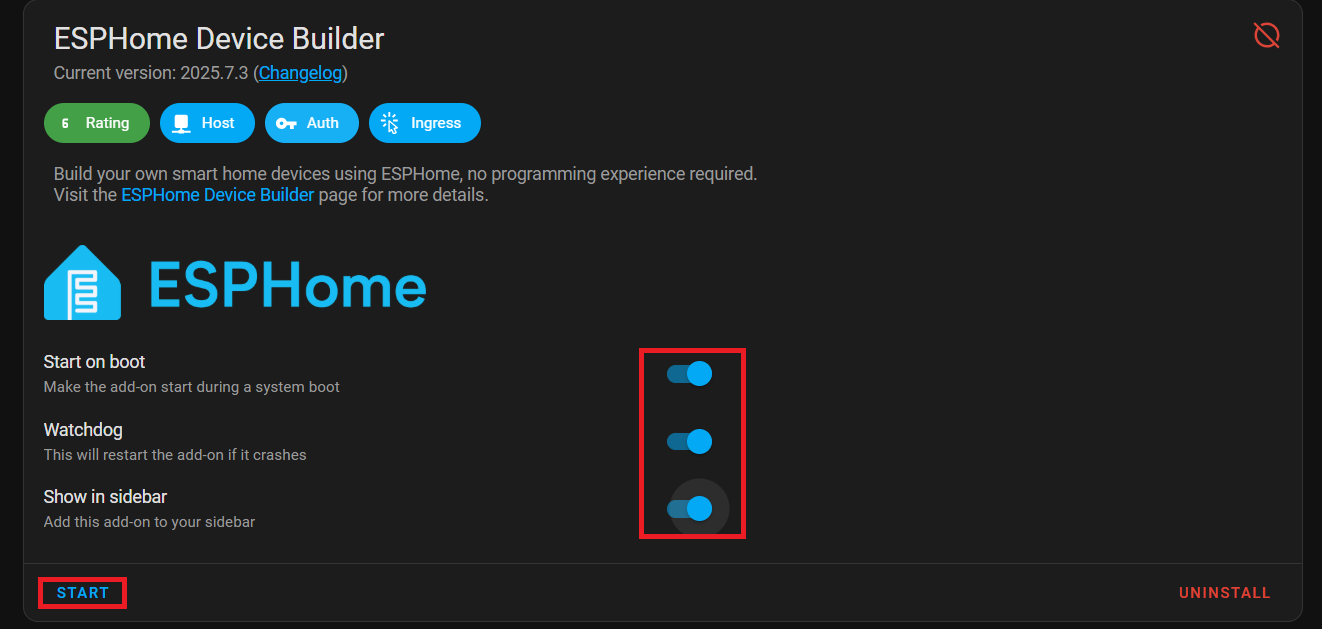
Ative Start on Boot, Watchdog, and Show in Sidebar para facilitar o acesso.
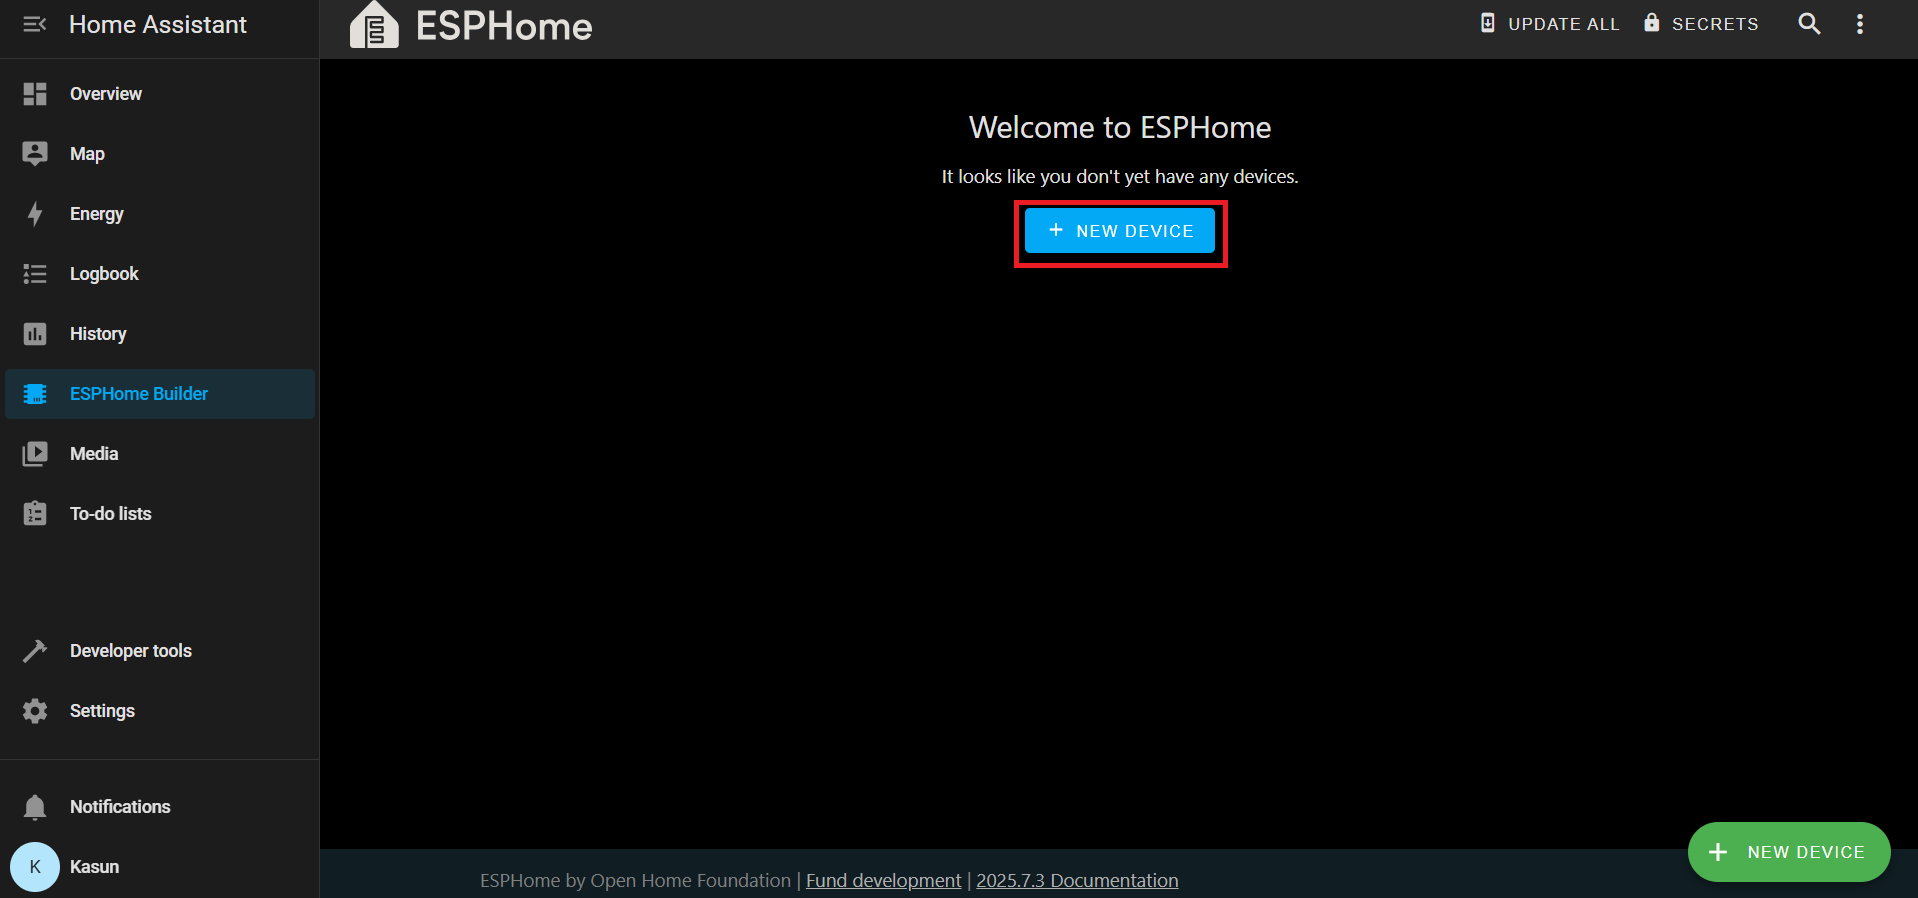
Na barra lateral do Home Assistant, vá para ESPHome Builder.
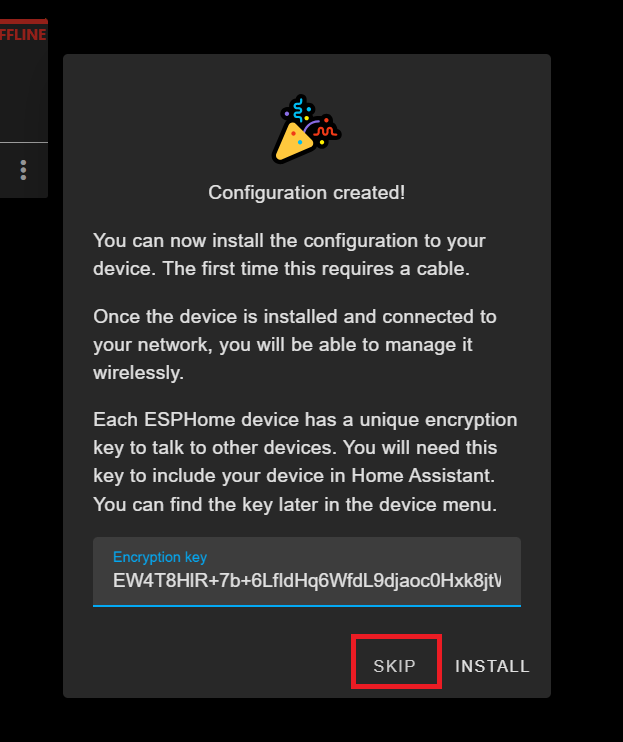
Clique em + NEW DEVICE.
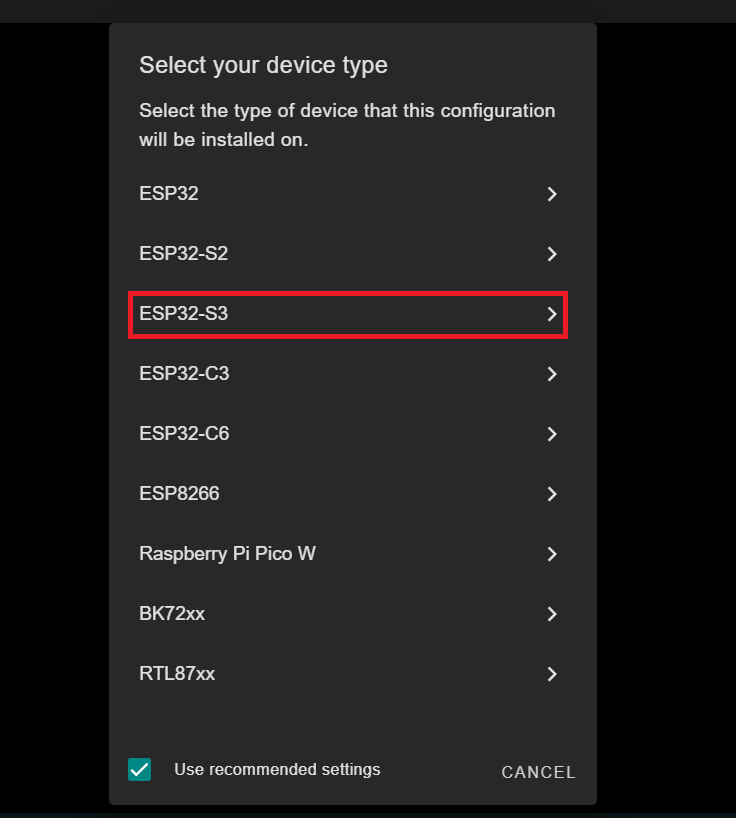
Quando solicitado, clique em SKIP – criaremos a configuração manualmente.
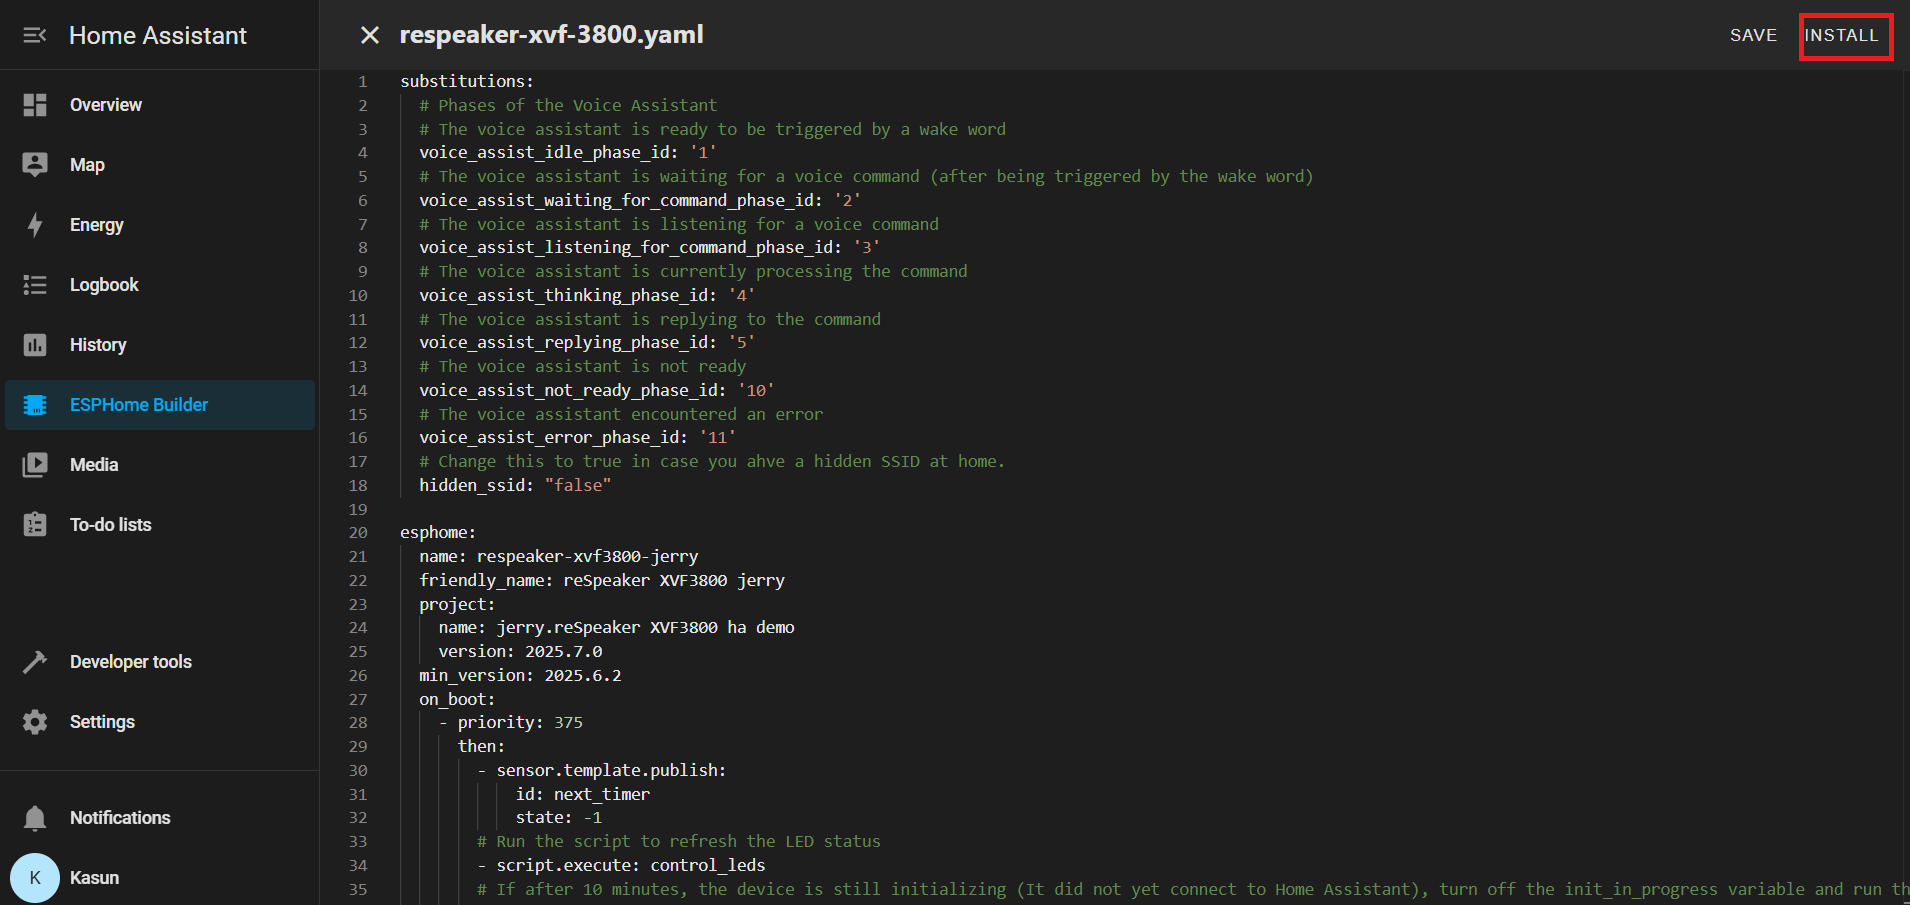
Selecione a nova entrada do seu dispositivo e clique em EDIT.

Substitua o conteúdo pela sua configuração YAML personalizada
Você pode encontrar o arquivo YAML Aqui
Depois que o seu YAML for salvo, clique em INSTALL.
Escolha Manual Download
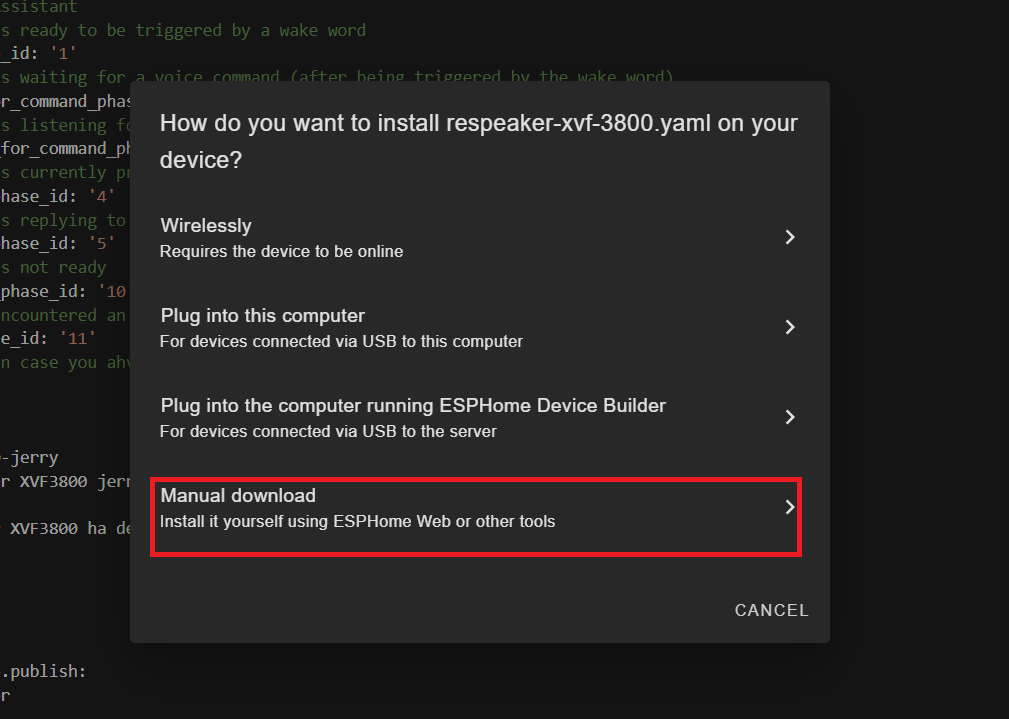
Aguarde a compilação do firmware.
Baixe o arquivo de firmware .bin gerado para o seu computador.

Conecte a placa ESP32-S3 (com o XVF3800 conectado) ao seu PC usando um cabo USB Tipo-C.
Abra o Web-ESPHome no Chrome ou Edge.
Clique em CONNECT e escolha a porta serial apropriada

Depois de conectado, clique em INSTALL
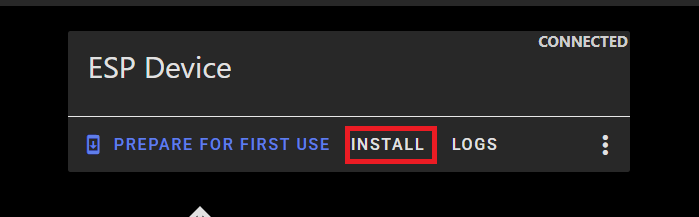
Selecione o arquivo .bin que você acabou de baixar.
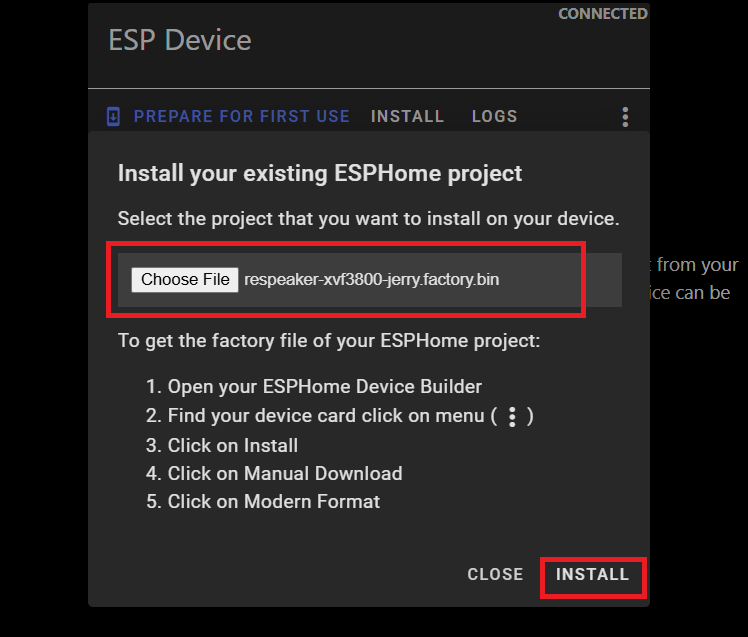
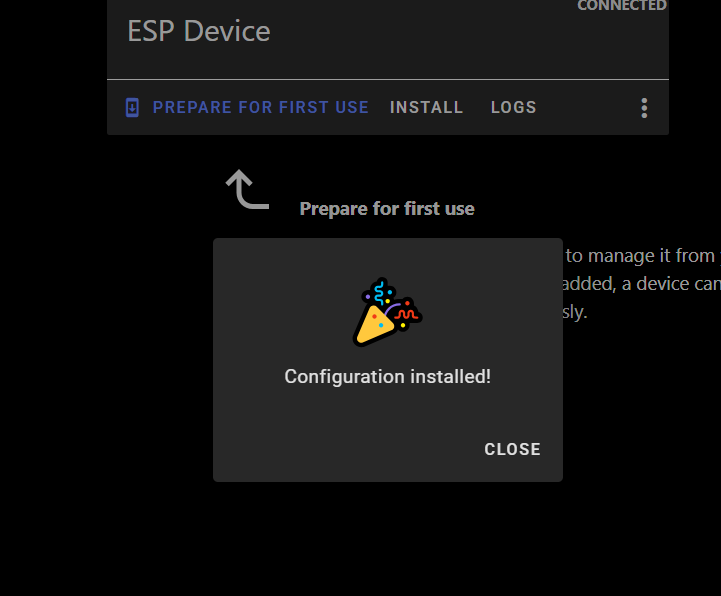
Aguarde a conclusão da instalação (pode levar alguns minutos).
Após a conclusão com sucesso, você verá uma mensagem de confirmação.
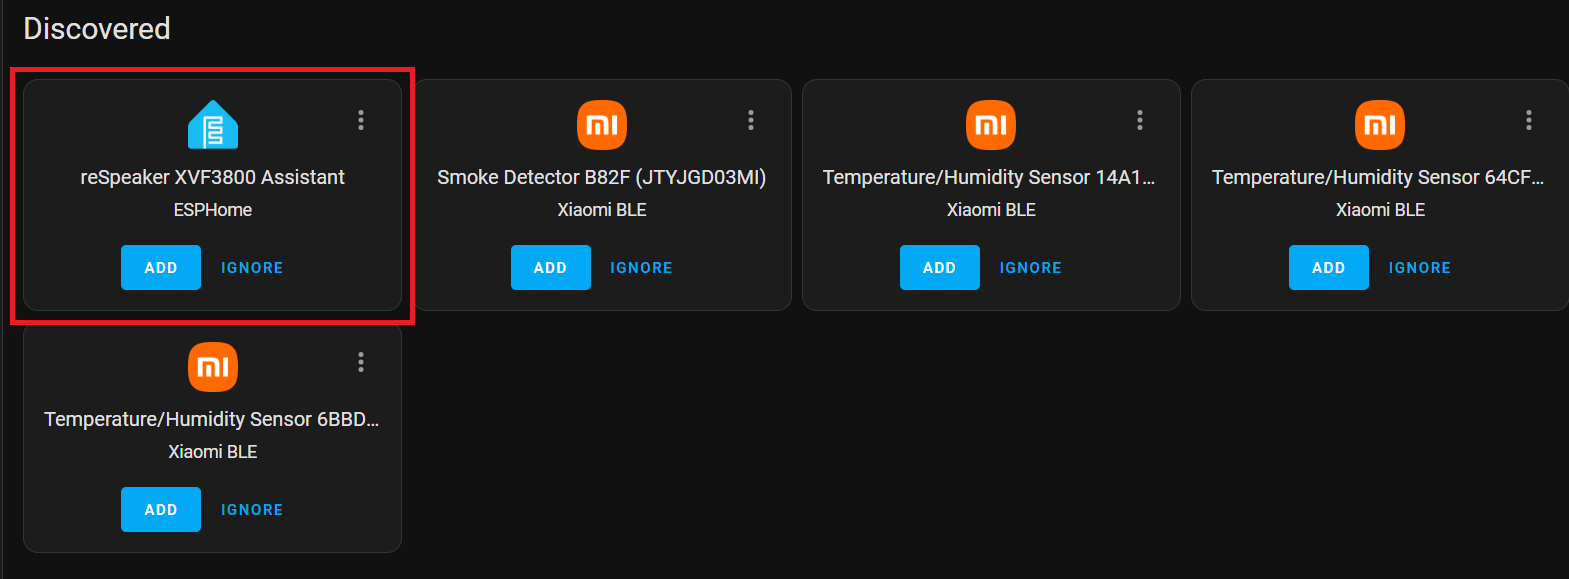
Volte para Home Assistant > Settings > Devices & Services.
Você deverá ver ESPHome listado como uma integração descoberta.
Clique em CONFIGURE e depois em Submit para finalizar a configuração.
Adicione seu dispositivo inteligente
Configure o dispositivo Sonoff BASICR2 de acordo com o manual do usuário do fabricante. Você precisará criar uma conta eWELink.
Instalar HACS
Se ainda não estiver instalado, siga o guia oficial para configurar o Home Assistant Community Store:
Abra o HACS na barra lateral. Pesquise por Sonoff LAN na seção Search.
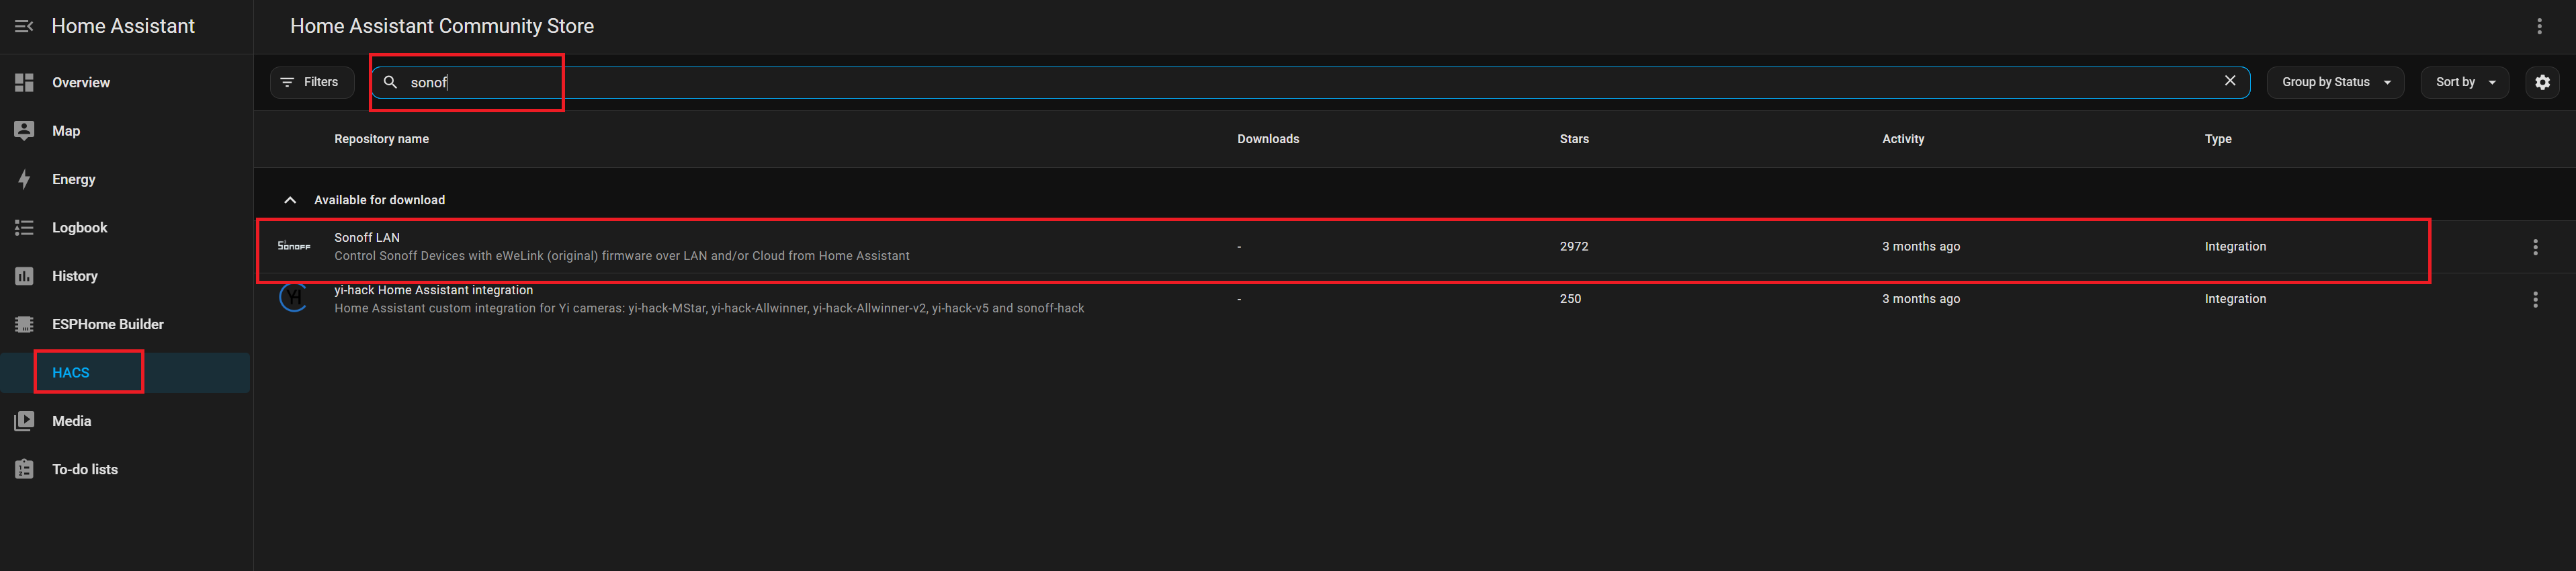
Clique em Install para adicionar a integração. Reinicie o Home Assistant para aplicar as alterações.
Sonoff
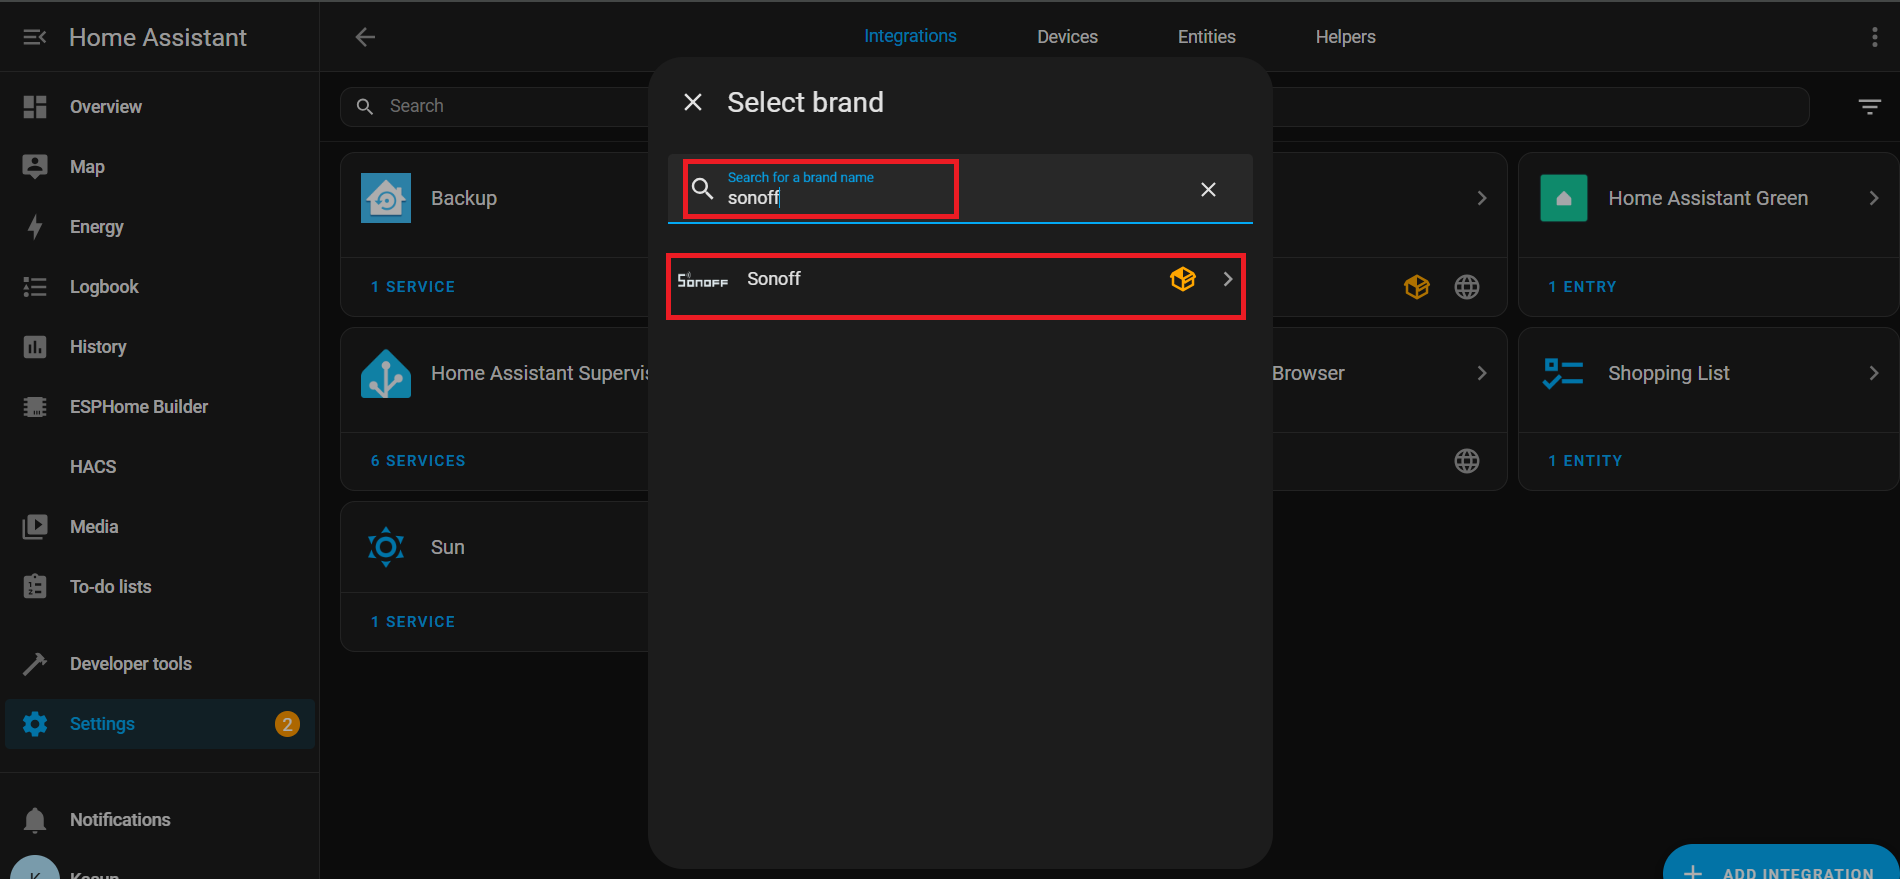
Navegue até Settings → Devices & Services. Clique em Add Integration. Pesquise e selecione Sonoff.
Insira suas credenciais da conta eWeLink para autenticar.

Depois de conectado com sucesso, você verá as entidades associadas listadas em: Settings → Devices & Services → Entities

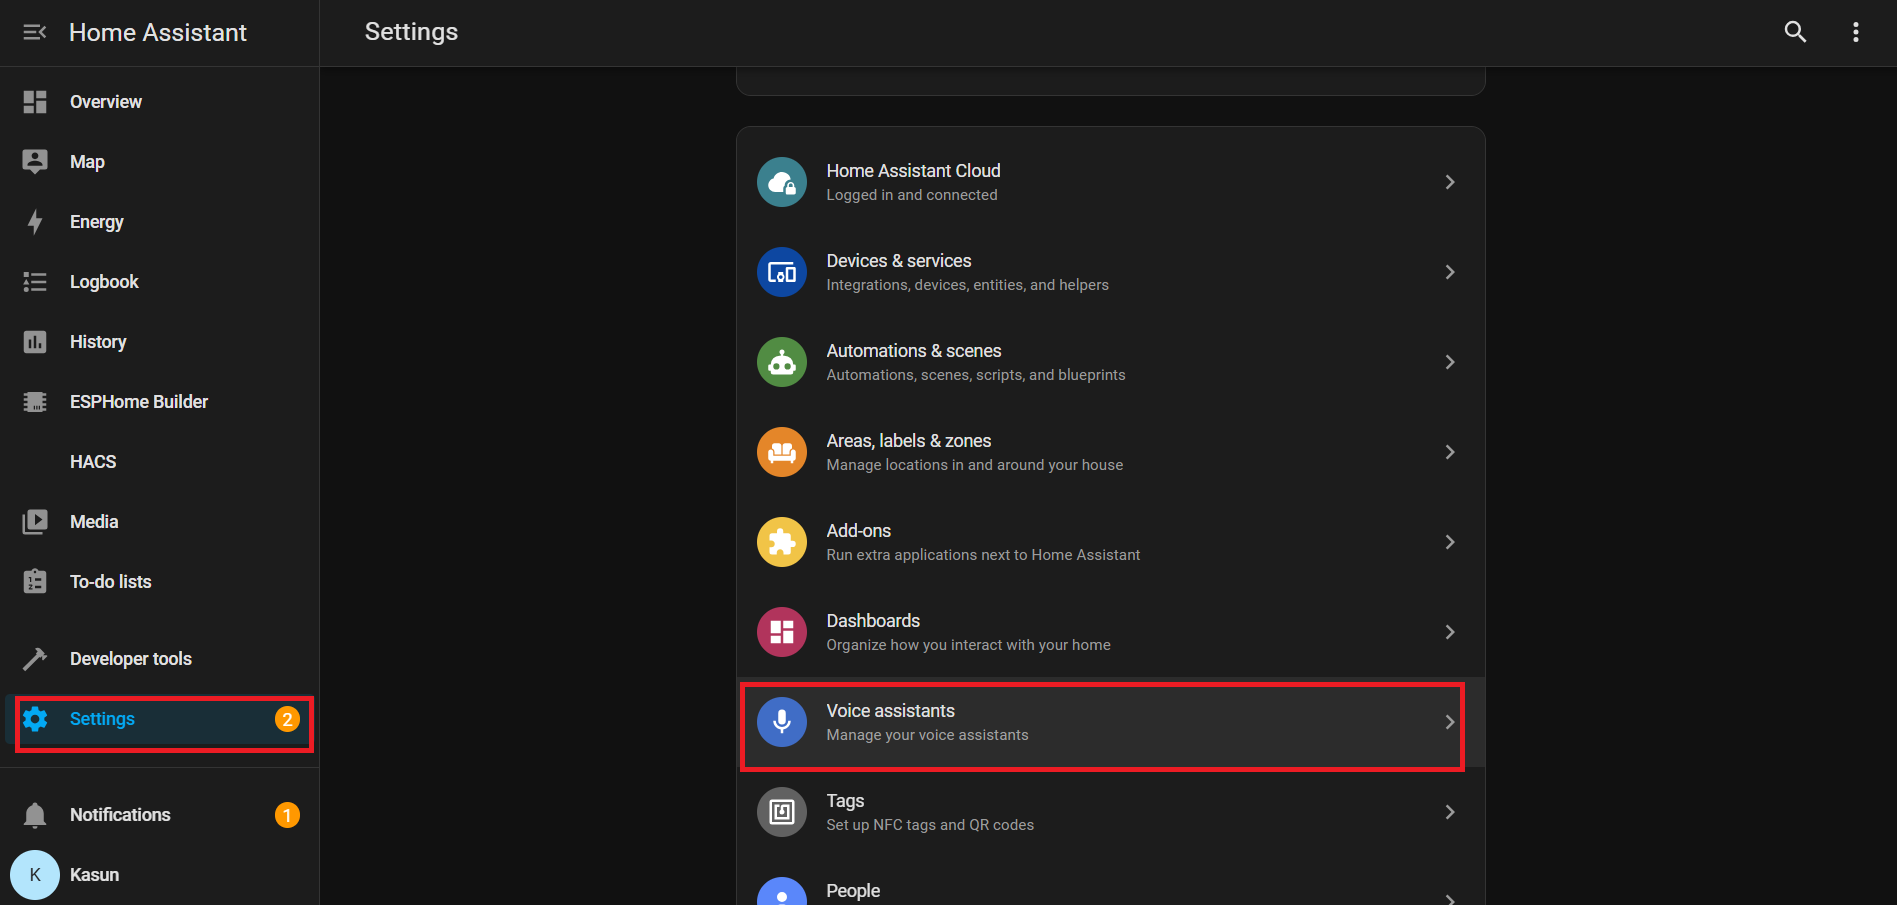
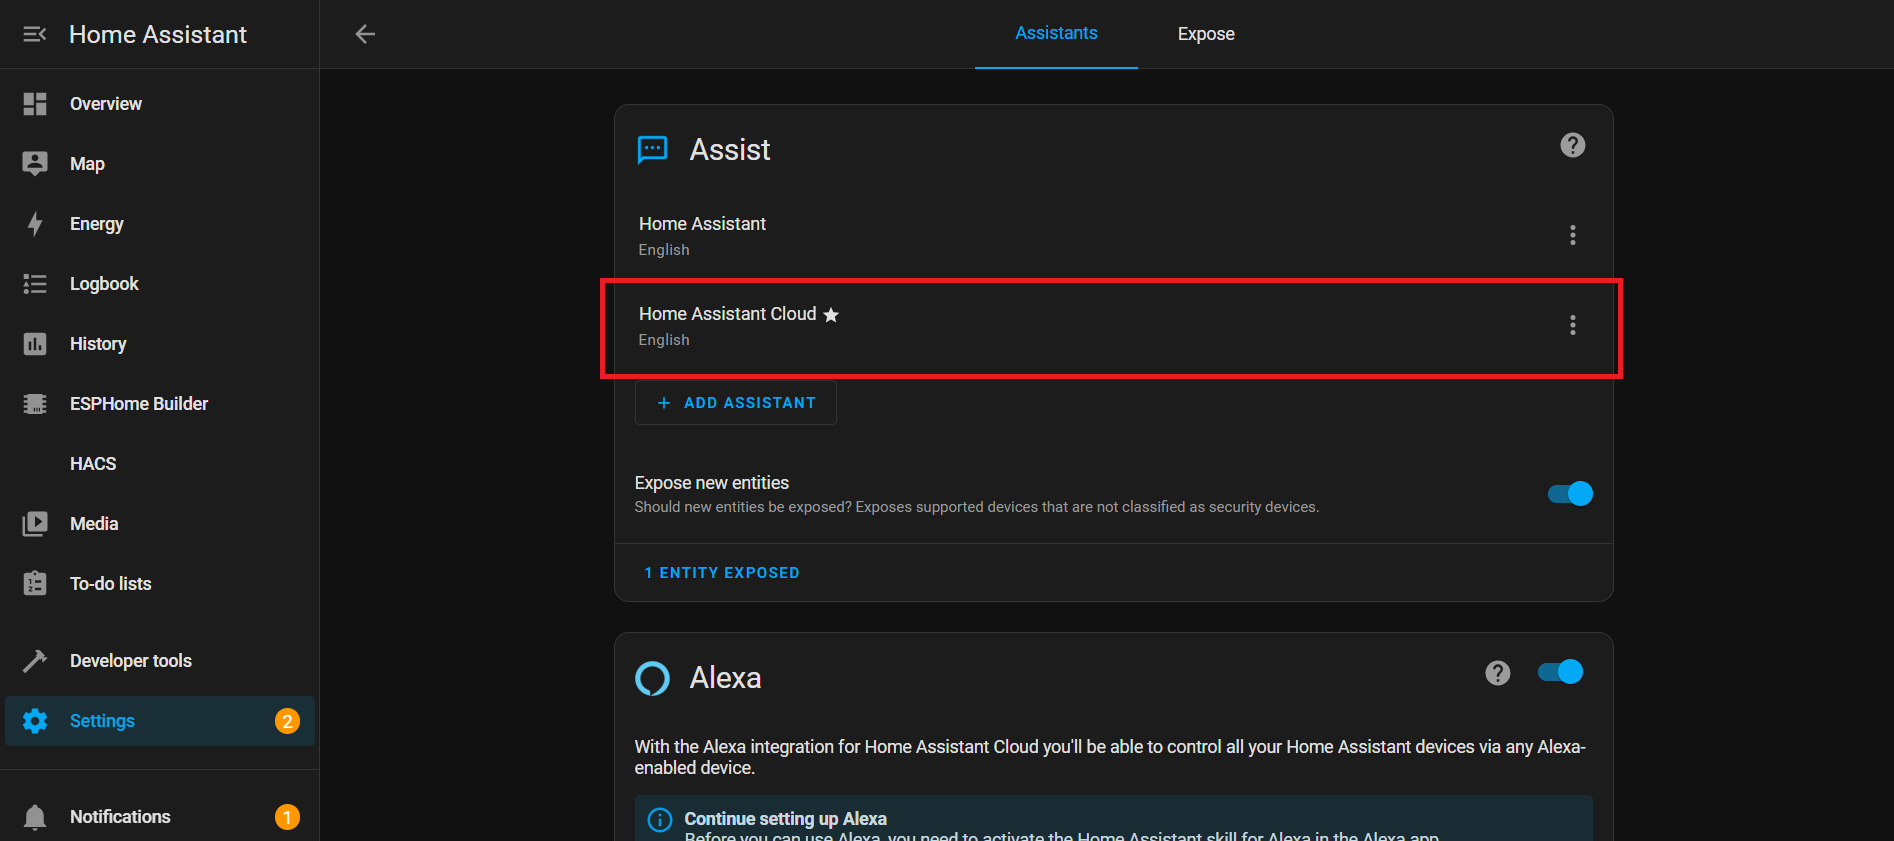
Assistente de Voz com Nabu Cloud
Nesta demonstração, estamos mostrando como se conectar com o Home Assistant Cloud (Nabu Casa) usando a voz. A configuração é simples e você pode aproveitar um teste gratuito de um mês para explorar todas as suas capacidades. Com a palavra de ativação integrada: “Okay Nabu”, você pode acionar comandos de voz com facilidade e integrar perfeitamente dispositivos e serviços em qualquer lugar, a qualquer momento — tudo isso sem configurações complexas.
Descrição YAML
WiFi
Esta seção define como seu dispositivo se conecta ao Wi‑Fi.
wifi:
  ssid: !secret wifi_ssid
  password: !secret wifi_password
- ssid & password: Obtidos do seu arquivo secrets.yaml para que sua senha não fique visível em texto simples.
- Eventos: Executa ações quando o Wi‑Fi conecta ou desconecta:
-
on_connect:
- Para a configuração BLE improv.
- Executa o script control_leds (efeito de LED para Wi‑Fi conectado).
-
on_disconnect:
- Executa o script control_leds (efeito de LED para Wi‑Fi desconectado).
-
Barramento I²C
I²C é uma linha de comunicação que permite ao seu ESP32 se comunicar com outros chips como o microfone ou o codec de áudio.
i2c:
  id: internal_i2c
  sda: GPIO5
  scl: GPIO6
  scan: true
  frequency: 100kHz
- id: Um nome para fazer referência a este barramento em outros lugares.
- sda / scl: Pinos usados para dados e clock.
- scan: Verifica os dispositivos conectados na inicialização.
- frequency: Velocidade de comunicação (100kHz é o padrão).
Interruptores
Interruptores
switch:
  # Mute Sound Switch.
  - platform: template
    id: mute_sound
    name: Mute/unmute sound
    icon: "mdi:bullhorn"
    entity_category: config
    optimistic: true
    restore_mode: RESTORE_DEFAULT_ON
  # Wake Word Sound Switch.
  - platform: template
    id: wake_sound
    name: Wake sound
    icon: "mdi:bullhorn"
    entity_category: config
    optimistic: true
    restore_mode: RESTORE_DEFAULT_ON
  # Internal switch to track when a timer is ringing on the device.
  - platform: template
    id: timer_ringing
    optimistic: true
    internal: true
    restore_mode: ALWAYS_OFF
    on_turn_off:
      # Disable stop wake word
      - micro_wake_word.disable_model: stop
      - script.execute: disable_repeat
      # Stop any current annoucement (ie: stop the timer ring mid playback)
      - if:
          condition:
            media_player.is_announcing:
          then:
            media_player.stop:
              announcement: true
      # Set back ducking ratio to zero
      - mixer_speaker.apply_ducking:
          id: media_mixing_input
          decibel_reduction: 0
          duration: 1.0s
      # Refresh the LED ring
      - script.execute: control_leds
    on_turn_on:
      # Duck audio
      - mixer_speaker.apply_ducking:
          id: media_mixing_input
          decibel_reduction: 20
          duration: 0.0s
      # Enable stop wake word
      - micro_wake_word.enable_model: stop
      # Ring timer
      - script.execute: ring_timer
      # Refresh LED
      - script.execute: control_leds
      # If 15 minutes have passed and the timer is still ringing, stop it.
      - delay: 15min
      - switch.turn_off: timer_ringing
  # Defines if alarm is active
  - platform: template
    optimistic: true
    restore_mode: RESTORE_DEFAULT_OFF
    id: alarm_on
    icon: mdi:bell-badge
    name: "Alarm on"
    on_turn_on:
      - script.execute: control_leds
    on_turn_off:
      - script.execute: control_leds
Interruptores são “botões” controlados por software no Home Assistant. Eles controlam recursos como som, cronômetros ou alarmes.
Interruptor de Som da Palavra de Ativação: Controla o áudio da palavra de ativação.
# Wake Word Sound Switch.
  - platform: template
    id: wake_sound
    name: Wake sound
    icon: "mdi:bullhorn"
    entity_category: config
    optimistic: true
    restore_mode: RESTORE_DEFAULT_ON
Interruptor Interno de Toque do Cronômetro:
- Acompanha se um cronômetro está ativo.
- on_turn_on: Reduz outros áudios em -20dB, inicia o som do cronômetro, atualiza o LED, para automaticamente após 15 min.
- on_turn_off: Para o cronômetro, restaura o volume, atualiza o LED.
# Internal switch to track when a timer is ringing on the device.
  - platform: template
    id: timer_ringing
    optimistic: true
    internal: true
    restore_mode: ALWAYS_OFF
    ...
    ...
Interruptor de Alarme Ativo:
# Defines if alarm is active
  - platform: template
    optimistic: true
    restore_mode: RESTORE_DEFAULT_OFF
    id: alarm_on
    ...
    ...
- Acompanha o status do alarme.
- Executa o script de LED quando ligado/desligado.
Sensores
Sensores
number:
  - platform: template
    id: led_ring_brightness
    name: "LED Ring Brightness"
    icon: mdi:brightness-6
    entity_category: config
    optimistic: true
    restore_value: true
    min_value: 0.4
    max_value: 1.0
    step: 0.05
    initial_value: 0.8
    mode: slider

sensor:
  - platform: template
    id: next_timer
    name: "Next timer"
    update_interval: never
    disabled_by_default: true
    device_class: duration
    unit_of_measurement: s
    icon: "mdi:timer"
    accuracy_decimals: 0

text_sensor:
  - platform: template
    id: next_timer_name
    name: "Next timer name"
    icon: "mdi:timer"
    disabled_by_default: true
  - platform: template
    name: "Alarm time"
    id: alarm_time
    icon: mdi:bell-ring
  - platform: template
    name: "Current device time"
    id: current_time
    icon: mdi:clock
Este bloco YAML adiciona controles e sensores para cronômetros, alarmes e brilho do LED. Ele permite ajustar o brilho do anel de LED com um controle deslizante, acompanhar o próximo cronômetro (hora + nome) e exibir a hora do alarme e a hora atual do dispositivo no Home Assistant.
Brilho do Anel de LED:
number:
  - platform: template
    id: led_ring_brightness
    name: "LED Ring Brightness"
    icon: mdi:brightness-6
    ...
- Permite ao usuário ajustar o brilho com um controle deslizante.
- min_value / max_value definem os limites.
- restore_value mantém a configuração anterior após reiniciar.
Próximo Cronômetro
sensor:
  - platform: template
    id: next_timer
    name: "Next timer"
    update_interval: never
    ...
- Mostra o tempo restante para o próximo cronômetro.
- Atualiza apenas quando um cronômetro é alterado (economiza recursos).
Hora do Alarme & Hora do Dispositivo
text_sensor:
  - platform: template
    id: next_timer_name
    name: "Next timer name"
    icon: "mdi:timer"
    ...
- Exibe o alarme atual e a hora do sistema do ESP32.
Efeitos de LED em intervalo
interval:
  - interval: 50ms
    id: led_animation_interval
    then:
      - lambda: |-
          if (id(volume_display_active)) {
            id(update_volume_display_effect).execute();
            return;
          }
          std::string effect = id(current_led_effect);
          if (effect == "off") {
            return;
          } else if (effect == "breathe") {
            id(update_breathe_effect).execute();
          } else if (effect == "rainbow") {
            id(update_rainbow_effect).execute();
          } else if (effect == "comet_cw") {
            id(update_comet_cw_effect).execute();
          } else if (effect == "comet_ccw") {
            id(update_comet_ccw_effect).execute();
          } else if (effect == "twinkle") {
            id(update_twinkle_effect).execute();
          } else if (effect == "timer_tick") {
            id(update_timer_tick_effect).execute();
          } else if (effect == "led_beam") {
            id(update_led_beam_effect).execute();
          }
- Intervalos executam código repetidamente em segundo plano.
- 50ms: Executa o código 20 vezes por segundo.
- Controla animações de LED com base no estado do sistema ou no efeito selecionado.
Controle de LED
Controle de LED
script:
# =========================================================================
# == Centralized script to control all LED effects ==
# =========================================================================
- id: led_set_effect
mode: restart
parameters:
effect: std::string
r: float
g: float
b: float
speed: float
then:
- lambda: |-
// Update global variables with the new parameters
id(led_ring_color_r) = r;
id(led_ring_color_g) = g;
id(led_ring_color_b) = b;
id(led_ring_speed) = speed;
id(current_led_effect) = effect;
// Handle the two types of effects: Off and Animated
if (effect == "off") {
uint32_t colors[12] = {0};
id(respeaker).set_led_ring(colors);
} else {
id(last_led_update_time) = millis(); // Reset timer for smooth animation start
}
# Individual update scripts for each animated effect
- id: update_breathe_effect
then:
- lambda: |-
static float phase = 0.0f;
uint32_t now = millis();
float dt = (now - id(last_led_update_time)) / 1000.0f;
id(last_led_update_time) = now;
phase += dt * id(led_ring_speed);
while (phase >= 1.0f) phase -= 1.0f;
float master_brightness = id(led_ring_brightness).state;
float breath_brightness = 0.5f * (1.0f + sinf(phase * 2.0f * M_PI)) * master_brightness;
uint8_t r = (uint8_t)(id(led_ring_color_r) * 255.0f * breath_brightness);
uint8_t g = (uint8_t)(id(led_ring_color_g) * 255.0f * breath_brightness);
uint8_t b = (uint8_t)(id(led_ring_color_b) * 255.0f * breath_brightness);
uint32_t current_color = (r << 16) | (g << 8) | b;
uint32_t colors[12];
for (int i = 0; i < 12; i++) colors[i] = current_color;
id(respeaker).set_led_ring(colors);
- id: update_rainbow_effect
then:
- lambda: |-
static float hue_offset = 0.0f;
uint32_t now = millis();
float dt = (now - id(last_led_update_time)) / 1000.0f;
id(last_led_update_time) = now;
hue_offset += dt * id(led_ring_speed);
if (hue_offset >= 1.0f) hue_offset -= 1.0f;
constexpr int NUM_LEDS = 12;
constexpr float HUE_STEP = 1.0f / NUM_LEDS;
uint32_t colors[NUM_LEDS];
float brightness = id(led_ring_brightness).state;
float current_hue = hue_offset;
for (int i = 0; i < NUM_LEDS; i++) {
float r, g, b;
if (current_hue >= 1.0f) current_hue -= 1.0f;
hsv_to_rgb((int)(current_hue * 360.0f), 1.0f, brightness, r, g, b);
colors[i] = ((uint8_t)(r * 255.0f) << 16) | ((uint8_t)(g * 255.0f) << 8) | ((uint8_t)(b * 255.0f));
current_hue += HUE_STEP;
}
id(respeaker).set_led_ring(colors);
- id: update_comet_cw_effect
then:
- lambda: |-
static float comet_pos = 0.0f;
uint32_t now = millis();
float dt = (now - id(last_led_update_time)) / 1000.0f;
id(last_led_update_time) = now;
constexpr int NUM_LEDS = 12;
constexpr int BASE_TAIL = 3;
float leds_per_sec = id(led_ring_speed) * NUM_LEDS;
comet_pos += dt * leds_per_sec;
while (comet_pos >= NUM_LEDS) comet_pos -= NUM_LEDS;
int head_index = (int)comet_pos;
int tail_length = BASE_TAIL + (int)(id(led_ring_speed));
if (tail_length > NUM_LEDS - 1) tail_length = NUM_LEDS - 1;
uint32_t colors[NUM_LEDS] = {0};
float brightness = id(led_ring_brightness).state;
uint8_t head_r = (uint8_t)(id(led_ring_color_r) * 255.0f * brightness);
uint8_t head_g = (uint8_t)(id(led_ring_color_g) * 255.0f * brightness);
uint8_t head_b = (uint8_t)(id(led_ring_color_b) * 255.0f * brightness);
colors[head_index % NUM_LEDS] = (head_r << 16) | (head_g << 8) | head_b;
for (int i = 1; i <= tail_length; i++) {
float tail_factor = (float)i / (tail_length + 1);
float tail_brightness = (1.0f - tail_factor) * brightness;
uint8_t r = (uint8_t)(id(led_ring_color_r) * 255.0f * tail_brightness);
uint8_t g = (uint8_t)(id(led_ring_color_g) * 255.0f * tail_brightness);
uint8_t b = (uint8_t)(id(led_ring_color_b) * 255.0f * tail_brightness);
int tail_index = (head_index - i + NUM_LEDS) % NUM_LEDS;
colors[tail_index] = (r << 16) | (g << 8) | b;
}
id(respeaker).set_led_ring(colors);
- id: update_comet_ccw_effect
then:
- lambda: |-
static float comet_pos = 0.0f;
uint32_t now = millis();
float dt = (now - id(last_led_update_time)) / 1000.0f;
id(last_led_update_time) = now;
constexpr int NUM_LEDS = 12;
constexpr int BASE_TAIL = 3;
float leds_per_sec = id(led_ring_speed) * NUM_LEDS;
comet_pos -= dt * leds_per_sec;
while (comet_pos < 0.0f) comet_pos += NUM_LEDS;
int head_index = (int)comet_pos;
int tail_length = BASE_TAIL + (int)(id(led_ring_speed));
if (tail_length > NUM_LEDS - 1) tail_length = NUM_LEDS - 1;
uint32_t colors[NUM_LEDS] = {0};
float brightness = id(led_ring_brightness).state;
uint8_t head_r = (uint8_t)(id(led_ring_color_r) * 255.0f * brightness);
uint8_t head_g = (uint8_t)(id(led_ring_color_g) * 255.0f * brightness);
uint8_t head_b = (uint8_t)(id(led_ring_color_b) * 255.0f * brightness);
colors[head_index % NUM_LEDS] = (head_r << 16) | (head_g << 8) | head_b;
for (int i = 1; i <= tail_length; i++) {
float tail_factor = (float)i / (tail_length + 1);
float tail_brightness = (1.0f - tail_factor) * brightness;
uint8_t r = (uint8_t)(id(led_ring_color_r) * 255.0f * tail_brightness);
uint8_t g = (uint8_t)(id(led_ring_color_g) * 255.0f * tail_brightness);
uint8_t b = (uint8_t)(id(led_ring_color_b) * 255.0f * tail_brightness);
int tail_index = (head_index + i) % NUM_LEDS;
colors[tail_index] = (r << 16) | (g << 8) | b;
}
id(respeaker).set_led_ring(colors);
- id: update_twinkle_effect
then:
- lambda: |-
constexpr int NUM_LEDS = 12;
static float led_brightness[NUM_LEDS] = {0.0f};
static float led_fade_speed[NUM_LEDS] = {0.0f};
uint32_t now = millis();
float dt = (now - id(last_led_update_time)) / 1000.0f;
id(last_led_update_time) = now;
// Update existing twinkles
for (int i = 0; i < NUM_LEDS; i++) {
if (led_fade_speed[i] != 0.0f) {
led_brightness[i] += led_fade_speed[i] * dt;
if (led_fade_speed[i] > 0.0f && led_brightness[i] >= 1.0f) {
led_brightness[i] = 1.0f;
led_fade_speed[i] *= -1.0f;
} else if (led_fade_speed[i] < 0.0f && led_brightness[i] <= 0.0f) {
led_brightness[i] = 0.0f;
led_fade_speed[i] = 0.0f;
}
}
}
// Start new twinkles
float twinkle_chance = dt * id(led_ring_speed);
if (random_float() < twinkle_chance) {
int led_to_start = (int)(random_float() * NUM_LEDS);
if (led_fade_speed[led_to_start] == 0.0f) {
led_brightness[led_to_start] = 0.0f;
float min_speed = 1.5f, max_speed = 3.0f;
led_fade_speed[led_to_start] = min_speed + (random_float() * (max_speed - min_speed));
}
}
// Render colors
uint32_t colors[NUM_LEDS];
float master_brightness = id(led_ring_brightness).state;
uint8_t base_r = (uint8_t)(id(led_ring_color_r) * 255.0f);
uint8_t base_g = (uint8_t)(id(led_ring_color_g) * 255.0f);
uint8_t base_b = (uint8_t)(id(led_ring_color_b) * 255.0f);
for (int i = 0; i < NUM_LEDS; i++) {
float current_led_brightness = led_brightness[i] * master_brightness;
uint8_t r = (uint8_t)(base_r * current_led_brightness);
uint8_t g = (uint8_t)(base_g * current_led_brightness);
uint8_t b = (uint8_t)(base_b * current_led_brightness);
colors[i] = (r << 16) | (g << 8) | b;
}
id(respeaker).set_led_ring(colors);
- id: update_timer_tick_effect
then:
- lambda: |-
constexpr int NUM_LEDS = 12;
static int tick_index = 0;
uint32_t now = millis();
// Only update tick position every 100ms to reduce I2C traffic
static uint32_t last_tick_update = 0;
if (now - last_tick_update >= 100) {
tick_index = (tick_index - 1 + NUM_LEDS) % NUM_LEDS;
last_tick_update = now;
}
uint32_t colors[NUM_LEDS] = {0};
uint32_t seconds_left = id(first_active_timer).seconds_left;
uint32_t total_seconds = id(first_active_timer).total_seconds;
float timer_ratio = (float)NUM_LEDS * seconds_left / std::max(total_seconds, (uint32_t)1);
float master_brightness = id(led_ring_brightness).state;
uint8_t base_r = (uint8_t)(id(led_ring_color_r) * 255.0f);
uint8_t base_g = (uint8_t)(id(led_ring_color_g) * 255.0f);
uint8_t base_b = (uint8_t)(id(led_ring_color_b) * 255.0f);
for (int i = 0; i < NUM_LEDS; i++) {
float bar_brightness = clamp(timer_ratio - i, 0.0f, 1.0f);
if (bar_brightness > 0.0f) {
float tick_dip = (i == tick_index) ? 0.9f : 1.0f;
float final_brightness = bar_brightness * tick_dip * master_brightness;
uint8_t r = (uint8_t)(base_r * final_brightness);
uint8_t g = (uint8_t)(base_g * final_brightness);
uint8_t b = (uint8_t)(base_b * final_brightness);
colors[i] = (r << 16) | (g << 8) | b;
}
}
id(respeaker).set_led_ring(colors);
- id: update_volume_display_effect
then:
- lambda: |-
constexpr int NUM_LEDS = 12;
uint32_t colors[NUM_LEDS] = {0};
if (id(external_media_player).is_ready()) {
bool is_muted = id(external_media_player).is_muted();
float volume = id(external_media_player).volume;
if (is_muted || volume == 0.0f) {
uint32_t mute_color = (255 << 16); // Red
colors[0] = mute_color;
colors[6] = mute_color;
} else {
float num_leds_on = volume * NUM_LEDS;
float master_brightness = id(led_ring_brightness).state;
uint8_t base_r = (uint8_t)(id(led_ring_color_r) * 255.0f);
uint8_t base_g = (uint8_t)(id(led_ring_color_g) * 255.0f);
uint8_t base_b = (uint8_t)(id(led_ring_color_b) * 255.0f);
for (int i = 0; i < NUM_LEDS; i++) {
float brightness = clamp(num_leds_on - i, 0.0f, 1.0f);
if (brightness > 0.0f) {
uint8_t r = (uint8_t)(base_r * brightness * master_brightness);
uint8_t g = (uint8_t)(base_g * brightness * master_brightness);
uint8_t b = (uint8_t)(base_b * brightness * master_brightness);
colors[i] = (r << 16) | (g << 8) | b;
}
}
}
}
id(respeaker).set_led_ring(colors);
- id: update_led_beam_effect
then:
- lambda: |-
constexpr int NUM_LEDS = 12;
constexpr int FADE_LEDS = 3;
constexpr float TRANSITION_DURATION = 0.5f; // Duration of the smooth transition
uint32_t colors[NUM_LEDS] = {0};
uint32_t now = millis();
float dt = (now - id(last_led_update_time)) / 1000.0f;
id(last_led_update_time) = now;
if (id(beam_direction).has_state()) {
// CORRECTING THE OFFSET: add 5 from the sensor reading
float target_pos = ((int)id(beam_direction).state + 5) % NUM_LEDS;
float current_pos = id(animated_beam_position);
// Calculate the shortest path around the circle
float diff = target_pos - current_pos;
if (diff > NUM_LEDS / 2.0f) {
diff -= NUM_LEDS;
} else if (diff < -NUM_LEDS / 2.0f) {
diff += NUM_LEDS;
}
// Move current position towards target
if (abs(diff) > 0.01f) {
float move_speed = diff / TRANSITION_DURATION;
current_pos += move_speed * dt;
} else {
current_pos = target_pos;
}
// Handle wrap-around for the animated position
if (current_pos >= NUM_LEDS) current_pos -= NUM_LEDS;
if (current_pos < 0.0f) current_pos += NUM_LEDS;
id(animated_beam_position) = current_pos;
// Render the smoothed beam
float master_brightness = id(led_ring_brightness).state;
uint8_t base_r = (uint8_t)(id(led_ring_color_r) * 255.0f);
uint8_t base_g = (uint8_t)(id(led_ring_color_g) * 255.0f);
uint8_t base_b = (uint8_t)(id(led_ring_color_b) * 255.0f);
for (int i = 0; i < NUM_LEDS; i++) {
// Calculate circular distance from current LED to the animated position
float dist = abs(i - current_pos);
if (dist > NUM_LEDS / 2.0f) {
dist = NUM_LEDS - dist;
}
// Calculate brightness based on distance (linear falloff)
float brightness_factor = 1.0f - (dist / (FADE_LEDS + 1.0f));
brightness_factor = std::max(0.0f, brightness_factor);
if (brightness_factor > 0.0f) {
float final_brightness = brightness_factor * master_brightness;
uint8_t r = (uint8_t)(base_r * final_brightness);
uint8_t g = (uint8_t)(base_g * final_brightness);
uint8_t b = (uint8_t)(base_b * final_brightness);
colors[i] = (r << 16) | (g << 8) | b;
}
}
}
id(respeaker).set_led_ring(colors);
# Master script controlling the LEDs, based on different conditions : initialization in progress, wifi and api connected and voice assistant phase.
# For the sake of simplicity and re-usability, the script calls child scripts defined below.
# This script will be called every time one of these conditions is changing.
- id: control_leds
mode: single # Prevent multiple simultaneous executions
then:
- lambda: |
// Cache expensive component checks
static bool last_respeaker_failed = false;
static bool last_wifi_connected = false;
static bool last_api_connected = false;
static int last_voice_phase = -1;
static bool last_timer_ringing = false;
static bool last_timer_active = false;
static bool last_improv_ble = false;
static bool last_init_progress = false;
bool respeaker_failed = id(respeaker).is_failed();
bool wifi_connected = id(wifi_id).is_connected();
bool api_connected = id(api_id).is_connected();
int voice_phase = id(voice_assistant_phase);
bool new_timer_ringing = id(timer_ringing).state;
bool improv_ble = id(improv_ble_in_progress);
bool init_progress = id(init_in_progress);
// Only update if something actually changed
bool needs_update = (
respeaker_failed != last_respeaker_failed ||
wifi_connected != last_wifi_connected ||
api_connected != last_api_connected ||
voice_phase != last_voice_phase ||
new_timer_ringing != last_timer_ringing ||
improv_ble != last_improv_ble ||
init_progress != last_init_progress
);
if (!needs_update) return;
// Update cache
last_respeaker_failed = respeaker_failed;
last_wifi_connected = wifi_connected;
last_api_connected = api_connected;
last_voice_phase = voice_phase;
last_timer_ringing = new_timer_ringing;
last_improv_ble = improv_ble;
last_init_progress = init_progress;
if (respeaker_failed) {
id(control_leds_respeaker_startup_failed).execute();
return;
}
// Only check timers if we need to
id(check_if_timers_active).execute();
if (id(is_timer_active)){
id(fetch_first_active_timer).execute();
}
// Continue with existing logic...
if (improv_ble) {
id(control_leds_improv_ble_state).execute();
} else if (init_progress) {
id(control_leds_init_state).execute();
} else if (!wifi_connected || !api_connected){
id(control_leds_no_ha_connection_state).execute();
} else if (new_timer_ringing) {
id(control_leds_timer_ringing).execute();
} else if (voice_phase == ${voice_assist_waiting_for_command_phase_id}) {
id(control_leds_voice_assistant_waiting_for_command_phase).execute();
} else if (voice_phase == ${voice_assist_listening_for_command_phase_id}) {
id(control_leds_voice_assistant_listening_for_command_phase).execute();
} else if (voice_phase == ${voice_assist_thinking_phase_id}) {
id(control_leds_voice_assistant_thinking_phase).execute();
} else if (voice_phase == ${voice_assist_replying_phase_id}) {
id(control_leds_voice_assistant_replying_phase).execute();
} else if (voice_phase == ${voice_assist_error_phase_id}) {
id(control_leds_voice_assistant_error_phase).execute();
} else if (voice_phase == ${voice_assist_not_ready_phase_id}) {
id(control_leds_voice_assistant_not_ready_phase).execute();
} else if (id(is_timer_active)) {
id(control_leds_timer_ticking).execute();
} else if (voice_phase == ${voice_assist_idle_phase_id}) {
id(control_leds_voice_assistant_idle_phase).execute();
}
# Script executed if respeaker startup failed
- id: control_leds_respeaker_startup_failed
then:
- script.execute:
id: led_set_effect
effect: "breathe"
r: 0.7
g: 0.0
b: 0.0
speed: 0.5
# Script executed during Improv BLE
- id: control_leds_improv_ble_state
then:
- script.execute:
id: led_set_effect
effect: "twinkle"
r: 1.0
g: 0.89
b: 0.71
speed: 10.0
# Script executed during initialization
- id: control_leds_init_state
then:
- if:
condition:
wifi.connected:
then:
- script.execute:
id: led_set_effect
effect: "twinkle"
r: 0.09
g: 0.73
b: 0.95
speed: 20.0
else:
- script.execute:
id: led_set_effect
effect: "twinkle"
r: 0.09
g: 0.73
b: 0.95
speed: 4.0
# Script executed when the device has no connection to Home Assistant
- id: control_leds_no_ha_connection_state
then:
- script.execute:
id: led_set_effect
effect: "twinkle"
r: 1.0
g: 0.0
b: 0.0
speed: 10.0
# Script executed when the voice assistant is waiting for a command (After the wake word)
- id: control_leds_voice_assistant_waiting_for_command_phase
then:
- lambda: |
id(animated_beam_position) = id(beam_direction).state;
- script.execute:
id: led_set_effect
effect: "led_beam"
r: 0.5
g: 0.0
b: 0.5
speed: 0.0
# Script executed when the voice assistant is listening to a command
- id: control_leds_voice_assistant_listening_for_command_phase
then:
- script.execute:
id: led_set_effect
effect: "led_beam"
r: 0.8
g: 0.0
b: 0.8
speed: 0.0
# Script executed when the voice assistant is thinking to a command
- id: control_leds_voice_assistant_thinking_phase
then:
- script.execute:
id: led_set_effect
effect: "breathe"
r: 0.6
g: 0.0
b: 0.6
speed: 1.0
# Script executed when the voice assistant is replying to a command
- id: control_leds_voice_assistant_replying_phase
then:
- script.execute:
id: led_set_effect
effect: "comet_ccw"
r: 0.6
g: 0.0
b: 0.6
speed: 1.0
# Script executed when the voice assistant is in error
- id: control_leds_voice_assistant_error_phase
then:
- script.execute:
id: led_set_effect
effect: "breathe"
r: 1.0
g: 0.0
b: 0.0
speed: 3.0
# Script executed when the voice assistant is not ready
- id: control_leds_voice_assistant_not_ready_phase
then:
- script.execute:
id: led_set_effect
effect: "twinkle"
r: 1.0
g: 0.0
b: 0.0
speed: 5.0
# Script executed when the volume is changed
- id: control_leds_volume_changed
mode: restart
then:
- lambda: |-
id(volume_display_active) = true;
- delay: 2s
- lambda: |-
id(volume_display_active) = false;
# Script executed when the timer is ringing, to control the LEDs
- id: control_leds_timer_ringing
then:
- script.execute:
id: led_set_effect
effect: "breathe"
r: 0.6
g: 0.0
b: 0.6
speed: 5.0
# Script executed when the timer is ticking, to control the LEDs
- id: control_leds_timer_ticking
then:
- script.execute:
id: led_set_effect
effect: "timer_tick"
r: 0.6
g: 0.0
b: 0.6
speed: 1.0
# Script executed when the voice assistant is idle (waiting for a wake word)
- id: control_leds_voice_assistant_idle_phase
then:
- script.execute:
id: led_set_effect
effect: "off"
r: 0.0
g: 0.0
b: 0.0
speed: 0.0
# Script executed when the timer is ringing, to playback sounds.
- id: ring_timer
then:
- script.execute: enable_repeat_one
- script.execute:
id: play_sound
priority: true
sound_file: !lambda return id(timer_finished_sound);
# Script executed when the timer is ringing, to repeat the timer finished sound.
- id: enable_repeat_one
then:
# Turn on the repeat mode and pause for 500 ms between playlist items/repeats
- lambda: |-
id(external_media_player)
->make_call()
.set_command(media_player::MediaPlayerCommand::MEDIA_PLAYER_COMMAND_REPEAT_ONE)
.set_announcement(true)
.perform();
id(external_media_player)->set_playlist_delay_ms(speaker::AudioPipelineType::ANNOUNCEMENT, 500);
# Script execute when the timer is done ringing, to disable repeat mode.
- id: disable_repeat
then:
# Turn off the repeat mode and pause for 0 ms between playlist items/repeats
- lambda: |-
id(external_media_player)
->make_call()
.set_command(media_player::MediaPlayerCommand::MEDIA_PLAYER_COMMAND_REPEAT_OFF)
.set_announcement(true)
.perform();
id(external_media_player)->set_playlist_delay_ms(speaker::AudioPipelineType::ANNOUNCEMENT, 0);
# Script executed when we want to play sounds on the device.
- id: play_sound
parameters:
priority: bool
sound_file: "audio::AudioFile*"
then:
- lambda: |-
if (priority) {
id(external_media_player)
->make_call()
.set_command(media_player::MediaPlayerCommand::MEDIA_PLAYER_COMMAND_STOP)
.set_announcement(true)
.perform();
}
if ( (id(external_media_player).state != media_player::MediaPlayerState::MEDIA_PLAYER_STATE_ANNOUNCING ) || priority) {
id(external_media_player)
->play_file(sound_file, true, false);
}
# Script used to fetch the first active timer (Stored in global first_active_timer)
- id: fetch_first_active_timer
mode: single
then:
- lambda: |
static uint32_t last_fetch_time = 0;
uint32_t now = millis();
// Only fetch every 500ms to reduce overhead
if (now - last_fetch_time < 500) return;
last_fetch_time = now;
const auto timers = id(va).get_timers();
if (timers.empty()) return;
auto output_timer = timers.begin()->second;
for (auto &iterable_timer : timers) {
if (iterable_timer.second.is_active &&
iterable_timer.second.seconds_left <= output_timer.seconds_left) {
output_timer = iterable_timer.second;
}
}
id(first_active_timer) = output_timer;
# Script used to check if a timer is active (Stored in global is_timer_active)
- id: check_if_timers_active
then:
- lambda: |
const auto timers = id(va).get_timers();
bool output = false;
if (timers.size() > 0) {
for (auto &iterable_timer : timers) {
if(iterable_timer.second.is_active) {
output = true;
}
}
}
id(is_timer_active) = output;
# Script used activate the stop word if the TTS step is long.
# Why is this wrapped on a script?
# Becasue we want to stop the sequence if the TTS step is faster than that.
# This allows us to prevent having the deactivation of the stop word before its own activation.
- id: activate_stop_word_once
then:
- delay: 1s
# Enable stop wake word
- if:
condition:
switch.is_off: timer_ringing
then:
- micro_wake_word.enable_model: stop
- wait_until:
not:
media_player.is_announcing:
- if:
condition:
switch.is_off: timer_ringing
then:
- micro_wake_word.disable_model: stop
- id: check_alarm
then:
- lambda: |-
id(publish_current_time).execute();
// Check alarm
if (id(alarm_on).state && id(alarm_time).has_state()) {
// Get the stored alarm time from the sensor
auto set_alarm_time = id(alarm_time).state;
if (set_alarm_time.length() == 5 &&
isdigit(set_alarm_time[0]) && isdigit(set_alarm_time[1]) &&
isdigit(set_alarm_time[3]) && isdigit(set_alarm_time[4])) {
auto alarm_hour = std::stoi(set_alarm_time.substr(0, 2));
auto alarm_minute = std::stoi(set_alarm_time.substr(3, 2));
// Trigger action if current time matches alarm time
auto time_now = id(homeassistant_time).now();
if (time_now.hour == alarm_hour && time_now.minute == alarm_minute) {
auto action = id(alarm_action).state;
if (action == "Play sound") {
id(timer_ringing).turn_on();
} else if (action == "Send event") {
id(send_alarm_event).execute();
} else if (action == "Sound and event") {
id(timer_ringing).turn_on();
id(send_alarm_event).execute();
}
}
} else {
ESP_LOGW("alarm", "Incorrect alarm time setting");
}
}
- id: send_alarm_event
then:
- homeassistant.event:
event: esphome.alarm_ringing
- id: send_tts_uri_event
parameters:
tts_uri: string
then:
- homeassistant.event:
event: esphome.tts_uri
data:
uri: !lambda return tts_uri;
- id: send_stt_text_event
parameters:
stt_text: string
then:
- homeassistant.event:
event: esphome.stt_text
data:
text: !lambda return stt_text;
- id: publish_current_time
mode: single
then:
- lambda: |-
static std::string last_time_string = "";
auto time_now = id(homeassistant_time).now();
std::string current_time_string = time_now.strftime("%H:%M");
// Only publish if time actually changed
if (current_time_string != last_time_string) {
id(current_time).publish_state(current_time_string);
last_time_string = current_time_string;
}
Controlador Central (led_set_effect)
script:
  # =========================================================================
  # == Centralized script to control all LED effects ==
  # =========================================================================
  - id: led_set_effect
    mode: restart
    parameters:
      effect: std::string
      r: float
      g: float
      b: float
      speed: float
      ....
- Gerencia todos os efeitos de LED em um só lugar.
- Pode definir dinamicamente o tipo de efeito, cor (R/G/B) e velocidade.
- Usa scripts de atualização para movimento suave.
- O efeito Off desliga imediatamente os LEDs.
Scripts Individuais
- Cada animação (respiração, arco-íris, cometa, cintilação, tique do temporizador, exibição de volume, feixe de LED) tem seu próprio script.
- Torna o sistema modular e fácil de manter.
- Acionados periodicamente por led_animation_interval ou pelo controlador central.
| Estado do Dispositivo | Efeito de LED |
|---|---|
| Falha na inicialização | Respiração vermelha |
| Modo Improv BLE | Cintilação quente |
| Inicialização | Cintilação azul |
| Sem conexão com o HA | Cintilação vermelha |
| Assistente de Voz aguardando | Feixe roxo |
| Assistente de Voz ouvindo | Feixe roxo brilhante |
| Assistente de Voz pensando | Respiração roxa |
| Assistente de Voz respondendo | Cometa roxo |
| Assistente de Voz erro | Respiração vermelha |
| Assistente de Voz ocioso | LEDs desligados |
| Temporizador tocando | Respiração roxa rápida |
| Mudança de volume | Exibição temporária |
Como o Controle de LED Funciona (Visão Geral do Fluxo)
-
Acionando um Efeito
-
Quando algo acontece (por exemplo, falha na inicialização, assistente de voz ouvindo, temporizador tocando), um script é executado.
-
Esse script chama o controlador central de LED (
led_set_effect) e informa:- qual efeito executar (por exemplo, respiração, arco-íris, cometa)
- qual cor (valores R, G, B)
- quão rápido (velocidade).
Se a inicialização falhar →
led_set_effecté chamado com effect = breathe, cor = vermelho. -
-
Controlador Central (loop de intervalo)
-
A cada 50ms (20 vezes por segundo), o loop
led_animation_intervalverifica qual é o efeito atual. -
Com base nesse nome de efeito, ele encaminha o controle para o script de atualização correspondente.
- Se effect = breathe → executa
update_breathe_effect. - Se effect = rainbow → executa
update_rainbow_effect. - E assim por diante para cintilação, cometa, tique de temporizador, feixe de LED, etc.
- Se effect = breathe → executa
-
Esse loop age como um despachante: decide qual script de animação executar em seguida.
interval:
  - interval: 50ms
    id: led_animation_interval
    then:
      - lambda: |-
          if (id(volume_display_active)) {
            id(update_volume_display_effect).execute();
            return;
          }
          std::string effect = id(current_led_effect);
          if (effect == "off") {
            return;
          } else if (effect == "breathe") {
            id(update_breathe_effect).execute();
          } else if (effect == "rainbow") {
            id(update_rainbow_effect).execute();
          } else if (effect == "comet_cw") {
            id(update_comet_cw_effect).execute();
          } else if (effect == "comet_ccw") {
            id(update_comet_ccw_effect).execute();
          } else if (effect == "twinkle") {
            id(update_twinkle_effect).execute();
          } else if (effect == "timer_tick") {
            id(update_timer_tick_effect).execute();
          } else if (effect == "led_beam") {
            id(update_led_beam_effect).execute();
          }
-
Script de Atualização do Efeito
-
Cada efeito tem seu próprio script que calcula as cores dos LEDs quadro a quadro.
-
Exemplo: efeito de respiração
- Usa uma onda senoidal para aumentar e diminuir o brilho suavemente.
- Multiplica o brilho pelas configurações globais do anel de LED (velocidade, controle deslizante de brilho, cor R/G/B).
- Cria um array de cores para todos os 12 LEDs.
- Envia as cores para o anel de LED Respeaker.
-
Exemplo:
 # Individual update scripts for each animated effect
  - id: update_breathe_effect
    then:
      - lambda: |-
          static float phase = 0.0f;
          uint32_t now = millis();
          float dt = (now - id(last_led_update_time)) / 1000.0f;
          id(last_led_update_time) = now;

          phase += dt * id(led_ring_speed);
          while (phase >= 1.0f) phase -= 1.0f;

          float master_brightness = id(led_ring_brightness).state;
          float breath_brightness = 0.5f * (1.0f + sinf(phase * 2.0f * M_PI)) * master_brightness;

          uint8_t r = (uint8_t)(id(led_ring_color_r) * 255.0f * breath_brightness);
          uint8_t g = (uint8_t)(id(led_ring_color_g) * 255.0f * breath_brightness);
          uint8_t b = (uint8_t)(id(led_ring_color_b) * 255.0f * breath_brightness);
          uint32_t current_color = (r << 16) | (g << 8) | b;

          uint32_t colors[12];
          for (int i = 0; i < 12; i++) colors[i] = current_color;
          id(respeaker).set_led_ring(colors);
Isso torna as animações suaves, dinâmicas e personalizáveis.
Configuração de Áudio
Entrada / Saída I²S
I²S (Inter-IC Sound) é uma conexão digital que permite ao ESP32 enviar e receber áudio de alta qualidade para chips como codecs, microfones e alto-falantes.
i2s_audio:
  - id: i2s_output
    i2s_lrclk_pin:
      number: GPIO7
      allow_other_uses: true
    i2s_bclk_pin:
      number: GPIO8
      allow_other_uses: true
    # i2s_mclk_pin:
    #   number: GPIO9
    #   allow_other_uses: true

  - id: i2s_input
    i2s_lrclk_pin:
      number: GPIO7
      allow_other_uses: true
    i2s_bclk_pin:
      number: GPIO8
      allow_other_uses: true
    # i2s_mclk_pin:
    #   number: GPIO9
    #   allow_other_uses: true
Microfone
- Captura áudio do array de microfones I²S / codec.
- GPIO43: Pino por onde os dados de áudio do microfone entram.
- Taxa de amostragem 48 kHz, 32 bits: Gravação de alta qualidade (estéreo, 2 canais).
- adc_type: external: Usa o codec externo (não o ADC interno do ESP32).
- i2s_mode: secondary: ESP32 segue o clock do codec (modo escravo).
microphone:
  - platform: i2s_audio
    id: i2s_mics
    i2s_din_pin: GPIO43
    adc_type: external
    pdm: false
    sample_rate: 48000
    bits_per_sample: 32bit
    i2s_mode: secondary
    i2s_audio_id: i2s_input
    channel: stereo
Alto-falante
- Envia áudio para o alto-falante via codec (DAC AIC3104).
- GPIO44: Pino por onde o áudio digital sai.
- 48 kHz, 32 bits estéreo: Reprodução de alta qualidade.
- buffer_duration 100ms: Mantém o áudio suave (evita falhas).
- timeout: never: Mantém o canal do alto-falante ativo (não será desligado).
speaker:
  # Hardware speaker output
  - platform: i2s_audio
    id: i2s_audio_speaker
    sample_rate: 48000
    i2s_mode: secondary
    i2s_dout_pin: GPIO44
    bits_per_sample: 32bit
    i2s_audio_id: i2s_output
    dac_type: external
    channel: stereo
    timeout: never
    buffer_duration: 100ms
    audio_dac: aic3104_dac
Mixer
- Combina múltiplos fluxos de áudio (mídia + anúncios) em uma única saída.
  # Virtual speakers to combine the announcement and media streams together into one output
  - platform: mixer
    id: mixing_speaker
    output_speaker: i2s_audio_speaker
    num_channels: 2
    source_speakers:
      - id: announcement_mixing_input
        timeout: never
      - id: media_mixing_input
        timeout: never
Reamostradores
- Garante que todas as fontes de áudio correspondam em taxa de amostragem e profundidade de bits.
  # Vritual speakers to resample each pipelines' audio, if necessary, as the mixer speaker requires the same sample rate
  - platform: resampler
    id: announcement_resampling_speaker
    output_speaker: announcement_mixing_input
    sample_rate: 48000
    bits_per_sample: 16
  - platform: resampler
    id: media_resampling_speaker
    output_speaker: media_mixing_input
    sample_rate: 48000
    bits_per_sample: 16
Media Player
- Controla volume, mudo, reprodução e ducking (reduz o volume da mídia durante anúncios).
- Sons pré-carregados para eventos (temporizador, palavra de ativação, erros).
media_player:
  - platform: speaker
    id: external_media_player
    name: None
    internal: False
    volume_increment: 0.05
    volume_min: 0.0
    volume_max: 1.0
    ...
    ...
Integração Respeaker XVF3800
- Endereço i2c: 0x2C
- ID: respeaker
- Interruptor de Mudo do Microfone: Atualiza a cada 1 segundo, reproduz som ao alternar.
- Relatório de Versão DFU: Informa firmware a cada 120s.
- Sensor de Direção do Feixe: Acompanha o feixe de voz (apenas interno).
- Gerenciamento de Firmware: Grava automaticamente o firmware do XVF3800 se necessário.
respeaker_xvf3800:
  id: respeaker
  address: 0x2C
  mute_switch:
    id: mic_mute_switch
    name: "Microphone Mute"
    update_interval: 1s
    on_turn_on:
    ...
    ...
Referências / Repositórios
external_components:
  - source:
      type: git
      url: https://github.com/formatBCE/esphome
      ref: respeaker_microphone
    components:
      - i2s_audio
    refresh: 0s
  - source:
      type: git
      url: https://github.com/formatBCE/Respeaker-XVF3800-ESPHome-integration
      ref: main
    components:
      - respeaker_xvf3800
      - aic3104
    refresh: 0s
- formatBCE/esphome: Componente de áudio I²S personalizado.
- formatBCE/Respeaker-XVF3800-ESPHome-integration:
- Driver XVF3800
- Driver do codec de áudio AIC3104
- refresh: 0s: Sempre busca o código mais recente dos repositórios.
Micro Wake Word
micro_wake_word:
  id: mww
  microphone:
    microphone: i2s_mics
    channels: 1
    # gain_factor: 4
  stop_after_detection: false
  ....
  ....
Detecta suas palavras de ativação (como “Okay Nabu”) e inicia o assistente de voz.
- id: mww → Nome de referência.
- microphone: i2s_mics, 1 canal.
- stop_after_detection: false → Continua ouvindo continuamente.
- okay_nabu, kenobi, hey_jarvis, hey_mycroft, stop (comando interno de parada; você pode adicionar os seus).
- vad probability_cutoff: 0.05 → Sensibilidade de fala.
Ao detectar (se o microfone não estiver mudo)
- Interrompe temporizadores, anúncios ou o assistente de voz se estiver ativo.
- Reproduz som de ativação (se habilitado).
- Inicia o assistente de voz para comandos.
Assistente de Voz
voice_assistant:
  id: va
  microphone:
    microphone: i2s_mics
    channels: 0
  media_player: external_media_player
  micro_wake_word: mww
  use_wake_word: false
  noise_suppression_level: 0
  ....
  ....
Controla o comportamento e as interações do seu assistente de voz (VA).
- Microfone e mídia: Usa i2s_mics e um reprodutor de mídia externo.
- Palavra de ativação: Vinculada a mww, mas a palavra de ativação não é obrigatória (use_wake_word: false).
- Configurações de áudio: Supressão de ruído desativada, ganho automático 0 dB, volume normal.
Eventos / O que acontece
- on_client_connected: Inicia o VA, os LEDs são atualizados, desativa mudo do microfone se necessário.
- on_client_disconnected: Interrompe o VA, restaura os LEDs.
- on_error: Mostra estado de erro nos LEDs; reproduz som local se a autenticação em nuvem falhar.
- on_start: Reduz o volume da mídia (
ducking) quando o VA inicia. - on_listening / on_stt_vad_start / on_stt_vad_end: Atualiza a fase do VA e os LEDs durante a escuta e o processamento.
- on_intent_progress / on_tts_start / on_tts_end: Gerencia a fala, atualiza os LEDs, pode acionar o script de palavra de parada.
- on_stt_end: Envia evento de texto reconhecido.
- on_end: Interrompe o VA, restaura os LEDs, encerra o
ducking.
Eventos de temporizador
- on_timer_started / on_timer_updated / on_timer_cancelled / on_timer_finished / on_timer_tick:
- Atualiza estados e nomes dos temporizadores.
- Atualiza LEDs.
- Reduz as atualizações de LED para a cada 5 segundos para temporizador em contagem.
Agradecimentos Especiais
Gostaríamos de agradecer ao FormatBCE por criar este incrível arquivo YAML para o Seeed Studio ReSpeaker XVF3800. Apoie-o no seu GitHub
Suporte Técnico e Discussão sobre o Produto
Obrigado por escolher nossos produtos! Estamos aqui para oferecer diferentes formas de suporte para garantir que sua experiência com nossos produtos seja o mais tranquila possível. Oferecemos vários canais de comunicação para atender a diferentes preferências e necessidades.