Cookbook ESPHome: Botões, Buzzer, LED, Bateria e Baixo Consumo (reTerminal E Series)
Esta página pressupõe que você já passou pelo cookbook de display ESPHome para reTerminal E Series (dispositivo no Wi-Fi, integração com Home Assistant online, primeiro dashboard renderizado). Para o esqueleto de YAML em nível de plataforma e etapas de integração com o Home Assistant, consulte Trabalhar com ESPHome. Para RTC, detecção de cartão microSD e configuração de microfone, consulte Cookbook ESPHome: RTC, Cartão SD e Microfone.
Se você quiser visualizar rapidamente os resultados do projeto ou testar o firmware demo básico antes de configurar um ambiente de desenvolvimento, abra o Hub de Firmware reTerminal E-Series. Você pode escolher um dispositivo reTerminal E Series compatível e gravar o firmware demo diretamente a partir de um navegador.
Este artigo aborda as configurações ESPHome de I/O onboard e relacionadas à energia para o seu dispositivo reTerminal E Series ePaper Display, com base nos conceitos fundamentais apresentados em nosso cookbook de display ESPHome. Se você é novo em ESPHome ou no reTerminal E Series, recomendamos começar pelo guia de display antes de usar estes exemplos de hardware.
Capacidades de Hardware
O reTerminal E Series ePaper Display inclui vários componentes de hardware que podem ser aproveitados no Home Assistant por meio do ESPHome:
-
Três botões programáveis (GPIO3, GPIO4, GPIO5)
-
Buzzer (GPIO45)
-
Monitoramento do nível da bateria (GPIO1 para tensão)
-
LED onboard (GPIO6)
-
Sensor de temperatura e umidade (interface I²C)
Vamos explorar como usar cada um desses componentes em aplicações práticas.
Controle de Componentes de Hardware do reTerminal E Series ePaper Display
Vamos explorar como usar cada um dos componentes de hardware no reTerminal E Series ePaper Display no Home Assistant.
Botões e LED
Este exemplo demonstra como usar os três botões do seu reTerminal E Series ePaper Display para controlar funções e fornecer feedback visual com o LED onboard.
Você pode usar este exemplo copiando o código abaixo e colando-o após a linha de código captive_portal no seu arquivo Yaml.
# Button configuration
binary_sensor:
  - platform: gpio
    pin:
      number: GPIO3         # Green button
      mode: INPUT_PULLUP
      inverted: true
    id: button_1
    name: "Button 1"
    on_press:
      then:
        - light.turn_on: onboard_led
        - delay: 500ms
        - light.turn_off: onboard_led

  - platform: gpio
    pin:
      number: GPIO4          # Right white button
      mode: INPUT_PULLUP
      inverted: true
    id: button_2
    name: "Button 2"
    on_press:
      then:
        - light.turn_on: onboard_led
        - delay: 200ms
        - light.turn_off: onboard_led
        - delay: 200ms
        - light.turn_on: onboard_led
        - delay: 200ms
        - light.turn_off: onboard_led

  - platform: gpio
    pin:
      number: GPIO5           # Left white button
      mode: INPUT_PULLUP
      inverted: true
    id: button_3
    name: "Button 3"
    on_press:
      then:
        - light.toggle: onboard_led

# LED configuration
output:
  - platform: gpio
    pin: GPIO6
    id: led_output
    inverted: true

light:
  - platform: binary
    name: "Onboard LED"
    output: led_output
    id: onboard_led
Esta configuração:
- Configura todos os três botões como entradas com resistores de pull-up
- Configura o Botão 1 para piscar brevemente o LED
- Configura o Botão 2 para piscar o LED em um padrão de duplo clique
- Configura o Botão 3 para alternar o LED ligado/desligado
- Torna o LED disponível no Home Assistant como uma entidade de luz controlável
Controle do Buzzer
O reTerminal E Series ePaper Display inclui um buzzer no GPIO45 que pode ser usado para fornecer feedback audível. Veja como configurá-lo:
Você pode usar este exemplo copiando o código abaixo e colando-o após a linha de código captive_portal no seu arquivo Yaml.
# This component creates a raw PWM (Pulse Width Modulation) output signal.
# For ESP32, the correct platform is 'ledc', which uses the dedicated LED Control hardware peripheral.
output:
  - platform: ledc   # CORRECTED: 'ledc' is the correct platform for ESP32 PWM.
    pin: GPIO45
    id: buzzer_pwm
    # The frequency determines the pitch of the buzzer's sound. 1000Hz is a mid-range tone.
    frequency: 1000Hz

# Create a light entity to provide a user-friendly way to control the buzzer.
# The 'brightness' of the light will control the PWM duty cycle, which effectively changes the buzzer's volume.
light:
  - platform: monochromatic
    output: buzzer_pwm
    name: "Buzzer"
    id: buzzer
    # Setting transition length to 0s makes the buzzer turn on and off instantly.
    default_transition_length: 0s

# This section defines the physical button that will trigger the buzzer.
binary_sensor:
  - platform: gpio
    pin:
      number: GPIO3            # The GPIO pin connected to the green button.
      mode: INPUT_PULLUP       # Use the internal pull-up resistor.
      inverted: true           # The signal is low when pressed.
    id: button_1
    # 'on_press' defines the sequence of actions to execute when the button is pressed.
    on_press:
      then:
        # First beep: turn on at 50% volume (brightness) for 200 milliseconds.
        - light.turn_on:
            id: buzzer
            brightness: 50%
        - delay: 200ms
        - light.turn_off: buzzer
        # Pause for 100 milliseconds between beeps.
        - delay: 100ms
        # Second beep: turn on at 70% volume for 200 milliseconds.
        - light.turn_on:
            id: buzzer
            brightness: 70%
        - delay: 200ms
        - light.turn_off: buzzer
Esta configuração:
- Configura o buzzer como uma saída PWM
- Cria uma entidade de luz para controlar o buzzer
- Configura o Botão 1 para reproduzir um padrão curto de bip quando pressionado
Você pode ajustar o parâmetro frequency para alterar o tom do buzzer. Valores mais altos criam tons mais agudos.
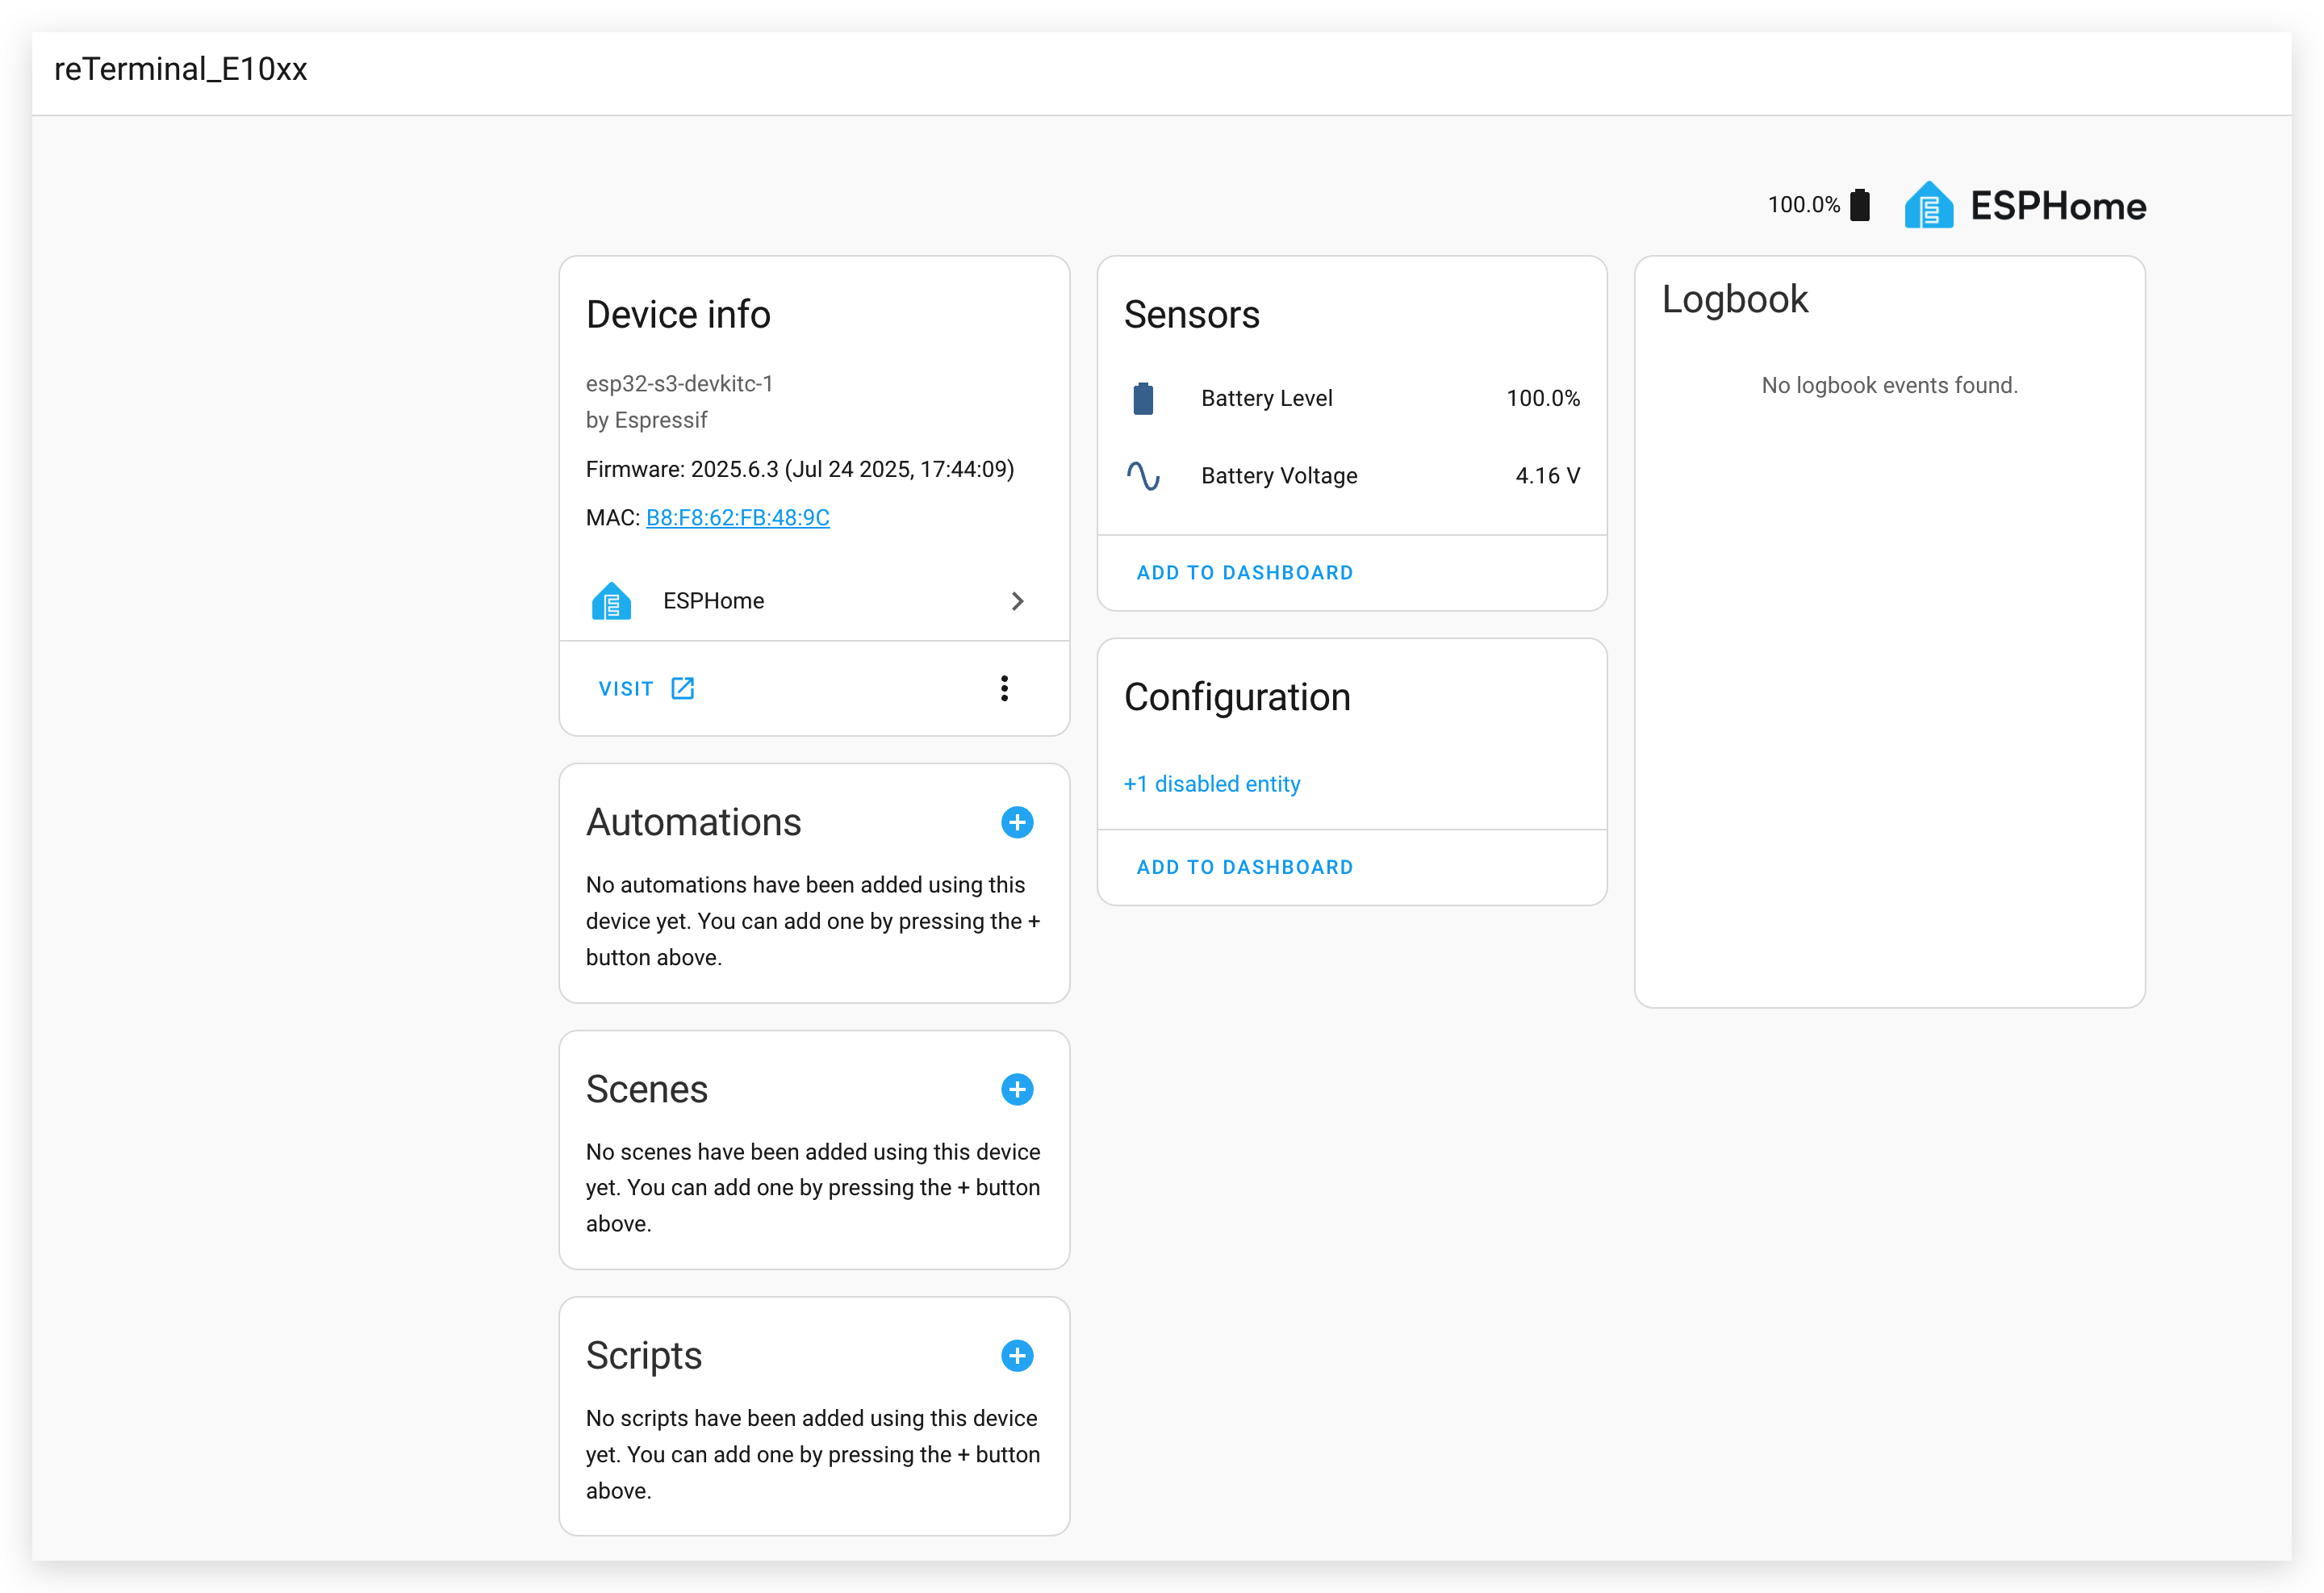
Monitoramento da Bateria
O reTerminal E Series ePaper Display pode monitorar o nível da bateria por meio da entrada analógica no GPIO1. Veja como configurá-lo:
esphome:
  name: reterminal-e10xx
  friendly_name: reTerminal_E10xx
  on_boot:
    priority: 600
    then:
      - output.turn_on: bsp_battery_enable

esp32:
  board: esp32-s3-devkitc-1
  framework:
    type: arduino

# Enable logging
logger:

# Enable Home Assistant API
api:
  encryption:
    key: "REPLACE_WITH_YOUR_API_KEY"

ota:
  - platform: esphome
    password: "REPLACE_WITH_YOUR_OTA_PASSWORD"

wifi:
  ssid: !secret wifi_ssid
  password: !secret wifi_password

  # Enable fallback hotspot (captive portal) in case wifi connection fails
  ap:
    ssid: "Reterminal-E10Xx"
    password: "ChangeMe123"

captive_portal:

output:
  - platform: gpio
    pin: GPIO21
    id: bsp_battery_enable

sensor:
  - platform: adc
    pin: GPIO1
    name: "Battery Voltage"
    id: battery_voltage
    update_interval: 60s
    attenuation: 12db
    filters:
      - multiply: 2.0  # Voltage divider compensation

  - platform: template
    name: "Battery Level"
    id: battery_level
    unit_of_measurement: "%"
    icon: "mdi:battery"
    device_class: battery
    state_class: measurement
    lambda: 'return id(battery_voltage).state;'
    update_interval: 10s
    filters:
      - calibrate_linear:
          - 4.15 -> 100.0
          - 3.96 -> 90.0
          - 3.91 -> 80.0
          - 3.85 -> 70.0
          - 3.80 -> 60.0
          - 3.75 -> 50.0
          - 3.68 -> 40.0
          - 3.58 -> 30.0
          - 3.49 -> 20.0
          - 3.41 -> 10.0
          - 3.30 -> 5.0
          - 3.27 -> 0.0
      - clamp:
          min_value: 0
          max_value: 100
Esta configuração:
- Lê a tensão da bateria por meio do ADC
- Converte a tensão em porcentagem de bateria usando uma curva de calibração
- Torna tanto a tensão bruta quanto a porcentagem disponíveis no Home Assistant
Para medir o nível da bateria, você precisa habilitar o pino GPIO21. Caso contrário, não é possível ler o valor de tensão da bateria a partir do GPIO1.
Demo 2. Capturar o Dashboard do Home Assistant como uma Captura de Tela
Este exemplo demonstra como capturar capturas de tela do seu dashboard do Home Assistant e exibi-las no seu reTerminal E Series.
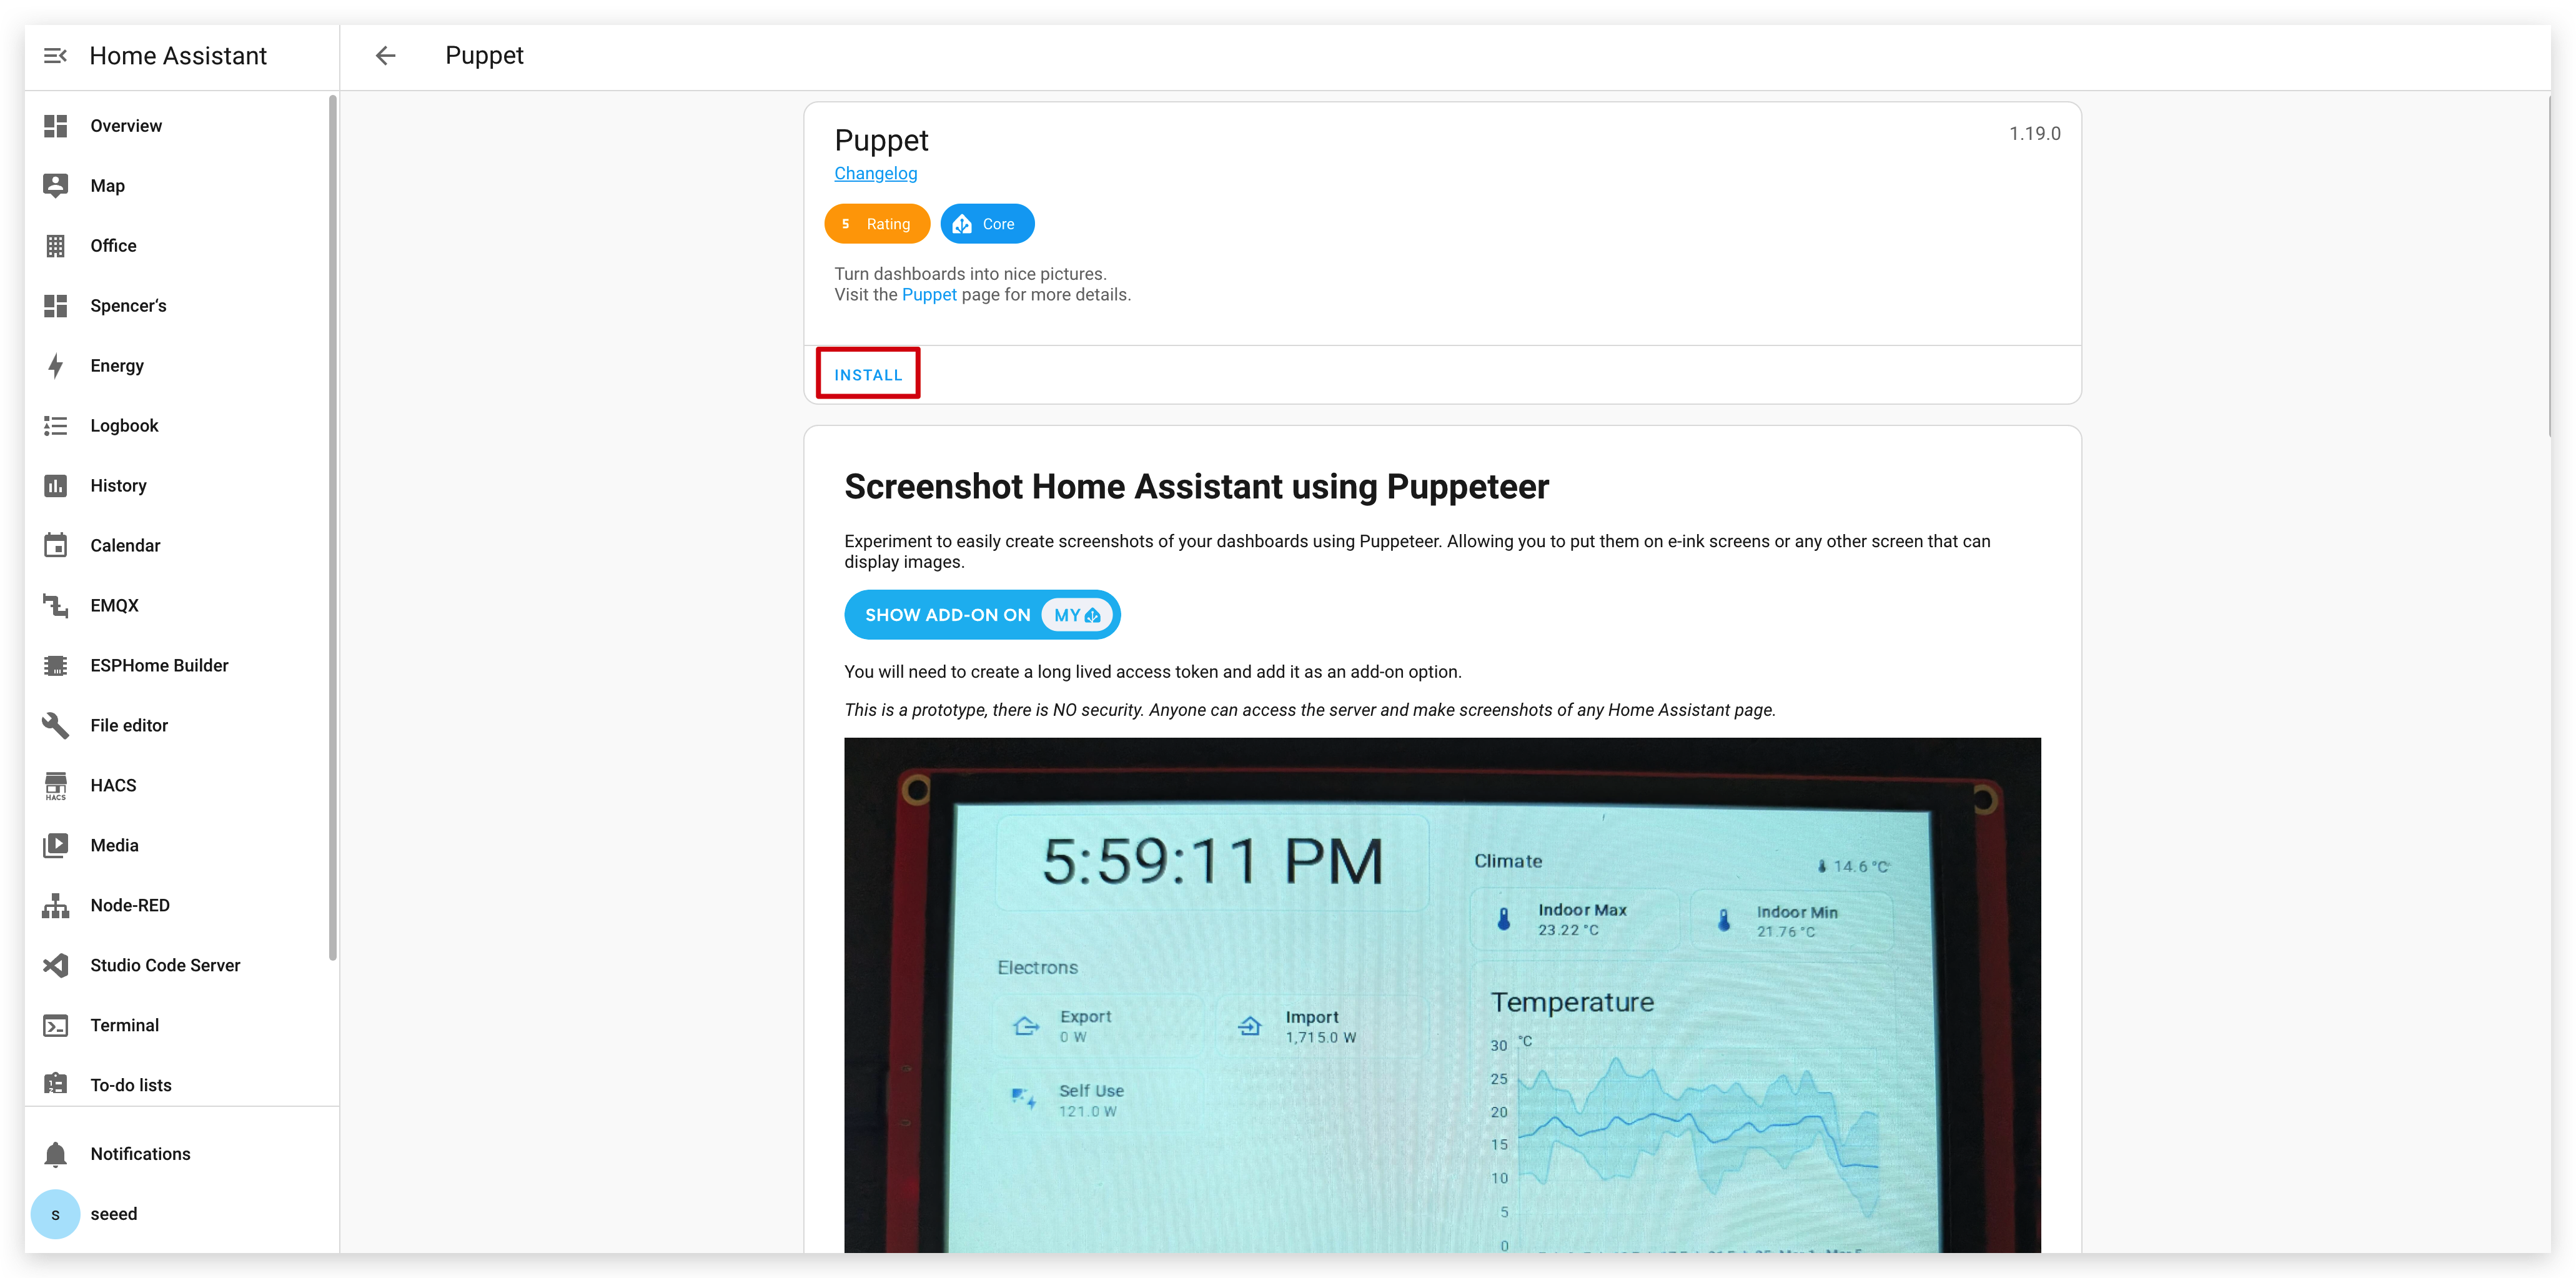
Instalando o Add-on Puppet
Passo 1. Primeiro, você precisa instalar o add-on Puppet. Clique no botão abaixo, que o levará diretamente para a página de instalação do add-on na sua instância do Home Assistant:
Etapa 2. Na página do add-on, clique no botão "INSTALL" e aguarde a conclusão da instalação.
Criando um Token de Acesso
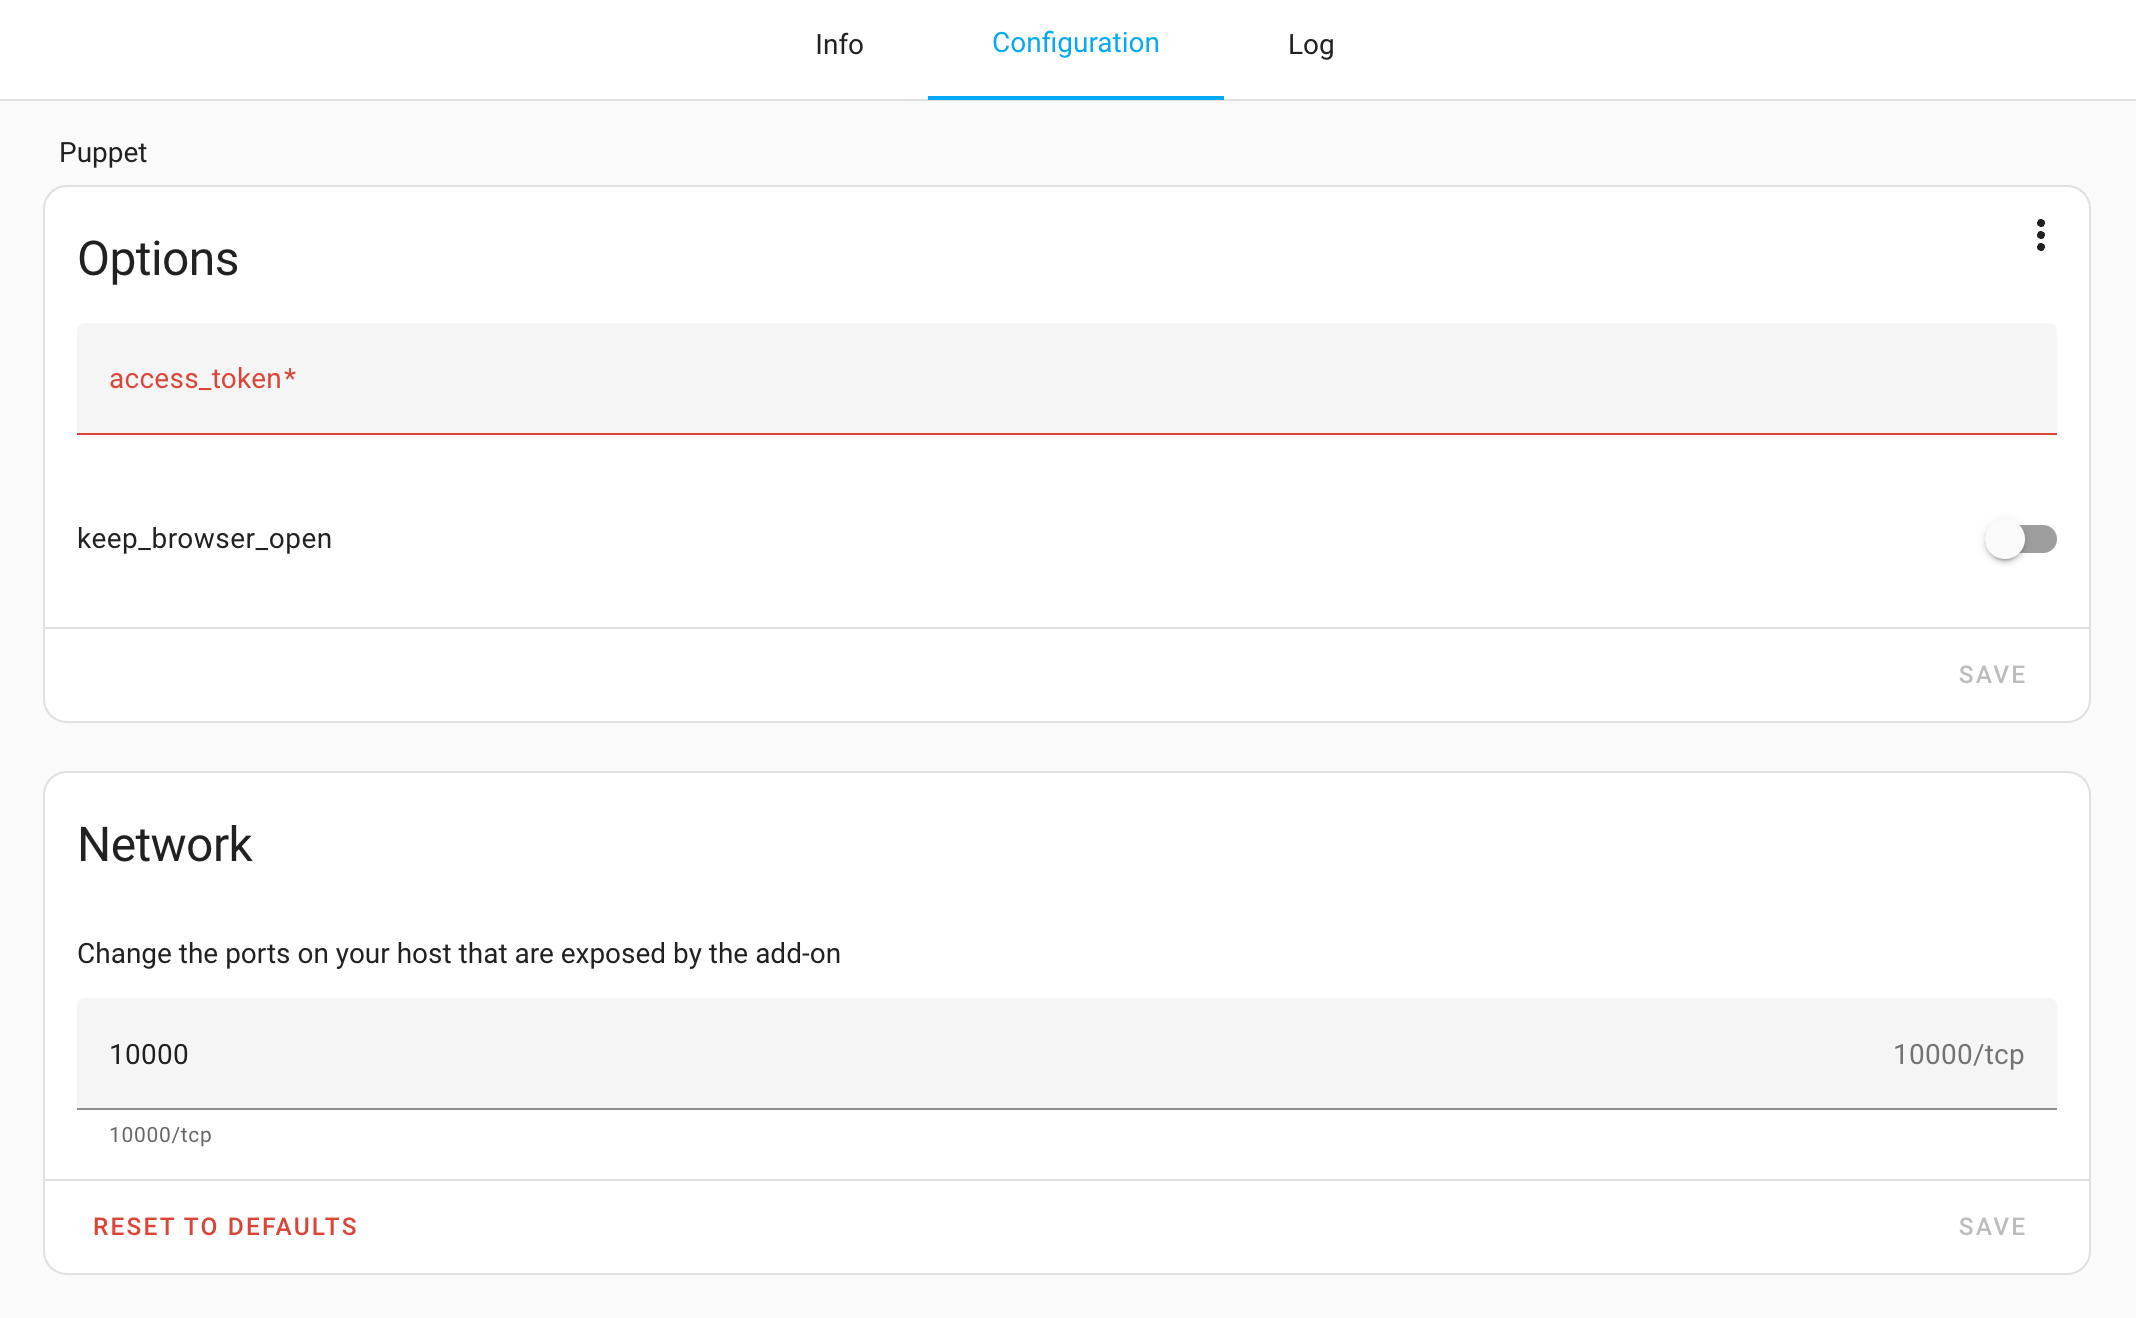
Etapa 3. Após a instalação, vá para a página Configuration do add-on Puppet. Como você pode ver, aqui precisamos inserir o token. Você precisará criar um token de acesso para este add-on.
Etapa 4. Acesse o seu perfil no Home Assistant clicando no seu nome de usuário no canto inferior esquerdo e, em seguida, selecione "Long-Lived Access Tokens" na parte inferior da página.
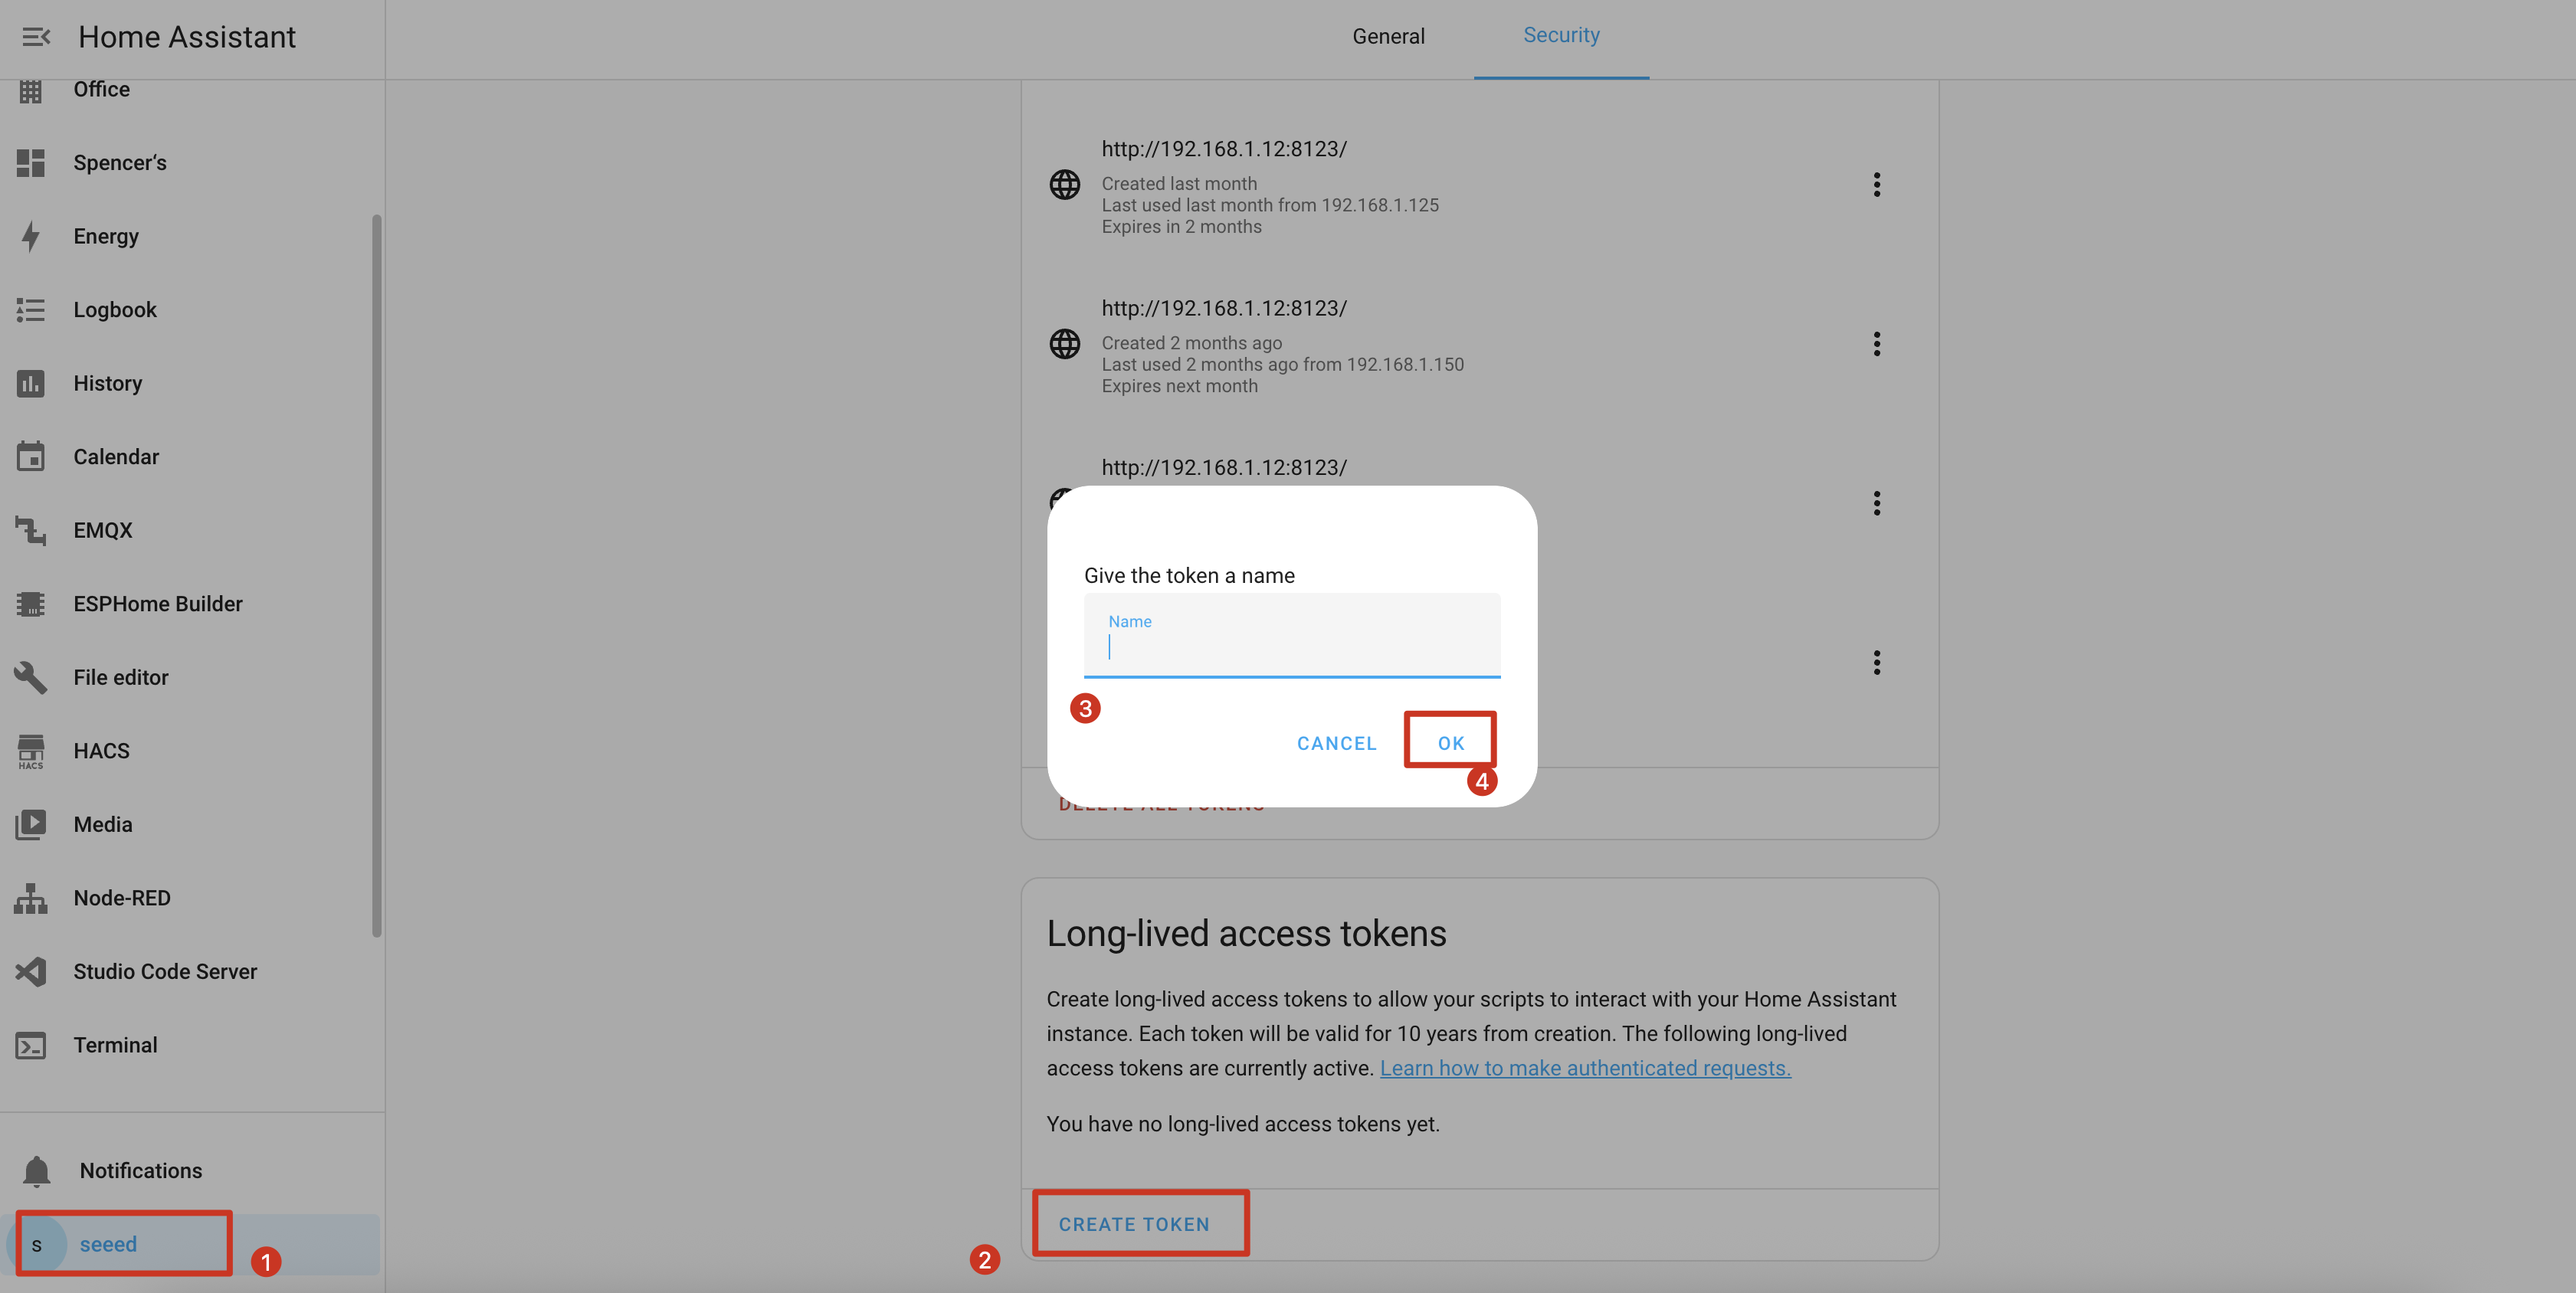
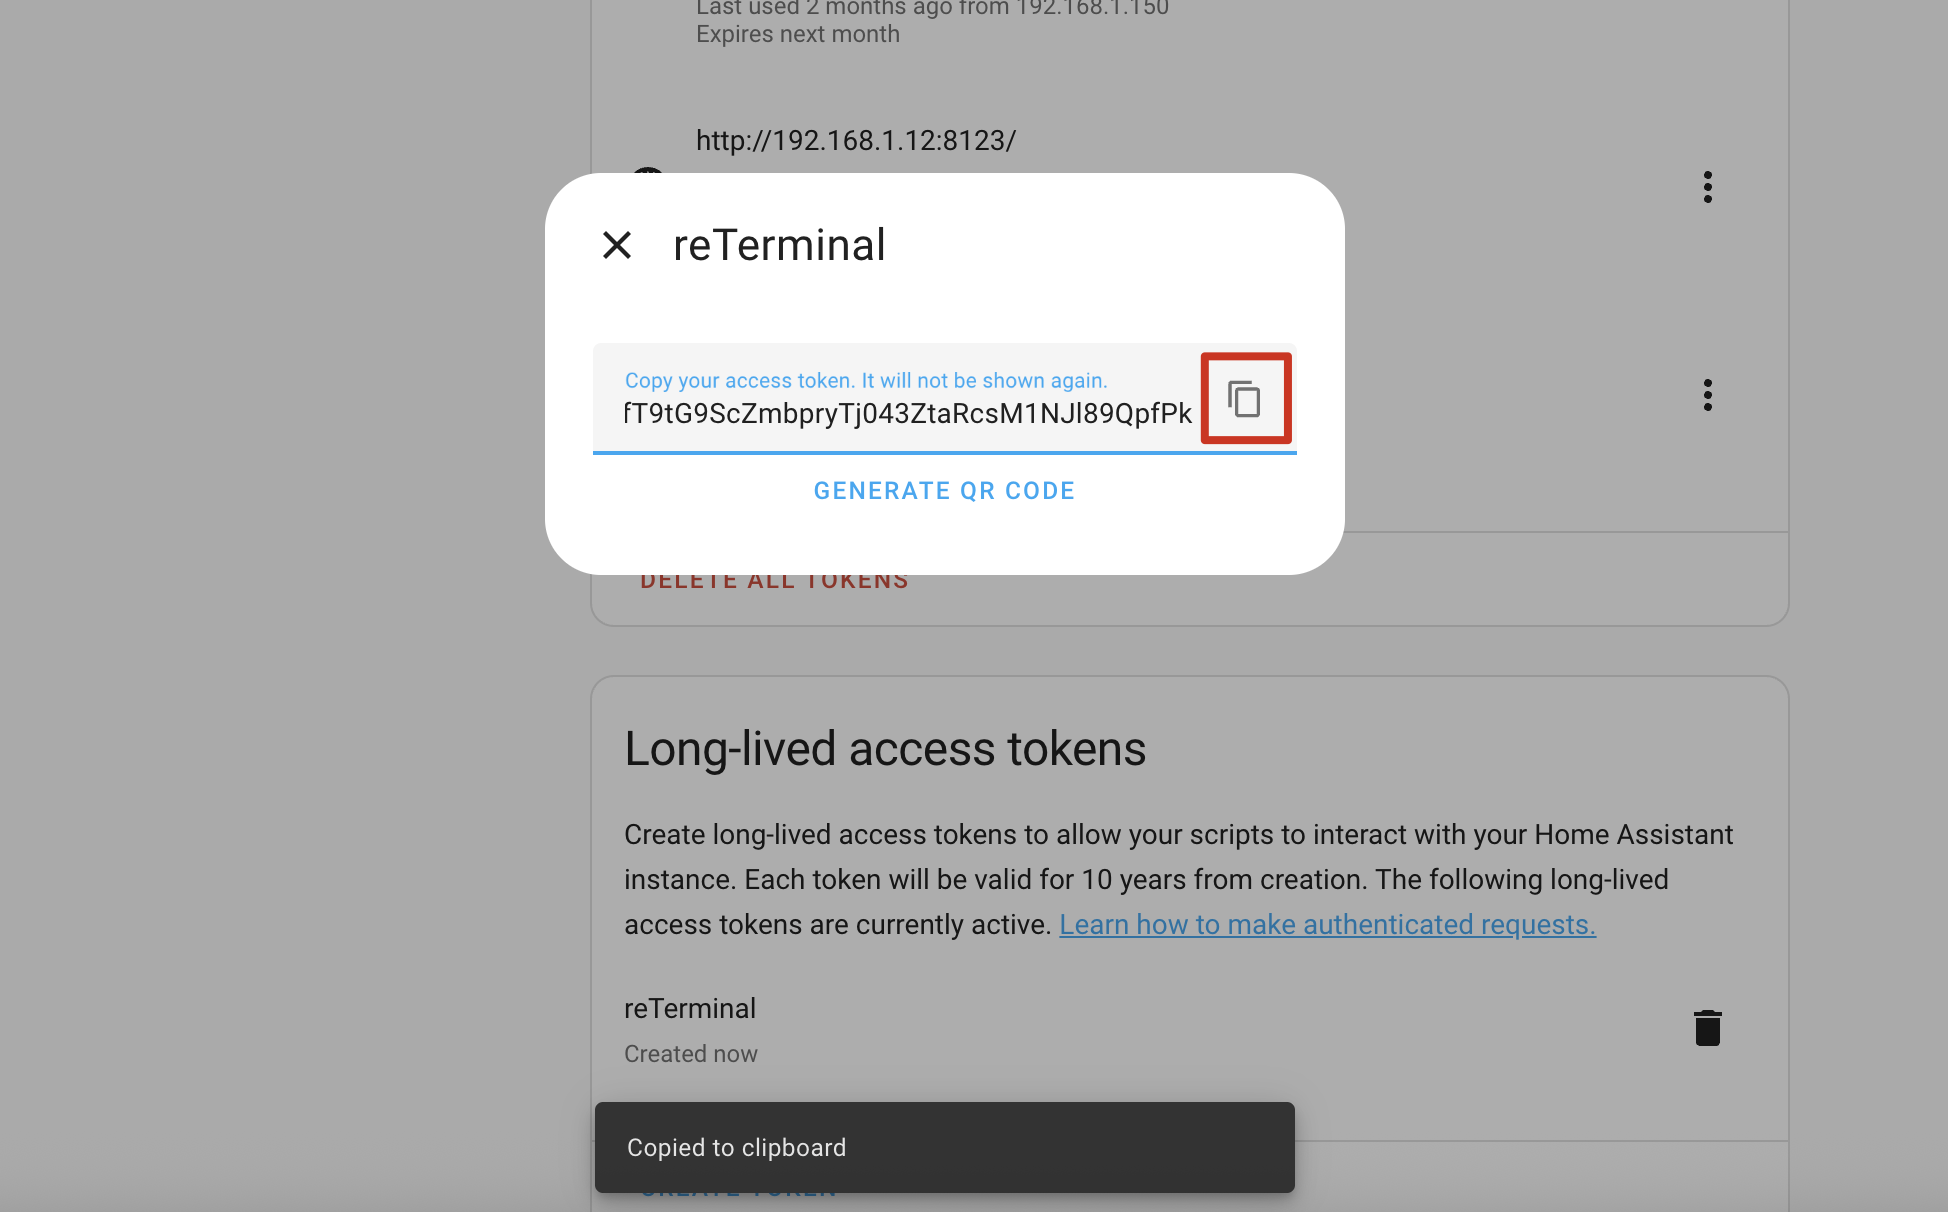
Etapa 5. Crie um novo token com um nome descritivo como "Puppet Screenshot" e copie o token gerado.
Etapa 6. Volte para a configuração do add-on Puppet e cole o token no campo "Long-Lived Access Token".
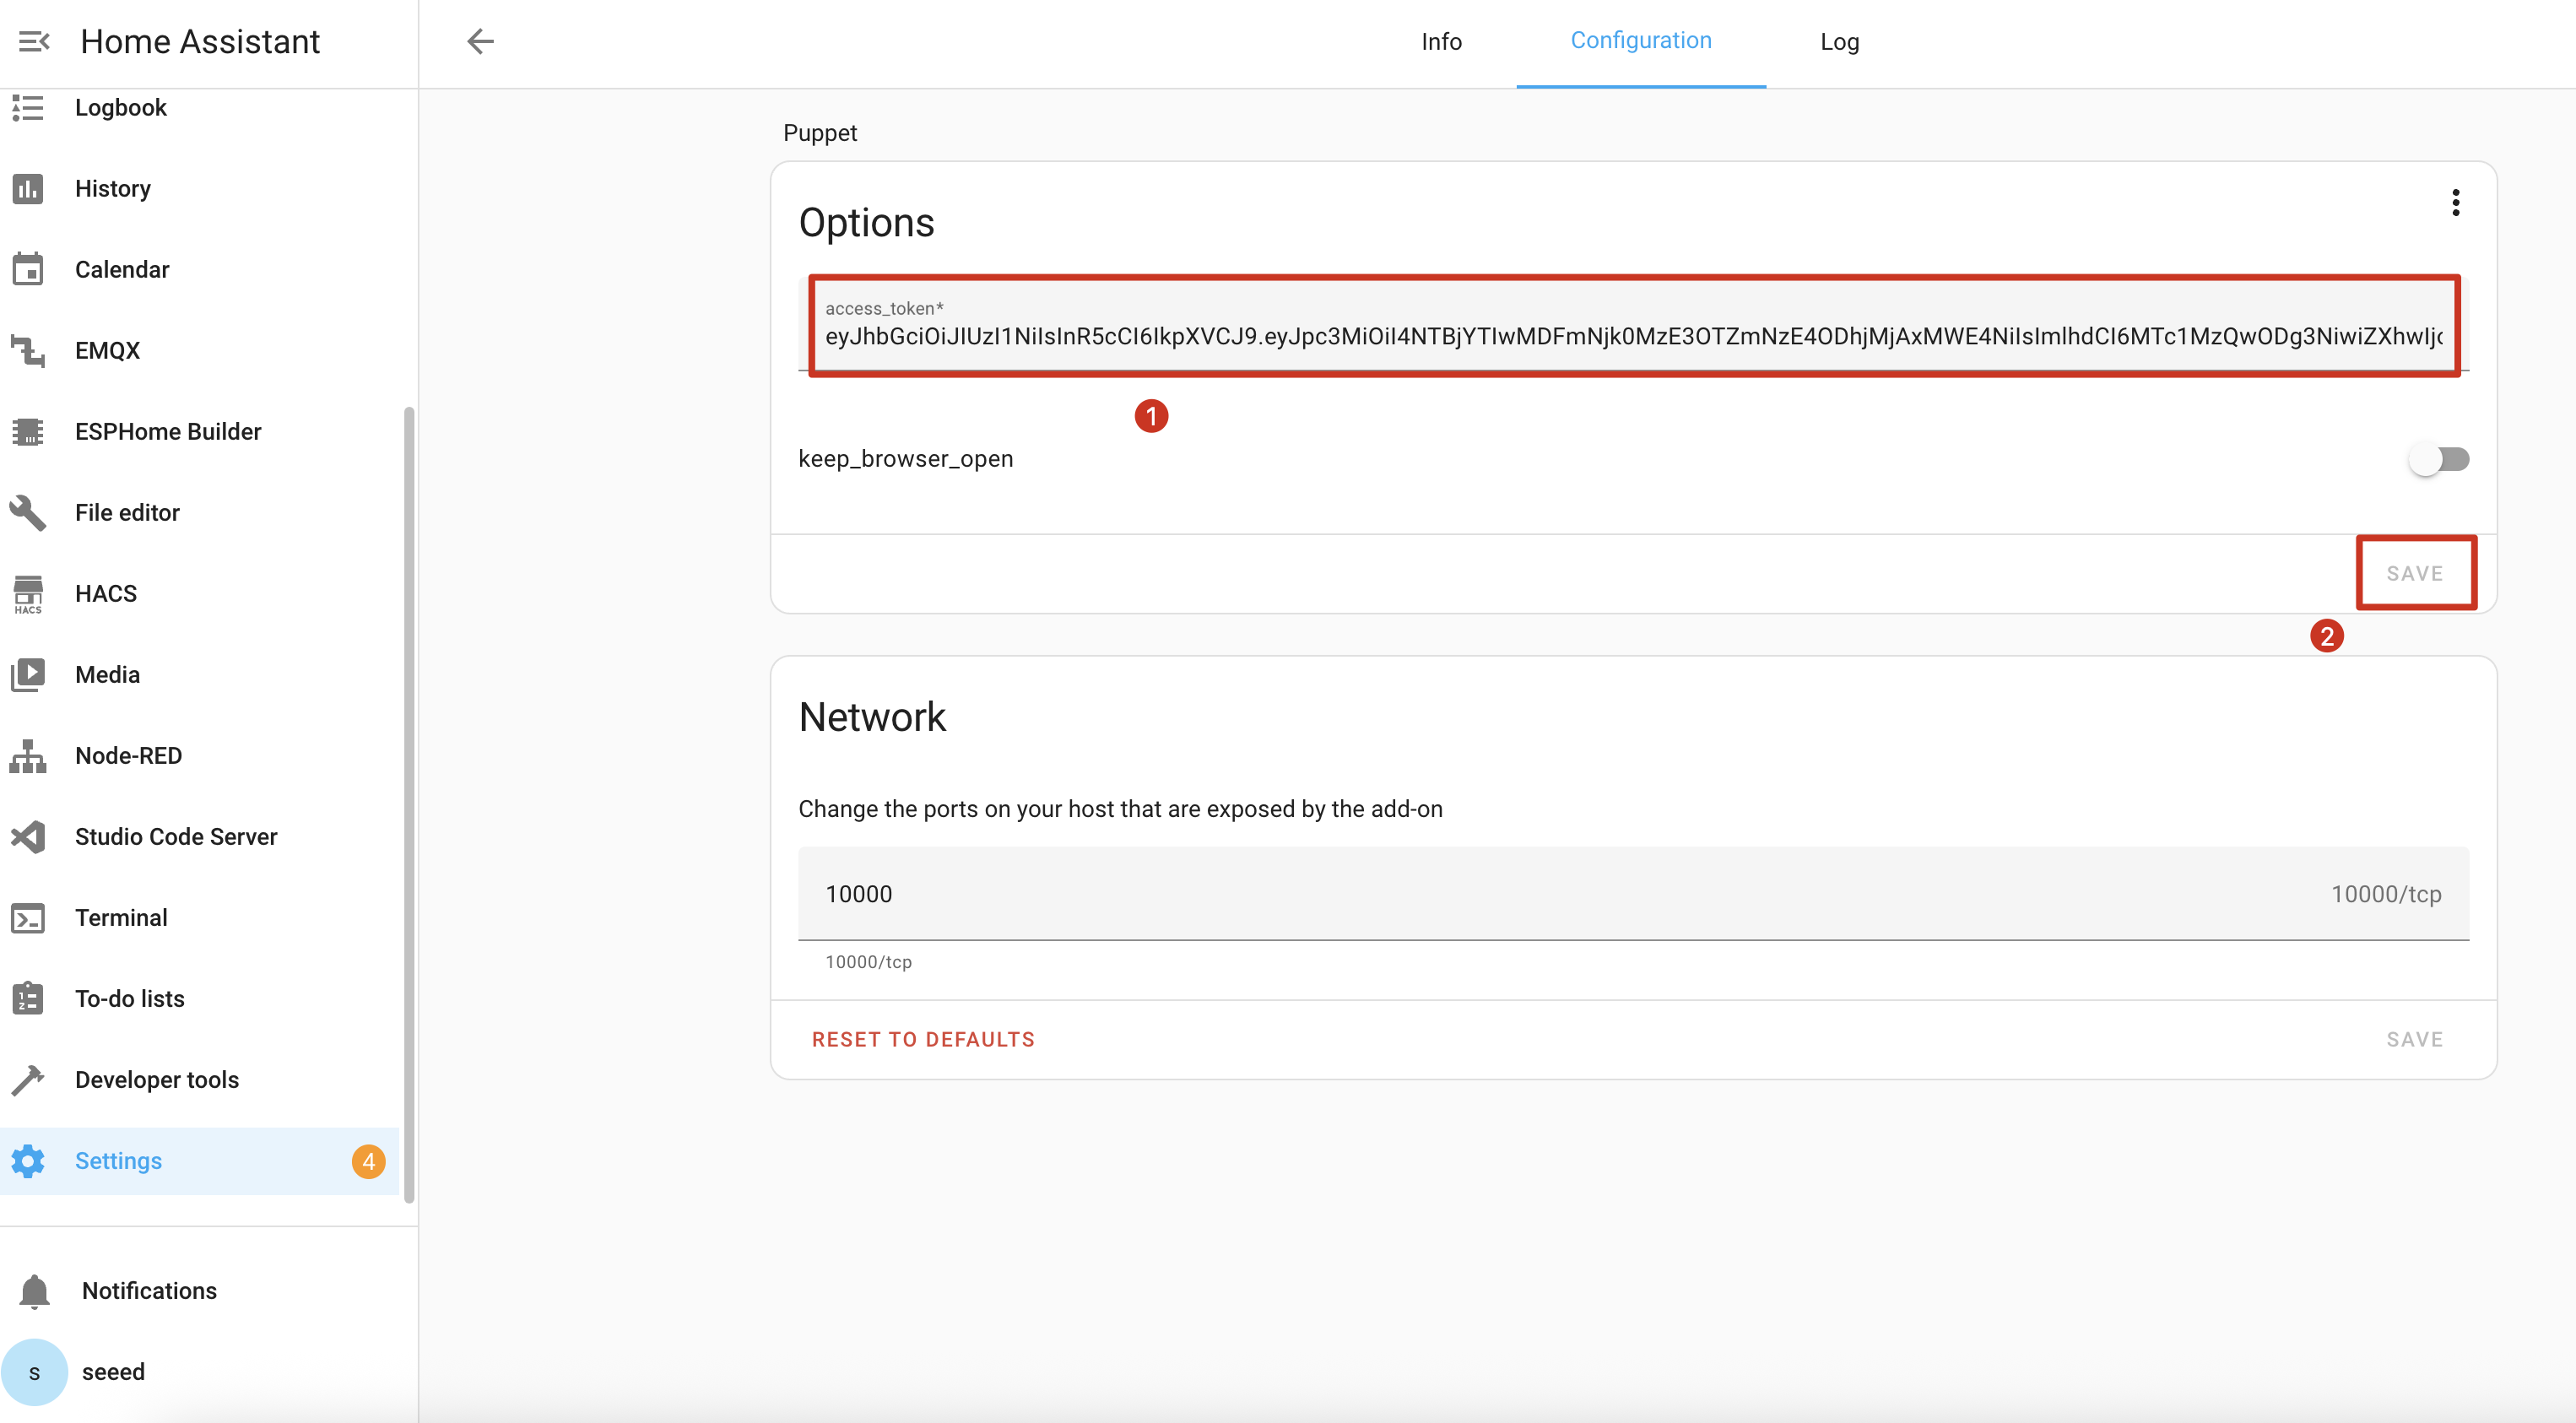
Etapa 7. Salve a configuração e reinicie o add-on Puppet.

Entendendo a API de Screenshot
O add-on Puppet inicia um servidor na porta 10000 que gera screenshots de qualquer página do Home Assistant. Veja como usá-lo:
Formato Básico da URL de Screenshot
http://homeassistant.local:10000/lovelace/0?viewport=800x480
Essa URL irá capturar um screenshot do seu dashboard padrão em resolução 800x480 (perfeito para o reTerminal E Series).
Otimização para E-Paper
Para telas e-paper, adicione o parâmetro eink para reduzir a paleta de cores:
http://homeassistant.local:10000/lovelace/0?viewport=800x480&eink=2
O valor 2 representa uma paleta de 2 cores (preto e branco).
Invertendo Cores
Adicione o parâmetro invert para inverter preto e branco:
http://homeassistant.local:10000/lovelace/0?viewport=800x480&eink=2&invert
Capturando Páginas Diferentes
Você pode capturar qualquer página do Home Assistant alterando o caminho da URL:
http://homeassistant.local:10000/todo?viewport=800x480&eink=2&invert
Teste sua URL de screenshot digitando-a em um navegador web. Você deverá ver o screenshot da página do Home Assistant selecionada.

Configuração ESPHome
Etapa 11. Adicione o código a seguir à sua configuração ESPHome após a seção captive_portal:
- Para E1001
- Para E1002
……
psram:
  mode: octal
  speed: 80MHz

……

captive_portal:

spi:
  clk_pin: GPIO7
  mosi_pin: GPIO9

http_request:
  verify_ssl: false
  timeout: 20s
  watchdog_timeout: 25s

online_image:
  - id: dashboard_image
    format: PNG
    type: GRAYSCALE
    buffer_size: 65536
    url: http://homeassistant.local:10000/lovelace/0?viewport=800x480&eink=2&invert
    update_interval: 1min
    on_download_finished:
      - component.update: epaper_display

display:
  - platform: waveshare_epaper
    id: epaper_display
    model: 7.50inv2 # You can use 7.50inv2alt when you draw complex info and it display not good.
    cs_pin: GPIO10
    dc_pin: GPIO11
    reset_pin:
      number: GPIO12
      inverted: false
    busy_pin:
      number: GPIO13
      inverted: true
    update_interval: 300s
    lambda: |-
      it.image(0, 0, id(dashboard_image));
……
psram:
  mode: octal
  speed: 80MHz

……

captive_portal:

spi:
  clk_pin: GPIO7
  mosi_pin: GPIO9

http_request:
  verify_ssl: false
  timeout: 20s
  watchdog_timeout: 25s

online_image:
  - id: dashboard_image
    format: PNG
    type: RGB565
    buffer_size: 65536
    url: http://192.168.1.12:10000/lovelace/0?viewport=800x480
    update_interval: 1min
    on_download_finished:
      - component.update: epaper_display

display:
  - platform: epaper_spi
    id: epaper_display
    model: Seeed-reTerminal-E1002
    update_interval: never
    lambda: |-
      it.image(0, 0, id(dashboard_image));
Substitua homeassistant.local pelo endereço IP real do seu Home Assistant se a resolução de DNS local não funcionar na sua rede.
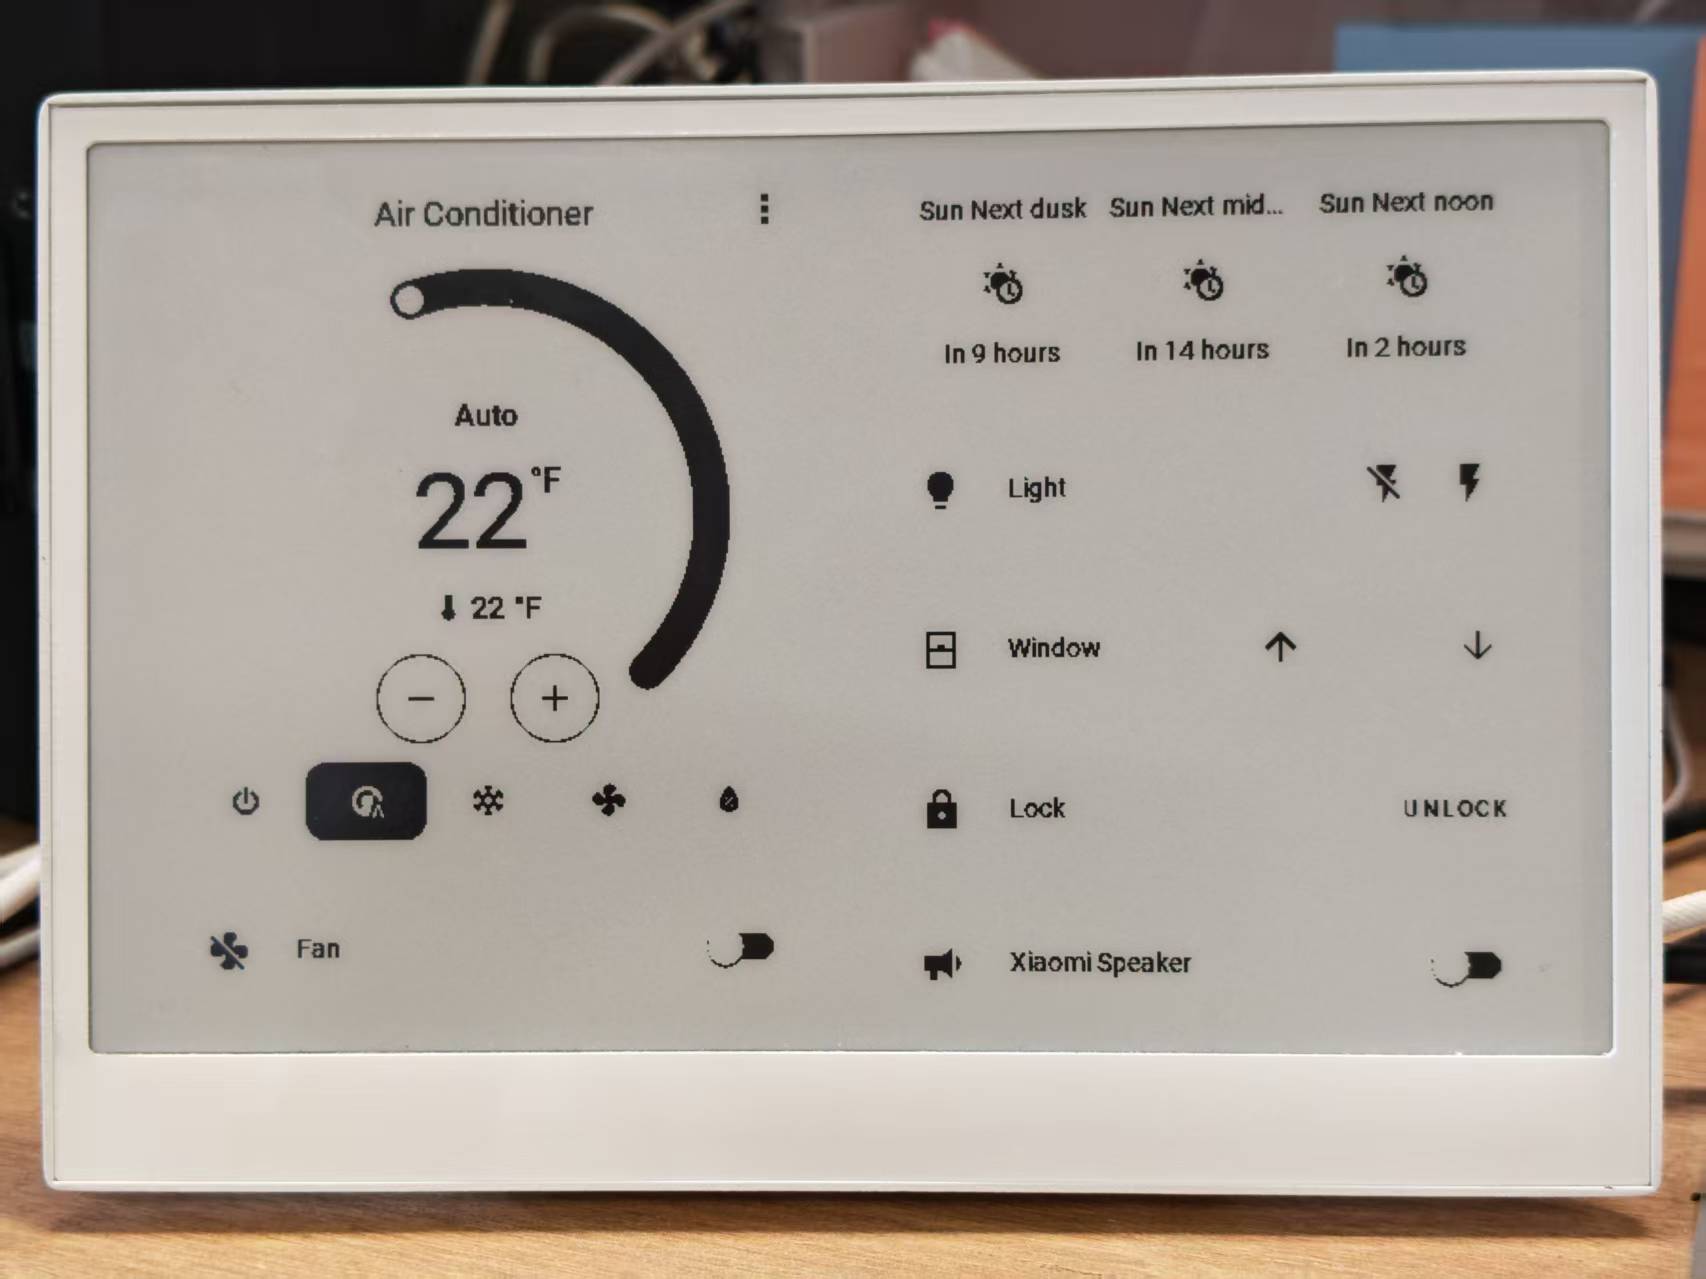
Quando sua configuração for enviada com sucesso e estiver em execução, o seu reTerminal E Series ePaper Display exibirá um screenshot do seu dashboard do Home Assistant:
- Para E1001
- Para E1002

Demo 3: Modo Deep Sleep
Se você começar a usar o programa de Deep Sleep, recomendamos que o utilize preferencialmente com o botão branco do lado direito e defina o botão branco do lado direito como o botão de Despertar do modo Sleep. Dessa forma, quando você quiser atualizar o programa, não encontrará a situação incômoda em que o dispositivo está dormindo e você não consegue enviar o programa pela porta serial.
Este exemplo demonstra como usar o modo deep sleep para reduzir significativamente o consumo de energia, tornando o seu reTerminal E Series ePaper Display adequado para aplicações alimentadas por bateria.
Você pode usar este exemplo copiando o código abaixo e colando-o após a linha de código captive_portal no seu arquivo Yaml.
- Para E1001
- Para E1002
globals:
  - id: sleep_counter
    type: int
    restore_value: yes  # Use RTC storage to maintain counter during sleep
    initial_value: '0'

# Deep sleep configuration
deep_sleep:
  id: deep_sleep_1
  run_duration: 30s  # Device remains awake for 30 seconds
  sleep_duration: 5min  # Then sleeps for 5 minutes
  # Optional: Use a button to wake from sleep
  wakeup_pin: GPIO4
  wakeup_pin_mode: INVERT_WAKEUP

interval:
  - interval: 29s  # Schedule sleep just before run_duration ends
    then:
      - logger.log: "Entering deep sleep now..."

font:
  - file: "gfonts://Inter@700"
    id: font1
    size: 24

spi:
  clk_pin: GPIO7
  mosi_pin: GPIO9

display:
  - platform: waveshare_epaper
    id: epaper_display
    model: 7.50inv2
    cs_pin: GPIO10
    dc_pin: GPIO11
    reset_pin:
      number: GPIO12
      inverted: false
    busy_pin:
      number: GPIO13
      inverted: true
    update_interval: 5min
    lambda: |-
      id(sleep_counter) += 1;
      ESP_LOGD("main", "Wakeup count: %d", id(sleep_counter));
      it.printf(100, 100, id(font1), "Wakeup count: %d", id(sleep_counter));
globals:
  - id: sleep_counter
    type: int
    restore_value: yes  # Use RTC storage to maintain counter during sleep
    initial_value: '0'

# Deep sleep configuration
deep_sleep:
  id: deep_sleep_1
  run_duration: 30s  # Device remains awake for 30 seconds
  sleep_duration: 5min  # Then sleeps for 5 minutes
  # Optional: Use a button to wake from sleep
  wakeup_pin: GPIO4
  wakeup_pin_mode: INVERT_WAKEUP

interval:
  - interval: 29s  # Schedule sleep just before run_duration ends
    then:
      - logger.log: "Entering deep sleep now..."

font:
  - file: "gfonts://Inter@700"
    id: font1
    size: 24

spi:
  clk_pin: GPIO7
  mosi_pin: GPIO9

display:
  - platform: epaper_spi
    id: epaper_display
    model: Seeed-reTerminal-E1002
    update_interval: 5min
    lambda: |-
      const auto BLACK   = Color(0,   0,   0,   0);
      id(sleep_counter) += 1;
      ESP_LOGD("main", "Wakeup count: %d", id(sleep_counter));
      it.printf(100, 100, id(font1), BLACK, "Wakeup count: %d", id(sleep_counter));
Esta configuração:
- Cria um contador que persiste entre os ciclos de sono
- Configura o dispositivo para acordar por 30 segundos e depois dormir por 3 minutos
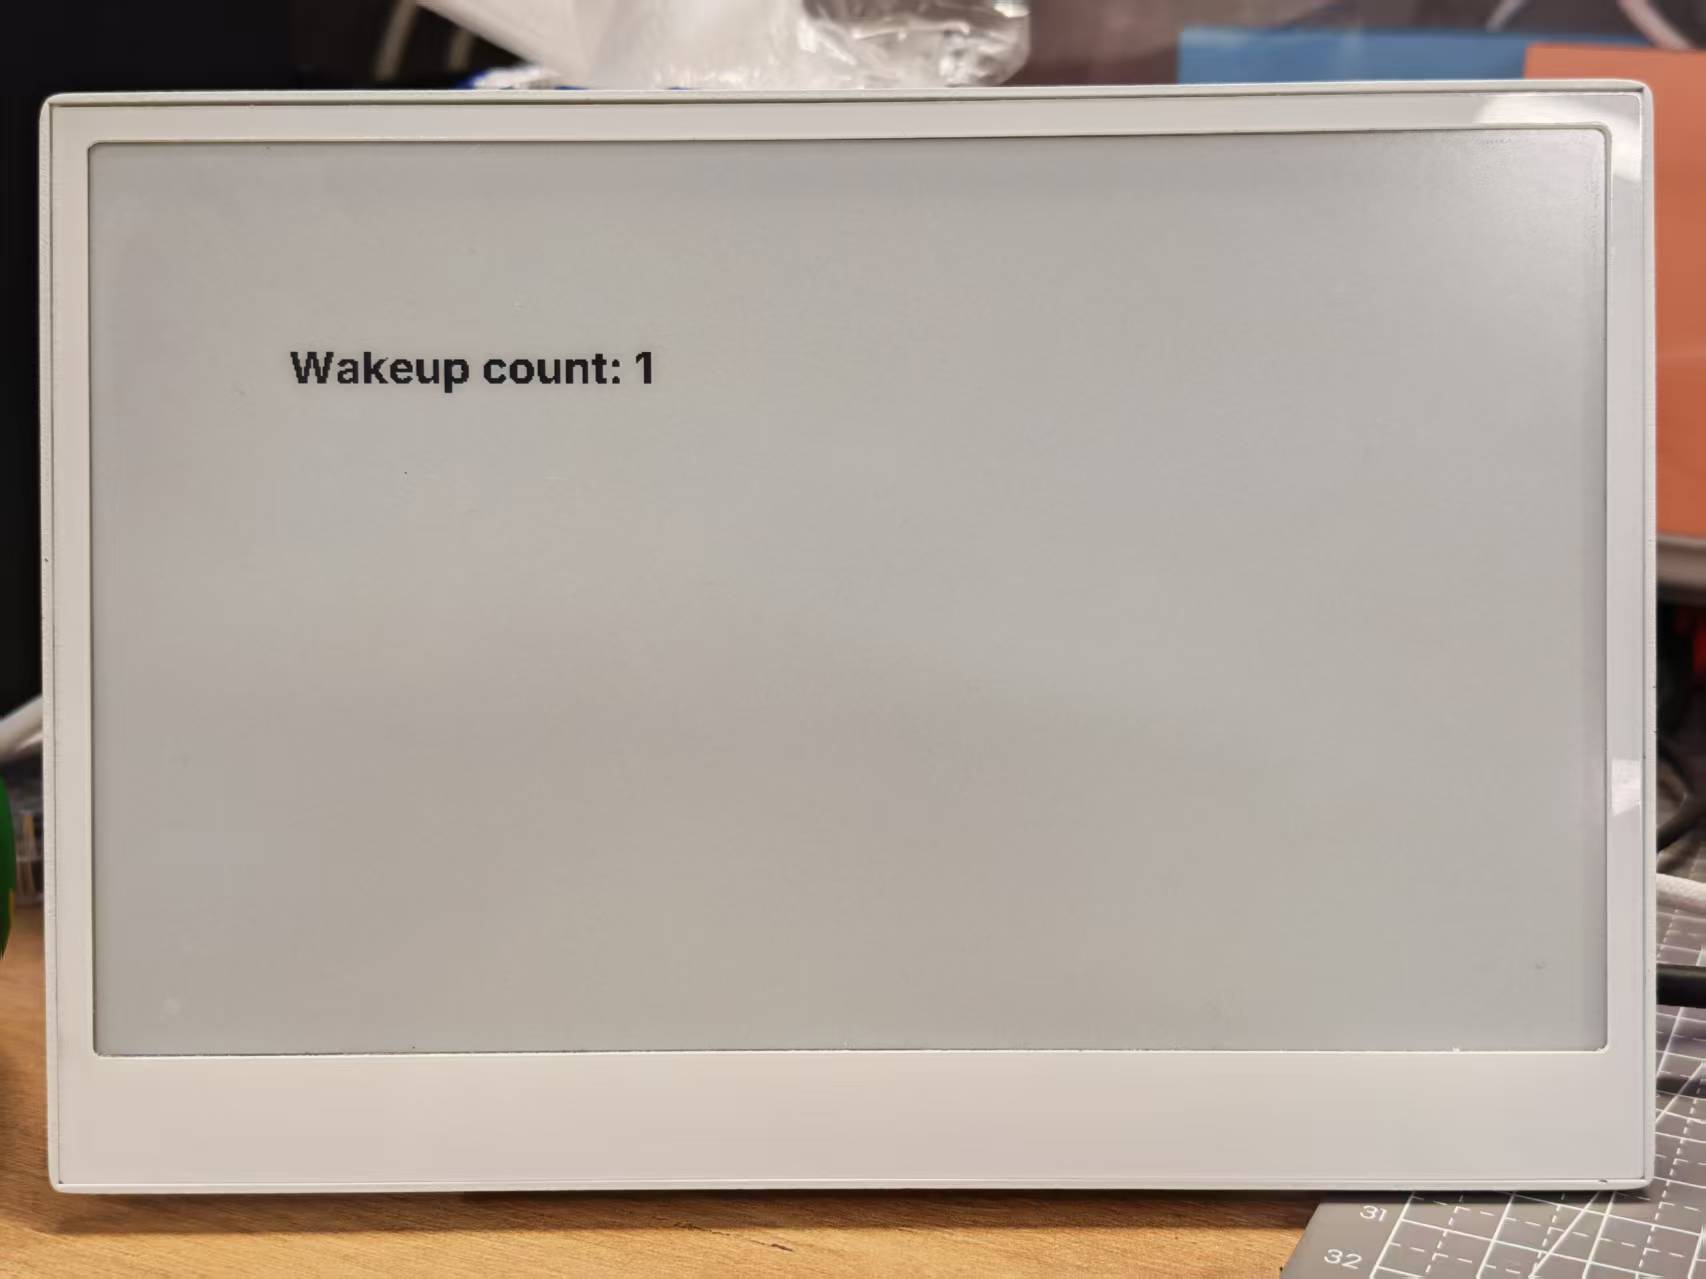
- Atualiza o display com a contagem atual de despertares
- Opcionalmente configura um botão para acordar o dispositivo
Quando estiver em execução, você verá um contador incrementar cada vez que o dispositivo acordar do modo de sono:
Demo 4: Exemplo Abrangente
Para uma melhor compreensão, recomendamos fortemente que você execute primeiro os exemplos básicos acima antes de tentar este exemplo abrangente.
Este exemplo avançado combina múltiplos recursos em uma solução completa de dashboard para o reTerminal E Series. Ele demonstra:
- Exibição de clima e condições ambientais internas
- Monitoramento de bateria com ícones
- Exibição de hora e data
- Troca de páginas usando botões
- Monitoramento de bateria
Clique aqui para ver o código completo
- Para E1001
- Para E1002
esphome:
  name: reterminal_e1001
  friendly_name: reTerminal_E1001
  on_boot:
    priority: 600
    then:
      - output.turn_on: bsp_sd_enable
      - output.turn_on: bsp_battery_enable
      - delay: 200ms
      - component.update: battery_voltage
      - component.update: battery_level


esp32:
  board: esp32-s3-devkitc-1
  framework:
    type: arduino

# Enable logging
logger:

# Enable Home Assistant API
api:
  encryption:
    key: "REPLACE_WITH_YOUR_API_KEY"

ota:
  - platform: esphome
    password: "REPLACE_WITH_YOUR_OTA_PASSWORD"

wifi:
  ssid: !secret wifi_ssid
  password: !secret wifi_password

  # Enable fallback hotspot (captive portal) in case wifi connection fails
  ap:
    ssid: "reTerminal-E1001"
    password: "ChangeMe123"

captive_portal:

# Deep-sleep, wake by GPIO4
deep_sleep:
  id: deep_sleep_1
  run_duration: 1min
  sleep_duration: 60min
  wakeup_pin: GPIO4          # Right white button
  wakeup_pin_mode: INVERT_WAKEUP

# SPI / I²C
spi:
  clk_pin: GPIO7
  mosi_pin: GPIO9
i2c:
  scl: GPIO20
  sda: GPIO19

# Fonts
font:
  - file: "gfonts://Inter@700"
    id: small_font
    size: 24
  - file: "gfonts://Inter@700"
    id: mid_font
    size: 36
  - file: "gfonts://Inter@700"
    id: big_font
    size: 180
  - file: "gfonts://Inter@700"
    id: time_font
    size: 96      # for the big time display
  - file: 'fonts/materialdesignicons-webfont.ttf'
    id: font_mdi_large
    size: 70
    glyphs:
      - "\U000F050F"  # thermometer
      - "\U000F058E"  # humidity
  - file: 'fonts/materialdesignicons-webfont.ttf'
    id: font_bat_icon
    size: 24
    glyphs:
      - "\U000F007A"  # mdi-battery-10
      - "\U000F007B"  # mdi-battery-20
      - "\U000F007C"  # mdi-battery-30
      - "\U000F007D"  # mdi-battery-40
      - "\U000F007E"  # mdi-battery-50
      - "\U000F007F"  # mdi-battery-60
      - "\U000F0080"  # mdi-battery-70
      - "\U000F0081"  # mdi-battery-80
      - "\U000F0082"  # mdi-battery-90
      - "\U000F0079"  # mdi-battery

globals:
  - id: page_index
    type: int
    restore_value: true
    initial_value: '0'
  - id: battery_glyph
    type: std::string
    restore_value: no
    initial_value: "\"\\U000F0079\""   # default full battery

sensor:
  - platform: sht4x
    temperature:
      name: "Temperature"
      id: temp_sensor
    humidity:
      name: "Relative Humidity"
      id: hum_sensor
  - platform: adc
    pin: GPIO1
    name: "Battery Voltage"
    id: battery_voltage
    update_interval: 60s
    attenuation: 12db
    filters:
      - multiply: 2.0
  - platform: template
    name: "Battery Level"
    id: battery_level
    unit_of_measurement: "%"
    icon: "mdi:battery"
    device_class: battery
    state_class: measurement
    lambda: 'return id(battery_voltage).state;'
    update_interval: 60s
    on_value:
      then:
        - lambda: |-
            int pct = int(x);
            if (pct <= 10)      id(battery_glyph) = "\U000F007A";
            else if (pct <= 20) id(battery_glyph) = "\U000F007B";
            else if (pct <= 30) id(battery_glyph) = "\U000F007C";
            else if (pct <= 40) id(battery_glyph) = "\U000F007D";
            else if (pct <= 50) id(battery_glyph) = "\U000F007E";
            else if (pct <= 60) id(battery_glyph) = "\U000F007F";
            else if (pct <= 70) id(battery_glyph) = "\U000F0080";
            else if (pct <= 80) id(battery_glyph) = "\U000F0081";
            else if (pct <= 90) id(battery_glyph) = "\U000F0082";
            else                id(battery_glyph) = "\U000F0079";
    filters:
      - calibrate_linear:
          - 4.15 -> 100.0
          - 3.96 -> 90.0
          - 3.91 -> 80.0
          - 3.85 -> 70.0
          - 3.80 -> 60.0
          - 3.75 -> 50.0
          - 3.68 -> 40.0
          - 3.58 -> 30.0
          - 3.49 -> 20.0
          - 3.41 -> 10.0
          - 3.30 -> 5.0
          - 3.27 -> 0.0
      - clamp:
          min_value: 0
          max_value: 100

output:
  - platform: gpio
    pin: GPIO6
    id: bsp_led
    inverted: true
  - platform: gpio
    pin: GPIO16
    id: bsp_sd_enable
  - platform: gpio
    pin: GPIO21
    id: bsp_battery_enable

# Onboard LED
light:
  - platform: binary
    name: "Onboard LED"
    output: bsp_led
    id: onboard_led

binary_sensor:
  - platform: gpio    # Next page
    pin:
      number: GPIO3
      mode: INPUT_PULLUP
      inverted: true
    id: key1
    name: "Key1"
    on_press:
      then:
        - lambda: |-
            id(page_index) = (id(page_index) + 1) % 2;
            id(epaper_display).update();

  - platform: gpio     # Prev page
    pin:
      number: GPIO5
      mode: INPUT_PULLUP
      inverted: true
    id: key2
    name: "Key2"
    on_press:
      then:
        - lambda: |-
            id(page_index) = (id(page_index) - 1 + 2) % 2;
            id(epaper_display).update();

  # - platform: gpio
  #   pin:
  #     number: GPIO4
  #     mode: INPUT_PULLUP
  #     inverted: true
  #   id: key2
  #   name: "Key2"
  #   on_press:
  #     then:
  #       - lambda: |-
  #           id(page_index) = (id(page_index) - 1 + 3) % 3;
  #           id(epaper_display).update();

# Home Assistant time
time:
  - platform: homeassistant
    id: ha_time

# e-paper
display:
  - platform: waveshare_epaper
    id: epaper_display
    model: 7.50inv2
    cs_pin: GPIO10
    dc_pin: GPIO11
    reset_pin:
      number: GPIO12
      inverted: false
    busy_pin:
      number: GPIO13
      inverted: true
    update_interval: never
    lambda: |-
      // ----------  PAGE 0  ----------
      if (id(page_index) == 0) {
        const int scr_w = 800;
        const int scr_h = 480;

        // Battery in upper-right corner
        it.printf(670, 13, id(font_bat_icon), "%s", id(battery_glyph).c_str());
        it.printf(700, 10, id(small_font), "%.0f%%", id(battery_level).state);

        //line
        it.filled_rectangle(400, 100, 2, 280);

        // Convert °C to °F
        float temp_f = id(temp_sensor).state * 9.0 / 5.0 + 32.0;

        // ---------------------------------------------------------
        // Horizontal split: two 400 px columns
        const int col_w = scr_w / 2;

        const int icon_y   = 100;   // Icon baseline
        const int value_y  = 220;   // Number baseline
        const int unit_y   = 300;   // Unit baseline
        const int label_y  = 380;   // Text label baseline

        const int icon_size = 70;   // icon font size
        const int val_size  = 120;  // number font size
        const int unit_size = 44;   // unit font size
        const int label_size= 36;   // label font size

        // --- Left column : Temperature -----------------------------
        const int left_mid = col_w / 2 - 30;   // 200 px

        // Icon
        it.printf(left_mid, icon_y, id(font_mdi_large), TextAlign::CENTER, "\U000F050F");
        // Value
        it.printf(left_mid, value_y, id(big_font), TextAlign::CENTER, "%.0f", temp_f);
        // Unit
        it.printf(left_mid + 150, unit_y, id(mid_font), TextAlign::CENTER, "°F");
        // Label
        it.printf(left_mid, label_y, id(mid_font), TextAlign::CENTER, "Temperature");

        // --- Right column : Humidity -------------------------------
        const int right_mid = col_w + col_w / 2;   // 600 px

        // Icon
        it.printf(right_mid, icon_y, id(font_mdi_large), TextAlign::CENTER, "\U000F058E");
        // Value
        it.printf(right_mid, value_y, id(big_font), TextAlign::CENTER, "%.0f", id(hum_sensor).state);
        // Unit
        it.printf(right_mid + 150, unit_y, id(mid_font), TextAlign::CENTER, "%%");
        // Label
        it.printf(right_mid, label_y, id(mid_font), TextAlign::CENTER, "Humidity");
      }
      // ----------  PAGE 1  ----------
      else{
        // Battery top-right
        it.printf(670, 13, id(font_bat_icon), "%s", id(battery_glyph).c_str());
        it.printf(700, 10, id(small_font), "%.0f%%", id(battery_level).state);

        auto now = id(ha_time).now();
        struct tm timeinfo = now.to_c_tm();

        // centering time HH:MM
        char timeStr[6];
        strftime(timeStr, sizeof(timeStr), "%H:%M", &timeinfo);
        it.printf(400, 180, id(time_font), TextAlign::CENTER, timeStr);

        // Date: Day of week
        const char *weekday[] = {"Sun","Mon","Tue","Wed","Thu","Fri","Sat"};
        const char *wday = weekday[timeinfo.tm_wday];

        // Date: month - day
        char dateStr[12];
        strftime(dateStr, sizeof(dateStr), "%b %d", &timeinfo);  // e.g. Jun 15

        // Day of the week + date below the time
        it.printf(400, 280, id(mid_font), TextAlign::CENTER, "%s, %s", wday, dateStr);
      }
esphome:
  name: reterminal_e1002
  friendly_name: reTerminal_E1002
  on_boot:
    priority: 600
    then:
      - output.turn_on: bsp_sd_enable
      - output.turn_on: bsp_battery_enable
      - delay: 200ms
      - component.update: battery_voltage
      - component.update: battery_level


esp32:
  board: esp32-s3-devkitc-1
  framework:
    type: arduino

# Enable logging
logger:

# Enable Home Assistant API
api:
  encryption:
    key: "REPLACE_WITH_YOUR_API_KEY"

ota:
  - platform: esphome
    password: "REPLACE_WITH_YOUR_OTA_PASSWORD"

wifi:
  ssid: !secret wifi_ssid
  password: !secret wifi_password

  # Enable fallback hotspot (captive portal) in case wifi connection fails
  ap:
    ssid: "reTerminal-E1002"
    password: "ChangeMe123"

captive_portal:

# Deep-sleep, wake by GPIO4
deep_sleep:
  id: deep_sleep_1
  run_duration: 1min
  sleep_duration: 60min
  wakeup_pin: GPIO4          # Right white button
  wakeup_pin_mode: INVERT_WAKEUP

# SPI / I²C
spi:
  clk_pin: GPIO7
  mosi_pin: GPIO9
i2c:
  scl: GPIO20
  sda: GPIO19

# Fonts
font:
  - file: "gfonts://Inter@700"
    id: small_font
    size: 24
  - file: "gfonts://Inter@700"
    id: mid_font
    size: 36
  - file: "gfonts://Inter@700"
    id: big_font
    size: 180
  - file: "gfonts://Inter@700"
    id: time_font
    size: 96      # for the big time display
  - file: 'fonts/materialdesignicons-webfont.ttf'
    id: font_mdi_large
    size: 70
    glyphs:
      - "\U000F050F"  # thermometer
      - "\U000F058E"  # humidity
  - file: 'fonts/materialdesignicons-webfont.ttf'
    id: font_bat_icon
    size: 24
    glyphs:
      - "\U000F007A"  # mdi-battery-10
      - "\U000F007B"  # mdi-battery-20
      - "\U000F007C"  # mdi-battery-30
      - "\U000F007D"  # mdi-battery-40
      - "\U000F007E"  # mdi-battery-50
      - "\U000F007F"  # mdi-battery-60
      - "\U000F0080"  # mdi-battery-70
      - "\U000F0081"  # mdi-battery-80
      - "\U000F0082"  # mdi-battery-90
      - "\U000F0079"  # mdi-battery

globals:
  - id: page_index
    type: int
    restore_value: true
    initial_value: '0'
  - id: battery_glyph
    type: std::string
    restore_value: no
    initial_value: "\"\\U000F0079\""   # default full battery

sensor:
  - platform: sht4x
    temperature:
      name: "Temperature"
      id: temp_sensor
    humidity:
      name: "Relative Humidity"
      id: hum_sensor
  - platform: adc
    pin: GPIO1
    name: "Battery Voltage"
    id: battery_voltage
    update_interval: 60s
    attenuation: 12db
    filters:
      - multiply: 2.0
  - platform: template
    name: "Battery Level"
    id: battery_level
    unit_of_measurement: "%"
    icon: "mdi:battery"
    device_class: battery
    state_class: measurement
    lambda: 'return id(battery_voltage).state;'
    update_interval: 60s
    on_value:
      then:
        - lambda: |-
            int pct = int(x);
            if (pct <= 10)      id(battery_glyph) = "\U000F007A";
            else if (pct <= 20) id(battery_glyph) = "\U000F007B";
            else if (pct <= 30) id(battery_glyph) = "\U000F007C";
            else if (pct <= 40) id(battery_glyph) = "\U000F007D";
            else if (pct <= 50) id(battery_glyph) = "\U000F007E";
            else if (pct <= 60) id(battery_glyph) = "\U000F007F";
            else if (pct <= 70) id(battery_glyph) = "\U000F0080";
            else if (pct <= 80) id(battery_glyph) = "\U000F0081";
            else if (pct <= 90) id(battery_glyph) = "\U000F0082";
            else                id(battery_glyph) = "\U000F0079";
    filters:
      - calibrate_linear:
          - 4.15 -> 100.0
          - 3.96 -> 90.0
          - 3.91 -> 80.0
          - 3.85 -> 70.0
          - 3.80 -> 60.0
          - 3.75 -> 50.0
          - 3.68 -> 40.0
          - 3.58 -> 30.0
          - 3.49 -> 20.0
          - 3.41 -> 10.0
          - 3.30 -> 5.0
          - 3.27 -> 0.0
      - clamp:
          min_value: 0
          max_value: 100

output:
  - platform: gpio
    pin: GPIO6
    id: bsp_led
    inverted: true
  - platform: gpio
    pin: GPIO16
    id: bsp_sd_enable
  - platform: gpio
    pin: GPIO21
    id: bsp_battery_enable

# Onboard LED
light:
  - platform: binary
    name: "Onboard LED"
    output: bsp_led
    id: onboard_led

binary_sensor:
  - platform: gpio    # Next page
    pin:
      number: GPIO3
      mode: INPUT_PULLUP
      inverted: true
    id: key1
    name: "Key1"
    on_press:
      then:
        - lambda: |-
            id(page_index) = (id(page_index) + 1) % 2;
            id(epaper_display).update();

  - platform: gpio     # Prev page
    pin:
      number: GPIO5
      mode: INPUT_PULLUP
      inverted: true
    id: key2
    name: "Key2"
    on_press:
      then:
        - lambda: |-
            id(page_index) = (id(page_index) - 1 + 2) % 2;
            id(epaper_display).update();

  # - platform: gpio
  #   pin:
  #     number: GPIO4
  #     mode: INPUT_PULLUP
  #     inverted: true
  #   id: key2
  #   name: "Key2"
  #   on_press:
  #     then:
  #       - lambda: |-
  #           id(page_index) = (id(page_index) - 1 + 3) % 3;
  #           id(epaper_display).update();

# Home Assistant time
time:
  - platform: homeassistant
    id: ha_time

# e-paper
display:
  - platform: epaper_spi
    id: epaper_display
    model: Seeed-reTerminal-E1002
    update_interval: never
    lambda: |-
      const auto BLACK   = Color(0,   0,   0,   0);
      const auto RED     = Color(255, 0,   0,   0);
      const auto GREEN   = Color(0,   255, 0,   0);
      const auto BLUE    = Color(0,   0,   255, 0);
      const auto YELLOW  = Color(255, 255, 0,   0);

      // ----------  PAGE 0  ----------
      if (id(page_index) == 0) {
        const int scr_w = 800;
        const int scr_h = 480;

        // Battery in upper-right corner
        it.printf(670, 13, id(font_bat_icon), GREEN, "%s", id(battery_glyph).c_str());
        it.printf(700, 10, id(small_font), GREEN, "%.0f%%", id(battery_level).state);

        //line
        it.filled_rectangle(400, 100, 2, 280, BLACK);

        // Convert °C to °F
        float temp_f = id(temp_sensor).state * 9.0 / 5.0 + 32.0;

        // ---------------------------------------------------------
        // Horizontal split: two 400 px columns
        const int col_w = scr_w / 2;

        const int icon_y   = 100;   // Icon baseline
        const int value_y  = 220;   // Number baseline
        const int unit_y   = 300;   // Unit baseline
        const int label_y  = 380;   // Text label baseline

        const int icon_size = 70;   // icon font size
        const int val_size  = 120;  // number font size
        const int unit_size = 44;   // unit font size
        const int label_size= 36;   // label font size

        // --- Left column : Temperature -----------------------------
        const int left_mid = col_w / 2 - 30;   // 200 px

        // Icon
        it.printf(left_mid, icon_y, id(font_mdi_large), BLUE, TextAlign::CENTER, "\U000F050F");
        // Value
        it.printf(left_mid, value_y, id(big_font), BLUE, TextAlign::CENTER, "%.0f", temp_f);
        // Unit
        it.printf(left_mid + 150, unit_y, id(mid_font), RED, TextAlign::CENTER, "°F");
        // Label
        it.printf(left_mid, label_y, id(mid_font), RED, TextAlign::CENTER, "Temperature");

        // --- Right column : Humidity -------------------------------
        const int right_mid = col_w + col_w / 2;   // 600 px

        // Icon
        it.printf(right_mid, icon_y, id(font_mdi_large), YELLOW, TextAlign::CENTER, "\U000F058E");
        // Value
        it.printf(right_mid, value_y, id(big_font), YELLOW, TextAlign::CENTER, "%.0f", id(hum_sensor).state);
        // Unit
        it.printf(right_mid + 150, unit_y, id(mid_font), GREEN, TextAlign::CENTER, "%%");
        // Label
        it.printf(right_mid, label_y, id(mid_font), GREEN, TextAlign::CENTER, "Humidity");
      }
      // ----------  PAGE 1  ----------
      else{
        // Battery top-right
        it.printf(670, 13, id(font_bat_icon), BLUE, "%s", id(battery_glyph).c_str());
        it.printf(700, 10, id(small_font), BLUE, "%.0f%%", id(battery_level).state);

        auto now = id(ha_time).now();
        struct tm timeinfo = now.to_c_tm();

        // centering time HH:MM
        char timeStr[6];
        strftime(timeStr, sizeof(timeStr), "%H:%M", &timeinfo);
        it.printf(400, 180, id(time_font), BLUE, TextAlign::CENTER, timeStr);

        // Date: Day of week
        const char *weekday[] = {"Sun","Mon","Tue","Wed","Thu","Fri","Sat"};
        const char *wday = weekday[timeinfo.tm_wday];

        // Date: month - day
        char dateStr[12];
        strftime(dateStr, sizeof(dateStr), "%b %d", &timeinfo);  // e.g. Jun 15

        // Day of the week + date below the time
        it.printf(400, 280, id(mid_font), YELLOW, TextAlign::CENTER, "%s, %s", wday, dateStr);
      }
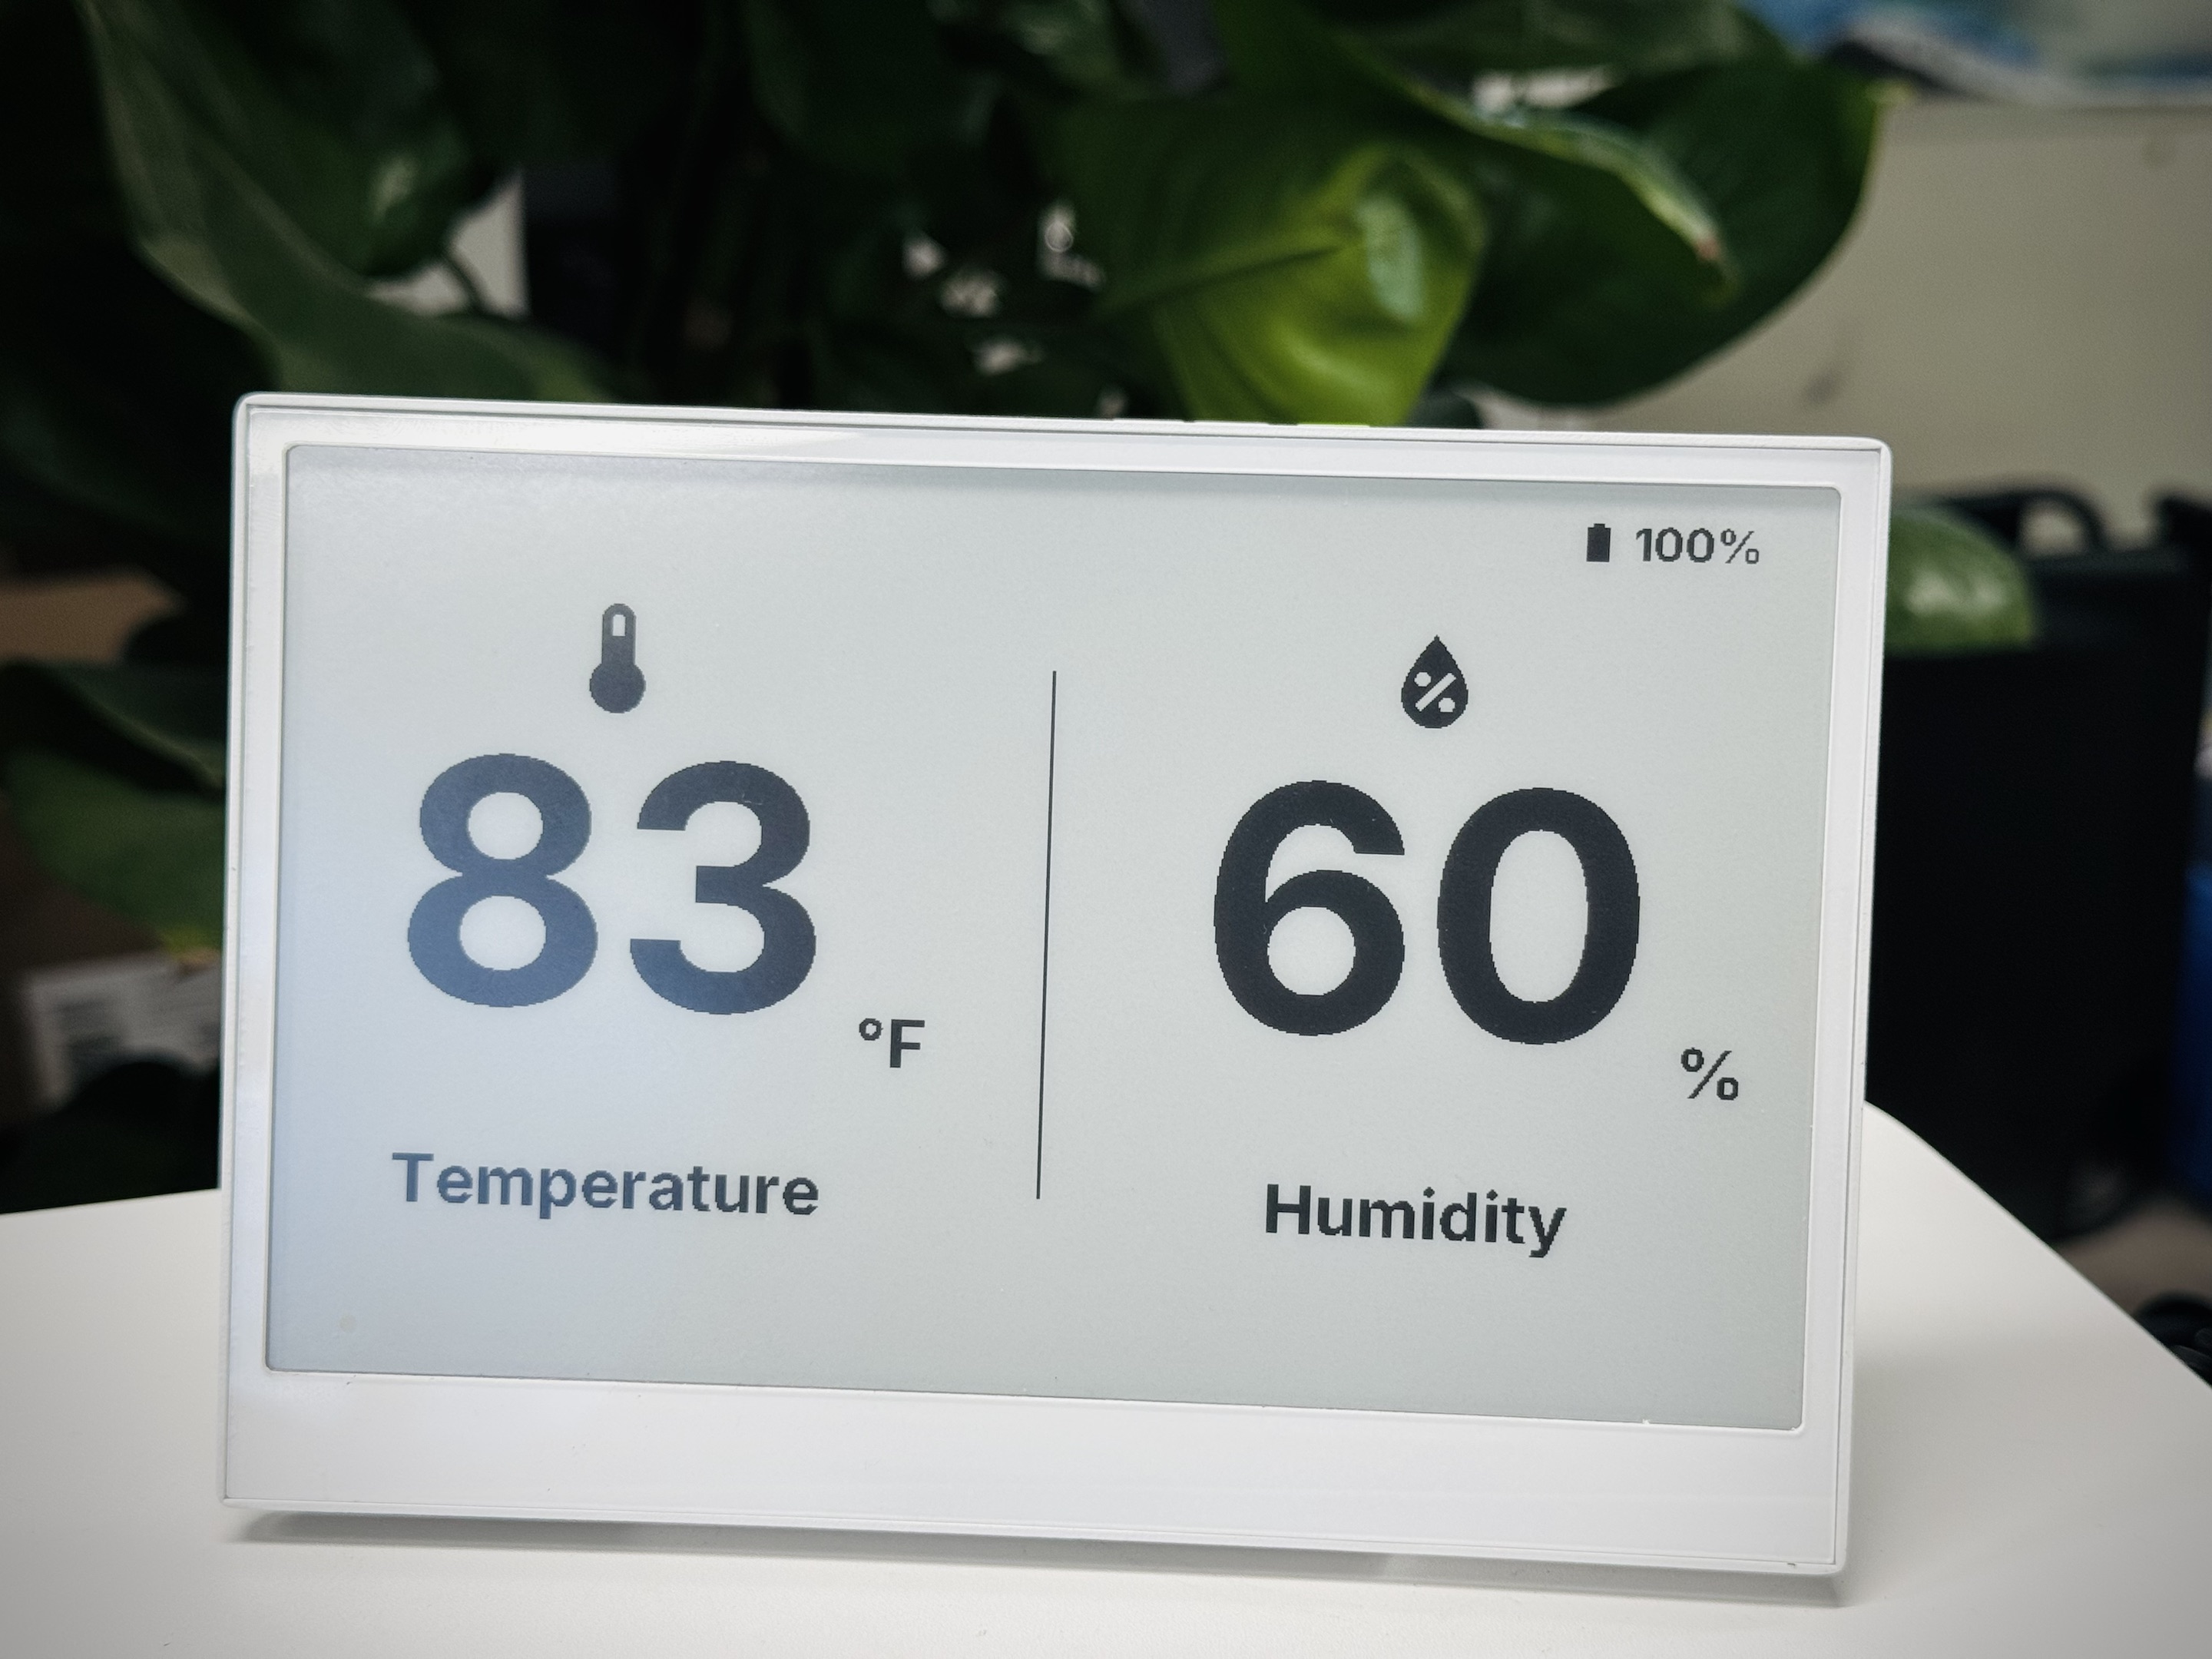
Quando sua configuração for carregada e estiver em execução com sucesso, o display ePaper do reTerminal E Series exibirá um painel abrangente com dados de ambiente, hora e status da bateria:
Entendendo o exemplo abrangente
Este exemplo implementa:
- Múltiplas páginas: O display alterna entre duas páginas - um painel climático e uma tela de hora/data
- Navegação por botões: Botões nos GPIO3 e GPIO5 são usados para navegar entre as páginas
- Monitoramento da bateria: O nível da bateria é mostrado com ícones apropriados que mudam com base no nível de carga
- Inicialização de hardware: O cartão SD e os circuitos de monitoramento da bateria são habilitados na inicialização
- Exibição de temperatura e umidade: Usando o sensor SHT4x integrado via I²C
- Ícones dinâmicos: Ícones Material Design mudam com base nos valores dos sensores
FAQ
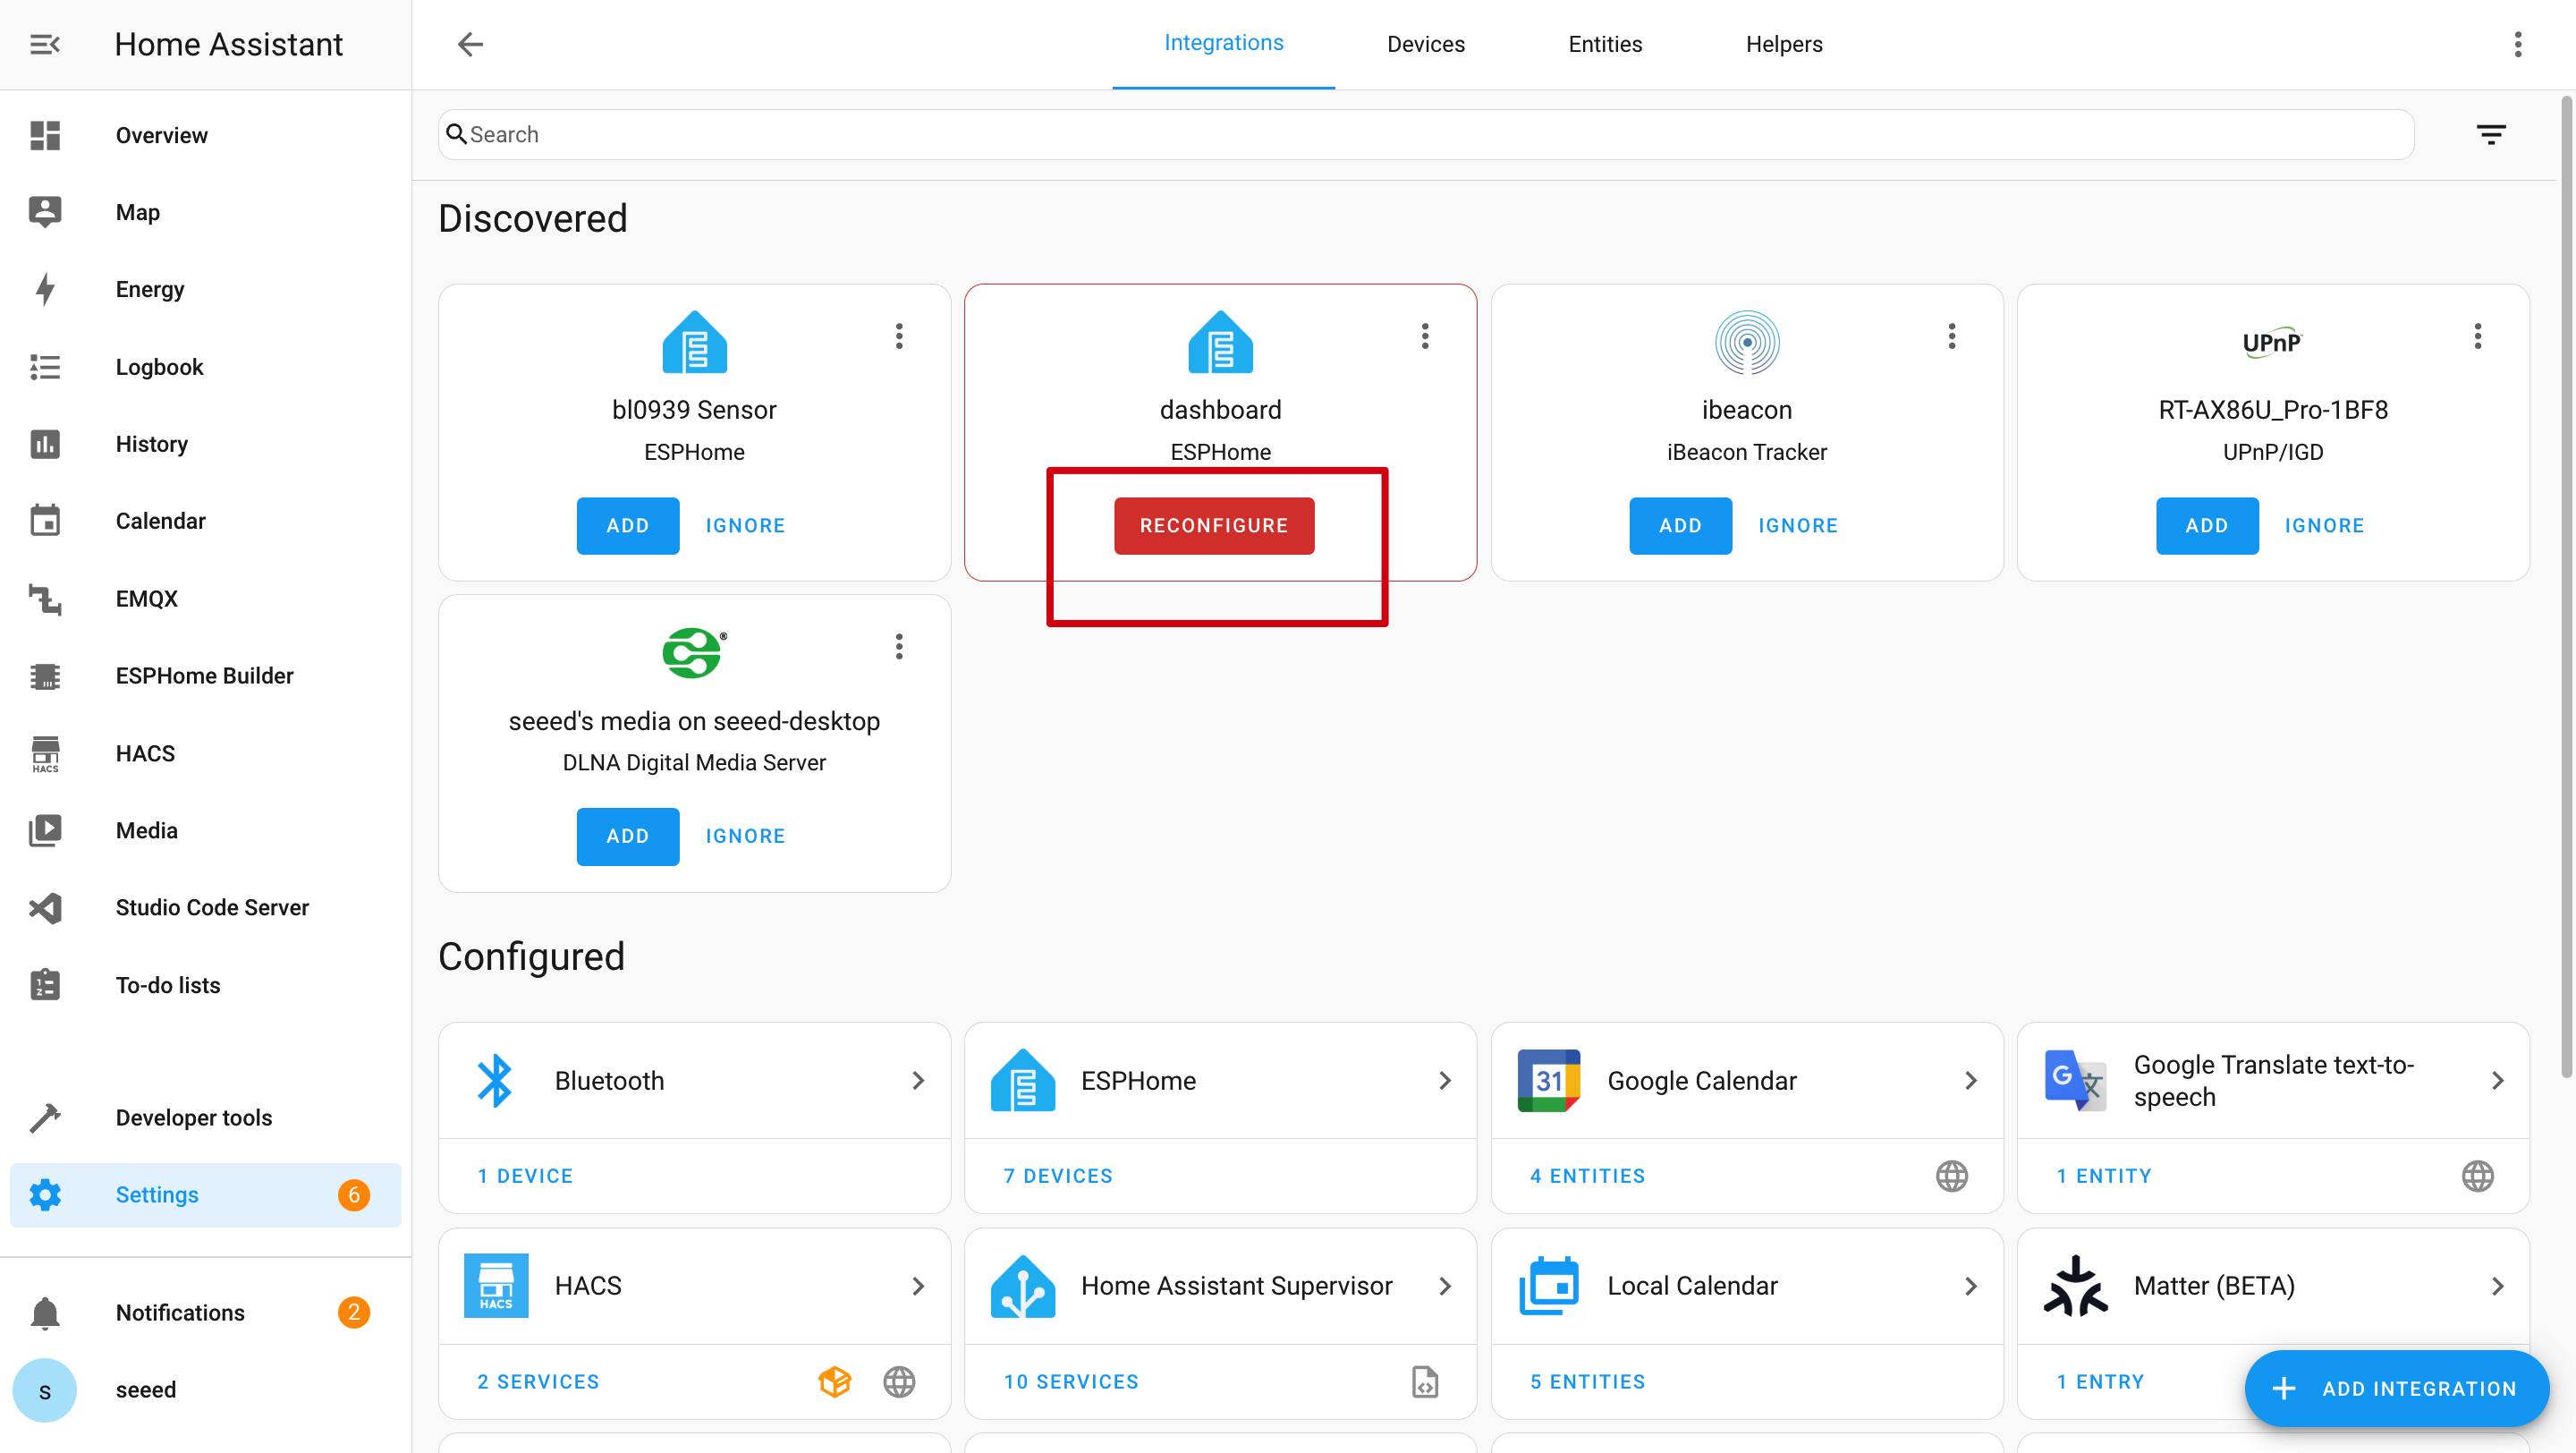
P1: Por que não há dados?
Nesse caso, você deve ir para Settings -> Devices & Services -> Integrations para RECONGFIGURE o dispositivo. Não encontrou seu painel ePaper? Tente reiniciar o Home Assistant.
P2: Por que não consigo obter esses dados no Home Assistant?
Nesse caso, você deve ir em Settings -> Devices & Services -> Integrations para ADICIONAR seu dispositivo ao Home Assistant.

P3: Falha ao enviar o programa via Wi‑Fi?

Nesse caso, seu dispositivo está offline ou em modo de sono profundo. Certifique-se de que ele esteja conectado à sua rede ou acorde-o do modo de sono antes de tentar enviar o programa.
P4: Por que não há log serial via USB?
A reTerminal E Series usa uma ponte USB‑para‑UART CH340K na UART0. Mantenha esta configuração de logger no seu YAML:
logger:
  hardware_uart: UART0
Suporte Técnico e Discussão de Produtos
Obrigado por escolher nossos produtos! Estamos aqui para oferecer diferentes tipos de suporte para garantir que sua experiência com nossos produtos seja a mais tranquila possível. Oferecemos vários canais de comunicação para atender a diferentes preferências e necessidades.