Conecte o Seeed Studio IoT Button ao Home Assistant via Zigbee
Neste tutorial, mostraremos como conectar o Seeed Studio IoT Button ao Home Assistant usando Zigbee. O Seeed Studio IoT Button possui um chip ESP32-C6 integrado com funcionalidade Zigbee, tornando-o um dispositivo versátil para sua casa inteligente. Você aprenderá como gravar o firmware Zigbee, pareá-lo com o Home Assistant e até personalizar o comportamento do botão através de desenvolvimento em Arduino.
Materiais Necessários
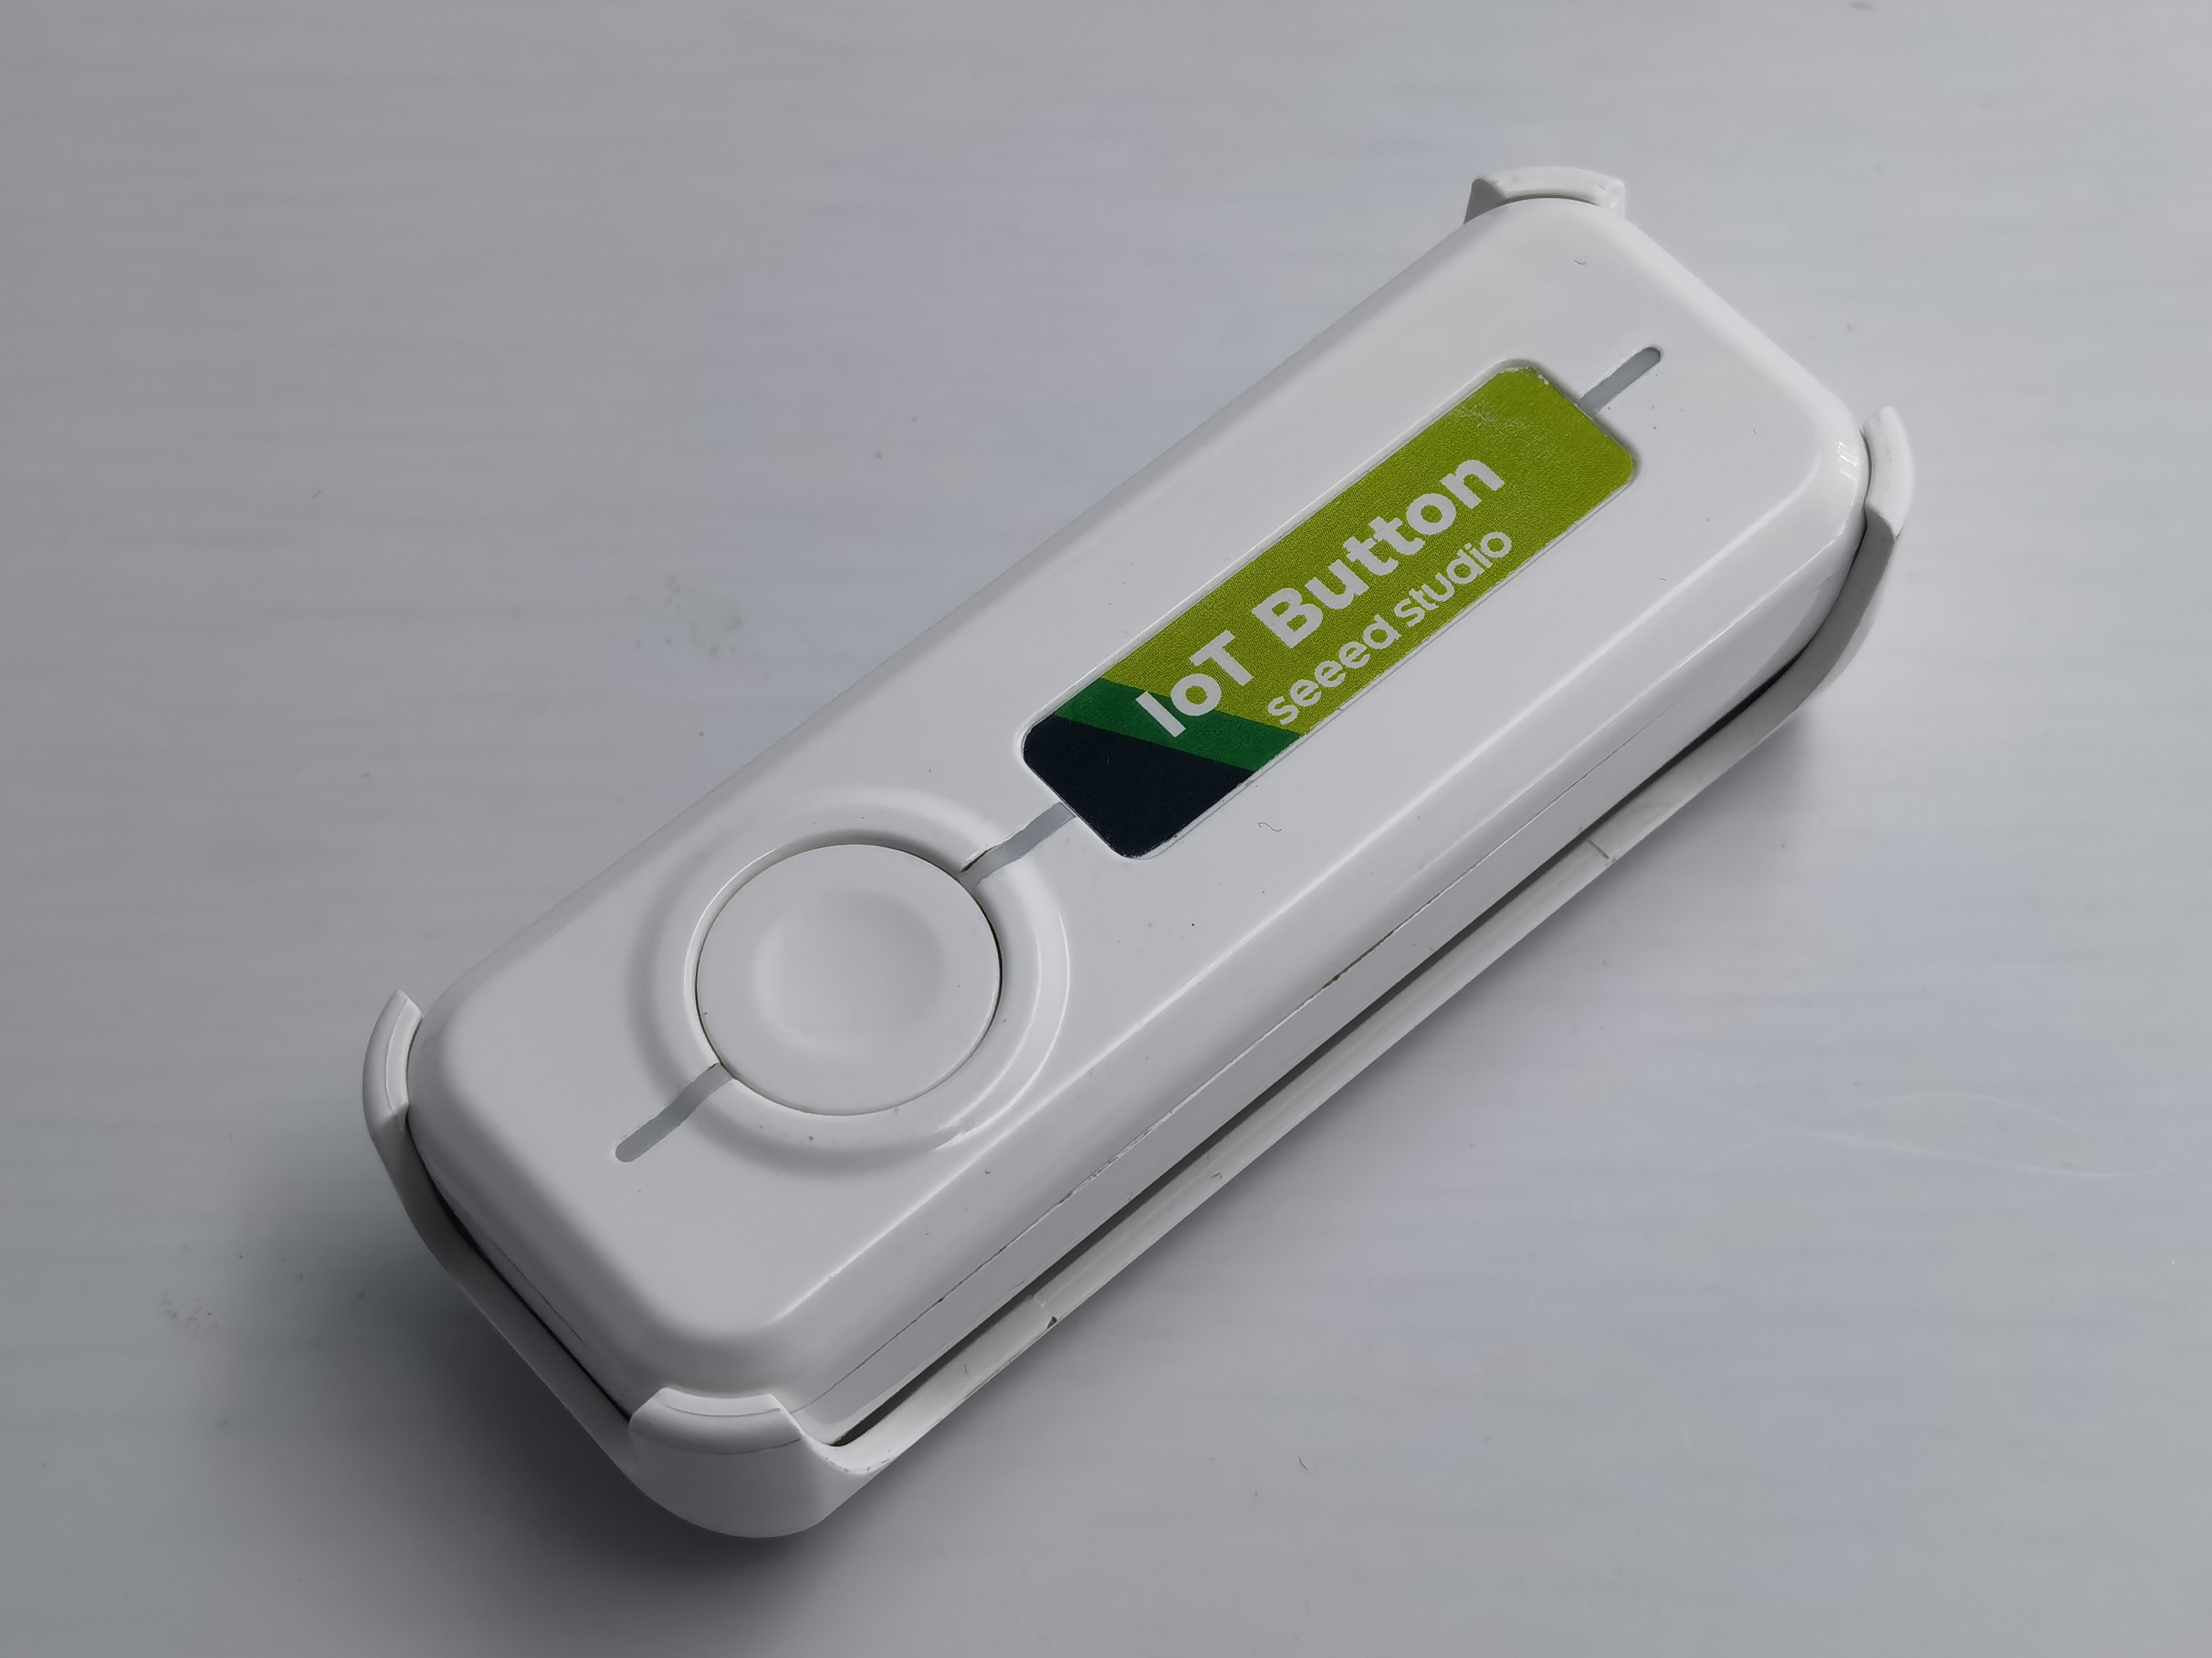
| Seeed Studio IoT Button | Coordenador Zigbee (por exemplo, Home Assistant Connect ZBT-1) |
|---|---|
|  |
O Seeed Studio IoT Button é um botão inteligente versátil com um chip ESP32-C6 integrado. É um dispositivo completo e independente que pode ser integrado ao Home Assistant via Zigbee para controlar vários dispositivos e acionar automações. Com seu chip ESP32-C6, oferece baixo consumo de energia e conectividade confiável.
Visão Geral de Funcionalidades (com base no firmware mais recente)
-
Detecção de múltiplas ações do botão
- Clique simples, duplo e triplo.
- Pressionamento longo curto (manter pressionado por 1–5 segundos).
- Pressionamento longo (manter pressionado por > 5 segundos) aciona um reset de fábrica Zigbee.
- Eventos de pressionar e soltar imediatos são reportados para automações em tempo real.
-
Quatro Endpoints Zigbee
- Endpoint 10: Um sensor binário principal que reflete o estado em tempo real do botão físico (ligado para pressionado, desligado para liberado).
- Endpoint 11: Uma chave virtual alternada por clique simples.
- Endpoint 12: Uma chave virtual alternada por clique duplo.
- Endpoint 13: Uma chave virtual alternada por pressionamento longo curto.
-
Monitoramento de Bateria (apenas IoT Button V2)
- Lê a tensão da bateria via ADC e aplica um filtro de Média Móvel Exponencial (EMA) para leituras suaves e estáveis.
- Reporta tanto a tensão (em unidades de 0,01 V) quanto a porcentagem de bateria para o Zigbee.
- Um status de bateria fraca (< 20%) acende o LED indicador vermelho.
-
Feedback de LED
- Um LED RGB WS2812 fornece feedback visual (efeitos de respiração, piscar, arco-íris) para ações de clique.
- Um LED azul de status indica o estado da conexão Zigbee.
- Um LED vermelho de status (apenas V2) indica condição de bateria fraca.
-
Gerenciamento de Energia
- Entra automaticamente em modo de suspensão após 2 minutos de inatividade para economizar energia.
- Utiliza light-sleep para a V1 e deep-sleep com retenção de estado do RTC para a V2, garantindo que os estados de clique do botão não sejam perdidos.
- Desperta instantaneamente da suspensão ao pressionar o botão.
Desenvolvendo Firmware Zigbee Personalizado com Arduino
Se você quiser personalizar o comportamento do seu IoT Button, pode desenvolver seu próprio firmware Zigbee usando Arduino.
Passo 1: Configurar a IDE Arduino para ESP32-C6
- Instale a versão mais recente da IDE Arduino.
- Adicione o suporte à placa ESP32:
- Vá em File > Preferences.
- Adicione
https://raw.githubusercontent.com/espressif/arduino-esp32/gh-pages/package_esp32_index.jsonao campo "Additional Boards Manager URLs". - Vá em Tools > Board > Boards Manager.
- Procure por "esp32" e instale a versão mais recente (certifique-se de que seja a versão 3.2.1 ou superior).
Passo 2: Instalar as Bibliotecas Necessárias
O firmware do IoT Button usa a biblioteca FastLED para efeitos RGB e o Espressif Zigbee SDK, que está incluído no pacote ESP32 Arduino. A biblioteca FastLED pode ser instalada via o Gerenciador de Bibliotecas da Arduino.
-
Vá em Sketch > Include Library > Manage Libraries....
-
Procure por "FastLED" e instale a biblioteca de Daniel Garcia.
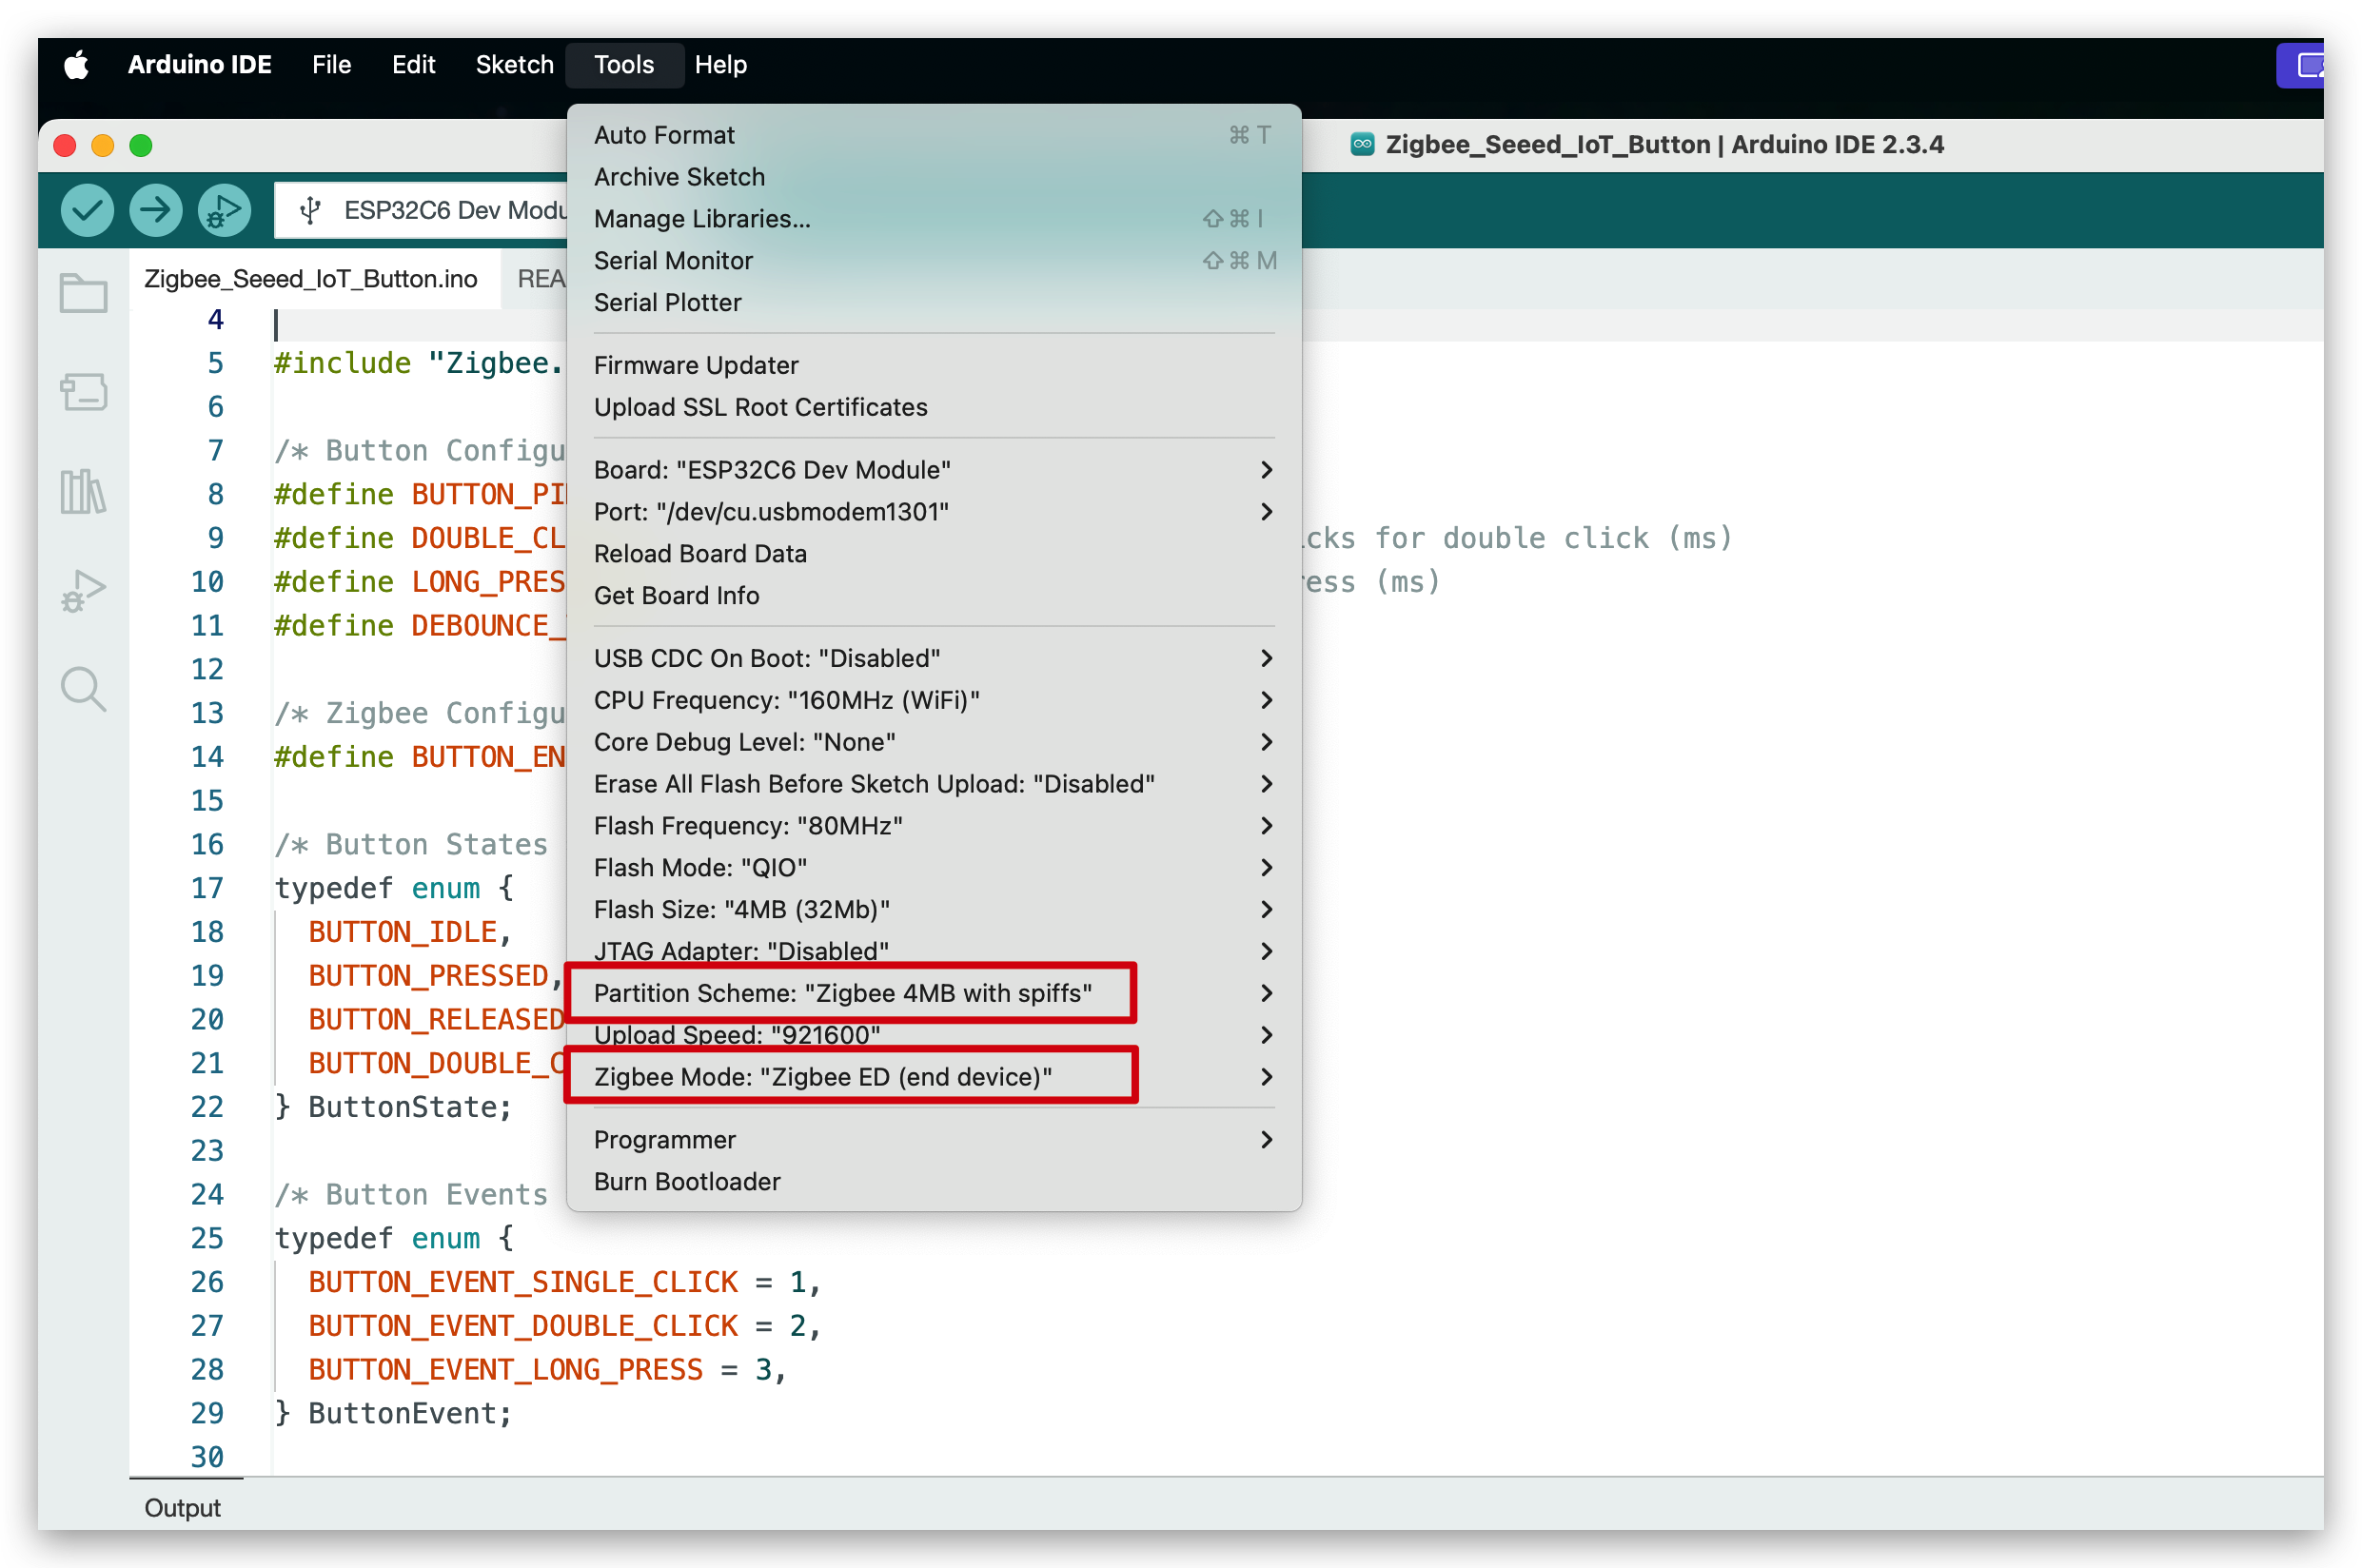
Passo 3: Configurar a IDE Arduino para Desenvolvimento Zigbee
-
Selecione a placa correta:
- Tools > Board > ESP32 Arduino > XIAO ESP32C6
-
Configure as configurações Zigbee:
- Tools > Zigbee Mode > Zigbee End Device
- Tools > Partition Scheme > Zigbee 4MB with spiffs
Passo 4: Crie Seu Firmware Personalizado
O novo firmware é um sketch Arduino independente. Ele oferece suporte tanto ao hardware do IoT Button V1 quanto ao V2, detecção avançada de eventos do botão (clique simples, duplo, triplo, pressão curta/longa), monitoramento de bateria (V2), feedback rico de LED e integração Zigbee robusta usando tarefas FreeRTOS.
Seleção da Versão de Hardware
O código é compilado para IoT Button V2 por padrão. Para compilar para V1, você deve descomentar a linha correspondente no topo do código:
Por favor, verifique a versão correta do dispositivo. Todos os IoT Buttons atualmente disponíveis no mercado são V1.
Clique aqui para pré-visualizar o código completo
#ifndef ZIGBEE_MODE_ED
#error "Zigbee end device mode is not selected in Tools->Zigbee mode"
#endif

#include "Zigbee.h"
#include <FastLED.h>
#include <freertos/FreeRTOS.h>
#include <freertos/task.h>
#include <freertos/queue.h>
#include <esp_sleep.h>
#include "driver/rtc_io.h"

// Logging macro switch
#define ENABLE_LOGGING // Comment out to disable logging

#ifdef ENABLE_LOGGING
#define LOG_PRINTLN(x) Serial.println(x)
#define LOG_PRINTF(x, ...) Serial.printf(x, __VA_ARGS__)
#else
#define LOG_PRINTLN(x)
#define LOG_PRINTF(x, ...)
#endif

#define IOT_BUTTON_V1  //Uncomment this line to select to compile the iot button v1 version
// #define IOT_BUTTON_V2  //Uncomment this line to select to compile the iot button v2 version

#if !defined(IOT_BUTTON_V1) && !defined(IOT_BUTTON_V2)
#define IOT_BUTTON_V2
#endif

#define BUTTON_PIN_BITMASK(GPIO) (1ULL << GPIO)

/* Hardware Configuration */
#if defined(IOT_BUTTON_V1)
const uint8_t BUTTON_PIN = 9;
const uint8_t BLUE_LED_PIN = 2;
const uint8_t RGB_ENABLE_PIN = 18;
const uint8_t RGB_PIN = 19;
const uint8_t NUM_RGBS = 1;
#elif defined(IOT_BUTTON_V2)
const uint8_t BUTTON_PIN = 2;
const uint8_t BLUE_LED_PIN = 3;
const uint8_t RED_LED_PIN = 14;
const uint8_t RGB_ENABLE_PIN = 18;
const uint8_t RGB_PIN = 19;
const uint8_t NUM_RGBS = 1;
const uint8_t BATTERY_ADC_PIN = 1;
const uint8_t BATTERY_ENABLE_PIN = 0;
const int SAMPLE_COUNT = 10;
const float MIN_VOLTAGE = 2.75;
const float MAX_VOLTAGE = 4.2;
const float ALPHA = 0.1; // Smoothing factor for EMA
#endif

/* Button Configuration */
const uint32_t MULTI_CLICK_TIME = 300;             // Maximum time between clicks for multi-click (ms)
const uint32_t SHORT_LONG_PRESS_TIME = 1000;       // Minimum time for short long press (1 second)
const uint32_t LONG_PRESS_TIME = 5000;             // Minimum time for long press (5 seconds)
const uint32_t DEBOUNCE_TIME = 20;                 // Debounce time (ms)
const uint32_t INACTIVITY_TIMEOUT = 2 * 60 * 1000; // 2 minutes inactivity timeout (ms)

/* LED Configuration */
CRGB rgbs[NUM_RGBS];

/* Button Events */
enum class ButtonEvent
{
  PRESS,            // Pressed
  RELEASE,          // Released
  SINGLE_CLICK,     // Single click
  DOUBLE_CLICK,     // Double click
  TRIPLE_CLICK,     // Triple click
  SHORT_LONG_PRESS, // Short long press (1-5 seconds)
  LONG_PRESS        // Long press (>5 seconds)
};

/* Zigbee Configuration */
#define BUTTON_ENDPOINT 10
#define SWITCH1_ENDPOINT 11
#define SWITCH2_ENDPOINT 12
#define SWITCH3_ENDPOINT 13
ZigbeeBinary zbIoTButton = ZigbeeBinary(BUTTON_ENDPOINT);
ZigbeeBinary zbSwitch1 = ZigbeeBinary(SWITCH1_ENDPOINT);
ZigbeeBinary zbSwitch2 = ZigbeeBinary(SWITCH2_ENDPOINT);
ZigbeeBinary zbSwitch3 = ZigbeeBinary(SWITCH3_ENDPOINT);
bool buttonStatus = false;
RTC_DATA_ATTR bool switch1Status = false;
RTC_DATA_ATTR bool switch2Status = false;
RTC_DATA_ATTR bool switch3Status = false;

/* Global Variables */
QueueHandle_t eventQueue;

uint32_t pressStartTime = 0;
uint32_t lastReleaseTime = 0;
uint8_t clickCount = 0;
bool longPressTriggered = false;
bool clickSequenceActive = false; // Tracks if a click sequence is in progress
TaskHandle_t clickTimeoutTaskHandle = NULL;
uint32_t lastActivityTime = 0;  // Tracks last button activity for sleep
volatile bool isAwake = true;   // Tracks device awake/sleep state
bool lastConnected = false;     // Track previous Zigbee connection state
bool zigbeeInitialized = false; // Track Zigbee initialization status

#if defined(IOT_BUTTON_V2)
// RTC variables for button state persistence
RTC_DATA_ATTR uint32_t pressStartTimeRTC = 0;
RTC_DATA_ATTR uint32_t lastReleaseTimeRTC = 0;
RTC_DATA_ATTR uint8_t clickCountRTC = 0;
RTC_DATA_ATTR bool longPressTriggeredRTC = false;
RTC_DATA_ATTR bool clickSequenceActiveRTC = false;

float emaVoltage = 0.0;
float batteryPercentage = 100.0;
#endif

#if defined(IOT_BUTTON_V2)
/********************* Battery Functions **************************/
void measureBattery()
{
  digitalWrite(BATTERY_ENABLE_PIN, HIGH);
  vTaskDelay(10 / portTICK_PERIOD_MS); // Wait for stabilization

  // Take multiple samples and compute average
  float adcSum = 0;
  for (int i = 0; i < SAMPLE_COUNT; i++)
  {
    adcSum += analogRead(BATTERY_ADC_PIN);
    vTaskDelay(5 / portTICK_PERIOD_MS); // Small delay between samples
  }
  digitalWrite(BATTERY_ENABLE_PIN, LOW);

  float adcAverage = adcSum / SAMPLE_COUNT;
  float voltage = (adcAverage / 4095.0) * 3.3 * 3.0; // Apply divider ratio

  if (voltage < MIN_VOLTAGE)
  {
    emaVoltage = 0.0;
    batteryPercentage = 0.0;
    LOG_PRINTF("Battery voltage: %.2fV (too low or not connected), EMA voltage: %.2fV, Percentage: %.2f%%\n",
               voltage, emaVoltage, batteryPercentage);
  }
  else
  {
    // Update EMA
    if (emaVoltage == 0.0)
    {
      emaVoltage = voltage;
    }
    else
    {
      emaVoltage = ALPHA * voltage + (1 - ALPHA) * emaVoltage;
    }

    // Calculate battery percentage from emaVoltage
    float localBatteryPercentage = (emaVoltage - MIN_VOLTAGE) / (MAX_VOLTAGE - MIN_VOLTAGE) * 100;
    if (localBatteryPercentage < 0)
      localBatteryPercentage = 0;
    if (localBatteryPercentage > 100)
      localBatteryPercentage = 100;

    // Update global battery percentage
    batteryPercentage = localBatteryPercentage;

    LOG_PRINTF("Battery voltage: %.2fV, EMA voltage: %.2fV, Percentage: %.2f%%\n",
               voltage, emaVoltage, localBatteryPercentage);
  }
}
#endif

/********************* FreeRTOS Tasks **************************/
void breathingLedTask(void *pvParameters)
{
  LOG_PRINTLN("Breathing LED");
  uint8_t hue = random8();    // Random color hue
  for (int i = 0; i < 1; i++) // one breathing cycle
  {
    // Brighten
    for (int brightness = 0; brightness <= 255; brightness += 5)
    {
      rgbs[0] = CHSV(hue, 255, brightness);
      FastLED.show();
      vTaskDelay(20 / portTICK_PERIOD_MS);
    }
    // Dim
    for (int brightness = 255; brightness >= 0; brightness -= 5)
    {
      rgbs[0] = CHSV(hue, 255, brightness);
      FastLED.show();
      vTaskDelay(20 / portTICK_PERIOD_MS);
    }
  }
  rgbs[0] = CRGB::Black;
  FastLED.show();
  vTaskDelete(NULL);
}

void blinkLedTask(void *pvParameters)
{
  LOG_PRINTLN("Blink LED");
  uint8_t rand = random8();
  for (int i = 0; i < 2; i++)
  {
    rgbs[0] = CHSV(rand, 255, 255); // Random color
    FastLED.show();
    vTaskDelay(200 / portTICK_PERIOD_MS);
    rgbs[0] = CRGB::Black;
    FastLED.show();
    vTaskDelay(200 / portTICK_PERIOD_MS);
  }
  vTaskDelete(NULL);
}

void rainbowLedTask(void *pvParameters)
{
  LOG_PRINTLN("Rainbow LED");
  for (int hue = 0; hue < 128; hue += 10)
  {
    rgbs[0] = CHSV(hue, 255, 255);
    FastLED.show();
    vTaskDelay(100 / portTICK_PERIOD_MS);
  }
  rgbs[0] = CRGB::Black;
  FastLED.show();
  vTaskDelete(NULL);
}

void clickTimeoutTask(void *pvParameters)
{
  uint32_t localClickCount = clickCount;
  uint32_t localLastReleaseTime = lastReleaseTime;

  while (millis() - localLastReleaseTime < MULTI_CLICK_TIME)
  {
    vTaskDelay(10 / portTICK_PERIOD_MS);
  }

  ButtonEvent event;
  switch (localClickCount)
  {
  case 1:
    event = ButtonEvent::SINGLE_CLICK;
    break;
  case 2:
    event = ButtonEvent::DOUBLE_CLICK;
    break;
  case 3:
    event = ButtonEvent::TRIPLE_CLICK;
    break;
  default:
    vTaskDelete(NULL);
    return;
  }
  xQueueSend(eventQueue, &event, 0);

  clickCount = 0;
  clickSequenceActive = false;
  clickTimeoutTaskHandle = NULL;

  vTaskDelete(NULL);
}

// --- Button Task Refactor ---
static bool debounceButton(bool currentState, uint32_t currentTime, uint32_t &lastDebounceTime)
{
  if (currentTime - lastDebounceTime < DEBOUNCE_TIME)
  {
    vTaskDelay(1 / portTICK_PERIOD_MS);
    return true;
  }
  return false;
}

static void handleButtonPress(uint32_t currentTime)
{
  pressStartTime = currentTime;
  ButtonEvent event = ButtonEvent::PRESS;
  xQueueSend(eventQueue, &event, 0);
  lastActivityTime = millis();

  if (clickSequenceActive && (currentTime - lastReleaseTime <= MULTI_CLICK_TIME))
  {
    clickCount++;
    if (clickTimeoutTaskHandle != NULL)
    {
      vTaskDelete(clickTimeoutTaskHandle);
      clickTimeoutTaskHandle = NULL;
    }
  }
  else
  {
    clickCount = 1;
    clickSequenceActive = true;
  }
  longPressTriggered = false;
}

static void handleButtonRelease(uint32_t currentTime)
{
  uint32_t pressDuration = currentTime - pressStartTime;
  ButtonEvent event = ButtonEvent::RELEASE;
  xQueueSend(eventQueue, &event, 0);
  lastActivityTime = millis();

  if (!longPressTriggered)
  {
    if (pressDuration >= LONG_PRESS_TIME)
    {
      event = ButtonEvent::LONG_PRESS;
      longPressTriggered = true;
      clickSequenceActive = false;
      clickCount = 0;
      xQueueSend(eventQueue, &event, 0);
      if (clickTimeoutTaskHandle != NULL)
      {
        vTaskDelete(clickTimeoutTaskHandle);
        clickTimeoutTaskHandle = NULL;
      }
    }
    else if (pressDuration >= SHORT_LONG_PRESS_TIME)
    {
      event = ButtonEvent::SHORT_LONG_PRESS;
      longPressTriggered = true;
      clickSequenceActive = false;
      clickCount = 0;
      xQueueSend(eventQueue, &event, 0);
      if (clickTimeoutTaskHandle != NULL)
      {
        vTaskDelete(clickTimeoutTaskHandle);
        clickTimeoutTaskHandle = NULL;
      }
    }
    else
    {
      lastReleaseTime = currentTime;
      if (clickTimeoutTaskHandle != NULL)
      {
        vTaskDelete(clickTimeoutTaskHandle);
        clickTimeoutTaskHandle = NULL;
      }
      xTaskCreate(clickTimeoutTask, "ClickTimeout", 2048, NULL, 1, &clickTimeoutTaskHandle);
    }
  }
}

static void checkLongPress(uint32_t currentTime)
{
  if (currentTime - pressStartTime >= LONG_PRESS_TIME)
  {
    ButtonEvent event = ButtonEvent::LONG_PRESS;
    longPressTriggered = true;
    clickSequenceActive = false;
    clickCount = 0;
    xQueueSend(eventQueue, &event, 0);
    lastActivityTime = millis();
    if (clickTimeoutTaskHandle != NULL)
    {
      vTaskDelete(clickTimeoutTaskHandle);
      clickTimeoutTaskHandle = NULL;
    }
  }
}

void buttonTask(void *pvParameters)
{
  uint32_t lastDebounceTime = 0;
  bool lastState = false;

  // Check if woken up by button press
  if (esp_sleep_get_wakeup_cause() == ESP_SLEEP_WAKEUP_EXT1)
  {
    bool currentState = (digitalRead(BUTTON_PIN) == LOW);
    if (currentState)
    {
      handleButtonPress(millis());
    }
  }

  while (1)
  {
    bool currentState = (digitalRead(BUTTON_PIN) == LOW);
    uint32_t currentTime = millis();

    if (debounceButton(currentState, currentTime, lastDebounceTime))
      continue;

    if (currentState != lastState)
    {
      lastDebounceTime = currentTime;
      lastState = currentState;
      if (currentState)
      {
        handleButtonPress(currentTime);
      }
      else
      {
        handleButtonRelease(currentTime);
      }
    }
    else if (currentState && !longPressTriggered)
    {
      checkLongPress(currentTime);
    }

    vTaskDelay(10 / portTICK_PERIOD_MS);
  }
}

void mainTask(void *pvParameters)
{
  ButtonEvent event;
  while (1)
  {
    if (xQueueReceive(eventQueue, &event, portMAX_DELAY) == pdTRUE)
    {
      switch (event)
      {
      case ButtonEvent::PRESS:
        if (buttonStatus == false)
        {
          buttonStatus = true;
          LOG_PRINTLN("Button Pressed");
          if (zigbeeInitialized && Zigbee.connected())
          {
            zbIoTButton.setBinaryInput(buttonStatus);
            zbIoTButton.reportBinaryInput();
          }
        }
        break;

      case ButtonEvent::RELEASE:
        if (buttonStatus == true)
        {
          buttonStatus = false;
          LOG_PRINTLN("Button Released");
          if (zigbeeInitialized && Zigbee.connected())
          {
            zbIoTButton.setBinaryInput(buttonStatus);
            zbIoTButton.reportBinaryInput();
          }
        }
        break;

      case ButtonEvent::SINGLE_CLICK:
        LOG_PRINTLN("Single Click");
        switch1Status = !switch1Status;
        if (zigbeeInitialized && Zigbee.connected())
        {
          zbSwitch1.setBinaryInput(switch1Status);
          zbSwitch1.reportBinaryInput();
        }
        xTaskCreate(breathingLedTask, "BreathingLed", 2048, NULL, 1, NULL);
        break;

      case ButtonEvent::DOUBLE_CLICK:
        LOG_PRINTLN("Double Click");
        switch2Status = !switch2Status;
        if (zigbeeInitialized && Zigbee.connected())
        {
          zbSwitch2.setBinaryInput(switch2Status);
          zbSwitch2.reportBinaryInput();
        }
        xTaskCreate(blinkLedTask, "BlinkLed", 2048, NULL, 1, NULL);
        break;

      case ButtonEvent::TRIPLE_CLICK:
        LOG_PRINTLN("Triple Click");
        if (zigbeeInitialized && Zigbee.connected())
        {
          // Add any specific Zigbee action here if needed
        }
        break;

      case ButtonEvent::SHORT_LONG_PRESS:
        LOG_PRINTLN("Short Long Press");
        switch3Status = !switch3Status;
        if (zigbeeInitialized && Zigbee.connected())
        {
          zbSwitch3.setBinaryInput(switch3Status);
          zbSwitch3.reportBinaryInput();
        }
        xTaskCreate(rainbowLedTask, "RainbowLed", 2048, NULL, 1, NULL);
        break;

      case ButtonEvent::LONG_PRESS:
        LOG_PRINTLN("Long Press\nReset Zigbee");
        vTaskDelay(1000 / portTICK_PERIOD_MS);
        if (zigbeeInitialized)
        {
          Zigbee.factoryReset();
        }
        break;
      }
    }
  }
}

#if defined(IOT_BUTTON_V1)
void ledTask(void *pvParameters)
{
  pinMode(BLUE_LED_PIN, OUTPUT);
  while (1)
  {
    if (isAwake)
    {
      if (!zigbeeInitialized || !Zigbee.connected()) // Blink when not connected or not initialized
      {
        digitalWrite(BLUE_LED_PIN, LOW); // On
        vTaskDelay(500 / portTICK_PERIOD_MS);
        digitalWrite(BLUE_LED_PIN, HIGH); // Off
        vTaskDelay(500 / portTICK_PERIOD_MS);
      }
      else
      {
        digitalWrite(BLUE_LED_PIN, LOW); // On when connected
      }
    }
    else
    {
      digitalWrite(BLUE_LED_PIN, HIGH); // Off during sleep
    }
    vTaskDelay(10 / portTICK_PERIOD_MS);
  }
}
#elif defined(IOT_BUTTON_V2)
void ledTask(void *pvParameters)
{
  pinMode(BLUE_LED_PIN, OUTPUT);
  pinMode(RED_LED_PIN, OUTPUT);
  bool ledState = false;

  while (1)
  {
    if (isAwake)
    {
      bool isLowBattery = (batteryPercentage < 20.0);
      bool isConnected = zigbeeInitialized && Zigbee.connected();
      uint8_t activeLedPin = isLowBattery ? RED_LED_PIN : BLUE_LED_PIN;
      uint8_t inactiveLedPin = isLowBattery ? BLUE_LED_PIN : RED_LED_PIN;

      if (isConnected)
      {
        digitalWrite(activeLedPin, LOW);
        digitalWrite(inactiveLedPin, HIGH);
      }
      else
      {
        ledState = !ledState;
        digitalWrite(activeLedPin, ledState ? LOW : HIGH);
        digitalWrite(inactiveLedPin, HIGH);
      }
    }
    else
    {
      digitalWrite(BLUE_LED_PIN, HIGH);
      digitalWrite(RED_LED_PIN, HIGH);
    }
    vTaskDelay(500 / portTICK_PERIOD_MS);
  }
}
#endif

#if defined(IOT_BUTTON_V2)
void batteryTask(void *pvParameters)
{
  pinMode(BATTERY_ENABLE_PIN, OUTPUT);

  while (1)
  {
    measureBattery();
    if (zigbeeInitialized && Zigbee.connected())
    {
      zbIoTButton.setBatteryVoltage((uint8_t)(emaVoltage * 100)); // Unit: 0.01V
      zbIoTButton.setBatteryPercentage((uint8_t)batteryPercentage);
      zbIoTButton.reportBatteryPercentage();
    }
    vTaskDelay(30000 / portTICK_PERIOD_MS); // Check every 30 seconds
  }
}
#endif

void sleepTask(void *pvParameters)
{
  while (1)
  {
    if (isAwake && (millis() - lastActivityTime > INACTIVITY_TIMEOUT))
    {
      LOG_PRINTLN("Entering sleep due to inactivity");
#if defined(IOT_BUTTON_V1)
      isAwake = false;
      digitalWrite(BLUE_LED_PIN, HIGH);
      esp_sleep_enable_gpio_wakeup();
      digitalWrite(BLUE_LED_PIN, HIGH); // Turn off LED
      gpio_wakeup_enable((gpio_num_t)BUTTON_PIN, GPIO_INTR_LOW_LEVEL);
      digitalWrite(RGB_ENABLE_PIN, LOW);
      esp_light_sleep_start();
      digitalWrite(RGB_ENABLE_PIN, HIGH);
      LOG_PRINTLN("Woke up from light sleep");
      isAwake = true;
      digitalWrite(BLUE_LED_PIN, LOW); // Turn on LED
#elif defined(IOT_BUTTON_V2)
      // Save button state to RTC memory
      pressStartTimeRTC = pressStartTime;
      lastReleaseTimeRTC = lastReleaseTime;
      clickCountRTC = clickCount;
      longPressTriggeredRTC = longPressTriggered;
      clickSequenceActiveRTC = clickSequenceActive;

      digitalWrite(BLUE_LED_PIN, HIGH);
      digitalWrite(RED_LED_PIN, HIGH);
      digitalWrite(RGB_PIN, LOW);
      digitalWrite(RGB_ENABLE_PIN, LOW);
      static gpio_num_t WAKEUP_GPIO = (gpio_num_t)BUTTON_PIN;
      esp_sleep_enable_ext1_wakeup_io(BUTTON_PIN_BITMASK(WAKEUP_GPIO), ESP_EXT1_WAKEUP_ANY_LOW);
      esp_deep_sleep_start();
#endif
    }
    vTaskDelay(10000 / portTICK_PERIOD_MS); // Check every 10 seconds
  }
}

/********************* Zigbee Functions **************************/
void onZigbeeConnected()
{
  if (!zigbeeInitialized)
  {
    return;
  }
#if defined(IOT_BUTTON_V2)
  measureBattery();                                           // Ensure latest battery data
  zbIoTButton.setBatteryVoltage((uint8_t)(emaVoltage * 100)); // Unit: 0.01V
  zbIoTButton.setBatteryPercentage((uint8_t)batteryPercentage);
  zbIoTButton.reportBatteryPercentage();
#endif
  zbSwitch1.setBinaryInput(switch1Status);
  zbSwitch1.reportBinaryInput();
  zbSwitch2.setBinaryInput(switch2Status);
  zbSwitch2.reportBinaryInput();
  zbSwitch3.setBinaryInput(switch3Status);
  zbSwitch3.reportBinaryInput();
}

void zigbeeSetupTask(void *pvParameters)
{
  zbIoTButton.addBinaryInput();
  zbIoTButton.setBinaryInputApplication(BINARY_INPUT_APPLICATION_TYPE_SECURITY_MOTION_DETECTION);
  zbIoTButton.setBinaryInputDescription("Button");
  zbSwitch1.addBinaryInput();
  zbSwitch1.setBinaryInputApplication(BINARY_INPUT_APPLICATION_TYPE_SECURITY_MOTION_DETECTION);
  zbSwitch1.setBinaryInputDescription("Switch1");
  zbSwitch2.addBinaryInput();
  zbSwitch2.setBinaryInputApplication(BINARY_INPUT_APPLICATION_TYPE_SECURITY_MOTION_DETECTION);
  zbSwitch2.setBinaryInputDescription("Switch2");
  zbSwitch3.addBinaryInput();
  zbSwitch3.setBinaryInputApplication(BINARY_INPUT_APPLICATION_TYPE_SECURITY_MOTION_DETECTION);
  zbSwitch3.setBinaryInputDescription("Switch3");

  // Set Zigbee device information
#if defined(IOT_BUTTON_V1)
  zbIoTButton.setManufacturerAndModel("Seeed Studio", "IoT_Button");
#elif defined(IOT_BUTTON_V2)
  zbIoTButton.setManufacturerAndModel("Seeed Studio", "IoT Button V2");
  zbIoTButton.setPowerSource(ZB_POWER_SOURCE_BATTERY, 100);
#endif

  // Add endpoint to Zigbee Core
  Zigbee.addEndpoint(&zbIoTButton);
  Zigbee.addEndpoint(&zbSwitch1);
  Zigbee.addEndpoint(&zbSwitch2);
  Zigbee.addEndpoint(&zbSwitch3);
  esp_zb_cfg_t zigbeeConfig = ZIGBEE_DEFAULT_ED_CONFIG();
  zigbeeConfig.nwk_cfg.zed_cfg.keep_alive = 10000;

  Zigbee.setTimeout(10000); // Set timeout for Zigbee Begin to 10s (default is 30s)
  LOG_PRINTLN("Starting Zigbee...");
  if (!Zigbee.begin(&zigbeeConfig, false))
  {
    LOG_PRINTLN("Zigbee failed to start!");
    LOG_PRINTLN("Please try holding down the 5S key for a long time to reset zigbee");
    zigbeeInitialized = false;
  }
  else
  {
    LOG_PRINTLN("Zigbee started successfully!");
    zigbeeInitialized = true;
  }

  vTaskDelete(NULL); // Terminate the task after completion
}

/********************* Arduino Setup **************************/
void setup()
{
  Serial.begin(115200);

  LOG_PRINTLN("Zigbee IoT Button Starting...");
#if defined(IOT_BUTTON_V2)
  // Restore button state from RTC memory
  pressStartTime = pressStartTimeRTC;
  lastReleaseTime = lastReleaseTimeRTC;
  clickCount = clickCountRTC;
  longPressTriggered = longPressTriggeredRTC;
  clickSequenceActive = clickSequenceActiveRTC;
#endif

  // Initialize button pin
  pinMode(BUTTON_PIN, INPUT_PULLUP);

  pinMode(RGB_ENABLE_PIN, OUTPUT);
  digitalWrite(RGB_ENABLE_PIN, HIGH);
#if defined(IOT_BUTTON_V2)
  pinMode(BATTERY_ENABLE_PIN, OUTPUT);
#endif

  // Initialize LED
  FastLED.addLeds<WS2812, RGB_PIN, GRB>(rgbs, NUM_RGBS);
  FastLED.setBrightness(50);

  // Create event queue
  eventQueue = xQueueCreate(10, sizeof(ButtonEvent));
  if (eventQueue == NULL)
  {
    LOG_PRINTLN("Failed to create event queue!");
    ESP.restart();
  }

#if defined(IOT_BUTTON_V2)
  // Check if woken up by button press and handle immediately
  if (esp_sleep_get_wakeup_cause() == ESP_SLEEP_WAKEUP_EXT1)
  {
    uint32_t currentTime = millis();
    if (digitalRead(BUTTON_PIN) == LOW)
    {
      handleButtonPress(currentTime);
    }
  }
#endif

  // Create FreeRTOS tasks
  xTaskCreate(buttonTask, "ButtonTask", 2048, NULL, 4, NULL);
  xTaskCreate(ledTask, "LedTask", 1024, NULL, 0, NULL);
  xTaskCreate(mainTask, "MainTask", 2048, NULL, 3, NULL);
  xTaskCreate(sleepTask, "SleepTask", 2048, NULL, 2, NULL);
  xTaskCreate(zigbeeSetupTask, "ZigbeeSetup", 2048, NULL, 1, NULL);
#if defined(IOT_BUTTON_V2)
  xTaskCreate(batteryTask, "BatteryTask", 2048, NULL, 1, NULL);
#endif
}

/********************* Arduino Loop **************************/
void loop()
{
  if (zigbeeInitialized)
  {
    bool currentConnected = Zigbee.connected();
    if (currentConnected && !lastConnected)
    {
      LOG_PRINTLN("Zigbee connected!");
      onZigbeeConnected();
    }
    else if (!currentConnected && lastConnected)
    {
      LOG_PRINTLN("Zigbee disconnected!");
    }
    lastConnected = currentConnected;
    if (!currentConnected)
    {
      LOG_PRINTLN("Zigbee not connected, retrying...");
      vTaskDelay(5000 / portTICK_PERIOD_MS);
    }
    else
    {
      vTaskDelay(1000 / portTICK_PERIOD_MS);
    }
  }
  else
  {
    vTaskDelay(1000 / portTICK_PERIOD_MS); // Keep loop running even if Zigbee fails
  }
}
A documentação pode não estar atualizada com as atualizações de código, você também pode clicar no botão abaixo para obter os procedimentos mais recentes.
Etapa 5: Carregue e Teste seu Firmware
- Conecte seu IoT Button ao computador via USB.
- Selecione a porta correta na Arduino IDE.
- Clique no botão Upload.
- Abra o Serial Monitor (baud rate 115200) para ver as informações de depuração.
- Quando a gravação estiver concluída, o botão estará pronto para ser pareado.
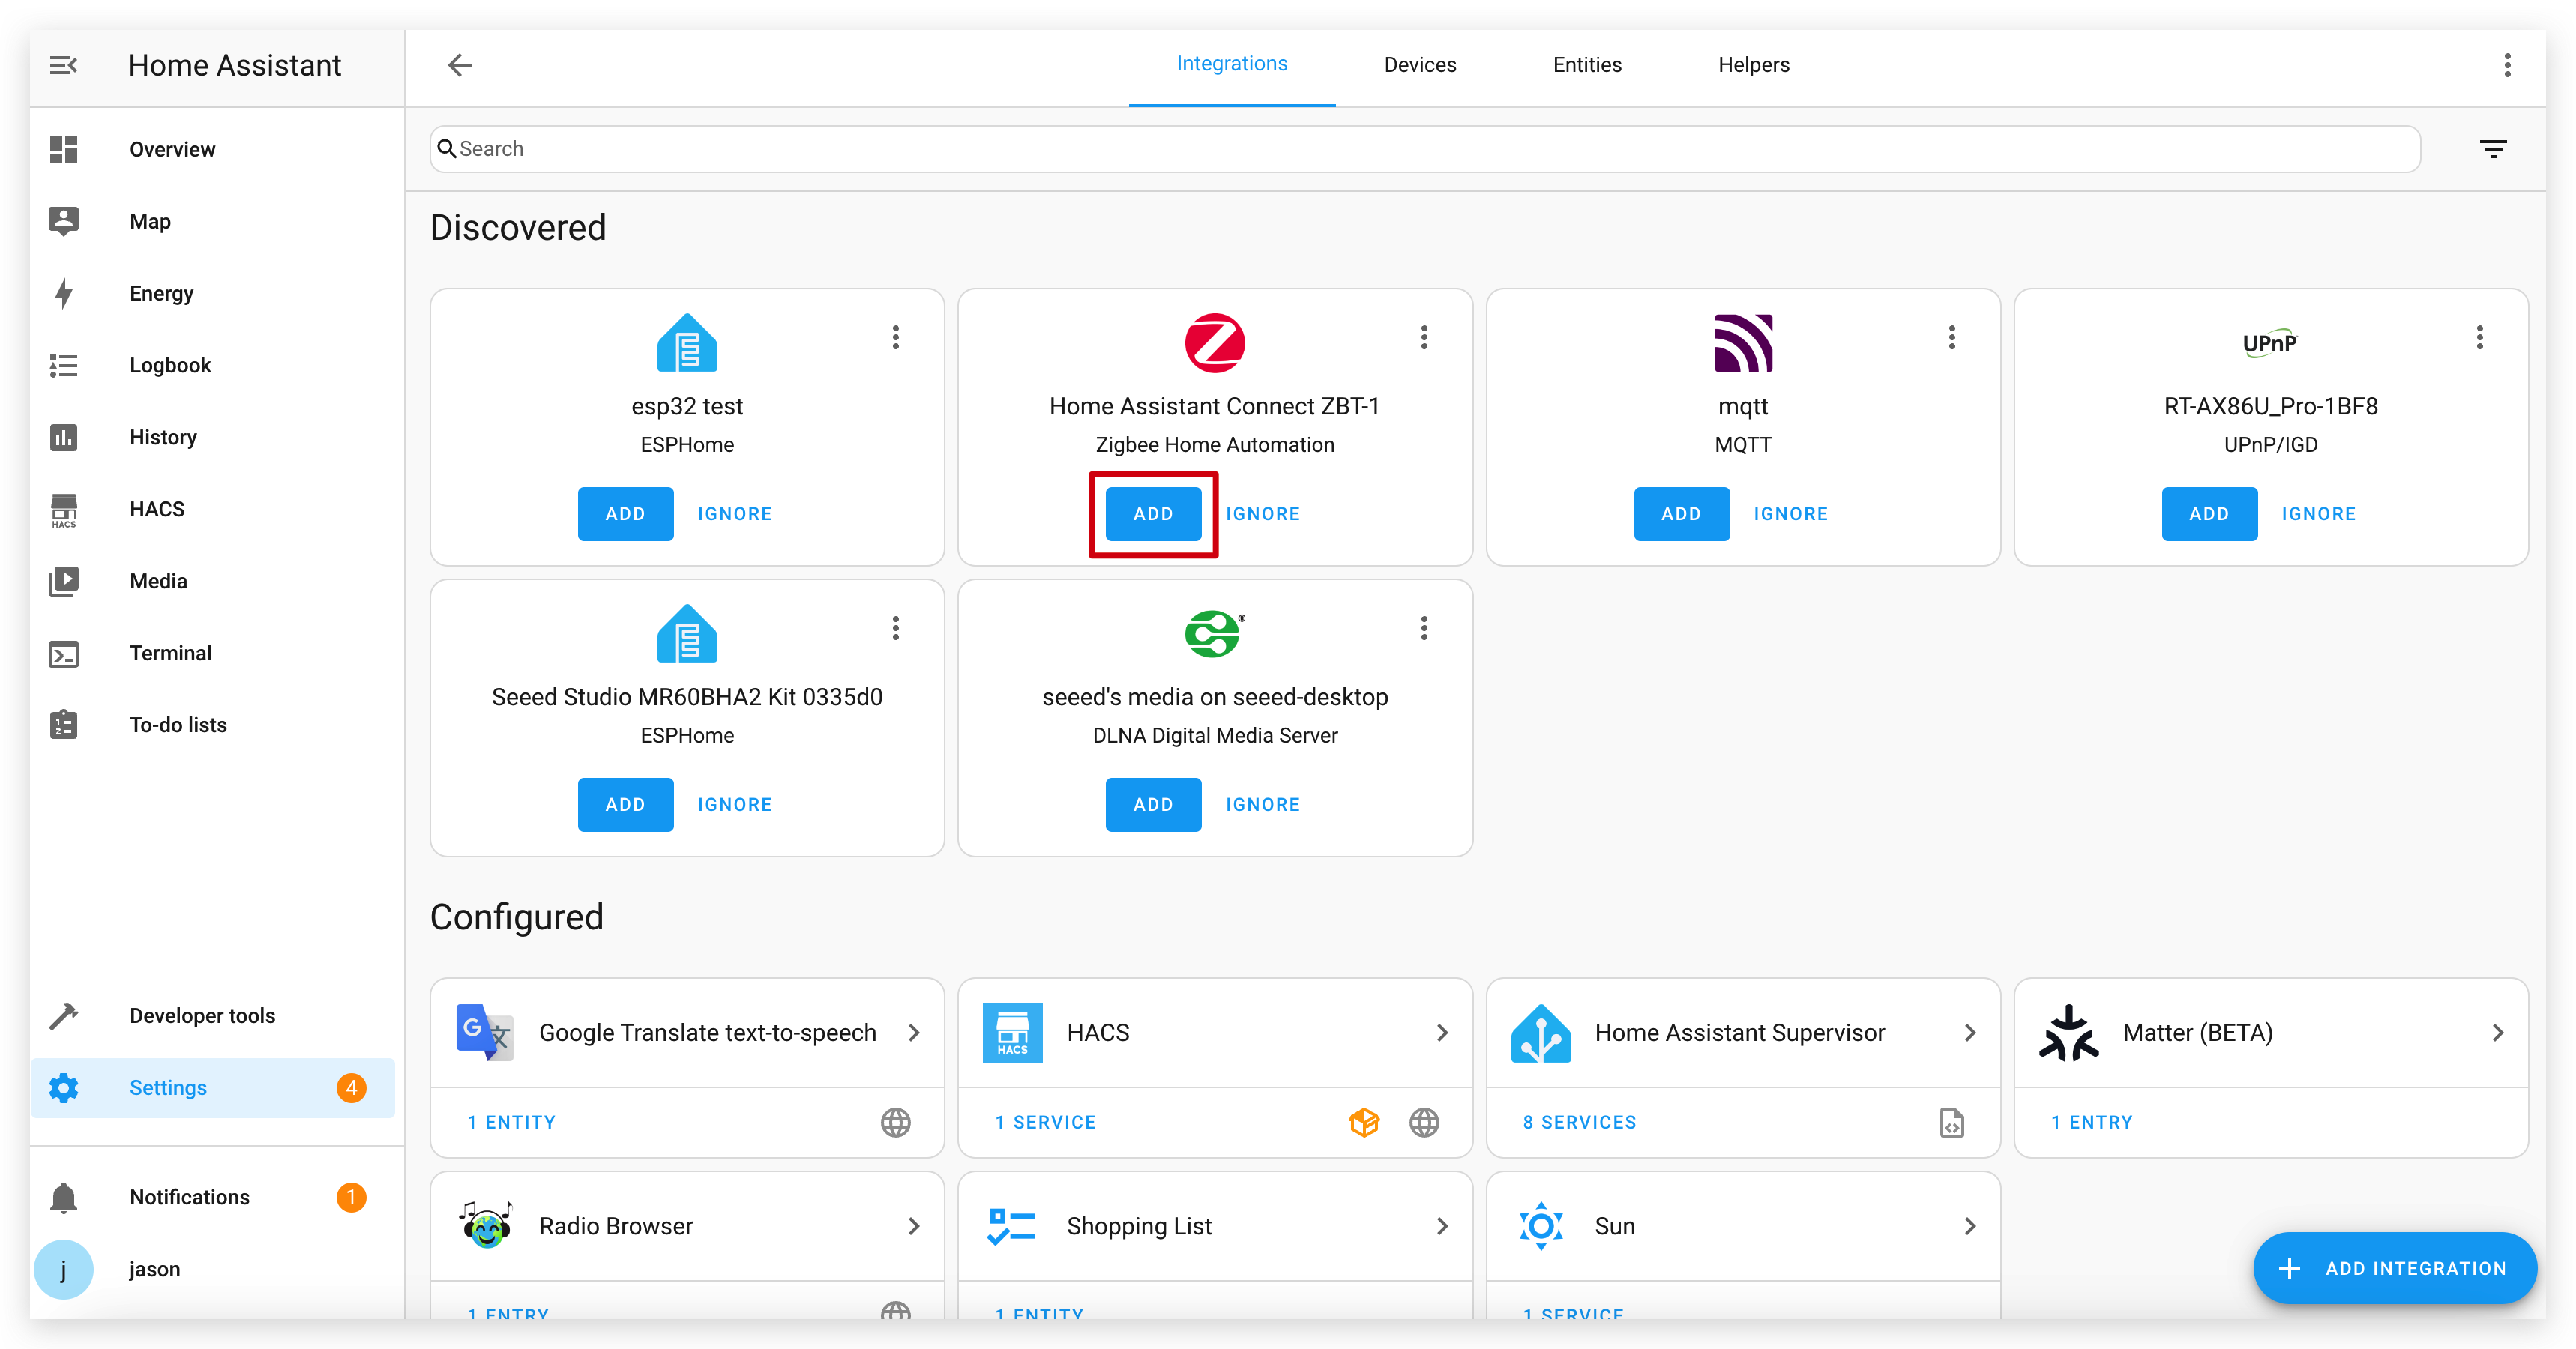
Etapa 6: Configure o Zigbee no Home Assistant
Antes de parear seu IoT Button, você precisa configurar um coordenador Zigbee no Home Assistant:
- Instale um Coordenador Zigbee: Conecte um coordenador Zigbee como o Home Assistant Connect ZBT-1 ao seu servidor Home Assistant.
- Configure o Zigbee Home Automation (ZHA):
- Vá para Settings > Devices & Services.
- Clique em "Add Integration" e procure por "Zigbee Home Automation".
- Siga as instruções para configurar o ZHA com o seu coordenador.
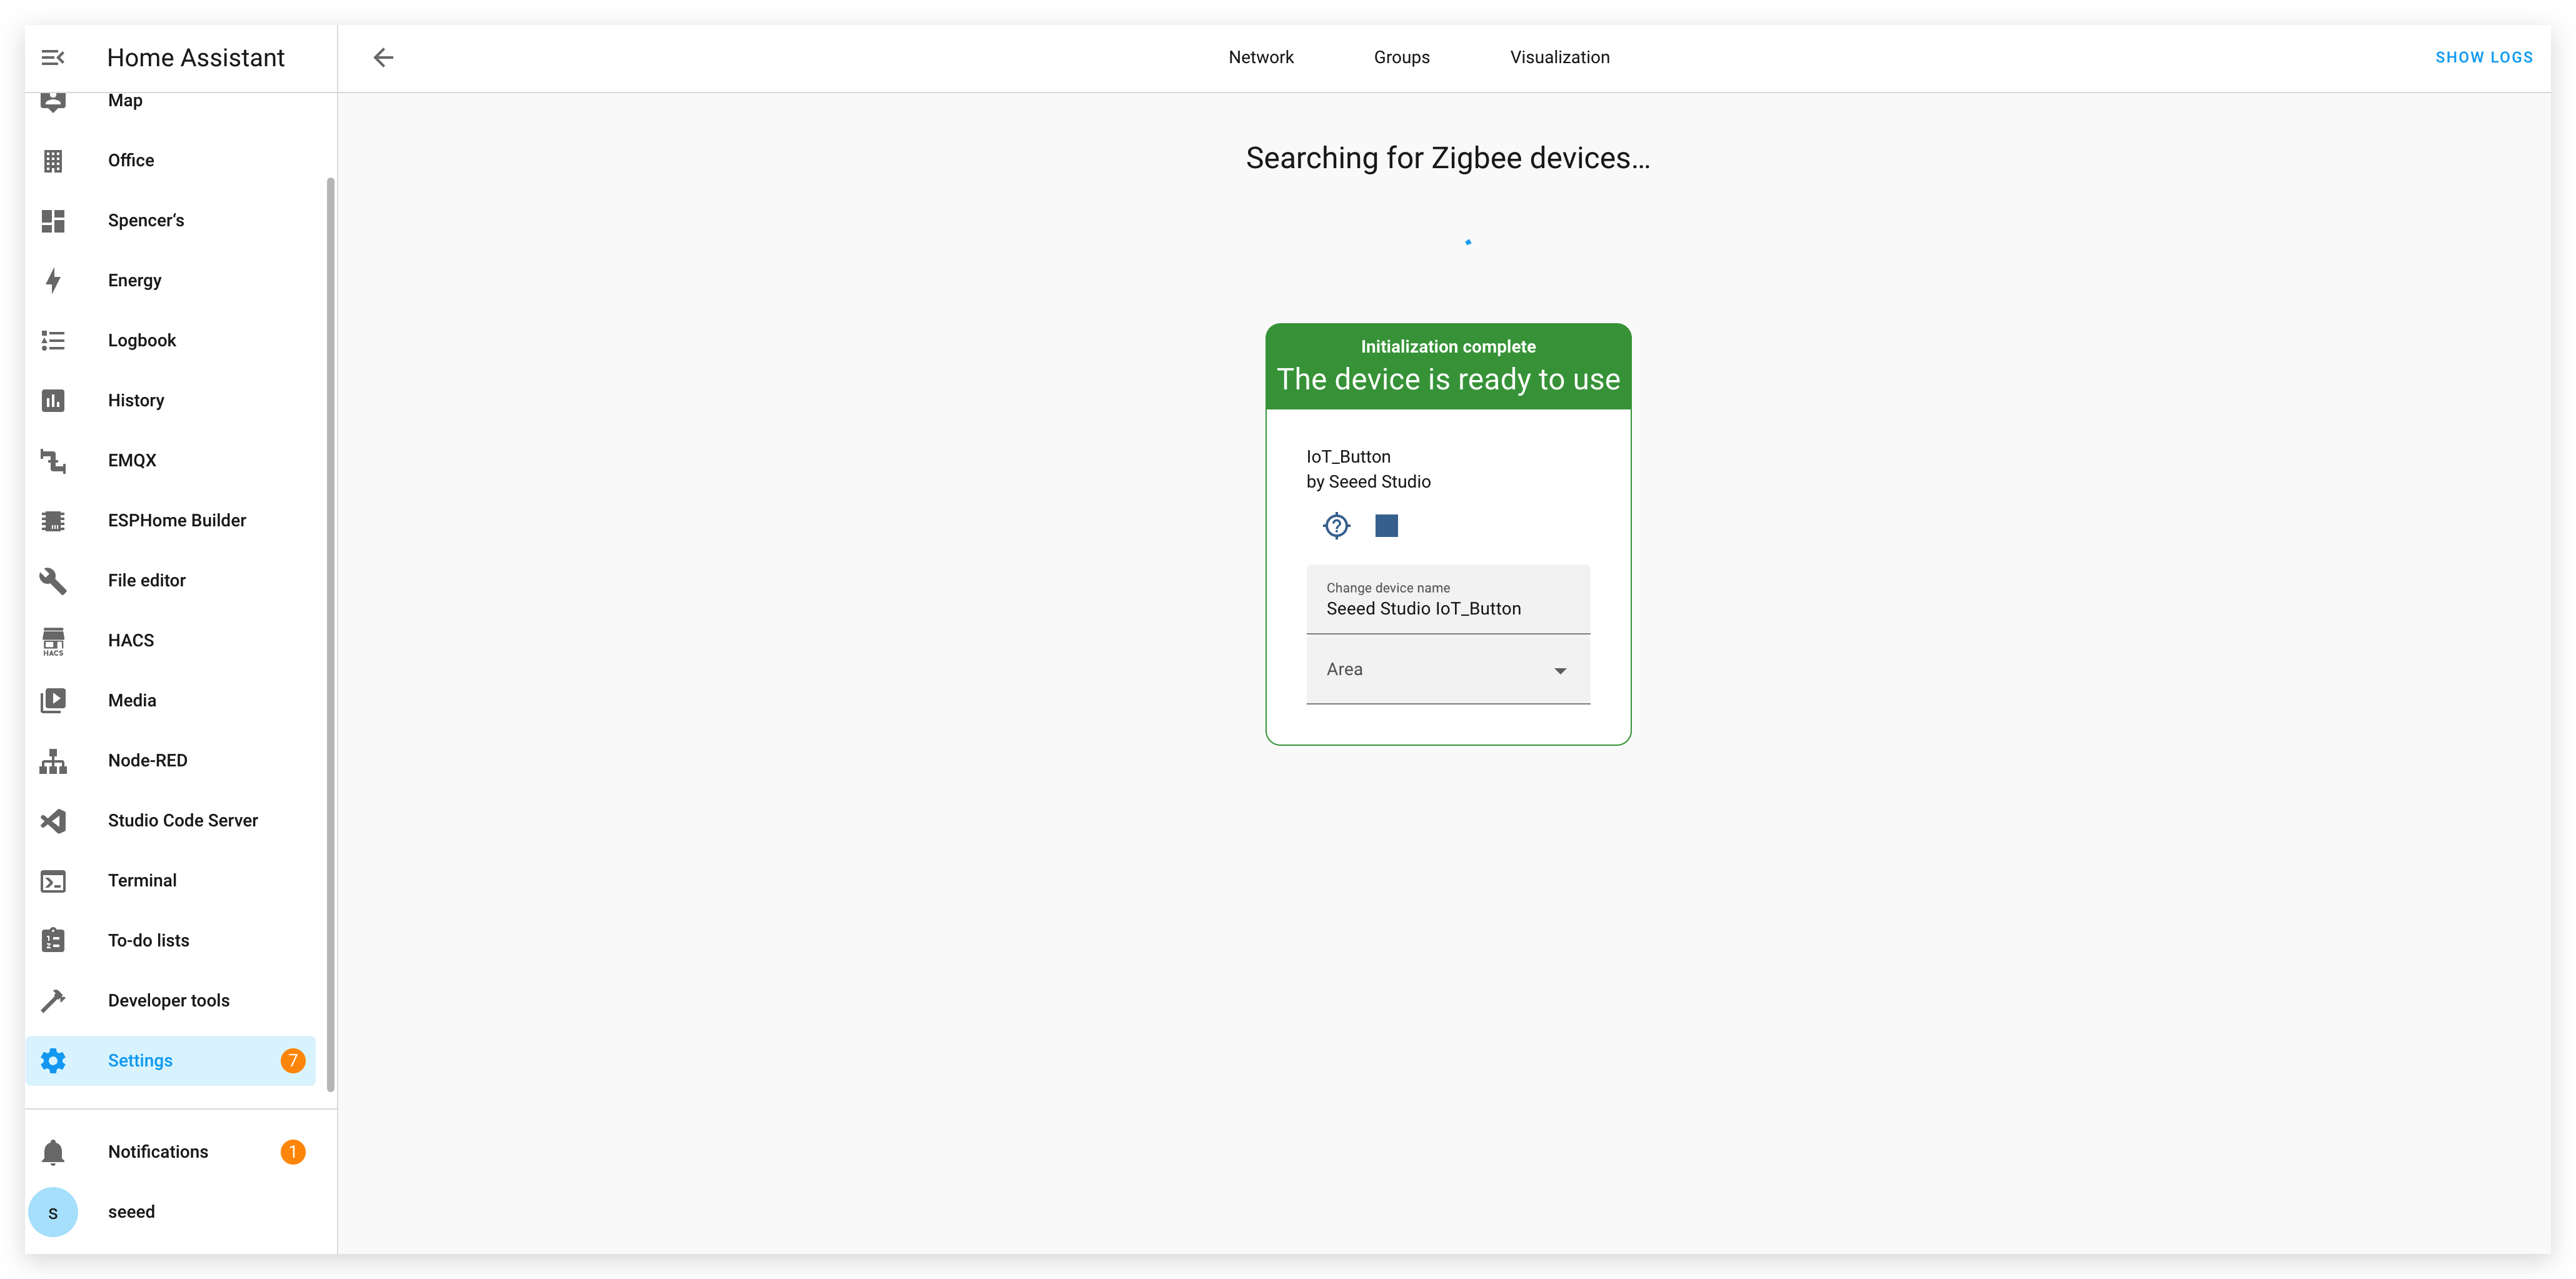
Etapa 7: Parelhe o IoT Button com o Home Assistant
- No Home Assistant, vá para Settings > Devices & Services > Zigbee Home Automation.
- Clique no seu dispositivo coordenador Zigbee.
- Clique em "Add Device" para colocar o coordenador em modo de pareamento.
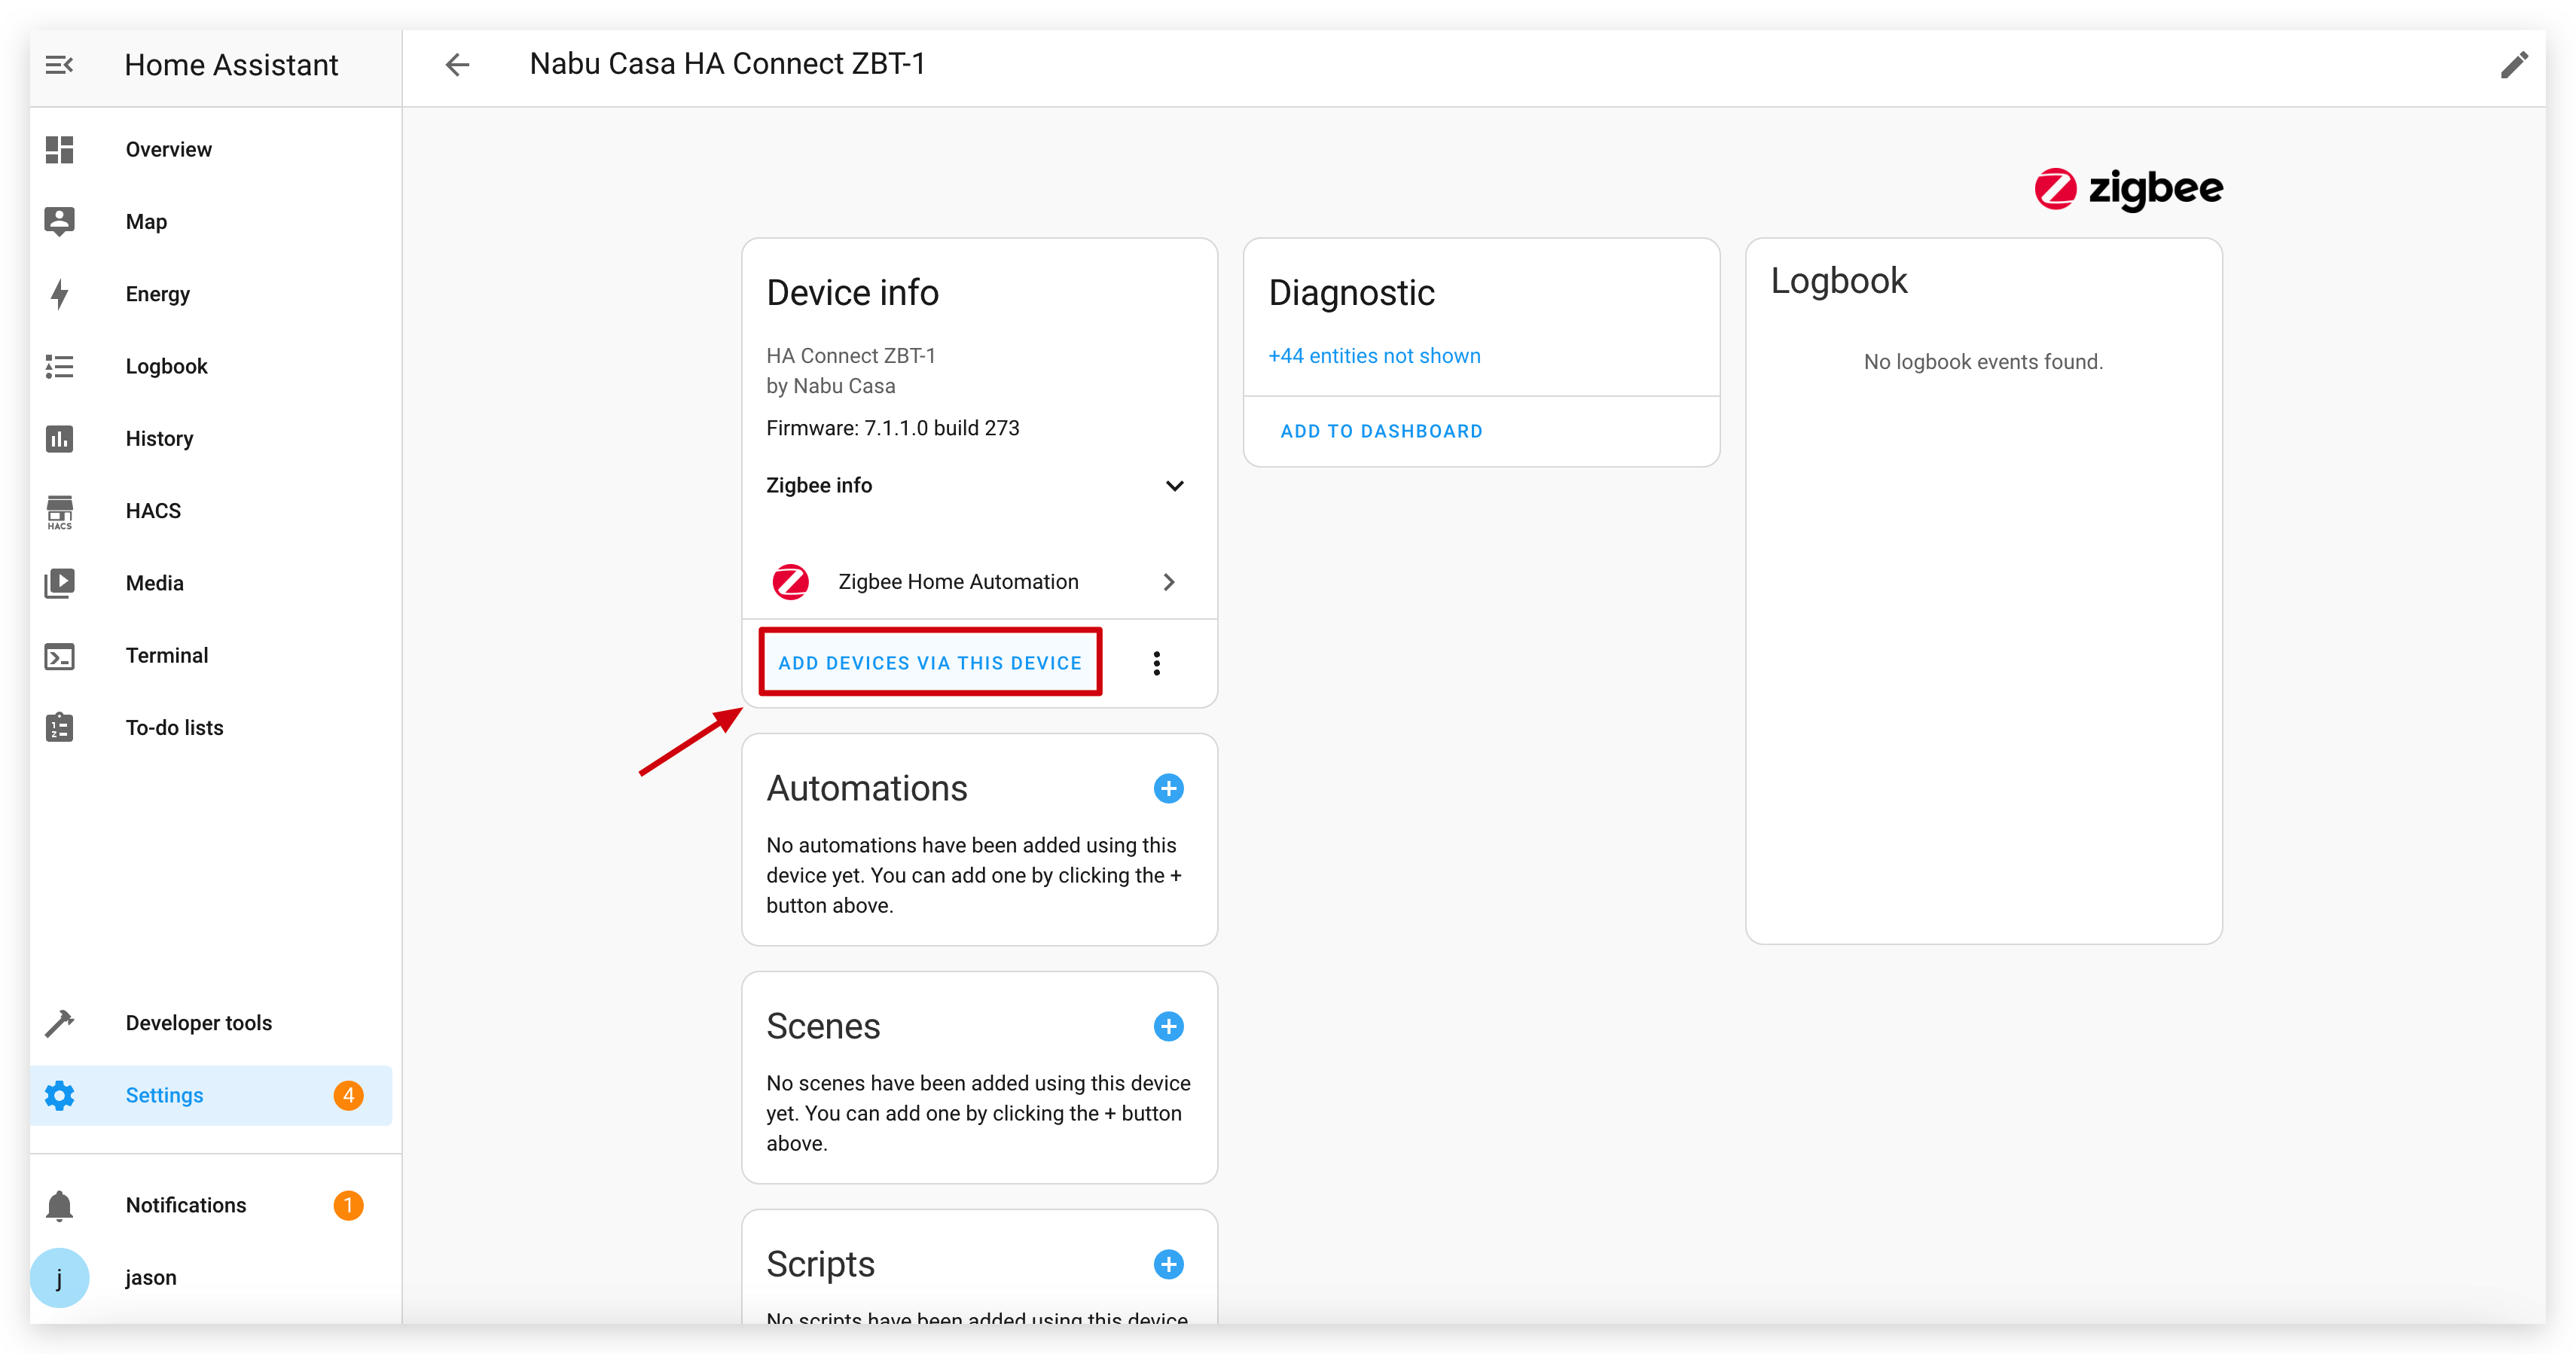
- Pressione o botão do seu IoT Button uma vez para acordá‑lo e iniciar o pareamento. Se não parear, tente manter o botão pressionado por mais de 5 segundos para acionar um reset de fábrica, o que também o colocará em modo de pareamento.
- O Home Assistant deve descobrir o IoT Button como "Seeed Studio IoT_Button".
- Siga as instruções para concluir o processo de pareamento. Você verá um dispositivo com múltiplas entidades (um sensor binário e três interruptores).
Etapa 8: Crie Automations no Home Assistant
Depois de pareado, você pode criar automations baseadas nas ações do botão. O firmware expõe diferentes tipos de clique como interruptores separados, tornando a automação simples.
- Vá para Settings > Automations & Scenes > Create Automation.
- Selecione "Device" como o tipo de gatilho.
- Encontre seu IoT Button na lista de dispositivos.
- Selecione o gatilho desejado na lista. O ZHA exporá os diferentes cliques como ações de dispositivo, por exemplo:
- "Single press" (do interruptor virtual no Endpoint 11)
- "Double press" (do interruptor virtual no Endpoint 12)
- "Long press" (do interruptor virtual no Endpoint 13)
- Configure as ações que você deseja executar quando o botão for pressionado.
- Salve a automation.
Exemplo de automation em YAML no Home Assistant para alternar uma luz com um double click:
alias: IoT Button Double Click - Toggle Living Room Light
description: ""
trigger:
  - platform: device
    domain: zha
    device_id: YOUR_DEVICE_ID_HERE # Replace with your button's device ID
    type: "remote_button_double_press" # The exact type may vary, select it from the UI
action:
  - service: light.toggle
    target:
      entity_id: light.living_room
mode: single
Conclusão
O Seeed Studio IoT Button com funcionalidade Zigbee oferece uma forma versátil e energeticamente eficiente de controlar sua casa inteligente. Seja usando o firmware pré‑construído ou desenvolvendo sua própria solução personalizada, o botão fornece uma interface simples para acionar automations complexas no Home Assistant.
Aproveitando os recursos Zigbee integrados do ESP32-C6, o IoT Button pode operar por longos períodos com alimentação por bateria, mantendo uma conectividade confiável com o seu ecossistema de casa inteligente.
Solução de Problemas
P1: Por que meu dispositivo continua caindo e não consegue se conectar à internet após substituir a bateria? Posso confirmar que a bateria está carregada
Após a bateria ter sido removida, devido à estratégia de proteção do chip da bateria 18650, é necessário ativá‑la um pouco com um cabo de alimentação USB carregado para que funcione corretamente.
Recursos
- [GITHUB] Repositório Github do Seeed IoT Button
- [PDF] PDF do Esquema (SCH) do Seeed IoT Button
- [SCH&PCB] Seeed IoT Button SCH & PCB
Suporte Técnico & Discussão sobre o Produto
Obrigado por escolher nossos produtos! Estamos aqui para fornecer diferentes tipos de suporte para garantir que sua experiência com nossos produtos seja a mais tranquila possível. Oferecemos vários canais de comunicação para atender a diferentes preferências e necessidades.