Home Assistant e Módulo de Detecção de Eventos Sonoros
Introdução
Uma placa de áudio de borda compacta oferece detecção de som em tempo real com forte proteção de privacidade de dados locais. Ela pode detectar cinco eventos sonoros anormais — choro de bebê, quebra de vidro, disparo de arma de fogo, alarmes T3/T4 e ronco — permitindo resposta imediata e aviso prévio confiável. Neste tutorial, vamos aprender como compilar e enviar o firmware para uma placa XIAO ESP32.
Hardware Necessário
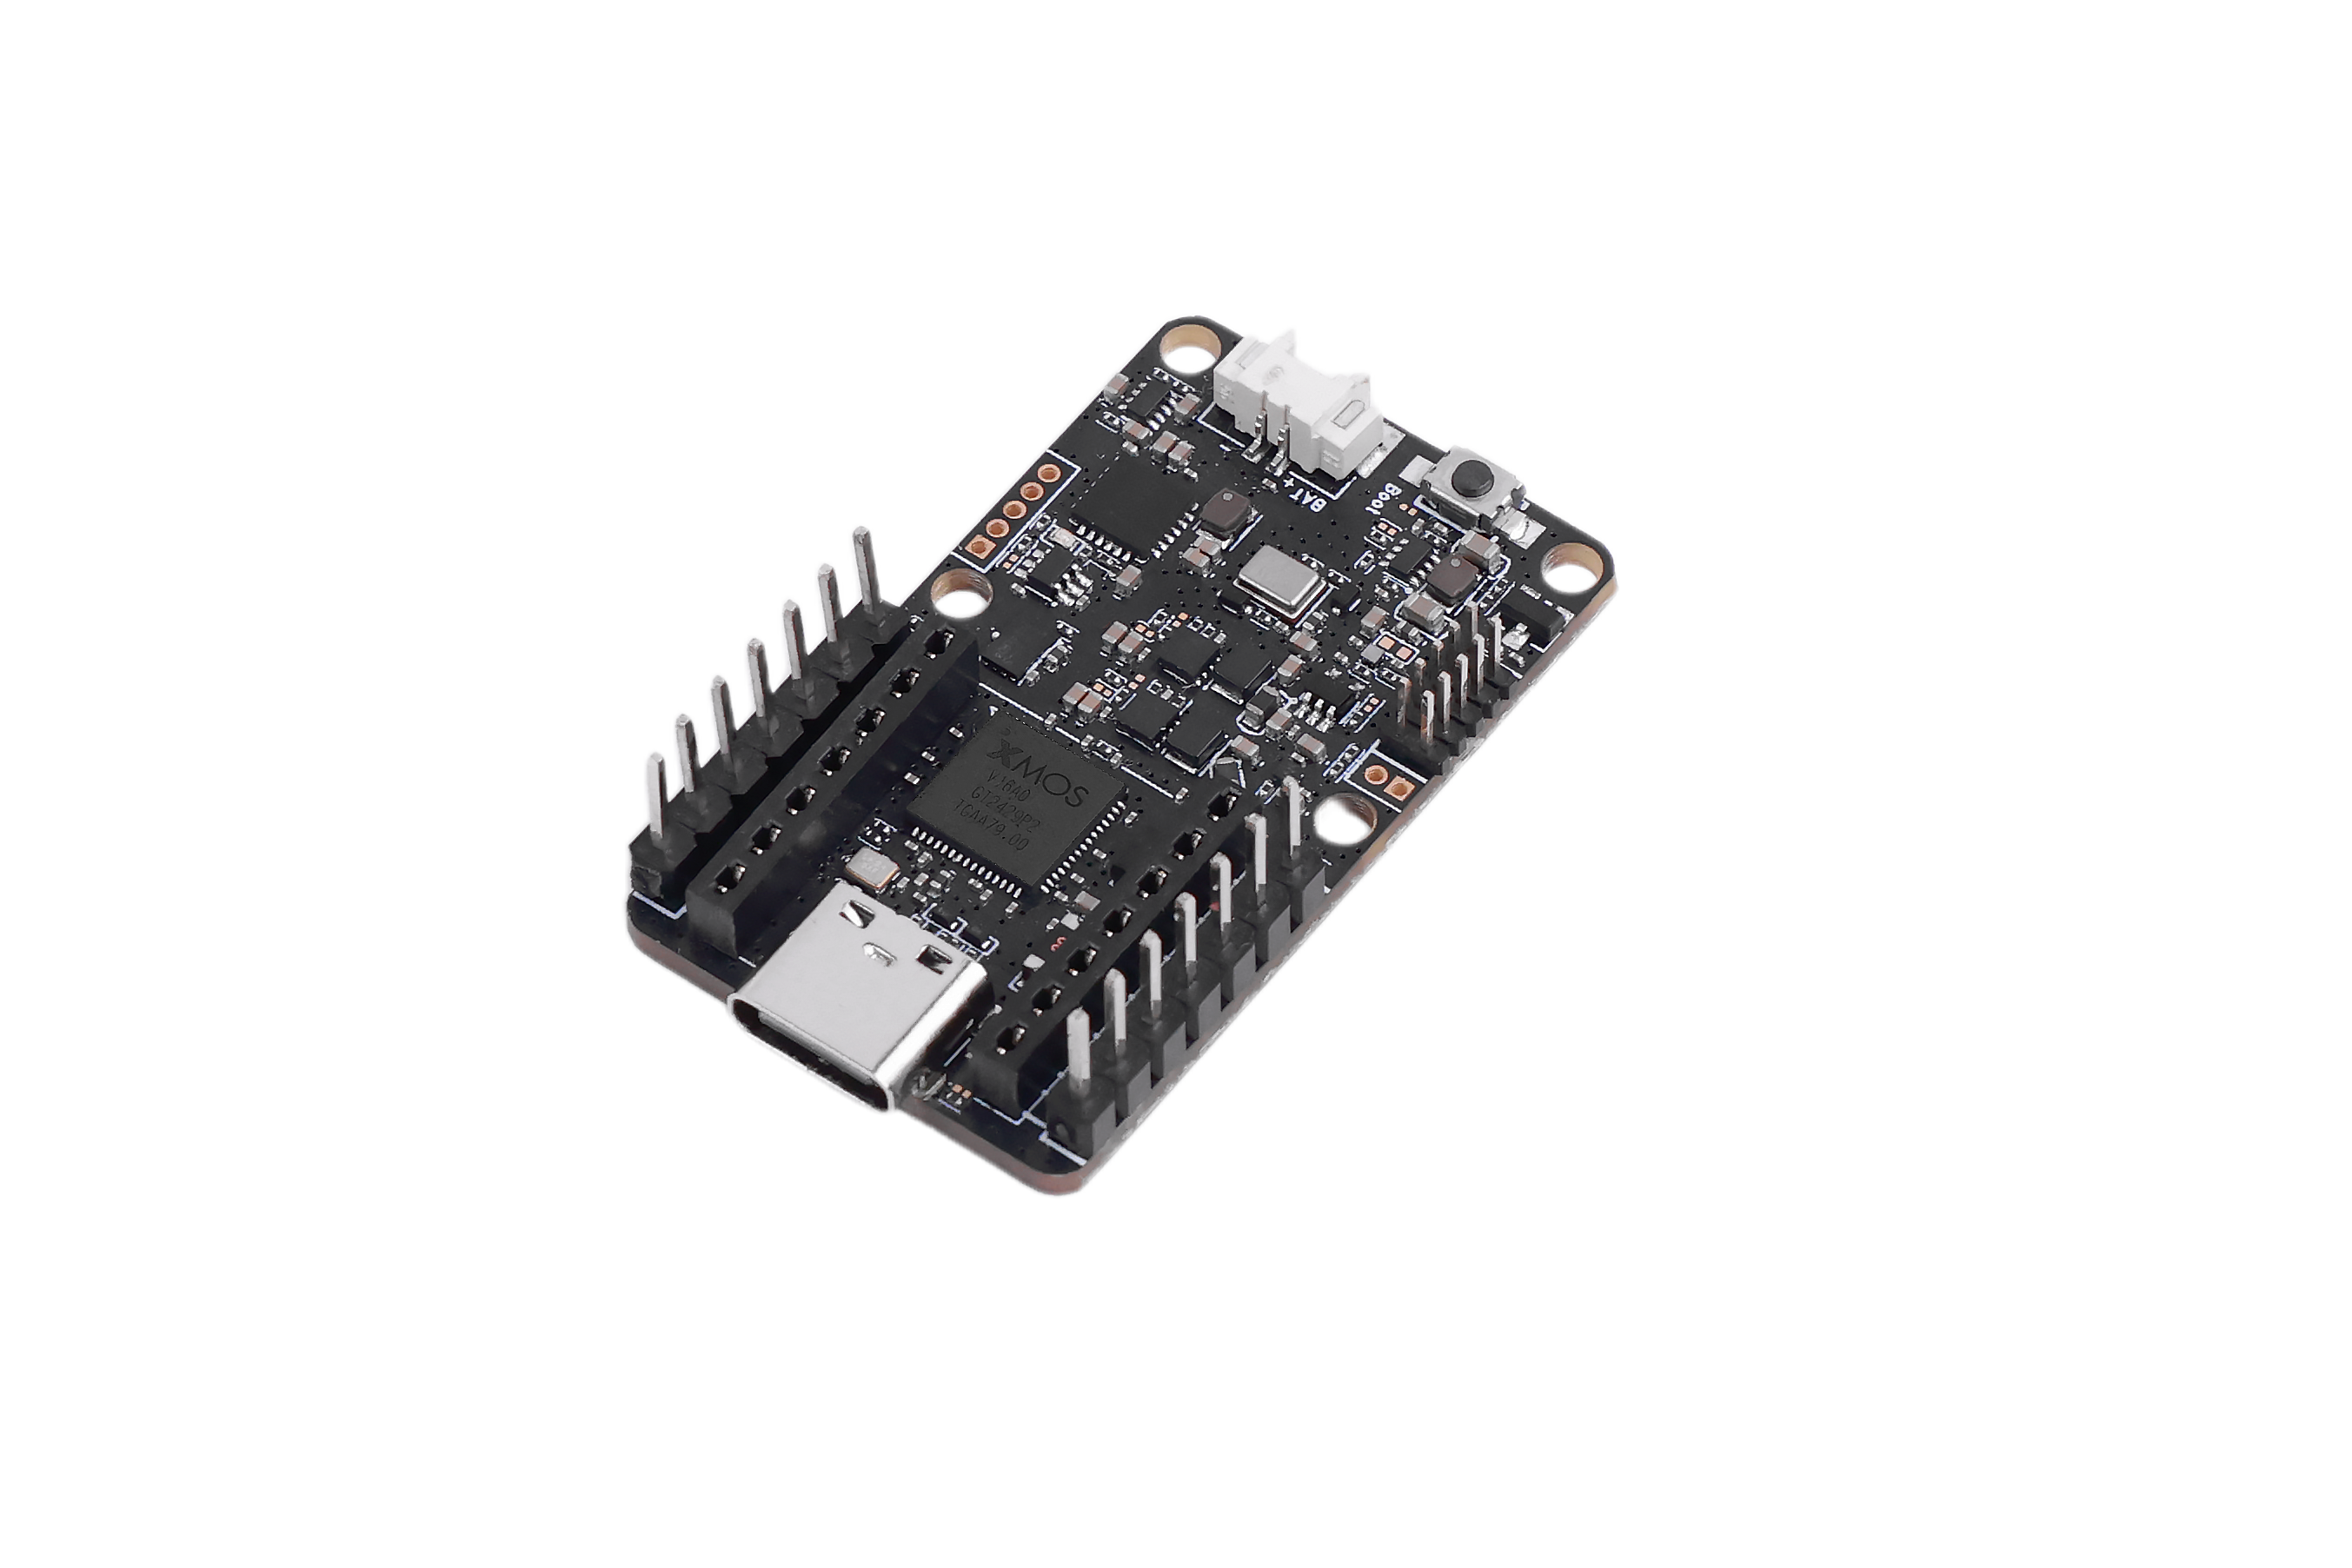
| Sensor de Eventos Sonoros | Home Assistant Yellow Kit | Xiao ESP32S3 |
|---|---|---|
 |  |  |
Instalar o ESPHome Builder
Settings → Add-ons → Click on Add-on Store → Install ESPHome Device Builder add-on.
Vá para Home Assistant > Settings > Add-ons.
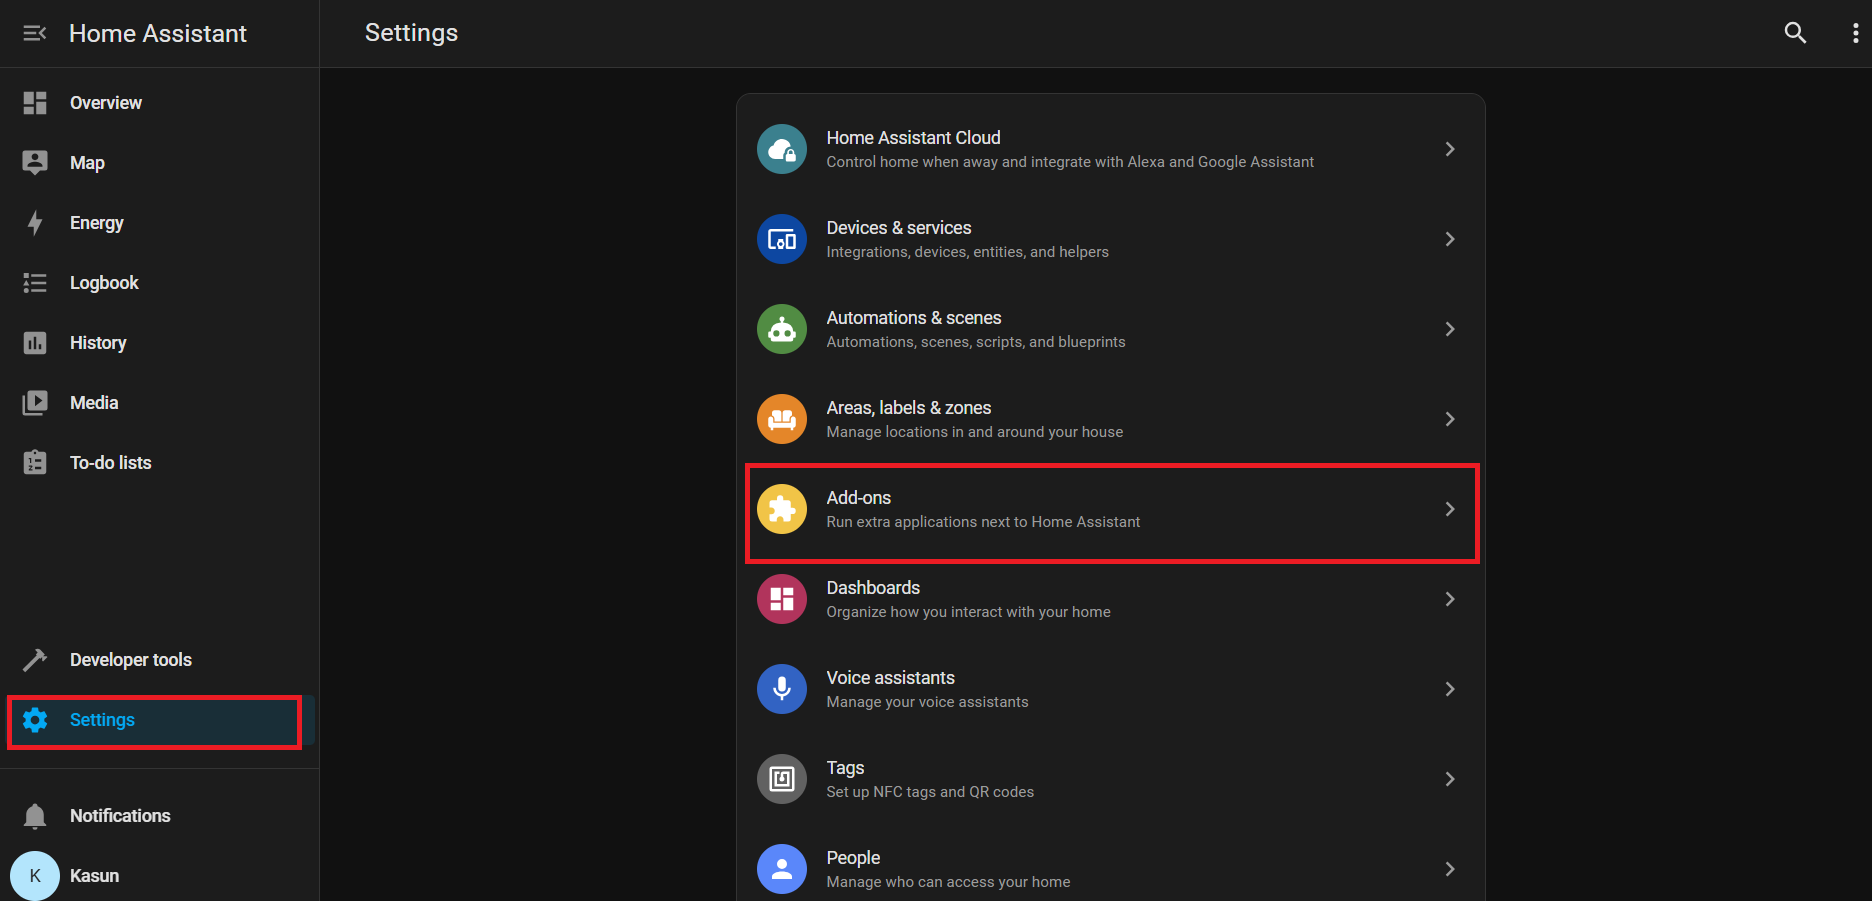
Clique em Add-on Store (geralmente no canto inferior direito)
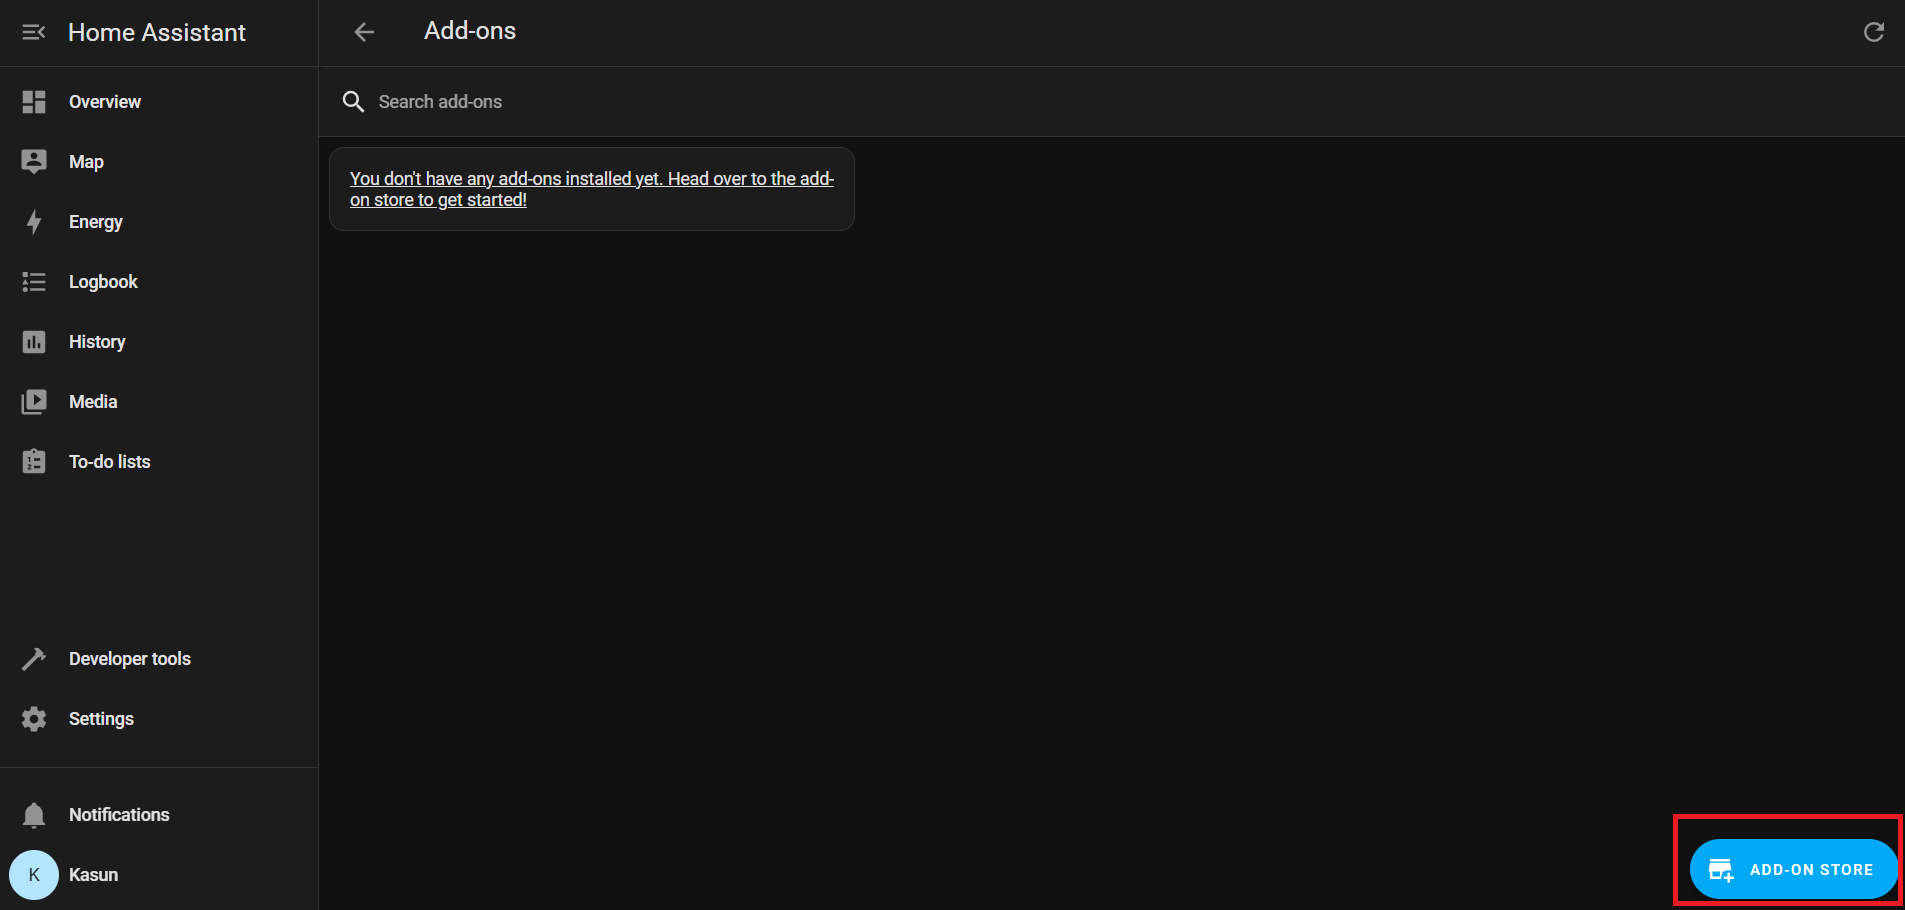
Em Official add-ons, procure e instale ESPHome Device Builder.
Após a instalação, clique em Start para executar o add-on ESPHome.
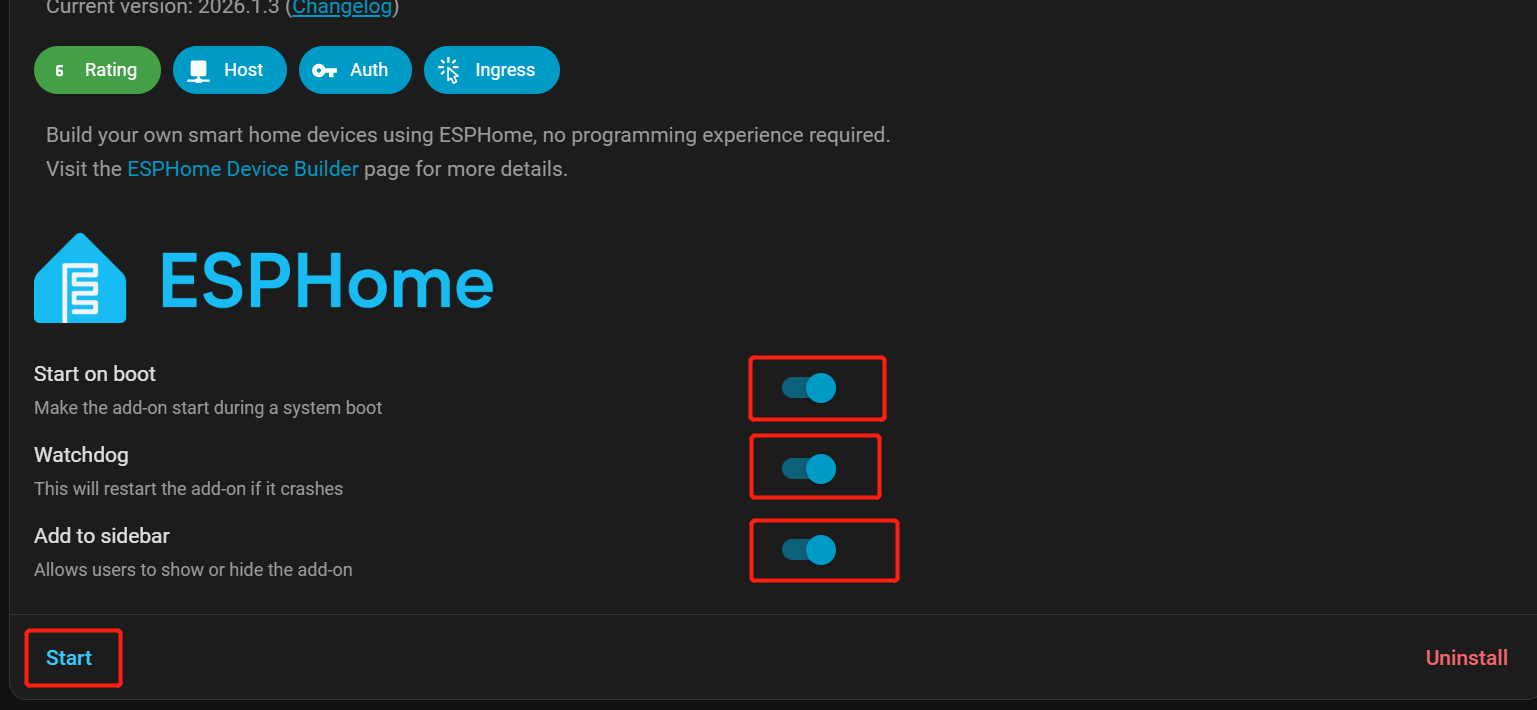
Ative Start on Boot, Watchdog, and Show in Sidebar para facilitar o acesso.
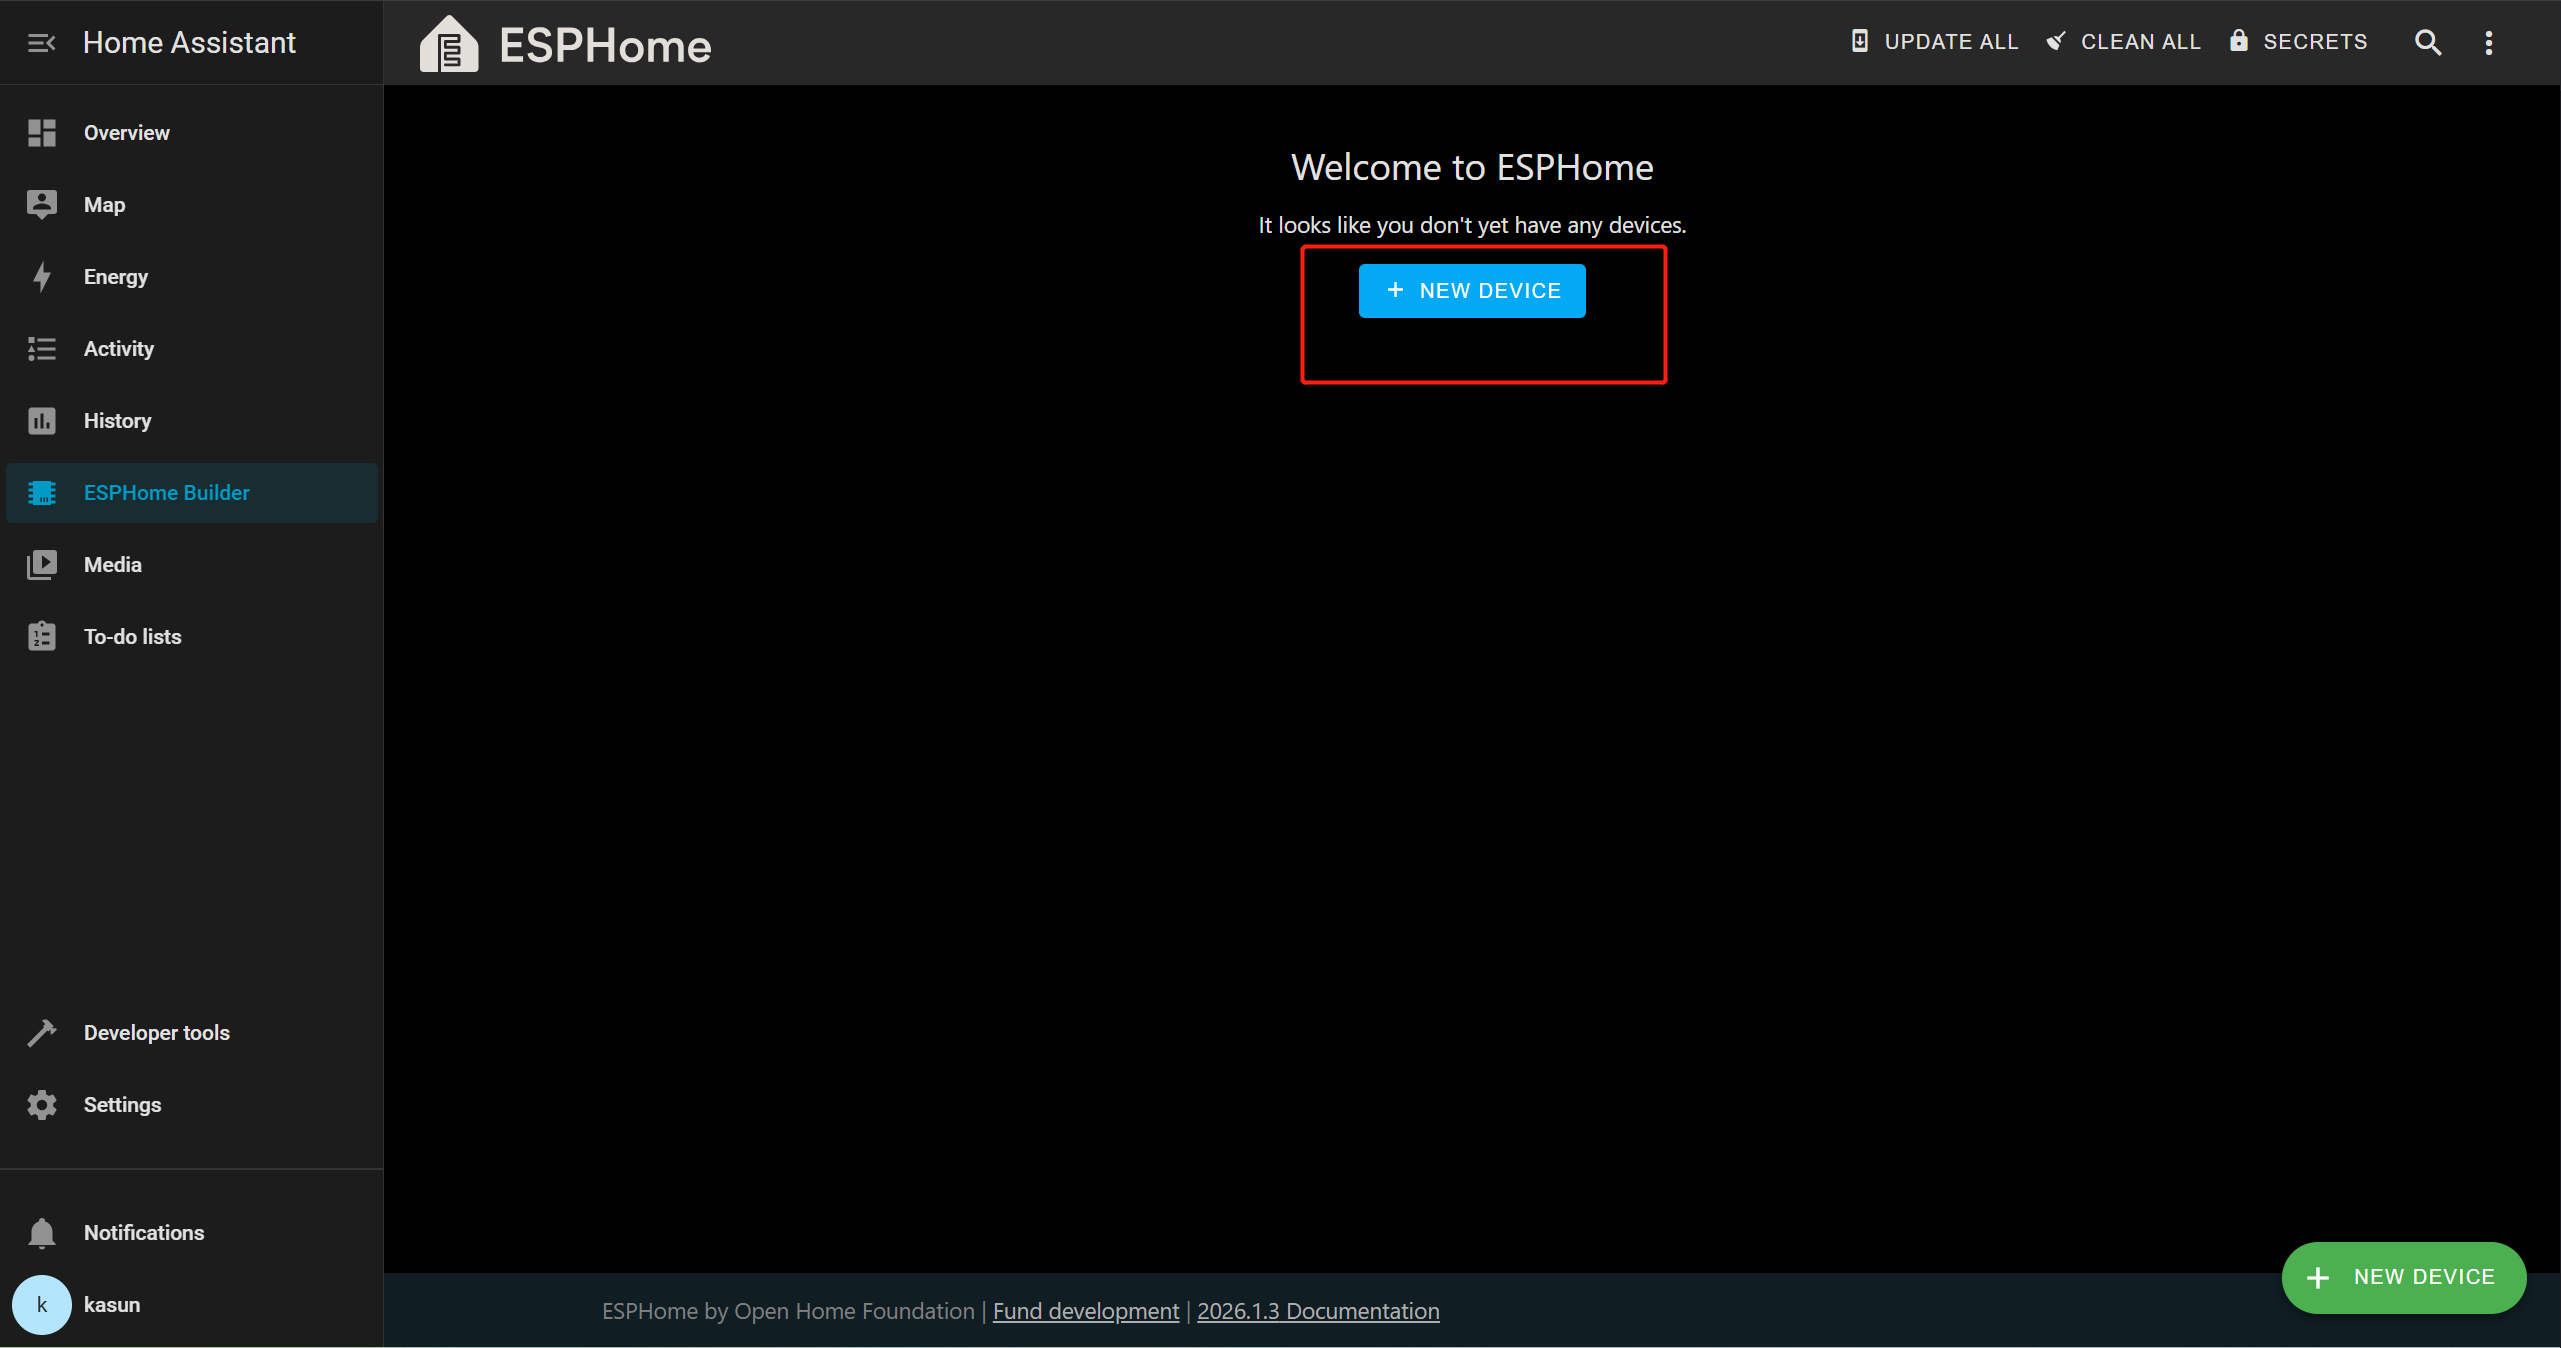
Na barra lateral do Home Assistant, vá para ESPHome Builder.
Adicionar dispositivo de evento sonoro
Clique em + NEW DEVICE.
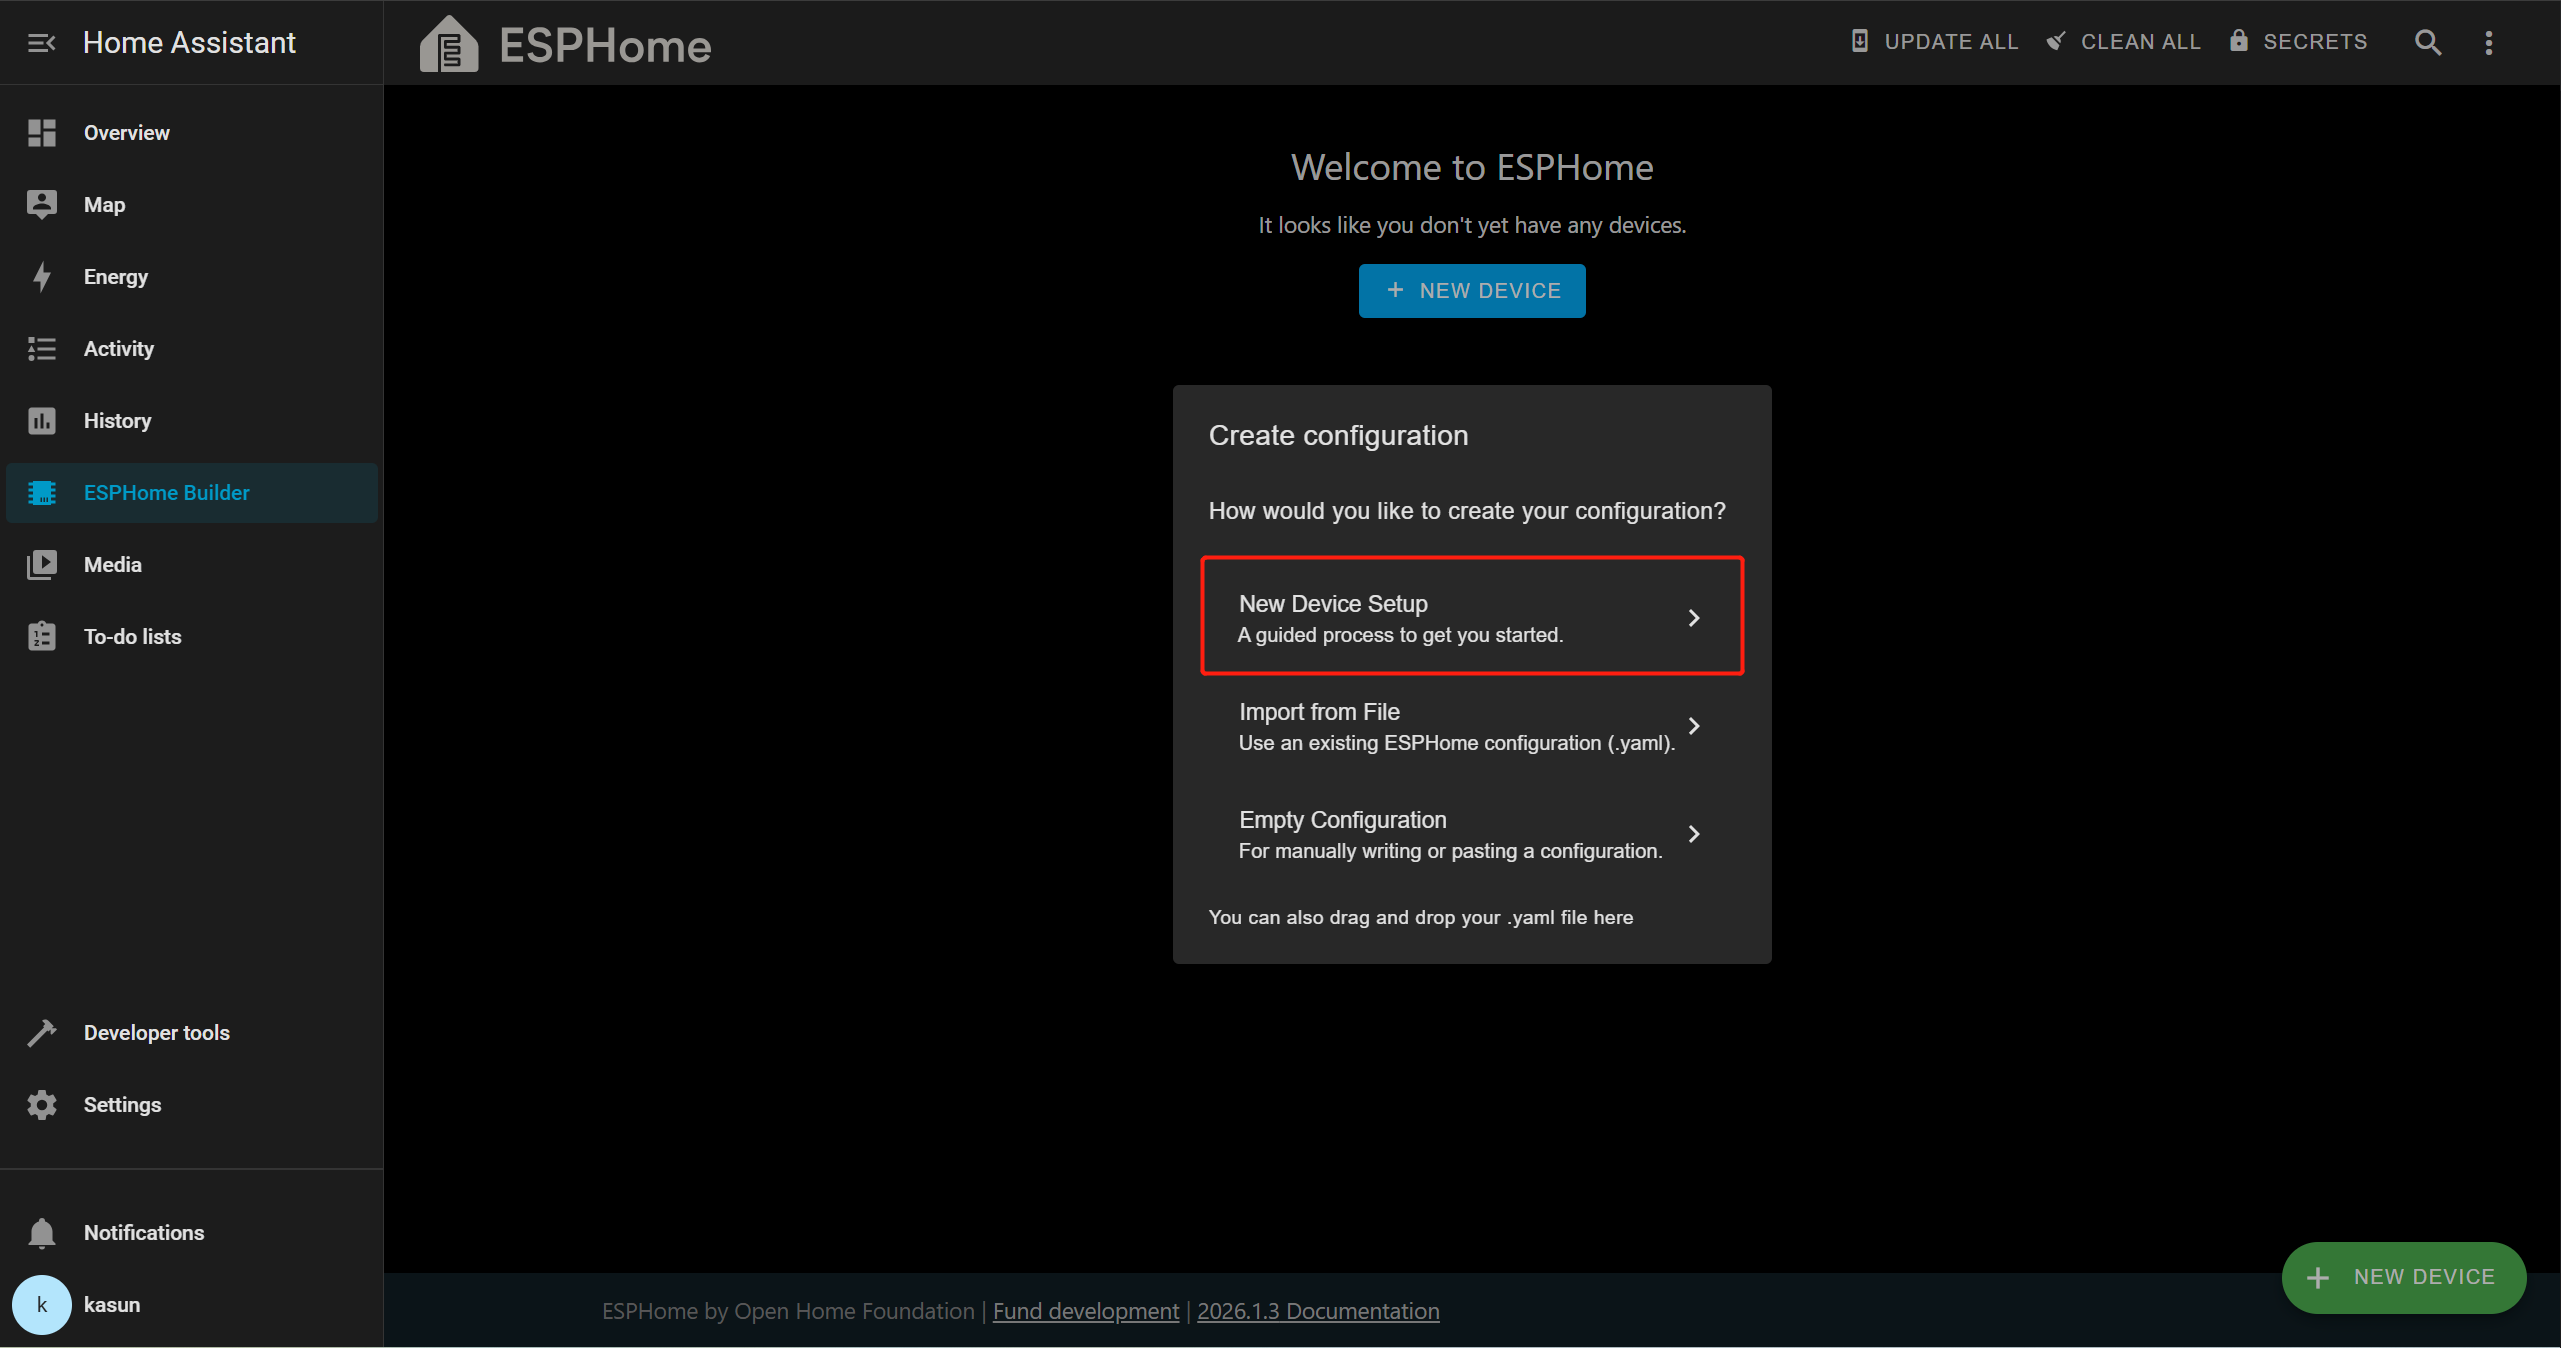
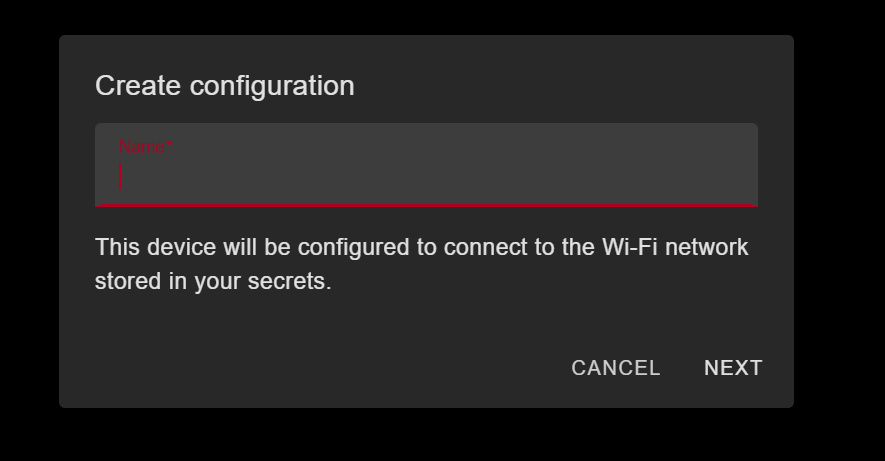
Clique em Continue → New Device Setup e forneça um nome apropriado para o dispositivo.
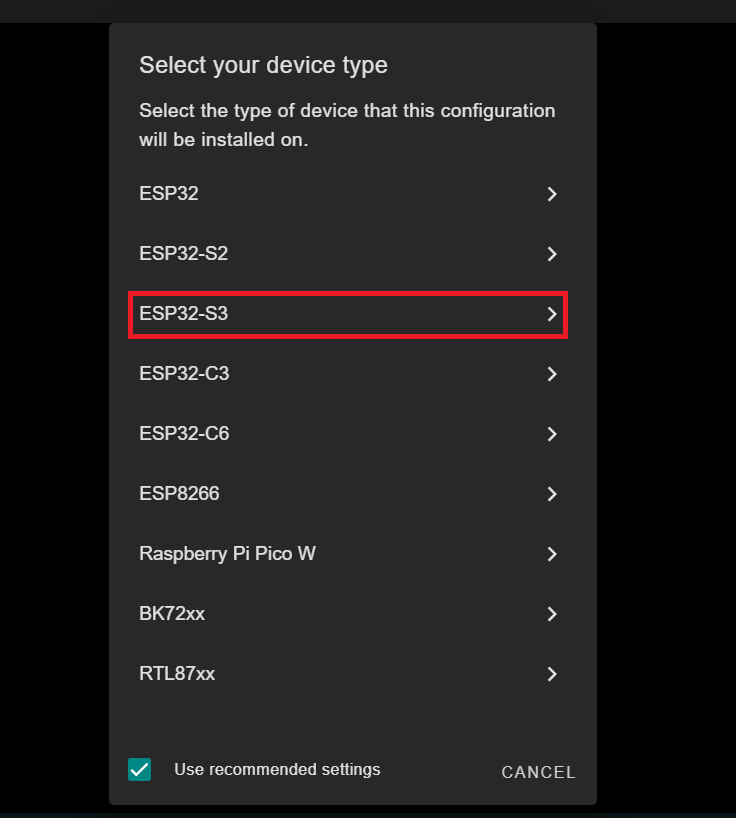
Nesta demonstração, estamos usando o XIAO ESP32-S3, então vamos selecionar ESP32-S3 como a placa de destino. Isso pode ser diferente dependendo da placa que você estiver usando.
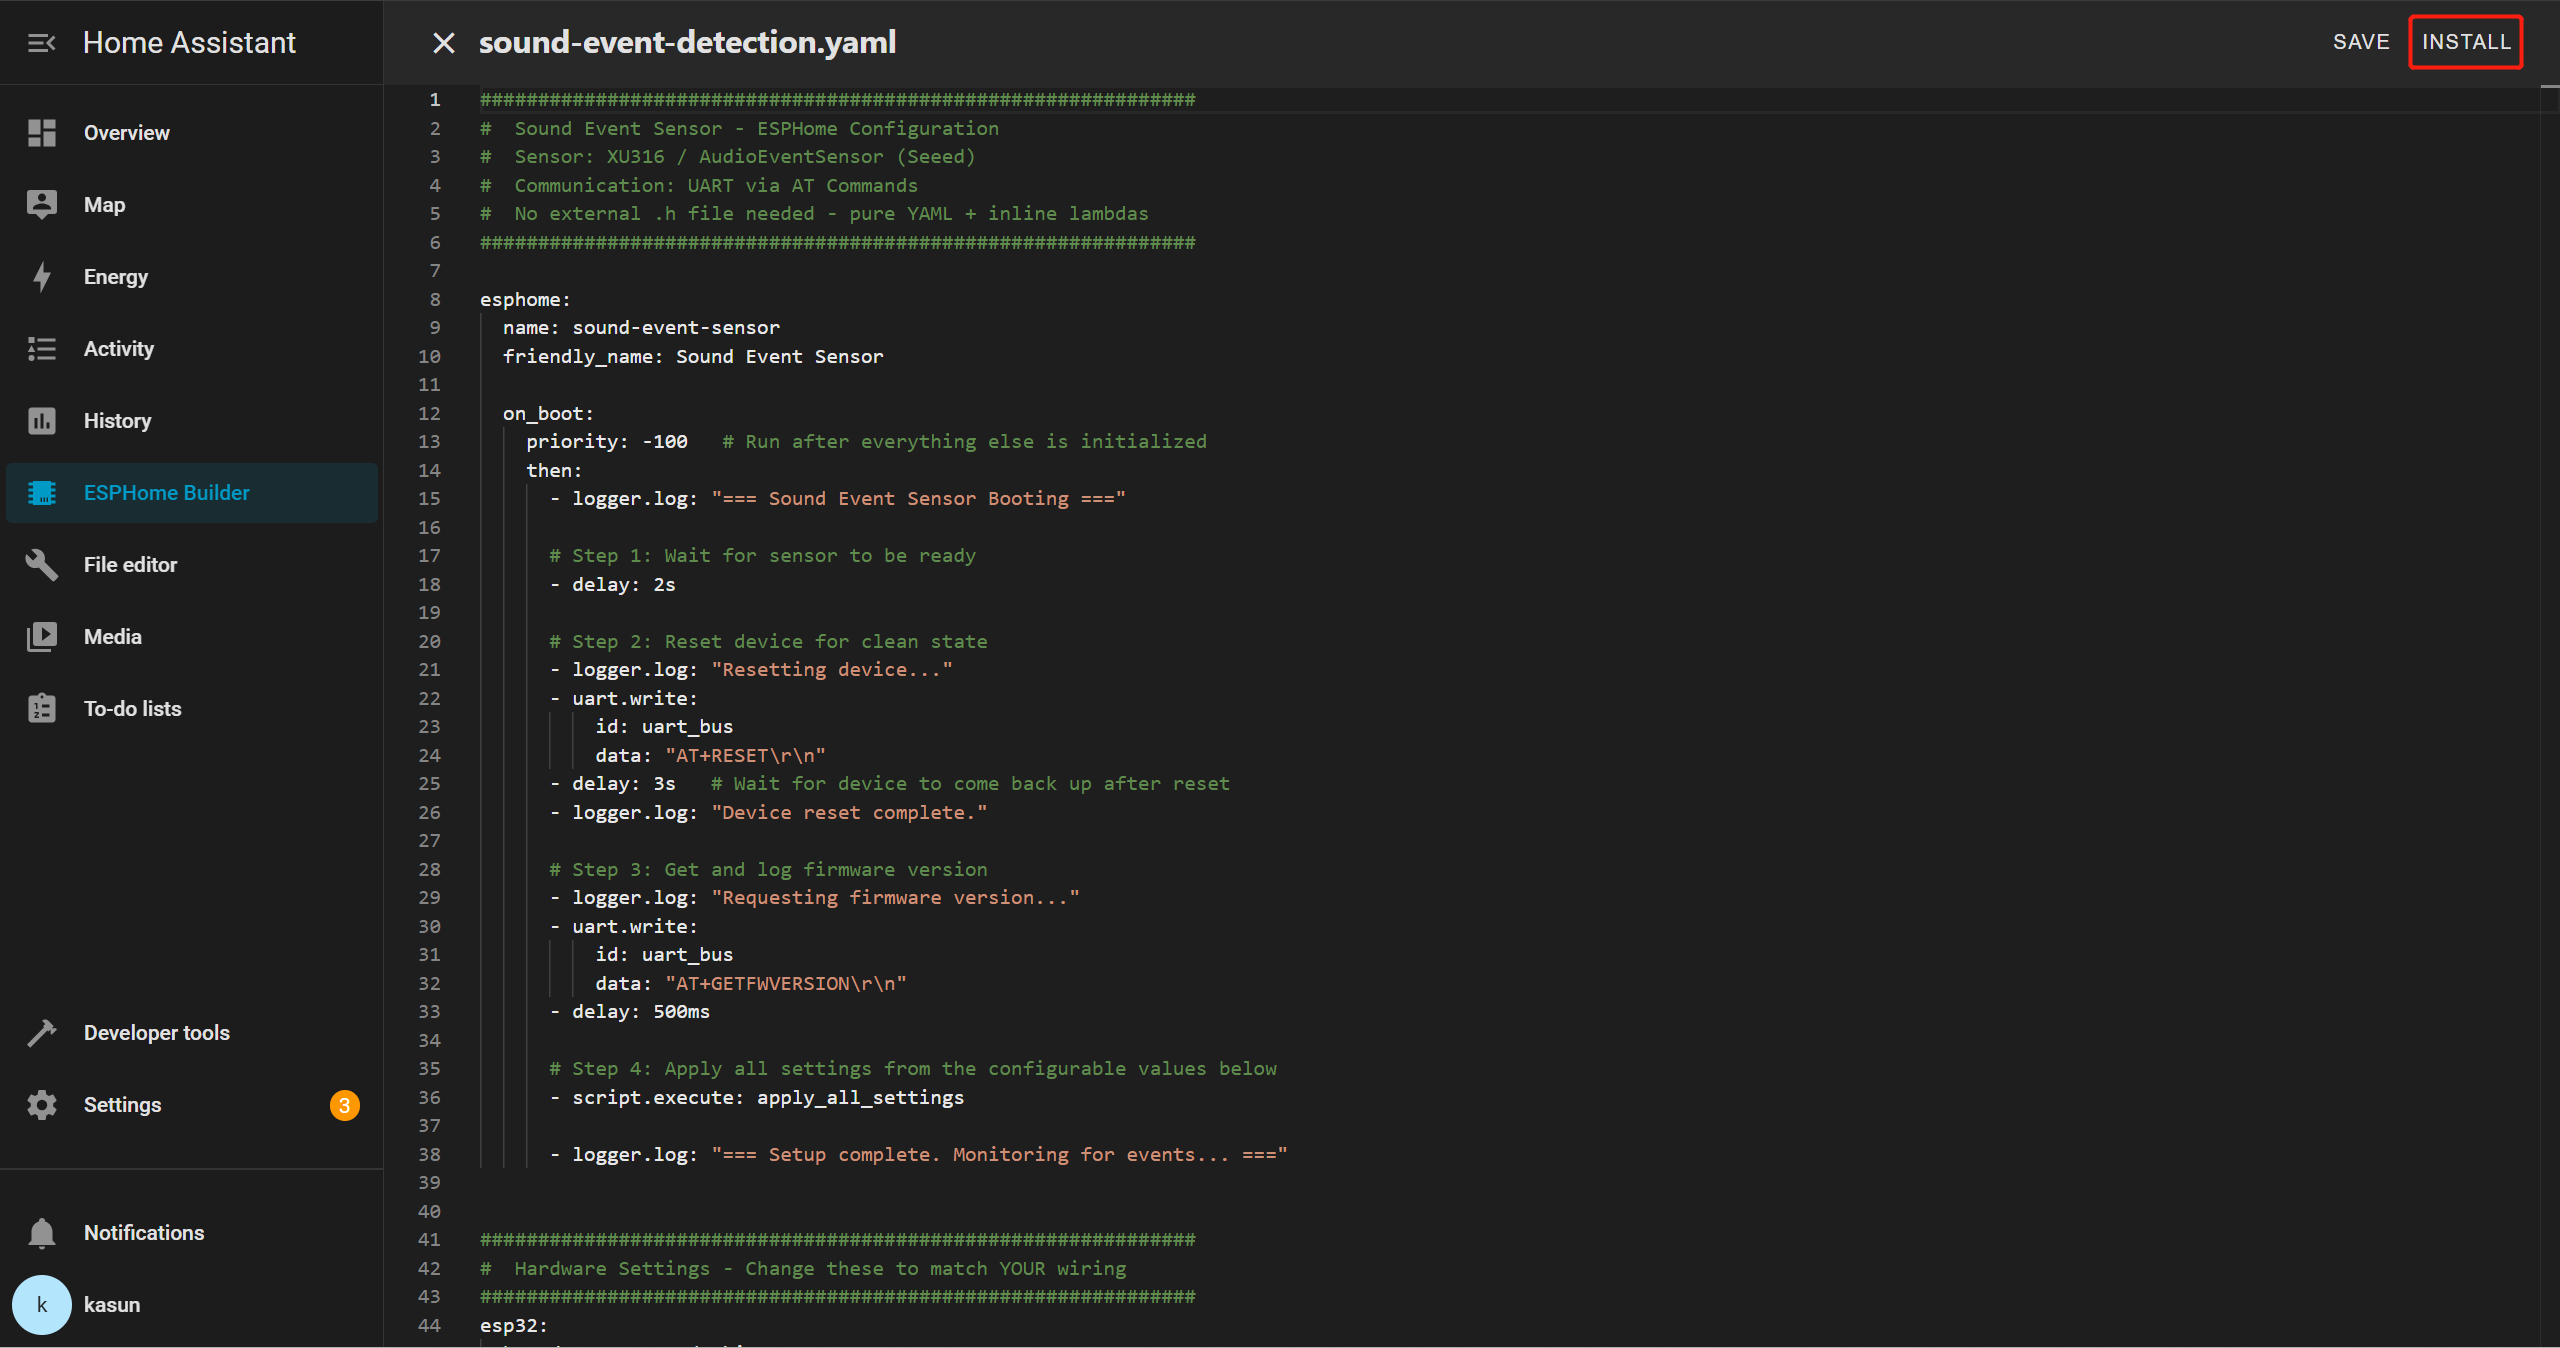
Selecione a nova entrada do dispositivo e clique em Edit. Exclua todo o modelo YAML e, em seguida, copie e cole o arquivo YAML fornecido no editor.
YAML de Evento Sonoro
##############################################################
#  Sound Event Sensor - ESPHome Configuration
#  Sensor: XU316 / AudioEventSensor (Seeed)
#  Communication: UART via AT Commands
#  No external .h file needed - pure YAML + inline lambdas
##############################################################

esphome:
  name: sound-event-sensor
  friendly_name: Sound Event Sensor

  on_boot:
    priority: -100   # Run after everything else is initialized
    then:
      - logger.log: "=== Sound Event Sensor Booting ==="

      # Step 1: Wait for sensor to be ready
      - delay: 2s

      # Step 2: Reset device for clean state
      - logger.log: "Resetting device..."
      - uart.write:
          id: uart_bus
          data: "AT+RESET\r\n"
      - delay: 3s   # Wait for device to come back up after reset
      - logger.log: "Device reset complete."

      # Step 3: Get and log firmware version
      - logger.log: "Requesting firmware version..."
      - uart.write:
          id: uart_bus
          data: "AT+GETFWVERSION\r\n"
      - delay: 500ms

      # Step 4: Apply all settings from the configurable values below
      - script.execute: apply_all_settings

      - logger.log: "=== Setup complete. Monitoring for events... ==="


##############################################################
#  Hardware Settings - Change these to match YOUR wiring
##############################################################
esp32:
  board: esp32-s3-devkitc-1
  variant: esp32s3
  framework:
    type: arduino
    version: recommended


##############################################################
#  Network
##############################################################
wifi:
  ssid: !secret wifi_ssid
  password: !secret wifi_password
  ap:
    ssid: "SoundSensor Fallback"
    password: "soundsensor123"

captive_portal:

ota:
  - platform: esphome
    password: !secret ota_password

api:
  id: api_id

logger:
  level: DEBUG   # Set to INFO to reduce log noise after testing


##############################################################
#  UART - The serial link to your sensor
#  Adjust tx_pin / rx_pin to match your wiring
##############################################################
uart:
  id: uart_bus
  tx_pin: GPIO43    # ← CHANGE to your TX pin
  rx_pin: GPIO44    # ← CHANGE to your RX pin
  baud_rate: 115200
  debug:            # Remove this block after testing
    direction: BOTH
    dummy_receiver: false


##############################################################
#  Global Variables (internal state)
##############################################################
globals:
  # UART line receive buffer
  - id: uart_rx_buffer
    type: std::string
    restore_value: no
    initial_value: '""'


##############################################################
#  SCRIPTS
##############################################################
script:
  - id: apply_all_settings
    then:
      # ── Build detect types from whichever switches are ON ──
      - lambda: |-
          std::string types = "";
          auto add = [&](bool on, const char* name) {
            if (on) { types += (types.empty() ? "" : ","); types += name; }
          };
          add(id(sw_detect_baby_cry).state,    "baby_cry");
          add(id(sw_detect_glass_break).state, "glass_break");
          add(id(sw_detect_gunshot).state,     "gunshot");
          add(id(sw_detect_snore).state,       "snore");
          add(id(sw_detect_t3).state,          "T3");
          add(id(sw_detect_t4).state,          "T4");
          if (types.empty()) types = "gunshot";   // safety fallback
          std::string cmd = "AT+SETDETECT=" + types + "\r\n";
          ESP_LOGI("sound", "Setting detect types: %s", types.c_str());
          id(uart_bus).write_array((const uint8_t*)cmd.c_str(), cmd.length());

      - delay: 400ms

      # ── Set thresholds for all 6 event types ──────────────
      - lambda: |-
          int val = (int) id(num_thr_baby_cry).state;
          std::string cmd = "AT+SETEVENTTHRESHOLD=baby_cry," + std::to_string(val) + "\r\n";
          ESP_LOGI("sound", "baby_cry threshold -> %d", val);
          id(uart_bus).write_array((const uint8_t*)cmd.c_str(), cmd.length());
      - delay: 400ms

      - lambda: |-
          int val = (int) id(num_thr_glass_break).state;
          std::string cmd = "AT+SETEVENTTHRESHOLD=glass_break," + std::to_string(val) + "\r\n";
          ESP_LOGI("sound", "glass_break threshold -> %d", val);
          id(uart_bus).write_array((const uint8_t*)cmd.c_str(), cmd.length());
      - delay: 400ms

      - lambda: |-
          int val = (int) id(num_thr_gunshot).state;
          std::string cmd = "AT+SETEVENTTHRESHOLD=gunshot," + std::to_string(val) + "\r\n";
          ESP_LOGI("sound", "gunshot threshold -> %d", val);
          id(uart_bus).write_array((const uint8_t*)cmd.c_str(), cmd.length());
      - delay: 400ms

      - lambda: |-
          int val = (int) id(num_thr_snore).state;
          std::string cmd = "AT+SETEVENTTHRESHOLD=snore," + std::to_string(val) + "\r\n";
          ESP_LOGI("sound", "snore threshold -> %d", val);
          id(uart_bus).write_array((const uint8_t*)cmd.c_str(), cmd.length());
      - delay: 400ms

      - lambda: |-
          int val = (int) id(num_thr_t3).state;
          std::string cmd = "AT+SETEVENTTHRESHOLD=T3," + std::to_string(val) + "\r\n";
          ESP_LOGI("sound", "T3 threshold -> %d", val);
          id(uart_bus).write_array((const uint8_t*)cmd.c_str(), cmd.length());
      - delay: 400ms

      - lambda: |-
          int val = (int) id(num_thr_t4).state;
          std::string cmd = "AT+SETEVENTTHRESHOLD=T4," + std::to_string(val) + "\r\n";
          ESP_LOGI("sound", "T4 threshold -> %d", val);
          id(uart_bus).write_array((const uint8_t*)cmd.c_str(), cmd.length());
      - delay: 400ms

      # ── Save to sensor flash ───────────────────────────────
      - logger.log: "Saving config to sensor..."
      - uart.write:
          id: uart_bus
          data: "AT+SAVECONFIG\r\n"
      - delay: 500ms
      - logger.log: "Settings applied and saved!"


##############################################################
#  INTERVAL - Parse incoming UART lines every 50ms
##############################################################
interval:
  - interval: 50ms
    then:
      - lambda: |-
          while (id(uart_bus).available()) {
            uint8_t b;
            id(uart_bus).read_byte(&b);
            char c = (char)b;

            if (c == '\n') {
              std::string line = id(uart_rx_buffer);
              id(uart_rx_buffer) = "";
              if (!line.empty() && line.back() == '\r') line.pop_back();
              if (line.empty()) continue;

              ESP_LOGD("uart_rx", "<- %s", line.c_str());

              // ── +EVENT: id,confidence ─────────────────────
              if (line.size() > 7 && line.substr(0, 7) == "+EVENT:") {
                std::string payload = line.substr(7);
                while (!payload.empty() && payload[0] == ' ') payload.erase(0,1);

                size_t comma = payload.find(',');
                if (comma != std::string::npos) {
                  int event_id = std::stoi(payload.substr(0, comma));
                  int pct      = (int) std::stof(payload.substr(comma + 1));

                  // ID map matches AudioEventSensor.cpp
                  const char* label_map[] = {"", "baby_cry", "glass_break", "gunshot", "snore", "T3", "T4"};
                  std::string name = (event_id >= 1 && event_id <= 6) ? label_map[event_id] : "unknown";
                  std::string full = name + " " + std::to_string(pct) + "% confidence";

                  id(txt_last_event_full).publish_state(full);
                  id(txt_last_event_name).publish_state(name);
                  id(sen_confidence).publish_state((float)pct);
                  ESP_LOGI("sound", "EVENT: %s", full.c_str());
                }
              }

              // ── +GETFWVERSION:1.0.0 ───────────────────────
              else if (line.size() > 14 && line.substr(0, 14) == "+GETFWVERSION:") {
                std::string ver = line.substr(14);
                while (!ver.empty() && ver[0] == ' ') ver.erase(0,1);
                id(txt_firmware_version).publish_state(ver);
                ESP_LOGI("sound", "Firmware: %s", ver.c_str());
              }

              else if (line == "OK") {
                ESP_LOGD("sound", "<- OK");
              } else if (line.size() >= 5 && line.substr(0, 5) == "ERROR") {
                ESP_LOGW("sound", "<- ERROR: %s", line.c_str());
              }

            } else if (c != '\r') {
              id(uart_rx_buffer) += c;
            }
          }


##############################################################
#  SWITCHES
#  All 6 events ON by default — user can disable any in HA
#  After changing: press the "Apply Settings" button
##############################################################
switch:
  - platform: template
    name: "Detect Baby Cry"          # Class ID 1
    id: sw_detect_baby_cry
    icon: mdi:baby-face-outline
    optimistic: true
    restore_mode: RESTORE_DEFAULT_ON  # ← ON by default

  - platform: template
    name: "Detect Glass Break"       # Class ID 2
    id: sw_detect_glass_break
    icon: mdi:glass-fragile
    optimistic: true
    restore_mode: RESTORE_DEFAULT_ON  # ← ON by default

  - platform: template
    name: "Detect Gunshot"           # Class ID 3
    id: sw_detect_gunshot
    icon: mdi:target
    optimistic: true
    restore_mode: RESTORE_DEFAULT_ON  # ← ON by default

  - platform: template
    name: "Detect Snore"             # Class ID 4
    id: sw_detect_snore
    icon: mdi:sleep
    optimistic: true
    restore_mode: RESTORE_DEFAULT_ON  # ← ON by default

  - platform: template
    name: "Detect T3"                # Class ID 5 (custom event)
    id: sw_detect_t3
    icon: mdi:waveform
    optimistic: true
    restore_mode: RESTORE_DEFAULT_ON  # ← ON by default

  - platform: template
    name: "Detect T4"                # Class ID 6 (custom event)
    id: sw_detect_t4
    icon: mdi:waveform
    optimistic: true
    restore_mode: RESTORE_DEFAULT_ON  # ← ON by default


##############################################################
#  NUMBER SLIDERS - Confidence thresholds
#  All default to 80% — adjust per event in HA
#  After changing: press the "Apply Settings" button
##############################################################
number:
  - platform: template
    name: "Baby Cry Threshold"
    id: num_thr_baby_cry
    icon: mdi:tune
    unit_of_measurement: "%"
    min_value: 0
    max_value: 100
    step: 5
    initial_value: 80             # ← Default 80%
    restore_value: true
    optimistic: true

  - platform: template
    name: "Glass Break Threshold"
    id: num_thr_glass_break
    icon: mdi:tune
    unit_of_measurement: "%"
    min_value: 0
    max_value: 100
    step: 5
    initial_value: 80             # ← Default 80%
    restore_value: true
    optimistic: true

  - platform: template
    name: "Gunshot Threshold"
    id: num_thr_gunshot
    icon: mdi:tune
    unit_of_measurement: "%"
    min_value: 0
    max_value: 100
    step: 5
    initial_value: 80             # ← Default 80%
    restore_value: true
    optimistic: true

  - platform: template
    name: "Snore Threshold"
    id: num_thr_snore
    icon: mdi:tune
    unit_of_measurement: "%"
    min_value: 0
    max_value: 100
    step: 5
    initial_value: 80             # ← Default 80%
    restore_value: true
    optimistic: true

  - platform: template
    name: "T3 Threshold"
    id: num_thr_t3
    icon: mdi:tune
    unit_of_measurement: "%"
    min_value: 0
    max_value: 100
    step: 5
    initial_value: 80             # ← Default 80%
    restore_value: true
    optimistic: true

  - platform: template
    name: "T4 Threshold"
    id: num_thr_t4
    icon: mdi:tune
    unit_of_measurement: "%"
    min_value: 0
    max_value: 100
    step: 5
    initial_value: 80             # ← Default 80%
    restore_value: true
    optimistic: true


##############################################################
#  BUTTONS
##############################################################
button:
  - platform: template
    name: "Apply Settings"
    id: btn_apply_settings
    icon: mdi:content-save-cog
    on_press:
      - script.execute: apply_all_settings

  - platform: template
    name: "Reset Sensor"
    id: btn_reset
    icon: mdi:restart
    on_press:
      - logger.log: "Manual reset triggered"
      - uart.write:
          id: uart_bus
          data: "AT+RESET\r\n"
      - delay: 3s
      - script.execute: apply_all_settings

  - platform: template
    name: "Save Sensor Config"
    id: btn_save_config
    icon: mdi:content-save
    on_press:
      - uart.write:
          id: uart_bus
          data: "AT+SAVECONFIG\r\n"

  - platform: template
    name: "Get Firmware Version"
    id: btn_get_fw
    icon: mdi:information
    on_press:
      - uart.write:
          id: uart_bus
          data: "AT+GETFWVERSION\r\n"

  - platform: restart
    name: "Restart ESP32"
    icon: mdi:restart-alert
    entity_category: config


##############################################################
#  TEXT SENSORS
##############################################################
text_sensor:
  - platform: template
    name: "Last Sound Event"
    id: txt_last_event_full
    icon: mdi:ear-hearing
    # Example: "glass_break 87% confidence"

  - platform: template
    name: "Event Type"
    id: txt_last_event_name
    icon: mdi:waveform
    # Example: "gunshot"
    # Use this in HA automations → trigger when state = "gunshot"

  - platform: template
    name: "Firmware Version"
    id: txt_firmware_version
    icon: mdi:chip
    entity_category: diagnostic

  - platform: wifi_info
    ip_address:
      name: "IP Address"
      icon: mdi:ip-network
      entity_category: diagnostic
    ssid:
      name: "Connected SSID"
      icon: mdi:wifi
      entity_category: diagnostic


##############################################################
#  SENSORS
##############################################################
sensor:
  - platform: template
    name: "Event Confidence"
    id: sen_confidence
    icon: mdi:percent
    unit_of_measurement: "%"
    accuracy_decimals: 0

  - platform: wifi_signal
    name: "WiFi Signal"
    update_interval: 60s
    entity_category: diagnostic
    icon: mdi:wifi-strength-2
Neste exemplo, estamos usando o XIAO ESP32S3, portanto você pode precisar atualizar os seguintes parâmetros no arquivo YAML de acordo com a sua placa e a configuração de fiação
board: esp32-s3-devkitc-1   # your board name
tx_pin: GPIO43             # your TX pin connection
rx_pin: GPIO44             # your RX pin connection
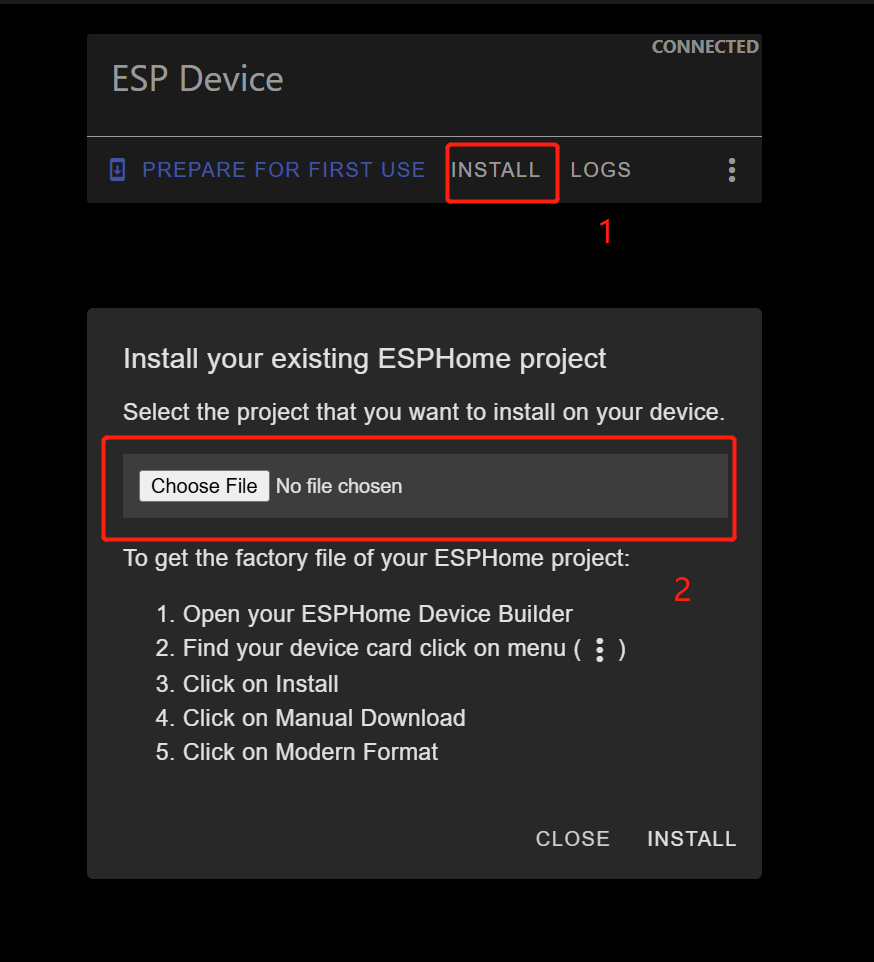
Depois que o seu YAML for salvo, clique em INSTALL.
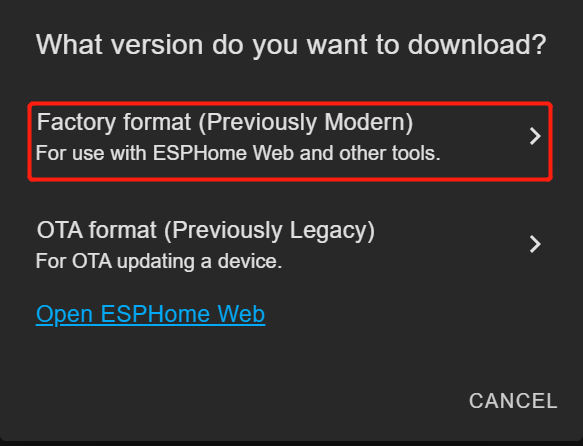
Escolha Manual Download

Aguarde a compilação do firmware.
Baixe o arquivo de firmware .bin gerado para o seu computador a partir de Factory Format.
Conecte a placa ESP32-S3 do sensor de som embarcado ao seu PC usando um cabo USB Tipo-C.
Abra o Web ESPHome no Google Chrome.
Clique em Connect e escolha a porta serial correta na lista.
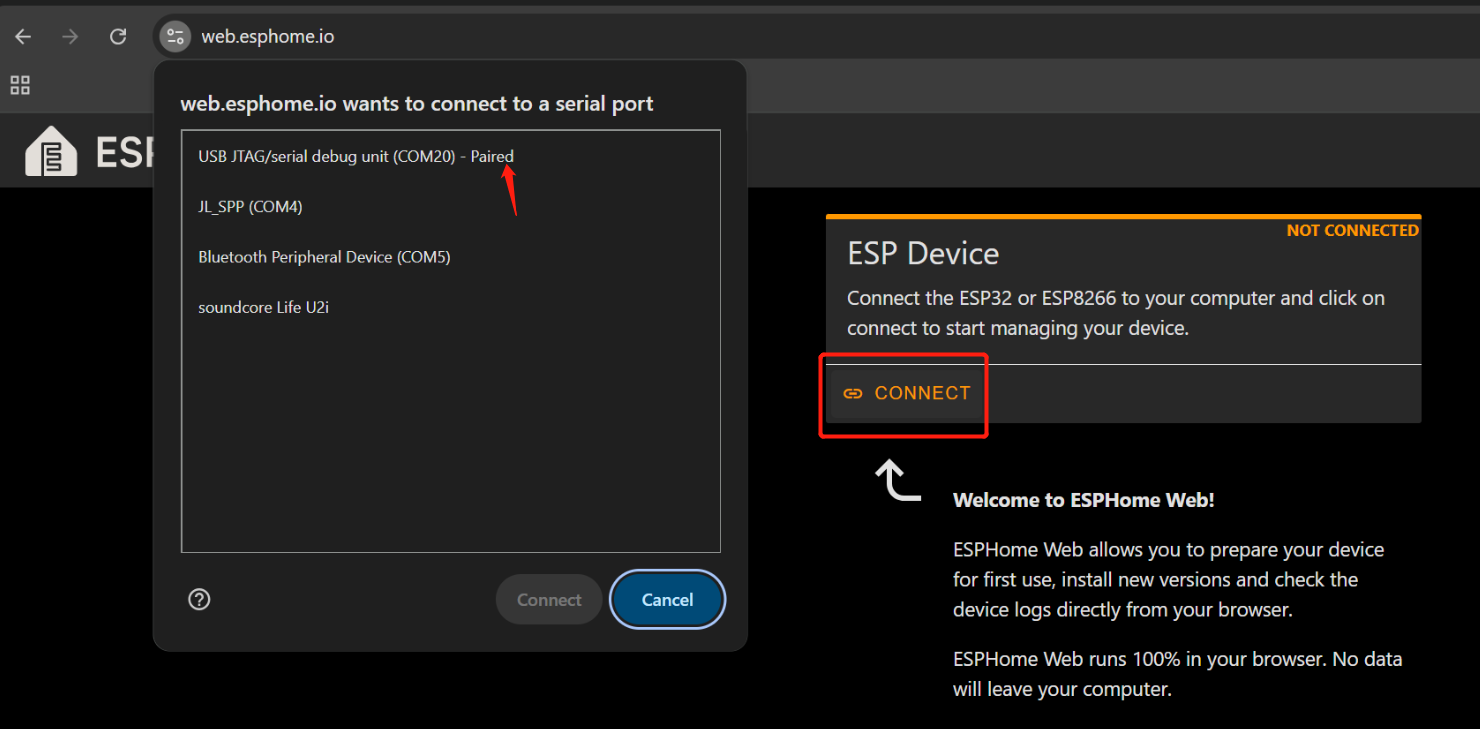
Depois de conectado, clique em INSTALL
Selecione o arquivo .bin que você acabou de baixar.
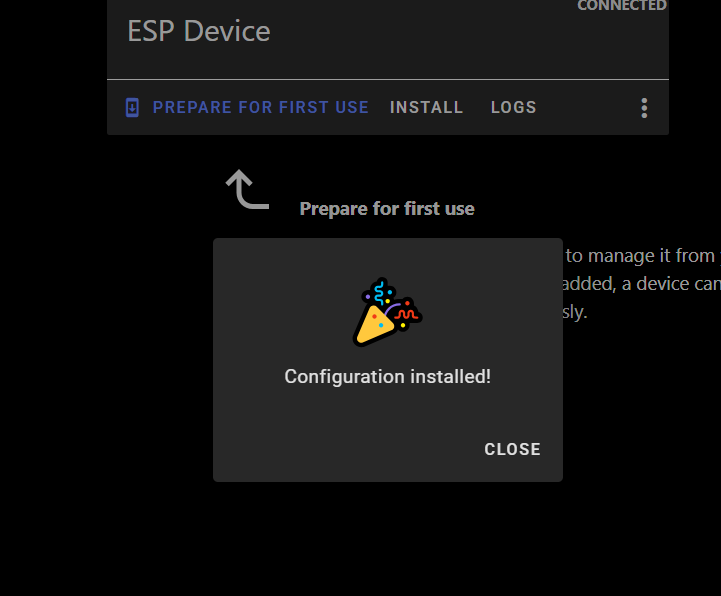
Aguarde a conclusão da instalação (pode levar alguns minutos).
Após a conclusão, você verá uma mensagem de confirmação.
Volte para Home Assistant > Settings > Devices & Services.
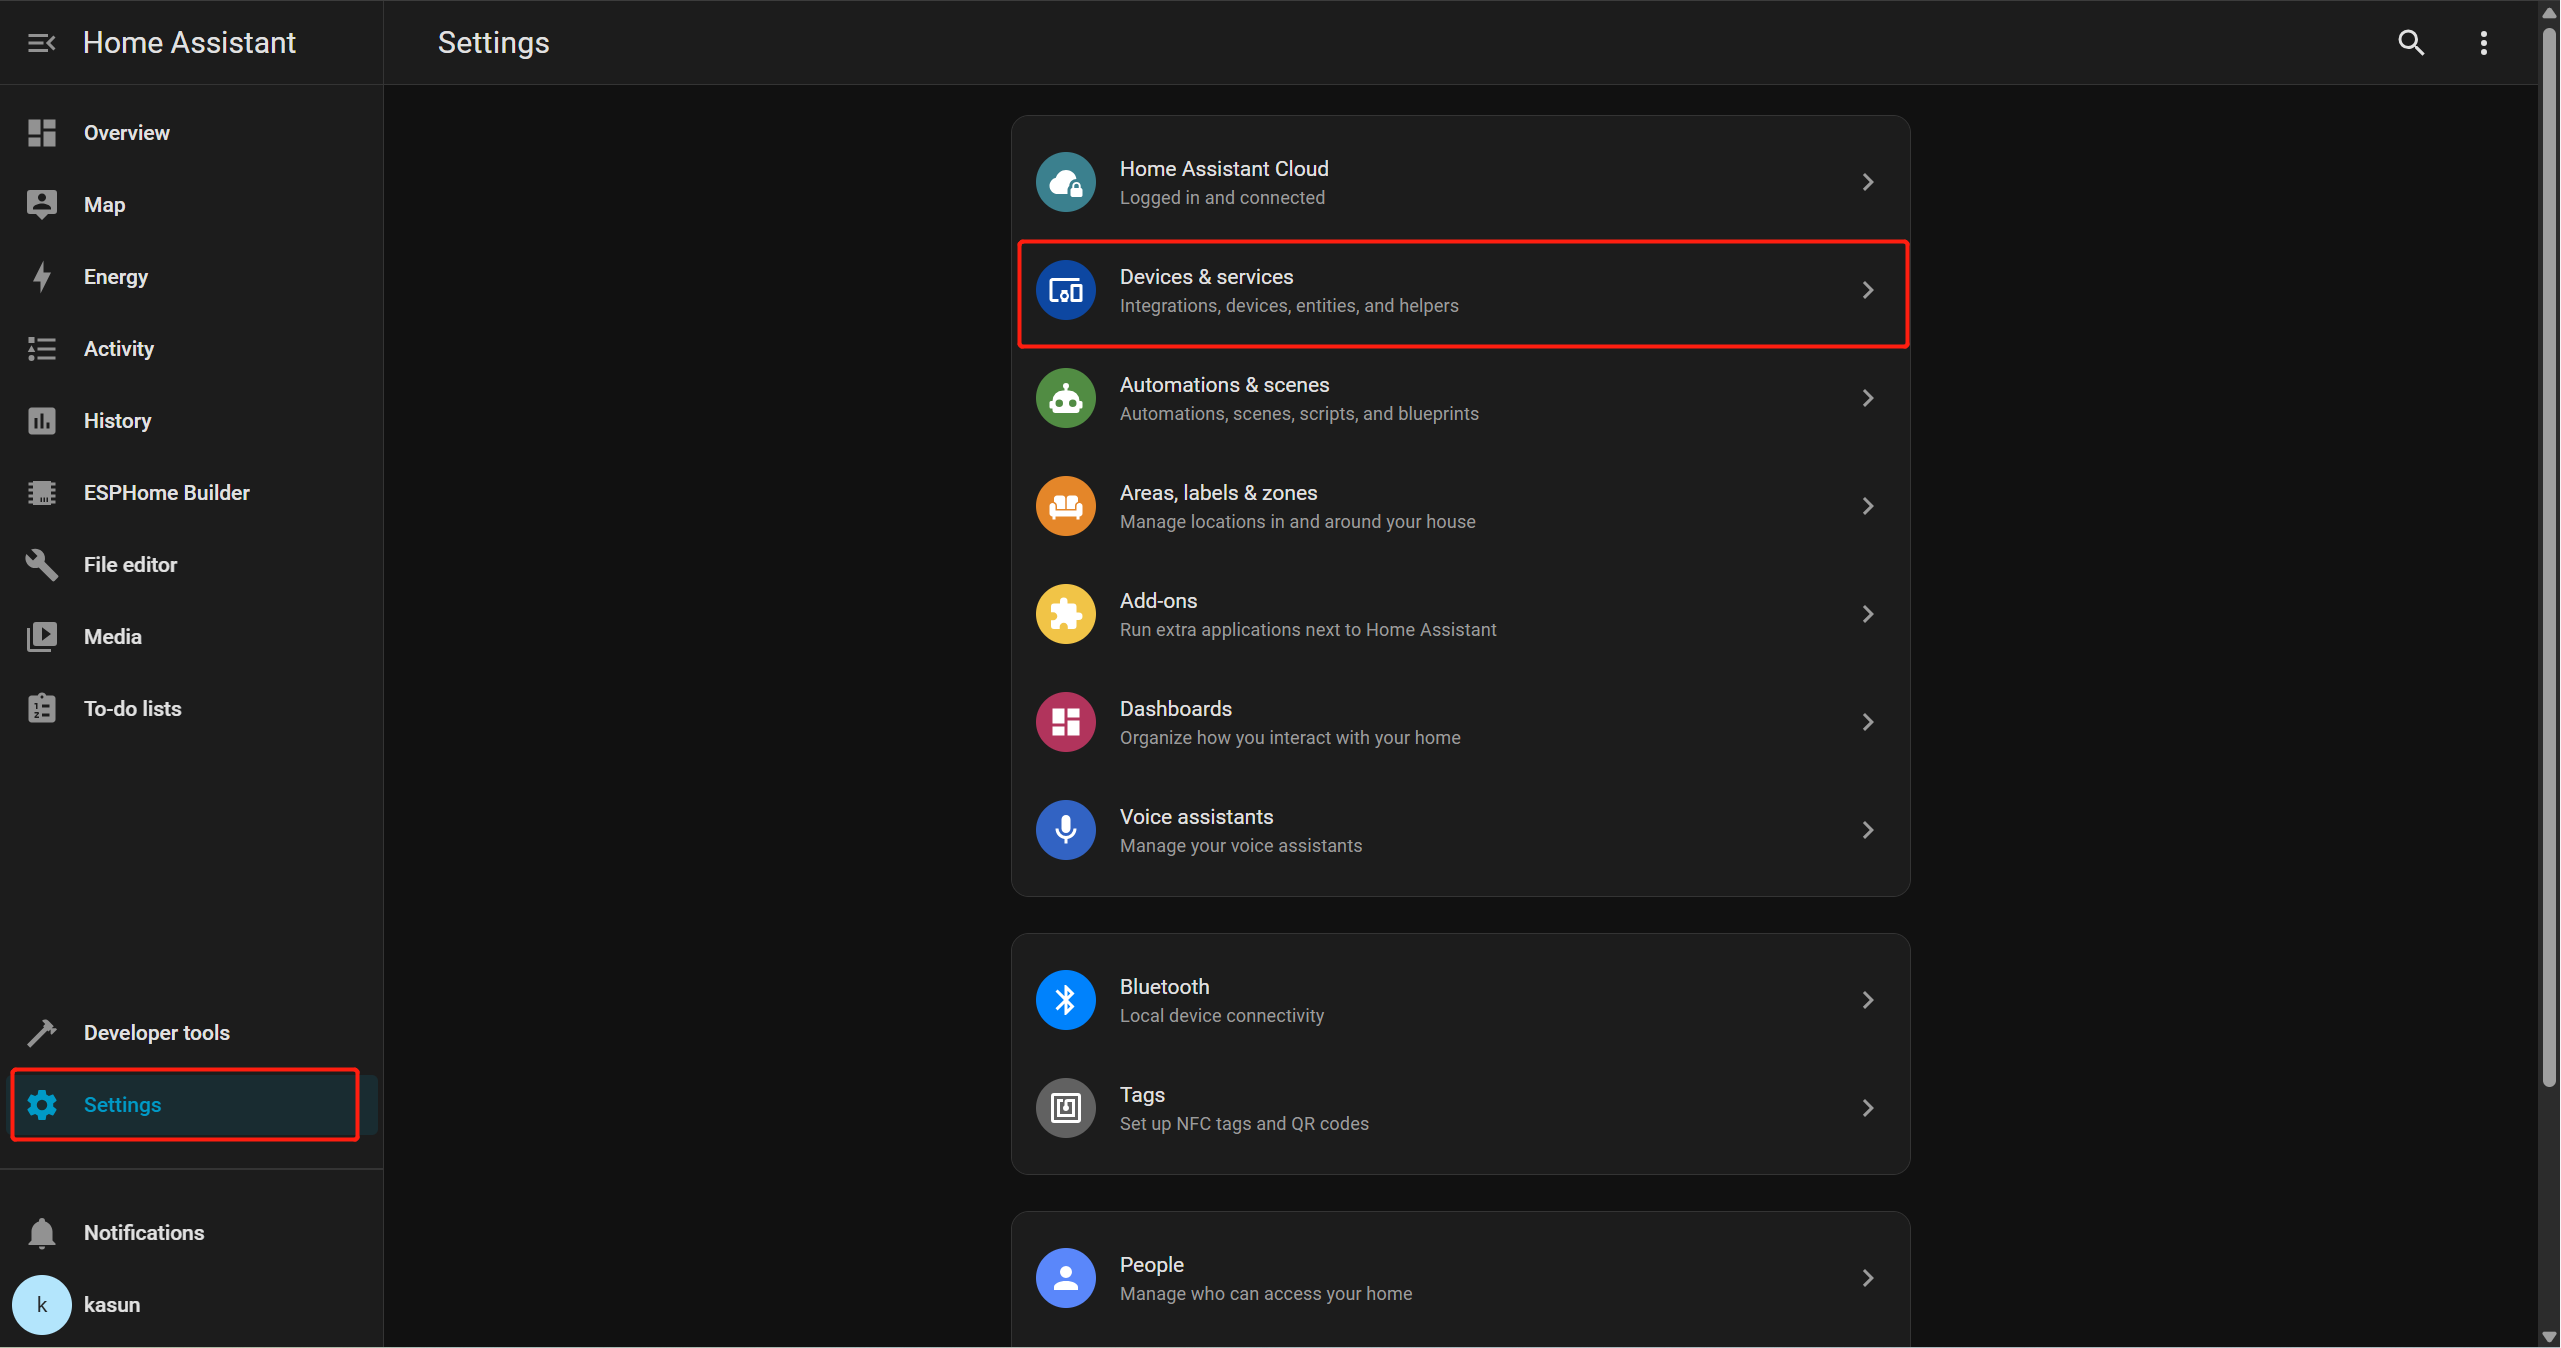
Você deverá ver ESPHome listado como uma integração descoberta.
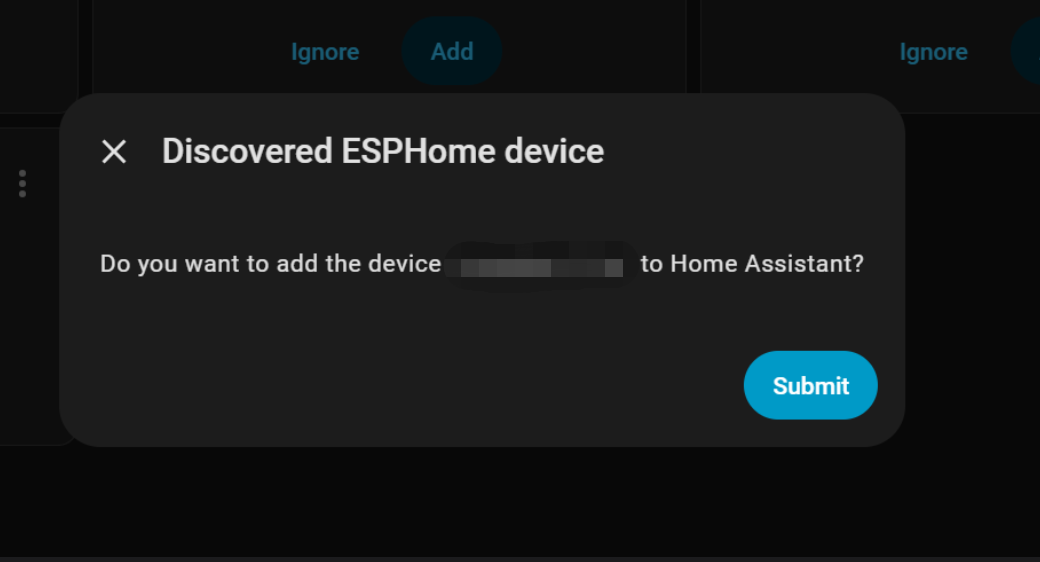
Clique em Add e, em seguida, em Submit para finalizar a configuração.
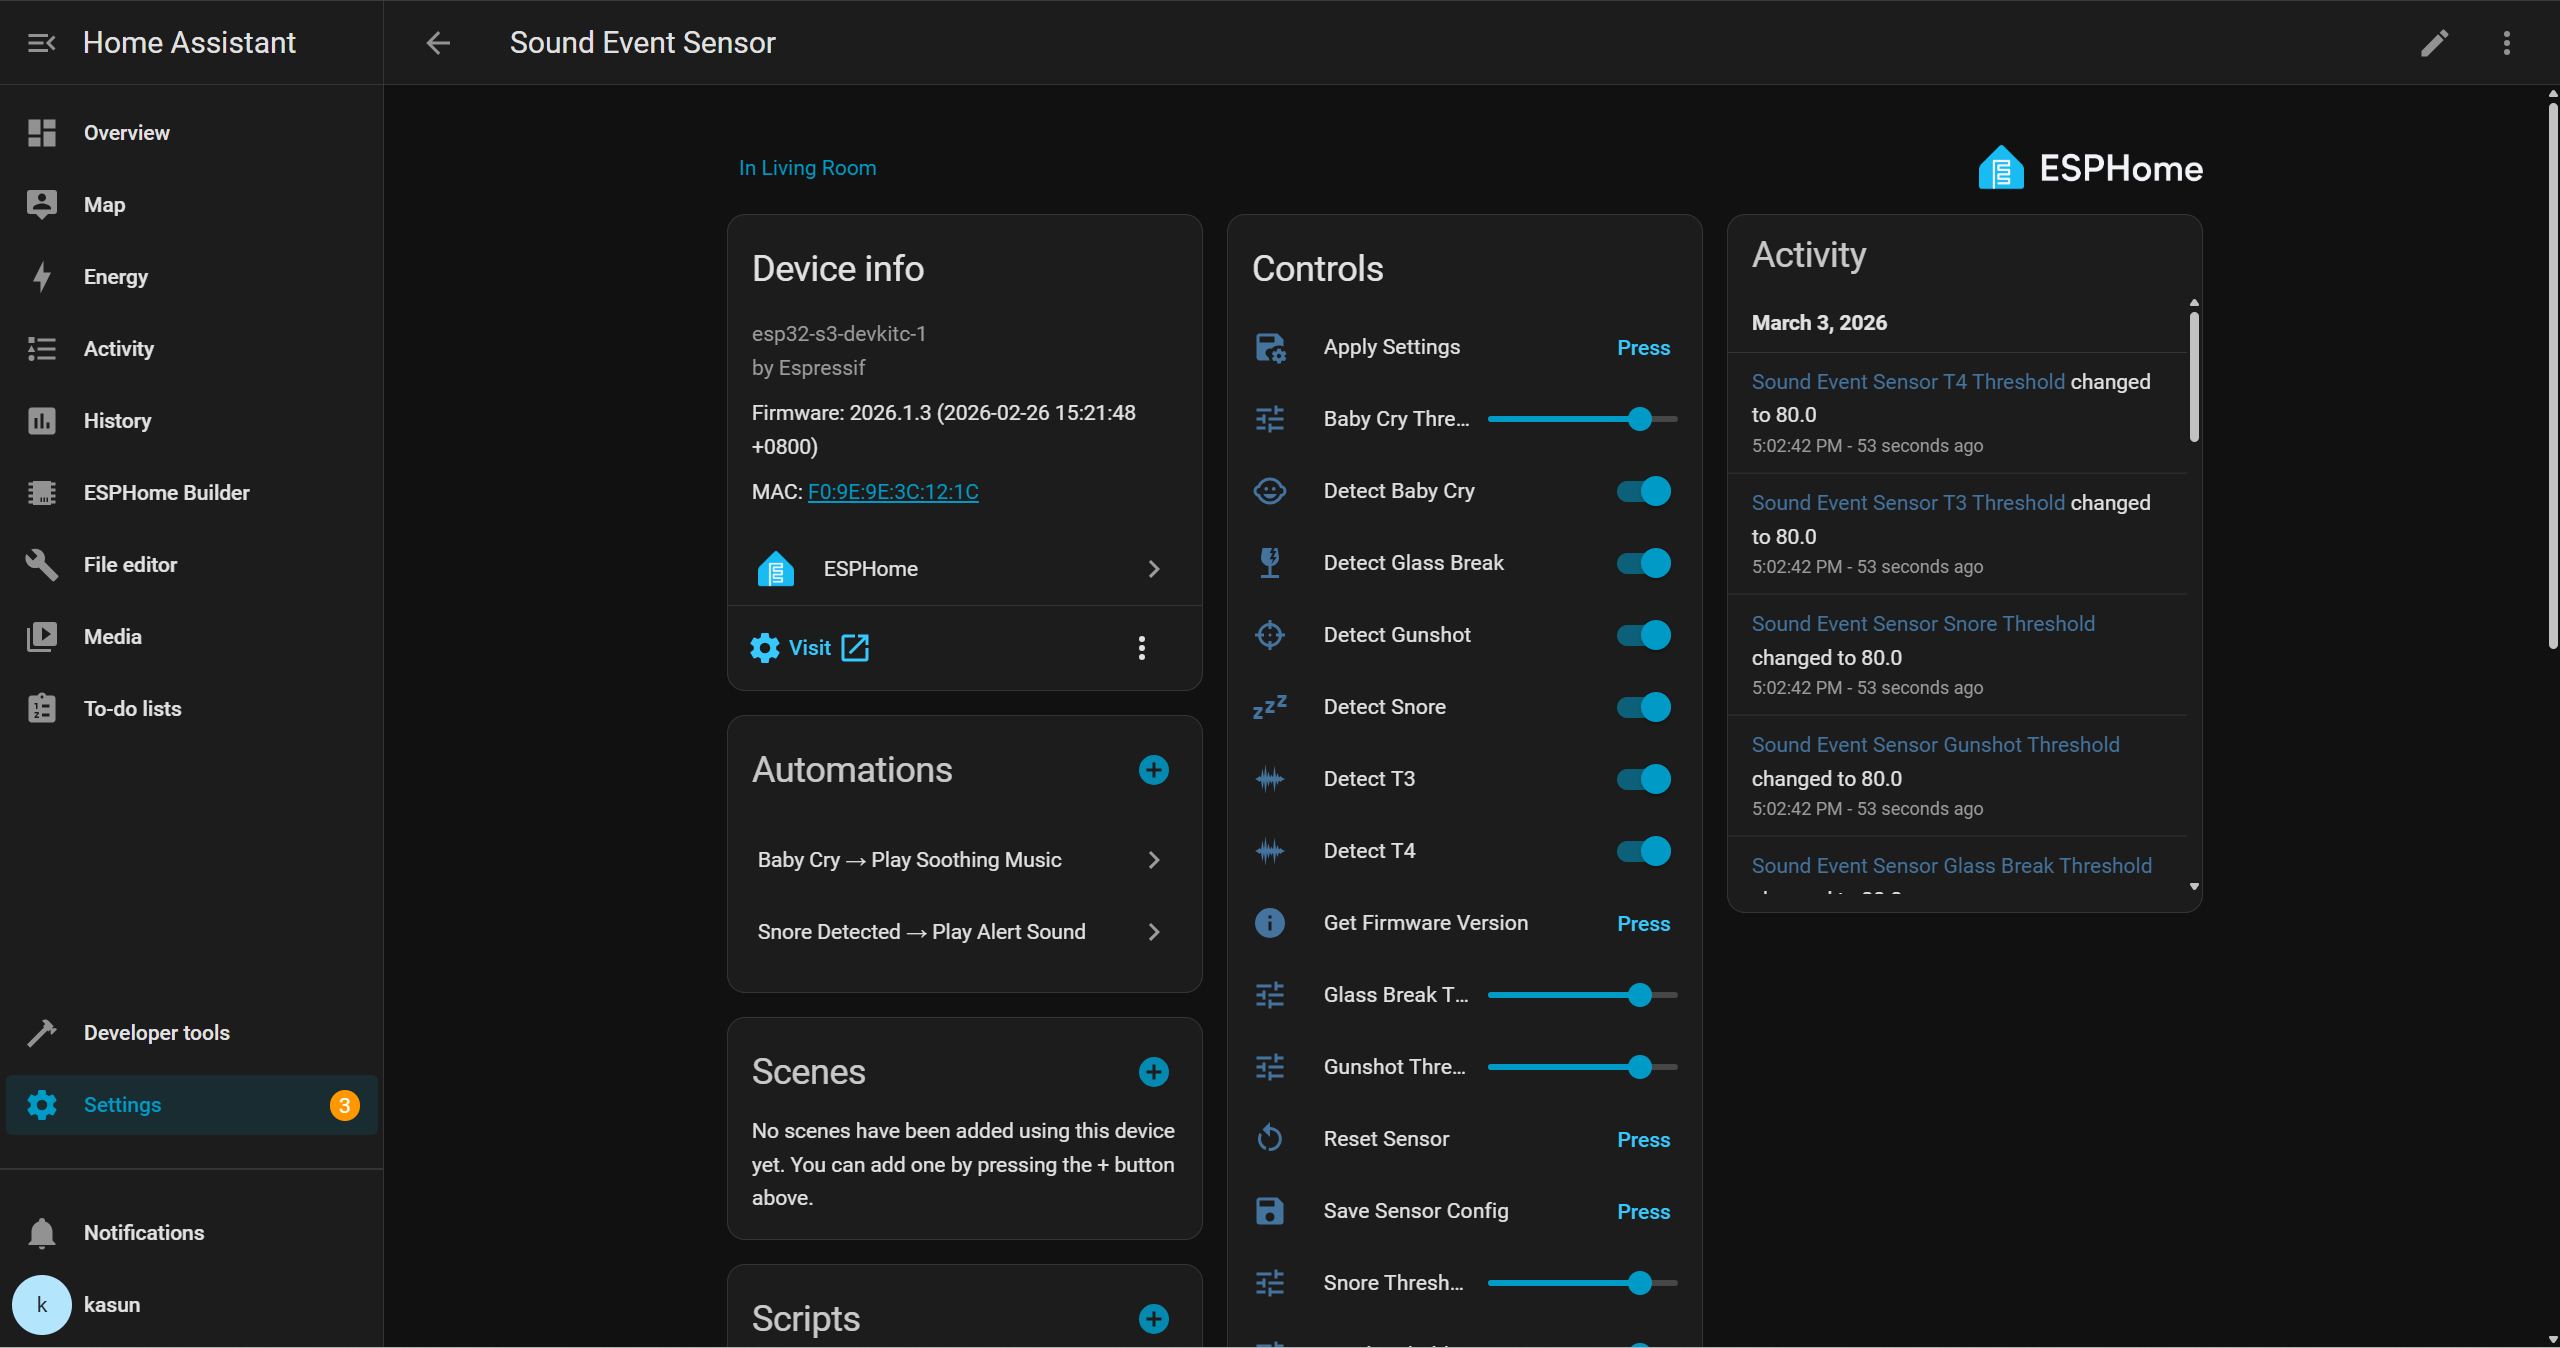
Depois disso, você poderá interagir com o dispositivo por meio da interface do Home Assistant e criar suas próprias automações com outros periféricos. Por exemplo, você pode acionar um buzzer quando uma quebra de vidro for detectada, ou reproduzir automaticamente uma música de ninar calma em um alto-falante inteligente quando o choro de um bebê for detectado.
Demo
Suporte Técnico e Discussão de Produtos
Obrigado por escolher nossos produtos! Estamos aqui para lhe oferecer diferentes tipos de suporte para garantir que sua experiência com nossos produtos seja a mais tranquila possível. Oferecemos vários canais de comunicação para atender a diferentes preferências e necessidades.