XIAO ESP32-C5 com FreeRTOS
Visão geral
FreeRTOS é um conjunto de bibliotecas em C composto por um kernel de tempo real e um conjunto de bibliotecas modulares que implementam funcionalidades complementares. O kernel FreeRTOS é um kernel de tempo real (ou escalonador de tempo real) que permite que aplicações construídas sobre o FreeRTOS atendam a seus requisitos rígidos de tempo real. Ele permite que as aplicações sejam organizadas como uma coleção de threads de execução independentes.

Referência : Mastering the FreeRTOS Real Time Kernel
Portas do FreeRTOS
FreeRTOS é um kernel de RTOS de código aberto que já vem integrado no Arduino ESP32 Core (que é construído sobre o ESP-IDF). Assim, todo sketch Arduino executando em um ESP32 está, na verdade, utilizando o FreeRTOS em segundo plano. O kernel FreeRTOS é portado para todas as arquiteturas de chip ESP, incluindo Xtensa e RISC-V (por exemplo, XIAO ESP32-C5).
Portanto, este tutorial é escrito com base no framework Arduino para oferecer uma experiência de desenvolvimento mais acessível.
Preparação de hardware
| Seeed Studio XIAO ESP32-C5 |
|---|
 |
Preparação de software
Se você ainda não usou a Arduino IDE, consulte Getting Started with Seeed Studio XIAO ESP32-C5.
Introdução às tarefas
Tarefas são pequenas funções/ trabalhos que o processador é solicitado a executar com um conjunto de configurações. As tarefas podem variar de pequenas funções a funções em loop infinito.
As tarefas são as unidades fundamentais de execução em uma aplicação FreeRTOS. Elas são essencialmente funções que são executadas concorrentemente com outras tarefas. Isso permite multitarefa eficiente e boa capacidade de resposta.
Propriedades da tarefa
- TaskFunction: Esta é a função que contém a lógica real da tarefa. É o ponto de entrada para a execução da tarefa.
- StackSize: Especifica a quantidade de memória alocada para a pilha da tarefa. A pilha é usada para armazenar variáveis locais, endereços de retorno de funções e dados temporários.
- TaskPriority: Determina a importância relativa da tarefa em comparação com outras tarefas. Tarefas de maior prioridade têm maior chance de serem executadas antes das de menor prioridade.
- TaskParameters: São argumentos opcionais que podem ser passados para a função da tarefa quando ela é criada. Eles podem ser usados para fornecer contexto adicional ou configuração para a tarefa.
- CoreAffinity: Especifica a qual núcleo de CPU a tarefa deve ser atribuída. Em sistemas com múltiplos núcleos, isso pode ser usado para otimizar o desempenho ou balancear a carga de trabalho.
Criar uma tarefa
Para criar uma tarefa no FreeRTOS, é usada a função xTaskCreate. Esta função recebe vários parâmetros, incluindo a função da tarefa, o nome da tarefa, o tamanho da pilha, os parâmetros, a prioridade e um identificador para a tarefa criada.
TaskHandle_t task;
xTaskCreate(
        taskFunction,             /* Function that implements the task. */
        "taskName",               /* Text name for the task. */
        configMINIMAL_STACK_SIZE, /* Stack size in words, or bytes. */
        NULL,                     /* Parameter passed into the task. */
        tskIDLE_PRIORITY,         /* Priority at which the task is created. */
        &task                     /* Used to pass out the created task's handle. */
        );
Função da tarefa
A função da tarefa é o código real que será executado pela tarefa.
void taskFunction(void * pvParameters) {
  /*
  Function definition goes here
  */
}
Visualização de tarefas
Crie quatro tarefas simples para visualizar como o FreeRTOS funciona.
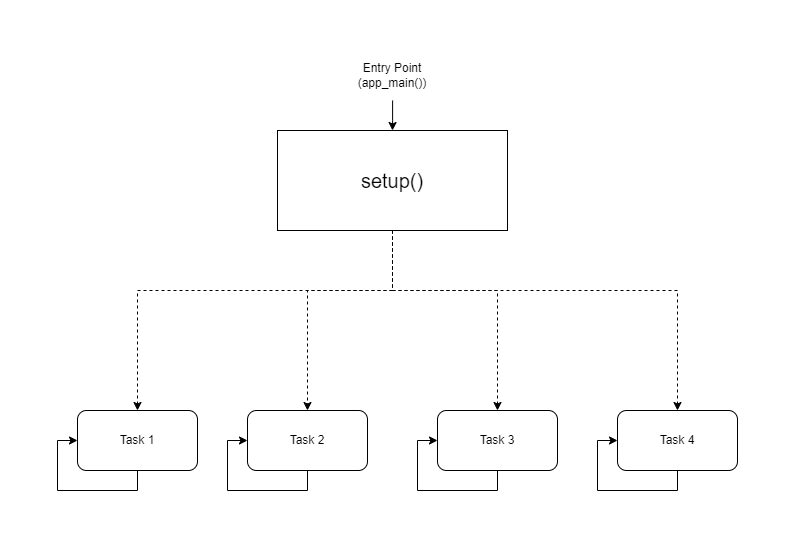
- Representação visual
taskFunction1 (1000ms delay)
taskFunction2 (500ms delay)
taskFunction3 (500ms delay)
taskFunction4 (500ms delay)
- Código de referência
freertos.ino
#include <Arduino.h>

// Task handles
TaskHandle_t task1, task2, task3, task4;

// ---------------------- Task Function Definitions ----------------------

void taskFunction1(void * pvParameters) {
    for (;;) { // Infinite loop, equivalent to while(true)
        // Print Task 1 and Hello message
        Serial.println("Task 1: Hello from task 1");

        // Delay 1000ms (1 second)
        vTaskDelay(pdMS_TO_TICKS(1000));
    }
}

void taskFunction2(void * pvParameters) {
    for (;;) {
        Serial.println("Task 2: Hello from task 2");
        vTaskDelay(pdMS_TO_TICKS(500)); // Delay 500ms
    }
}

void taskFunction3(void * pvParameters) {
    for (;;) {
        Serial.println("Task 3: Hello from task 3");
        vTaskDelay(pdMS_TO_TICKS(500));
    }
}

void taskFunction4(void * pvParameters) {
    for (;;) {
        Serial.println("Task 4: Hello from task 4");
        vTaskDelay(pdMS_TO_TICKS(500));
    }
}

// ---------------------- Main Program Entry ----------------------

void setup() {
    // 1. Initialize serial port (C5 typically uses USB CDC)
    Serial.begin(115200);

    // Give the serial port some startup time to prevent loss of initial prints
    delay(2000);
    Serial.println("--- ESP32-C5 FreeRTOS Tasks Demo ---");

    // 2. Create tasks
    // Use xTaskCreate, no need to specify core - the system will automatically schedule on the only Core 0
    // Important: Set stack size to 4096 bytes to prevent Stack Overflow

    xTaskCreate(
        taskFunction1,    /* Task function */
        "task_1",         /* Task name */
        4096,             /* Stack size (Bytes) - Do NOT use configMINIMAL_STACK_SIZE */
        NULL,             /* Parameters */
        1,                /* Priority */
        &task1            /* Handle */
    );

    xTaskCreate(
        taskFunction2,
        "task_2",
        4096,
        NULL,
        1,
        &task2
    );

    xTaskCreate(
        taskFunction3,
        "task_3",
        4096,
        NULL,
        1,
        &task3
    );

    xTaskCreate(
        taskFunction4,
        "task_4",
        4096,
        NULL,
        1,
        &task4
    );
}

void loop() {
    // Main loop is idle, reserved for task execution
    // To prove the main loop is still active, you can print occasionally or leave it empty
    delay(1000);
}
configMINIMAL_STACK_SIZE pode ser alterado em sdkconfig.
- Quatro tarefas: o código define quatro tarefas: taskFunction1, taskFunction2, taskFunction3 e taskFunction4.
- Prioridades das tarefas: todas as tarefas são criadas com tskIDLE_PRIORITY. Isso significa que elas têm a mesma prioridade.
- Atrasos das tarefas: taskFunction1 tem um atraso de 1000 ms, enquanto as outras três têm um atraso de 500 ms.
O XIAO ESP32-C5 é um microcontrolador RISC-V de núcleo único e alta frequência, portanto, a troca de núcleo não é possível; caso contrário, causará overflow de pilha.
Sensores e FreeRTOS
Em seguida, implementarei um Sistema Inteligente de Boas-Vindas na Entrada usando o XIAO ESP32-C5, FreeRTOS e vários sensores.
Este sistema simula um cenário de entrada em uma casa inteligente:
-
Monitoramento Ambiental: Monitoramento em tempo real da temperatura e umidade na entrada (usando um sensor DHT11) e exibição dos dados na tela.
-
Detecção de Presença Humana: Utilização de um sensor ultrassônico para detectar se alguém está se aproximando.
-
Boas-vindas Inteligentes:
-
Quando ninguém está presente (distância é grande): O LED permanece apagado, a tela exibe os dados ambientais e o sistema entra em uma interface de economia de energia/standby.
-
Quando alguém se aproxima (distância é pequena, por exemplo, < 30cm): O LED acende automaticamente (simulando uma luz da varanda) e a tela exibe Welcome!.
-
Preparação de hardware
Você precisará preparar uma placa XIAO ESP32-C5 e os seguintes sensores.
| Seeed Studio XIAO ESP32-C5 | Seeed Studio Expansion Board Base for XIAO | Grove - Purple LED | Grove - Temperature & Humidity Sensor (DHT11) | Grove - Ultrasonic Distance Sensor |
|---|---|---|---|---|
|  |  |  |  |
Software
Baixe a biblioteca e coloque-a no caminho de bibliotecas do Arduino.
-
Grove - Sensor de Temperatura e Umidade (DHT11)
-
Grove - Sensor de Distância Ultrassônico
-
Código de Referência
Smart_Entrance_Welcome_System.ino
#include <Arduino.h>
#include <Wire.h>
#include <Adafruit_GFX.h>
#include <Adafruit_SSD1306.h>
#include "Ultrasonic.h"
#include "Grove_Temperature_And_Humidity_Sensor.h"

// ---------------- Configuration Area ----------------
// Pin Definitions
#define PIN_DHT         D6   // DHT11 connection pin
#define PIN_ULTRASONIC  D7   // Ultrasonic sensor connection pin
#define PIN_LED         D2   // LED light pin
#define PIN_SDA         D4   // OLED SDA pin
#define PIN_SCL         D5   // OLED SCL pin

// Sensor Type Definition
#define DHTTYPE DHT11

// OLED Parameters
#define SCREEN_WIDTH 128
#define SCREEN_HEIGHT 64
#define OLED_RESET    -1

// Logic Parameters
#define DIST_THRESHOLD 30 // Person detected if within 30cm
#define DHT_READ_INTERVAL 3000 // DHT11 reading interval (milliseconds)
#define DHT_TIMEOUT 250 // DHT11 reading timeout (milliseconds)

// ---------------- Object Initialization ----------------
Ultrasonic ultrasonic(PIN_ULTRASONIC);
DHT dht(PIN_DHT, DHTTYPE);
Adafruit_SSD1306 display(SCREEN_WIDTH, SCREEN_HEIGHT, &Wire, OLED_RESET);

// ---------------- Shared Data Structure ----------------
struct SystemState {
    float temperature;
    float humidity;
    long distanceCm;
    bool personDetected;
    bool dhtValid; // Whether DHT data is valid
    unsigned long lastDHTUpdate; // Last DHT update time
};

// Global State Variable
SystemState currentState = {0.0, 0.0, 0, false, false, 0};

// Mutex: Protect shared data access
SemaphoreHandle_t xMutex;

// I2C Mutex: Protect I2C bus access
SemaphoreHandle_t xI2CMutex;

// Task Handles
TaskHandle_t taskDHTHandle, taskUltraHandle, taskOLEDHandle, taskLogicHandle;

// ---------------- Task Function Implementations ----------------

// Task 1: DHT Temperature & Humidity Reading (Optimized - Non-blocking)
void taskDHT(void *pvParameters) {
    dht.begin();

    float temp_hum_val[2] = {0};
    unsigned long lastReadTime = 0;

    for (;;) {
        unsigned long currentTime = millis();

        // Control reading frequency to avoid frequent reads
        if (currentTime - lastReadTime >= DHT_READ_INTERVAL) {

            // Release CPU before sensor reading to allow other tasks to run
            // Read sensor without holding mutex
            bool readSuccess = !dht.readTempAndHumidity(temp_hum_val);

            if (readSuccess) {
                // Only acquire lock and update data quickly after successful reading
                if (xSemaphoreTake(xMutex, pdMS_TO_TICKS(100)) == pdTRUE) {
                    currentState.humidity = temp_hum_val[0];
                    currentState.temperature = temp_hum_val[1];
                    currentState.dhtValid = true;
                    currentState.lastDHTUpdate = currentTime;
                    xSemaphoreGive(xMutex);
                }

                Serial.printf("[DHT] Temp: %.1f°C, Humi: %.1f%%\n",
                             temp_hum_val[1], temp_hum_val[0]);
            } else {
                Serial.println("[DHT] Read failed");

                // Mark data as invalid
                if (xSemaphoreTake(xMutex, pdMS_TO_TICKS(100)) == pdTRUE) {
                    currentState.dhtValid = false;
                    xSemaphoreGive(xMutex);
                }
            }

            lastReadTime = currentTime;
        }

        // Use longer delay to yield CPU time
        vTaskDelay(pdMS_TO_TICKS(500));
    }
}

// Task 2: Ultrasonic Distance Measurement (Optimized)
void taskUltrasonic(void *pvParameters) {
    for (;;) {
        // Perform measurement without holding mutex
        long RangeInCentimeters = ultrasonic.MeasureInCentimeters();

        // Update data quickly
        if (xSemaphoreTake(xMutex, pdMS_TO_TICKS(50)) == pdTRUE) {
            currentState.distanceCm = RangeInCentimeters;

            // Determine if person is present
            if (RangeInCentimeters > 0 && RangeInCentimeters < DIST_THRESHOLD) {
                currentState.personDetected = true;
            } else {
                currentState.personDetected = false;
            }
            xSemaphoreGive(xMutex);
        }

        // Appropriate delay to avoid excessive frequency
        vTaskDelay(pdMS_TO_TICKS(100));
    }
}

// Task 3: LED Logic Control (Optimized)
void taskLogic(void *pvParameters) {
    pinMode(PIN_LED, OUTPUT);
    bool isPerson = false;
    bool lastState = false;

    for (;;) {
        // Read state quickly
        if (xSemaphoreTake(xMutex, pdMS_TO_TICKS(10)) == pdTRUE) {
            isPerson = currentState.personDetected;
            xSemaphoreGive(xMutex);
        }

        // Perform operation only when state changes
        if (isPerson != lastState) {
            digitalWrite(PIN_LED, isPerson ? HIGH : LOW);
            Serial.printf("[Logic] LED %s\n", isPerson ? "ON" : "OFF");
            lastState = isPerson;
        }

        vTaskDelay(pdMS_TO_TICKS(50));
    }
}

// Task 4: OLED Display (Optimized - Using I2C Mutex)
void taskOLED(void *pvParameters) {
    // Initialize I2C
    Wire.begin(PIN_SDA, PIN_SCL);
    Wire.setClock(400000); // Set I2C to fast mode 400kHz

    // Protect initialization with I2C mutex
    if (xSemaphoreTake(xI2CMutex, portMAX_DELAY) == pdTRUE) {
        if(!display.begin(SSD1306_SWITCHCAPVCC, 0x3C)) {
            Serial.println(F("[OLED] Init failed"));
            xSemaphoreGive(xI2CMutex);
            vTaskDelete(NULL);
        }
        display.clearDisplay();
        display.setTextColor(SSD1306_WHITE);
        display.display();
        xSemaphoreGive(xI2CMutex);
    }

    SystemState localState;
    unsigned long lastUpdate = 0;
    const unsigned long UPDATE_INTERVAL = 250; // Reduce refresh rate to 4Hz

    for (;;) {
        unsigned long currentTime = millis();

        // Control refresh rate
        if (currentTime - lastUpdate < UPDATE_INTERVAL) {
            vTaskDelay(pdMS_TO_TICKS(50));
            continue;
        }

        // Copy data quickly
        if (xSemaphoreTake(xMutex, pdMS_TO_TICKS(50)) == pdTRUE) {
            localState = currentState;
            xSemaphoreGive(xMutex);
        } else {
            // Skip update if mutex acquisition fails
            vTaskDelay(pdMS_TO_TICKS(50));
            continue;
        }

        // Protect display operations with I2C mutex
        if (xSemaphoreTake(xI2CMutex, pdMS_TO_TICKS(100)) == pdTRUE) {
            display.clearDisplay();

            if (localState.personDetected) {
                // --- Person Approaching Mode ---
                display.setTextSize(2);
                display.setCursor(10, 10);
                display.println(F("WELCOME!"));

                display.setTextSize(1);
                display.setCursor(10, 35);
                display.print(F("Distance: "));
                display.print(localState.distanceCm);
                display.println(F(" cm"));

                // Display temperature and humidity (if valid)
                if (localState.dhtValid) {
                    display.setCursor(10, 50);
                    display.print(localState.temperature, 1);
                    display.print(F("C "));
                    display.print(localState.humidity, 0);
                    display.println(F("%"));
                }
            } else {
                // --- Environment Monitoring Mode ---
                display.setTextSize(1);
                display.setCursor(0, 0);
                display.println(F("-- Home Monitor --"));

                if (localState.dhtValid) {
                    display.setCursor(0, 20);
                    display.print(F("Temperature: "));
                    display.print(localState.temperature, 1);
                    display.println(F(" C"));

                    display.setCursor(0, 35);
                    display.print(F("Humidity:    "));
                    display.print(localState.humidity, 0);
                    display.println(F(" %"));

                    // Display data age
                    unsigned long dataAge = (millis() - localState.lastDHTUpdate) / 1000;
                    display.setCursor(0, 50);
                    display.print(F("Updated: "));
                    display.print(dataAge);
                    display.println(F("s ago"));
                } else {
                    display.setCursor(0, 28);
                    display.println(F("Sensor reading..."));
                }
            }

            display.display();
            xSemaphoreGive(xI2CMutex);
        }

        lastUpdate = currentTime;
        vTaskDelay(pdMS_TO_TICKS(50));
    }
}

// ---------------- Setup & Loop ----------------

void setup() {
    Serial.begin(115200);
    delay(1000);
    Serial.println("\n=== System Starting ===");

    // Create mutexes
    xMutex = xSemaphoreCreateMutex();
    xI2CMutex = xSemaphoreCreateMutex();

    if (xMutex == NULL || xI2CMutex == NULL) {
        Serial.println("[ERROR] Failed to create mutex!");
        while(1) delay(1000);
    }

    // Create tasks - adjust priority and stack size
    // Priority: Higher number = higher priority
    // DHT task: lowest priority (1) - slow reading and non-urgent
    xTaskCreate(taskDHT, "DHT_Task", 4096, NULL, 1, &taskDHTHandle);

    // Ultrasonic task: medium priority (2) - requires fast response
    xTaskCreate(taskUltrasonic, "Ultra_Task", 3072, NULL, 2, &taskUltraHandle);

    // Logic task: medium priority (2) - same level as ultrasonic
    xTaskCreate(taskLogic, "Logic_Task", 2048, NULL, 2, &taskLogicHandle);

    // OLED task: low priority (1) - display does not require real-time performance
    xTaskCreate(taskOLED, "OLED_Task", 4096, NULL, 1, &taskOLEDHandle);

    Serial.println("=== FreeRTOS Tasks Started ===");
    Serial.printf("Free heap: %d bytes\n", ESP.getFreeHeap());
}

void loop() {
    // Monitor system status
    static unsigned long lastReport = 0;
    unsigned long now = millis();

    if (now - lastReport > 10000) { // Report every 10 seconds
        Serial.printf("\n[System] Uptime: %lu s, Free heap: %d bytes\n",
                     now / 1000, ESP.getFreeHeap());
        lastReport = now;
    }

    vTaskDelay(pdMS_TO_TICKS(1000));
}
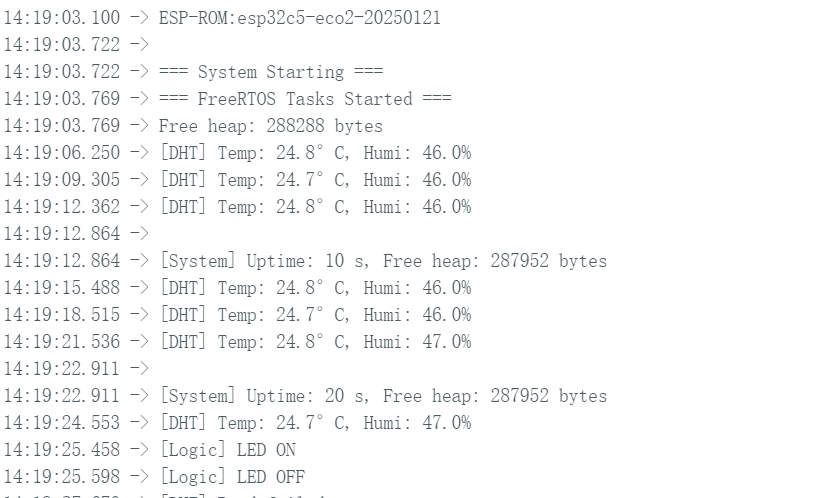
Resultado
- Após fazer o upload do código, você pode observar os resultados por meio do Serial Monitor.
- Efeito na tela de exibição
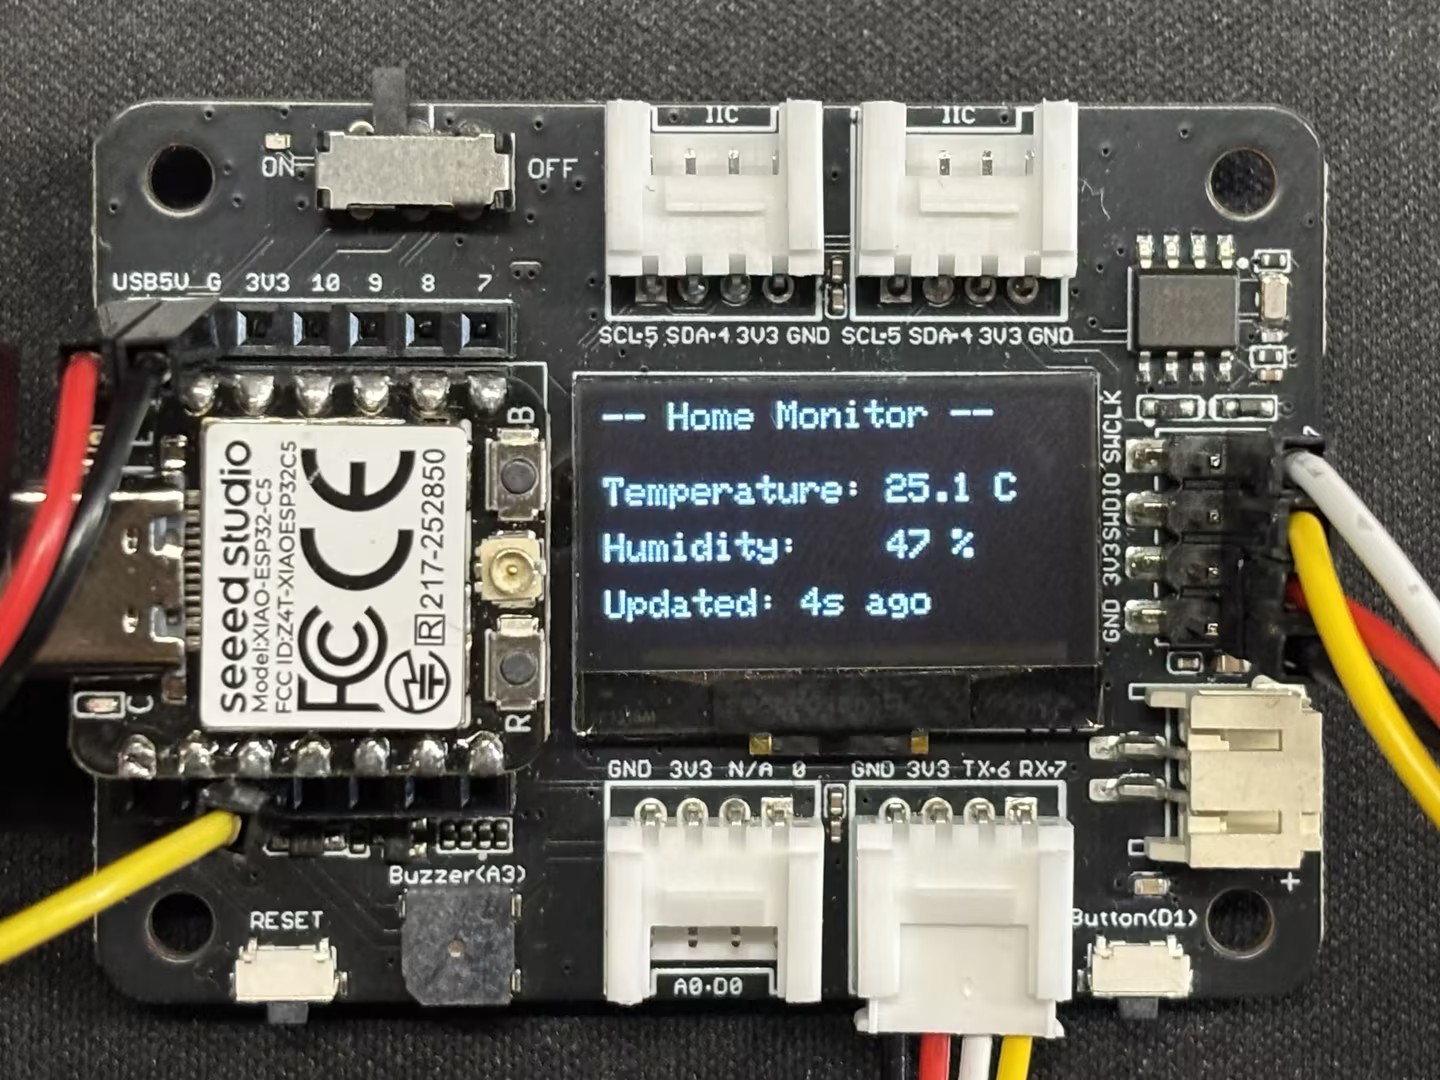 | 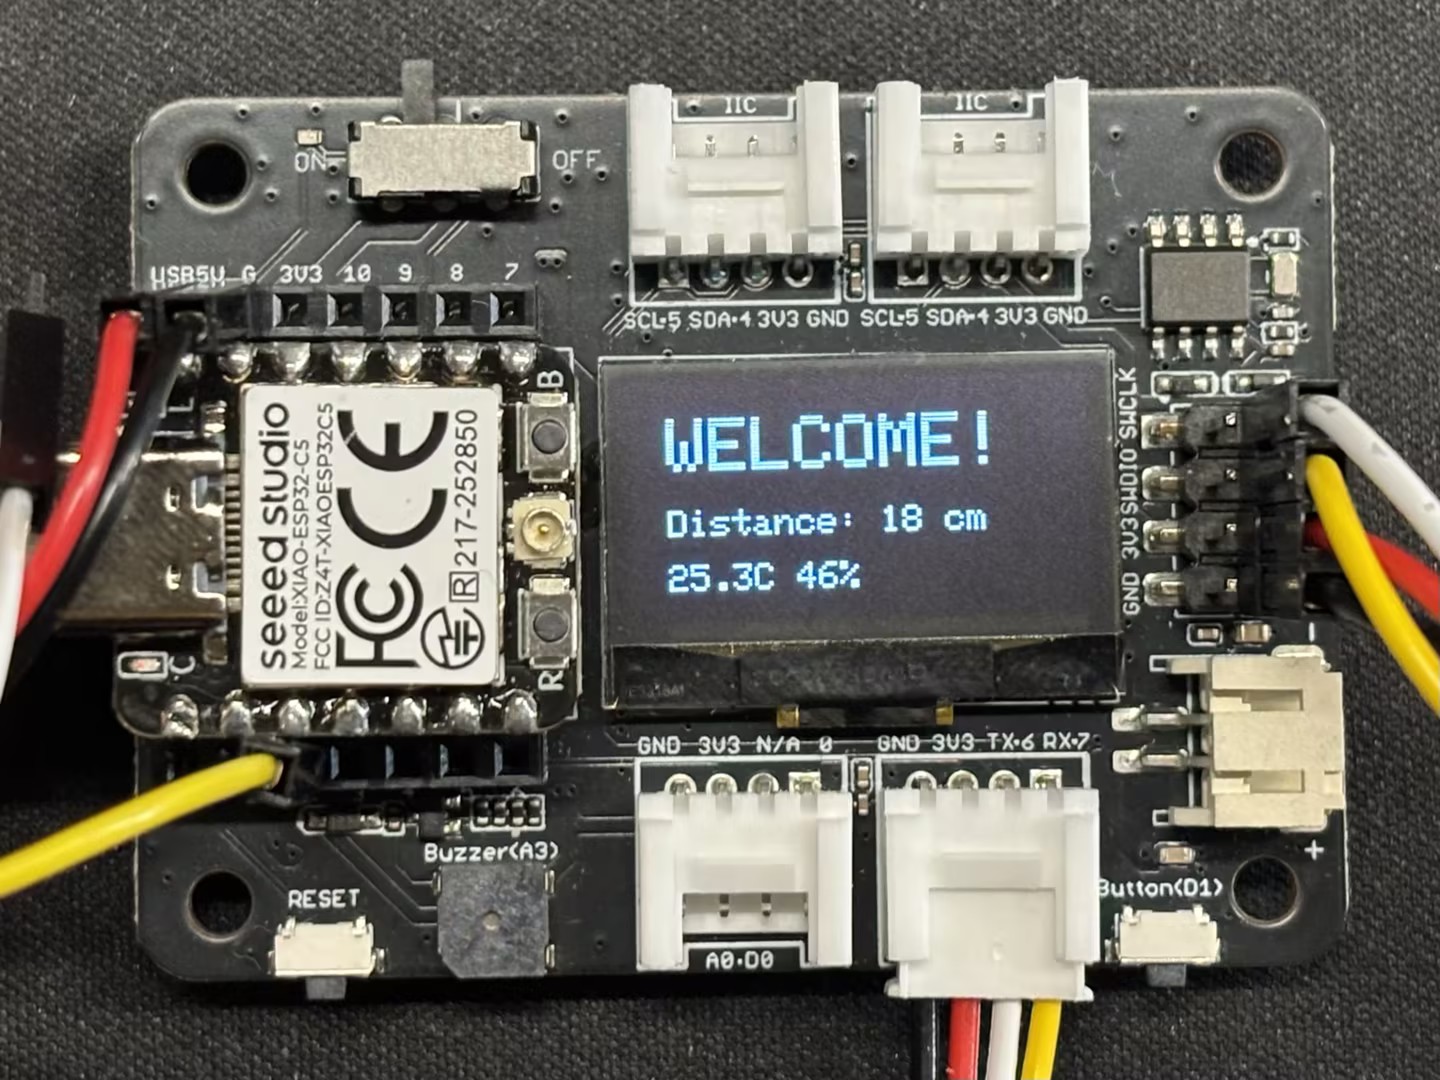 |
- Efeito real
Conclusão
Acredito que, por meio deste guia, você tenha adquirido um domínio sólido do XIAO ESP32-C5 e do FreeRTOS. Estou ansioso para ver suas criações e invenções inovadoras em uma ampla variedade de aplicações!
Suporte Técnico & Discussão de Produtos
Obrigado por escolher nossos produtos! Estamos aqui para oferecer diferentes tipos de suporte para garantir que sua experiência com nossos produtos seja a mais tranquila possível. Oferecemos vários canais de comunicação para atender a diferentes preferências e necessidades.