Assistente de Voz Miniatura do ChatGPT baseado em XIAO ESP32S3
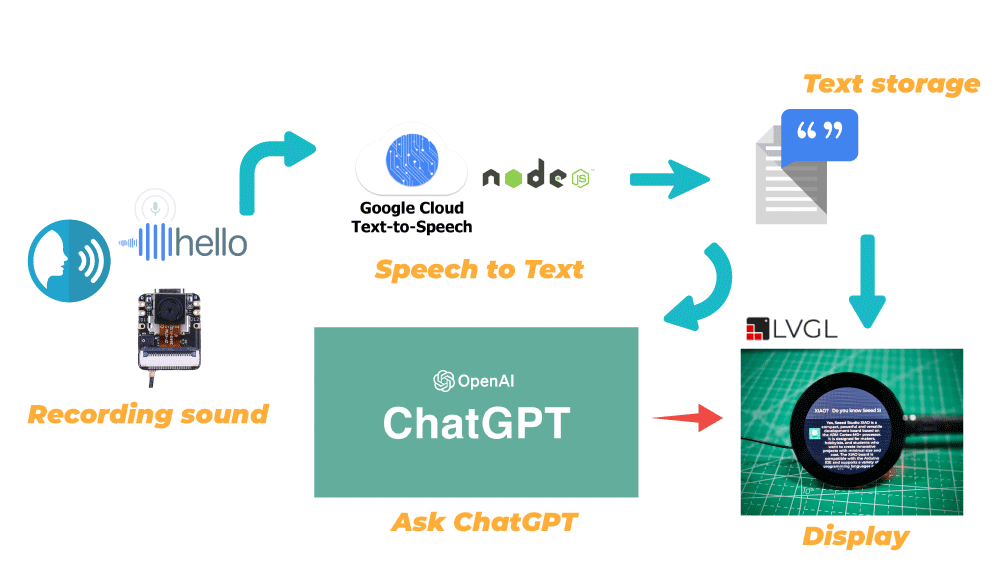
Temos o prazer de apresentar hoje um projeto totalmente novo usando o XIAO ESP32S3 Sense e o Round Display for XIAO! O objetivo do projeto é primeiro construir um sistema de reconhecimento de fala usando o microfone do XIAO ESP32S3 Sense e o serviço de conversão de fala em texto do Google Cloud. O texto de fala reconhecido é então usado para chamar a interface da OpenAI para fazer perguntas ao ChatGPT e obter respostas. Por fim, exibimos na tela a fala reconhecida e o conteúdo das respostas.
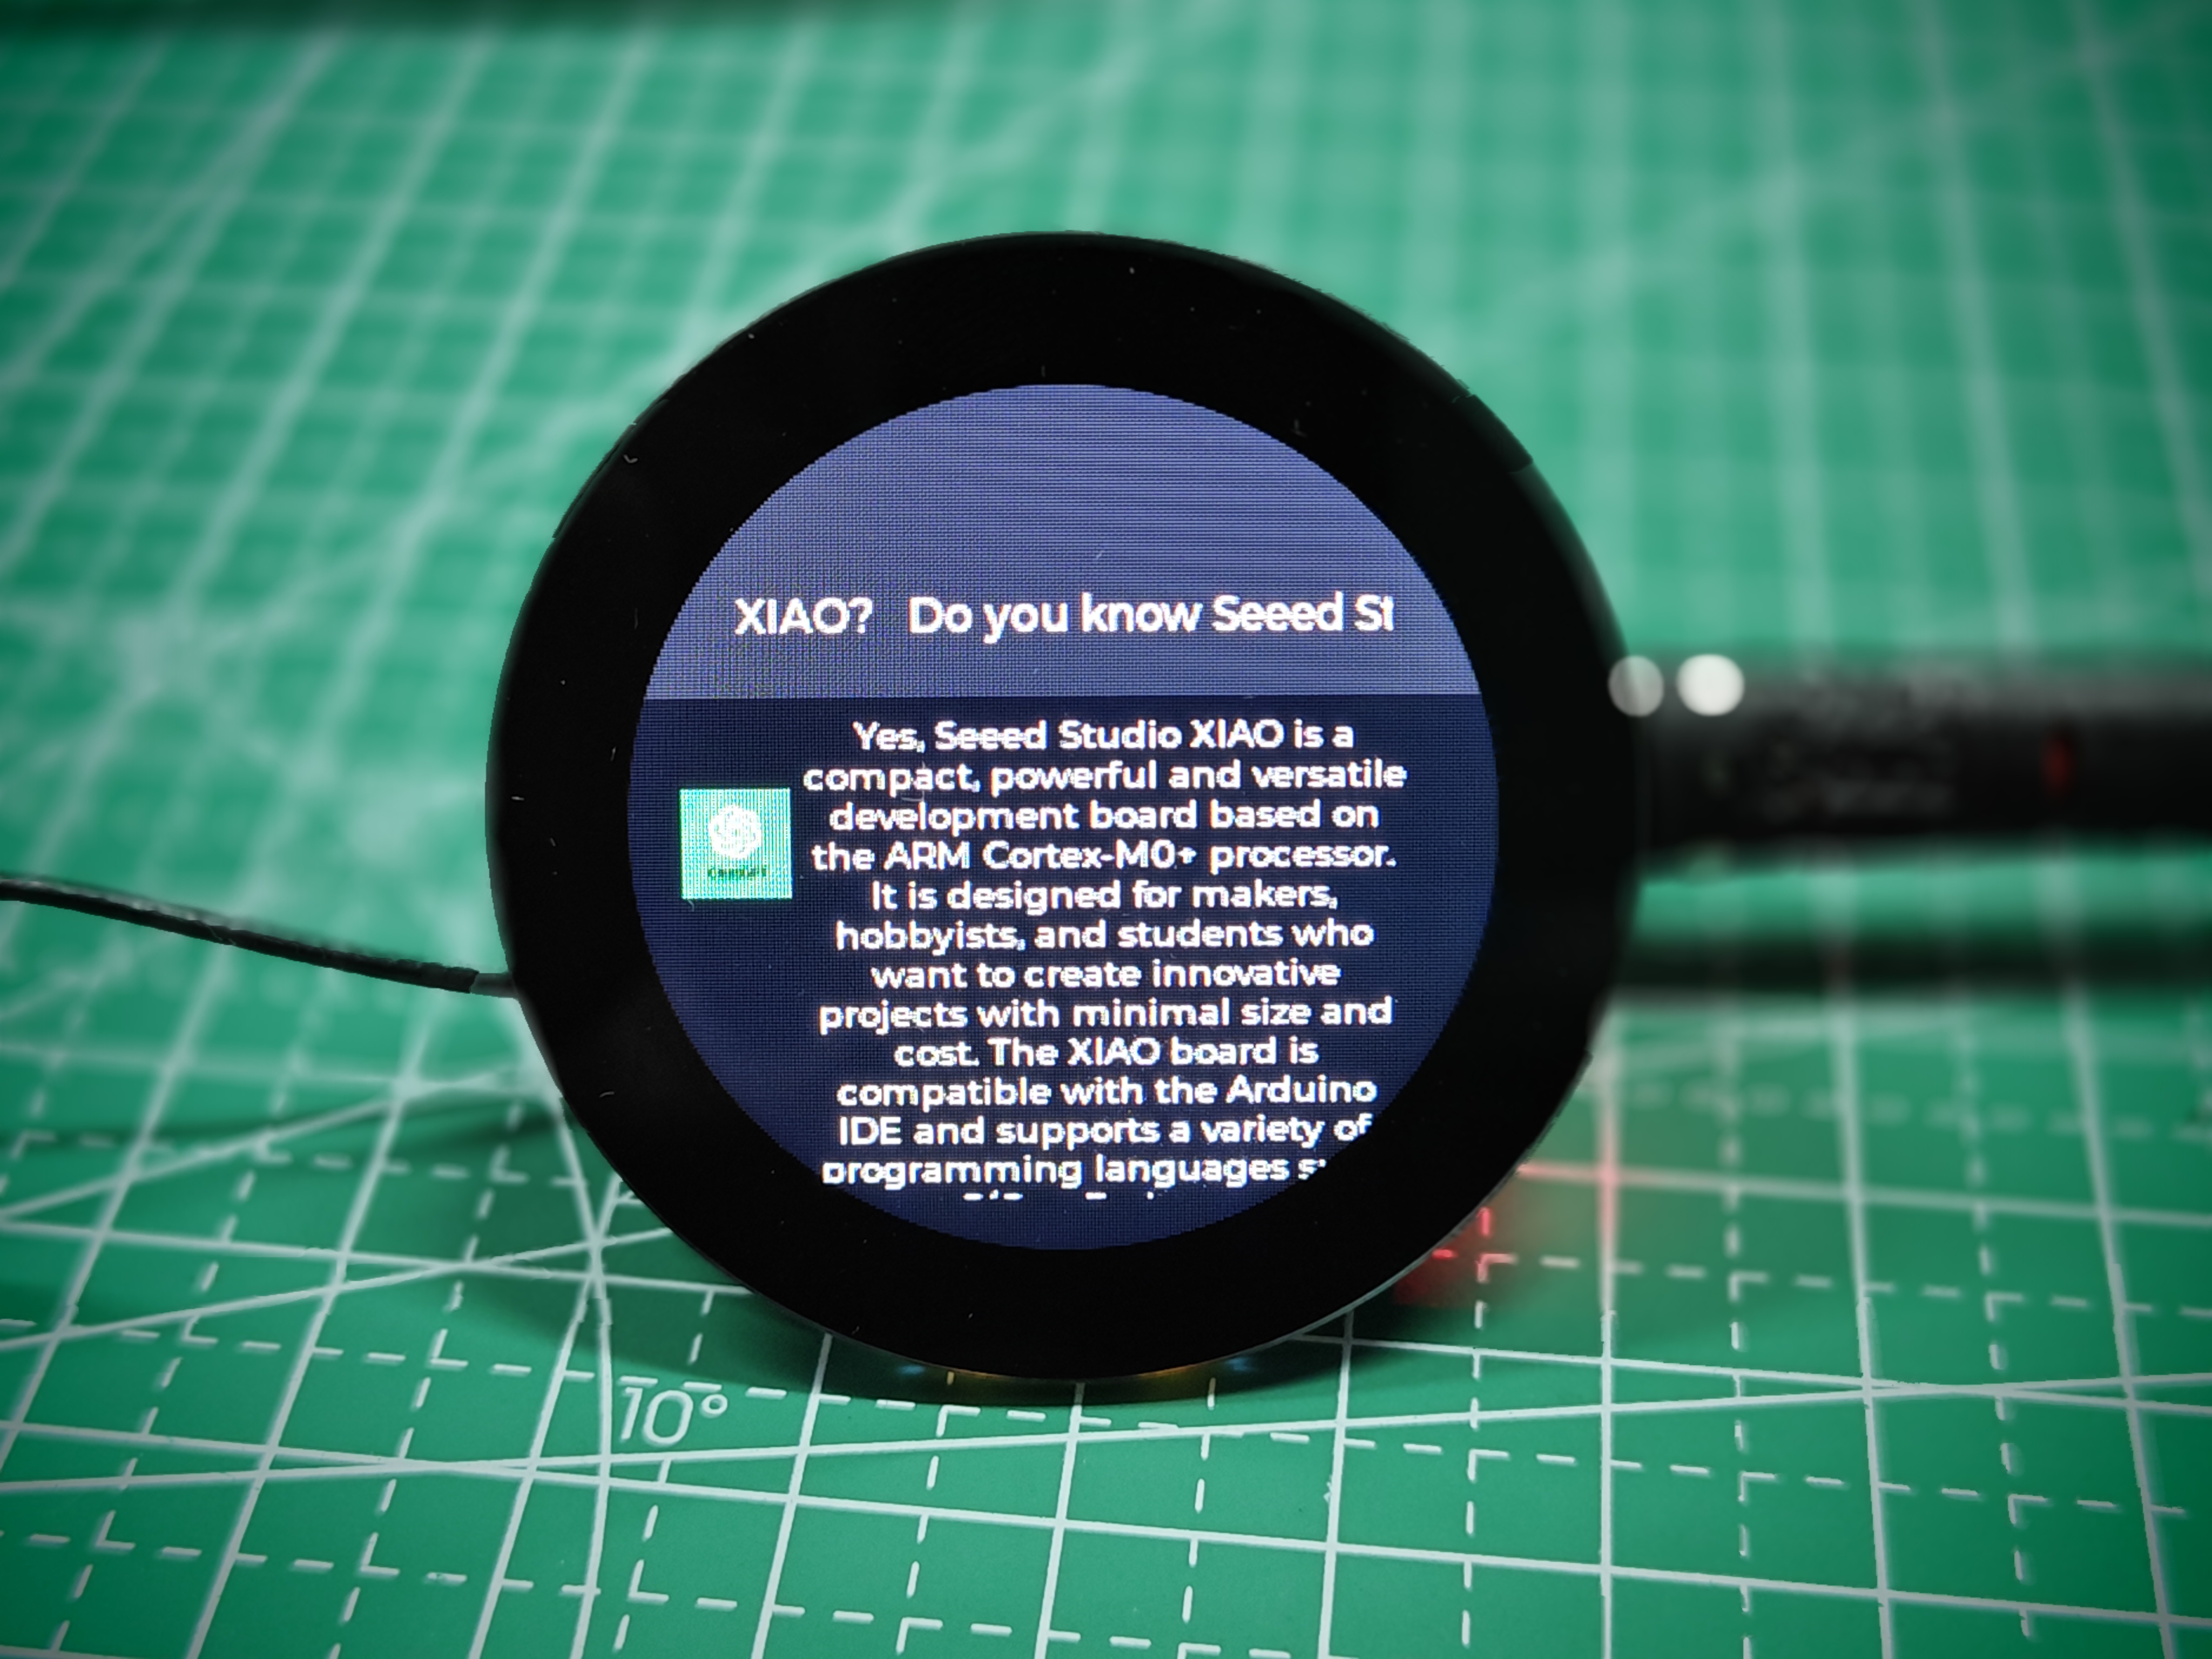
Este é o nosso assistente inteligente "XIAO"!
Vamos dar uma olhada em algumas das etapas gerais necessárias para concluir este projeto.
- Registrar-se e ativar o serviço Google Cloud Speech to Text
- Implantar serviços de conversão de fala em texto em hosts locais
- Fazer upload de arquivos de som gravados pelo XIAO ESP32S3 Sense para o Google Cloud para reconhecimento
- Implantar o ChatGPT no XIAO ESP32S3 Sense
- Design do conteúdo exibido na tela e integração dos programas
A estrutura geral do framework pode ser vista no diagrama abaixo.
Primeiros Passos
Antes de iniciar este projeto, talvez você precise preparar seu hardware e software com antecedência, conforme descrito aqui.
Preparação de hardware
Se você quiser experimentar todo o conteúdo do programa por completo, precisará ter pelo menos os seguintes equipamentos de hardware.
| Seeed Studio XIAO ESP32S3 Sense | Seeed Studio Round Display for XIAO |
|---|---|
 | 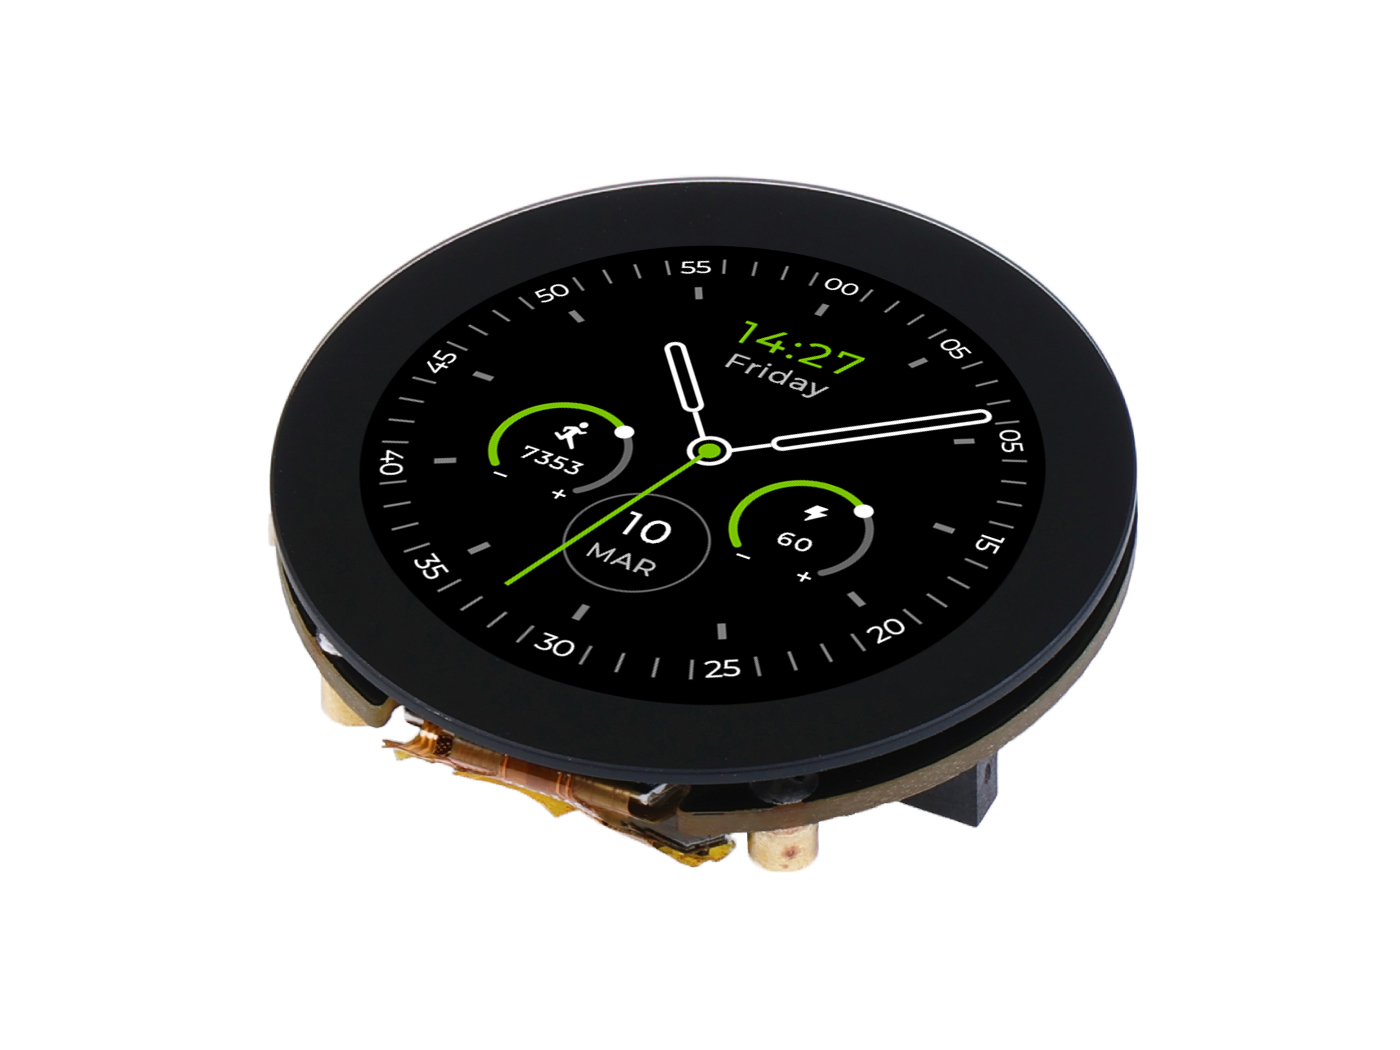 |
Além disso, precisamos de um cartão microSD em formato FAT32 com no máximo 32 GB para armazenar os arquivos de gravação.
Como o XIAO EPS32S3 Sense foi projetado com três resistores de pull-up R4~R6 conectados ao slot do cartão SD, e o display redondo também possui resistores de pull-up, o cartão SD não pode ser lido quando ambos são usados ao mesmo tempo. Para resolver esse problema, precisamos cortar o J3 na placa de expansão do XIAO ESP32S3 Sense.
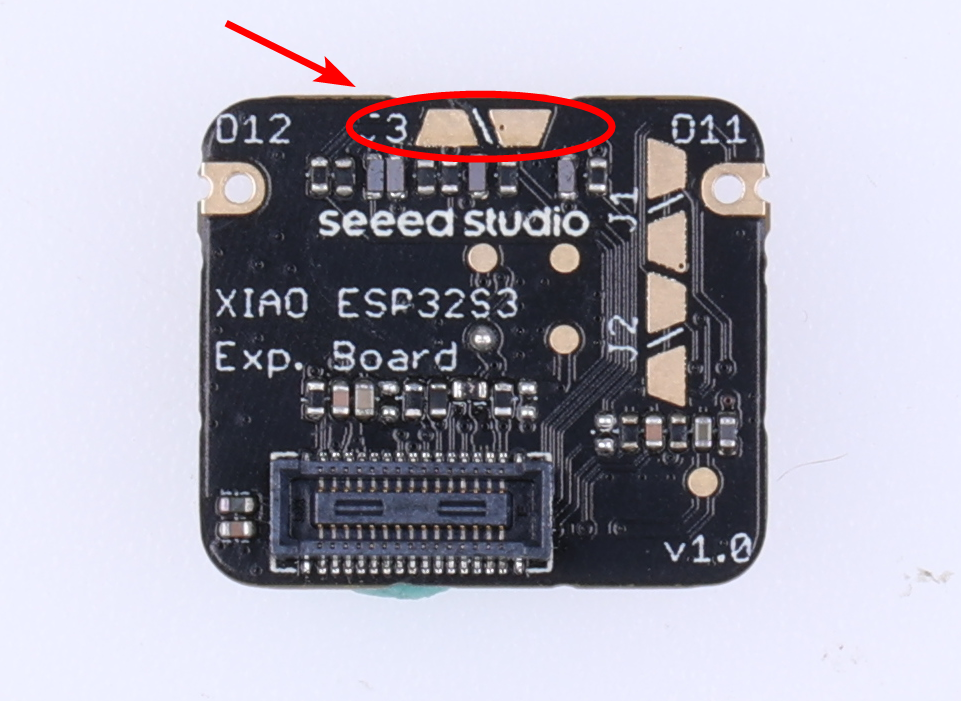
Após desconectar o J3, o slot de cartão SD no XIAO ESP32S3 Sense não funcionará corretamente, portanto você precisa inserir um cartão microSD no slot de cartão SD do Round Display.
Em seguida, instale o cartão microSD, o XIAO ESP32S3 Sense e o Round Display na ordem indicada.
Recomendamos que você remova primeiro o módulo da câmera para evitar arranhá-la ao cortar a conexão J3 com a lâmina.
Preparação de software
Como o XIAO ESP32S3 é utilizado, instale o pacote on-board do XIAO ESP32S3 de acordo com as instruções da Wiki antes de começar.
Além disso, também usamos o Round Display for XIAO, portanto você também precisará preparar a biblioteca para a placa de expansão conforme a Wiki.
Durante o projeto, também podemos usar algumas bibliotecas de terceiros, como a biblioteca do ChatGPT e a ArduinoJSON, que podem ser baixadas e adicionadas ao ambiente de desenvolvimento Arduino aqui.
Além das bibliotecas básicas, também precisamos usar o serviço Node, portanto você precisará instalar o Nodejs por conta própria; você pode baixá-lo diretamente no site oficial.
Com tudo pronto, vamos começar o tutorial de hoje.
Registrar-se e ativar o serviço Google Cloud Speech to Text
Você também pode consultar diretamente o tutorial oficial do Google Cloud sobre como se registrar e iniciar o serviço de conversão de fala em texto do Google Cloud para configurá-lo.
Speech-to-Text é uma API que é alimentada pela tecnologia de inteligência artificial (IA) do Google. Você envia seus dados de áudio para o Speech-to-Text e então recebe, em resposta, uma transcrição em texto dos seus dados de áudio. Antes de começar a enviar solicitações ao Speech-to-Text, você deve ativar a API no console do Google Cloud.
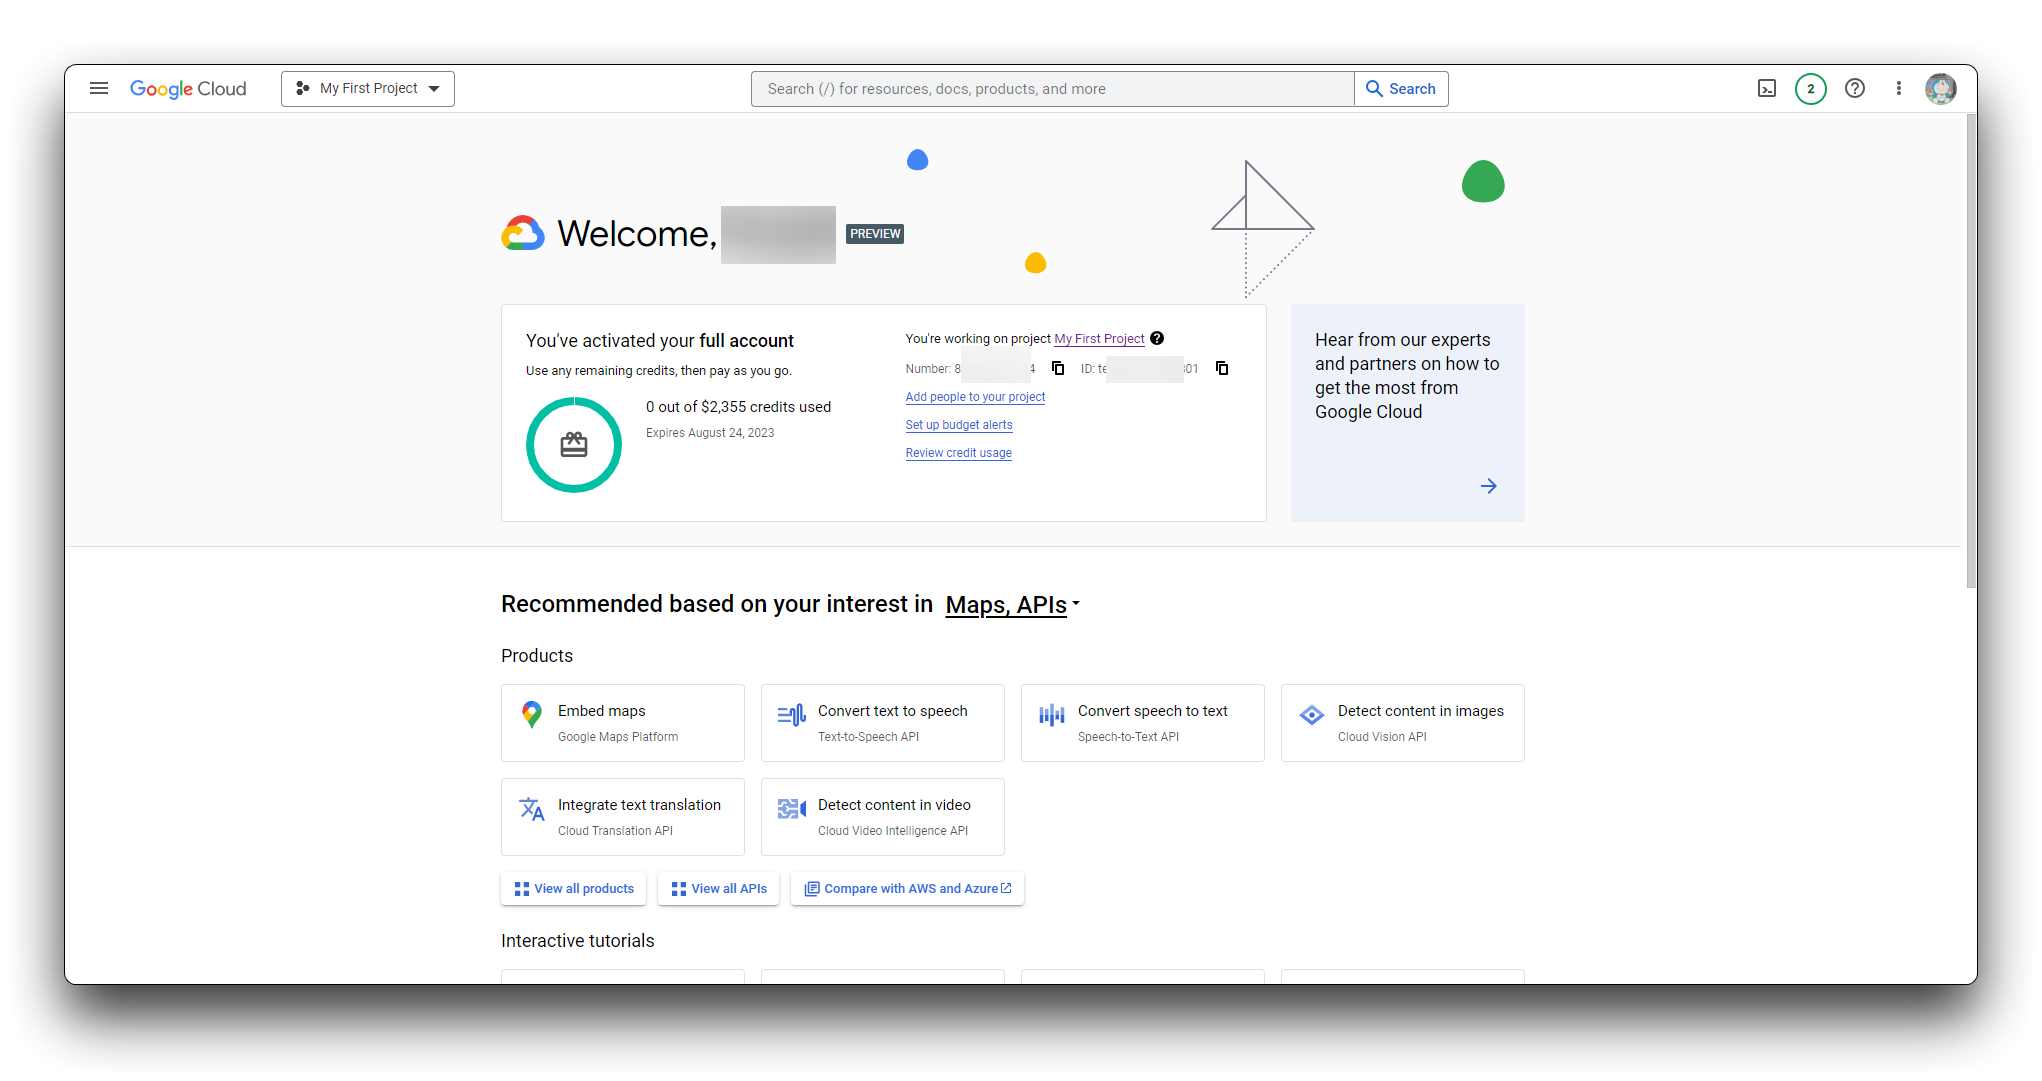
Etapa 1. Fazer login no console do Google Cloud
Você pode ir para o console do Google Cloud clicando aqui, e se você ainda não se registrou no Google Cloud pode fazê-lo aqui.
Etapa 2. Ir para a página de seleção de projeto
Você pode escolher um projeto existente ou criar um novo. Para mais informações sobre como criar um projeto, consulte Criando e gerenciando projetos.
Se você criar um novo projeto, será solicitado que vincule uma conta de faturamento a esse projeto. Se estiver usando um projeto já existente, certifique-se de que o faturamento esteja ativado.
Observação: você deve ativar o faturamento para usar a API Speech-to-Text, porém não será cobrado a menos que exceda a cota gratuita. Consulte a página de preços para mais detalhes.

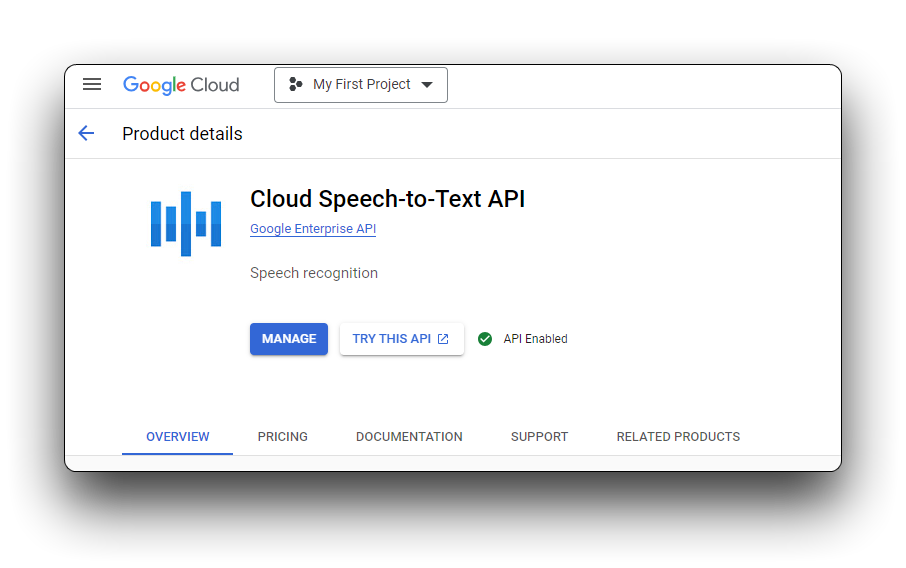
Etapa 3. Iniciar um serviço Speech-to-Text
Depois de selecionar um projeto e vinculá-lo a uma conta de faturamento, você pode ativar a API Speech-to-Text. Vá até a barra Search products and resources no topo da página e digite speech. Selecione Cloud Speech-to-Text API na lista de resultados.
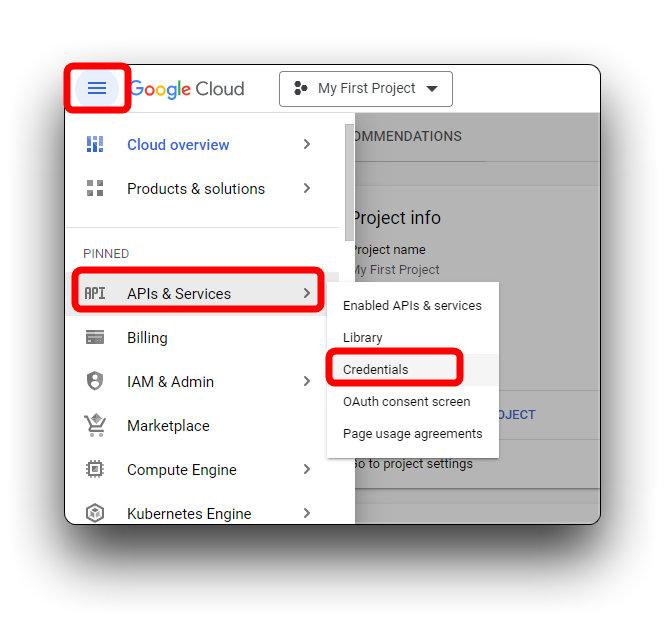
Etapa 4. Criar uma conta de serviço
Crie uma nova conta de serviço se o seu projeto ainda não tiver uma. Você deve criar uma conta de serviço para poder usar o Speech-to-Text.
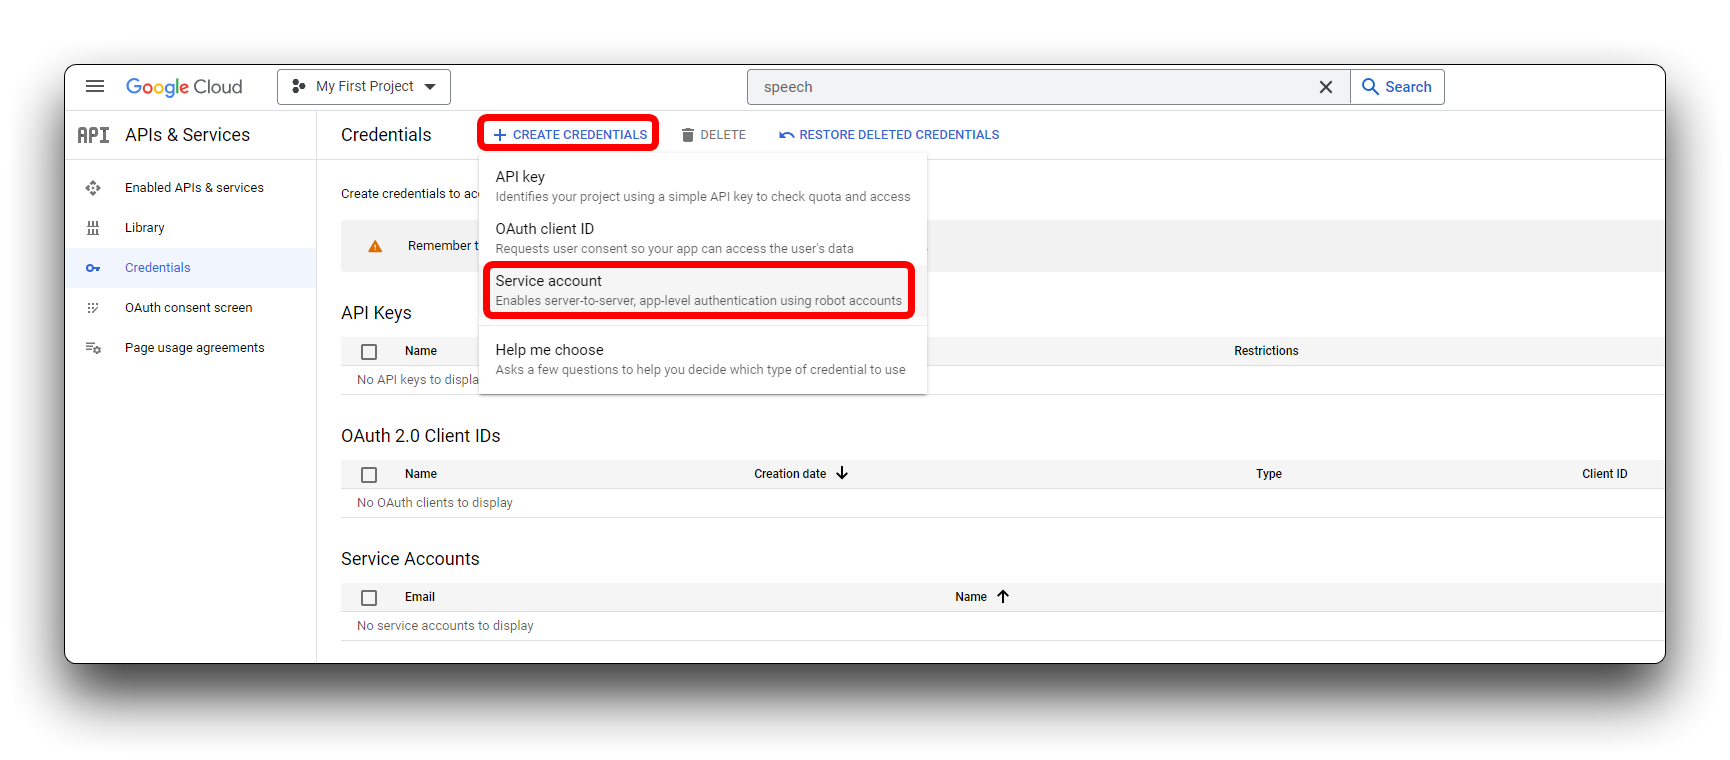
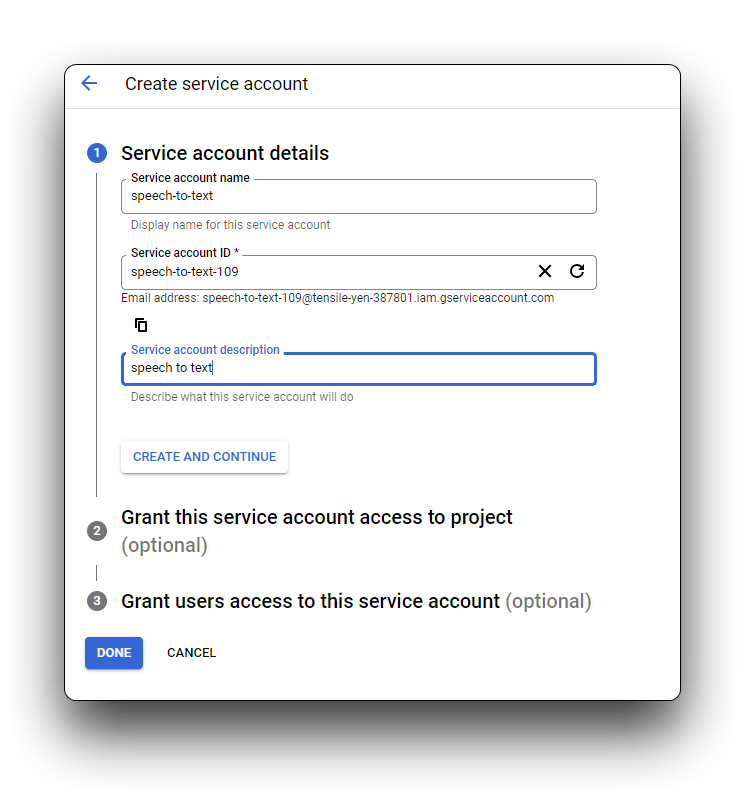
Na nova página pop-up, selecione Service account em CREATE CREDENTIALS.
Na caixa service account name, digite um nome exclusivo para a nova conta de serviço. Sua entrada é preenchida automaticamente na Service account ID box. A caixa Service account description é opcional, mas recomendada se você planeja associar várias contas de serviço ao seu projeto. Insira uma breve descrição da conta de serviço nesta caixa e clique em CREATE AND CONTINUE.
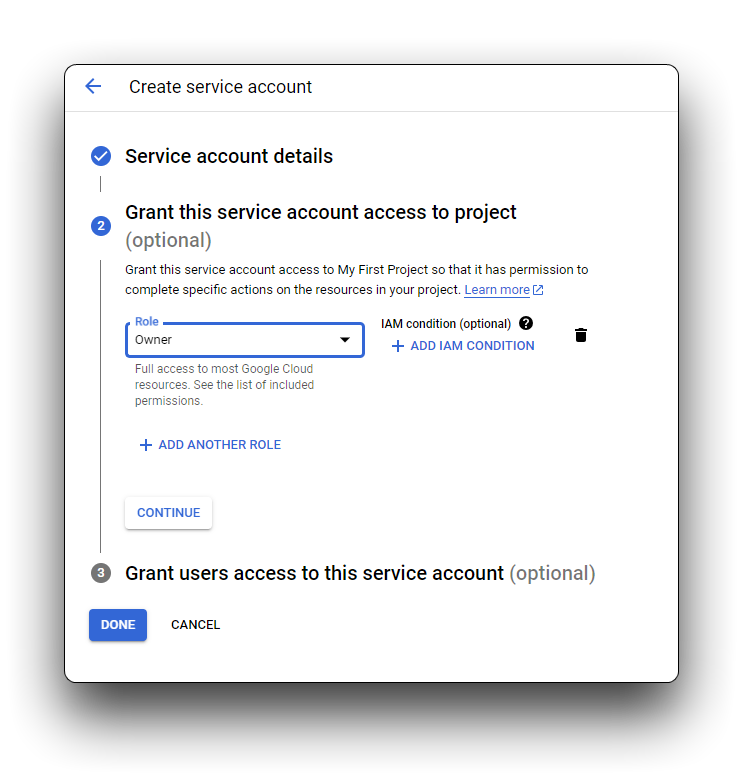
Recomendamos que você atribua uma das funções IAM básicas à sua conta de serviço. Você também pode atribuir várias funções a uma única conta de serviço, se necessário. Consulte Funções do IAM para obter detalhes sobre as funções disponíveis e as permissões concedidas a cada uma. Clique no menu suspenso Select a role e role para baixo até Owner. Você pode escolher uma função para esta conta de serviço entre as opções que aparecem na coluna da direita. Clique em CONTINUE.
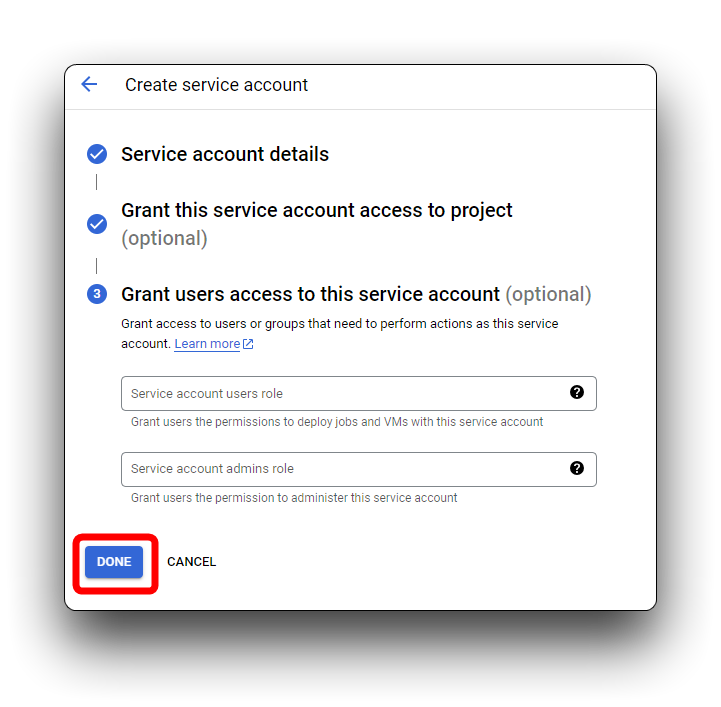
A etapa final permite, opcionalmente, que você autorize outras entidades (indivíduos, grupos do Google etc.) a acessar sua conta de serviço. Se você não precisar conceder acesso adicional, pode clicar em DONE sem inserir nenhuma informação.
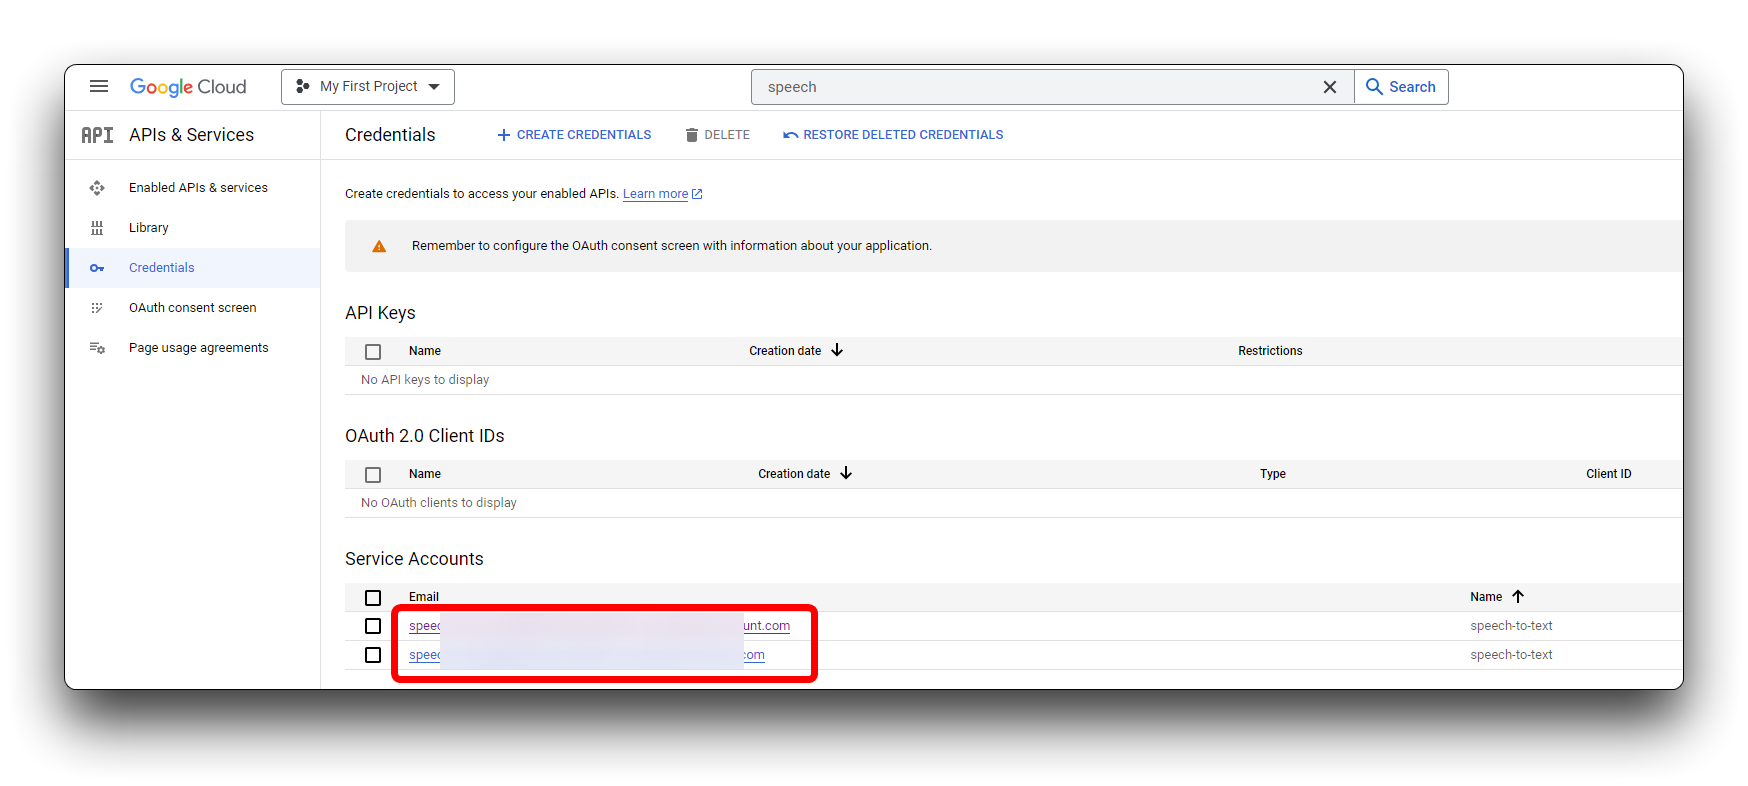
A conta de serviço agora é exibida na página Service Accounts. Você pode alterar as permissões da conta de serviço, adicionar ou gerar novas chaves e conceder acesso a qualquer momento.
Etapa 5. Criar uma chave JSON para sua conta de serviço
Você precisa usar essa chave privada durante o processo de autenticação quando enviar uma solicitação para o Speech-to-Text.
Para criar uma chave, clique na conta de serviço e selecione a guia KEYS. Clique em ADD KEY -> Create new key. Recomendamos que você crie uma chave em formato JSON.
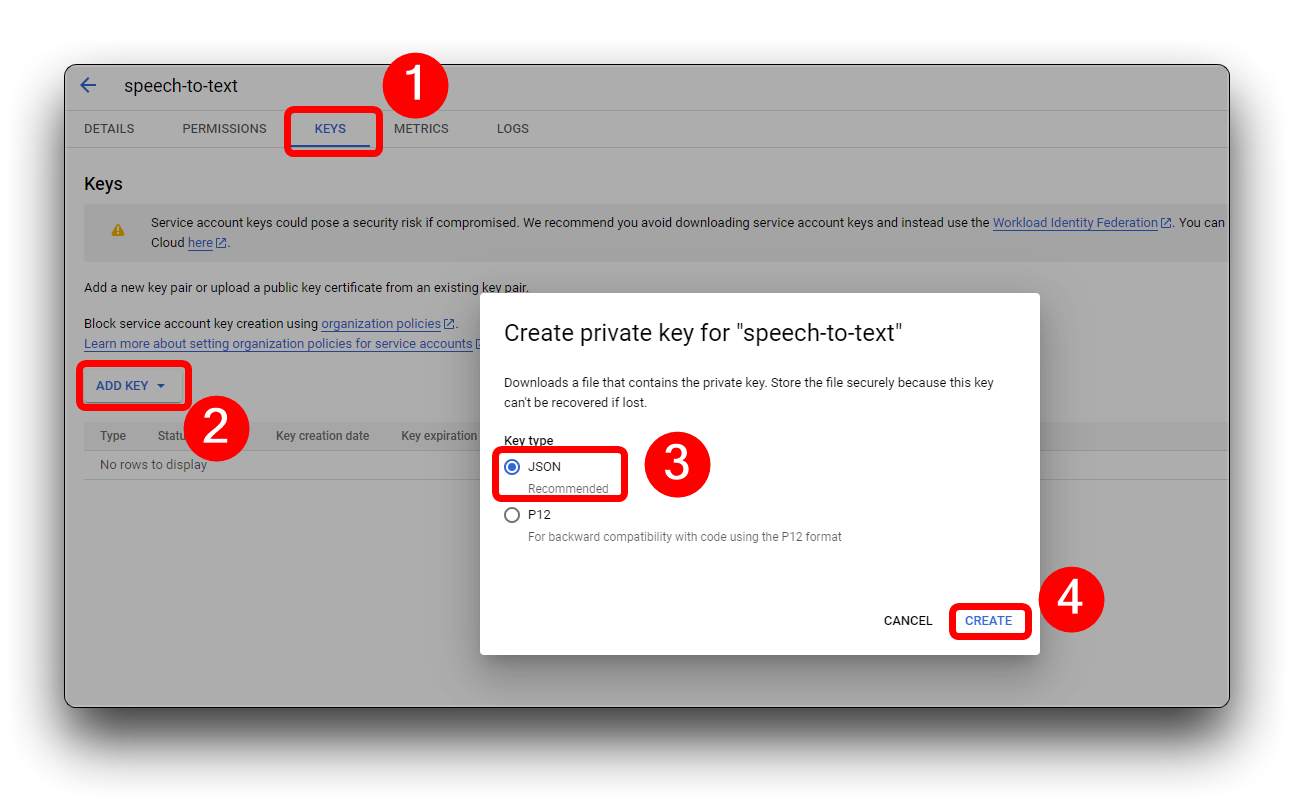
Uma nova chave, no formato de sua escolha, é baixada automaticamente. Armazene esse arquivo em um local seguro e anote o caminho do arquivo. Você precisará apontar a variável de ambiente GOOGLE_APPLICATION_CREDENTIALS para esse arquivo quando passar pelo processo de autenticação no início de cada nova sessão do Speech-to-Text. Esta é uma etapa essencial para autenticar solicitações ao Speech-to-Text. O ID exclusivo da chave aparece ao lado do nome da conta de serviço.
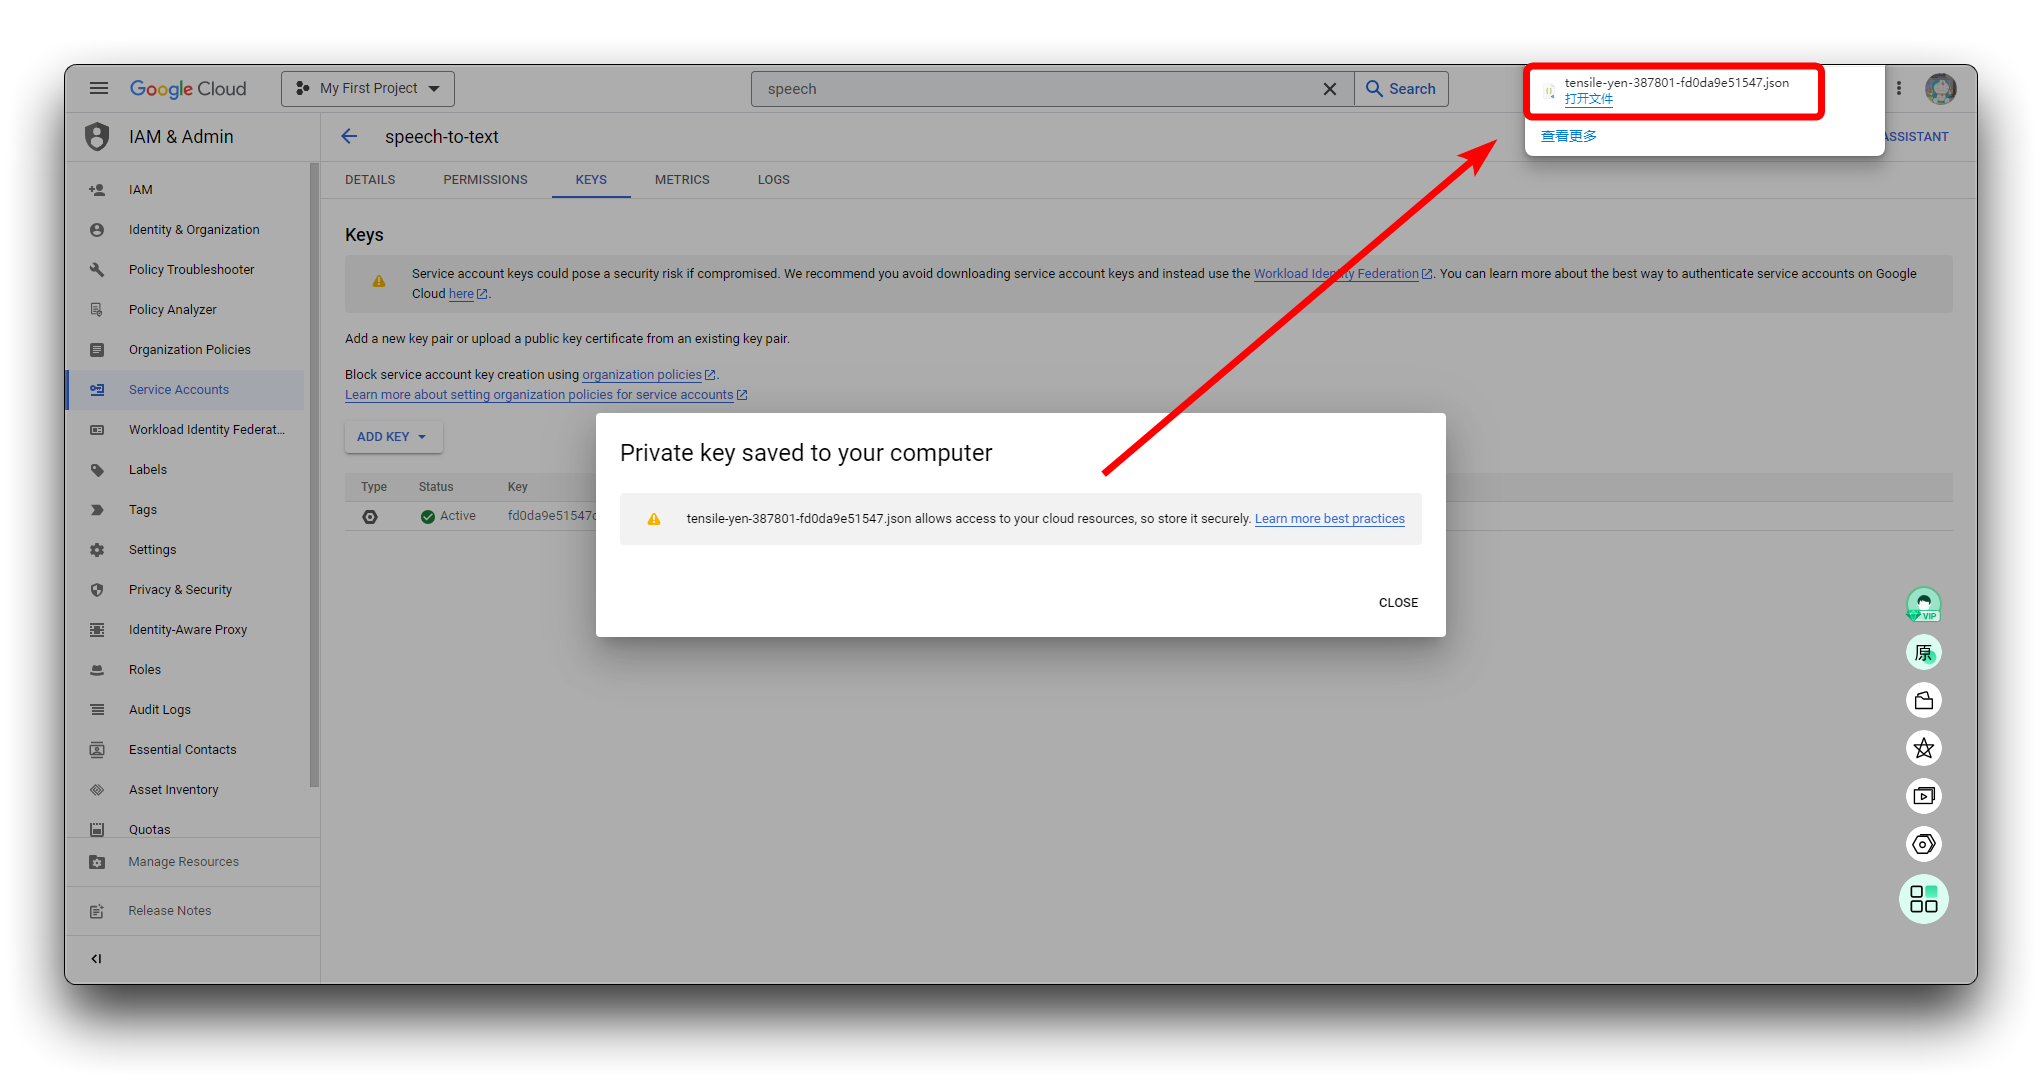
Por favor, mantenha a chave em formato JSON, pois a utilizaremos em uma etapa posterior.
Implantar serviços de conversão de fala em texto em hosts locais
Etapa 6. Baixar o arquivo do projeto
Empacotamos o arquivo de projeto necessário para concluir todo o tutorial e você pode baixá-lo diretamente do Github usando o botão abaixo, ou pode baixá-lo localmente usando o comando Git.
git clone https://github.com/limengdu/XIAO-ESP32S3Sense-Speech2ChatGPT.git
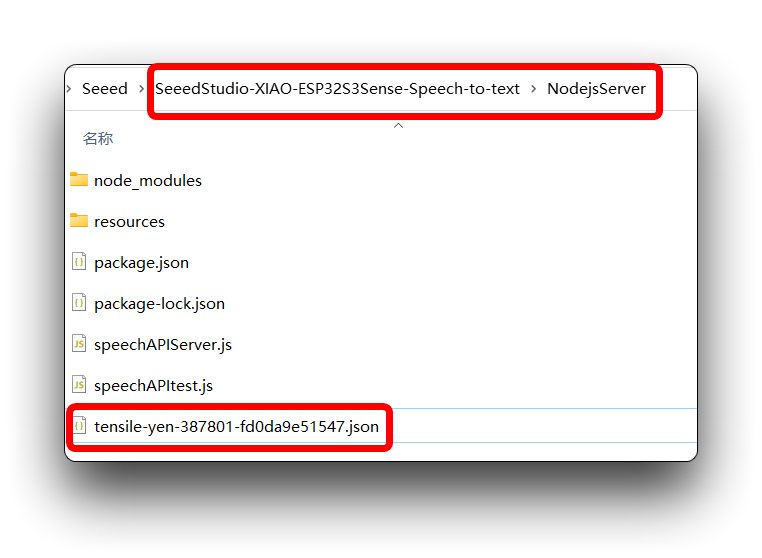
Enquanto isso, você pode copiar o arquivo JSON que preparamos na etapa 5 para a pasta NodejsServer e iremos usá-lo depois.
Etapa 7. Definir sua variável de ambiente de autenticação
Para definir sua GOOGLE_APPLICATION_CREDENTIALS, você deve ter uma conta de serviço associada ao seu projeto e ter acesso à chave JSON dessa conta de serviço.
Forneça credenciais de autenticação para o código do seu aplicativo definindo a variável de ambiente GOOGLE_APPLICATION_CREDENTIALS.
- Windows
- MacOS or Linux
Para PowerShell:
$env:GOOGLE_APPLICATION_CREDENTIALS="KEY_PATH"
Substitua KEY_PATH pelo caminho do arquivo JSON que contém a chave da sua conta de serviço.
Por exemplo:
$env:GOOGLE_APPLICATION_CREDENTIALS="C:\Users\username\Downloads\service-account-file.json"
Para o prompt de comando:
set GOOGLE_APPLICATION_CREDENTIALS=KEY_PATH
Substitua KEY_PATH pelo caminho do arquivo JSON que contém a chave da sua conta de serviço.
export GOOGLE_APPLICATION_CREDENTIALS="KEY_PATH"
Substitua KEY_PATH pelo caminho do arquivo JSON que contém a chave da sua conta de serviço.
Por exemplo:
export GOOGLE_APPLICATION_CREDENTIALS="/home/user/Downloads/service-account-file.json"
Na etapa anterior, colocamos o arquivo JSON na pasta NodejsServer, então podemos ir diretamente para essa pasta, clicar com o botão direito e selecionar Open in Powershell para entrar no terminal do Windows.
Em seguida, basta digitar o comando.
$env:GOOGLE_APPLICATION_CREDENTIALS="tensile-yen-3xxxxx-fdxxxxxxxxxx.json"
Por favor, use o nome do seu arquivo JSON ao executar o comando acima.
Se você tiver reiniciado o computador ou fechado o Powershell, isso pode exigir que você reconfigure suas variáveis de ambiente para adicionar a chave.
Etapa 8. Testar a implantação de um serviço local de conversão de fala em texto do Google Cloud
Com tudo pronto, podemos então usar um trecho de áudio gravado, combinado com um programa em json, para verificar se nossa implantação está obtendo com sucesso a transcrição da gravação para texto.
Abra uma janela do Powershell em NodejsServer na pasta do projeto.
Em seguida, insira o seguinte comando. Este comando executará o arquivo speechAPItest.js e usará o arquivo de gravação na pasta resources do projeto como a fonte de entrada de áudio a ser enviada ao Google Cloud para análise e retorno do conteúdo de fala reconhecido.
node ./speechAPItest.js
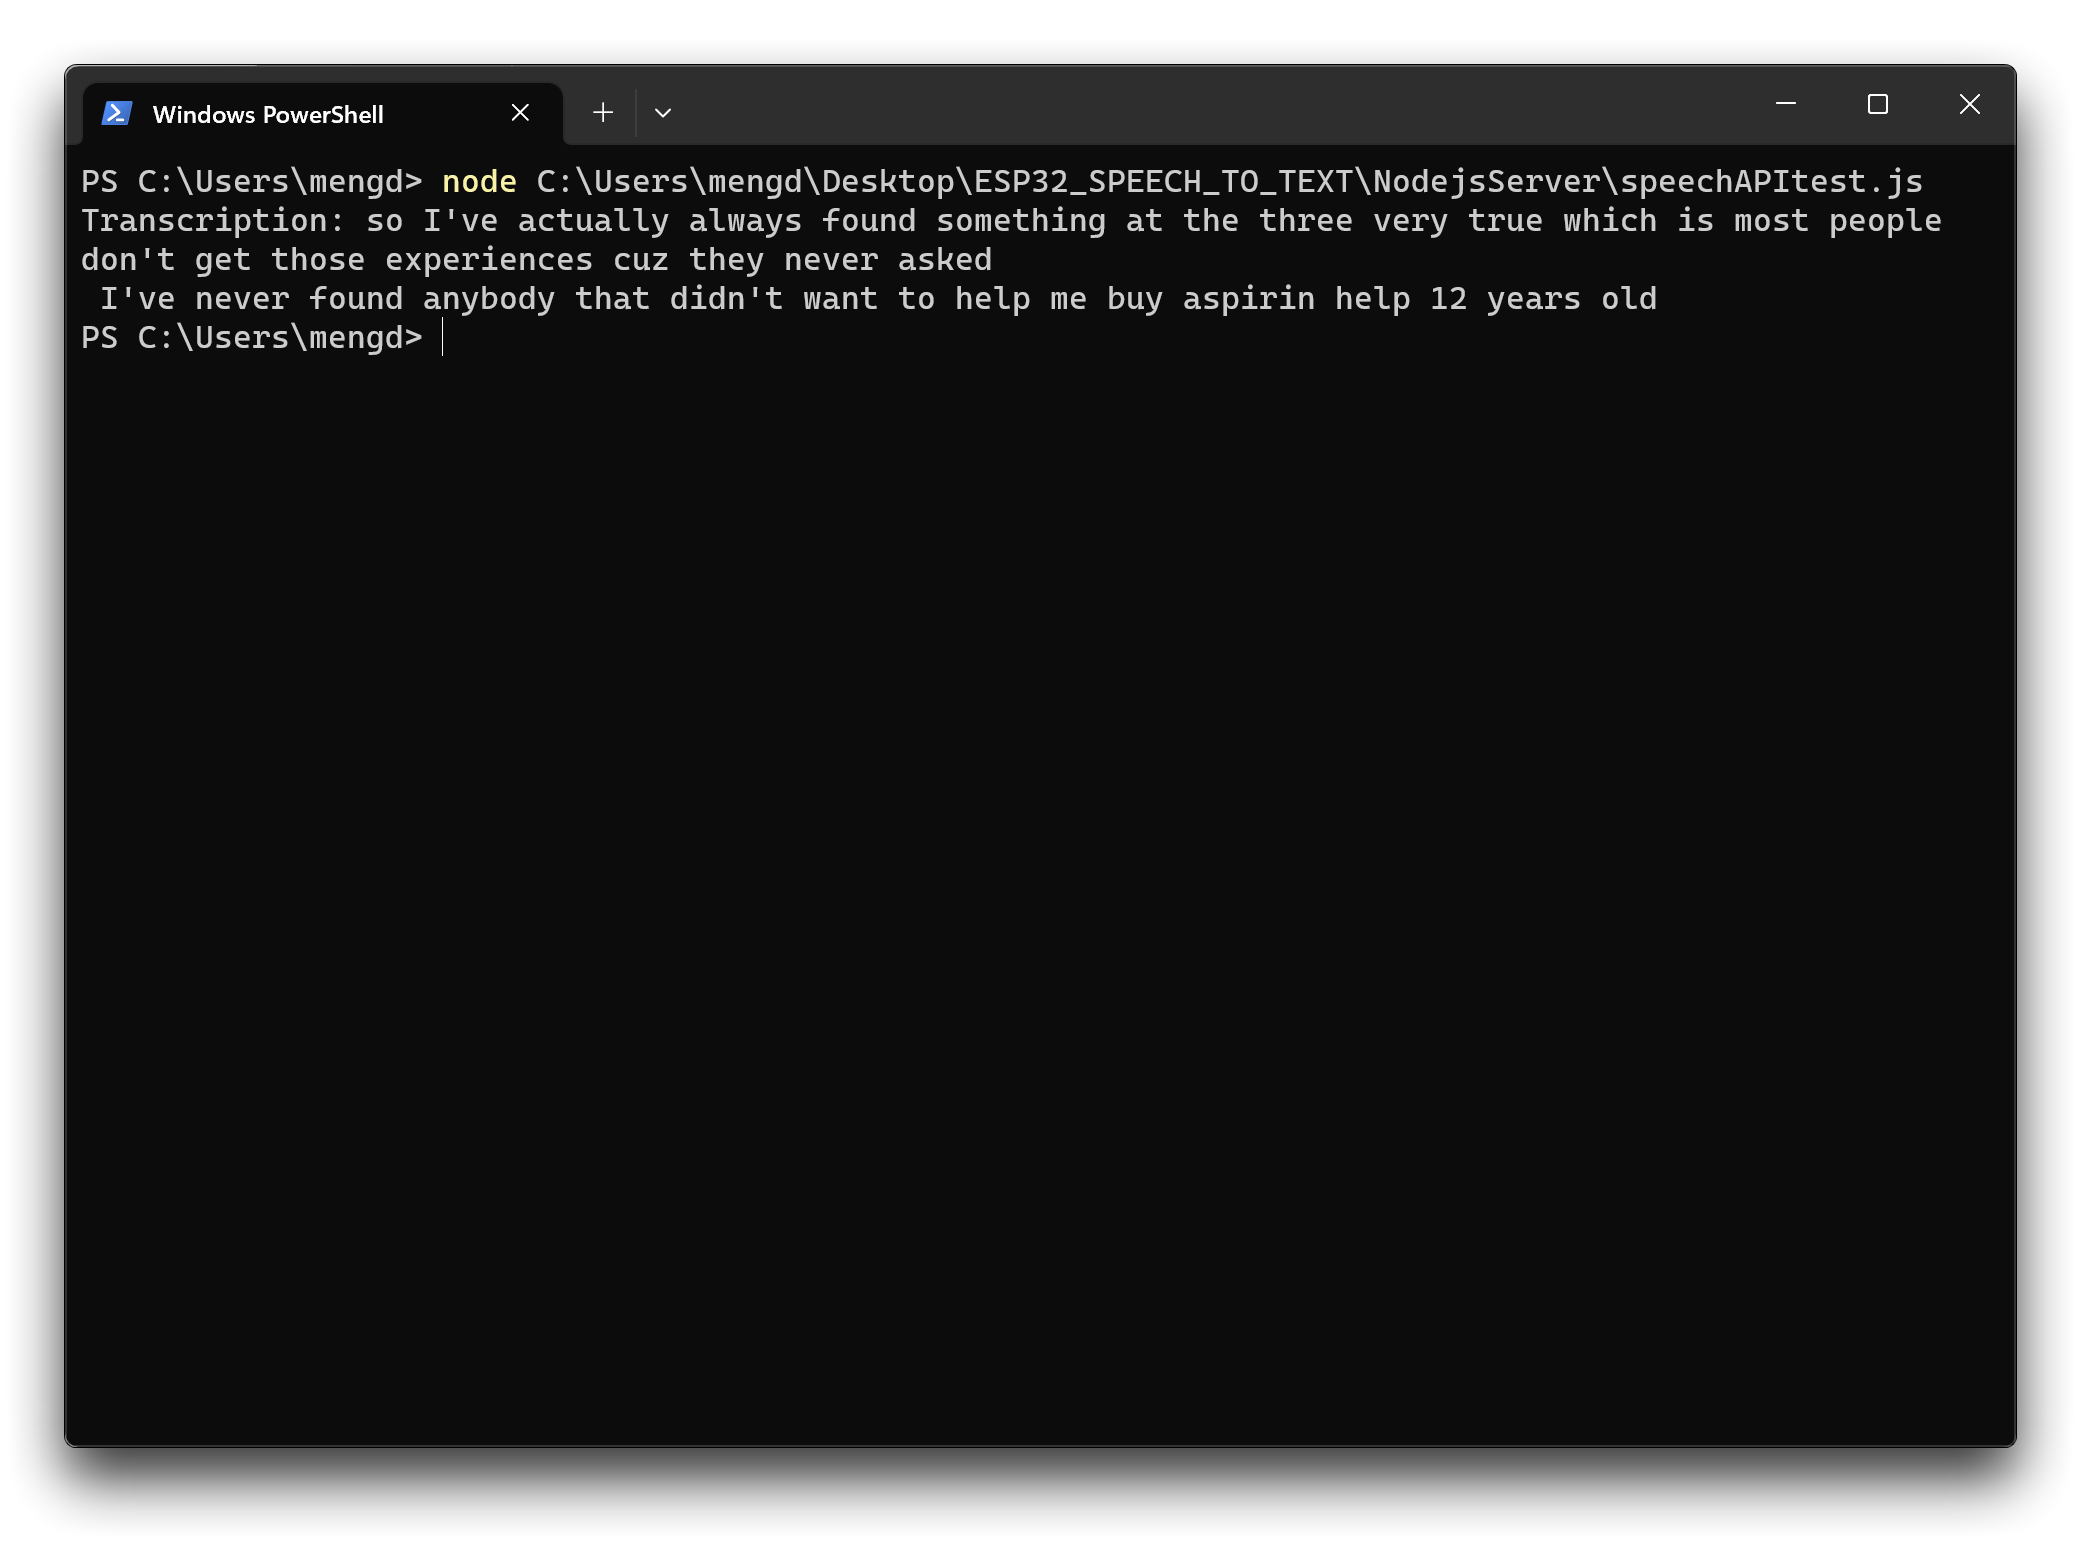
Se a sua implementação funcionar como mostrado acima, isso indica que você implantou com sucesso os serviços do Google Cloud em seu host local e está pronto para prosseguir para a próxima etapa.
Se você encontrar problemas, pode consultar as instruções oficiais do Google Cloud para verificar se há algum erro ou etapa ausente no processo de implantação.
Enviar arquivos de som gravados pelo XIAO ESP32S3 Sense para o Google Cloud para reconhecimento
Em seguida, mudamos o caminho para o arquivo de áudio enviado. De um envio local para um envio via gravação do XIAO ESP32S3 Sense. E os arquivos de áudio gravados pelo XIAO ESP32S3 Sense são primeiro salvos em um cartão microSD e depois transferidos para o Google Cloud por meio da porta local.
Etapa 9. Ligar a escuta da porta para o Serviço de Reconhecimento de Fala do Google Cloud
Da mesma forma, na pasta NodejsServer, use o Poweshell para executar o seguinte comando.
node ./speechAPIServer.js
Uma vez executado, o programa speechAPIServer.js será iniciado e continuará ouvindo localhost:8888. Assim que um arquivo for transferido para essa porta, o serviço do Google Cloud será chamado.
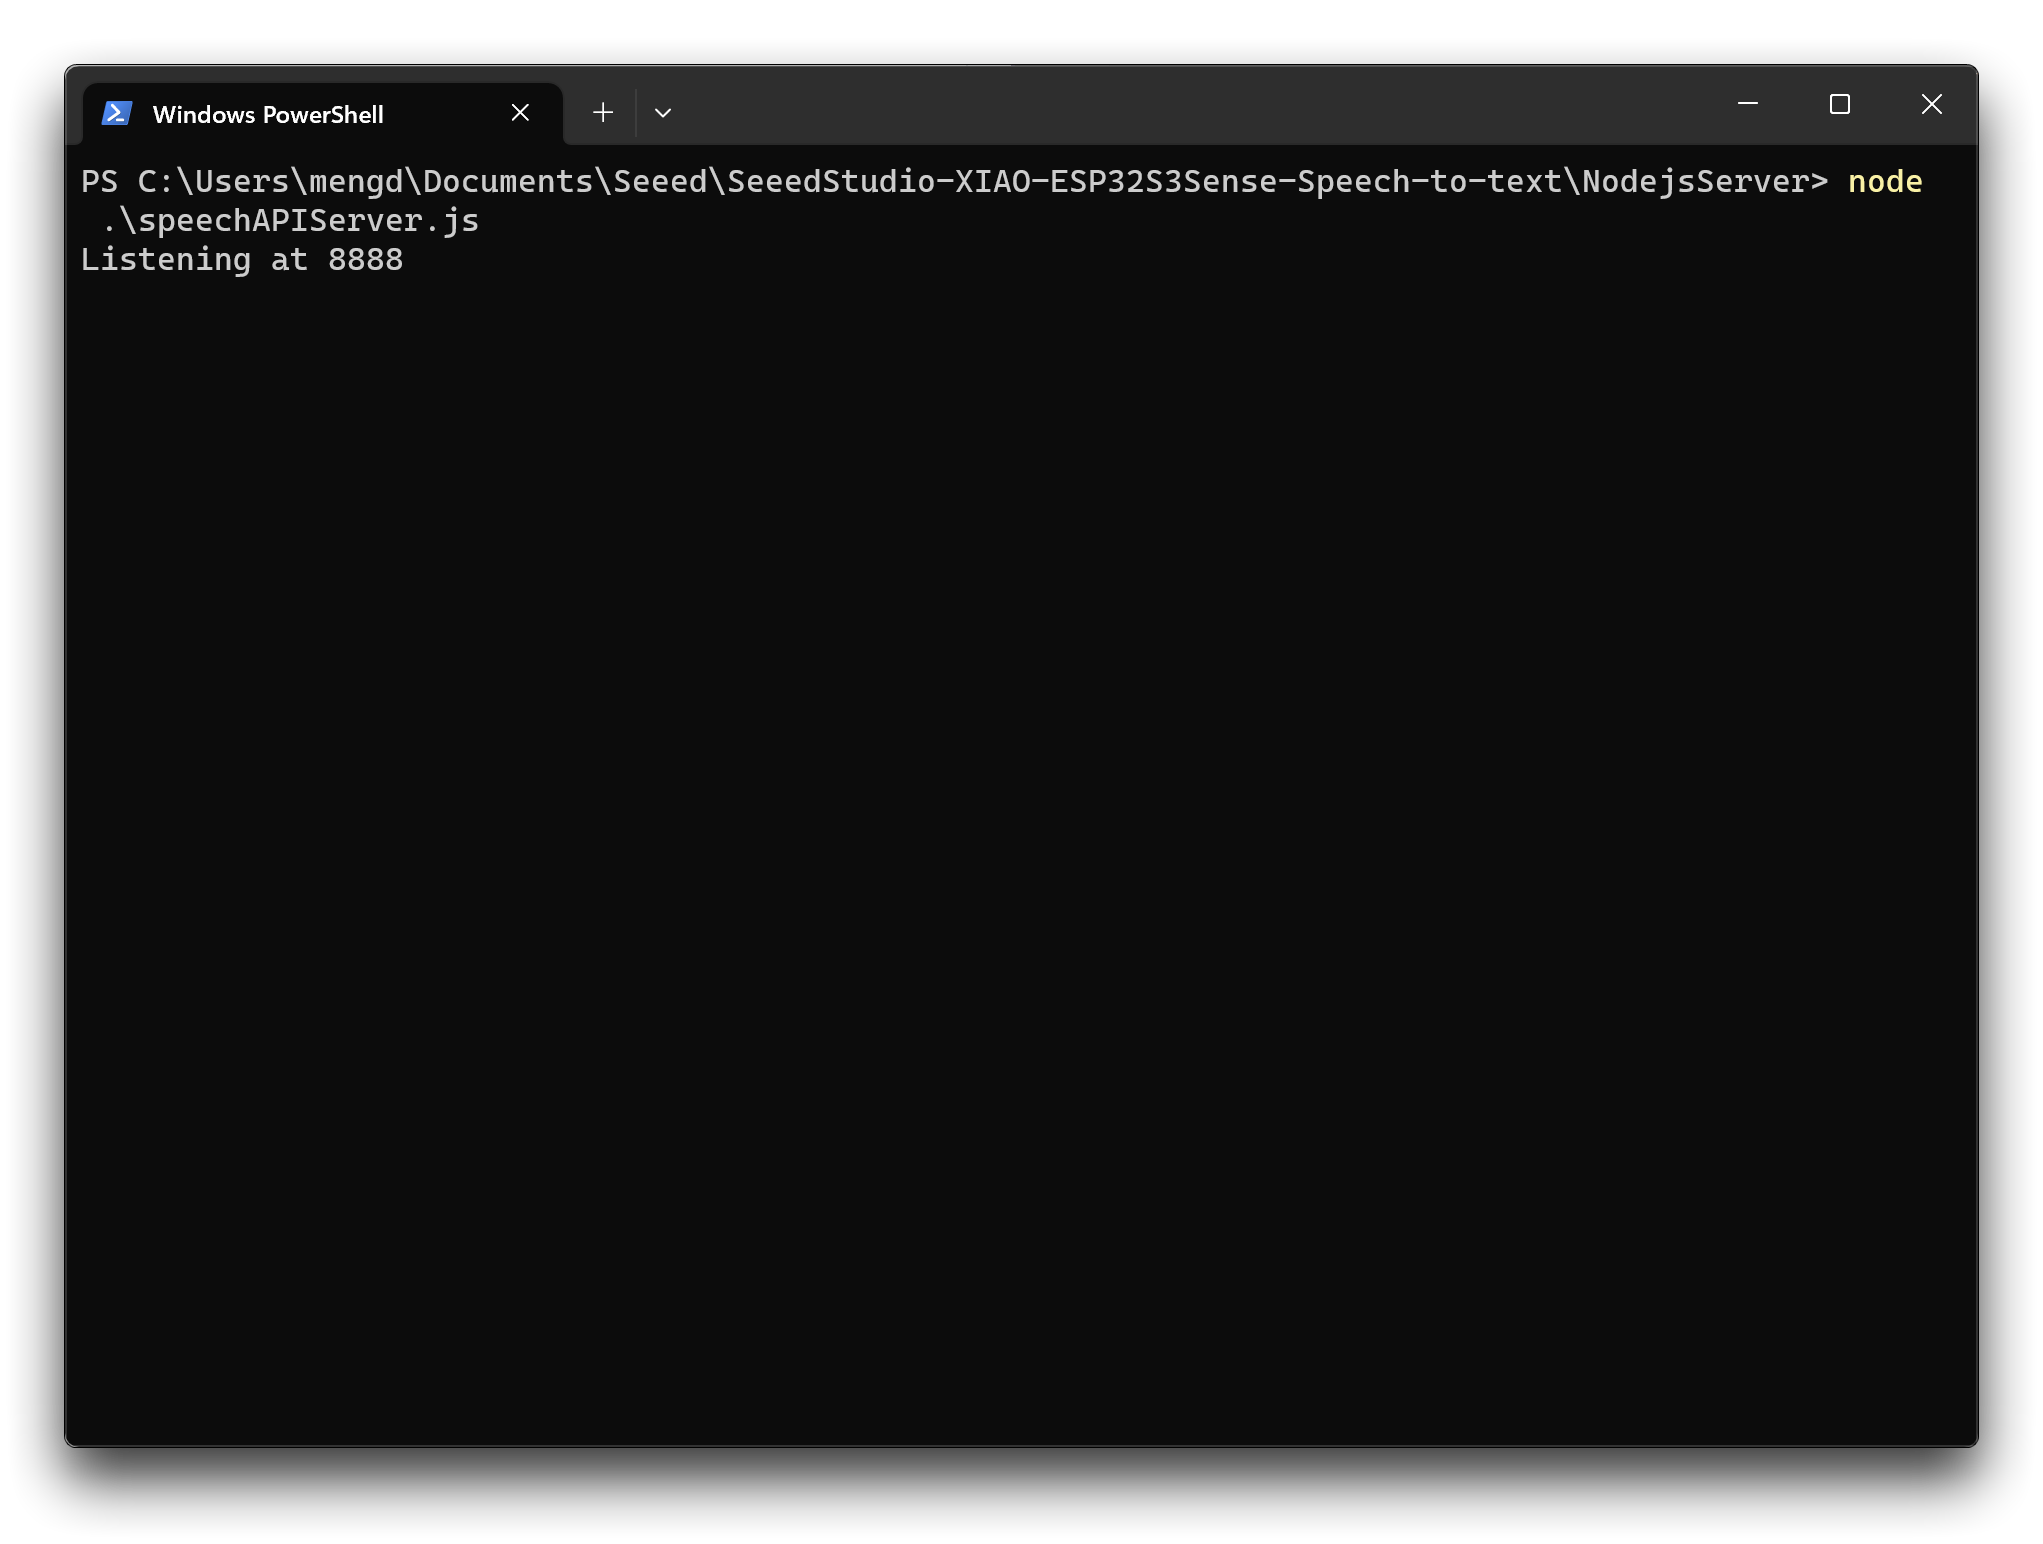
Depois que a escuta tiver começado, basta deixar a janela aberta e o serviço permanecerá em execução.
Etapa 10. Verificar o endereço IP do host
Como os arquivos de gravação após o XIAO precisam ser enviados aos Serviços do Google Cloud por meio do número de porta do host, precisamos saber o endereço IP do computador host.
- Windows
- MacOS or Linux
Execute o seguinte comando no Powershell para obter informações sobre o endereço IP do seu computador.
ipcofig
Execute o seguinte comando no shell para obter informações sobre o endereço IP do seu computador.
ifconfig
Anote o seu endereço IP, pois precisaremos usá-lo mais tarde.
Etapa 11. Enviando programas para o XIAO ESP32S3 Sense
Na pasta do projeto XIAOESP32S3-RECORD-UPLOAD preparamos o programa para os exemplos desta seção.
Se a sua versão do ESP32 for 2.0.x. Clique aqui para visualizar o programa completo
#include <I2S.h>
#include <WiFi.h>
#include <HTTPClient.h>
#include "FS.h"
#include "SD.h"
#include "SPI.h"

//Variables to be used in the recording program, do not change for best
#define SAMPLE_RATE 16000U
#define SAMPLE_BITS 16
#define WAV_HEADER_SIZE 44
#define VOLUME_GAIN 2
#define RECORD_TIME 10      // seconds, The maximum value is 240

// Number of bytes required for the recording buffer
uint32_t record_size = (SAMPLE_RATE * SAMPLE_BITS / 8) * RECORD_TIME;

File file;
const char filename[] = "/recording.wav";

bool isWIFIConnected;

void setup() {
  // put your setup code here, to run once:
  Serial.begin(115200);
  while (!Serial) ;

  I2S.setAllPins(-1, 42, 41, -1, -1);

  //The transmission mode is PDM_MONO_MODE, which means that PDM (pulse density modulation) mono mode is used for transmission
  if (!I2S.begin(PDM_MONO_MODE, SAMPLE_RATE, SAMPLE_BITS)) {
    Serial.println("Failed to initialize I2S!");
    while (1) ;
  }

  if(!SD.begin(D2)){
    Serial.println("Failed to mount SD Card!");
    while (1) ;
  }

  xTaskCreate(i2s_adc, "i2s_adc", 1024 * 8, NULL, 1, NULL);
  delay(500);
  xTaskCreate(wifiConnect, "wifi_Connect", 4096, NULL, 0, NULL);
}

void loop() {
  // put your main code here, to run repeatedly:
}

void i2s_adc(void *arg)
{
  uint32_t sample_size = 0;

  //This variable will be used to point to the actual recording buffer
  uint8_t *rec_buffer = NULL;
  Serial.printf("Ready to start recording ...\n");

  File file = SD.open(filename, FILE_WRITE);

  // Write the header to the WAV file
  uint8_t wav_header[WAV_HEADER_SIZE];

  //Write the WAV file header information to the wav_header array
  generate_wav_header(wav_header, record_size, SAMPLE_RATE);

  //Call the file.write() function to write the data in the wav_header array to the newly created WAV file
  file.write(wav_header, WAV_HEADER_SIZE);

  // This code uses the ESP32's PSRAM (external cache memory) to dynamically allocate a section of memory to store the recording data.
  rec_buffer = (uint8_t *)ps_malloc(record_size);
  if (rec_buffer == NULL) {
    Serial.printf("malloc failed!\n");
    while(1) ;
  }
  Serial.printf("Buffer: %d bytes\n", ESP.getPsramSize() - ESP.getFreePsram());

  // Start recording
  // I2S port number (in this case I2S_NUM_0),
  // a pointer to the buffer to which the data is to be written (i.e. rec_buffer),
  // the size of the data to be read (i.e. record_size),
  // a pointer to a variable that points to the actual size of the data being read (i.e. &sample_size),
  // and the maximum time to wait for the data to be read (in this case portMAX_DELAY, indicating an infinite wait time).
  esp_i2s::i2s_read(esp_i2s::I2S_NUM_0, rec_buffer, record_size, &sample_size, portMAX_DELAY);
  if (sample_size == 0) {
    Serial.printf("Record Failed!\n");
  } else {
    Serial.printf("Record %d bytes\n", sample_size);
  }

  // Increase volume
  for (uint32_t i = 0; i < sample_size; i += SAMPLE_BITS/8) {
    (*(uint16_t *)(rec_buffer+i)) <<= VOLUME_GAIN;
  }

  // Write data to the WAV file
  Serial.printf("Writing to the file ...\n");
  if (file.write(rec_buffer, record_size) != record_size)
    Serial.printf("Write file Failed!\n");

  free(rec_buffer);
  rec_buffer = NULL;
  file.close();
  Serial.printf("The recording is over.\n");

  listDir(SD, "/", 0);

  if(isWIFIConnected){
    uploadFile();
  }

  vTaskDelete(NULL);
}


void generate_wav_header(uint8_t *wav_header, uint32_t wav_size, uint32_t sample_rate)
{
  // See this for reference: http://soundfile.sapp.org/doc/WaveFormat/
  uint32_t file_size = wav_size + WAV_HEADER_SIZE - 8;
  uint32_t byte_rate = SAMPLE_RATE * SAMPLE_BITS / 8;
  const uint8_t set_wav_header[] = {
    'R', 'I', 'F', 'F', // ChunkID
    file_size, file_size >> 8, file_size >> 16, file_size >> 24, // ChunkSize
    'W', 'A', 'V', 'E', // Format
    'f', 'm', 't', ' ', // Subchunk1ID
    0x10, 0x00, 0x00, 0x00, // Subchunk1Size (16 for PCM)
    0x01, 0x00, // AudioFormat (1 for PCM)
    0x01, 0x00, // NumChannels (1 channel)
    sample_rate, sample_rate >> 8, sample_rate >> 16, sample_rate >> 24, // SampleRate
    byte_rate, byte_rate >> 8, byte_rate >> 16, byte_rate >> 24, // ByteRate
    0x02, 0x00, // BlockAlign
    0x10, 0x00, // BitsPerSample (16 bits)
    'd', 'a', 't', 'a', // Subchunk2ID
    wav_size, wav_size >> 8, wav_size >> 16, wav_size >> 24, // Subchunk2Size
  };
  memcpy(wav_header, set_wav_header, sizeof(set_wav_header));
}


void listDir(fs::FS &fs, const char * dirname, uint8_t levels){
    Serial.printf("Listing directory: %s\n", dirname);

    File root = fs.open(dirname);
    if(!root){
        Serial.println("Failed to open directory");
        return;
    }
    if(!root.isDirectory()){
        Serial.println("Not a directory");
        return;
    }

    File file = root.openNextFile();
    while(file){
        if(file.isDirectory()){
            Serial.print("  DIR : ");
            Serial.println(file.name());
            if(levels){
                listDir(fs, file.path(), levels -1);
            }
        } else {
            Serial.print("  FILE: ");
            Serial.print(file.name());
            Serial.print("  SIZE: ");
            Serial.println(file.size());
        }
        file = root.openNextFile();
    }
}

void wifiConnect(void *pvParameters){
  isWIFIConnected = false;
  char* ssid = "wifi-ssid";
  char* password = "wifi-password";
  Serial.print("Try to connect to ");
  Serial.println(ssid);
  WiFi.begin(ssid, password);
  while(WiFi.status() != WL_CONNECTED){
    vTaskDelay(500);
    Serial.print(".");
  }
  Serial.println("Wi-Fi Connected!");
  isWIFIConnected = true;
  while(true){
    vTaskDelay(1000);
  }
}

void uploadFile(){
  file = SD.open(filename, FILE_READ);
  if(!file){
    Serial.println("FILE IS NOT AVAILABLE!");
    return;
  }

  Serial.println("===> Upload FILE to Node.js Server");

  HTTPClient client;
  client.begin("http://192.168.1.208:8888/uploadAudio");
  client.addHeader("Content-Type", "audio/wav");
  int httpResponseCode = client.sendRequest("POST", &file, file.size());
  Serial.print("httpResponseCode : ");
  Serial.println(httpResponseCode);

  if(httpResponseCode == 200){
    String response = client.getString();
    Serial.println("==================== Transcription ====================");
    Serial.println(response);
    Serial.println("====================      End      ====================");
  }else{
    Serial.println("Error");
  }
  file.close();
  client.end();
}
Se a versão do seu ESP32 for 3.0.x. Clique aqui para visualizar o programa completo
#include <ESP_I2S.h>
#include <WiFi.h>
#include <HTTPClient.h>
#include "FS.h"
#include "SD.h"
#include "SPI.h"

//Variables to be used in the recording program, do not change for best
#define SAMPLE_RATE 16000U
#define SAMPLE_BITS 16
#define WAV_HEADER_SIZE 44
#define VOLUME_GAIN 2
#define RECORD_TIME 10      // seconds, The maximum value is 240

//define I2S
I2SClass I2S;

// Number of bytes required for the recording buffer
uint32_t record_size = (SAMPLE_RATE * SAMPLE_BITS / 8) * RECORD_TIME;

File file;
const char filename[] = "/recording.wav";

bool isWIFIConnected;

void setup() {
  // put your setup code here, to run once:
  Serial.begin(115200);
  while (!Serial) ;

  // setup 42 PDM clock and 41 PDM data pins
  I2S.setPinsPdmRx(42, 41);

  //The transmission mode is PDM_MONO_MODE, which means that PDM (pulse density modulation) mono mode is used for transmission
  if (!I2S.begin(I2S_MODE_PDM_RX, 16000, I2S_DATA_BIT_WIDTH_16BIT, I2S_SLOT_MODE_MONO)) {
    Serial.println("Failed to initialize I2S!");
    while (1) ;
  }

  if(!SD.begin(D2)){
    Serial.println("Failed to mount SD Card!");
    while (1) ;
  }

  xTaskCreate(i2s_adc, "i2s_adc", 1024 * 8, NULL, 1, NULL);
  delay(500);
  xTaskCreate(wifiConnect, "wifi_Connect", 4096, NULL, 0, NULL);
}

void loop() {
  // put your main code here, to run repeatedly:
}

void i2s_adc(void *arg)
{
  uint32_t sample_size = 0;

  //This variable will be used to point to the actual recording buffer
  uint8_t *rec_buffer = NULL;
  Serial.printf("Ready to start recording ...\n");

  File file = SD.open(filename, FILE_WRITE);

  // Write the header to the WAV file
  uint8_t wav_header[WAV_HEADER_SIZE];

  //Write the WAV file header information to the wav_header array
  generate_wav_header(wav_header, record_size, SAMPLE_RATE);

  //Call the file.write() function to write the data in the wav_header array to the newly created WAV file
  file.write(wav_header, WAV_HEADER_SIZE);

  // This code uses the ESP32's PSRAM (external cache memory) to dynamically allocate a section of memory to store the recording data.
  rec_buffer = (uint8_t *)ps_malloc(record_size);
  if (rec_buffer == NULL) {
    Serial.printf("malloc failed!\n");
    while(1) ;
  }
  Serial.printf("Buffer: %d bytes\n", ESP.getPsramSize() - ESP.getFreePsram());

  // Start recording
  // I2S port number (in this case I2S_NUM_0),
  // a pointer to the buffer to which the data is to be written (i.e. rec_buffer),
  // the size of the data to be read (i.e. record_size),
  // a pointer to a variable that points to the actual size of the data being read (i.e. &sample_size),
  // and the maximum time to wait for the data to be read (in this case portMAX_DELAY, indicating an infinite wait time).
  esp_i2s::i2s_read(esp_i2s::I2S_NUM_0, rec_buffer, record_size, &sample_size, portMAX_DELAY);
  if (sample_size == 0) {
    Serial.printf("Record Failed!\n");
  } else {
    Serial.printf("Record %d bytes\n", sample_size);
  }

  // Increase volume
  for (uint32_t i = 0; i < sample_size; i += SAMPLE_BITS/8) {
    (*(uint16_t *)(rec_buffer+i)) <<= VOLUME_GAIN;
  }

  // Write data to the WAV file
  Serial.printf("Writing to the file ...\n");
  if (file.write(rec_buffer, record_size) != record_size)
    Serial.printf("Write file Failed!\n");

  free(rec_buffer);
  rec_buffer = NULL;
  file.close();
  Serial.printf("The recording is over.\n");

  listDir(SD, "/", 0);

  if(isWIFIConnected){
    uploadFile();
  }

  vTaskDelete(NULL);
}


void generate_wav_header(uint8_t *wav_header, uint32_t wav_size, uint32_t sample_rate)
{
  // See this for reference: http://soundfile.sapp.org/doc/WaveFormat/
  uint32_t file_size = wav_size + WAV_HEADER_SIZE - 8;
  uint32_t byte_rate = SAMPLE_RATE * SAMPLE_BITS / 8;
  const uint8_t set_wav_header[] = {
    'R', 'I', 'F', 'F', // ChunkID
    file_size, file_size >> 8, file_size >> 16, file_size >> 24, // ChunkSize
    'W', 'A', 'V', 'E', // Format
    'f', 'm', 't', ' ', // Subchunk1ID
    0x10, 0x00, 0x00, 0x00, // Subchunk1Size (16 for PCM)
    0x01, 0x00, // AudioFormat (1 for PCM)
    0x01, 0x00, // NumChannels (1 channel)
    sample_rate, sample_rate >> 8, sample_rate >> 16, sample_rate >> 24, // SampleRate
    byte_rate, byte_rate >> 8, byte_rate >> 16, byte_rate >> 24, // ByteRate
    0x02, 0x00, // BlockAlign
    0x10, 0x00, // BitsPerSample (16 bits)
    'd', 'a', 't', 'a', // Subchunk2ID
    wav_size, wav_size >> 8, wav_size >> 16, wav_size >> 24, // Subchunk2Size
  };
  memcpy(wav_header, set_wav_header, sizeof(set_wav_header));
}


void listDir(fs::FS &fs, const char * dirname, uint8_t levels){
    Serial.printf("Listing directory: %s\n", dirname);

    File root = fs.open(dirname);
    if(!root){
        Serial.println("Failed to open directory");
        return;
    }
    if(!root.isDirectory()){
        Serial.println("Not a directory");
        return;
    }

    File file = root.openNextFile();
    while(file){
        if(file.isDirectory()){
            Serial.print("  DIR : ");
            Serial.println(file.name());
            if(levels){
                listDir(fs, file.path(), levels -1);
            }
        } else {
            Serial.print("  FILE: ");
            Serial.print(file.name());
            Serial.print("  SIZE: ");
            Serial.println(file.size());
        }
        file = root.openNextFile();
    }
}

void wifiConnect(void *pvParameters){
  isWIFIConnected = false;
  char* ssid = "wifi-ssid";
  char* password = "wifi-password";
  Serial.print("Try to connect to ");
  Serial.println(ssid);
  WiFi.begin(ssid, password);
  while(WiFi.status() != WL_CONNECTED){
    vTaskDelay(500);
    Serial.print(".");
  }
  Serial.println("Wi-Fi Connected!");
  isWIFIConnected = true;
  while(true){
    vTaskDelay(1000);
  }
}

void uploadFile(){
  file = SD.open(filename, FILE_READ);
  if(!file){
    Serial.println("FILE IS NOT AVAILABLE!");
    return;
  }

  Serial.println("===> Upload FILE to Node.js Server");

  HTTPClient client;
  client.begin("http://192.168.1.208:8888/uploadAudio");
  client.addHeader("Content-Type", "audio/wav");
  int httpResponseCode = client.sendRequest("POST", &file, file.size());
  Serial.print("httpResponseCode : ");
  Serial.println(httpResponseCode);

  if(httpResponseCode == 200){
    String response = client.getString();
    Serial.println("==================== Transcription ====================");
    Serial.println(response);
    Serial.println("====================      End      ====================");
  }else{
    Serial.println("Error");
  }
  file.close();
  client.end();
}
Antes de compilar e enviar o programa de exemplo, há algumas coisas que você precisará alterar para se adequar à sua situação.
- Tempo para gravar o som - Na linha 13 do código, o tempo de gravação padrão é definido como 10 segundos; você pode ajustar esse tempo de gravação como desejar, até um máximo de 240 segundos.
- Nome do arquivo de gravação salvo - Na linha 19 do código, você pode alterar o nome do seu arquivo de gravação.
- Nome WiFi da rede - Altere o nome da rede do código na linha 172 para o nome da rede que está na mesma LAN que o host onde você está implantando os Serviços do Google Cloud.
- Senha WiFi da rede - Na linha 172 do código, altere a senha correspondente à rede.
- Endereço IP do host - Na linha 198 do código, você precisa alterar o endereço IP aqui para o endereço IP do seu host e manter o número da porta em 8888.
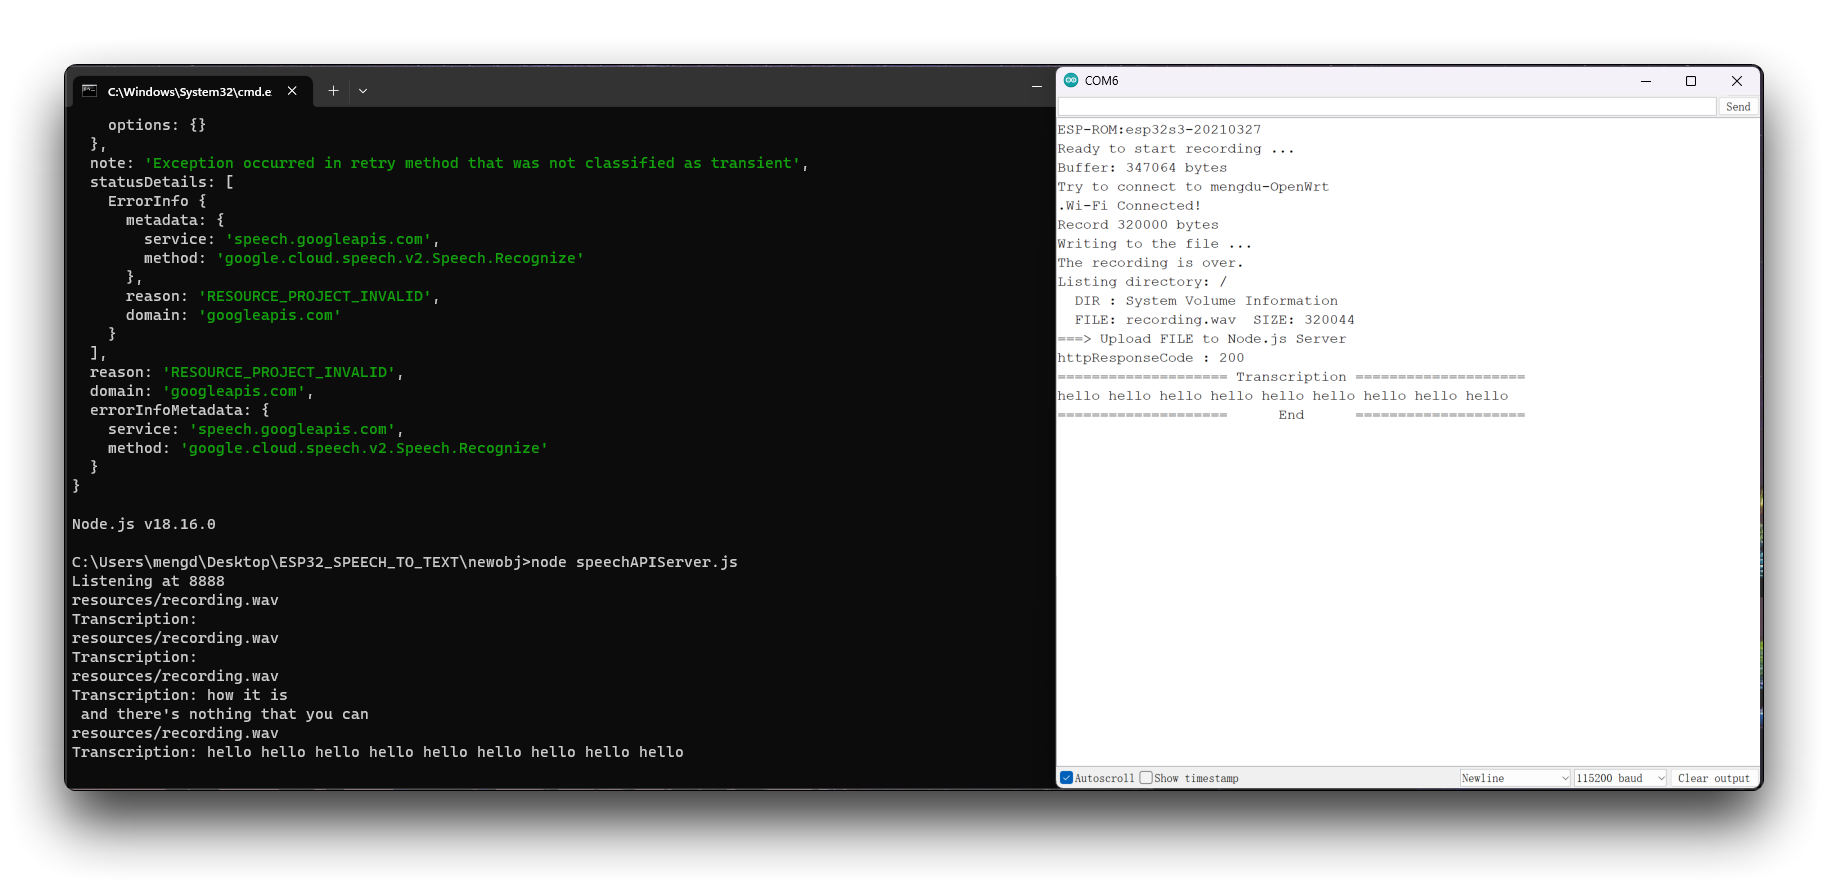
Depois que você tiver alterado o programa para atender às suas necessidades e enviado-o, poderá ligar o monitor serial e começar a se preparar para gravar o que deseja dizer. Após a gravação de dez segundos, o Google Cloud analisará seu arquivo de gravação e retornará para você os resultados do reconhecimento.
Implantar o ChatGPT no XIAO ESP32S3 Sense
Em seguida, aumentamos a dificuldade. Continue adicionando chamadas ao ChatGPT no código.
Etapa 12. Pergunte algo ao ChatGPT usando o texto identificado como pergunta
Na pasta do projeto XIAOESP32S3-SPEECH-TO-CHATGPT nós preparamos o programa para os exemplos desta seção.
Se a versão do seu ESP32 for 2.0.x. Clique aqui para visualizar o programa completo
#include <I2S.h>
#include <WiFi.h>
#include <HTTPClient.h>
#include <WiFiClientSecure.h>
#include <ArduinoJson.h>
#include <ChatGPT.hpp>
#include "FS.h"
#include "SD.h"
#include "SPI.h"

// Variables to be used in the recording program, do not change for best
#define SAMPLE_RATE 16000U
#define SAMPLE_BITS 16
#define WAV_HEADER_SIZE 44
#define VOLUME_GAIN 2
#define RECORD_TIME 5  // seconds, The maximum value is 240

const char* ssid = "wifi-ssid";
const char* password = "wifi-password";


// Number of bytes required for the recording buffer
uint32_t record_size = (SAMPLE_RATE * SAMPLE_BITS / 8) * RECORD_TIME;

File file;
const char filename[] = "/recording.wav";
bool isWIFIConnected;

String chatgpt_Q;

TaskHandle_t chatgpt_handle;
WiFiClientSecure client;
ChatGPT<WiFiClientSecure> chat_gpt(&client, "v1", "OpenAI-TOKEN");

//*****************************************Arduino Base******************************************//

void setup() {
  // put your setup code here, to run once:
  Serial.begin(115200);
  while (!Serial) ;

  I2S.setAllPins(-1, 42, 41, -1, -1);

  // The transmission mode is PDM_MONO_MODE, which means that PDM (pulse density modulation) mono mode is used for transmission
  if (!I2S.begin(PDM_MONO_MODE, SAMPLE_RATE, SAMPLE_BITS)) {
    Serial.println("Failed to initialize I2S!");
    while (1) ;
  }

  if(!SD.begin(D2)){
    Serial.println("Failed to mount SD Card!");
    while (1) ;
  }

  xTaskCreate(wifiConnect, "wifi_Connect", 4096, NULL, 0, NULL);
  delay(500);
  xTaskCreate(i2s_adc, "i2s_adc", 1024 * 8, NULL, 1, NULL);
  xTaskCreate(chatgpt, "chatgpt", 1024 * 8, NULL, 2, &chatgpt_handle);
}

void loop() {
  // put your main code here, to run repeatedly:
}

//*****************************************RTOS TASK******************************************//

void i2s_adc(void *arg)
{
  while(1){
    uint32_t sample_size = 0;

    // This variable will be used to point to the actual recording buffer
    uint8_t *rec_buffer = NULL;
    Serial.printf("Ready to start recording ...\n");

    File file = SD.open(filename, FILE_WRITE);

    // Write the header to the WAV file
    uint8_t wav_header[WAV_HEADER_SIZE];

    // Write the WAV file header information to the wav_header array
    generate_wav_header(wav_header, record_size, SAMPLE_RATE);

    // Call the file.write() function to write the data in the wav_header array to the newly created WAV file
    file.write(wav_header, WAV_HEADER_SIZE);

    // This code uses the ESP32's PSRAM (external cache memory) to dynamically allocate a section of memory to store the recording data
    rec_buffer = (uint8_t *)ps_malloc(record_size);
    if (rec_buffer == NULL) {
      Serial.printf("malloc failed!\n");
      while(1) ;
    }
    Serial.printf("Buffer: %d bytes\n", ESP.getPsramSize() - ESP.getFreePsram());

    // Start recording
    // I2S port number (in this case I2S_NUM_0),
    // a pointer to the buffer to which the data is to be written (i.e. rec_buffer),
    // the size of the data to be read (i.e. record_size),
    // a pointer to a variable that points to the actual size of the data being read (i.e. &sample_size),
    // and the maximum time to wait for the data to be read (in this case portMAX_DELAY, indicating an infinite wait time).
    esp_i2s::i2s_read(esp_i2s::I2S_NUM_0, rec_buffer, record_size, &sample_size, portMAX_DELAY);
    if (sample_size == 0) {
      Serial.printf("Record Failed!\n");
    } else {
      Serial.printf("Record %d bytes\n", sample_size);
    }

    // Increase volume
    for (uint32_t i = 0; i < sample_size; i += SAMPLE_BITS/8) {
      (*(uint16_t *)(rec_buffer+i)) <<= VOLUME_GAIN;
    }

    // Write data to the WAV file
    Serial.printf("Writing to the file ...\n");
    if (file.write(rec_buffer, record_size) != record_size)
      Serial.printf("Write file Failed!\n");

    free(rec_buffer);
    rec_buffer = NULL;
    file.close();
    Serial.printf("The recording is over.\n");

    listDir(SD, "/", 0);

    bool uploadStatus = false;

    if(isWIFIConnected){
      uploadStatus = uploadFile();
    }

    if(uploadStatus)
      xTaskNotifyGive(chatgpt_handle);
    vTaskDelay(10000);       // Each recording is spaced 10s apart
  }
//  vTaskDelete(NULL);
}

void wifiConnect(void *pvParameters){
  isWIFIConnected = false;
  Serial.print("Try to connect to ");
  Serial.println(ssid);
  WiFi.begin(ssid, password);
  while(WiFi.status() != WL_CONNECTED){
    vTaskDelay(500);
    Serial.print(".");
  }
  Serial.println("Wi-Fi Connected!");
  isWIFIConnected = true;
  // Ignore SSL certificate validation
  client.setInsecure();
  while(true){
    vTaskDelay(1000);
  }
}

void chatgpt(void *pvParameters){
  while(1){
    // Waiting for notification signal from Task 1
    ulTaskNotifyTake(pdTRUE, portMAX_DELAY);

    String result;
    if (chat_gpt.simple_message("gpt-3.5-turbo-0301", "user", chatgpt_Q, result)) {
      Serial.println("===OK===");
      Serial.println(result);
    } else {
      Serial.println("===ERROR===");
      Serial.println(result);
    }

  }
}

//*****************************************Audio Process******************************************//

void generate_wav_header(uint8_t *wav_header, uint32_t wav_size, uint32_t sample_rate)
{
  // See this for reference: http://soundfile.sapp.org/doc/WaveFormat/
  uint32_t file_size = wav_size + WAV_HEADER_SIZE - 8;
  uint32_t byte_rate = SAMPLE_RATE * SAMPLE_BITS / 8;
  const uint8_t set_wav_header[] = {
    'R', 'I', 'F', 'F', // ChunkID
    file_size, file_size >> 8, file_size >> 16, file_size >> 24, // ChunkSize
    'W', 'A', 'V', 'E', // Format
    'f', 'm', 't', ' ', // Subchunk1ID
    0x10, 0x00, 0x00, 0x00, // Subchunk1Size (16 for PCM)
    0x01, 0x00, // AudioFormat (1 for PCM)
    0x01, 0x00, // NumChannels (1 channel)
    sample_rate, sample_rate >> 8, sample_rate >> 16, sample_rate >> 24, // SampleRate
    byte_rate, byte_rate >> 8, byte_rate >> 16, byte_rate >> 24, // ByteRate
    0x02, 0x00, // BlockAlign
    0x10, 0x00, // BitsPerSample (16 bits)
    'd', 'a', 't', 'a', // Subchunk2ID
    wav_size, wav_size >> 8, wav_size >> 16, wav_size >> 24, // Subchunk2Size
  };
  memcpy(wav_header, set_wav_header, sizeof(set_wav_header));
}

//*****************************************File Process******************************************//

void listDir(fs::FS &fs, const char * dirname, uint8_t levels){
    Serial.printf("Listing directory: %s\n", dirname);

    File root = fs.open(dirname);
    if(!root){
        Serial.println("Failed to open directory");
        return;
    }
    if(!root.isDirectory()){
        Serial.println("Not a directory");
        return;
    }

    File file = root.openNextFile();
    while(file){
        if(file.isDirectory()){
            Serial.print("  DIR : ");
            Serial.println(file.name());
            if(levels){
                listDir(fs, file.path(), levels -1);
            }
        } else {
            Serial.print("  FILE: ");
            Serial.print(file.name());
            Serial.print("  SIZE: ");
            Serial.println(file.size());
        }
        file = root.openNextFile();
    }
}

bool uploadFile(){
  file = SD.open(filename, FILE_READ);
  if(!file){
    Serial.println("FILE IS NOT AVAILABLE!");
    return false;
  }

  Serial.println("===> Upload FILE to Node.js Server");

  HTTPClient client;
  client.begin("http://192.168.1.208:8888/uploadAudio");
  client.addHeader("Content-Type", "audio/wav");
  int httpResponseCode = client.sendRequest("POST", &file, file.size());
  Serial.print("httpResponseCode : ");
  Serial.println(httpResponseCode);

  if(httpResponseCode == 200){
    String response = client.getString();
    Serial.println("==================== Transcription ====================");
    Serial.println(response);
    chatgpt_Q = response;
    Serial.println("====================      End      ====================");
    file.close();
    client.end();
    return true;
  }else{
    Serial.println("Error");
    return false;
  }

}
Se a versão do seu ESP32 for 3.0.x. Clique aqui para visualizar o programa completo
#include <ESP_I2S.h>
#include <WiFi.h>
#include <HTTPClient.h>
#include <WiFiClientSecure.h>
#include <ArduinoJson.h>
#include <ChatGPT.hpp>
#include "FS.h"
#include "SD.h"
#include "SPI.h"

// Variables to be used in the recording program, do not change for best
#define SAMPLE_RATE 16000U
#define SAMPLE_BITS 16
#define WAV_HEADER_SIZE 44
#define VOLUME_GAIN 2
#define RECORD_TIME 5  // seconds, The maximum value is 240

const char* ssid = "wifi-ssid";
const char* password = "wifi-password";

//define I2S
I2SClass I2S;


// Number of bytes required for the recording buffer
uint32_t record_size = (SAMPLE_RATE * SAMPLE_BITS / 8) * RECORD_TIME;

File file;
const char filename[] = "/recording.wav";
bool isWIFIConnected;

String chatgpt_Q;

TaskHandle_t chatgpt_handle;
WiFiClientSecure client;
ChatGPT<WiFiClientSecure> chat_gpt(&client, "v1", "OpenAI-TOKEN");

//*****************************************Arduino Base******************************************//

void setup() {
  // put your setup code here, to run once:
  Serial.begin(115200);
  while (!Serial) ;

  // setup 42 PDM clock and 41 PDM data pins
  I2S.setPinsPdmRx(42, 41);

  // The transmission mode is PDM_MONO_MODE, which means that PDM (pulse density modulation) mono mode is used for transmission
  if (!I2S.begin(I2S_MODE_PDM_RX, 16000, I2S_DATA_BIT_WIDTH_16BIT, I2S_SLOT_MODE_MONO)) {
    Serial.println("Failed to initialize I2S!");
    while (1) ;
  }

  if(!SD.begin(D2)){
    Serial.println("Failed to mount SD Card!");
    while (1) ;
  }

  xTaskCreate(wifiConnect, "wifi_Connect", 4096, NULL, 0, NULL);
  delay(500);
  xTaskCreate(i2s_adc, "i2s_adc", 1024 * 8, NULL, 1, NULL);
  xTaskCreate(chatgpt, "chatgpt", 1024 * 8, NULL, 2, &chatgpt_handle);
}

void loop() {
  // put your main code here, to run repeatedly:
}

//*****************************************RTOS TASK******************************************//

void i2s_adc(void *arg)
{
  while(1){
    uint32_t sample_size = 0;

    // This variable will be used to point to the actual recording buffer
    uint8_t *rec_buffer = NULL;
    Serial.printf("Ready to start recording ...\n");

    File file = SD.open(filename, FILE_WRITE);

    // Write the header to the WAV file
    uint8_t wav_header[WAV_HEADER_SIZE];

    // Write the WAV file header information to the wav_header array
    generate_wav_header(wav_header, record_size, SAMPLE_RATE);

    // Call the file.write() function to write the data in the wav_header array to the newly created WAV file
    file.write(wav_header, WAV_HEADER_SIZE);

    // This code uses the ESP32's PSRAM (external cache memory) to dynamically allocate a section of memory to store the recording data
    rec_buffer = (uint8_t *)ps_malloc(record_size);
    if (rec_buffer == NULL) {
      Serial.printf("malloc failed!\n");
      while(1) ;
    }
    Serial.printf("Buffer: %d bytes\n", ESP.getPsramSize() - ESP.getFreePsram());

    // Start recording
    // I2S port number (in this case I2S_NUM_0),
    // a pointer to the buffer to which the data is to be written (i.e. rec_buffer),
    // the size of the data to be read (i.e. record_size),
    // a pointer to a variable that points to the actual size of the data being read (i.e. &sample_size),
    // and the maximum time to wait for the data to be read (in this case portMAX_DELAY, indicating an infinite wait time).
    esp_i2s::i2s_read(esp_i2s::I2S_NUM_0, rec_buffer, record_size, &sample_size, portMAX_DELAY);
    if (sample_size == 0) {
      Serial.printf("Record Failed!\n");
    } else {
      Serial.printf("Record %d bytes\n", sample_size);
    }

    // Increase volume
    for (uint32_t i = 0; i < sample_size; i += SAMPLE_BITS/8) {
      (*(uint16_t *)(rec_buffer+i)) <<= VOLUME_GAIN;
    }

    // Write data to the WAV file
    Serial.printf("Writing to the file ...\n");
    if (file.write(rec_buffer, record_size) != record_size)
      Serial.printf("Write file Failed!\n");

    free(rec_buffer);
    rec_buffer = NULL;
    file.close();
    Serial.printf("The recording is over.\n");

    listDir(SD, "/", 0);

    bool uploadStatus = false;

    if(isWIFIConnected){
      uploadStatus = uploadFile();
    }

    if(uploadStatus)
      xTaskNotifyGive(chatgpt_handle);
    vTaskDelay(10000);       // Each recording is spaced 10s apart
  }
//  vTaskDelete(NULL);
}

void wifiConnect(void *pvParameters){
  isWIFIConnected = false;
  Serial.print("Try to connect to ");
  Serial.println(ssid);
  WiFi.begin(ssid, password);
  while(WiFi.status() != WL_CONNECTED){
    vTaskDelay(500);
    Serial.print(".");
  }
  Serial.println("Wi-Fi Connected!");
  isWIFIConnected = true;
  // Ignore SSL certificate validation
  client.setInsecure();
  while(true){
    vTaskDelay(1000);
  }
}

void chatgpt(void *pvParameters){
  while(1){
    // Waiting for notification signal from Task 1
    ulTaskNotifyTake(pdTRUE, portMAX_DELAY);

    String result;
    if (chat_gpt.simple_message("gpt-3.5-turbo-0301", "user", chatgpt_Q, result)) {
      Serial.println("===OK===");
      Serial.println(result);
    } else {
      Serial.println("===ERROR===");
      Serial.println(result);
    }

  }
}

//*****************************************Audio Process******************************************//

void generate_wav_header(uint8_t *wav_header, uint32_t wav_size, uint32_t sample_rate)
{
  // See this for reference: http://soundfile.sapp.org/doc/WaveFormat/
  uint32_t file_size = wav_size + WAV_HEADER_SIZE - 8;
  uint32_t byte_rate = SAMPLE_RATE * SAMPLE_BITS / 8;
  const uint8_t set_wav_header[] = {
    'R', 'I', 'F', 'F', // ChunkID
    file_size, file_size >> 8, file_size >> 16, file_size >> 24, // ChunkSize
    'W', 'A', 'V', 'E', // Format
    'f', 'm', 't', ' ', // Subchunk1ID
    0x10, 0x00, 0x00, 0x00, // Subchunk1Size (16 for PCM)
    0x01, 0x00, // AudioFormat (1 for PCM)
    0x01, 0x00, // NumChannels (1 channel)
    sample_rate, sample_rate >> 8, sample_rate >> 16, sample_rate >> 24, // SampleRate
    byte_rate, byte_rate >> 8, byte_rate >> 16, byte_rate >> 24, // ByteRate
    0x02, 0x00, // BlockAlign
    0x10, 0x00, // BitsPerSample (16 bits)
    'd', 'a', 't', 'a', // Subchunk2ID
    wav_size, wav_size >> 8, wav_size >> 16, wav_size >> 24, // Subchunk2Size
  };
  memcpy(wav_header, set_wav_header, sizeof(set_wav_header));
}

//*****************************************File Process******************************************//

void listDir(fs::FS &fs, const char * dirname, uint8_t levels){
    Serial.printf("Listing directory: %s\n", dirname);

    File root = fs.open(dirname);
    if(!root){
        Serial.println("Failed to open directory");
        return;
    }
    if(!root.isDirectory()){
        Serial.println("Not a directory");
        return;
    }

    File file = root.openNextFile();
    while(file){
        if(file.isDirectory()){
            Serial.print("  DIR : ");
            Serial.println(file.name());
            if(levels){
                listDir(fs, file.path(), levels -1);
            }
        } else {
            Serial.print("  FILE: ");
            Serial.print(file.name());
            Serial.print("  SIZE: ");
            Serial.println(file.size());
        }
        file = root.openNextFile();
    }
}

bool uploadFile(){
  file = SD.open(filename, FILE_READ);
  if(!file){
    Serial.println("FILE IS NOT AVAILABLE!");
    return false;
  }

  Serial.println("===> Upload FILE to Node.js Server");

  HTTPClient client;
  client.begin("http://192.168.1.208:8888/uploadAudio");
  client.addHeader("Content-Type", "audio/wav");
  int httpResponseCode = client.sendRequest("POST", &file, file.size());
  Serial.print("httpResponseCode : ");
  Serial.println(httpResponseCode);

  if(httpResponseCode == 200){
    String response = client.getString();
    Serial.println("==================== Transcription ====================");
    Serial.println(response);
    chatgpt_Q = response;
    Serial.println("====================      End      ====================");
    file.close();
    client.end();
    return true;
  }else{
    Serial.println("Error");
    return false;
  }

}
Novamente, antes que este programa possa ser usado, você precisará fazer as seguintes alterações no código conforme achar adequado
- Nome WiFi da rede - Altere o nome da rede no código line 18 para o nome da rede que está na mesma LAN que o host onde você está implantando os Serviços Google Cloud.
- Senha WiFi da rede - Na line 19 do código, altere a senha correspondente à rede.
- Endereço IP do host - Na line 241 do código, você precisa alterar o endereço IP aqui para o endereço IP do seu host e manter o número da porta em 8888.
- Token da OpenAI API - Como você precisa chamar a interface do ChatGPT, é necessário preparar o Token da OpenAI e preenchê-lo no código na line 33. Se esta é a sua primeira vez usando Tokens, você pode ler o conteúdo deste Wiki para aprender como obtê-los.
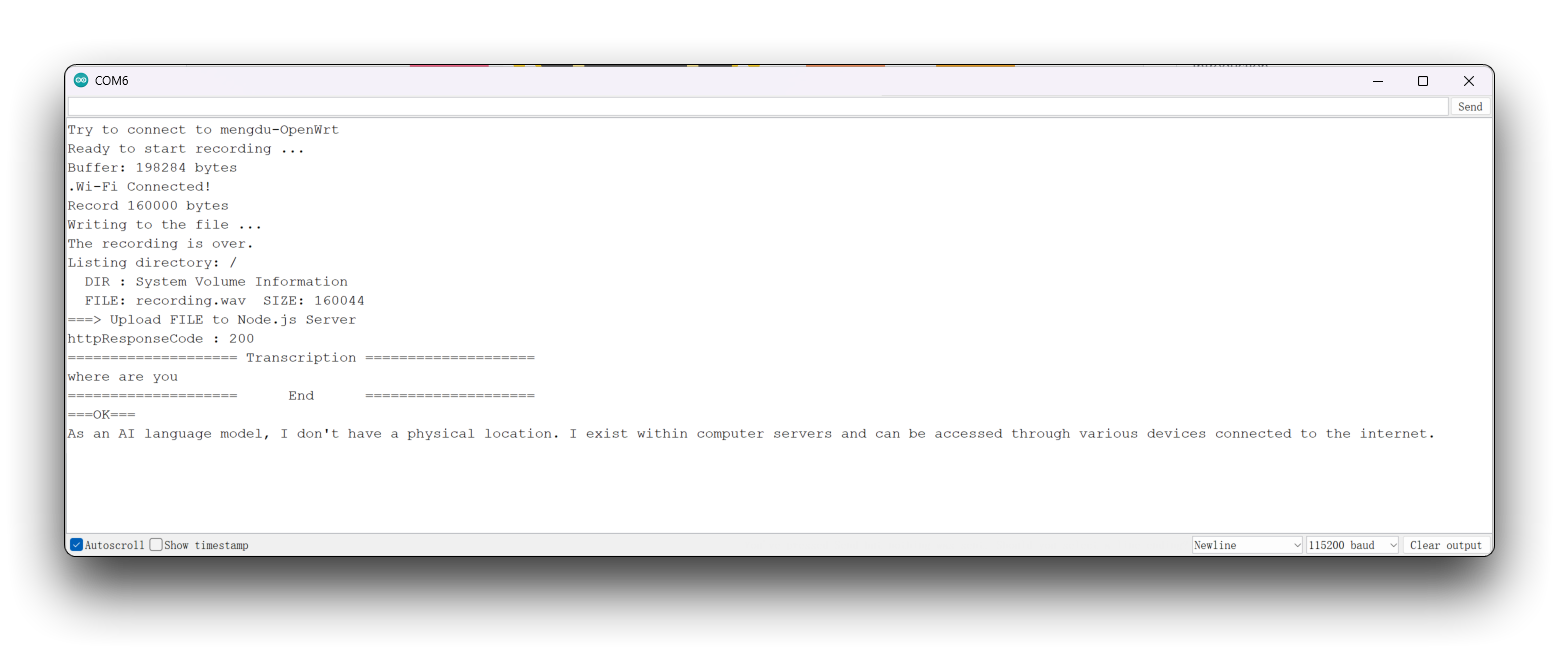
Uma vez modificado, faça o upload do programa e ligue o monitor serial. Após a gravação, você verá a resposta retornada pelo ChatGPT para a sua pergunta.
Design de conteúdo de exibição na tela e Integração de programas
Por fim, adicionamos um pouco mais de sofisticação. Em vez de usar um monitor serial, que é uma interface menos adequada para exibir efeitos, utilizamos uma tela sensível ao toque para a função de toque e clique.
Etapa 13. Usando o SquareLine Studio para desenhar telas de exibição
SquareLine Studio é uma ferramenta de design de GUI desenvolvida pela LVGL, uma biblioteca gráfica para sistemas embarcados. O SquareLine Studio foi projetado para ajudar desenvolvedores a criar e projetar interfaces de usuário para seus sistemas embarcados de forma rápida e eficiente. Ele fornece uma interface de arrastar e soltar para projetar UIs e oferece suporte a vários widgets e temas.
Portanto, recomendamos que você use esta ferramenta para projetar interfaces simples como esta. Se você quiser saber mais sobre o uso do Round Display no SquareLine Studio, você pode acessar nosso Wiki.
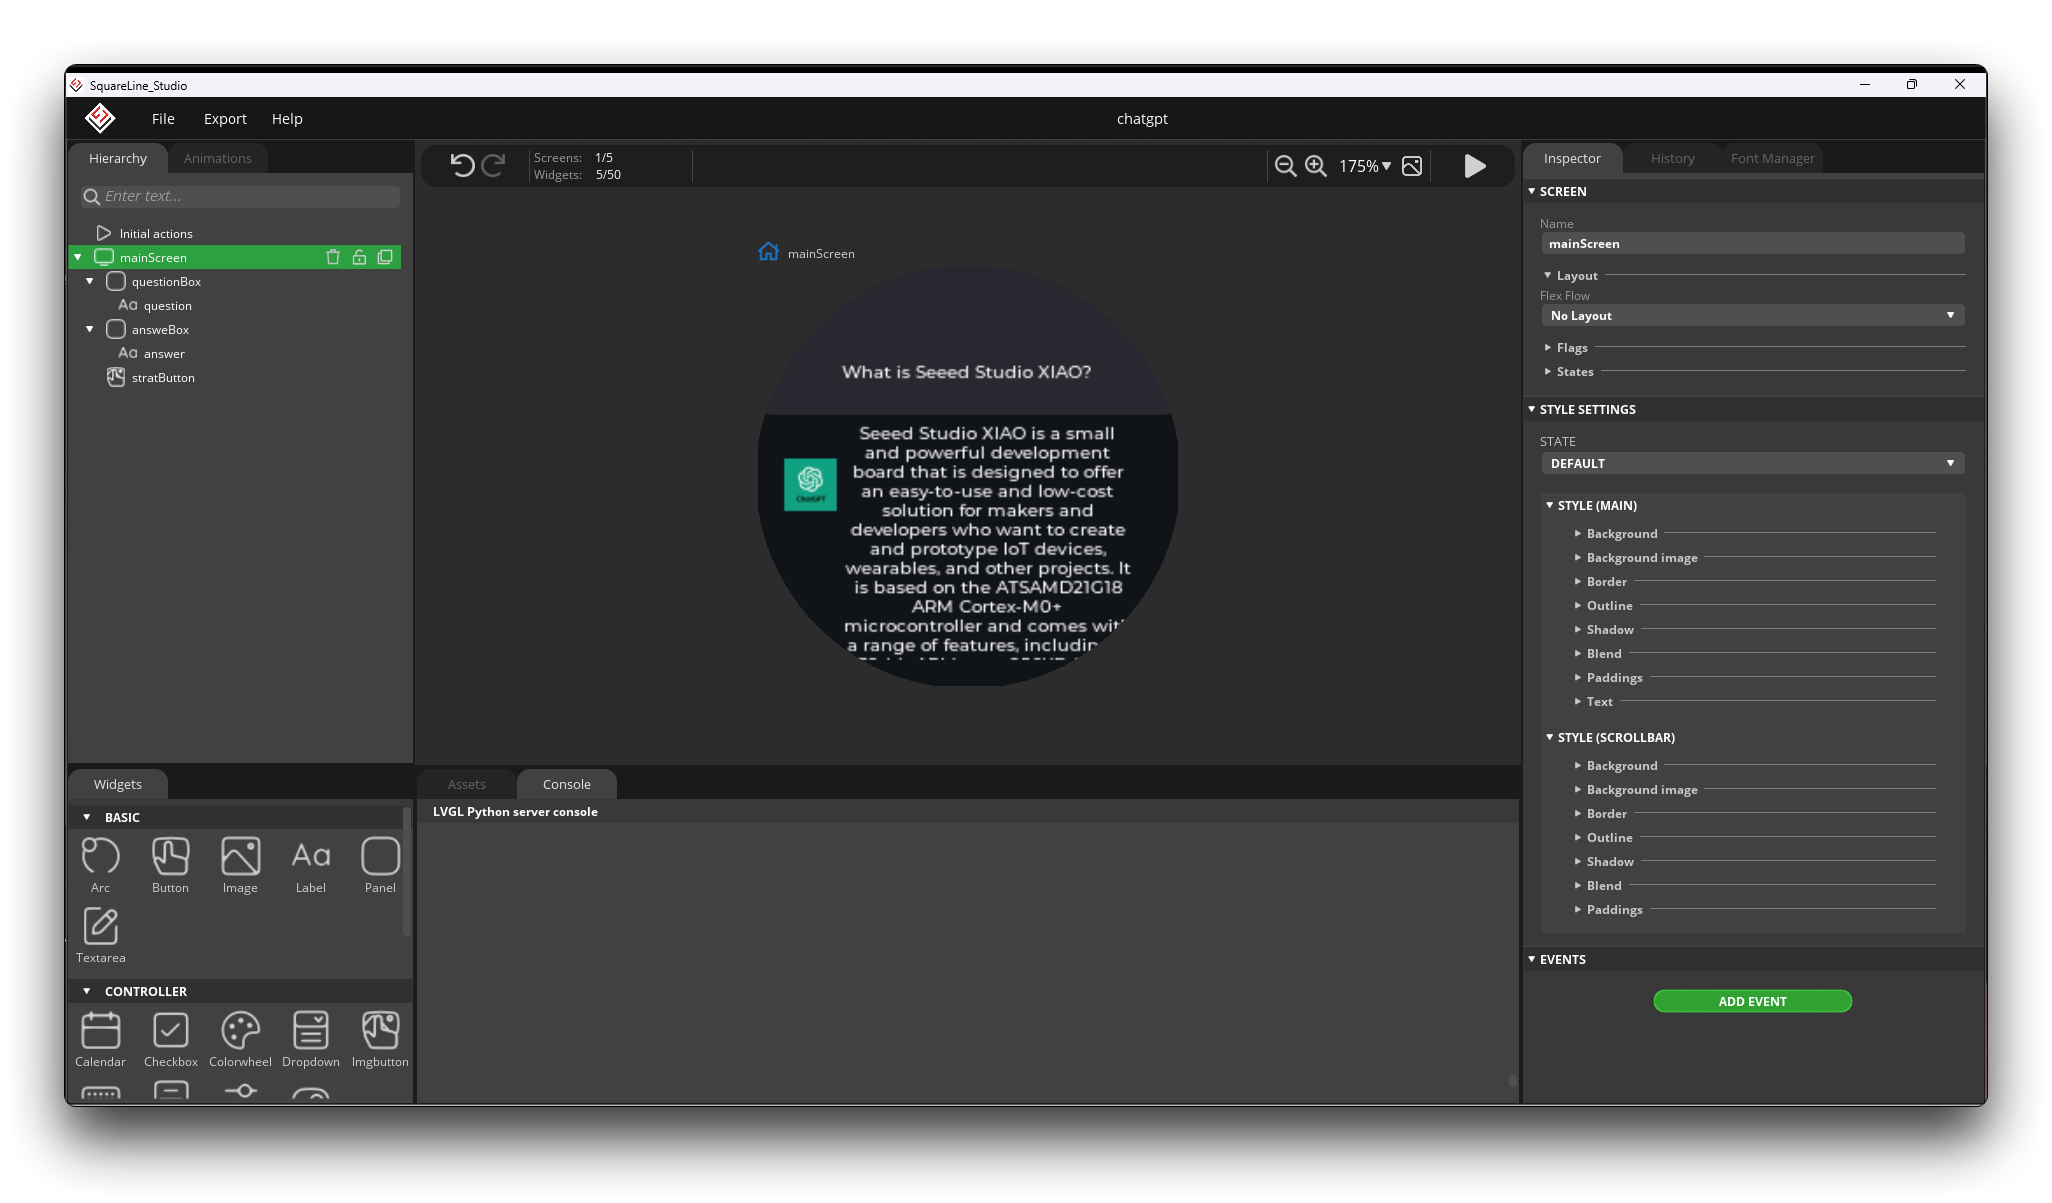
Por questões de espaço, este artigo não entrará em detalhes sobre como projetar uma página de exibição, mas fornecemos o código do programa exportado que você pode usar. Ele está atualmente na pasta ui dentro daquela pasta do projeto.
Recomendamos que você use a versão v1.2.3 do SquareLine Studio. Após testes, a versão v1.3.0 pode apresentar problemas de compatibilidade com a biblioteca tft_eSPI.
Etapa 14. Procedimentos de integração
O código final do projeto completo está na pasta XIAOESP32S3-SPEECH-CHATGPT-COMPLETE.
Se a versão do seu ESP32 for 2.0.x. Clique aqui para visualizar o programa completo
#include <lvgl.h>
#include <TFT_eSPI.h>
#include "ui.h"
#include <WiFi.h>
#include <WiFiClientSecure.h>
#include <ArduinoJson.h>
#include <ChatGPT.hpp>
#include <I2S.h>
#include <HTTPClient.h>
#include "FS.h"
#include "SD.h"
#include "SPI.h"


// Import the library for the round display and define the frame used as the TFT display frame
#define USE_TFT_ESPI_LIBRARY
#include "lv_xiao_round_screen.h"


/*Change to your screen resolution*/
static const uint16_t screenWidth  = 240;
static const uint16_t screenHeight = 240;


// Variables to be used in the recording program, do not change for best
#define SAMPLE_RATE 16000U
#define SAMPLE_BITS 16
#define WAV_HEADER_SIZE 44
#define VOLUME_GAIN 2
#define RECORD_TIME 5  // seconds, The maximum value is 240


// Number of bytes required for the recording buffer
uint32_t record_size = (SAMPLE_RATE * SAMPLE_BITS / 8) * RECORD_TIME;


// Name of the file in which the recording is saved
File file;
const char filename[] = "/recording.wav";


// Network connection status flag
bool isWIFIConnected;


// Answers to the questions chatgpt replied to
String response;


// Flags for different task starts
bool recordTask = false;
bool chatgptTask = false;

WiFiClientSecure client;
ChatGPT<WiFiClientSecure> chat_gpt(&client, "v1", "OpenAI-TOKEN");   // Please fill in your OpenAI key


// Please change to your network
const char* ssid = "wifi-ssid";
const char* password = "wifi-password";

static lv_disp_draw_buf_t draw_buf;
static lv_color_t buf[ screenWidth * screenHeight / 10 ];


//****************************************LVGL****************************************************//

#if LV_USE_LOG != 0
/* Serial debugging */
void my_print(const char * buf)
{
    Serial.printf(buf);
    Serial.flush();
}
#endif

/* Display flushing */
void my_disp_flush( lv_disp_drv_t *disp, const lv_area_t *area, lv_color_t *color_p )
{
    uint32_t w = ( area->x2 - area->x1 + 1 );
    uint32_t h = ( area->y2 - area->y1 + 1 );

    tft.startWrite();
    tft.setAddrWindow( area->x1, area->y1, w, h );
    tft.pushColors( ( uint16_t * )&color_p->full, w * h, true );
    tft.endWrite();

    lv_disp_flush_ready( disp );
}

/*Read the touchpad*/
void my_touchpad_read( lv_indev_drv_t * indev_driver, lv_indev_data_t * data )
{
    // uint16_t touchX = 0, touchY = 0;
    // bool touched = false;//tft.getTouch( &touchX, &touchY, 600 );

    lv_coord_t touchX, touchY;
    chsc6x_get_xy(&touchX, &touchY);

    // if( !touched )
    if(!chsc6x_is_pressed())
    {
        data->state = LV_INDEV_STATE_REL;
    }
    else
    {
        data->state = LV_INDEV_STATE_PR;

        /*Set the coordinates*/
        data->point.x = touchX;
        data->point.y = touchY;

//        Serial.print( "Data x " );
//        Serial.println( touchX );
//
//        Serial.print( "Data y " );
//        Serial.println( touchY );

        // You can also start recording by uncommenting and configuring by clicking on the logo
//        if((touchX < 240 && touchX > 230) && (touchY < 120 && touchY > 100)){
          recordTask = true;
//        }
    }
}

//****************************************Arduino Base****************************************************//

void setup()
{
    Serial.begin( 115200 ); /* prepare for possible serial debug */
//    while(!Serial);

    pinMode(TOUCH_INT, INPUT_PULLUP);
    Wire.begin();

    String LVGL_Arduino = "Hello Arduino! ";
    LVGL_Arduino += String('V') + lv_version_major() + "." + lv_version_minor() + "." + lv_version_patch();

    Serial.println( LVGL_Arduino );
    Serial.println( "I am LVGL_Arduino" );

    lv_init();

#if LV_USE_LOG != 0
    lv_log_register_print_cb( my_print ); /* register print function for debugging */
#endif

    tft.begin();          /* TFT init */
    tft.setRotation( 0 ); /* Landscape orientation, flipped */

    lv_disp_draw_buf_init( &draw_buf, buf, NULL, screenWidth * screenHeight / 10 );

    /*Initialize the display*/
    static lv_disp_drv_t disp_drv;
    lv_disp_drv_init( &disp_drv );
    /*Change the following line to your display resolution*/
    disp_drv.hor_res = screenWidth;
    disp_drv.ver_res = screenHeight;
    disp_drv.flush_cb = my_disp_flush;
    disp_drv.draw_buf = &draw_buf;
    lv_disp_drv_register( &disp_drv );

    /*Initialize the (dummy) input device driver*/
    static lv_indev_drv_t indev_drv;
    lv_indev_drv_init( &indev_drv );
    indev_drv.type = LV_INDEV_TYPE_POINTER;
    indev_drv.read_cb = my_touchpad_read;
    lv_indev_drv_register( &indev_drv );

    ui_init();

    I2S.setAllPins(-1, 42, 41, -1, -1);

    //The transmission mode is PDM_MONO_MODE, which means that PDM (pulse density modulation) mono mode is used for transmission
    if (!I2S.begin(PDM_MONO_MODE, SAMPLE_RATE, SAMPLE_BITS)) {
        Serial.println("Failed to initialize I2S!");
        while (1) ;
    }

    if(!SD.begin(D2)){
        Serial.println("Failed to mount SD Card!");
        while (1) ;
    }

    Serial.println( "Setup done" );

    // Create a FreeRTOS task to check the connection status of the network at regular intervals.
    xTaskCreate(wifiConnect, "wifi_Connect", 4096, NULL, 0, NULL);
}

void loop()
{
    lv_timer_handler(); /* let the GUI do its work */
    record();
    chatgpt();
    delay(5);
}

//*****************************************Audio Process******************************************//

void generate_wav_header(uint8_t *wav_header, uint32_t wav_size, uint32_t sample_rate)
{
  // See this for reference: http://soundfile.sapp.org/doc/WaveFormat/
  uint32_t file_size = wav_size + WAV_HEADER_SIZE - 8;
  uint32_t byte_rate = SAMPLE_RATE * SAMPLE_BITS / 8;
  const uint8_t set_wav_header[] = {
    'R', 'I', 'F', 'F', // ChunkID
    file_size, file_size >> 8, file_size >> 16, file_size >> 24, // ChunkSize
    'W', 'A', 'V', 'E', // Format
    'f', 'm', 't', ' ', // Subchunk1ID
    0x10, 0x00, 0x00, 0x00, // Subchunk1Size (16 for PCM)
    0x01, 0x00, // AudioFormat (1 for PCM)
    0x01, 0x00, // NumChannels (1 channel)
    sample_rate, sample_rate >> 8, sample_rate >> 16, sample_rate >> 24, // SampleRate
    byte_rate, byte_rate >> 8, byte_rate >> 16, byte_rate >> 24, // ByteRate
    0x02, 0x00, // BlockAlign
    0x10, 0x00, // BitsPerSample (16 bits)
    'd', 'a', 't', 'a', // Subchunk2ID
    wav_size, wav_size >> 8, wav_size >> 16, wav_size >> 24, // Subchunk2Size
  };
  memcpy(wav_header, set_wav_header, sizeof(set_wav_header));
}

//*****************************************File Process******************************************//

void listDir(fs::FS &fs, const char * dirname, uint8_t levels){
    Serial.printf("Listing directory: %s\n", dirname);

    File root = fs.open(dirname);
    if(!root){
        Serial.println("Failed to open directory");
        return;
    }
    if(!root.isDirectory()){
        Serial.println("Not a directory");
        return;
    }

    File file = root.openNextFile();
    while(file){
        if(file.isDirectory()){
            Serial.print("  DIR : ");
            Serial.println(file.name());
            if(levels){
                listDir(fs, file.path(), levels -1);
            }
        } else {
            Serial.print("  FILE: ");
            Serial.print(file.name());
            Serial.print("  SIZE: ");
            Serial.println(file.size());
        }
        file = root.openNextFile();
    }
}

bool uploadFile(){
  file = SD.open(filename, FILE_READ);
  if(!file){
    Serial.println("FILE IS NOT AVAILABLE!");
    return false;
  }

  Serial.println("===> Upload FILE to Node.js Server");

  HTTPClient client;
  client.begin("http://192.168.1.208:8888/uploadAudio");
  client.addHeader("Content-Type", "audio/wav");
  int httpResponseCode = client.sendRequest("POST", &file, file.size());
  Serial.print("httpResponseCode : ");
  Serial.println(httpResponseCode);

  if(httpResponseCode == 200){
    response = client.getString();
    Serial.println("==================== Transcription ====================");
    Serial.println(response);
    const char* chatgpt_Q = response.c_str();
    lv_label_set_text(ui_question, chatgpt_Q);
    Serial.println("====================      End      ====================");
    file.close();
    client.end();
    recordTask = false;
    chatgptTask = true;
    return true;
  }else{
    Serial.println("Error");
    lv_label_set_text(ui_question, "Error");
    recordTask = false;
    chatgptTask = false;
    return false;
  }
}


//*****************************************Main Functions******************************************//

void record(){
  if(recordTask){
    Serial.println("Record Task Begin!!!");
    lv_label_set_text(ui_question, "Recording ...");
    lv_timer_handler();
    uint32_t sample_size = 0;

    // This variable will be used to point to the actual recording buffer
    uint8_t *rec_buffer = NULL;
    Serial.printf("Ready to start recording ...\n");

    File file = SD.open(filename, FILE_WRITE);

    // Write the header to the WAV file
    uint8_t wav_header[WAV_HEADER_SIZE];

    // Write the WAV file header information to the wav_header array
    generate_wav_header(wav_header, record_size, SAMPLE_RATE);

    // Call the file.write() function to write the data in the wav_header array to the newly created WAV file
    file.write(wav_header, WAV_HEADER_SIZE);

    // This code uses the ESP32's PSRAM (external cache memory) to dynamically allocate a section of memory to store the recording data.
    rec_buffer = (uint8_t *)ps_malloc(record_size);
    if (rec_buffer == NULL) {
      Serial.printf("malloc failed!\n");
      while(1) ;
    }
    Serial.printf("Buffer: %d bytes\n", ESP.getPsramSize() - ESP.getFreePsram());

    // Start recording
    // I2S port number (in this case I2S_NUM_0),
    // a pointer to the buffer to which the data is to be written (i.e. rec_buffer),
    // the size of the data to be read (i.e. record_size),
    // a pointer to a variable that points to the actual size of the data being read (i.e. &sample_size),
    // and the maximum time to wait for the data to be read (in this case portMAX_DELAY, indicating an infinite wait time).
    esp_i2s::i2s_read(esp_i2s::I2S_NUM_0, rec_buffer, record_size, &sample_size, portMAX_DELAY);
    if (sample_size == 0) {
      Serial.printf("Record Failed!\n");
    } else {
      Serial.printf("Record %d bytes\n", sample_size);
    }

    // Increase volume
    for (uint32_t i = 0; i < sample_size; i += SAMPLE_BITS/8) {
      (*(uint16_t *)(rec_buffer+i)) <<= VOLUME_GAIN;
    }

    // Write data to the WAV file
    Serial.printf("Writing to the file ...\n");
    if (file.write(rec_buffer, record_size) != record_size)
      Serial.printf("Write file Failed!\n");

    free(rec_buffer);
    rec_buffer = NULL;
    file.close();
    Serial.printf("The recording is over.\n");
    lv_label_set_text(ui_question, "Identifying ...");
    lv_timer_handler();
    listDir(SD, "/", 0);

    bool uploadStatus = false;

    if(isWIFIConnected){
      uploadStatus = uploadFile();
    }
  }
}

void chatgpt(){
  if(chatgptTask){
    Serial.println("ChatGPT Task Begin!!!");
    lv_label_set_text(ui_answer,"Answering ...");
    lv_timer_handler();
    String result;
    if (chat_gpt.simple_message("gpt-3.5-turbo-0301", "user", response, result)) {
      Serial.println("===OK===");
      Serial.println(result);
      const char* chatgpt_A = result.c_str();
      lv_label_set_text(ui_answer, chatgpt_A);
    } else {
      Serial.println("===ERROR===");
      Serial.println(result);
      lv_label_set_text(ui_answer, "ERROR");
      lv_timer_handler();
    }
    recordTask = false;
    chatgptTask = false;
  }
}

//*****************************************RTOS******************************************//

void wifiConnect(void *pvParameters){
  isWIFIConnected = false;
  Serial.print("Try to connect to ");
  Serial.println(ssid);
  WiFi.begin(ssid, password);
  while(WiFi.status() != WL_CONNECTED){
    vTaskDelay(500);
    Serial.print(".");
  }
  Serial.println("Wi-Fi Connected!");
  isWIFIConnected = true;
  // Ignore SSL certificate validation
  client.setInsecure();
  while(true){
    vTaskDelay(1000);
  }
}
Se a sua versão do ESP32 for 3.0.x. Clique aqui para visualizar o programa completo
#include <lvgl.h>
#include <TFT_eSPI.h>
#include "ui.h"
#include <WiFi.h>
#include <WiFiClientSecure.h>
#include <ArduinoJson.h>
#include <ChatGPT.hpp>
#include <ESP_I2S.h>
#include <HTTPClient.h>
#include "FS.h"
#include "SD.h"
#include "SPI.h"


// Import the library for the round display and define the frame used as the TFT display frame
#define USE_TFT_ESPI_LIBRARY
#include "lv_xiao_round_screen.h"


/*Change to your screen resolution*/
static const uint16_t screenWidth  = 240;
static const uint16_t screenHeight = 240;


// Variables to be used in the recording program, do not change for best
#define SAMPLE_RATE 16000U
#define SAMPLE_BITS 16
#define WAV_HEADER_SIZE 44
#define VOLUME_GAIN 2
#define RECORD_TIME 5  // seconds, The maximum value is 240


// Number of bytes required for the recording buffer
uint32_t record_size = (SAMPLE_RATE * SAMPLE_BITS / 8) * RECORD_TIME;

//define I2S
I2SClass I2S;

// Name of the file in which the recording is saved
File file;
const char filename[] = "/recording.wav";


// Network connection status flag
bool isWIFIConnected;


// Answers to the questions chatgpt replied to
String response;


// Flags for different task starts
bool recordTask = false;
bool chatgptTask = false;

WiFiClientSecure client;
ChatGPT<WiFiClientSecure> chat_gpt(&client, "v1", "OpenAI-TOKEN");   // Please fill in your OpenAI key


// Please change to your network
const char* ssid = "wifi-ssid";
const char* password = "wifi-password";

static lv_disp_draw_buf_t draw_buf;
static lv_color_t buf[ screenWidth * screenHeight / 10 ];


//****************************************LVGL****************************************************//

#if LV_USE_LOG != 0
/* Serial debugging */
void my_print(const char * buf)
{
    Serial.printf(buf);
    Serial.flush();
}
#endif

/* Display flushing */
void my_disp_flush( lv_disp_drv_t *disp, const lv_area_t *area, lv_color_t *color_p )
{
    uint32_t w = ( area->x2 - area->x1 + 1 );
    uint32_t h = ( area->y2 - area->y1 + 1 );

    tft.startWrite();
    tft.setAddrWindow( area->x1, area->y1, w, h );
    tft.pushColors( ( uint16_t * )&color_p->full, w * h, true );
    tft.endWrite();

    lv_disp_flush_ready( disp );
}

/*Read the touchpad*/
void my_touchpad_read( lv_indev_drv_t * indev_driver, lv_indev_data_t * data )
{
    // uint16_t touchX = 0, touchY = 0;
    // bool touched = false;//tft.getTouch( &touchX, &touchY, 600 );

    lv_coord_t touchX, touchY;
    chsc6x_get_xy(&touchX, &touchY);

    // if( !touched )
    if(!chsc6x_is_pressed())
    {
        data->state = LV_INDEV_STATE_REL;
    }
    else
    {
        data->state = LV_INDEV_STATE_PR;

        /*Set the coordinates*/
        data->point.x = touchX;
        data->point.y = touchY;

//        Serial.print( "Data x " );
//        Serial.println( touchX );
//
//        Serial.print( "Data y " );
//        Serial.println( touchY );

        // You can also start recording by uncommenting and configuring by clicking on the logo
//        if((touchX < 240 && touchX > 230) && (touchY < 120 && touchY > 100)){
          recordTask = true;
//        }
    }
}

//****************************************Arduino Base****************************************************//

void setup()
{
    Serial.begin( 115200 ); /* prepare for possible serial debug */
//    while(!Serial);

    pinMode(TOUCH_INT, INPUT_PULLUP);
    Wire.begin();

    String LVGL_Arduino = "Hello Arduino! ";
    LVGL_Arduino += String('V') + lv_version_major() + "." + lv_version_minor() + "." + lv_version_patch();

    Serial.println( LVGL_Arduino );
    Serial.println( "I am LVGL_Arduino" );

    lv_init();

#if LV_USE_LOG != 0
    lv_log_register_print_cb( my_print ); /* register print function for debugging */
#endif

    tft.begin();          /* TFT init */
    tft.setRotation( 0 ); /* Landscape orientation, flipped */

    lv_disp_draw_buf_init( &draw_buf, buf, NULL, screenWidth * screenHeight / 10 );

    /*Initialize the display*/
    static lv_disp_drv_t disp_drv;
    lv_disp_drv_init( &disp_drv );
    /*Change the following line to your display resolution*/
    disp_drv.hor_res = screenWidth;
    disp_drv.ver_res = screenHeight;
    disp_drv.flush_cb = my_disp_flush;
    disp_drv.draw_buf = &draw_buf;
    lv_disp_drv_register( &disp_drv );

    /*Initialize the (dummy) input device driver*/
    static lv_indev_drv_t indev_drv;
    lv_indev_drv_init( &indev_drv );
    indev_drv.type = LV_INDEV_TYPE_POINTER;
    indev_drv.read_cb = my_touchpad_read;
    lv_indev_drv_register( &indev_drv );

    ui_init();

    // setup 42 PDM clock and 41 PDM data pins
    I2S.setPinsPdmRx(42, 41);

    //The transmission mode is PDM_MONO_MODE, which means that PDM (pulse density modulation) mono mode is used for transmission
    if (!I2S.begin(I2S_MODE_PDM_RX, 16000, I2S_DATA_BIT_WIDTH_16BIT, I2S_SLOT_MODE_MONO)) {
        Serial.println("Failed to initialize I2S!");
        while (1) ;
    }

    if(!SD.begin(D2)){
        Serial.println("Failed to mount SD Card!");
        while (1) ;
    }

    Serial.println( "Setup done" );

    // Create a FreeRTOS task to check the connection status of the network at regular intervals.
    xTaskCreate(wifiConnect, "wifi_Connect", 4096, NULL, 0, NULL);
}

void loop()
{
    lv_timer_handler(); /* let the GUI do its work */
    record();
    chatgpt();
    delay(5);
}

//*****************************************Audio Process******************************************//

void generate_wav_header(uint8_t *wav_header, uint32_t wav_size, uint32_t sample_rate)
{
  // See this for reference: http://soundfile.sapp.org/doc/WaveFormat/
  uint32_t file_size = wav_size + WAV_HEADER_SIZE - 8;
  uint32_t byte_rate = SAMPLE_RATE * SAMPLE_BITS / 8;
  const uint8_t set_wav_header[] = {
    'R', 'I', 'F', 'F', // ChunkID
    file_size, file_size >> 8, file_size >> 16, file_size >> 24, // ChunkSize
    'W', 'A', 'V', 'E', // Format
    'f', 'm', 't', ' ', // Subchunk1ID
    0x10, 0x00, 0x00, 0x00, // Subchunk1Size (16 for PCM)
    0x01, 0x00, // AudioFormat (1 for PCM)
    0x01, 0x00, // NumChannels (1 channel)
    sample_rate, sample_rate >> 8, sample_rate >> 16, sample_rate >> 24, // SampleRate
    byte_rate, byte_rate >> 8, byte_rate >> 16, byte_rate >> 24, // ByteRate
    0x02, 0x00, // BlockAlign
    0x10, 0x00, // BitsPerSample (16 bits)
    'd', 'a', 't', 'a', // Subchunk2ID
    wav_size, wav_size >> 8, wav_size >> 16, wav_size >> 24, // Subchunk2Size
  };
  memcpy(wav_header, set_wav_header, sizeof(set_wav_header));
}

//*****************************************File Process******************************************//

void listDir(fs::FS &fs, const char * dirname, uint8_t levels){
    Serial.printf("Listing directory: %s\n", dirname);

    File root = fs.open(dirname);
    if(!root){
        Serial.println("Failed to open directory");
        return;
    }
    if(!root.isDirectory()){
        Serial.println("Not a directory");
        return;
    }

    File file = root.openNextFile();
    while(file){
        if(file.isDirectory()){
            Serial.print("  DIR : ");
            Serial.println(file.name());
            if(levels){
                listDir(fs, file.path(), levels -1);
            }
        } else {
            Serial.print("  FILE: ");
            Serial.print(file.name());
            Serial.print("  SIZE: ");
            Serial.println(file.size());
        }
        file = root.openNextFile();
    }
}

bool uploadFile(){
  file = SD.open(filename, FILE_READ);
  if(!file){
    Serial.println("FILE IS NOT AVAILABLE!");
    return false;
  }

  Serial.println("===> Upload FILE to Node.js Server");

  HTTPClient client;
  client.begin("http://192.168.1.208:8888/uploadAudio");
  client.addHeader("Content-Type", "audio/wav");
  int httpResponseCode = client.sendRequest("POST", &file, file.size());
  Serial.print("httpResponseCode : ");
  Serial.println(httpResponseCode);

  if(httpResponseCode == 200){
    response = client.getString();
    Serial.println("==================== Transcription ====================");
    Serial.println(response);
    const char* chatgpt_Q = response.c_str();
    lv_label_set_text(ui_question, chatgpt_Q);
    Serial.println("====================      End      ====================");
    file.close();
    client.end();
    recordTask = false;
    chatgptTask = true;
    return true;
  }else{
    Serial.println("Error");
    lv_label_set_text(ui_question, "Error");
    recordTask = false;
    chatgptTask = false;
    return false;
  }
}


//*****************************************Main Functions******************************************//

void record(){
  if(recordTask){
    Serial.println("Record Task Begin!!!");
    lv_label_set_text(ui_question, "Recording ...");
    lv_timer_handler();
    uint32_t sample_size = 0;

    // This variable will be used to point to the actual recording buffer
    uint8_t *rec_buffer = NULL;
    Serial.printf("Ready to start recording ...\n");

    File file = SD.open(filename, FILE_WRITE);

    // Write the header to the WAV file
    uint8_t wav_header[WAV_HEADER_SIZE];

    // Write the WAV file header information to the wav_header array
    generate_wav_header(wav_header, record_size, SAMPLE_RATE);

    // Call the file.write() function to write the data in the wav_header array to the newly created WAV file
    file.write(wav_header, WAV_HEADER_SIZE);

    // This code uses the ESP32's PSRAM (external cache memory) to dynamically allocate a section of memory to store the recording data.
    rec_buffer = (uint8_t *)ps_malloc(record_size);
    if (rec_buffer == NULL) {
      Serial.printf("malloc failed!\n");
      while(1) ;
    }
    Serial.printf("Buffer: %d bytes\n", ESP.getPsramSize() - ESP.getFreePsram());

    // Start recording
    // I2S port number (in this case I2S_NUM_0),
    // a pointer to the buffer to which the data is to be written (i.e. rec_buffer),
    // the size of the data to be read (i.e. record_size),
    // a pointer to a variable that points to the actual size of the data being read (i.e. &sample_size),
    // and the maximum time to wait for the data to be read (in this case portMAX_DELAY, indicating an infinite wait time).
    esp_i2s::i2s_read(esp_i2s::I2S_NUM_0, rec_buffer, record_size, &sample_size, portMAX_DELAY);
    if (sample_size == 0) {
      Serial.printf("Record Failed!\n");
    } else {
      Serial.printf("Record %d bytes\n", sample_size);
    }

    // Increase volume
    for (uint32_t i = 0; i < sample_size; i += SAMPLE_BITS/8) {
      (*(uint16_t *)(rec_buffer+i)) <<= VOLUME_GAIN;
    }

    // Write data to the WAV file
    Serial.printf("Writing to the file ...\n");
    if (file.write(rec_buffer, record_size) != record_size)
      Serial.printf("Write file Failed!\n");

    free(rec_buffer);
    rec_buffer = NULL;
    file.close();
    Serial.printf("The recording is over.\n");
    lv_label_set_text(ui_question, "Identifying ...");
    lv_timer_handler();
    listDir(SD, "/", 0);

    bool uploadStatus = false;

    if(isWIFIConnected){
      uploadStatus = uploadFile();
    }
  }
}

void chatgpt(){
  if(chatgptTask){
    Serial.println("ChatGPT Task Begin!!!");
    lv_label_set_text(ui_answer,"Answering ...");
    lv_timer_handler();
    String result;
    if (chat_gpt.simple_message("gpt-3.5-turbo-0301", "user", response, result)) {
      Serial.println("===OK===");
      Serial.println(result);
      const char* chatgpt_A = result.c_str();
      lv_label_set_text(ui_answer, chatgpt_A);
    } else {
      Serial.println("===ERROR===");
      Serial.println(result);
      lv_label_set_text(ui_answer, "ERROR");
      lv_timer_handler();
    }
    recordTask = false;
    chatgptTask = false;
  }
}

//*****************************************RTOS******************************************//

void wifiConnect(void *pvParameters){
  isWIFIConnected = false;
  Serial.print("Try to connect to ");
  Serial.println(ssid);
  WiFi.begin(ssid, password);
  while(WiFi.status() != WL_CONNECTED){
    vTaskDelay(500);
    Serial.print(".");
  }
  Serial.println("Wi-Fi Connected!");
  isWIFIConnected = true;
  // Ignore SSL certificate validation
  client.setInsecure();
  while(true){
    vTaskDelay(1000);
  }
}
Antes de compilar e enviar o programa de exemplo, há algumas coisas que você precisará alterar para se adequar à sua situação.
- Nome WiFi da rede - Altere o nome da rede no código na linha 18 para o nome da rede que está na mesma LAN que o host onde você está implantando os Serviços Google Cloud.
- Senha WiFi da rede - Na linha 19 do código, altere a senha correspondente à rede.
- Endereço IP do host - Na linha 241 do código, você precisa alterar o endereço IP aqui para o endereço IP do seu host e manter o número da porta em 8888.
- Token da OpenAI API - Como você precisa chamar a interface do ChatGPT, é necessário preparar o Token da OpenAI e inseri‑lo no código na linha 33. Se esta for a primeira vez que você usa Tokens, você pode ler o conteúdo deste Wiki para aprender como obtê‑los.
Depois de enviar o programa e clicar na tela, a tarefa de gravação será iniciada e, nesse momento, você poderá falar ao microfone a pergunta que deseja fazer. Assim que o resultado for reconhecido, a pergunta será exibida na metade superior da tela. Em seguida, obteremos imediatamente a resposta do ChatGPT e ela será exibida na parte inferior da tela.
Suporte Técnico & Discussão sobre o Produto
Obrigado por escolher nossos produtos! Estamos aqui para fornecer diferentes formas de suporte para garantir que sua experiência com nossos produtos seja a mais tranquila possível. Oferecemos vários canais de comunicação para atender a diferentes preferências e necessidades.