MicroPython para Seeed Studio XIAO nRF54L15
Entendendo o MicroPython
Este tutorial tem como objetivo apresentar como usar MicroPython no Thonny com base no XIAO nRF54L15.
MicroPython é um interpretador Python com um recurso parcial de compilação para código nativo. Ele fornece um subconjunto dos recursos do Python 3.5, implementado para processadores embarcados e sistemas com recursos limitados. Ele é diferente do CPython e você pode ler mais sobre as diferenças aqui. Se você precisar de coleções mais interessantes, pode conferir aqui
Preparar o hardware.
| Seeed Studio XIAO nRF54L15 | Seeed Studio XIAO nRF54L15 Sense |
|---|---|
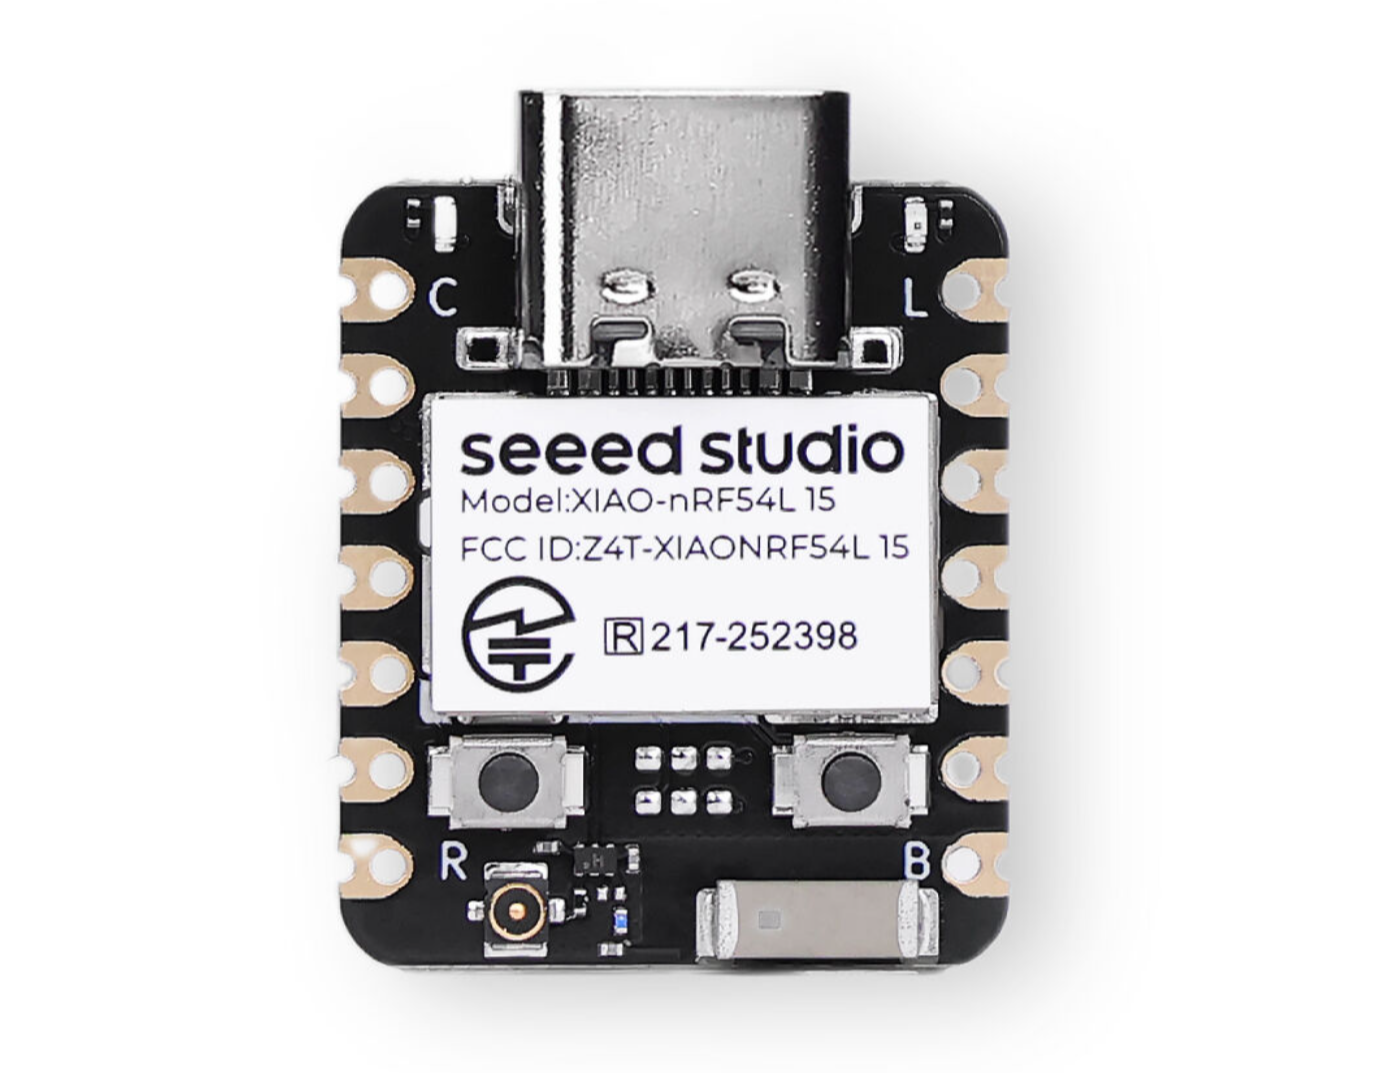 | 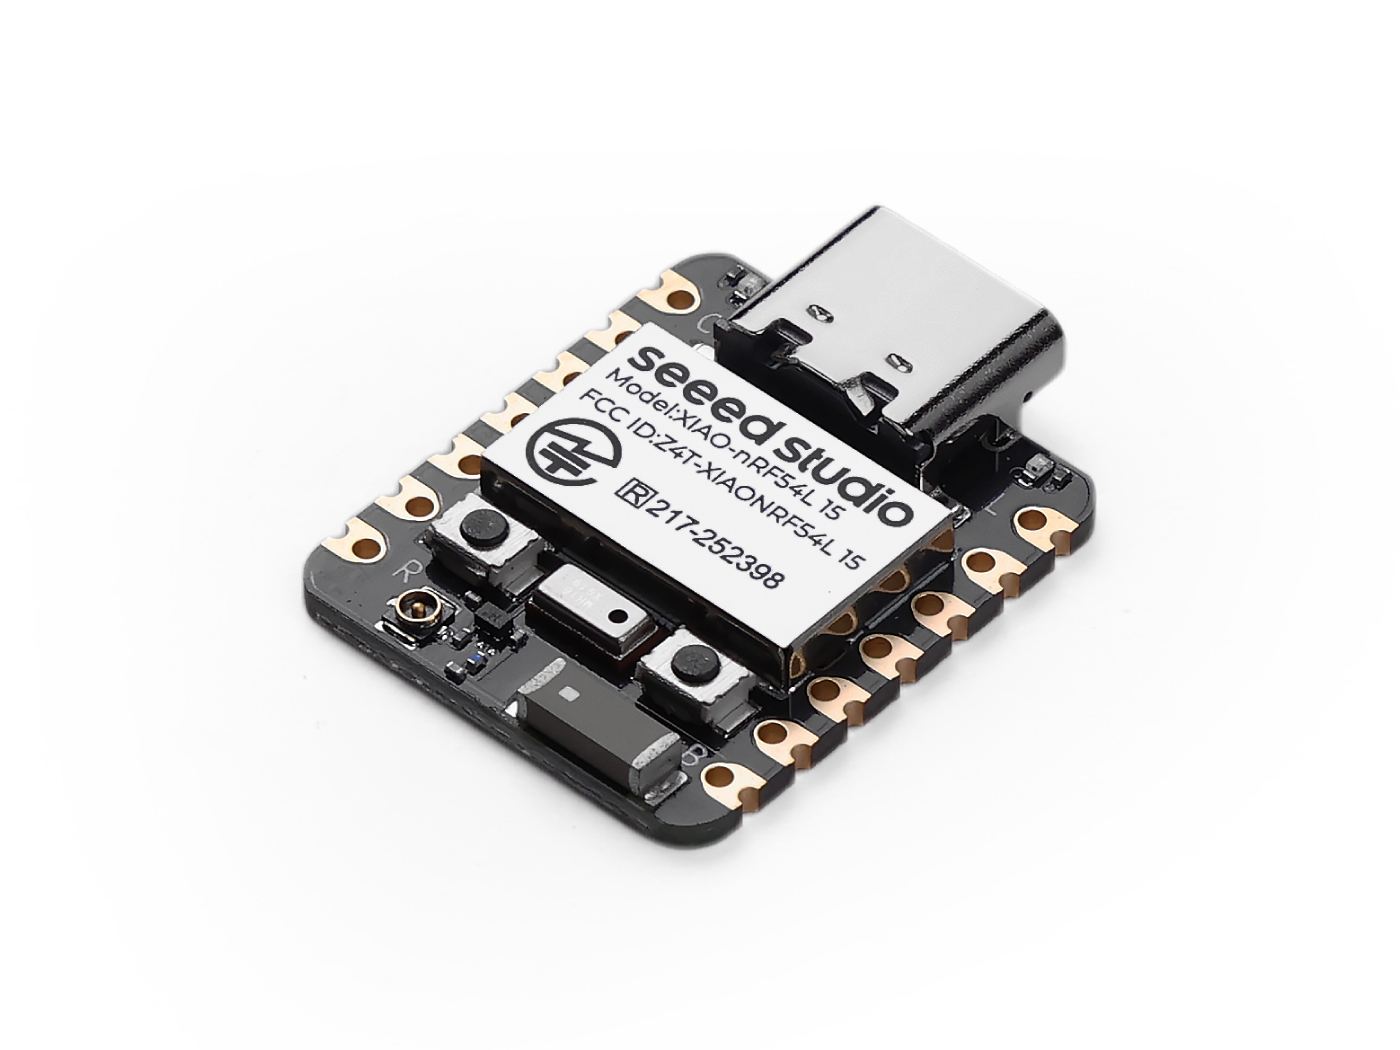 |
Instalar o Thonny IDE
Escolha a versão apropriada para instalação. Aqui, estou instalando em um sistema Windows, então selecionei a versão para Windows.
Siga as instruções para a versão desejada do Python.
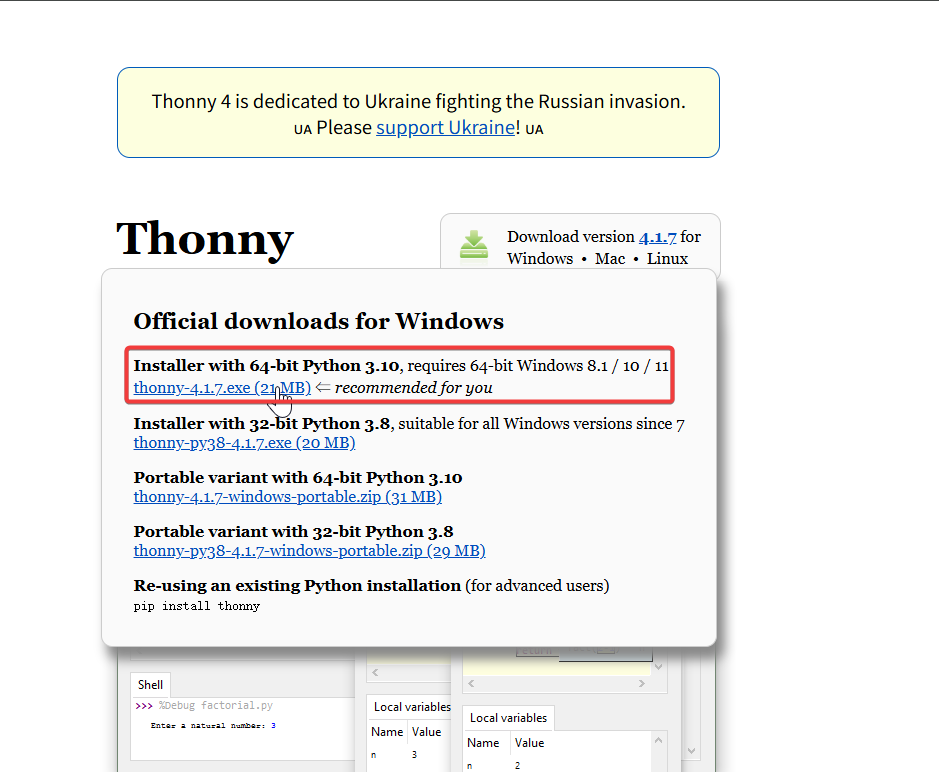
Em seguida, basta seguir as etapas padrão de configuração.
Baixar o repositório
Clone-o para a máquina local e, em seguida, lembre-se do caminho onde o MicroPython do XIAO nRF54L15 está armazenado. Esse caminho será usado mais tarde.
git clone https://github.com/Seeed-Studio/micropython-seeed-boards.git

Fazer upload do arquivo da placa
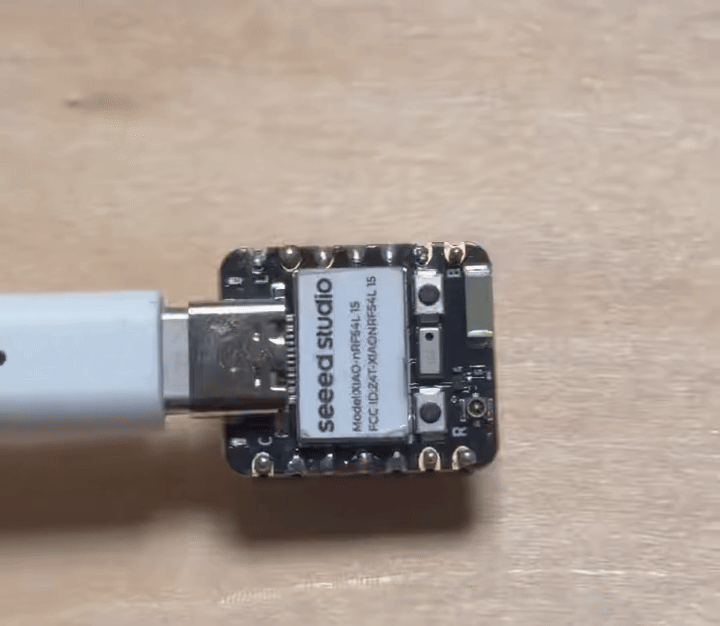
Passo 0. Conecte o XIAO NRF54L15 ao computador usando um cabo USB
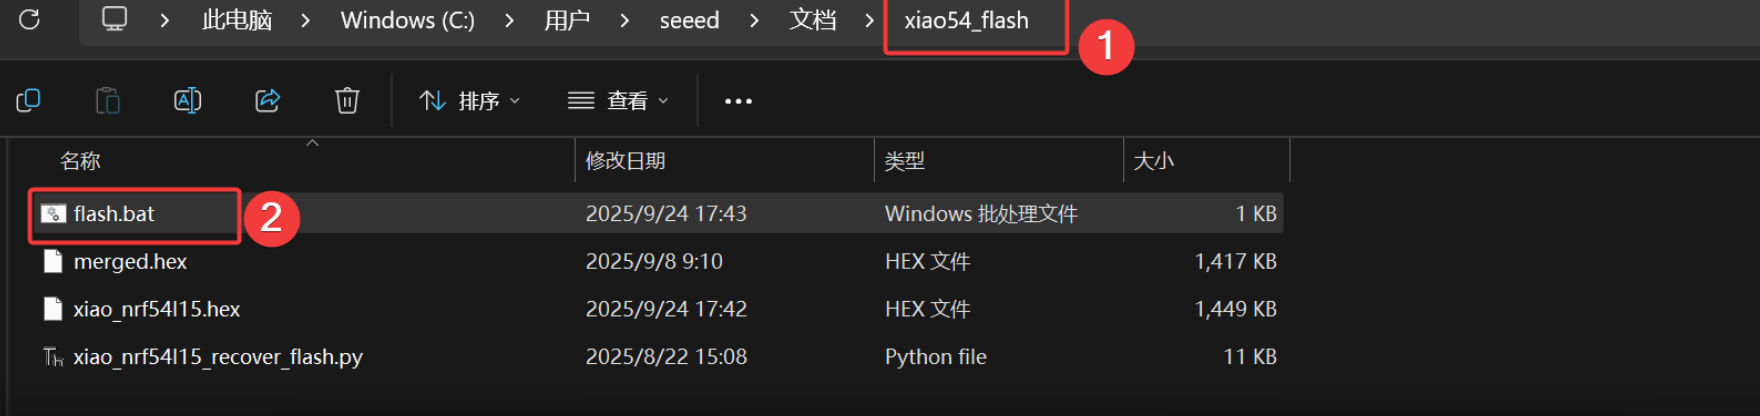
Passo 1. Grave o firmware MicroPython para o XIAO nRF54L15
-
Baixe o pacote de firmware e extraia-o para o local apropriado. Em seguida, clique em flash.bat e ele irá gravar o firmware automaticamente para você.
[Firmware] XIAO nRF54L15 MicroPython Firmware
O resultado é o seguinte
Este script possui comandos de cadeia de ferramentas de gravação pré-configurados. Se você estiver usando-o pela primeira vez, pode levar um pouco de tempo. Ele irá fechar automaticamente após o download. Se o XIAO NRF54L15 não estiver conectado, ocorrerá um erro “200” durante a gravação.
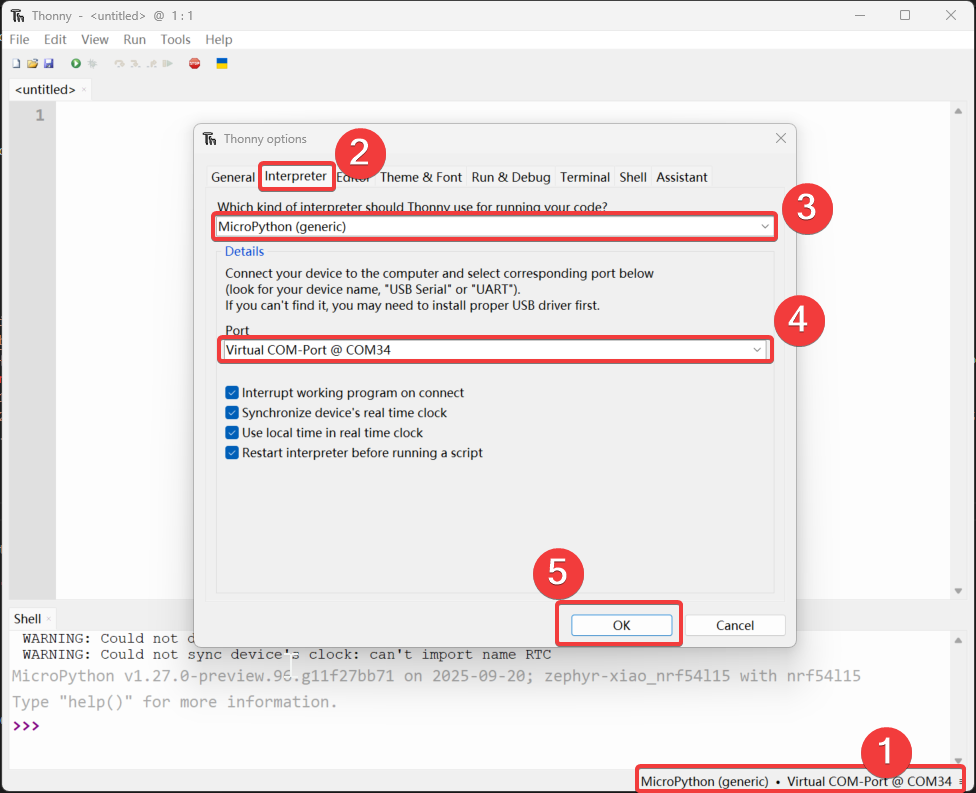
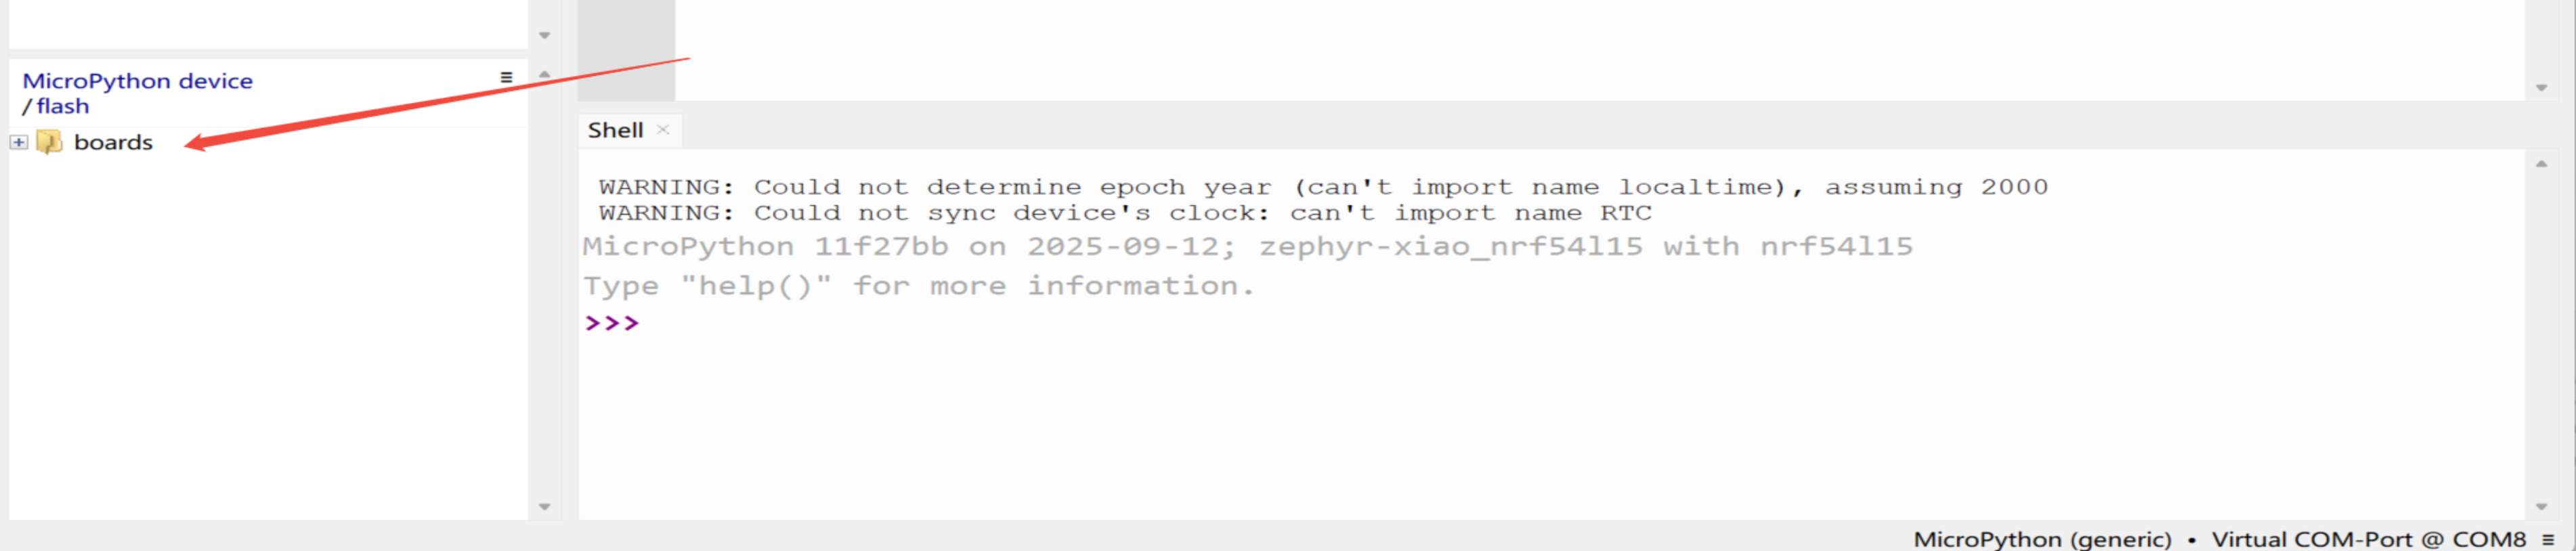
Passo 2. Abra o Thonny IDE, depois clique no canto inferior direito da interface para configurar as opções do interpretador. Selecione MicroPython (generic) e Port
Passo 3. Faça upload do arquivo boards
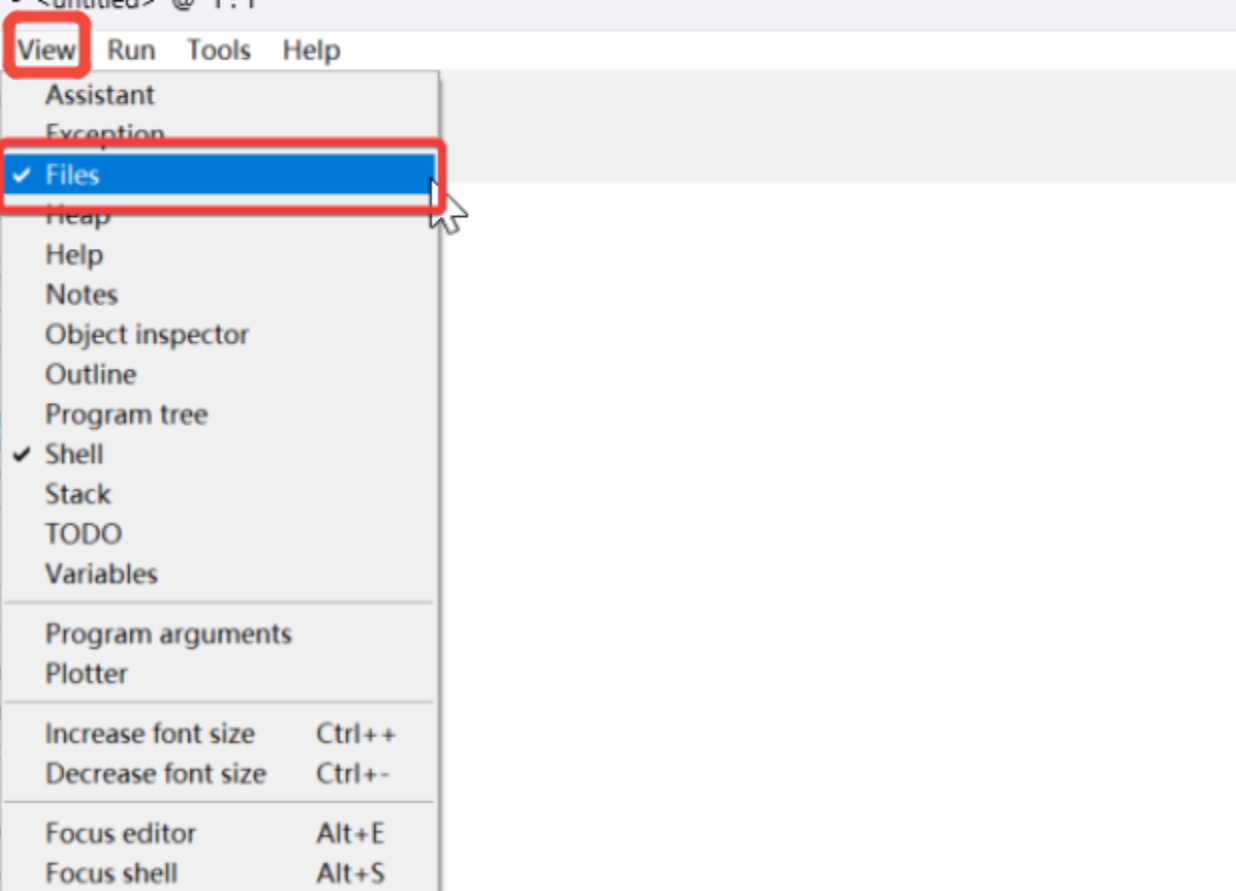
- Abra “view”, selecione "File", e o caminho do gerenciador de arquivos será exibido na barra lateral esquerda.
- Abra o caminho do arquivo clonado ou baixado e abra
micropython-seeed-boards\examples-Clique com o botão direito na pasta "boards" e faça o upload para a flash. Em seguida, você poderá ver o arquivo enviado no dispositivo/flash MicroPython.
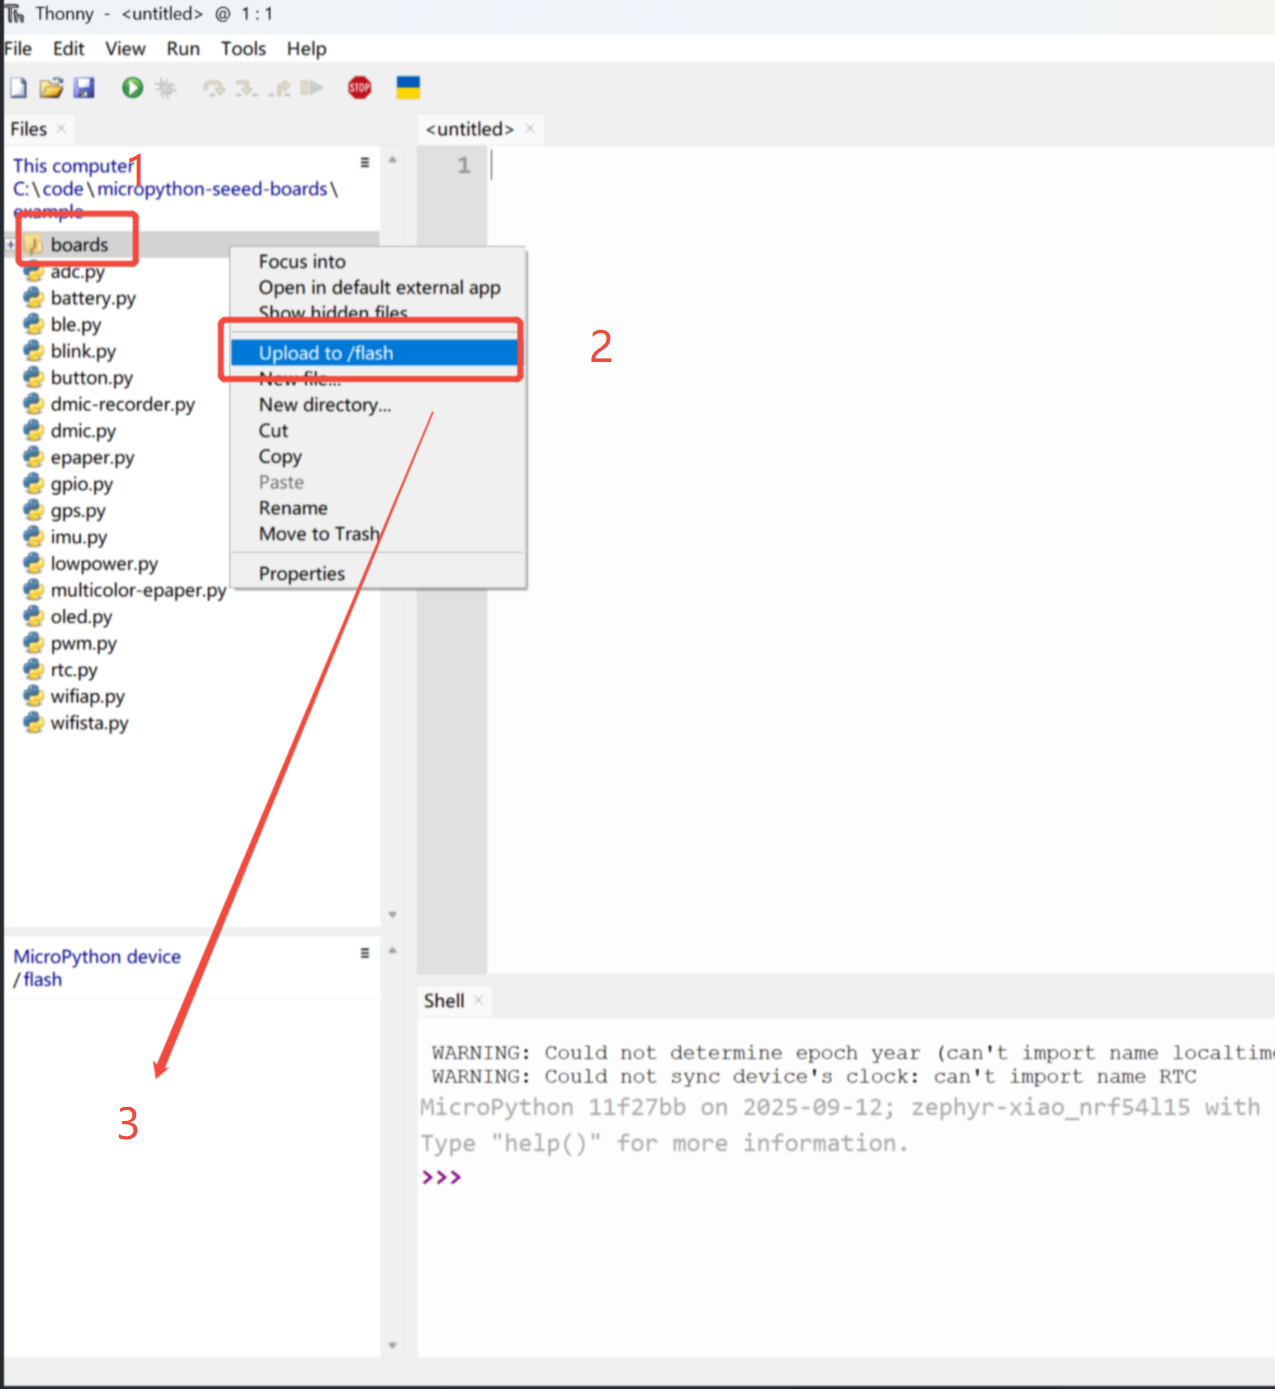
Quando estiver tudo normal, um ícone aparecerá na posição “3”
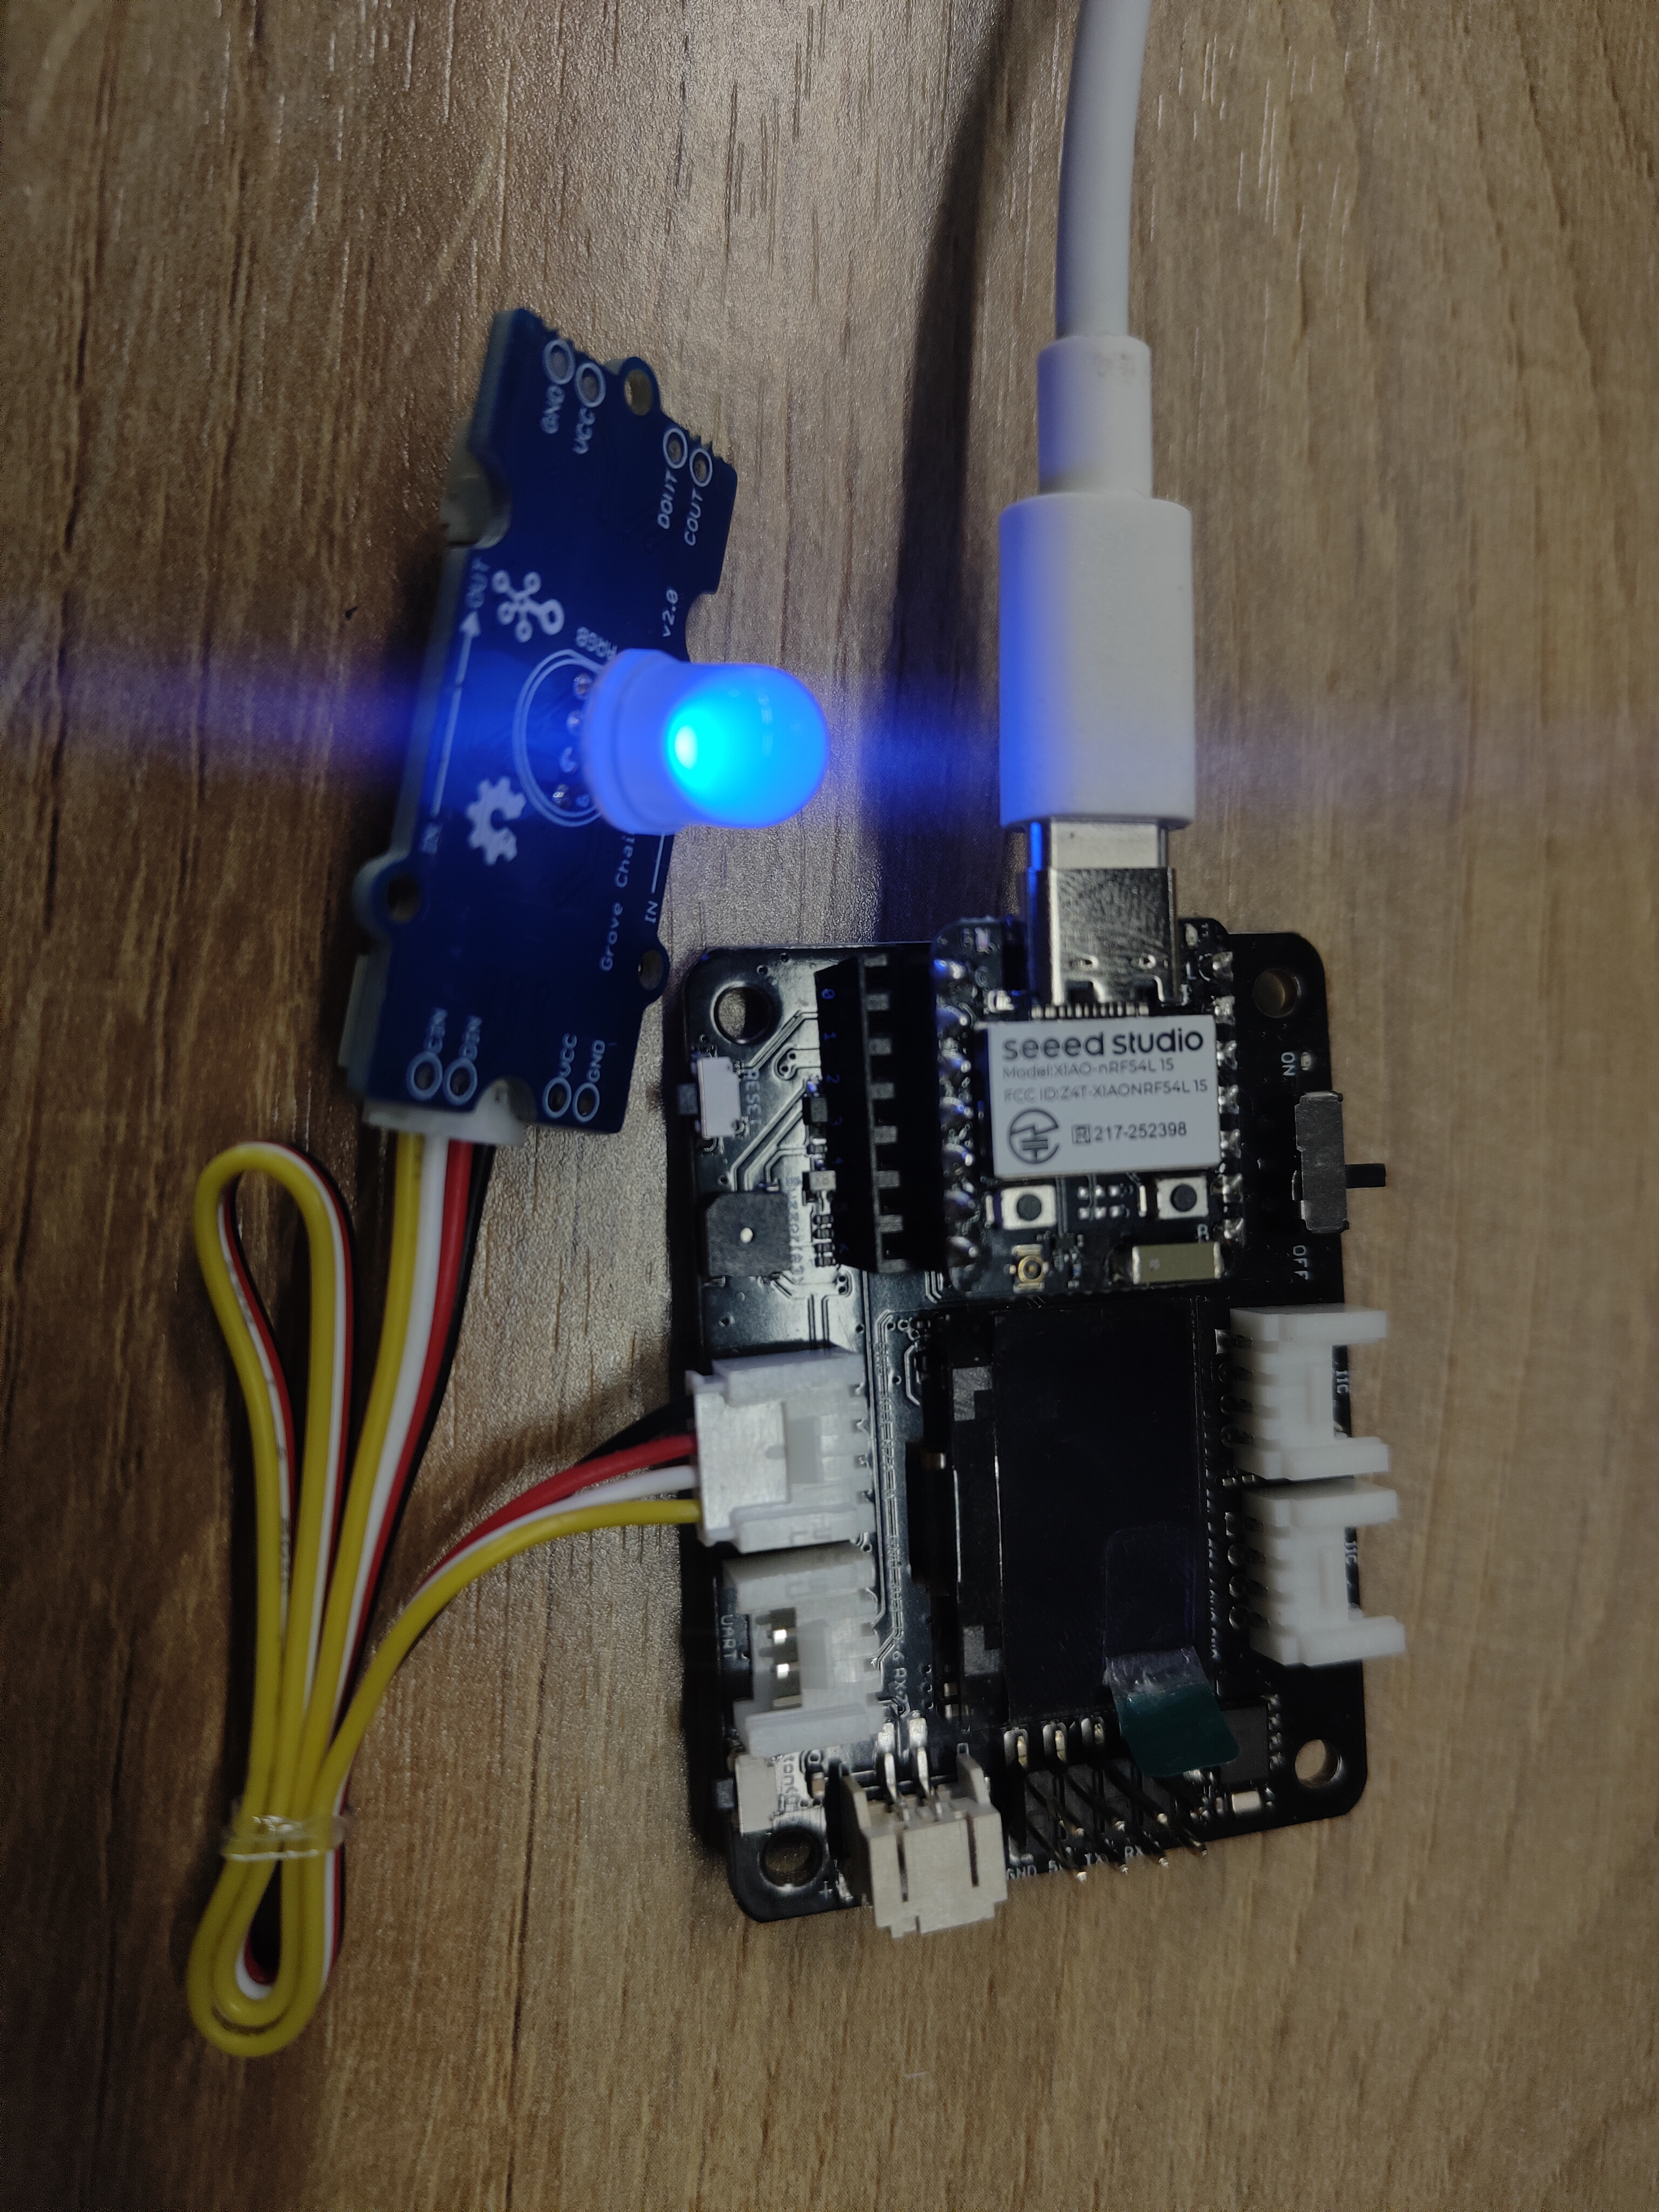
Passo 4. Ligar o LED
Abra um novo arquivo (XX.py) ou vá para a página inicial, depois copie o código e pressione F5 para executá-lo.
import time
from boards.xiao import XiaoPin

led = "led"

try:
    # Initialize LED
    led = XiaoPin(led, XiaoPin.OUT)
    while True:
        # LED 0.5 seconds on, 0.5 seconds off
        led.value(1)
        time.sleep(0.5)
        led.value(0)
        time.sleep(0.5)
except KeyboardInterrupt:
    print("\nProgram interrupted by user")
except Exception as e:
    print("\nError occurred: %s" % {e})
finally:
    led.value(1)
O resultado é o seguinte:
Digital
Hardware
| Seeed Studio XIAO nRF54L15 Sense | Seeed Studio Expansion Base for XIAO with Grove OLED | Grove - Relay |
|---|---|---|
|  |  |
Software
from machine import Pin
from boards.xiao_nrf54l15 import xiao_nrf54l15 as xiao

# Define a function to get the GPIO information corresponding to pin A0
def get_a0_pin():
    # Get the information of pin A0 through the pin method of the xiao module
    # According to the definition in xiao_nrf54l15.py, A0 corresponds to digital pin 0
    pin_info = xiao.pin(0)  # Get the information of digital pin 0, the return value is a tuple, such as ("gpio1", 4)
    return pin_info

# Define a function to set pin A0 to high level
def set_a0_high():
    # Get the GPIO information of pin A0
    gpio_port, gpio_pin = get_a0_pin()  # Get the port and pin number
    # Create a Pin object, specify the pin as output mode, and set it to high level
    pin = Pin((gpio_port, gpio_pin), Pin.OUT)  # Initialize the pin as output mode
    pin.value(1)  # Set the pin to high level

# Main program
if __name__ == "__main__":
    set_a0_high()  # Call the function to set pin A0 to high level
    print("Pin A0 has been set to high level")  # Output prompt information
Explicação do código: Este código possui quatro partes, como importação de módulos, uma função para obter as informações de GPIO do pino A0, uma função para definir o pino A0 em nível alto e a função principal, onde no programa principal ela chama a operação para definir o pino A0 em nível alto.
Resultado
Analógico
Hardware
| Seeed Studio XIAO nRF54L15 Sense | Grove-Variable Color LED | Grove-Rotary Angle Sensor | Seeed Studio Grove Base for XIAO |
|---|---|---|---|
|  |  |  |
Software
import time
from boards.xiao import XiaoPin, XiaoADC, XiaoPWM

adc = 0    #D0
pwm = 1    #D1

try:
    # Initialize ADC for potentiometer
    adc = XiaoADC(adc)
    # Initialize PWM for LED control
    pwm = XiaoPWM(pwm)
    FREQ = 1000
    PERIOD_NS = 1000000
    pwm.init(freq=FREQ, duty_ns=0)
    # Potentiometer parameters
    MIN_VOLTAGE = 0.0
    MAX_VOLTAGE = 3.3
    DEAD_ZONE = 0.05
    last_duty = -1
    while True:
        # Read ADC voltage value
        voltage = adc.read_uv() / 1000000

        # Ensure voltage is within valid range
        if voltage < MIN_VOLTAGE:
            voltage = MIN_VOLTAGE
        elif voltage > MAX_VOLTAGE:
            voltage = MAX_VOLTAGE

        duty_percent = (voltage - MIN_VOLTAGE) / (MAX_VOLTAGE - MIN_VOLTAGE)

        # Apply dead zone to prevent tiny fluctuations
        if abs(duty_percent - last_duty) < DEAD_ZONE / 100:
            time.sleep(0.05)
            continue

        # Calculate duty cycle time (nanoseconds)
        duty_ns = int(duty_percent * PERIOD_NS)

        # Set PWM duty cycle
        pwm.duty_ns(duty_ns)

        # Print current status
        print("Voltage: {:.2f}V, Duty Cycle: {:.1f}%".format(voltage, duty_percent * 100))

        # Update last duty cycle value
        last_duty = duty_percent

        # Short delay
        time.sleep(0.05)
except KeyboardInterrupt:
    print("\nProgram interrupted by user")
except Exception as e:
    print("\nError occurred: %s" % {e})
finally:
    pwm.deinit()
Code Explain: This code can be divided into four parts:
- importing modules:including the time module for delay operations, as well as the XiaoADC and XiaoPWM modules
- initializing the hardware:defining the ADC and PWM pins, and initializing the ADC to read the voltage of the potentiometer, and initializing the PWM to control the LED brightness.
- The main program logic:in an infinite loop, reads the voltage of the potentiometer, converts it to a PWM duty cycle, and adjusts the LED brightness according to the voltage.
- Exception handling and cleanup:capturing user interruptions (such as pressing Ctrl+C) and other exceptions to ensure the program exits safely.
Resultado
I2C
Hardware
| Seeed Studio XIAO nRF54L15 Sense | Placa Base de Expansão Seeed Studio para XIAO |
|---|---|
| |
Software
import time
from boards.xiao import XiaoI2C
sda = 4 #D4
scl = 5 #D5
i2c = "i2c0"
frq = 400000
i2c = XiaoI2C(i2c, sda, scl, frq)
# --- SSD1306 I2C address and command definitions ---
SSD1306_I2C_ADDR = 0x3C
SSD1306_SET_CONTRAST = 0x81
SSD1306_DISPLAY_ALL_ON_RESUME = 0xA4
SSD1306_DISPLAY_ALL_ON = 0xA5
SSD1306_NORMAL_DISPLAY = 0xA6
SSD1306_INVERT_DISPLAY = 0xA7
SSD1306_DISPLAY_OFF = 0xAE
SSD1306_DISPLAY_ON = 0xAF
SSD1306_SET_DISPLAY_OFFSET = 0xD3
SSD1306_SET_COM_PINS = 0xDA
SSD1306_SET_VCOM_DETECT = 0xDB
SSD1306_SET_DISPLAY_CLOCK_DIV = 0xD5
SSD1306_SET_PRECHARGE = 0xD9
SSD1306_SET_MULTIPLEX = 0xA8
SSD1306_SET_LOW_COLUMN = 0x00
SSD1306_SET_HIGH_COLUMN = 0x10
SSD1306_SET_START_LINE = 0x40
SSD1306_MEMORY_MODE = 0x20
SSD1306_COLUMN_ADDR = 0x21
SSD1306_PAGE_ADDR = 0x22
SSD1306_COM_SCAN_INC = 0xC0
SSD1306_COM_SCAN_DEC = 0xC8
SSD1306_SEG_REMAP = 0xA0
SSD1306_CHARGE_PUMP = 0x8D
# Display dimensions
SSD1306_WIDTH = 128
SSD1306_HEIGHT = 64
SSD1306_PAGES = 8
# Basic 8x8 font
font_data = {
' ': [0x00,0x00,0x00,0x00,0x00,0x00,0x00,0x00],
'A': [0x18,0x24,0x42,0x7E,0x42,0x42,0x42,0x00],
'B': [0x7C,0x42,0x42,0x7C,0x42,0x42,0x7C,0x00],
'C': [0x3C,0x42,0x40,0x40,0x40,0x42,0x3C,0x00],
'D': [0x78,0x44,0x42,0x42,0x42,0x44,0x78,0x00],
'E': [0x7C,0x40,0x40,0x78,0x40,0x40,0x7C,0x00],
'F': [0x7C,0x40,0x40,0x78,0x40,0x40,0x40,0x00],
'G': [0x3C,0x42,0x40,0x4E,0x42,0x42,0x3C,0x00],
'H': [0x44,0x44,0x44,0x7C,0x44,0x44,0x44,0x00],
'I': [0x38,0x10,0x10,0x10,0x10,0x10,0x38,0x00],
'J': [0x1C,0x08,0x08,0x08,0x08,0x48,0x30,0x00],
'K': [0x44,0x48,0x50,0x60,0x50,0x48,0x44,0x00],
'L': [0x40,0x40,0x40,0x40,0x40,0x40,0x7C,0x00],
'M': [0x42,0x66,0x5A,0x42,0x42,0x42,0x42,0x00],
'N': [0x42,0x62,0x52,0x4A,0x46,0x42,0x42,0x00],
'O': [0x3C,0x42,0x42,0x42,0x42,0x42,0x3C,0x00],
'P': [0x7C,0x42,0x42,0x7C,0x40,0x40,0x40,0x00],
'Q': [0x3C,0x42,0x42,0x42,0x4A,0x44,0x3A,0x00],
'R': [0x7C,0x42,0x42,0x7C,0x48,0x44,0x42,0x00],
'S': [0x3C,0x42,0x40,0x3C,0x02,0x42,0x3C,0x00],
'T': [0x7C,0x10,0x10,0x10,0x10,0x10,0x10,0x00],
'U': [0x42,0x42,0x42,0x42,0x42,0x42,0x3C,0x00],
'V': [0x42,0x42,0x42,0x42,0x42,0x24,0x18,0x00],
'W': [0x42,0x42,0x42,0x42,0x5A,0x66,0x42,0x00],
'X': [0x42,0x24,0x18,0x18,0x18,0x24,0x42,0x00],
'Y': [0x44,0x44,0x28,0x10,0x10,0x10,0x10,0x00],
'Z': [0x7E,0x04,0x08,0x10,0x20,0x40,0x7E,0x00],
'0': [0x3C,0x42,0x46,0x4A,0x52,0x62,0x3C,0x00],
'1': [0x10,0x30,0x10,0x10,0x10,0x10,0x38,0x00],
'2': [0x3C,0x42,0x02,0x0C,0x30,0x40,0x7E,0x00],
'3': [0x3C,0x42,0x02,0x1C,0x02,0x42,0x3C,0x00],
'4': [0x08,0x18,0x28,0x48,0x7E,0x08,0x08,0x00],
'5': [0x7E,0x40,0x7C,0x02,0x02,0x42,0x3C,0x00],
'6': [0x1C,0x20,0x40,0x7C,0x42,0x42,0x3C,0x00],
'7': [0x7E,0x42,0x04,0x08,0x10,0x10,0x10,0x00],
'8': [0x3C,0x42,0x42,0x3C,0x42,0x42,0x3C,0x00],
'9': [0x3C,0x42,0x42,0x3E,0x02,0x04,0x38,0x00],
'!': [0x10,0x10,0x10,0x10,0x10,0x00,0x10,0x00],
'?': [0x3C,0x42,0x02,0x0C,0x10,0x00,0x10,0x00],
'.': [0x00,0x00,0x00,0x00,0x00,0x00,0x10,0x00],
',': [0x00,0x00,0x00,0x00,0x00,0x10,0x10,0x20],
':': [0x00,0x10,0x00,0x00,0x00,0x10,0x00,0x00],
';': [0x00,0x10,0x00,0x00,0x00,0x10,0x10,0x20],
'-': [0x00,0x00,0x00,0x7C,0x00,0x00,0x00,0x00],
'_': [0x00,0x00,0x00,0x00,0x00,0x00,0x7E,0x00],
'+': [0x00,0x10,0x10,0x7C,0x10,0x10,0x00,0x00],
'*': [0x00,0x24,0x18,0x7E,0x18,0x24,0x00,0x00],
'/': [0x02,0x04,0x08,0x10,0x20,0x40,0x00,0x00],
'\\': [0x40,0x20,0x10,0x08,0x04,0x02,0x00,0x00],
'=': [0x00,0x00,0x7E,0x00,0x7E,0x00,0x00,0x00],
'\'': [0x10,0x10,0x20,0x00,0x00,0x00,0x00,0x00],
'"': [0x24,0x24,0x00,0x00,0x00,0x00,0x00,0x00],
'(': [0x08,0x10,0x20,0x20,0x20,0x10,0x08,0x00],
')': [0x20,0x10,0x08,0x08,0x08,0x10,0x20,0x00],
'[': [0x1C,0x10,0x10,0x10,0x10,0x10,0x1C,0x00],
']': [0x38,0x08,0x08,0x08,0x08,0x08,0x38,0x00],
'{': [0x0C,0x10,0x10,0x60,0x10,0x10,0x0C,0x00],
'}': [0x30,0x08,0x08,0x06,0x08,0x08,0x30,0x00],
'<': [0x08,0x10,0x20,0x40,0x20,0x10,0x08,0x00],
'>': [0x20,0x10,0x08,0x04,0x08,0x10,0x20,0x00],
'|': [0x10,0x10,0x10,0x10,0x10,0x10,0x10,0x00],
'@': [0x3C,0x42,0x5A,0x5A,0x5C,0x40,0x3C,0x00],
'#': [0x24,0x24,0x7E,0x24,0x7E,0x24,0x24,0x00],
'$': [0x10,0x3C,0x50,0x3C,0x12,0x3C,0x10,0x00],
'%': [0x62,0x64,0x08,0x10,0x26,0x46,0x00,0x00],
'^': [0x10,0x28,0x44,0x00,0x00,0x00,0x00,0x00],
'&': [0x30,0x48,0x50,0x20,0x54,0x48,0x34,0x00],
'~': [0x00,0x00,0x34,0x4C,0x00,0x00,0x00,0x00]
}
# --- Helper functions ---
# Write a single command byte to SSD1306 via I2C
def ssd1306_write_command(cmd):
i2c.writeto(SSD1306_I2C_ADDR, bytes([0x00, cmd]))
# Write multiple command bytes to SSD1306 via I2C
def ssd1306_write_commands(cmds):
data = bytearray([0x00] + list(cmds))
i2c.writeto(SSD1306_I2C_ADDR, data)
# Write display data bytes to SSD1306 via I2C
def ssd1306_write_data(data):
buffer = bytearray(len(data) + 1)
buffer[0] = 0x40
buffer[1:] = data
i2c.writeto(SSD1306_I2C_ADDR, buffer)
# Clear the entire SSD1306 display
def ssd1306_clear():
ssd1306_write_commands(bytearray([SSD1306_COLUMN_ADDR, 0, SSD1306_WIDTH - 1]))
ssd1306_write_commands(bytearray([SSD1306_PAGE_ADDR, 0, SSD1306_PAGES - 1]))
empty_data = bytearray(SSD1306_WIDTH)
for _ in range(SSD1306_PAGES):
ssd1306_write_data(empty_data)
ssd1306_write_commands([SSD1306_COLUMN_ADDR, 0, SSD1306_WIDTH - 1])
# Initialize SSD1306 display with recommended settings
def ssd1306_init():
commands = [
bytearray([SSD1306_DISPLAY_OFF]),
bytearray([SSD1306_SET_DISPLAY_CLOCK_DIV, 0x80]),
bytearray([SSD1306_SET_MULTIPLEX, SSD1306_HEIGHT - 1]),
bytearray([SSD1306_SET_DISPLAY_OFFSET, 0x00]),
bytearray([SSD1306_SET_START_LINE | 0x00]),
bytearray([SSD1306_CHARGE_PUMP, 0x14]),
bytearray([SSD1306_MEMORY_MODE, 0x00]),
bytearray([SSD1306_SEG_REMAP | 0x01]),
bytearray([SSD1306_COM_SCAN_DEC]),
bytearray([SSD1306_SET_COM_PINS, 0x12]),
bytearray([SSD1306_SET_CONTRAST, 0xCF]),
bytearray([SSD1306_SET_PRECHARGE, 0xF1]),
bytearray([SSD1306_SET_VCOM_DETECT, 0x40]),
bytearray([SSD1306_DISPLAY_ALL_ON_RESUME]),
bytearray([SSD1306_NORMAL_DISPLAY]),
bytearray([SSD1306_DISPLAY_ON])
]
for cmd in commands:
ssd1306_write_commands(cmd)
ssd1306_clear()
print("SSD1306 initialized successfully.")
ssd1306_write_commands([SSD1306_COLUMN_ADDR, 0, SSD1306_WIDTH - 1])
# Draw a string of text at specified column and page (row) on SSD1306
def ssd1306_draw_text(text, x, y):
ssd1306_write_commands(bytearray([SSD1306_COLUMN_ADDR, x, x + len(text) * 8 - 1]))
ssd1306_write_commands(bytearray([SSD1306_PAGE_ADDR, y, y + 0]))
display_data = bytearray()
for char in text:
font_bytes = font_data.get(char.upper(), font_data[' '])
for col in range(7, -1, -1):
val = 0
for row in range(8):
if font_bytes[row] & (1 << col):
val |= (1 << row)
display_data.append(val)
ssd1306_write_data(display_data)
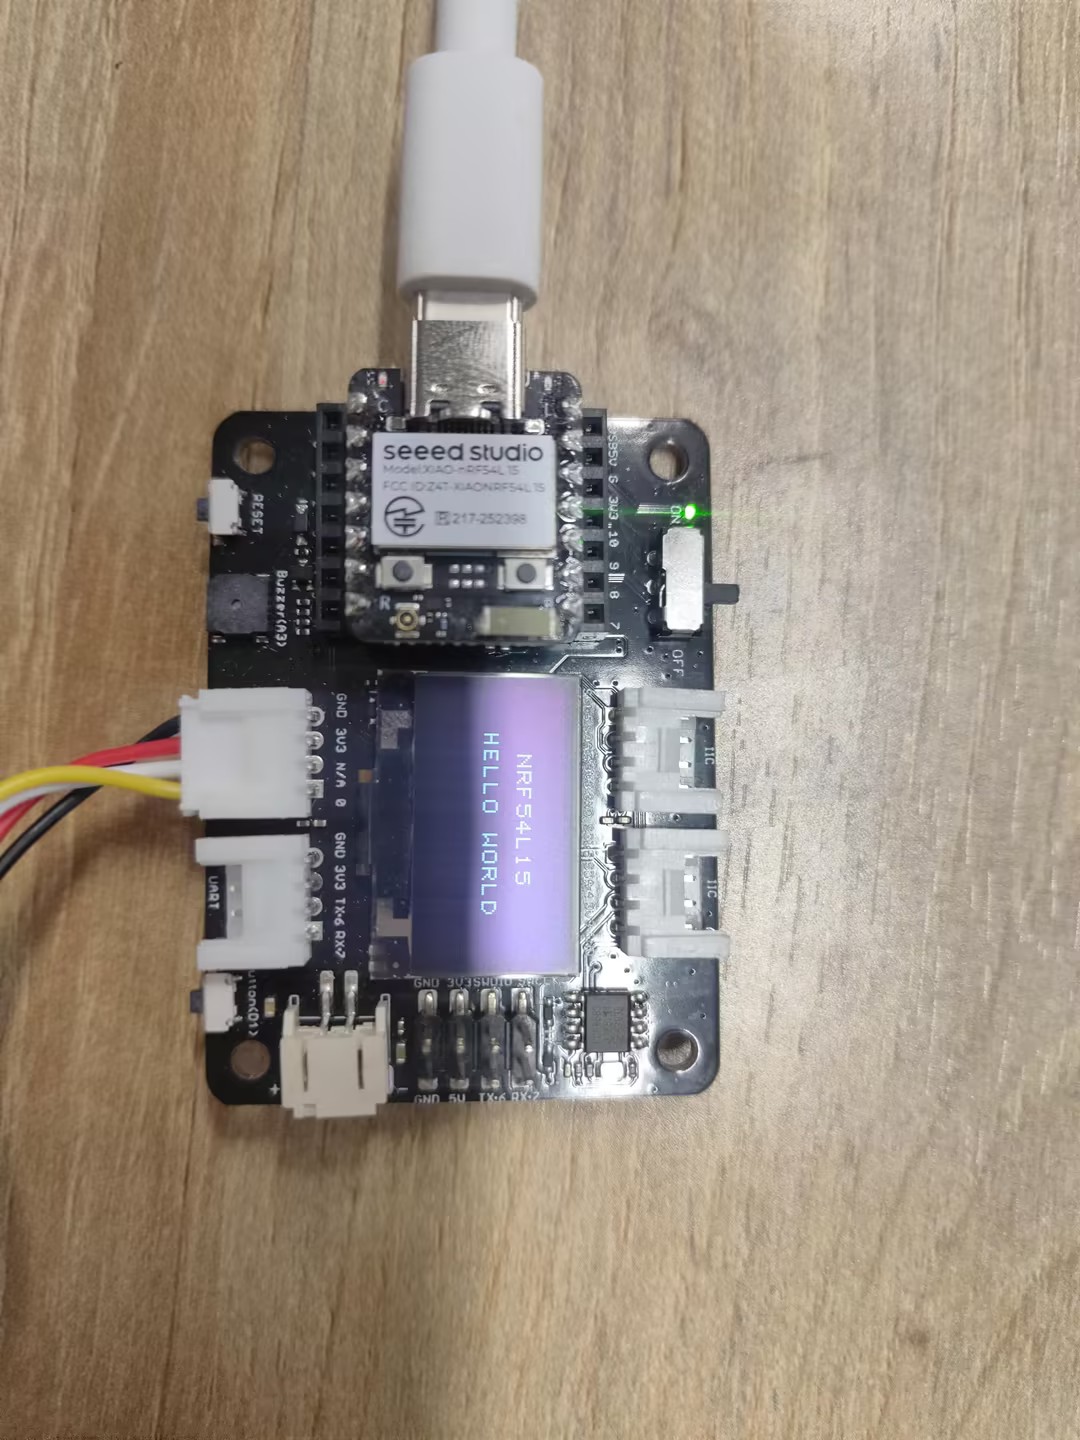
i2c_addr = i2c.scan()
if SSD1306_I2C_ADDR not in i2c_addr:
raise Exception("SSD1306 not found on I2C bus")
else:
print("SSD1306 found on I2C bus: 0x{:02X}".format(SSD1306_I2C_ADDR))
# Initialize display
ssd1306_init()
ssd1306_draw_text("NRF54L15", 30, 2)
ssd1306_draw_text("HELLO WORLD", 20, 4)
Explicação do código:
Este código inicializa e controla um display OLED SSD1306 via comunicação I2C, define os comandos e parâmetros do display e implementa funções para limpar a tela, inicialização e exibição de texto.
-
Importar módulos e inicializar a comunicação I2C: O módulo time foi importado para operações de atraso, e o módulo XiaoI2C foi importado para inicializar a comunicação I2C. Os pinos SDA e SCL do I2C foram definidos e a frequência do I2C foi configurada. Em seguida, um objeto XiaoI2C foi criado para comunicação com dispositivos I2C, como um display OLED.
-
Definir as instruções e parâmetros do display SSD1306: Define o endereço I2C do display SSD1306 e uma série de comandos de controle (como ajuste de contraste, ligar/desligar o display, etc.). Também define os parâmetros de tamanho do display (largura, altura e número de páginas) e uma biblioteca de fonte em matriz de pontos 8x8 simples para exibir caracteres na tela.
-
Definir função auxiliar: Uma série de funções auxiliares é definida para enviar comandos e dados ao SSD1306.
-
Lógica principal do programa: Primeiro, verifica se o display SSD1306 está conectado ao barramento I2C realizando uma varredura I2C. Se o display for encontrado, chama a função ssd1306_init para inicializar o display. Em seguida, chama a função ssd1306_draw_text para exibir as duas linhas de texto "NRF54L15" e "HELLO WORLD" no display.
Resultado
SPI
Hardware
| Seeed Studio XIAO nRF54L15 Sense | Placa Controladora de ePaper para Seeed Studio XIAO |
|---|---|
|  |
Software
import time
from boards.xiao import XiaoPin, XiaoSPI
# -------- Pins & SPI --------
RST = 0; CS = 1; DC = 3; BUSY = 5
sck = 9; mosi = 10; miso = 8; spi_id = "spi0"
RST = XiaoPin(RST, XiaoPin.OUT)
CS = XiaoPin(CS, XiaoPin.OUT)
DC = XiaoPin(DC, XiaoPin.OUT)
BUSY = XiaoPin(BUSY, XiaoPin.IN, XiaoPin.PULL_UP)
spi = XiaoSPI(spi_id, 20_000_000, sck, mosi, miso)
# -------- ePaper basics --------
def reset():
RST.value(0); time.sleep_ms(10)
RST.value(1); time.sleep_ms(10)
def send_command(cmd):
DC.value(0); CS.value(0)
spi.write(bytearray([cmd & 0xFF]))
CS.value(1)
def send_data(data):
DC.value(1); CS.value(0)
if isinstance(data, int):
spi.write(bytearray([data & 0xFF]))
else:
spi.write(data)
CS.value(1)
def wait_until_idle():
# If BUSY = 0, it indicates that the device is busy. You can then switch back to polling.
# while BUSY.value() == 0: time.sleep_ms(1)
time.sleep_ms(1)
def init_display():
reset()
send_command(0x00); send_data(0x1F)
send_command(0x04); time.sleep_ms(100); wait_until_idle()
send_command(0x50); send_data(0x21); send_data(0x07)
def clear_screen():
CS.value(0)
DC.value(0); spi.write(b'\x10'); DC.value(1)
for _ in range(48000): spi.write(b'\xFF')
DC.value(0); spi.write(b'\x13'); DC.value(1)
for _ in range(48000): spi.write(b'\xFF')
DC.value(0); spi.write(b'\x12'); CS.value(1)
wait_until_idle()
# -------- Geometry --------
WIDTH, HEIGHT = 800, 480
BYTES_PER_ROW = WIDTH // 8
linebuf = bytearray(BYTES_PER_ROW)
# -------- Minimal 5x7 glyphs (columns, LSB=top) --------
FONT_W, FONT_H = 5, 7
G = {
' ':[0x00,0x00,0x00,0x00,0x00],
# Digits
'0':[0x3E,0x51,0x49,0x45,0x3E],
'1':[0x00,0x42,0x7F,0x40,0x00],
'2':[0x42,0x61,0x51,0x49,0x46],
'3':[0x21,0x41,0x45,0x4B,0x31],
'4':[0x18,0x14,0x12,0x7F,0x10],
'5':[0x27,0x45,0x45,0x45,0x39],
'6':[0x3C,0x4A,0x49,0x49,0x30],
'7':[0x01,0x71,0x09,0x05,0x03],
'8':[0x36,0x49,0x49,0x49,0x36],
'9':[0x06,0x49,0x49,0x29,0x1E],
# Uppercase
'A':[0x7E,0x11,0x11,0x11,0x7E],
'F':[0x7F,0x09,0x09,0x09,0x01],
'H':[0x7F,0x08,0x08,0x08,0x7F],
'I':[0x00,0x41,0x7F,0x41,0x00],
'L':[0x7F,0x40,0x40,0x40,0x40],
'M':[0x7F,0x02,0x0C,0x02,0x7F],
'O':[0x3E,0x41,0x41,0x41,0x3E],
'P':[0x7F,0x09,0x09,0x09,0x06],
'R':[0x7F,0x09,0x19,0x29,0x46],
'T':[0x01,0x01,0x7F,0x01,0x01],
'X':[0x63,0x14,0x08,0x14,0x63],
'Y':[0x07,0x08,0x70,0x08,0x07],
# Lowercase
'a':[0x20,0x54,0x54,0x54,0x78],
'c':[0x38,0x44,0x44,0x44,0x20],
'e':[0x38,0x54,0x54,0x54,0x18],
'h':[0x7F,0x08,0x04,0x04,0x78],
'i':[0x00,0x44,0x7D,0x40,0x00],
'l':[0x00,0x41,0x7F,0x40,0x00],
'n':[0x7C,0x08,0x04,0x04,0x78],
'o':[0x38,0x44,0x44,0x44,0x38],
'p':[0x7C,0x14,0x14,0x14,0x08],
'r':[0x7C,0x08,0x04,0x04,0x08],
't':[0x04,0x3F,0x44,0x40,0x20],
'y':[0x0C,0x50,0x50,0x50,0x3C],
}
def glyph(ch):
return G.get(ch, G[' '])
# -------- Text helpers --------
def text_size(text, scale=1, spacing=1):
w = 0
for _ in text:
w += (FONT_W * scale + spacing)
if w: w -= spacing
return w, FONT_H * scale
def text_pixel(x, y, text, sx, sy, scale=1, spacing=1):
# Return 0 = Black, 1 = White
if y < sy or y >= sy + FONT_H * scale:
return 1
lx = x - sx
if lx < 0:
return 1
cursor = 0
for ch in text:
cw = FONT_W * scale
if cursor <= lx < cursor + cw:
cx_scaled = lx - cursor
cy_scaled = y - sy
cx = cx_scaled // scale
cy = cy_scaled // scale
col = glyph(ch)[cx]
bit = (col >> cy) & 1
return 0 if bit else 1
cursor += cw + spacing
return 1
# -------- Stream update --------
def epaper_update_lines(lines):
CS.value(0)
# The old picture is completely white.
DC.value(0); spi.write(b'\x10'); DC.value(1)
for _ in range(HEIGHT * BYTES_PER_ROW):
spi.write(b'\xFF')
# New image: Generated row by row
DC.value(0); spi.write(b'\x13'); DC.value(1)
for y in range(HEIGHT):
bi = 0; bitpos = 7; linebuf[:] = b'\x00' * BYTES_PER_ROW
for x in range(WIDTH):
val = 1 # Default white
for (txt, tx, ty, scale) in lines:
if text_pixel(x, y, txt, tx, ty, scale) == 0:
val = 0
break
if val:
linebuf[bi] |= (1 << bitpos) # 1 = white
bitpos -= 1
if bitpos < 0:
bitpos = 7; bi += 1
spi.write(linebuf)
# Redresh
DC.value(0); spi.write(b'\x12'); CS.value(1)
wait_until_idle()
# -------- Main --------
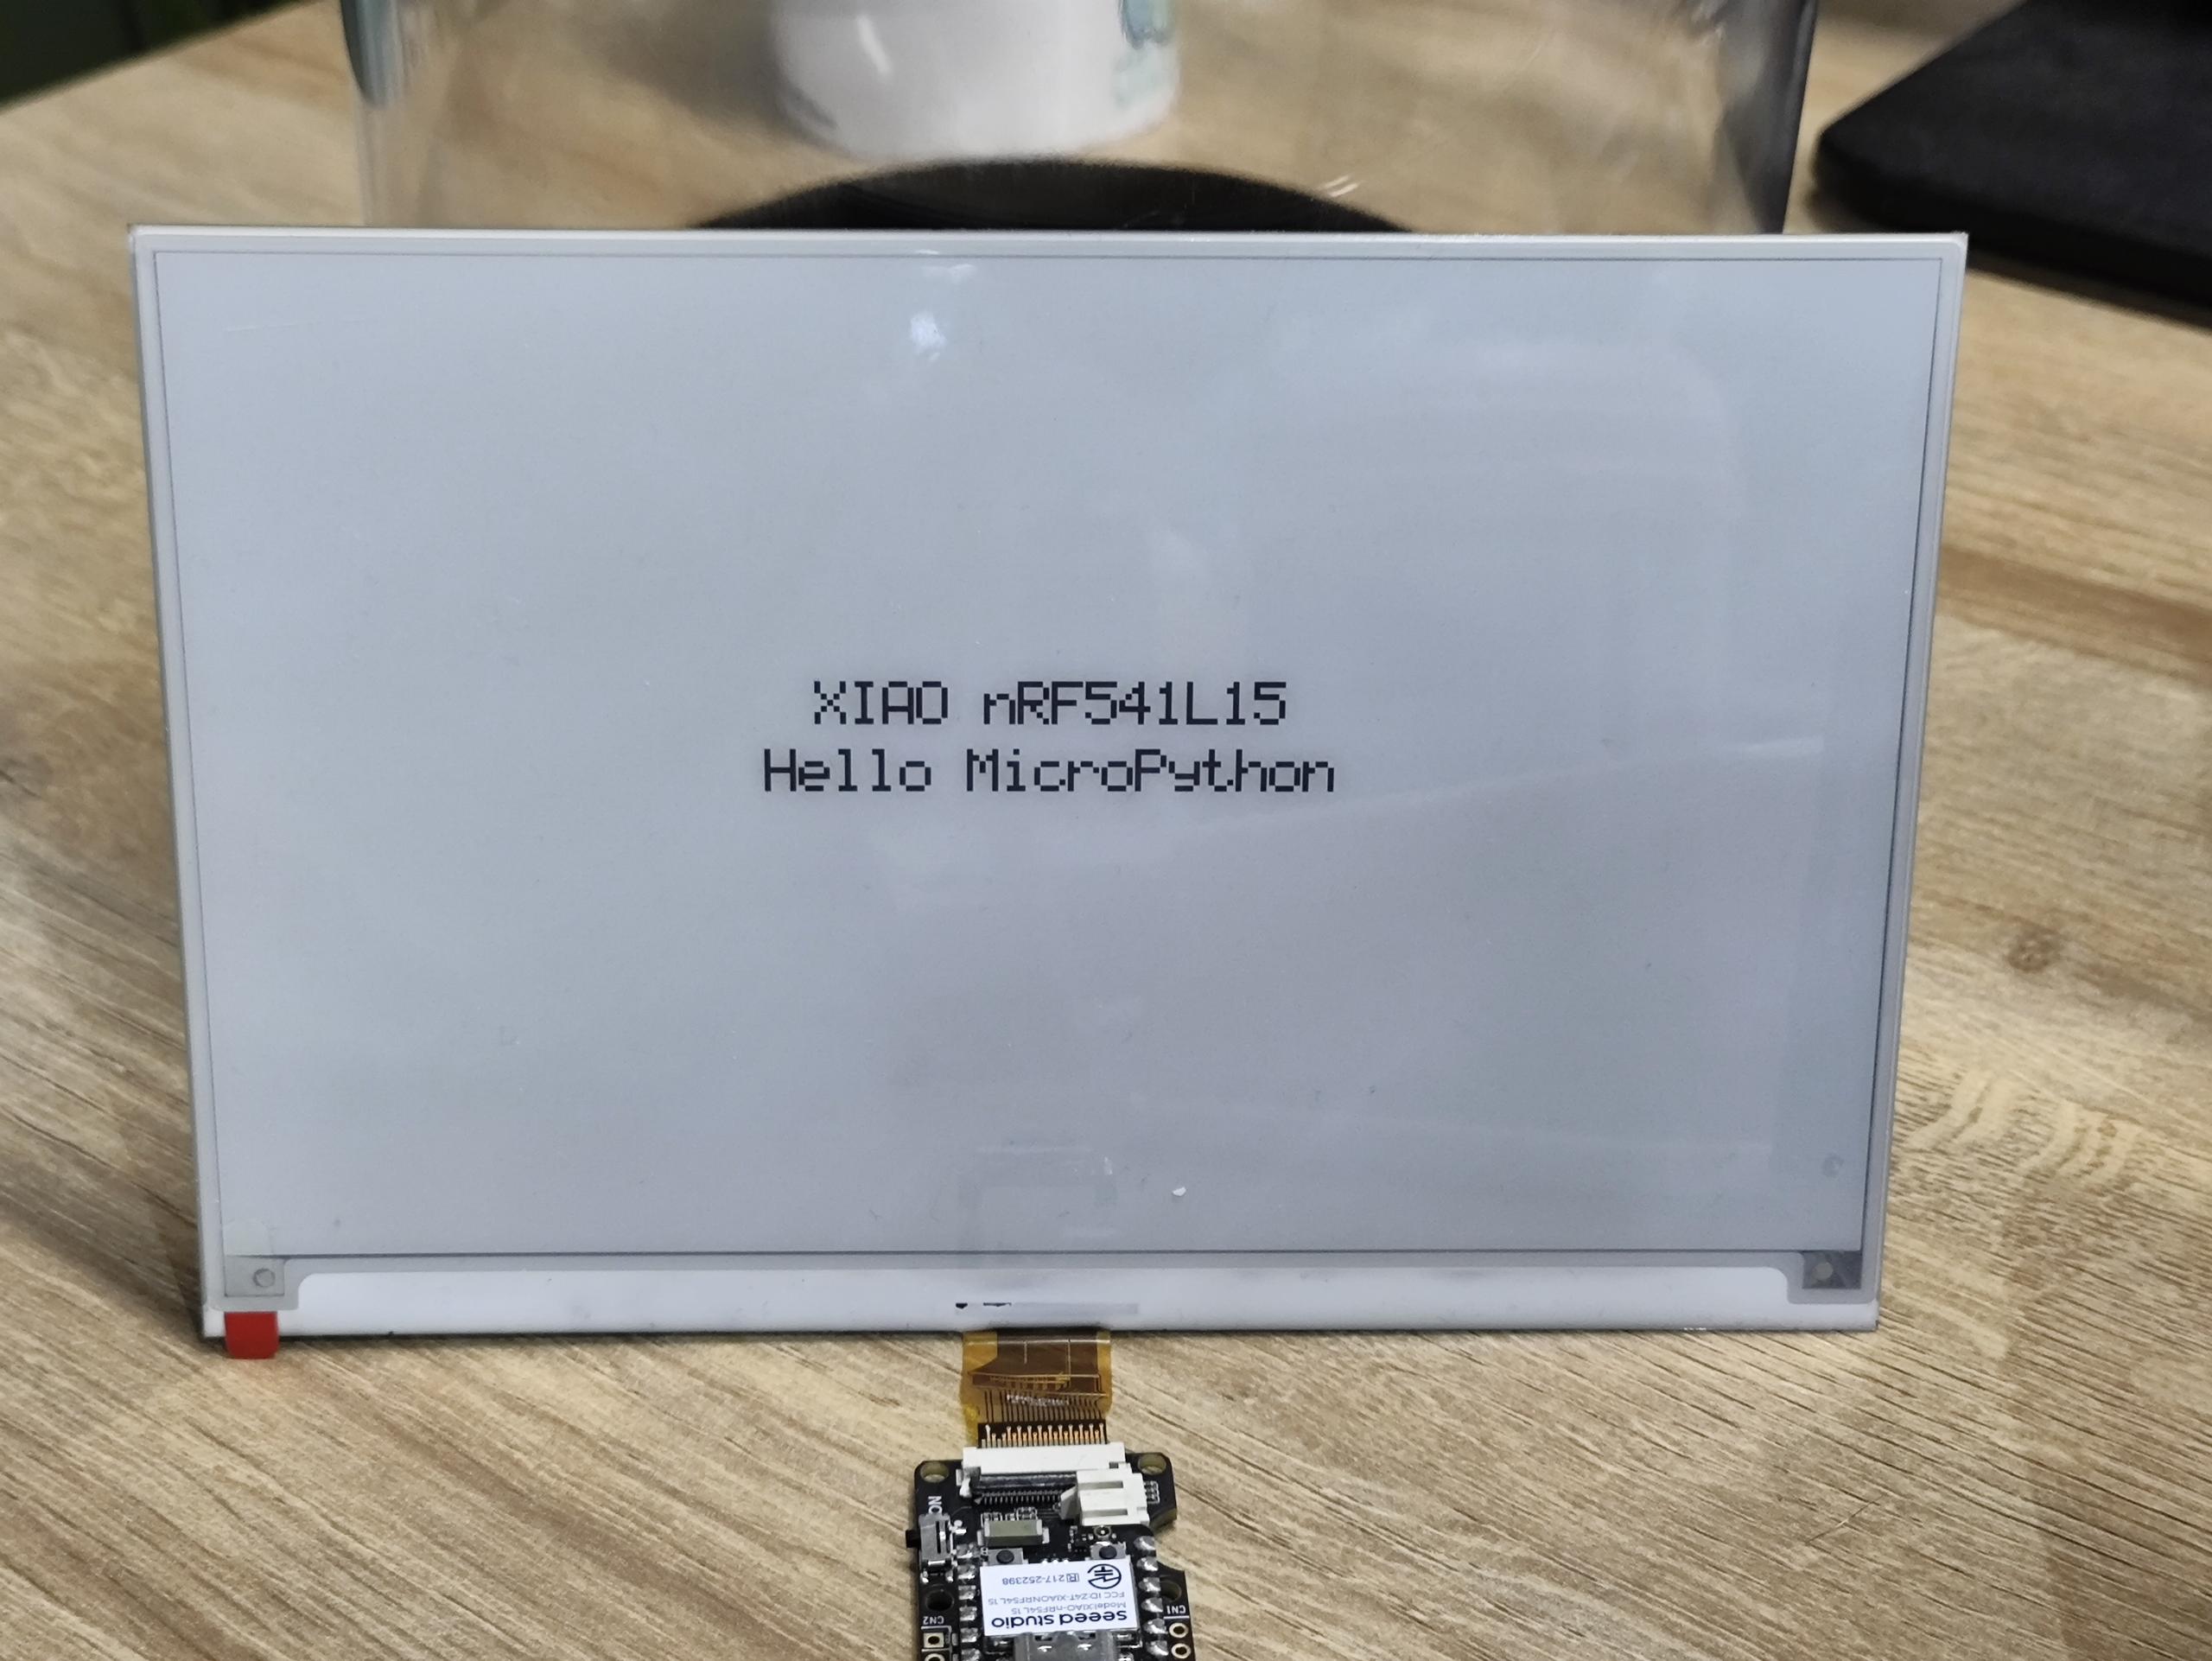
LINE1 = "XIAO nRF541L15"
LINE2 = "Hello MicroPython"
SCALE1 = 3
SCALE2 = 3
def main():
init_display()
clear_screen()
# Centered layout
w1, h1 = text_size(LINE1, SCALE1)
w2, h2 = text_size(LINE2, SCALE2)
total_h = h1 + 12 + h2 # Line spacing: 12 px
y0 = (HEIGHT - total_h) // 2
x1 = (WIDTH - w1) // 2
x2 = (WIDTH - w2) // 2
y1 = y0
y2 = y0 + h1 + 12
lines = [
(LINE1, x1, y1, SCALE1),
(LINE2, x2, y2, SCALE2),
]
epaper_update_lines(lines)
while True:
time.sleep(1_000_000)
if __name__ == "__main__":
main()
Explicação do código:
-
Importação de módulos
time: Habilita funções relacionadas a tempo, como atrasos.XiaoPin and XiaoSPI: Importados deboards.xiao; XiaoPin é usado para controlar pinos GPIO, enquanto XiaoSPI lida com a comunicação SPI.
-
Configuração de pinos e SPI
- Definidos pinos específicos: Reset (RST), Chip Select (CS), Data/Command (DC) e Busy (BUSY).
- Configurados os pinos relacionados ao SPI (SCK, MOSI, MISO) e o controlador SPI.
- Inicializado o modo de trabalho (entrada/saída) para todos os pinos GPIO.
- Criada uma instância de SPI com frequência definida de 20 MHz.
-
Funções básicas do ePaper
reset(): Executa uma operação de reset de hardware no display.send_command(cmd): Transmite um comando de um único byte.send_data(data): Envia dados, que podem ser um único byte ou múltiplos bytes.wait_until_idle(): Aguarda o display entrar em estado ocioso (atualmente implementado com um atraso simples).init_display(): Executa os procedimentos de inicialização do display.clear_screen(): Limpa a tela, definindo-a para um estado totalmente branco.
-
Parâmetros do display
WIDTH, HEIGHT = 800, 480: Especifica a resolução do display.BYTES_PER_ROW: Indica o número de bytes necessários para cada linha de pixels.linebuf: Um buffer de linha que armazena temporariamente os dados de pixels de uma única linha.
-
Sistema de fontes
- Definida uma fonte simples de 5x7 pixels, armazenada no dicionário
G. glyph(ch): Obtém os dados de pixels correspondentes a um determinado caractere.text_size(): Calcula as dimensões do texto quando exibido em uma taxa de escala especificada.text_pixel(): Determina se um pixel deve ser desenhado em uma posição específica (usado na renderização de texto).
- Definida uma fonte simples de 5x7 pixels, armazenada no dicionário
-
Atualização do display
- epaper_update_lines(lines): A função principal para atualizar o display.
- Primeiro, envia dados para definir um fundo totalmente branco.
- Em seguida, calcula e transmite os novos dados de imagem linha por linha.
- Por fim, aciona uma atualização do display para mostrar o novo conteúdo.
- Suporta exibição de texto em várias linhas, onde cada linha pode ter posições e taxas de escala distintas.
-
Função main()
- Inicializa o display.
- Calcula a posição centralizada para o texto.
- Cria uma lista de configuração para as linhas de texto.
- Chama
epaper_update_lines()para atualizar o conteúdo do display. - Entra em um loop de espera infinito.
Resultado
Executar o programa automaticamente
Se você quiser que seu programa de abreviação possa ser executado automaticamente, você pode seguir estas etapas:
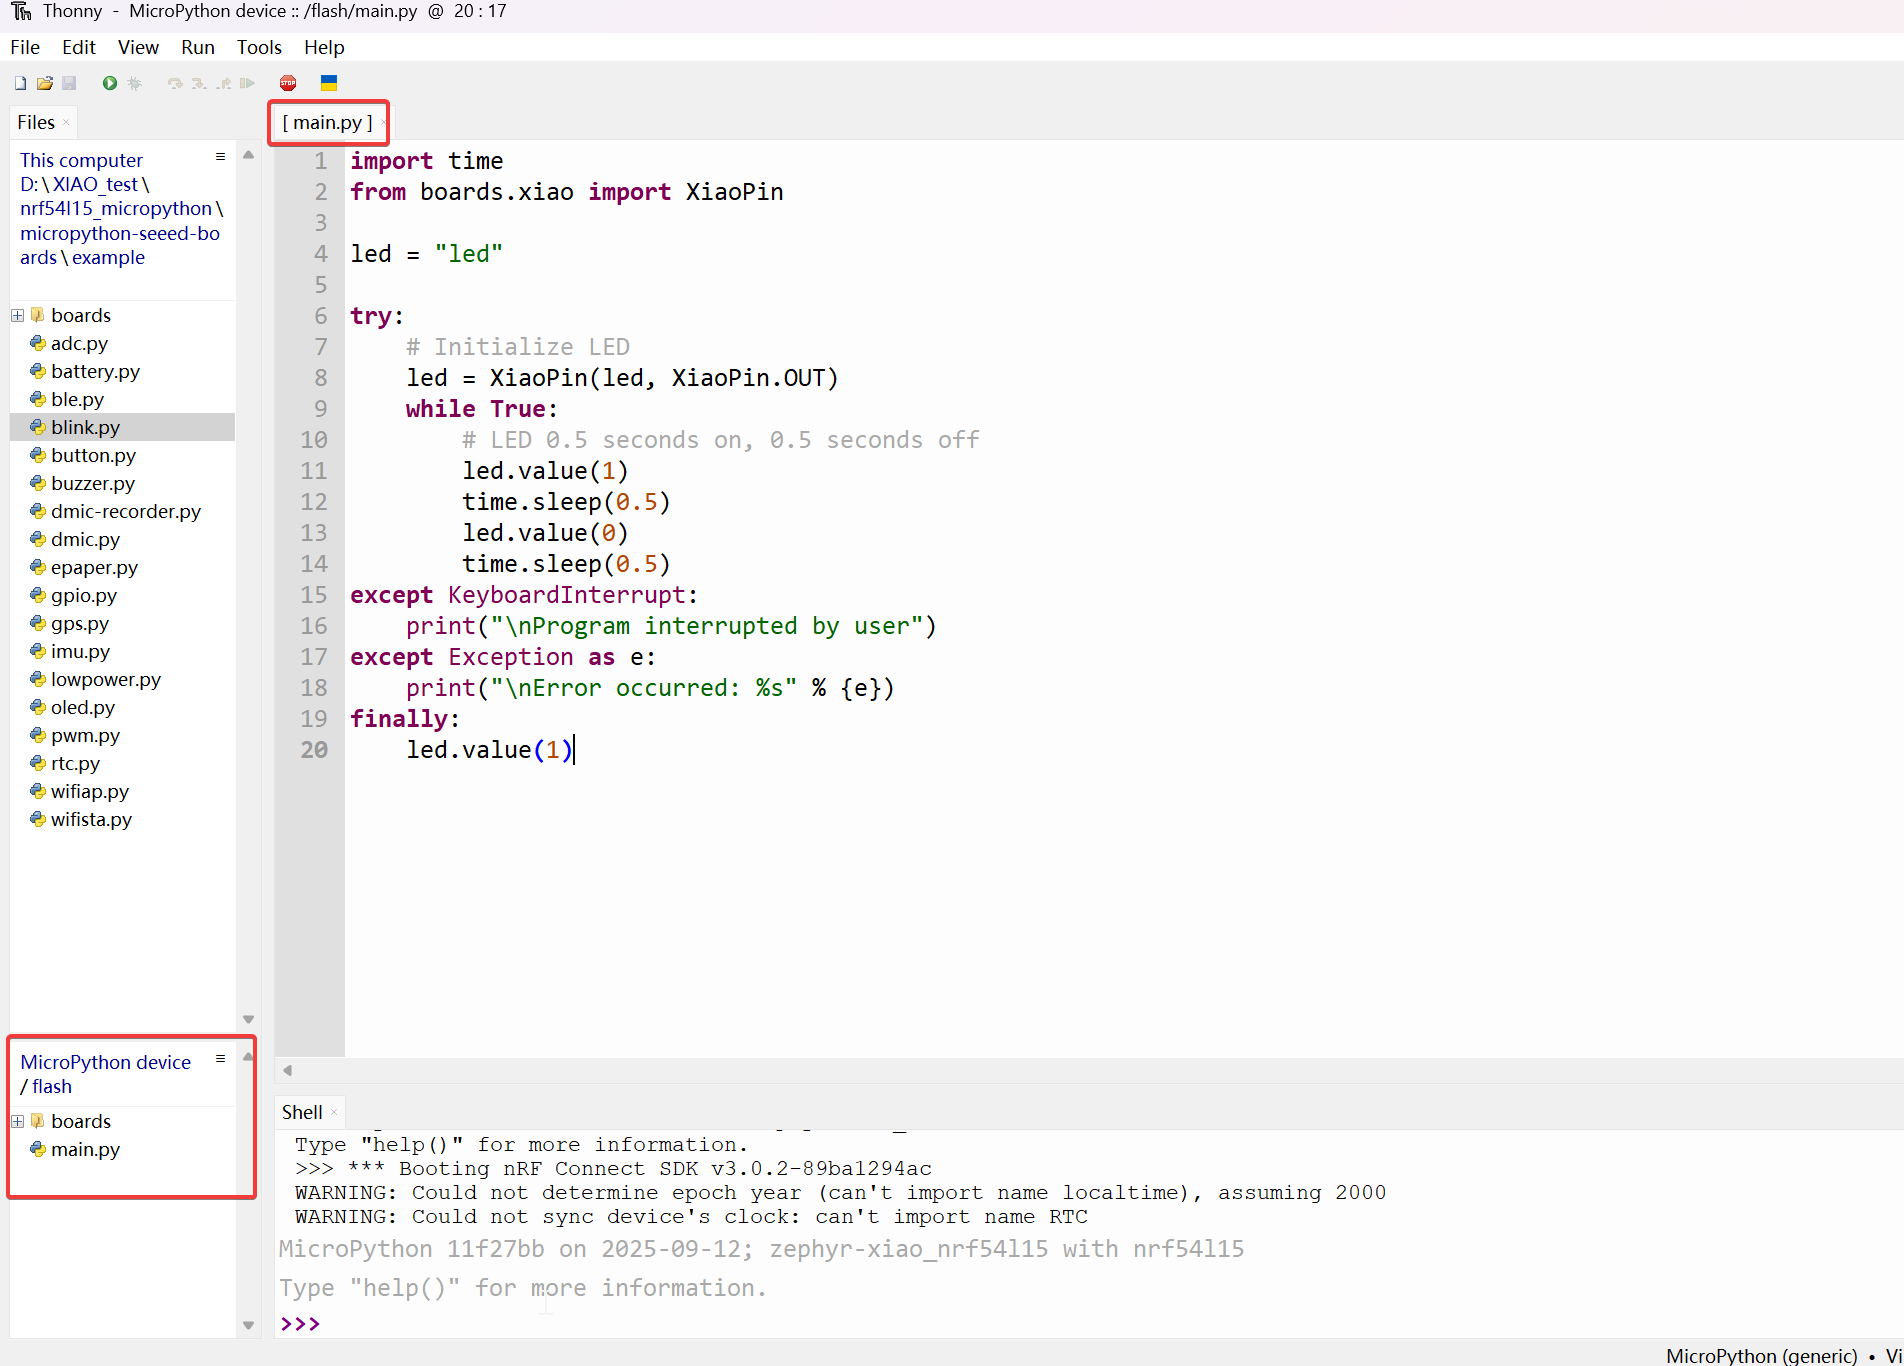
Etapa 1. Crie um novo arquivo de programa e use Ctrl + S para salvá-lo na memória flash do dispositivo MicroPython, e nomeie-o como main.py.
Vamos pegar o programa de piscar como exemplo aqui
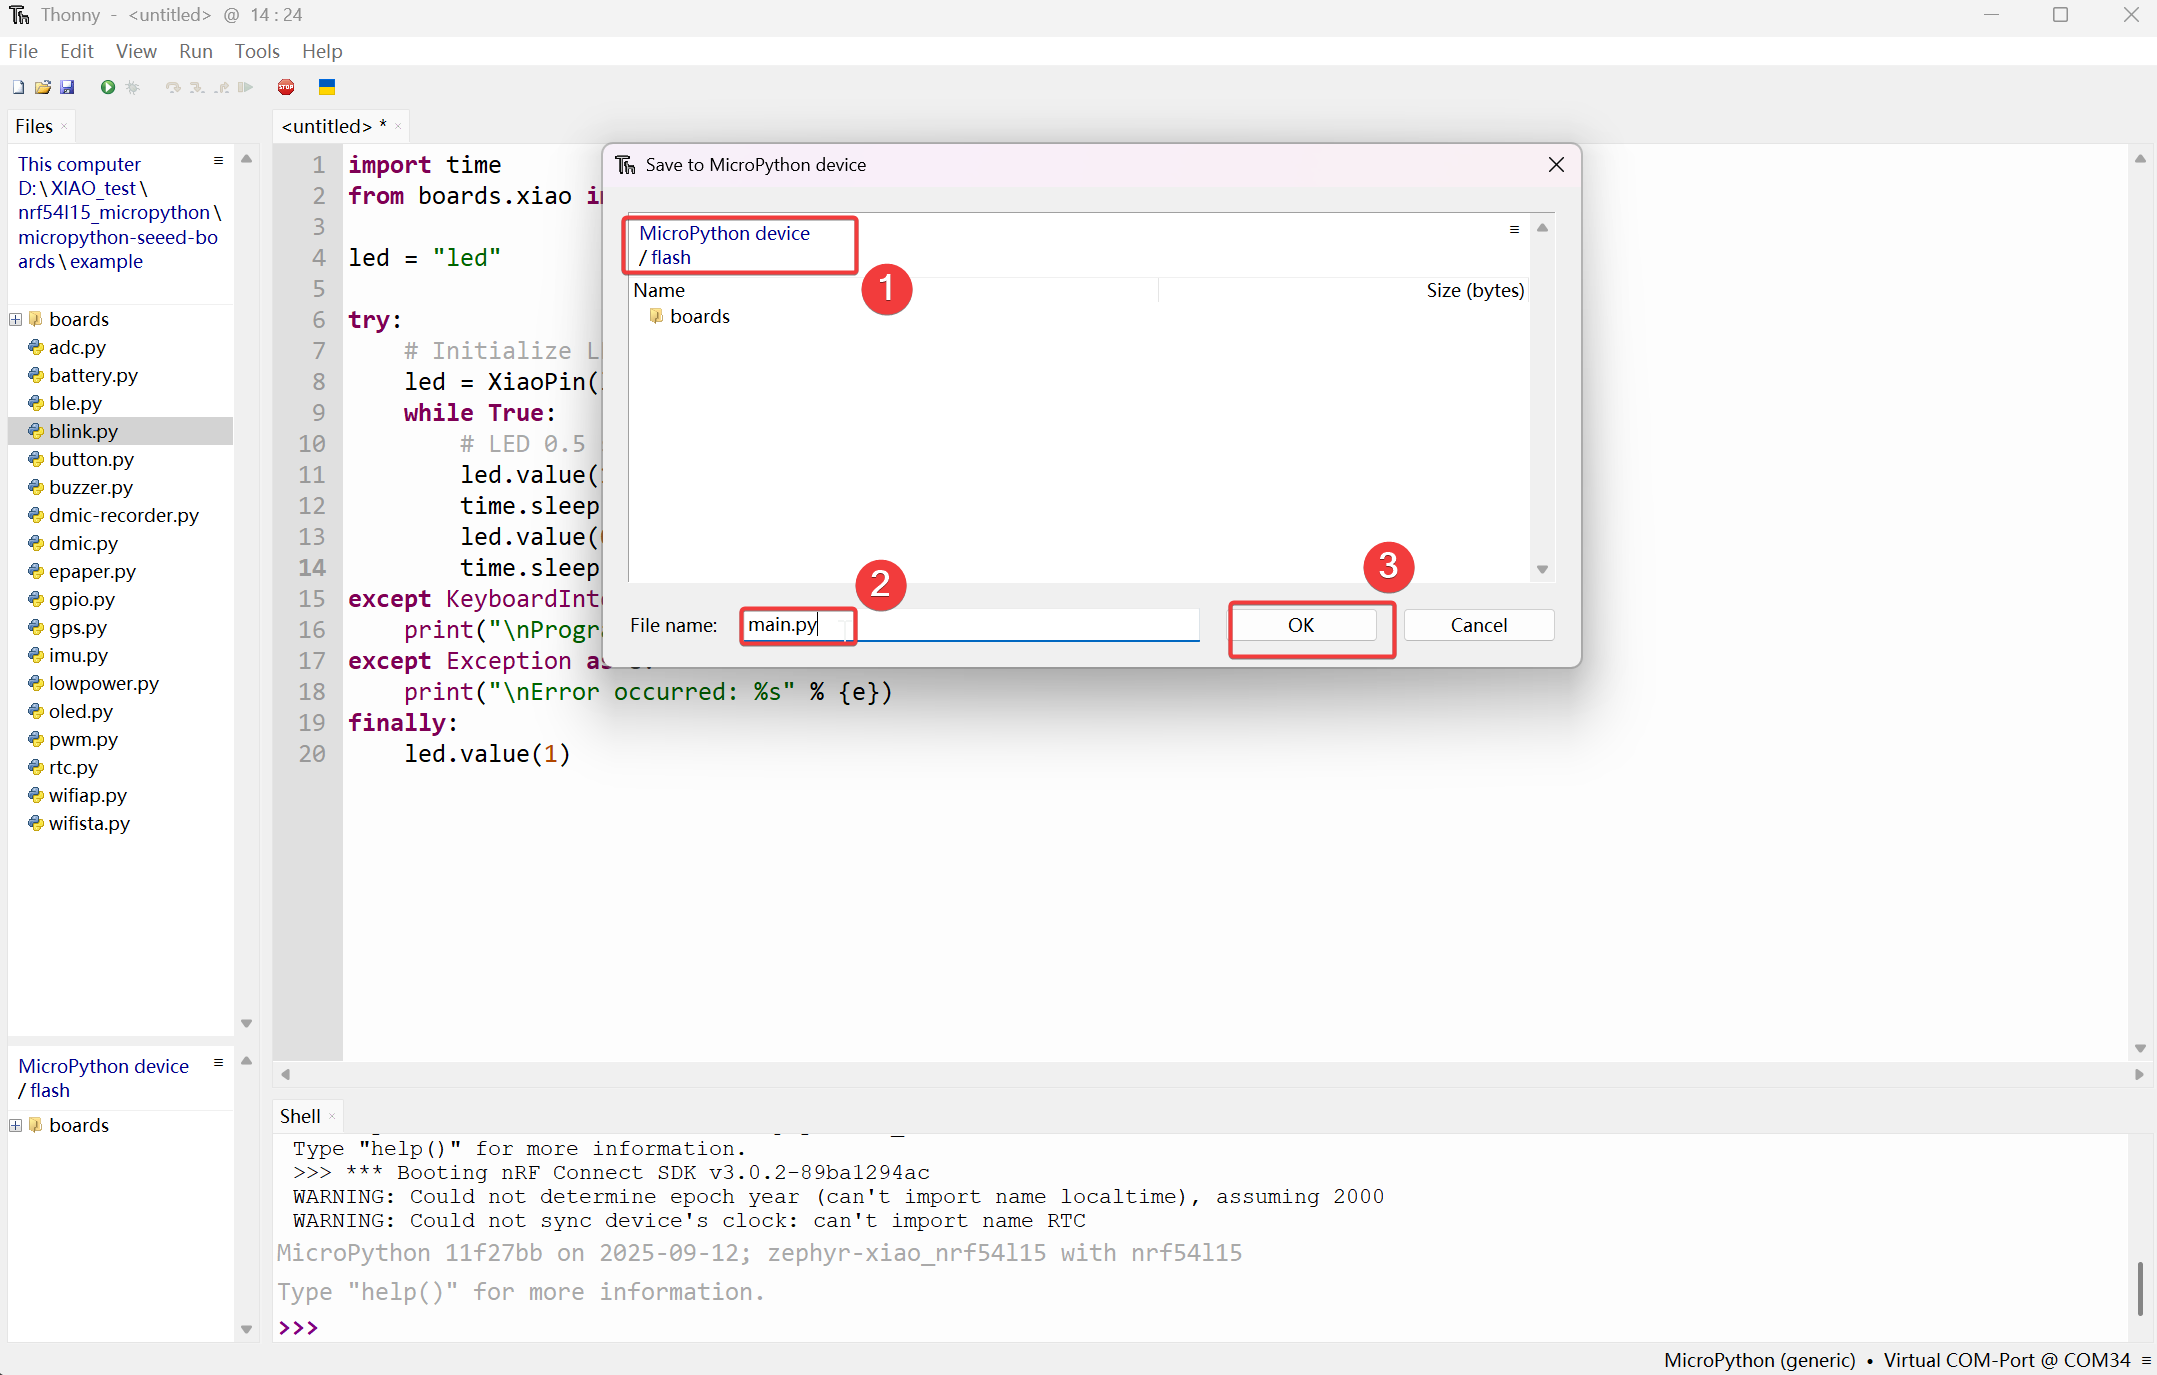
Então ele será exibido na seção MicroPython device/flash.
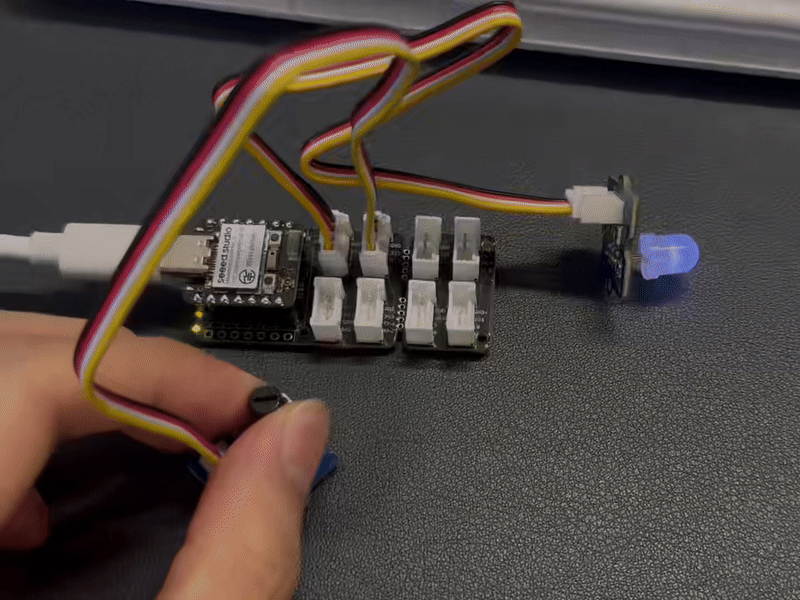
Etapa 2. Ao pressionar o botão Reset on-board, o efeito de execução automática pode ser alcançado.
efeito:
FAQ
Atualização do Bootloader
Se você encontrar uma situação em que não consegue enviar programas MicroPython usando o Thonny, pode ser porque o Bootloader usado durante a produção de fábrica era de uma versão mais antiga.
Etapa 1. Fiação
| OpenOCD / JTAG / SWD | XIAO nRF54L15 |
|---|---|
| 5V | 5V |
| GND | GND |
| SWDIO | SWDIO2 |
| SWDCLK | SWDCLK2 |
| RST | RST |
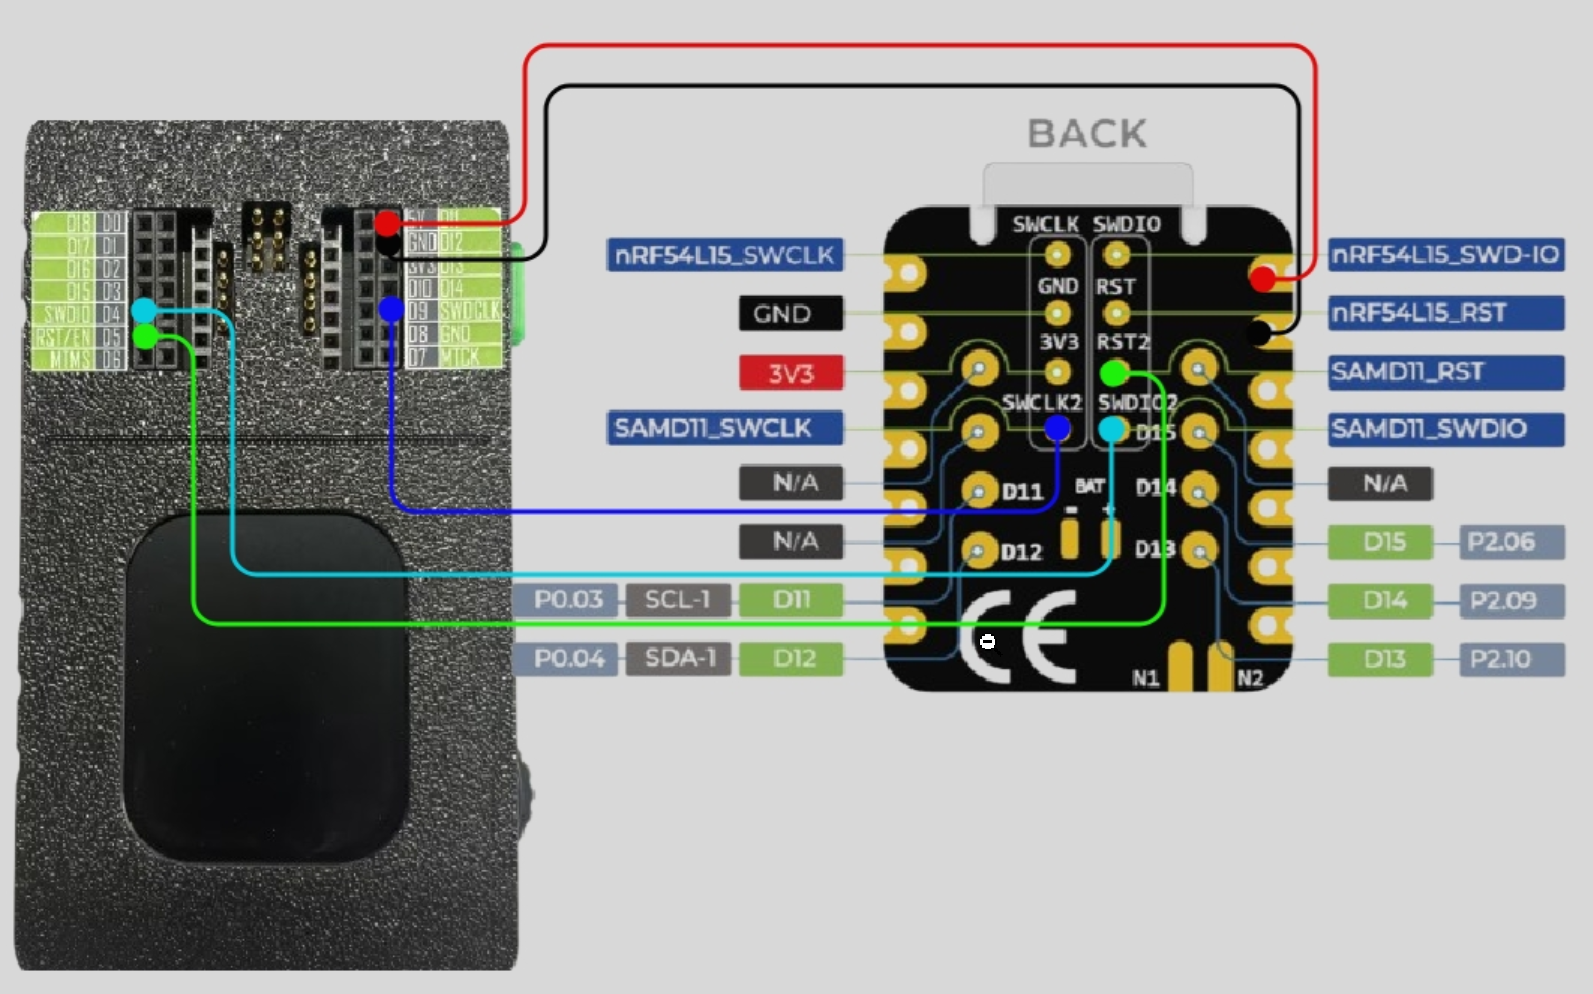
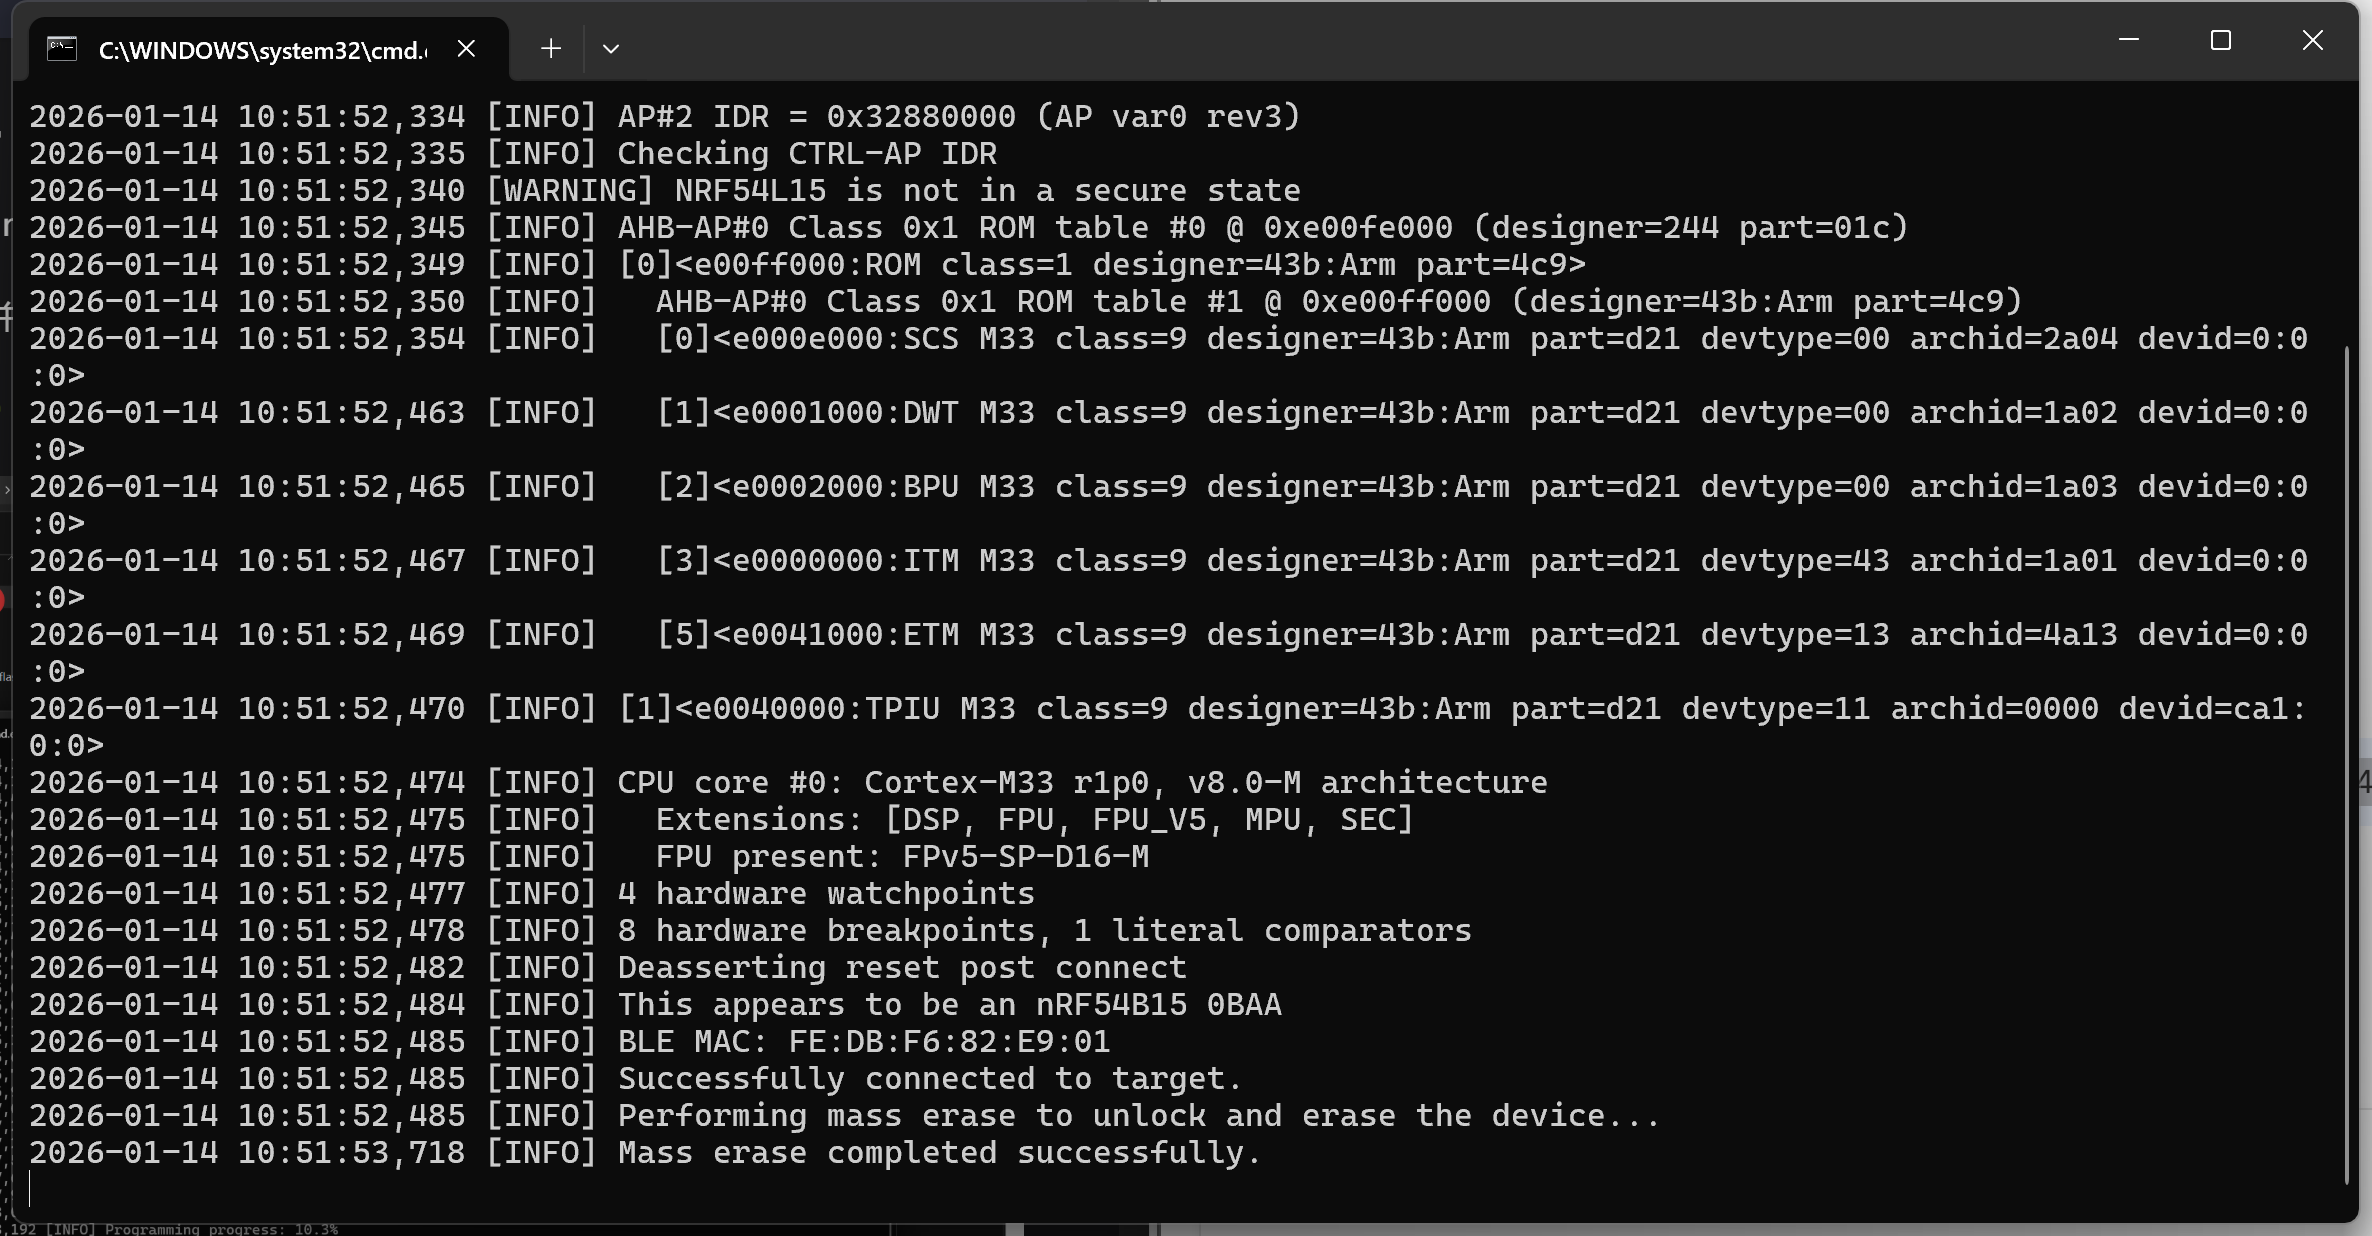
Certifique-se de que as conexões dos pinos estejam corretas para evitar que o processo de gravação falhe.
Etapa 2. Baixar o programa de gravação de firmware
Etapa 3. Executar o script
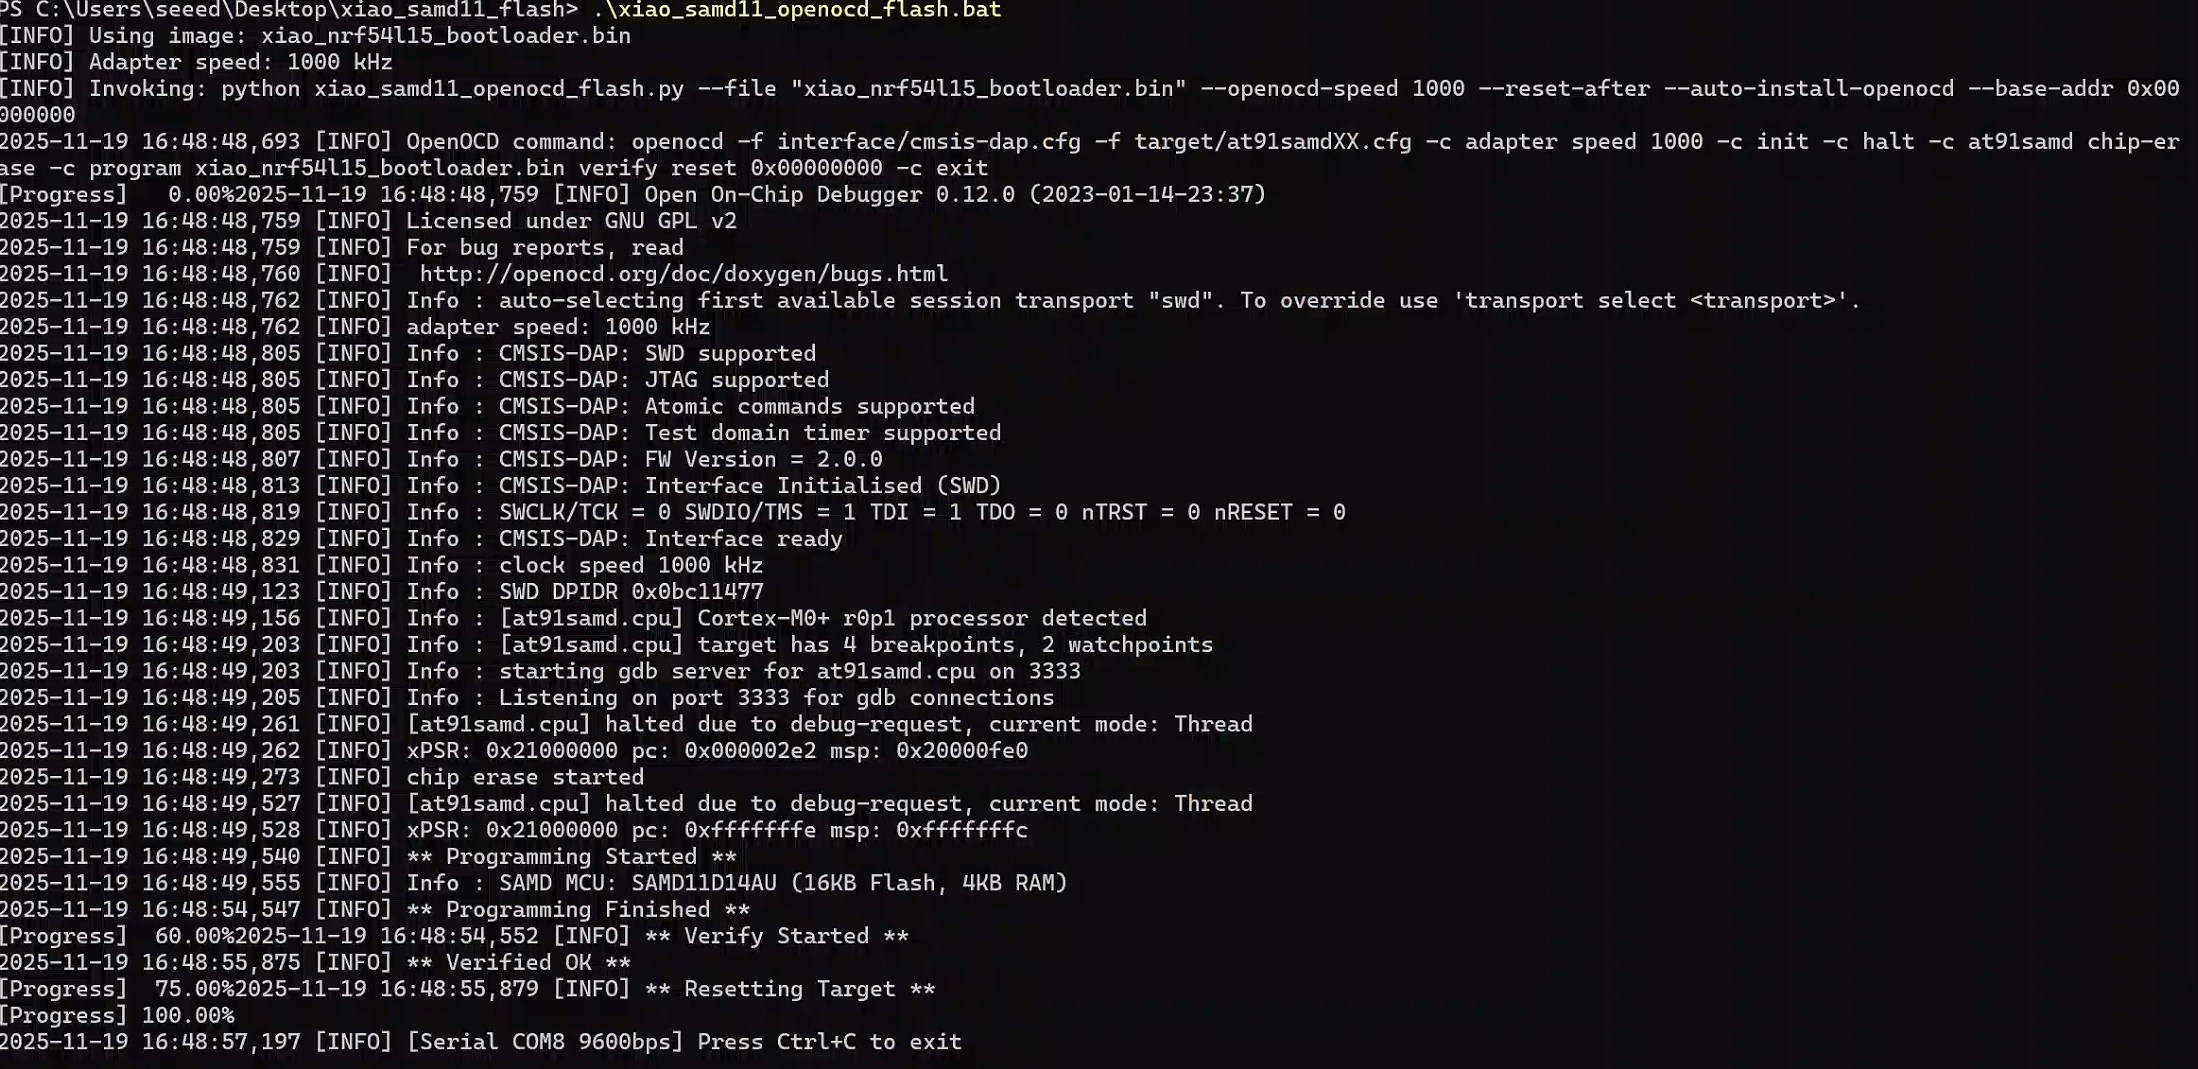
Tomando o sistema Windows como exemplo. Descompacte o arquivo baixado, clique com o botão direito na pasta e abra o terminal. Execute .\xiao_samd11_openocd_flash.bat. Se a sua fiação estiver correta, o resultado será como mostrado na figura a seguir.
Em sistemas Mac/Linux, você precisa mudar .bat para .sh
Suporte Técnico & Discussão de Produto
Obrigado por escolher nossos produtos! Estamos aqui para fornecer diferentes tipos de suporte para garantir que sua experiência com nossos produtos seja a mais tranquila possível. Oferecemos vários canais de comunicação para atender a diferentes preferências e necessidades.