Controlando E-Paper e SD Card com XIAO nRF54LM20A Sense
O XIAO nRF54LM20A oferece suporte ao desenvolvimento com módulos periféricos da série XIAO e é totalmente compatível com todo o ecossistema de desenvolvimento dos produtos XIAO. Este artigo demonstra sua compatibilidade com o ecossistema usando como exemplo o driver de ePaper e as funções de leitura/gravação de MicroSD card da série XIAO.
Este tutorial foi desenvolvido com base no sistema de build PlatformIO e no Zephyr RTOS. Se você não estiver familiarizado com a criação de um projeto para o XIAO nRF54LM20A no PlatformIO, você pode ir para Getting Sarted With Seeed Studio XIAO nRF54LM20A.
Preparação de hardware
Antes de começar, prepare um XIAO nRF54LM20A e os periféricos correspondentes.
| Seeed Studio XIAO nRF54LM20A Sense | Placa Controladora de ePaper para Seeed Studio XIAO | eInk Monocromático 2,13" | Placa de Expansão Base da Seeed Studio para XIAO |
|---|---|---|---|
 |  |  |  |
Epaer com eInk Monocromático 2,13"
Esta seção mostra como usar a ePaper Breakout Board para controlar o display eInk Monocromático 2,13" e renderizar os gráficos desejados.
Preparação de software
- Modifique o arquivo de device tree app.overlay e escreva a configuração de hardware para o driver do display alvo.
/ {
	chosen {
		zephyr,display = &ssd16xx_2in13_epaper_gdey0213b74;
	};

	mipi_dbi_2in13_epaper_gdey0213b74 {
		compatible = "zephyr,mipi-dbi-spi";
		spi-dev = <&xiao_spi>;
		dc-gpios = <&xiao_d 3 GPIO_ACTIVE_HIGH>;
		reset-gpios = <&xiao_d 0 GPIO_ACTIVE_LOW>;
		#address-cells = <1>;
		#size-cells = <0>;

		ssd16xx_2in13_epaper_gdey0213b74: ssd16xxfb@0 {
			compatible = "gooddisplay,gdey0213b74", "solomon,ssd1680";
			mipi-max-frequency = <4000000>;
			reg = <0>;
			/* Adjust to an integer multiple of 8, the actual resolution is 250x122.*/
			width = <256>;
			height = <122>;
			busy-gpios = <&xiao_d 2 GPIO_ACTIVE_HIGH>;	/* D7 */

			tssv = <0x80>;

			full {
				border-waveform = <0x05>;
			};

			partial {
				border-waveform = <0x3c>;
			};
		};
	};
};

&xiao_spi {
    status = "okay";
	cs-gpios = <&xiao_d 1 GPIO_ACTIVE_LOW>;
};
- Modifique prj.conf para habilitar as configurações de software.
CONFIG_MAIN_STACK_SIZE=4096
CONFIG_HEAP_MEM_POOL_SIZE=16384

CONFIG_LOG=y
CONFIG_LOG_DEFAULT_LEVEL=3

CONFIG_MIPI_DBI_SPI=y
CONFIG_DISPLAY=y

CONFIG_LVGL=y
CONFIG_LV_Z_MEM_POOL_SIZE=49152
CONFIG_LV_USE_MONKEY=y

CONFIG_LV_USE_LABEL=y

CONFIG_LV_USE_THEME_DEFAULT=y
CONFIG_LV_Z_VDB_SIZE=64
CONFIG_LV_COLOR_DEPTH_1=y

CONFIG_LV_FONT_MONTSERRAT_12=y
CONFIG_LV_FONT_MONTSERRAT_14=y
CONFIG_LV_FONT_MONTSERRAT_16=y
CONFIG_LV_FONT_MONTSERRAT_18=y
CONFIG_LV_FONT_MONTSERRAT_24=y

# Benchmark Demo
CONFIG_LV_USE_FONT_COMPRESSED=y
- Modifique o arquivo main.c e implemente a lógica e o conteúdo do display.
main.c
#include <zephyr/kernel.h>
#include <zephyr/device.h>
#include <zephyr/drivers/display.h>
#include <lvgl.h>
#define LOG_LEVEL CONFIG_LOG_DEFAULT_LEVEL
#include <zephyr/logging/log.h>
LOG_MODULE_REGISTER(epaper);
int main(void)
{
// Get display device
const struct device *display_dev = DEVICE_DT_GET(DT_CHOSEN(zephyr_display));
if (!device_is_ready(display_dev)) {
LOG_ERR("Display device not ready!");
return 0;
}
LOG_INF("Display device ready.");
// Initialize LVGL
// Must be called before any LVGL object creation or operation
lv_init();
// Turn off display blanking (for ePaper, this usually triggers a full refresh to clear old content)
if (display_blanking_off(display_dev)) {
LOG_ERR("Failed to turn off display blanking!");
return 0;
}
LOG_INF("Display blanking is off. Screen should be cleared by full refresh.");
// Get the current active screen and set its background to white
// This is also an LVGL-level "clear" operation to ensure the canvas is white
lv_obj_t *scr = lv_scr_act();
lv_obj_set_style_bg_color(scr, lv_color_white(), LV_STATE_DEFAULT);
lv_obj_set_style_bg_opa(scr, LV_OPA_COVER, LV_STATE_DEFAULT);
// Remove screen padding and scrollbar
lv_obj_set_style_pad_all(scr, 0, LV_STATE_DEFAULT);
lv_obj_set_scrollbar_mode(scr, LV_SCROLLBAR_MODE_OFF);
// Get display width and height (for layout)
lv_disp_t *disp = lv_disp_get_default();
lv_coord_t width = lv_disp_get_hor_res(disp);
lv_coord_t height = lv_disp_get_ver_res(disp);
LOG_INF("Display width: %d, height: %d", width, height);
// Create a centered panel
lv_obj_t *panel = lv_obj_create(scr);
lv_obj_set_size(panel, 230, 50);
lv_obj_align(panel, LV_ALIGN_CENTER, 0, 0);
// Set panel background to white, border to black for visibility
lv_obj_set_style_bg_color(panel, lv_color_white(), LV_STATE_DEFAULT);
lv_obj_set_style_border_color(panel, lv_color_black(), LV_STATE_DEFAULT);
lv_obj_set_style_border_width(panel, 2, LV_STATE_DEFAULT);
lv_obj_set_style_pad_all(panel, 10, LV_STATE_DEFAULT);
// Add text to the panel
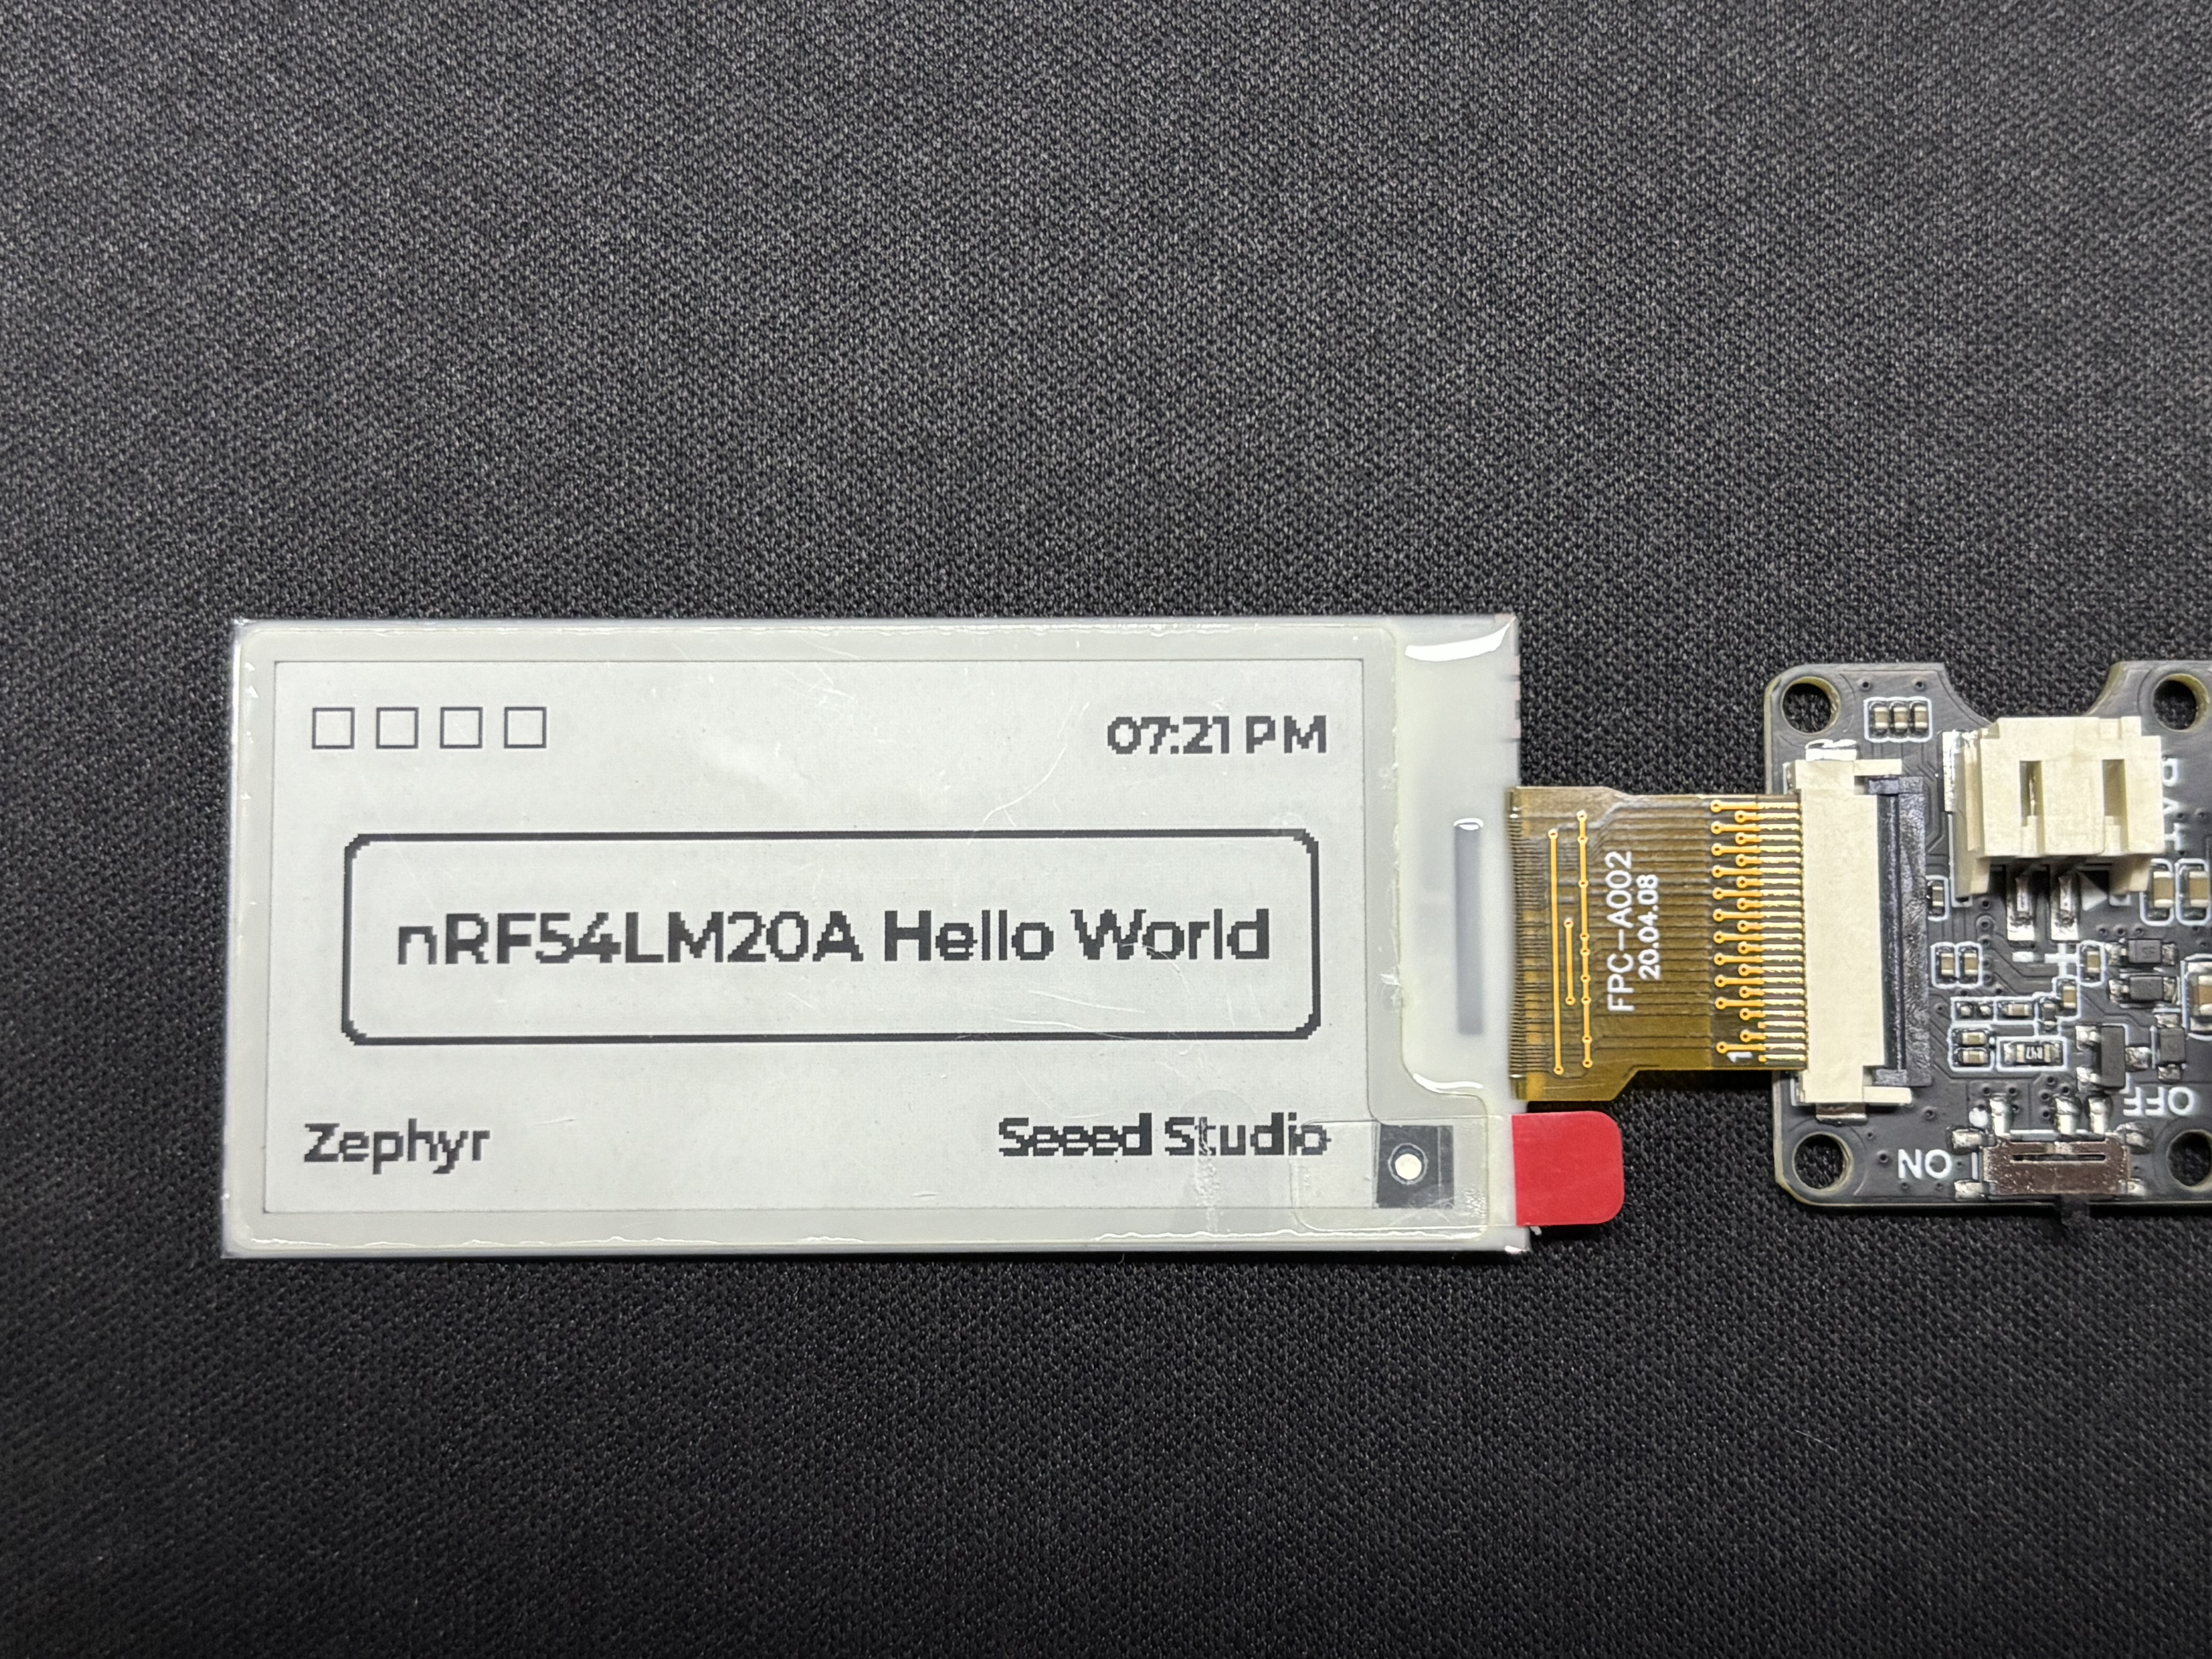
lv_obj_t *label = lv_label_create(panel);
lv_label_set_text(label, "nRF54LM20A Hello World");
// Set text color to black for visibility on white background
lv_obj_set_style_text_color(label, lv_color_black(), LV_STATE_DEFAULT);
lv_obj_set_style_text_font(label, &lv_font_montserrat_16, LV_STATE_DEFAULT);
lv_obj_align(label, LV_ALIGN_CENTER, 0, 0);
// Add a time label at the top right
lv_obj_t *time_label = lv_label_create(scr);
lv_label_set_text(time_label, "07:21 PM");
lv_obj_set_style_text_color(time_label, lv_color_black(), LV_STATE_DEFAULT);
lv_obj_set_style_text_font(time_label, &lv_font_montserrat_12, LV_STATE_DEFAULT);
lv_obj_align(time_label, LV_ALIGN_TOP_RIGHT, -11, 5);
// Add a Zephyr logo at the bottom left
lv_obj_t *zephyr_label = lv_label_create(scr);
lv_label_set_text(zephyr_label, "Zephyr");
lv_obj_set_style_text_color(zephyr_label, lv_color_black(), LV_STATE_DEFAULT);
lv_obj_set_style_text_font(zephyr_label, &lv_font_montserrat_12, LV_STATE_DEFAULT);
lv_obj_align(zephyr_label, LV_ALIGN_BOTTOM_LEFT, 5, -5);
// Add author label at the bottom right
lv_obj_t *author_label = lv_label_create(scr);
lv_label_set_text(author_label, "Seeed Studio");
lv_obj_set_style_text_color(author_label, lv_color_black(), LV_STATE_DEFAULT);
lv_obj_set_style_text_font(author_label, &lv_font_montserrat_12, LV_STATE_DEFAULT);
lv_obj_align(author_label, LV_ALIGN_BOTTOM_RIGHT, -11, -5);
// Add four squares at the top left with a for loop
lv_obj_t *squares[4];
int square_offsets = 5;
for (int i = 0; i < 4; i++) {
squares[i] = lv_obj_create(scr);
lv_obj_set_size(squares[i], 10, 10);
lv_obj_set_style_bg_color(squares[i], lv_color_white(), LV_STATE_DEFAULT);
lv_obj_set_style_border_color(squares[i], lv_color_black(), LV_STATE_DEFAULT);
lv_obj_set_style_border_width(squares[i], 1, LV_STATE_DEFAULT);
lv_obj_set_style_radius(squares[i], 0, LV_STATE_DEFAULT);
lv_obj_align(squares[i], LV_ALIGN_TOP_LEFT, square_offsets, 5);
square_offsets+=15;
}
while (1) {
lv_task_handler();
k_sleep(K_MSEC(1000)); // Lower refresh rate, suitable for ePaper
}
return 0;
}
Se você precisar controlar displays de outros tamanhos e tipos, visite o link do repositório abaixo.
Resultado
Após gravar o programa e ligar o dispositivo, o texto nRF54LM20A Hello World será exibido no display eInk monocromático de 2,13".
Cartão SD
Antes de iniciar este exemplo, além da Expansion Board Base for XIAO, você também precisa de um cartão MicroSD formatado em FAT32 com capacidade não superior a 32 GB. O slot do cartão está localizado na parte de trás da Expansion Board Base for XIAO.
Preparação de software
- Modifique o arquivo de device tree app.overlay e adicione configurações de protocolo SPI para operações de leitura e gravação no cartão SD.
&xiao_spi {
	status = "okay";
	cs-gpios = <&xiao_d 2 GPIO_ACTIVE_LOW>;

	sdhc0: sdhc@0 {
		compatible = "zephyr,sdhc-spi-slot";
		reg = <0>;
		status = "okay";
		mmc {
			compatible = "zephyr,sdmmc-disk";
			disk-name = "SD";
			status = "okay";
		};
		spi-max-frequency = <24000000>;
	};
};
- Habilite a configuração de software SPI em prj.conf.
CONFIG_DISK_ACCESS=y
CONFIG_LOG=y

# Enable SDHC interface
CONFIG_DISK_DRIVERS=y
CONFIG_DISK_DRIVER_SDMMC=y

# Allocate buffer on RAM for transferring chunk of data
# from Flash to SPI — increased from 8 to 64 for SD card reliability
CONFIG_SPI_NRFX_RAM_BUFFER_SIZE=64
# SDHC driver for SD card interface
CONFIG_SDHC=y

# FAT filesystem for SD card
CONFIG_FILE_SYSTEM=y
CONFIG_FAT_FILESYSTEM_ELM=y
CONFIG_FS_FATFS_LFN=y
CONFIG_FS_FATFS_LFN_MODE_STACK=y
CONFIG_FS_FATFS_EXFAT=y
CONFIG_FS_FATFS_MAX_LFN=255

# Increased stack and heap sizes for SD card operations
CONFIG_SYSTEM_WORKQUEUE_STACK_SIZE=16384
CONFIG_HEAP_MEM_POOL_SIZE=16384
CONFIG_MAIN_STACK_SIZE=32000
CONFIG_IDLE_STACK_SIZE=8192

# Shell for filesystem operations
CONFIG_SHELL=y
CONFIG_SHELL_STACK_SIZE=16000
CONFIG_FILE_SYSTEM_SHELL=y
- Adicione a lógica para gravar dados no cartão SD em main.c. Como o código é bastante extenso, recomenda-se consultar o código de exemplo no repositório.
Resultado
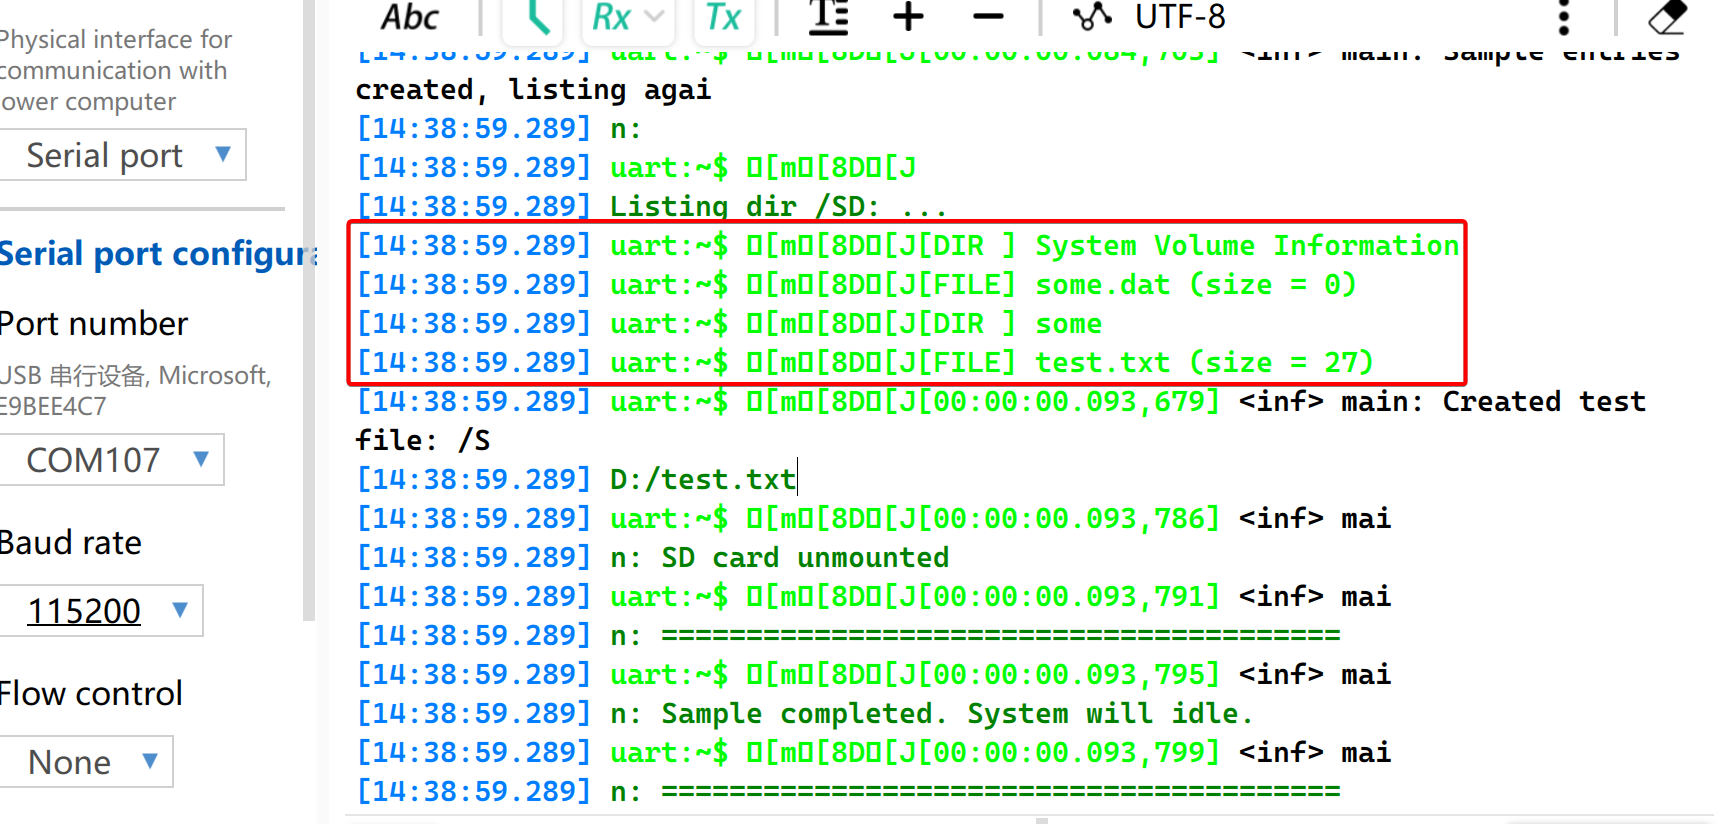
- Insira o cartão MicroSD no slot da Expansion Board for XIAO. Ligue o dispositivo e abra o monitor serial. O sistema lerá o tamanho do cartão SD, testará a função de montagem e, em seguida, gravará arquivos.
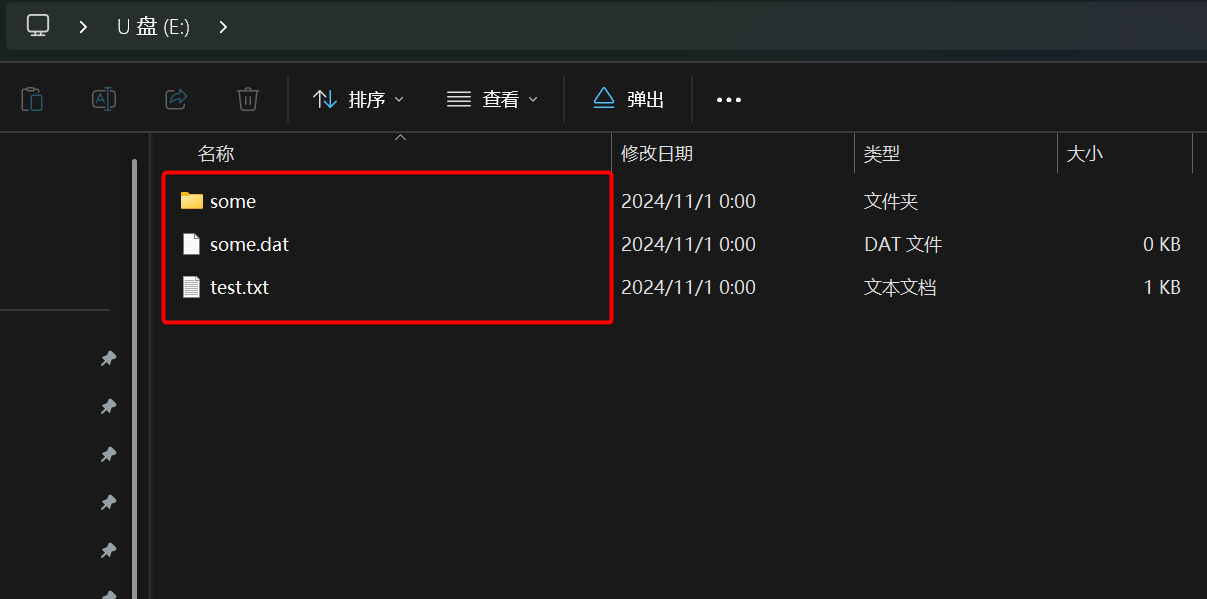
- Crie uma nova pasta chamada
some - Crie um novo arquivo chamado
some.dat - Crie um novo arquivo chamado
test.txte escreva conteúdo nele
- Use um leitor de cartões para acessar o cartão SD e você encontrará os três arquivos criados com conteúdo dentro.
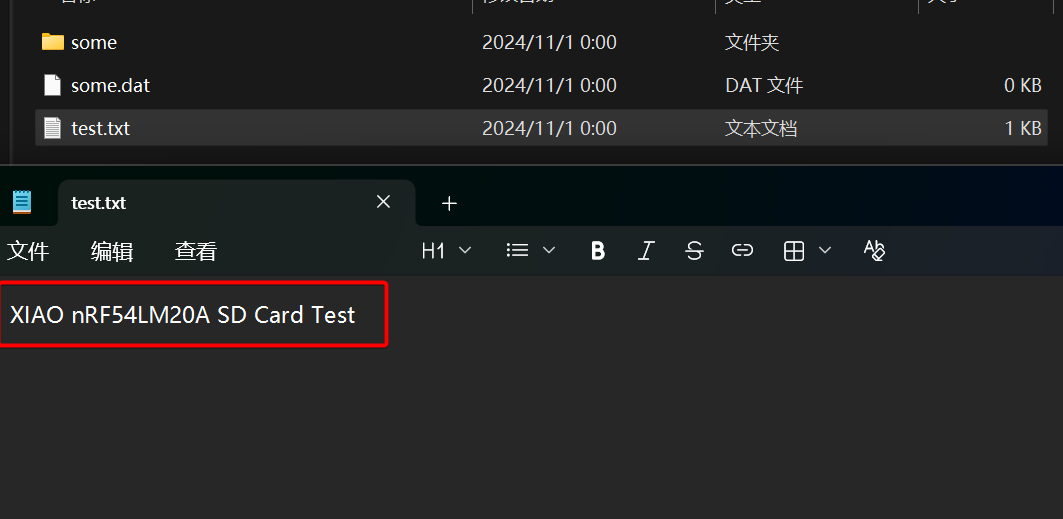
- Abra o arquivo TXT. Seu conteúdo é
XIAO nRF54LM20A SD Card Test, o que verifica a gravação bem-sucedida no cartão SD.
Resumo
Com os exemplos acima, você agora deve ter um bom domínio do uso do display ePaper e do cartão MicroSD no XIAO nRF54LM20A. Sinta-se à vontade para compartilhar suas ideias com a comunidade de código aberto.
Suporte técnico e discussão sobre o produto
Obrigado por escolher nossos produtos! Estamos aqui para oferecer diferentes tipos de suporte para garantir que sua experiência com nossos produtos seja a mais tranquila possível. Oferecemos vários canais de comunicação para atender a diferentes preferências e necessidades.