Flash JetPack OS to A203 Carrier Board (NVIDIA Jetson Nano & NVIDIA Jetson Xavier NX supported)
In this wiki, we will show you how to flash Jetpack OS to the A203 Carrier Board which supports both NVIDIA Jetson Nano module and NVIDIA Jetson Xavier module. We here will introduce you two ways to flash the system, and because the A203 Carrier Board is different to the official NVIDIA Jetson Carrier Board, the corresponding dirver should be installed as well.

Getting Started
We can use NVIDIA SDK manager and Linux terminal to flash the system, or we can easily do this by using the Linux Terminal. For people who have Linux knowledge base, we highly recommand using Linux Terminal only.
- Flashing JetPack OS via NVIDIA SDK manager and Linux terminal
- Flashing JetPack OS via Linux terminal
There are still some preparation that we need first:
Software Preparation
- NVIDIA account
- Linux Host Computer with Ubuntu 18.04 OS (or above)
!!!note In this tutorial, we will use Ubuntu 18.04 LTS based system to complete the installation.
Hardware Preparation (Force Recovery Mode)
Before we can move on to the installation steps, we need to make sure that the board is in the force recovery mode. There are different types of the board, please note the difference.
Step 1. First, we need to disconnect power of the board.
Step 2. To enter recovery mode, you need to connect FC REC and GND using jumpers.
 |  | ||||||
| A203 Carrier Boards | A203 V2 Carrier Boards | ||||||
|---|---|---|---|---|---|---|---|
| Pin | Description | Pin | Description | Pin | Description | Pin | Description |
| 1 | GND | 5 | PWR_BTN- | 1 | SYS_RST | 8 | LATCH_SET |
| 2 | GND | 6 | RECOVERY | 2 | GND | 9 | GND |
| 3 | GND | 7 | RST | 3 | RECOVERY | 7 | UART2_RXD |
| 4 | GND | 8 | PWR_BTN+ | 4 | GND | 11 | CAN_L |
| 5 | PWR_BTN- | 12 | GND | ||||
| 6 | GND | 13 | CAN_H | ||||
| 7 | LATCH_SET_BUT | 14 | GND | ||||
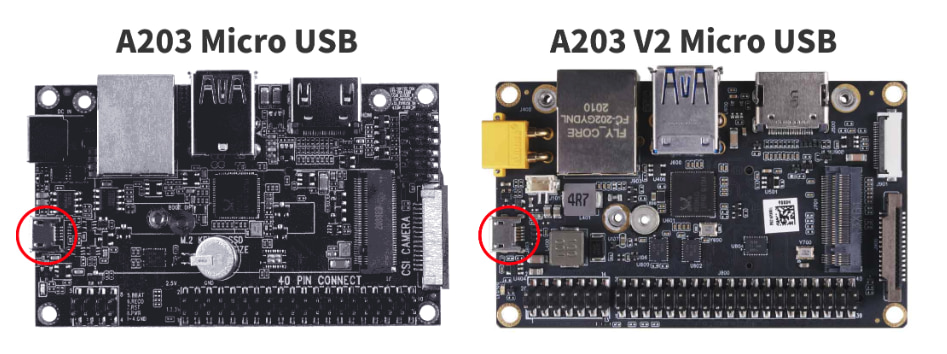
Step 3. Connect your carrier board and your Linux host PC with a Micro USB link
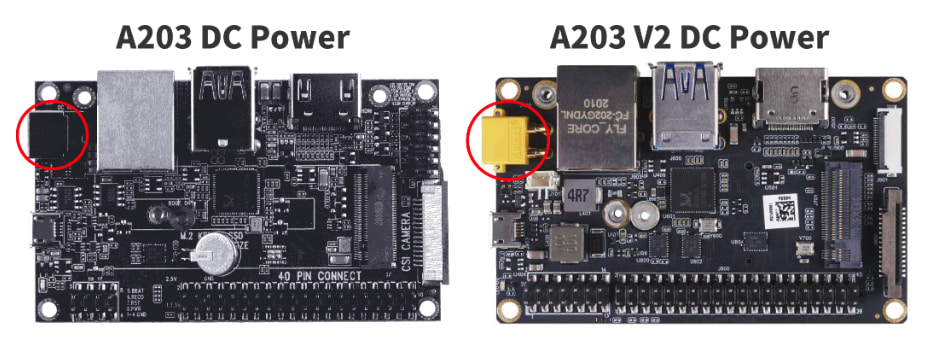
Step 4. Power up the board with a DC Power adapter.
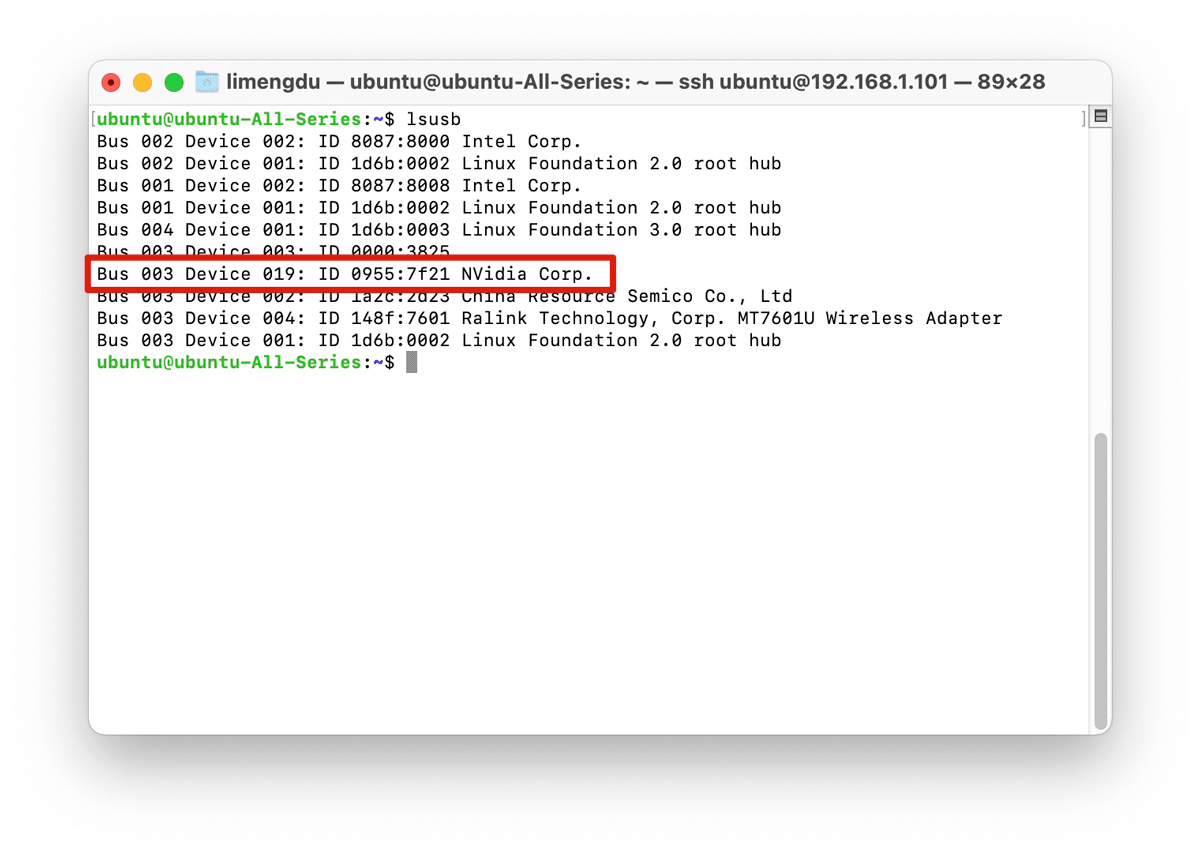
Step 5. On the Linux host PC screen, we can right click the mouse to open a Terminal and enter the command lsusb. When the returned content has the NVidia Corp. in it, it means that your A203 Carrier Board is in force recovery mode and you can proceed to the subsequent operations.
The ID depends on the modules on the carrier board and the information show as below:
- For Jetson Nano: 0955:7f21 NVidia Corp
- For Jetson Xavier NX: 0955:7e19 NVidia Corp
- For Jetson TX2 NX: 0955:7c18 NVidia Corp
Flashing JetPack OS via NVIDIA SDK Manager
Next we will go through the tutorial about installing the system via NVIDIA SDK Manager. The an NVIDIA SDK Manager all-in-one tool that bundles developer software and provides an end-to-end development environment setup solution for NVIDIA SDKs.
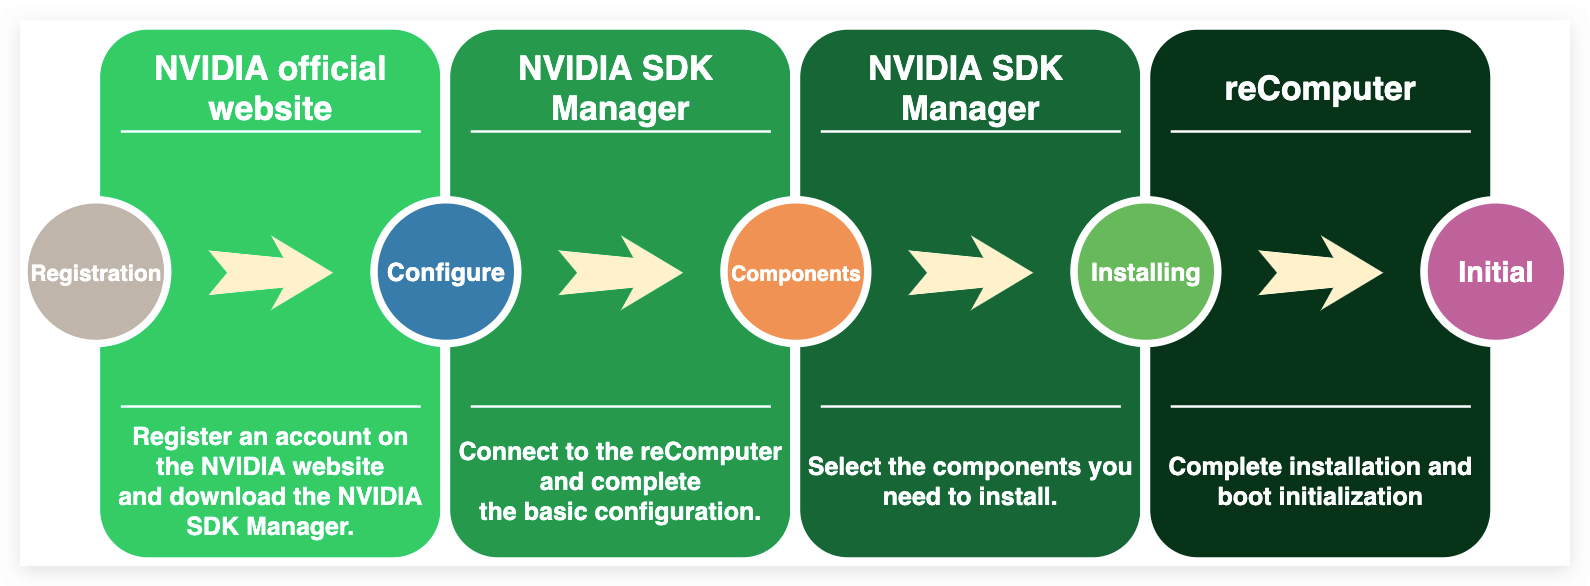
Step 1. Install NVIDIA SDK Manager on the Linux Host PC
We need to open the browser on the Linux Host PC and download the NVIDIA SDK Manager from the NVIDIA official website.
Step 2. Open NVIDIA SDK Manager and login
On the Linux host PC screen, we can right click the mouse and open a Terminal. Then we can type the command below to start the SDK Manager:
sdkmanager
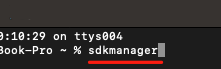
The first time you use NVIDIA SDK Manager, a web page will pop up prompting you to log in with your previously registered NVIDIA account.
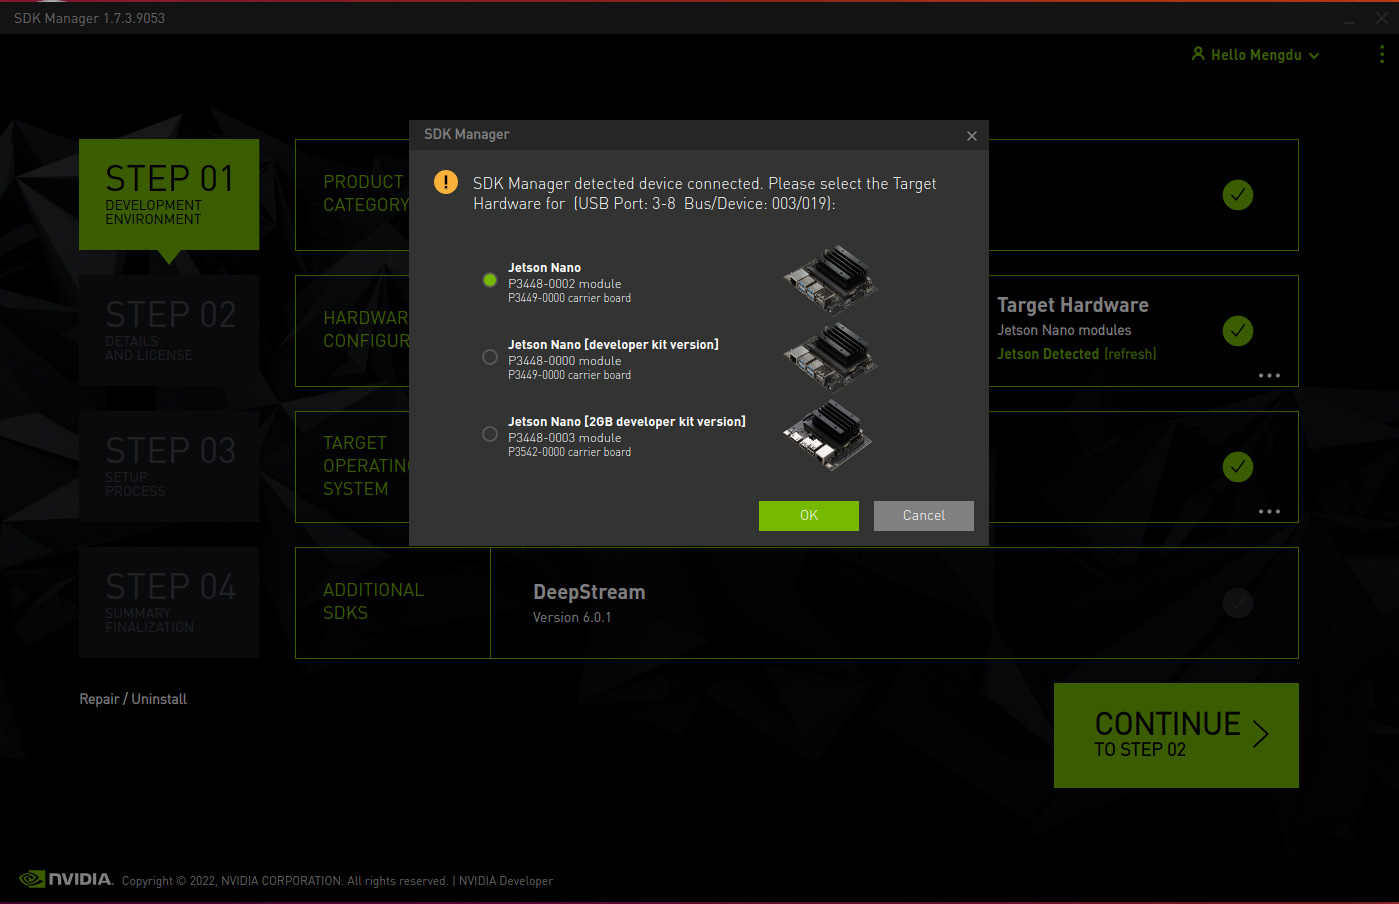
Step 3. Select the target device
After logging in, you will be taken to the first screen where the first step of installing. Since we have already connected the board, there will be a window pop up to let you select the hardware device.
The example here is equipping with the NVIDIA Jetson Nano 4GB module, so we can choose the first one.
There are more selections for you to choose in the first screen:
- The Jetson in the Product Category panel need to be selected.
- In the Hardware Configuration panel, we recommend that you do not select Host Machine. This will take more time to install the NVIDIA components for your current Ubuntu host. You can choose it if you need.
- In the Target Operating System panel, we can select different operating system and JetPack version. But be careful the version of JetPack, different modules may support different type of JetPack. We recommand "JetPack 4.6.1" here.
- In the Additional SDKs, since the storage space of eMMC is only 16GB, it will be out of memory if we install DeepStream here.
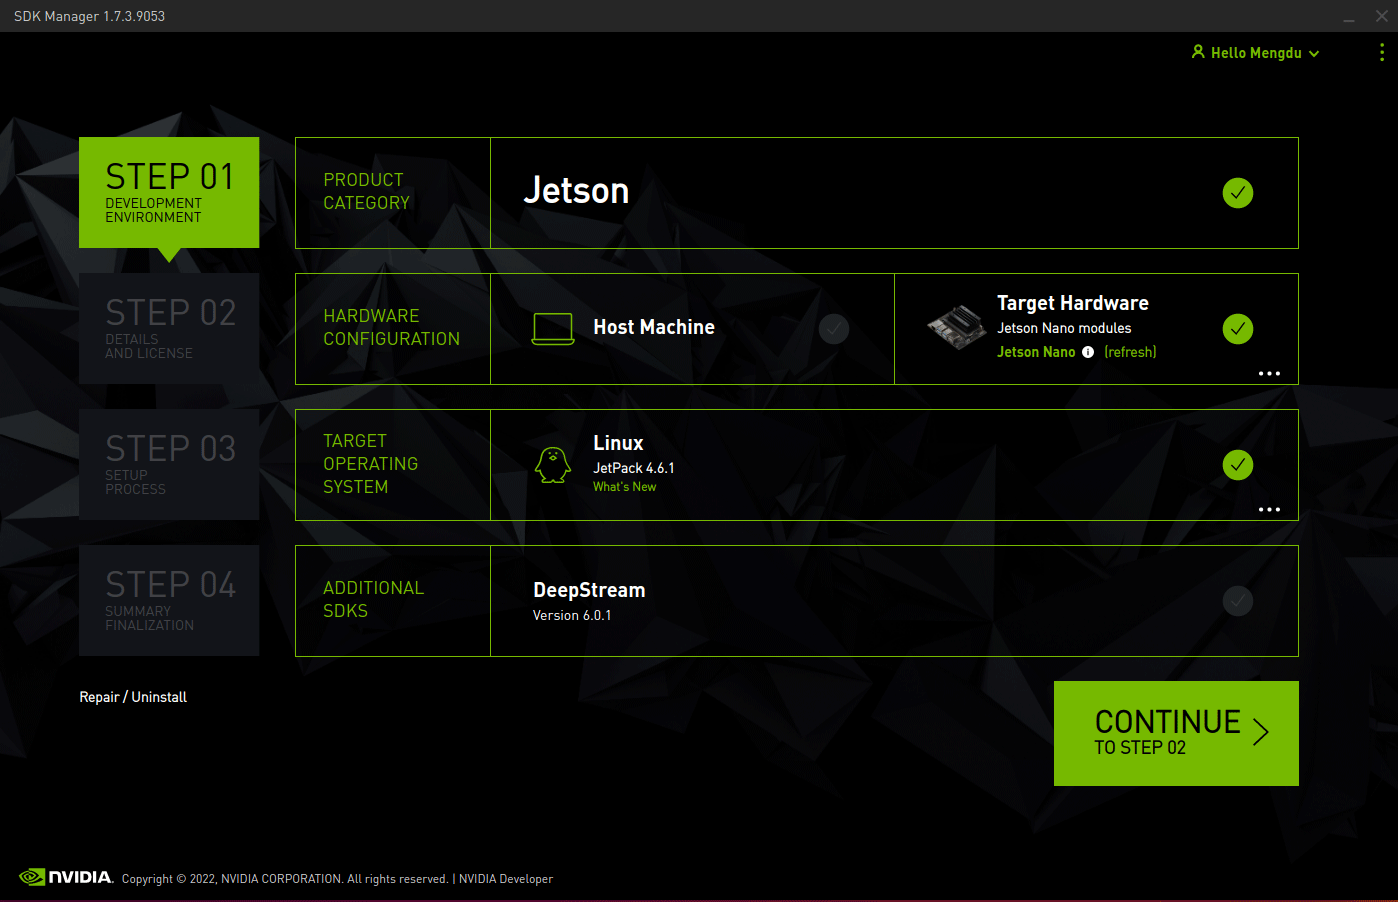
Click Continue to proceed to the next step.
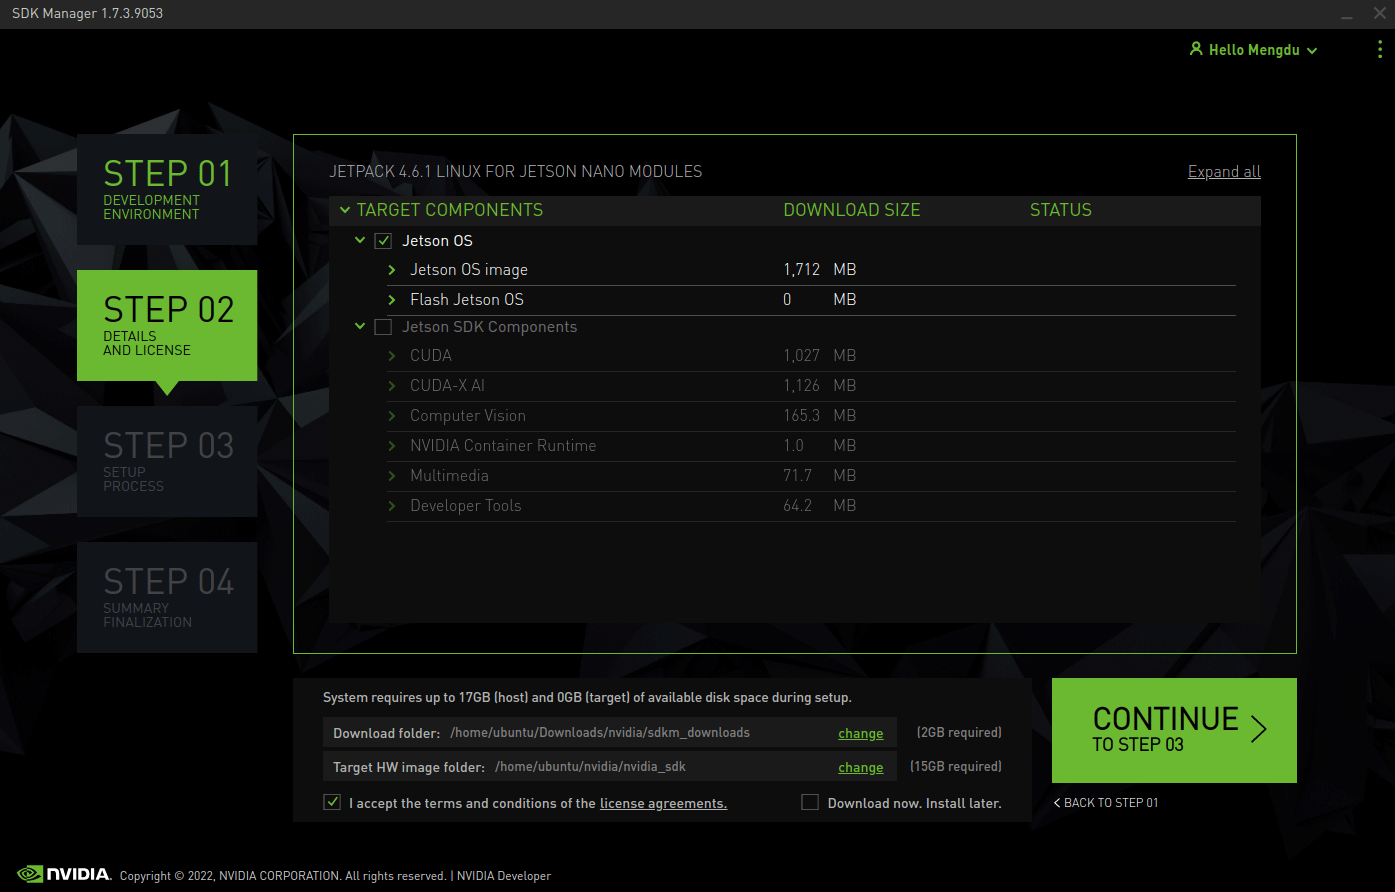
Step 4. Review wanted components
From Details and License, you can expand the host components and target components panels to review the components that will be installed on your system.
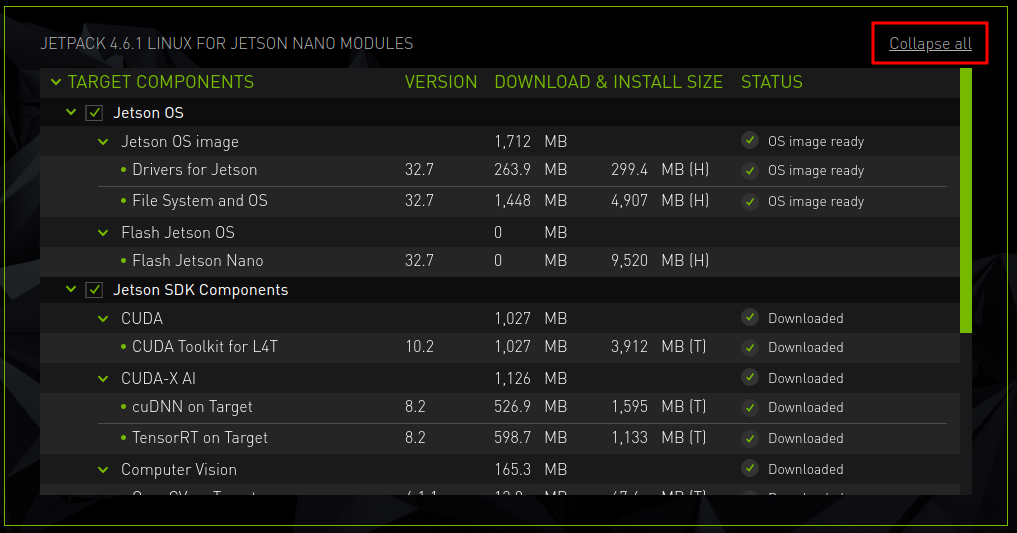
If you only need to install the system, you can uncheck the SDK component.
!!!Tip When choosing which components to install, you may want to keep an eye on the capacity used. The built-in eMMC size is only 16GB, please allocate and use this space wisely according to your actual needs.

After actual testing, there is only about 500MB of eMMC space left after installing the full set of SDK components.
If you want to check how to solve the problem of insufficient capacity, please refer to Troubleshooting.
If you want SDK Manager to download all the files to a location other than the default path, go to the Download & Install Options located at the bottom of the screen, then select the path you wish to use.
And because the A203 carrier board requires a flash drive, please make sure to check the Download now. Install later. box first to download the system but not install it.

Select Continue to proceed to the next step.
At this point the system will start downloading to the path of your choice, so we can take advantage of this time to get the driver ready.
Step 5. Choose Proper Drivers
Now, we need to install the driver as well to make sure each component on the board is working. First we need to choose the driver files in Ubuntu host according to the carrier board and the module.
| Carrier Board | Jetson Module | JetPack Version | L4T Version | Download Address |
|---|---|---|---|---|
| A203/ A203V2 | Jetson Nano eMMC | 4.6 | 32.6.1 | Download |
| A203/ A203V2 | Jetson Xavier NX eMMC | 4.6 | 32.6.1 | Download |
| A203/ A203V2 | Jetson Xavier NX SD | 4.6 | 32.6.1 | Download |
| A203/ A203V2 | Jetson TX2NX eMMC | 4.6 | 32.6.1 | Download |
| A203/ A203V2 | Jetson Xavier NX eMMC | 5.0.2 | 35.1.0 | Download |
| A203/ A203V2 | Jetson Xavier NX eMMC | 5.1.4 | 35.6.0 | Download |
!!!Note There are two JetPack 5.0.2 drivers for A203 included in the downloaded files. Both work fine, except that one of them supports IMX-219 camera and the other one supports IMX-477 camera.
Step 6. Unzip the Driver in the system folder
!!!Attention Please note, make sure that the SDK Manager has completed the download of the system before proceeding with this step!
In the Linux host PC, we need to replace some files in the official image with the downloaded driver package files. Since we are using SDK Manager here, the position(path) of the official image is:
/home/<username>/nvidia/nvidia_sdk/JetPack_<version num>_Linux_<board name>_TARGETS/Linux_for_Tegra
Replace the Files
!!!Attention
Before replacing the files, you can choose to make a backup of the .dtb file that will be replaced in the kernel folder and save it temporarily in another path so that you can restore the official download at any time.
We can drag the file into the official one:

Or we can execute the following command to replace the files:
cp -a -f ${Drive package kernel path} ${Officially unpacked Linux_for_Tegra path}
!!!Note
${} is the use of environment variables.
${Drive package kernel path} indicates the full path to the kernel image folder
${Officially unpacked Linux_for_Tegra path} indicates the full path to the officially provided folder Linux_for_Tegra folder after the L4T zip package is extracted.
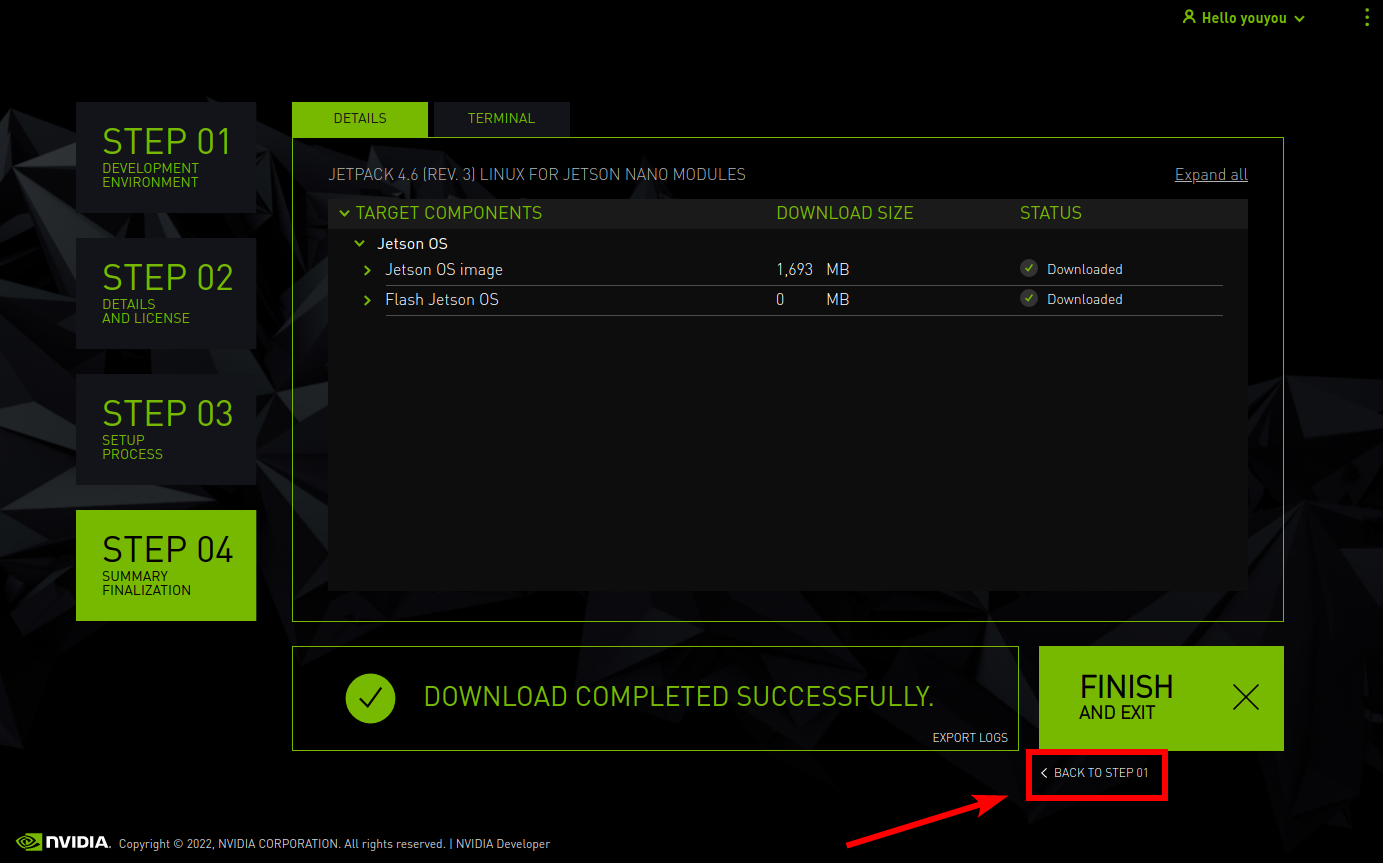
Step 7. Installing system
As we chose to install the system later earlier, we will need to redo steps 3 to 4 earlier at this point, which will install the system on the A203 with the driver files already replaced.
Before the installation begins, SDK Manager prompts you to enter your sudo password.
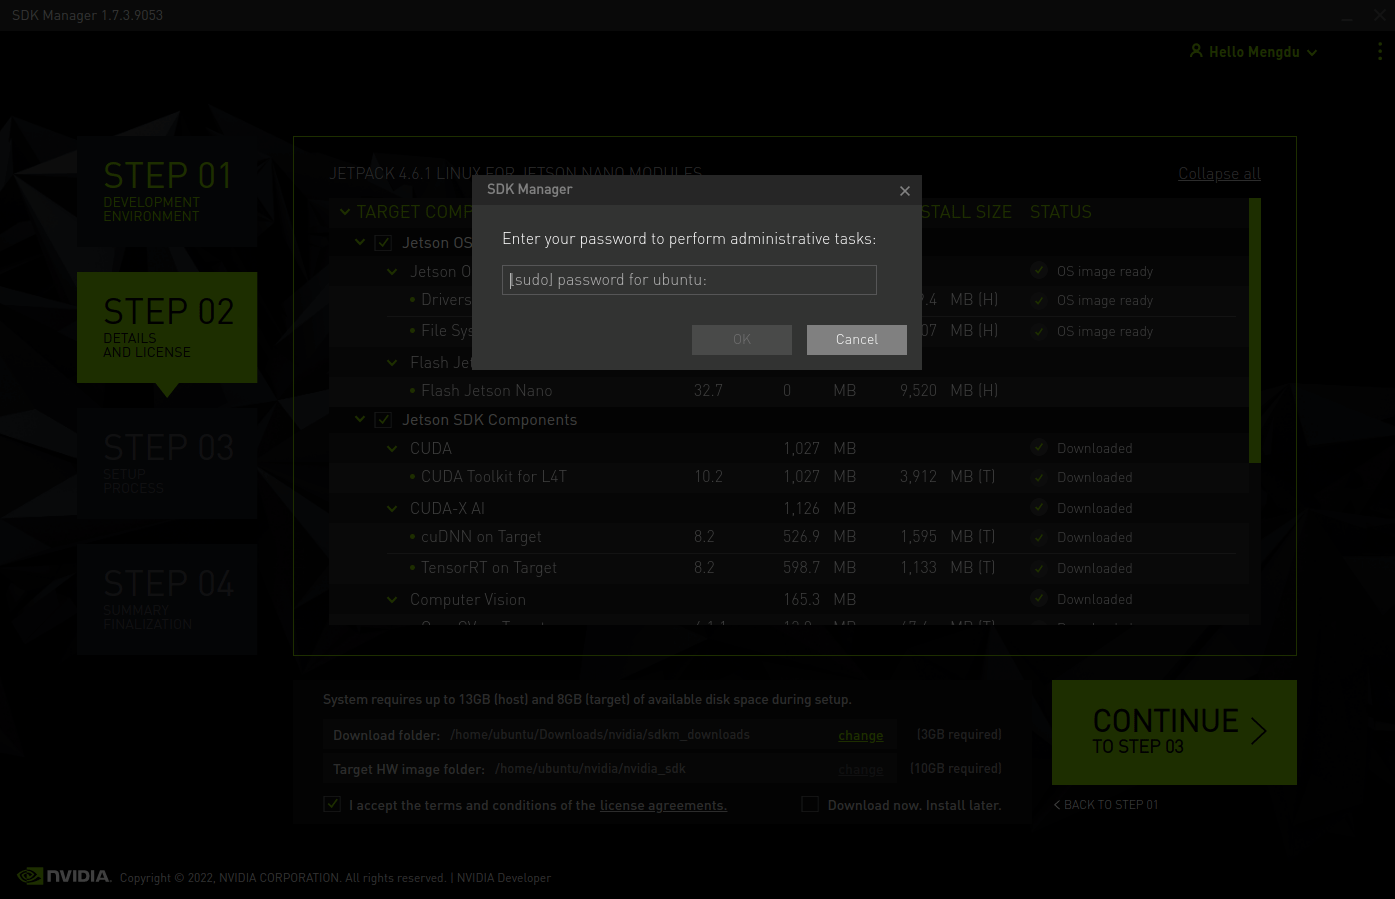
SDK Manager supports two options to put your Jetson target into Force Recovery Mode. We understand the operation of Jetson-202 Carrier Board into force recovery mode and have already been in force recovery mode in the previous steps. So we select Manual setup: set the target to Force Recovery Mode via manual operations.
You can also choose whether to pre-configure the OEM configuration.
- Pre-Config: SDK Manager will flash the target with the predefined configuration, and there is no need to complete the System Configuration Wizard after flashing.
- Runtime: No default configuration is set on the target, and you will need to manually complete the System Configuration Wizard after flashing.
Here, we select the default Pre-Config.
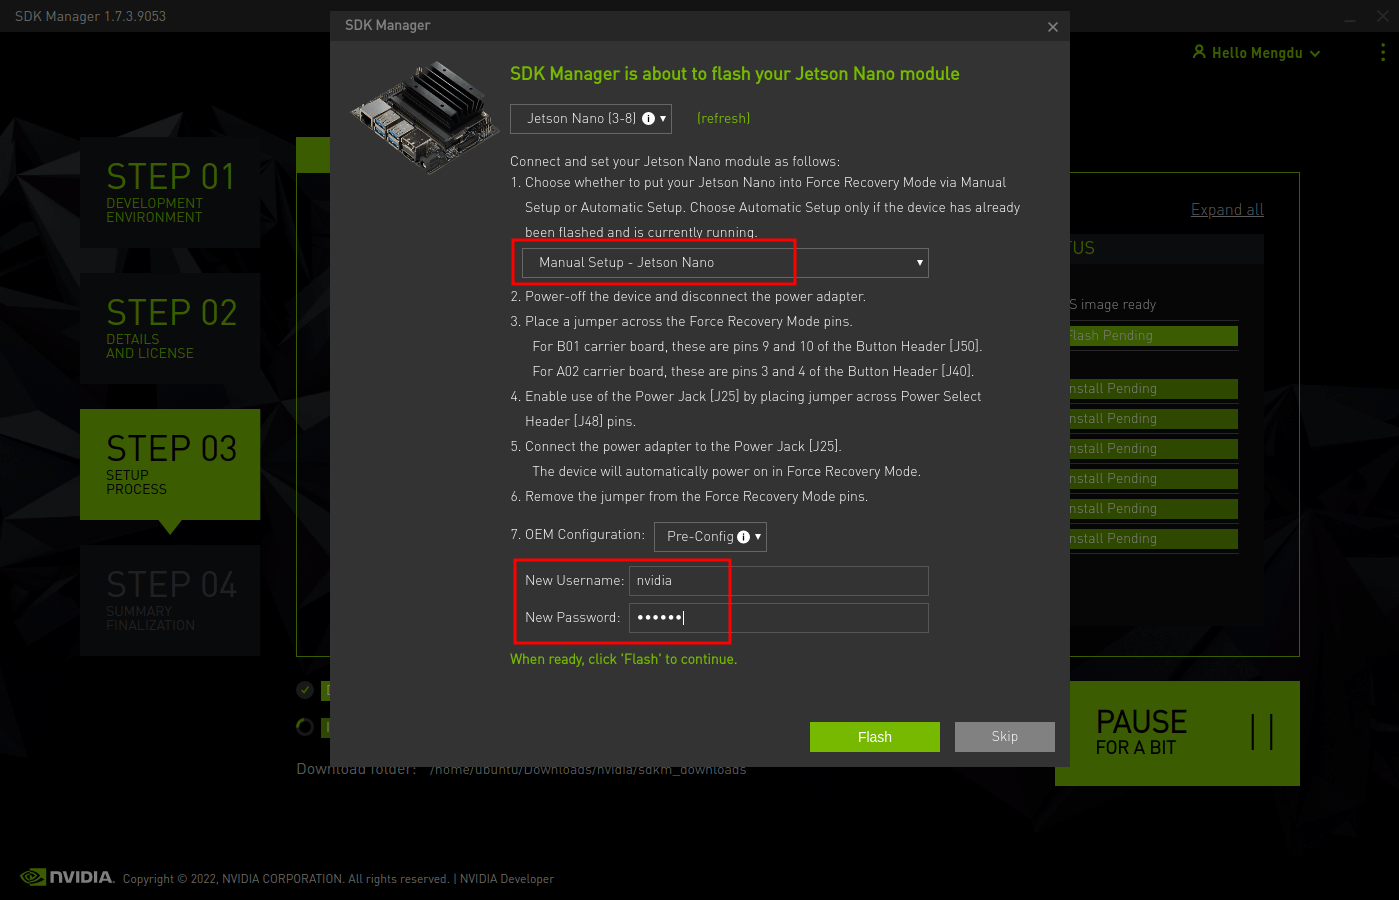
After that, enter the name and password of the new Jetson system at the bottom, please keep them in mind.
When ready, click Flash to continue.
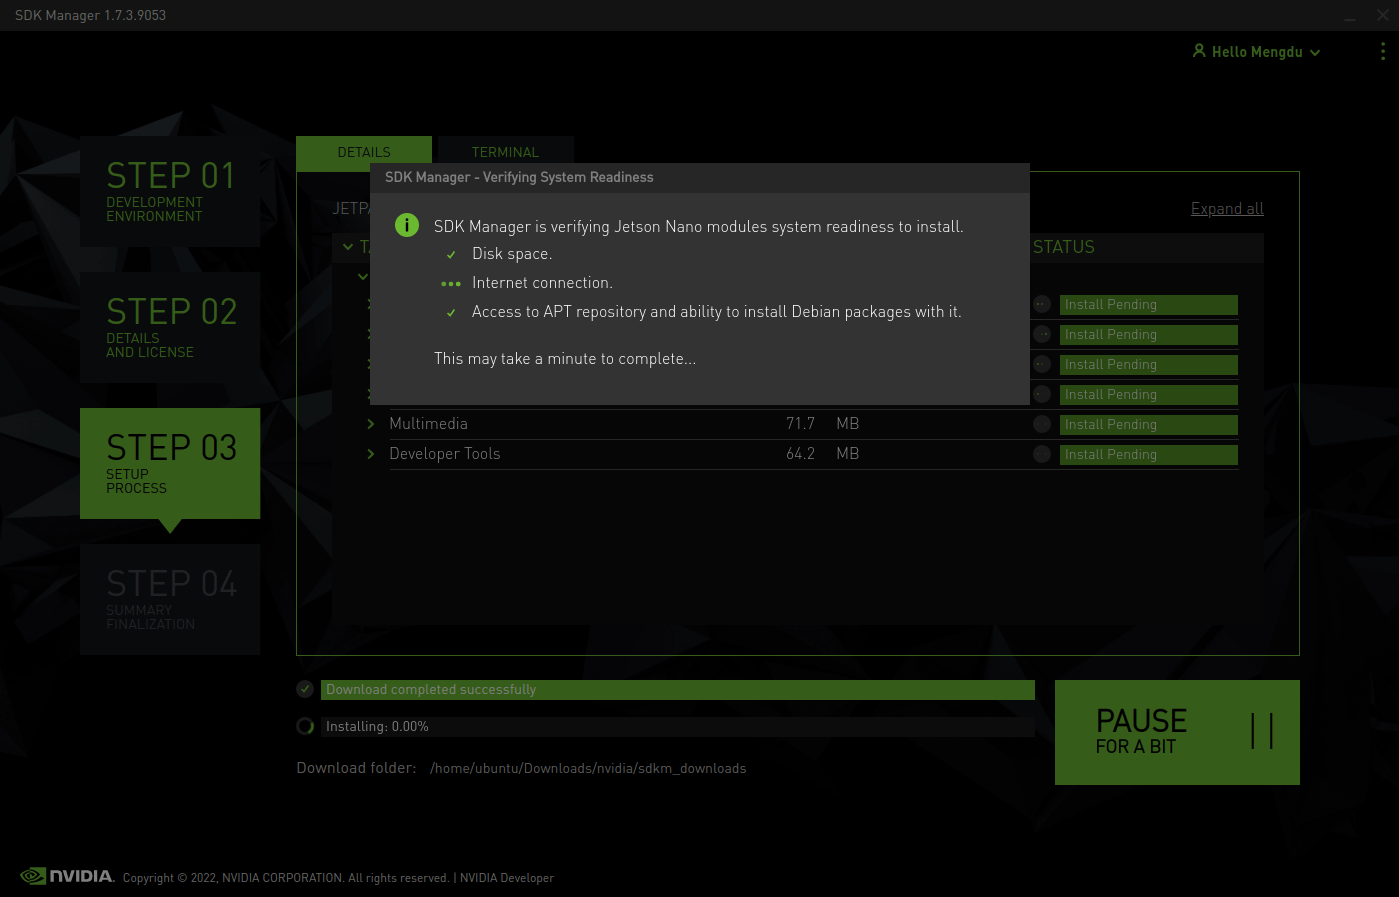
The display shows the progress of the download and installation of the software. Please wait patiently for the installation to complete.
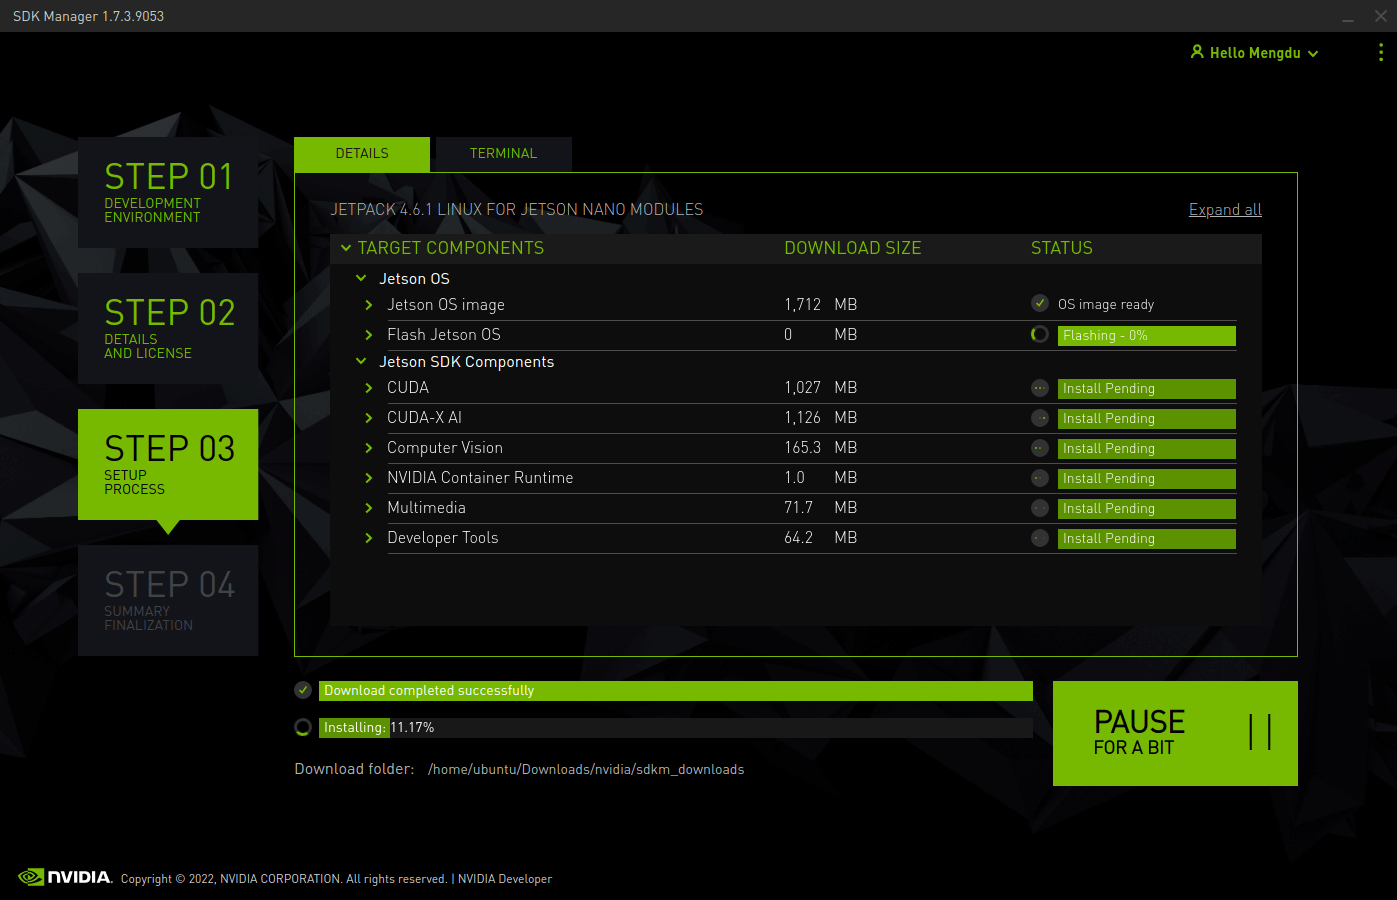
(Optional)Step 7. Install the SDK components
If you checked the installation of the component in the previous step 4, you will need to go through this step.
After a moment, you will be able to see a new window pop up in the NVIDIA SDK Manager, prompting you that you need to connect to your device via IP address. It means the system has been alreadly installed and the components installing will be proceeded.
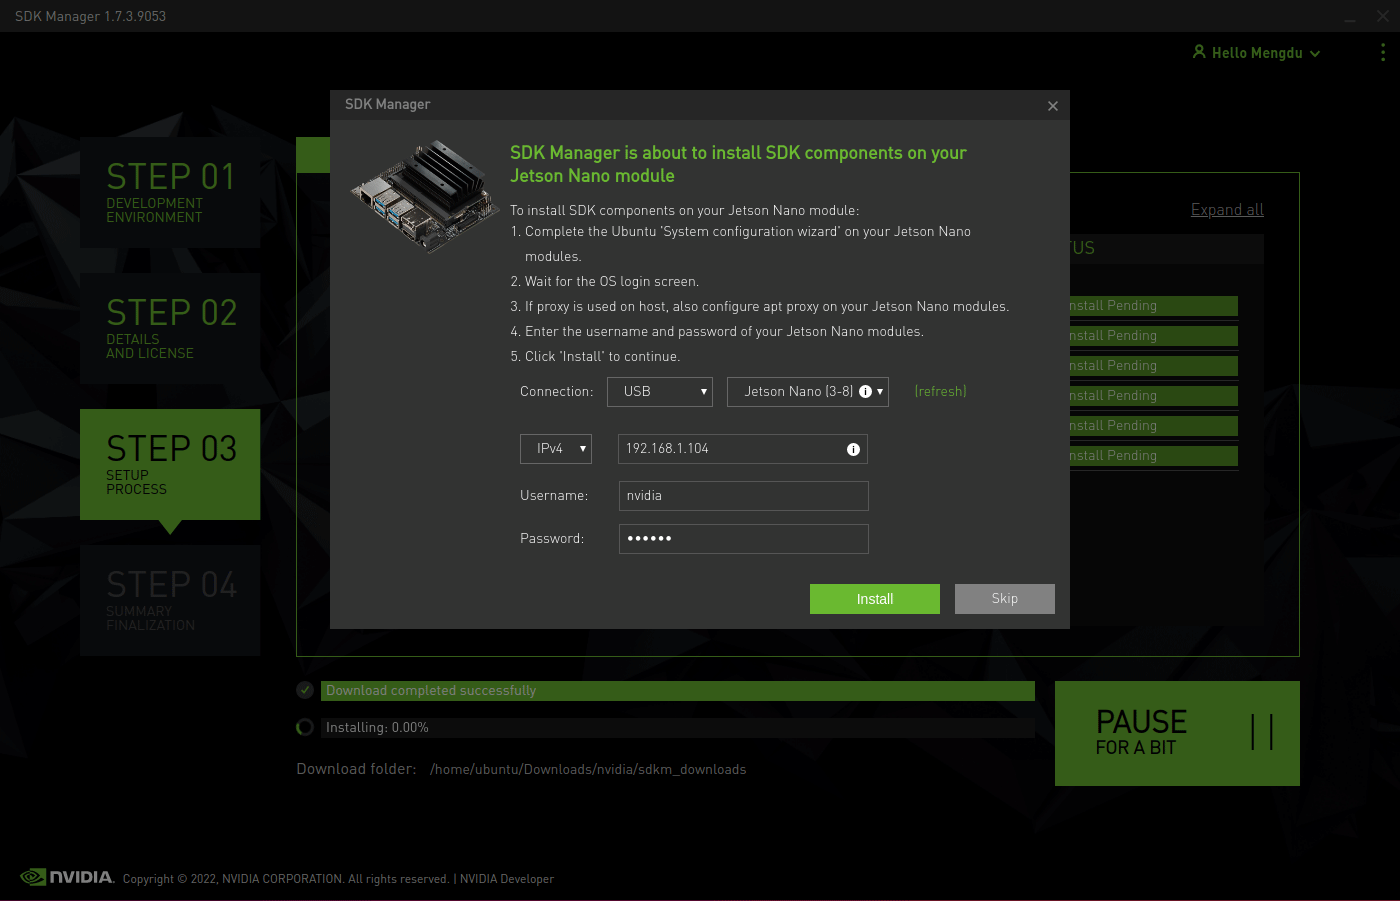
In this case, we can pull out the jumper and restart the board. Then we need to connect the board to a monitor via HDMI, enter the password you entered in step 4, and log in to the main interface.
At this point you need to connect the board to the same LAN as the Linux host PC and determine the IP address of the Jetson by using the command ifconfig.
Go back to the Linux host PC and enter the IP address you just obtained. NVIDIA SDK Manager will try to connect to the Jetson device and proceed to complete the installation of the next SDK components.
When you see the following window appear, the installation has been done. But we still need to install the driver so we should remain the board in the Force Recovery Mode.

After the flash you can fully apply the board.
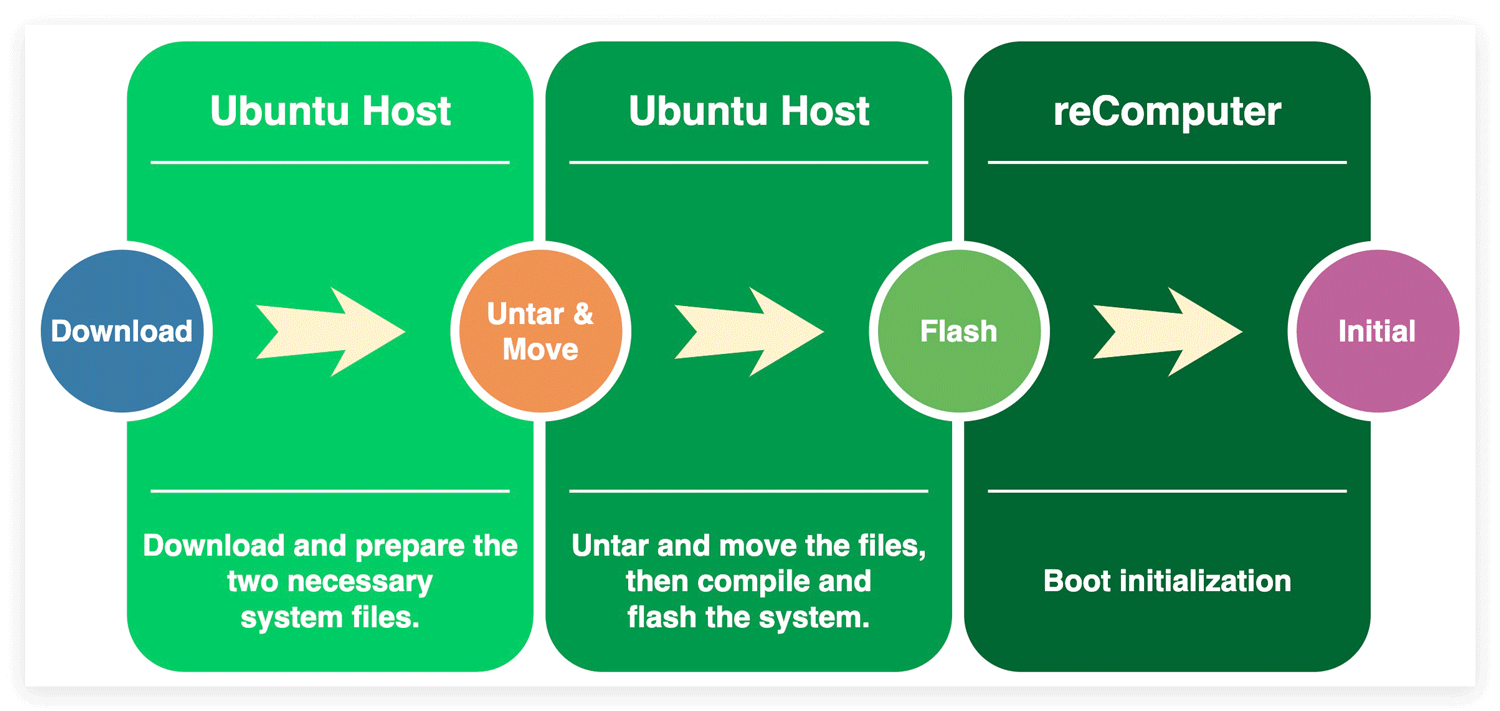
Flashing JetPack OS via Command Line
Thanks to the freedom to customize the BSP(NVIDIA Linux Driver Package), flashing JetPack OS via command line can be very easy for the Linux knowledge base users.
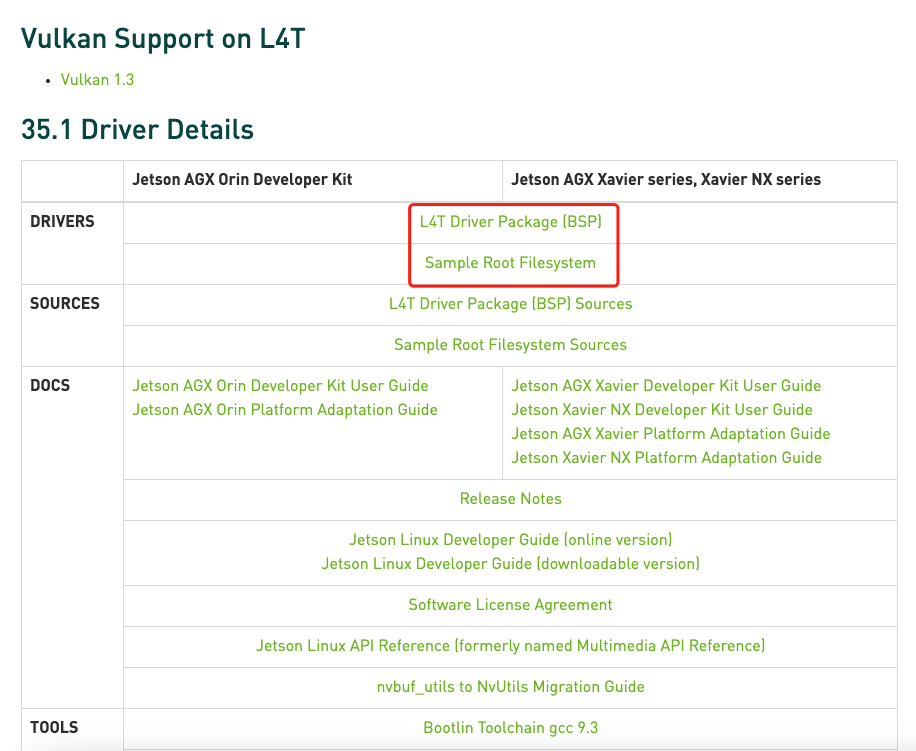
Step 1. Download the proper NVIDIA Linux Driver Package
On the Linux host PC, we need to open a browser and go the Jetson Linux Archive. First we should check if the version of Jetson Linux is supported.
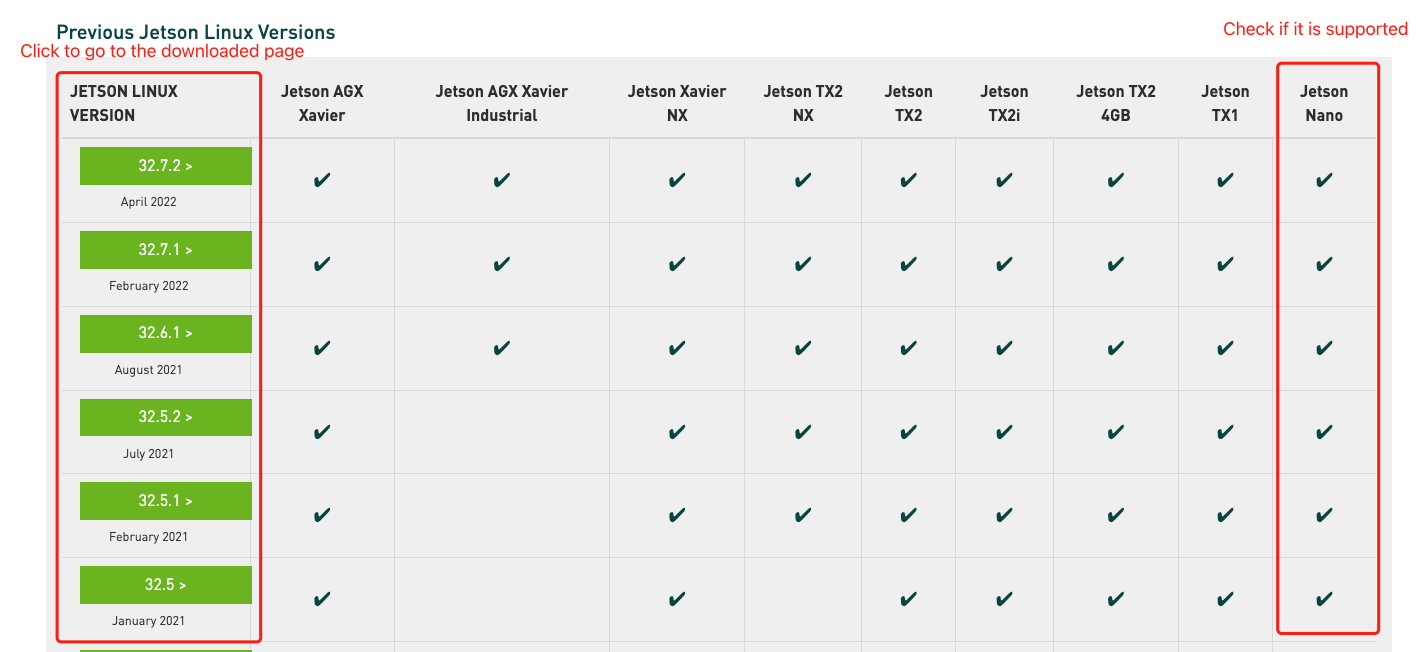
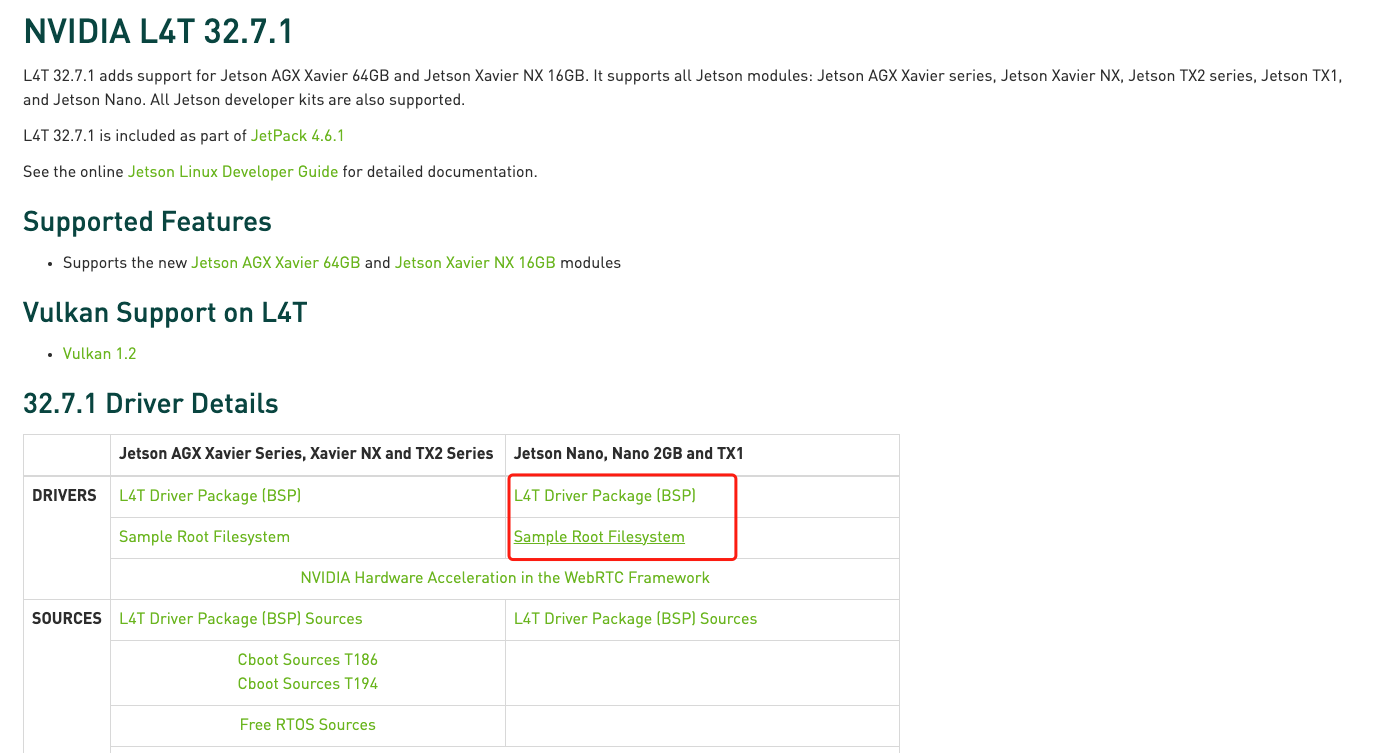
Once you find the proper version, click to go to the downloaded page. Find and click the "L4T Driver Package (BSP)" and "Sample Root Filesystem" to download the driver files. The names of the files are like Tegra_Linux_Sample-Root-Filesystem_Rxx.x.x_aarch64.tbz2 and Jetson-210_Linux_Rxx.x.x_aarch64.tbz2.
As the example, we choose the NVIDIA L4T 32.7.1 version since it is included as part of JetPack4.6.1 and supports the Jetson Nano module. The names of the files:
- Tegra_Linux_Sample-Root-Filesystem_R32.7.2_aarch64.tbz2
- Jetson-210_Linux_R32.7.2_aarch64.tbz2
Step 2. Unzip Package Files and Assemble the Rootfs via Command Line
On the Linux host PC, we should find a folder and store the package files we download before. Then open a command line window(Terminal) at the folder and use the command line below to unzip the files and assemble the rootfs:
tar xf ${L4T_RELEASE_PACKAGE}
cd Linux_for_Tegra/rootfs/
sudo tar xpf ../../${SAMPLE_FS_PACKAGE}
!!!Note
${} is where you put the names of the files.
*As the example of NVIDIA L4T 32.7.1, the downloaded files are stored in /Desktop/L4T_Drivers, so under the '/Desktop/L4T_Drivers' path we open the command line window(Terminal) and execute the following command.
tar xf Jetson-210_Linux_R32.7.1_aarch64.tbz2
cd Linux_for_Tegra/rootfs/
sudo tar xpf ../../Tegra_Linux_Sample-Root-Filesystem_R32.7.1_aarch64.tbz2
Step 3. Choose Proper Drivers
After we unzip the package, we need to install the driver as well to make sure each component on the board is working. First we need to choose the driver files in Ubuntu host according to the carrier board and the module.
| Carrier Board | Jetson Module | JetPack Version | L4T Version | Download Address |
|---|---|---|---|---|
| A203/ A203V2 | Jetson Nano eMMC | 4.6 | 32.6.1 | Download |
| A203/ A203V2 | Jetson Xavier NX eMMC | 4.6 | 32.6.1 | Download |
| A203/ A203V2 | Jetson Xavier NX SD | 4.6 | 32.6.1 | Download |
| A203/ A203V2 | Jetson TX2NX eMMC | 4.6 | 32.6.1 | Download |
| A203/ A203V2 | Jetson TX2NX eMMC | 4.6.6 | 32.7.6 | Download |
| A203/ A203V2 | Jetson Xavier NX eMMC | 5.1.4 | 35.6.0 | Download |
There are two JetPack 5.0.2 drivers for A203 included in the downloaded files. Both work fine, except that one of them supports IMX-219 camera and the other one supports IMX-477 camera.
Step 4. Unzip the Driver in the file
We can drag the file into the official one:
Or we can execute the following command to replace the files:
cp -a -f ${Drive package kernel path} ${Officially unpacked Linux_for_Tegra path}
!!!Note
${} is the use of environment variables.
${Drive package kernel path} indicates the full path to the kernel image folder
${Officially unpacked Linux_for_Tegra path} indicates the full path to the officially provided folder Linux_for_Tegra folder after the L4T zip package is extracted.
Step 5. Flash the System to the Board
In the example we use NVIDIA Jetson Nano module and we can directly flash the system into the board execute following command:
sudo ./apply_binaries.sh
sudo ./flash.sh ${BOARD} mmcblk0p1
!!!Note
${BOARD} is the use of environment variables, the information of it should be the name of your module in the carrier board. You can check here for the full knowledge.

!!!Tip Flashing L4T takes about 10 minutes, or more under a slow host computer.
Troubleshooting
Troubleshooting Installation with NVIDIA SDK Manager
There are many causes of various installation errors. Below is a checklist of common installation issues, which may help you recover from a broken installation.
-
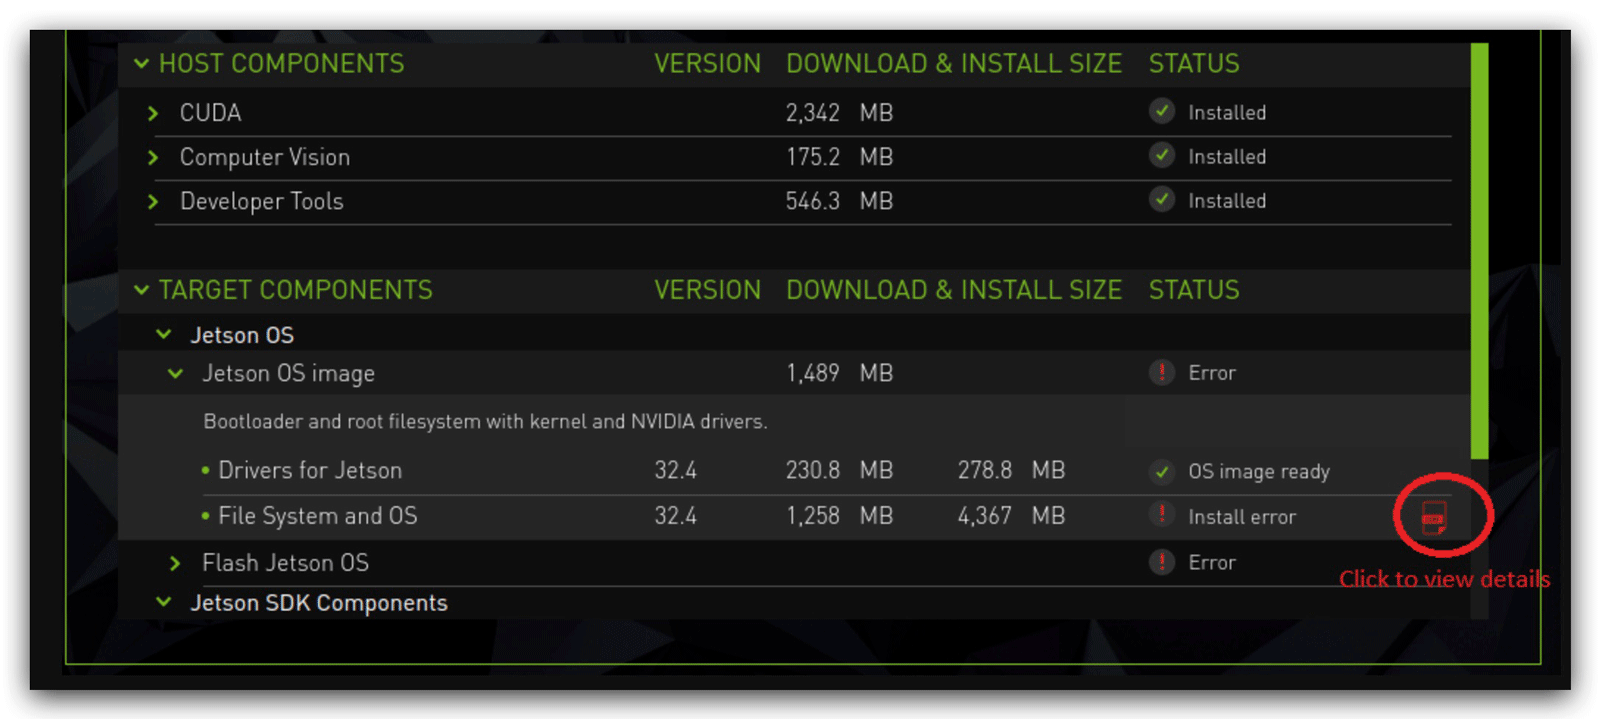
Review the summary table to identify which component failed.
a. Expand the group with the "Error" status.
b. When you find the failed component, click the details icon to the right of Install Error to be redirected to the Terminal tab, which will display the exact error.
- If the error is related to an environment issue, such as a broken apt repository or missing prerequisite, try to fix it manually, then click the Retry Failed Items button.

-
Retrying the installation is also available in two other ways:
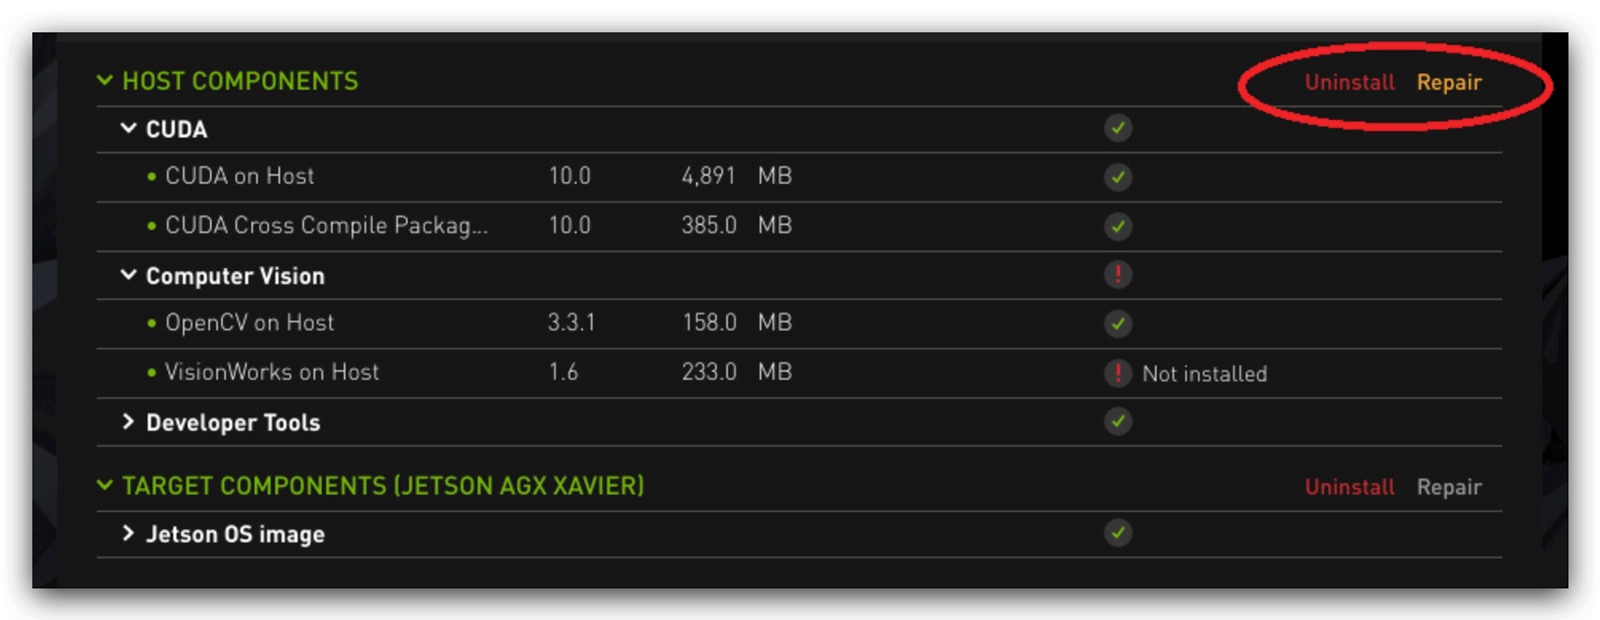
a. From Flashing to eMMC with SDK Manager -- Step 3, use the Repair/Uninstall button to get to the Manage NVIDIA SDKs page. If needed, expand the SDK that has the "Broken" status, then click Repair for the relevant part (Host or Target).
-
At Flashing to eMMC with SDK Manager -- Step 3, select the required SDK and run through the installation again.
-
Finally, try to uninstall and reinstall the relevant SDK.
Troubleshooting installation using the command line
The command line installation method is relatively simple, and is often prone to error in scenarios where force recovery mode is used.
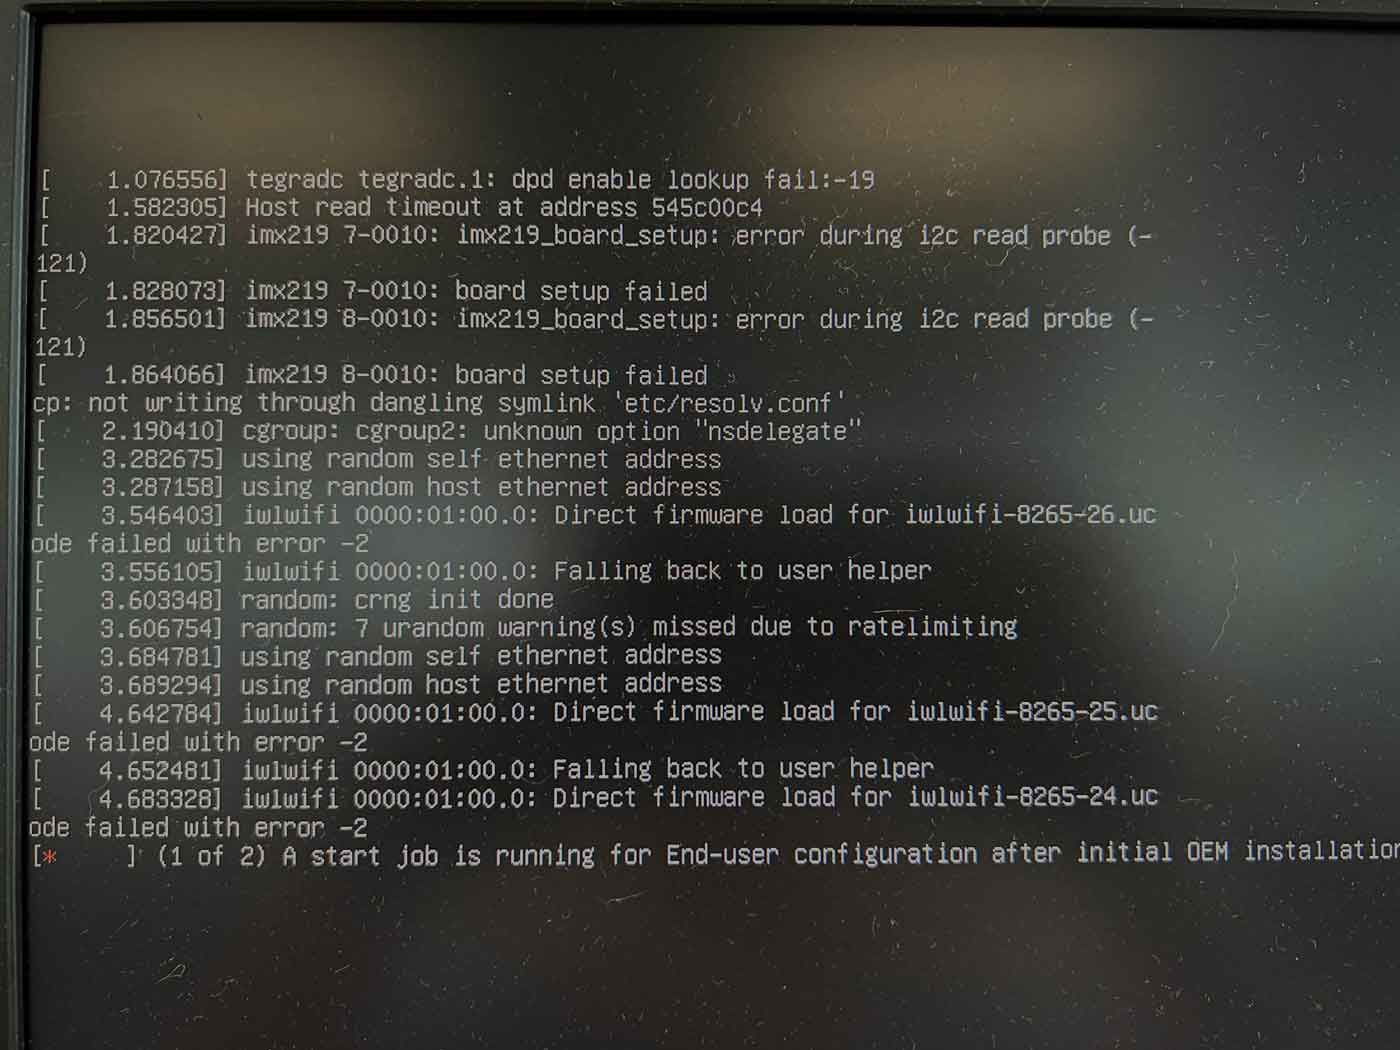
If you encounter the error shown below in Flashing to eMMC with command-line -- Step 2, you probably did not succeed in getting the Carrier Board into force recovery mode. Please pay special attention, do not enter force recovery mode with the Carrier Board powered on, as this is not valid.

If you can't get into the system in Flashing to eMMC with command-line -- Step 3 and are stuck on the boot up display command line, you probably did not exit force recovery mode. Likewise, it is not valid for you to unplug the jumper to exit force recovery mode while the Carrier Board is powered up, this all needs to be done while you are powered down.
!!!Note If more storage space is needed, we can use SD card to expand the capacity, or burn the system on SD card, you can refer to our recommended solution Flash System on SD card
Tech Support & Product Discussion
Thank you for choosing our products! We are here to provide you with different support to ensure that your experience with our products is as smooth as possible. We offer several communication channels to cater to different preferences and needs.