LVGL for reTerminal

Introduction
LVGL provides everything you need to create an embedded GUI with easy-to-use graphical elements, beautiful visual effects and a low memory footprint. LVGL is a graphics library targeting microcontrollers with limited resources. However it possible to use it to create embedded GUIs with high-end microprocessors and boards running Linux operation system. There are currently two ways of doing this:
- PC simulator with SDL 2 cross platform library
- simply using Linux’s frame buffer device (typically /dev/fb0).
In this Wiki article we'll use PC simulator example with SDL2 and modify it slightly to display UI full screen instead of in a window.
Features
-
Powerful building blocks: buttons, charts, lists, sliders, images, etc.
-
Advanced graphics engine: animations, anti-aliasing, opacity, smooth scrolling, blending modes, etc
-
Supports various input devices: touchscreen, mouse, keyboard, encoder, buttons, etc.
-
Supports multiple displays
-
Hardware independent, can be use with any microcontroller and display
-
Scalable to operate with little memory (64 kB Flash, 16 kB RAM)
-
Multi-language support with UTF-8 handling, CJK, Bidirectional and Arabic script support
-
Fully customizable graphical elements via CSS-like styles
-
OS, External memory and GPU are supported but not required. (built in support for STM32 DMA2D, and NXP PXP and VGLite)
-
Smooth rendering even with a single frame buffer
-
Written in C and compatibile with C++
-
Micropython Binding exposes LVGL API in Micropython
-
Simulator to develop on PC without embedded hardware
-
100+ simple Examples
-
Documentation and API references online and in PDF
Prepare Development Environment
On reTerminal
On Rasperry Pi OS you can easily install SDL2 using a terminal:
sudo apt-get update && sudo apt-get install build-essential libsdl2-dev cmake -y
Then clone the simulator project and the related sub modules:
git clone --recursive https://github.com/littlevgl/pc_simulator.git
On Host PC
EdgeLine is WYSIWYG editor for LVGL, that allows users create interface and then export C/Micropython code for using on target device. It is currently in beta stage in limited functionality and available for both Windows and Linux.
Windows version: LINK Linux version: LINK
Since EdgeLine is at beta stage, check for presense of newer versions at LVGL forum EdgeLine subforum
For the linux version be sure Edgeline.x86_64 and server/micropython are executable. (chmod +x filename)
After that EdgeLine can be run by
./Edgeline.x86_64
The exported code doesn’t load any of the screens by default therefore you need to call lv_scr_load(scr_name) manually on the desired screen.
Run demos

The following steps can be used with CMake on a Raspberry Pi OS.
Ensure CMake is installed, i.e. the cmake command works on the terminal.
cd pc_simulator/
mkdir build
cd build.
cmake ..
make -j4
The binary will be in pc_simulator/build/bin/main, and can be run by typing that command:
DISPLAY=:0 ./bin/main
That would display widget demo in a windowed mode - to change that to fullscreen, open
pc_simulator/lv_drivers/sdl/sdl.c
and change #L344 to
static void window_create(monitor_t * m)
{
    m->window = SDL_CreateWindow("TFT Simulator",
                            SDL_WINDOWPOS_UNDEFINED, SDL_WINDOWPOS_UNDEFINED,
                            1280 , 720 , SDL_WINDOW_FULLSCREEN);       /*last param. SDL_WINDOW_BORDERLESS to hide borders*/
Additionally, change screen resolution in pc_simulator/lv_drv_conf.h #L90
/*-------------------
 *  Monitor of PC
 *-------------------*/
#ifndef USE_MONITOR
#  define USE_MONITOR         1
#endif

#if USE_MONITOR
#  define MONITOR_HOR_RES     1280
#  define MONITOR_VER_RES     720
Recompile and execute the binary to see demo application full screen!
make -j4
DISPLAY=:0 ./bin/main
If the touch direction is not correct, you need to change /boot/config.txt line 89 to dtoverlay=reTerminal,tp_rotate=0
Build your own GUI application

To see how can you build your own UI application for reTerminal with LVGL 8.0, you can have a look at the example code in this GitHub repository.
All the necessary components are imported and initialized in main.c, after that the main UI function is called. The UI description, callbacks and helper functions are located inside of lv_demo_reterminal_UI/lv_demo_reterminal_UI.c.
    tv = lv_tabview_create(lv_scr_act(), LV_DIR_TOP, tab_h);

    lv_obj_set_style_text_font(lv_scr_act(), font_normal, 0);

    lv_obj_t * tab_btns = lv_tabview_get_tab_btns(tv);
    lv_obj_set_style_pad_left(tab_btns, 0, 0);

    lv_obj_t * t1 = lv_tabview_add_tab(tv, "Assistant");
    lv_obj_t * t2 = lv_tabview_add_tab(tv, "Debug");
    lv_obj_t * t3 = lv_tabview_add_tab(tv, "Stats");
We create a Tabview widget on the active screen and populate it with three tabs: Assistant, Debug, and Stats.

The content of each tab is initialized separately in a corresponding function:
    assistant_create(t1);
    debug_create(t2);
    stats_create(t3);

    color_changer_create(tv);

    evdev_lis3dh_init();
Additionally color changer elements are created on the Tabview widget and built-in accelerometer is initialized. After that we create three timer callbacks with dummy input data:
    static uint32_t user_data = 10;
    lv_timer_t * time_timer = lv_timer_create(time_timer_cb, 1,  &user_data);
    lv_timer_t * system_timer = lv_timer_create(system_timer_cb, 500,  &user_data);
    lv_timer_t * accelerometer_timer = lv_timer_create(accelerometer_timer_cb, 50,  &user_data);
These are responsible for getting system time, system status (CPU, Mem, Disk Space, Ethernet current speed, etc) and accelerometer readings respectively. You can find these three callback functions at the bottom of the lv_demo_reterminal_UI.c.
void time_timer_cb(lv_timer_t * timer)
{

    time_t t = time(NULL);
    struct tm *local = localtime(&t);

    sprintf(timeString, "%02d:%02d:%02d", local->tm_hour, local->tm_min, local->tm_sec);
    sprintf(dateString, "%s\n%s %02d %04d", DAY[local->tm_wday], MONTH[local->tm_mon], local->tm_mday, local->tm_year + 1900);

    lv_label_set_text(clock_label, timeString);
    lv_label_set_text(date_label, dateString);

}

void system_timer_cb(lv_timer_t * timer)
{

    lv_meter_indicator_t *indic1 = timer->user_data;
    cpu_pct = 100 - lv_timer_get_idle();

    lv_mem_monitor_t mon;
    lv_mem_monitor(&mon);

    uint32_t used_size = mon.total_size - mon.free_size;;
    uint32_t used_kb = used_size / 1024;
    uint32_t used_kb_tenth = (used_size - (used_kb * 1024)) / 102;
    mem_pct = mon.used_pct;

    dsk_pct = get_available_space();
    eth0_num = get_current_network_speed();
    //light_num = get_light_sensor();

}

void accelerometer_timer_cb(lv_timer_t * timer)
{

    evdev_lis3dh_read(&data);

    lv_chart_set_next_value(chart1, x_ser, data.x_val);
    lv_chart_set_next_value(chart1, y_ser, data.y_val);
    lv_chart_set_next_value(chart1, z_ser, data.z_val);

}
For your particular application it might be more suitable to use other widgets, than Tabview. You can consult full description of LVGL 8.0 widgets for usage and examples.
If you decide to follow our demo application closely when creating your first UI application with LVGL for reTerminal, below you can find more detailed information about what happens inside of one of these functions (assistant_create()). Your workflow for creating new applications will be similar:
- Initialize widgets on the screen(s)
- Create timer-based or event-based callback to obtain the data from sensors/system
- Change the content of widgets based on data - normally that is done using global variables declared at the top of the code
assistant_create We create a panel object for the tab and set its height.
    lv_obj_t * panel1 = lv_obj_create(parent);
    lv_obj_set_height(panel1, lv_pct(100));

Then we create an image button object from C array located in assets folder, obtained with LVGL image conversion tool. We also initialize and assign button press style transformation to the image button object (button becomes green on press). Additionally an event callback speech_event_cb is assigned to button press - since it is just a mock example, that will only print out a text in the terminal. But in real application it can be used to start Intelligent Assistant.
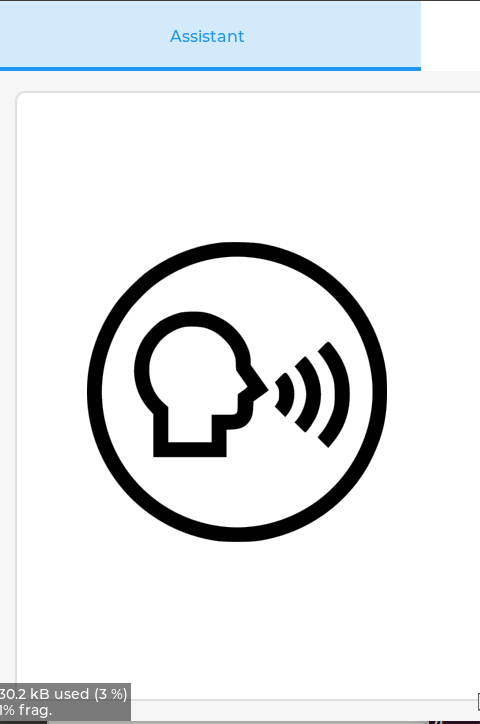
    LV_IMG_DECLARE(speech_btn_img);

    /*Create a transition animation on width transformation and recolor.*/
    static lv_style_prop_t tr_prop[] = {LV_STYLE_IMG_RECOLOR_OPA, 0};
    static lv_style_transition_dsc_t tr;
    lv_style_transition_dsc_init(&tr, tr_prop, lv_anim_path_linear, 500, 0, NULL);

    static lv_style_t style_def;
    lv_style_init(&style_def);
    lv_style_set_text_color(&style_def, lv_color_white());
    lv_style_set_transition(&style_def, &tr);

    /*Darken the button when pressed and make it wider*/
    static lv_style_t style_pr;
    lv_style_init(&style_pr);
    lv_style_set_img_recolor_opa(&style_pr, LV_OPA_70);
    lv_style_set_img_recolor(&style_pr, lv_palette_main(LV_PALETTE_GREEN));

    /*Create an image button*/
    lv_obj_t * speech_btn = lv_imgbtn_create(panel1);
    lv_imgbtn_set_src(speech_btn, LV_IMGBTN_STATE_RELEASED, NULL, &speech_btn_img, NULL);
    //lv_img_set_zoom(speech_btn, 128);
    lv_obj_set_size(speech_btn, 300, 300);
    lv_obj_add_event_cb(speech_btn, speech_event_cb, LV_EVENT_ALL, NULL);
    lv_obj_add_style(speech_btn, &style_def, 0);
    lv_obj_add_style(speech_btn, &style_pr, LV_STATE_PRESSED);
In the next code block we create text labels for time, date, user greeting. These are initialized with default text, which will be changed in time_timer callback every second.

    lv_obj_t * name = lv_label_create(panel1);
    lv_label_set_text(name, "Hi there, Username");
    lv_obj_add_style(name, &style_large, 0);

    clock_label = lv_label_create(panel1);
    lv_obj_add_style(clock_label, &style_clock, 0);
    lv_label_set_text(clock_label, timeString);
    lv_label_set_long_mode(clock_label, LV_LABEL_LONG_WRAP);

    lv_obj_t * time_icn = lv_label_create(panel1);
    lv_obj_add_style(time_icn, &style_large, 0);
    lv_label_set_text(time_icn, LV_SYMBOL_BELL);

    date_label = lv_label_create(panel1);
    lv_label_set_text(date_label, dateString);
    lv_obj_add_style(date_label, &style_large, 0);
Finally, we structure the widgets we placed in this tab using Grid layout. The Grid layout is a subset of CSS Flexbox.
It can arrange items into a 2D "table" that has rows or columns (tracks). The item can span through multiple columns or rows. The track's size can be set in pixel, to the largest item (LV_GRID_CONTENT) or in "Free unit" (FR) to distribute the free space proportionally.
To make an object a grid container call lv_obj_set_layout(obj, LV_LAYOUT_GRID).
Note that the grid layout feature of LVGL needs to be globally enabled with LV_USE_GRID in lv_conf.h.
You can read about Layouts in LVGL in more detail by following this link.
    static lv_coord_t grid_main_col_dsc[] = {LV_GRID_FR(1), LV_GRID_FR(1), LV_GRID_TEMPLATE_LAST};
    static lv_coord_t grid_main_row_dsc[] = {LV_GRID_CONTENT, LV_GRID_CONTENT, LV_GRID_TEMPLATE_LAST};

    /*Create the top panel*/
    static lv_coord_t grid_1_col_dsc[] = {400, 50, LV_GRID_CONTENT, LV_GRID_FR(2), LV_GRID_FR(1), LV_GRID_FR(1), LV_GRID_TEMPLATE_LAST};
    static lv_coord_t grid_1_row_dsc[] = {200, 100, 100, LV_GRID_CONTENT, 10, LV_GRID_CONTENT, LV_GRID_CONTENT, LV_GRID_TEMPLATE_LAST};

    lv_obj_set_grid_dsc_array(parent, grid_main_col_dsc, grid_main_row_dsc);

    lv_obj_set_grid_cell(panel1, LV_GRID_ALIGN_STRETCH, 0, 2, LV_GRID_ALIGN_CENTER, 0, 1);

    lv_obj_set_grid_dsc_array(panel1, grid_1_col_dsc, grid_1_row_dsc);
    lv_obj_set_grid_cell(speech_btn, LV_GRID_ALIGN_CENTER, 0, 1, LV_GRID_ALIGN_CENTER, 0, 5);
    lv_obj_set_grid_cell(name, LV_GRID_ALIGN_START, 2, 2, LV_GRID_ALIGN_CENTER, 0, 1);
    lv_obj_set_grid_cell(clock_label, LV_GRID_ALIGN_STRETCH, 2, 4, LV_GRID_ALIGN_START, 1, 1);
    lv_obj_set_grid_cell(time_icn, LV_GRID_ALIGN_CENTER, 2, 1, LV_GRID_ALIGN_CENTER, 3, 1);
    lv_obj_set_grid_cell(date_label, LV_GRID_ALIGN_START, 3, 1, LV_GRID_ALIGN_CENTER, 3, 1);
The rest of the tabs have different widgets, but overall workflow is the same. If you need to find more about parameters or usage of a specific widget, consult LVGL documentation.
To compile the application, from your project folder (containing main.c source file)
mkdir build
cd build.
cmake ..
make -j4
The binary will be in ../bin/main, and can be run by typing that command:
DISPLAY=:0 ./../bin/main
If you add other folders to the project, make sure you change CMakeLists.txt accordingly and re-run cmake .. from build directory, otherwise you'll run into linking errors.
Resources
- [GitHub] LVGL
- [Webpage] Official LVGL Documentation
- [GitHub] PC Simulator Source Code
Tech Support & Product Discussion
Thank you for choosing our products! We are here to provide you with different support to ensure that your experience with our products is as smooth as possible. We offer several communication channels to cater to different preferences and needs.