Object detection with Edge Impulse and reTerminal

Introduction
In today's digital landscape, the integration of edge AI and IoT (Internet of Things) technologies has opened up exciting possibilities for developers and enthusiasts. One such powerful platform that simplifies the creation of machine learning models for edge devices is Edge Impulse. In this step-by-step guide, we will walk you through the process of installing Edge Impulse on your reTerminal device and creating a local object detection solution.
What You'll Learn:
- Installing essential dependencies for your reTerminal.
- Setting up Node.js and npm for your project.
- Deploying the Edge Impulse Linux CLI tool.
- Creating and training an object detection model within Edge Impulse.
- Deploying and testing your model locally on the reTerminal device.
By the end of this guide, you'll have a hands-on understanding of how to harness the power of Edge Impulse for object detection on edge devices like the reTerminal. So, let's dive in and explore the exciting world of local AI-driven object detection!
Hardware preparation
| reTerminal | Camera Module V1 |
|---|---|
 |  |
Edge Impulse

Edge Impulse is a versatile platform dedicated to streamlining the development of machine learning models tailored for edge devices, such as microcontrollers and embedded systems. This comprehensive solution simplifies the entire machine learning workflow, encompassing data collection, preprocessing, model training, deployment, and monitoring, all within a unified environment. One of its standout features is its user-friendly interface, which allows users to effortlessly collect and label data while offering a library of pre-built signal processing blocks and machine learning algorithms for efficient model development. Edge Impulse is engineered for optimal inference performance on resource-constrained edge devices, ensuring real-time processing without relying on continuous internet connectivity. It's further enhanced by seamless integration with a wide array of popular hardware platforms, empowering developers to deploy models with ease.
Software preparation
We recommend installing the latest version of Raspberry Pi 64 bit OS from their official website. If you prefer to install a new Raspbian OS, please follow the steps outlined in this guide.
After that we need to configure raspberry pi camera, please follow the steps outlined in this guide
You'll need an Edge Impulse account to get started, so please create one by visiting this link. By default initial project will be created.
Install Dependencies on your reTerminal device
To set this device up in Edge Impulse, run the following commands one by one
sudo apt update
curl -sL https://deb.nodesource.com/setup_12.x | sudo bash -
sudo apt install -y gcc g++ make build-essential nodejs sox gstreamer1.0-tools gstreamer1.0-plugins-good gstreamer1.0-plugins-base gstreamer1.0-plugins-base-apps
npm config set user root && sudo npm install edge-impulse-linux -g --unsafe-perm
Connecting to Edge Impulse
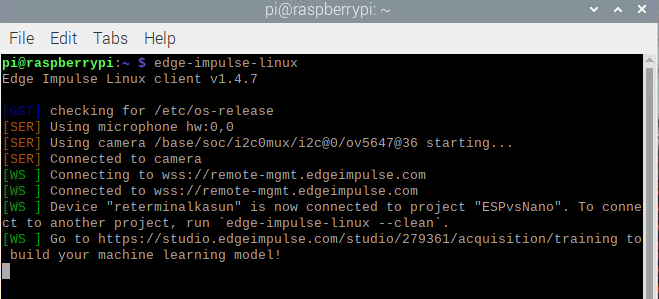
With all the software set up, connect your camera or microphone to your reTerminal. You'll need to provide your email address ,password linked to your Edge Impulse account and a device name.
edge-impulse-linux

Verifying that your device is connected
That's all! Your device is now connected to Edge Impulse. To verify this, go to your Edge Impulse project, and click Devices. The device will be listed here.
Detect objects
Building a dataset
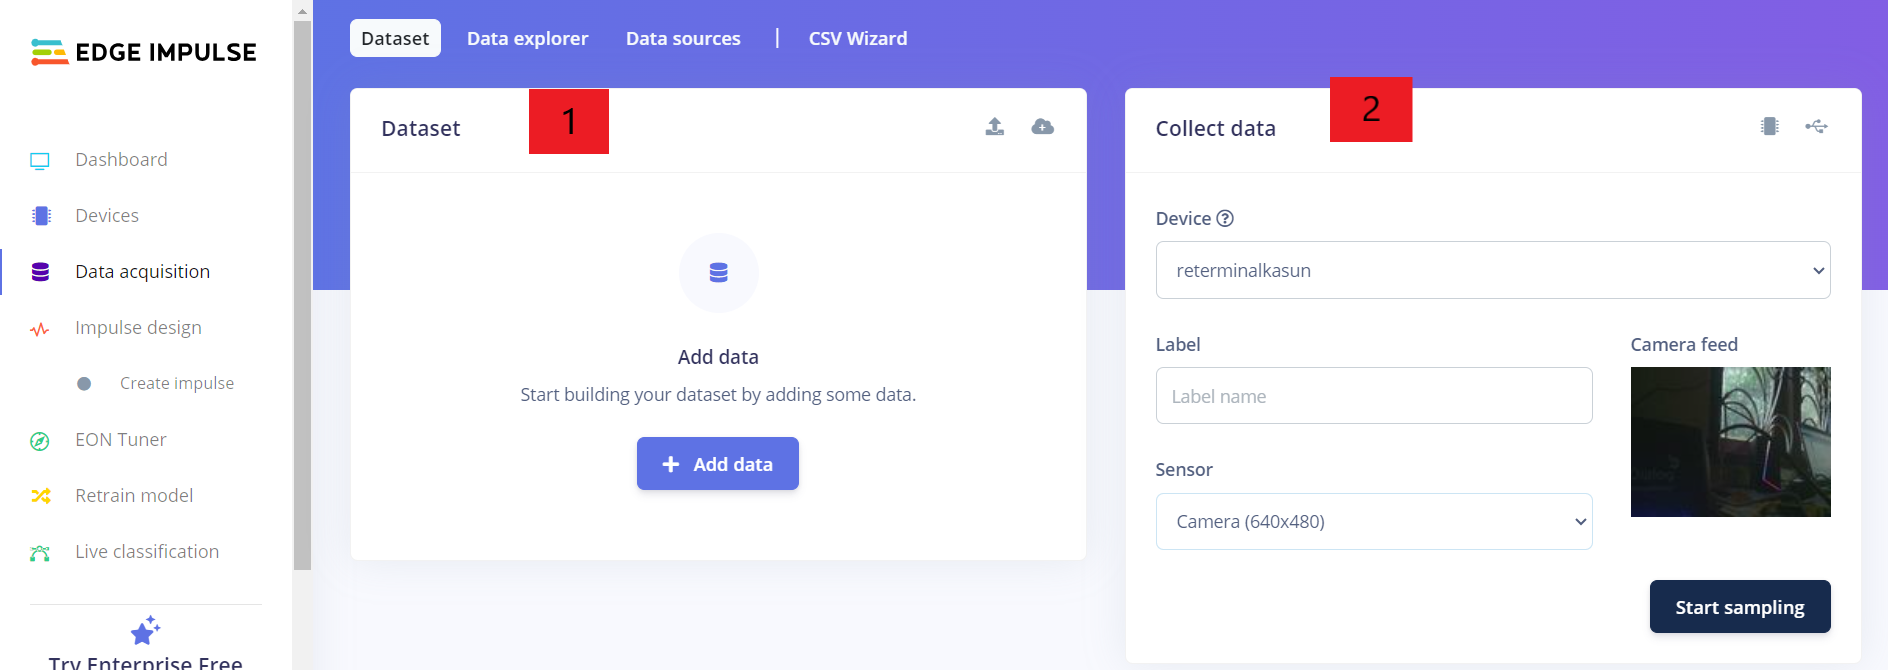
You have the option to collect data from the attached Raspberry Pi camera directly through the reTerminal or to upload pre-collected data from your local storage.

By selecting 'Camera' as the sensor and providing a label name, you can initiate the data sampling process.
Labeling data
All your collected images will be staged for annotation at the "labeling queue". Labeling your objects is as easy as dragging a box around the object, and entering a label. Then click save label.
Rebalancing your dataset
To validate the effectiveness of your model, it's essential to reserve a portion of your data, usually around 20%, as a 'test set.' This data should not be used during model training but solely for validation purposes. You can easily switch between your training and test sets using the two buttons located above the 'Data collected' widget. If you've collected data on your development board and there's currently no data in the testing set, you can resolve this by navigating to Dashboard > Perform train/test split.
Create a impulse
In this tutorial, we've been working with 96x96 images, but it's important to note that Edge Impulse can handle other resolutions as long as the images are square. To configure this, follow these steps: First, go to Create Impulse, then set the image width and image height to your desired dimensions (e.g., 96). Next, choose Fit shortest axis as the resize mode, and add the Images and Object Detection (Images) blocks. Finally, click Save Impulse to apply these settings.
Feature generation
In this step, you'll perform the following tasks:
- Resize all the data.
- Apply the processing block to the entire dataset.
- Generate a 3D visualization of your complete dataset.
- Click 'Generate features' to initiate the process.
Afterward, the 'Feature explorer' will load. This feature explorer represents a plot of all the data in your dataset. Since images have numerous dimensions, we utilize a technique called 'dimensionality reduction' on the dataset before visualizing it.
Training
Within the 'Object Detection' tab, you have the option to train your dataset. To do this, you'll need to configure specific parameters and select the model you intend to use. In this tutorial, we're opting for the FOMO model, which, according to its website, introduces a revolutionary approach to running object detection models on resource-constrained devices. FOMO is an innovative algorithm that brings real-time object detection, tracking, and counting capabilities to microcontrollers, marking a significant milestone. Notably, FOMO boasts a remarkable speed advantage, outperforming MobileNet SSD by a factor of 30, and it can operate with less than 200K of RAM.
After completing the training process, you will receive a confusion matrix that resembles the following.
Validating your model
Now that the model is trained, let's put it to the test using some test data. During data collection, we divided the dataset into training and testing subsets. The model was exclusively trained on the training data. Therefore, we can employ the testing dataset to assess how effectively the model will perform in real-world scenarios. This validation step is crucial to ensure that the model hasn't overfit the training data, a common issue. To validate our model, navigate to Model Testing and select Classify all

Running the model on your reTerminal device
in new blank terminal run following command line .
edge-impulse-linux-runner
This action will trigger the model to be built and downloaded. It will then be executed on your reTerminal. If you are on the same network, you can access a live view of the camera feed and view the classification results directly from your reTerminal. Go to Url that device suggests.
Want to see a feed of the camera and live classification in your browser? Go to http://192.168.8.117:4912
Conclusion
In conclusion, the seamless integration of reTerminal and Edge Impulse empowers developers to unlock the full potential of edge AI. reTerminal, with its robust hardware and versatile capabilities, serves as an excellent platform for running real-time object detection solutions. When coupled with Edge Impulse, which simplifies the creation and deployment of machine learning models on resource-constrained devices, the possibilities become limitless. Whether you're working on IoT applications, robotics, or any project that demands efficient, on-device AI, this powerful synergy between reTerminal and Edge Impulse opens up a world of innovation at the edge of technology.
Tech Support
Thank you for choosing our products! We are here to provide you with different support to ensure that your experience with our products is as smooth as possible. We offer several communication channels to cater to different preferences and needs.