Reachy Mini × XIAO Screen Motion Control
Combine the Reachy Mini robot with the XIAO ESP32-S3 Plus touch display — using the built-in IMU sensor (LSM6DS3), tilting the screen controls the robot's body sway, head yaw, and head pitch.
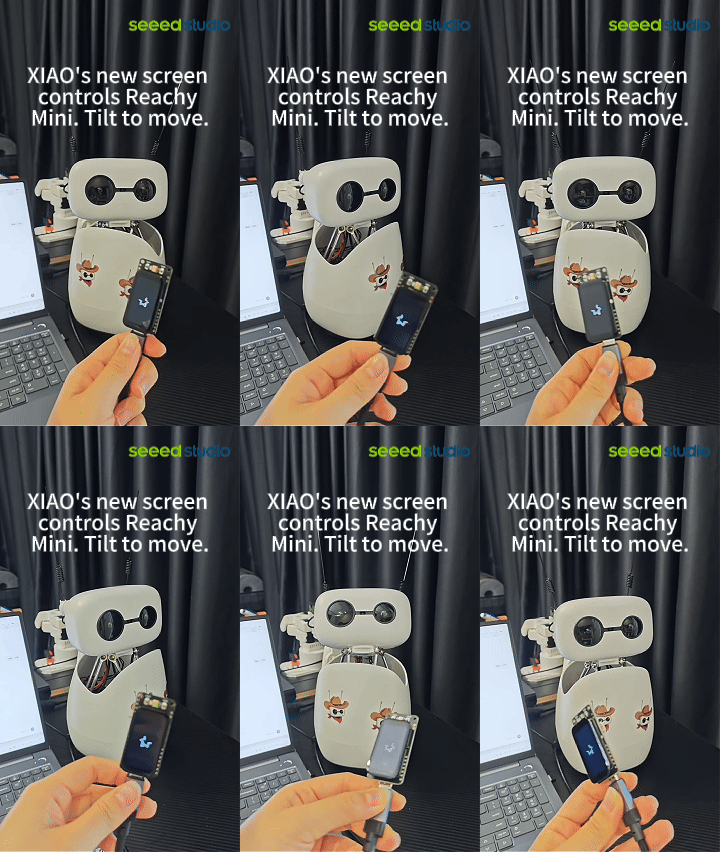




Demo
| Action | Robot Response | Screen Display |
|---|---|---|
| Tilt screen left/right | Body sway + head yaw (left/right) | Kaomoji tilts with direction |
| Tilt screen forward/back | Head pitch (nodding up/down) | — |
| Screen held still | Robot stays still (manual trigger) | Kaomoji returns to center |
The screen displays a ≧∇≦ kaomoji, rotated 90° upright, swaying with the tilt direction. The XIAO screen display pattern can be customized — refer to the 1.47 inch Touch Display Getting Started tutorial to compile and flash your own pattern.
Hardware
| Hardware | Description |
|---|---|
| Reachy Mini Wireless Kit | USB connected to PC |
| 1.47 inch Touch Display — XIAO ESP32-S3 Plus | Built-in LSM6DS3 IMU sensor |
| PC (Windows) | Python 3.11+ |
| USB-C cables ×2 | One for screen, one for robot |
Software Setup
Step 1. Install Arduino CLI
Download and install from Arduino CLI Releases.
Step 2. Install ESP32 Board Support
arduino-cli config init
Edit ~/.arduino15/arduino-cli.yaml and add the ESP32 board URL under board_manager.additional_urls:
board_manager:
  additional_urls:
    - https://raw.githubusercontent.com/espressif/arduino-esp32/gh-pages/package_esp32_index.json
Install the ESP32 core:
arduino-cli core install esp32:esp32
Select XIAO_ESP32S3_Plus as the board target (fqbn) for the screen.
Step 3. Install Seeed GFX Library
The screen display depends on the Seeed_GFX library. Install it from GitHub into your Arduino libraries directory.
Step 4. Install Python Dependencies
pip install reachy-mini pyserial numpy
Step 1: Get the Project Code
git clone https://github.com/Genie-INSPIRE/reachy-mini-sway-screen.git
cd reachy-mini-sway-screen
Project contents:
| File | Purpose |
|---|---|
reachy_sway_screen/reachy_sway_screen.ino | Screen firmware: reads IMU + serial output + draws kaomoji |
reachy_sync/sway_follow.py | Main control program: reads serial + controls robot |
reachy_sync/start_daemon.py | Reachy Mini daemon launcher |
Step 2: Flash the Screen Firmware
1. Find the Screen COM Port
Plug in the screen via USB, open Device Manager, and find the USB-Serial/JTAG COM port (VID 0x303A).
The screen is auto-detected by VID, so COM port number changes don't matter.
2. Compile and Flash
arduino-cli compile --fqbn esp32:esp32:XIAO_ESP32S3_Plus -u -p COM9 --warnings none reachy_sway_screen
Replace COM9 with your actual screen COM port.
3. Calibrate Neutral Position
- Place the screen flat on a table (keep it level)
- Wait 2 seconds (screen shows
hold neutral) - Auto-samples for 0.5 seconds, saves neutral to NVS (persists after power off)
- To recalibrate: send the letter
cto the screen via a serial tool (115200 baud)
You must calibrate the neutral position on first use or when switching screens, otherwise tilt angles will be off.
Step 3: Start the Robot Daemon
1. Find the Robot COM Port
Plug in the robot via USB, find the CH343 chip COM port in Device Manager (VID 0x1A86).
2. Set the COM Port
Edit reachy_sync/start_daemon.py and change COM14 to your actual robot COM port:
# Open start_daemon.py in an editor, change COM14 to your actual port
3. Start
cd reachy_sync
python -u start_daemon.py
You should see Uvicorn running on http://127.0.0.1:8000 — success!
Open http://127.0.0.1:8000/ in a browser to confirm the daemon is running.
Step 4: Run the Main Control Program
cd reachy_sync
python -u sway_follow.py
You should see:
screen connected on COMx
connected
ready: L/R tilt -> body sway + head yaw. F/B tilt -> head pitch.
Tilt the screen, and the robot will follow!
How It Works
Data Flow
Screen IMU (LSM6DS3)
  ax = left/right tilt, ay = forward/back tilt
  tilt = -asinf(ax), pitch = -asinf(ay)
  deadband filter + gain + low-pass filter
  Serial output: "sway <value> pitch <value> rad" (115200 baud)
        ↓
Python (sway_follow.py)
  Reads serial data
  Two-stage low-pass filter (0.22)
  Computes body_yaw, head yaw, head pitch
        ↓
Reachy Mini Daemon (port 8000)
  set_target(body_yaw, antennas, head)
        ↓
Robot motors execute
Screen Firmware Parameters
| Parameter | Value | Description |
|---|---|---|
GAIN | 6.0 | Tilt amplification factor — higher = more sensitive |
FILT | 0.25 | Low-pass filter coefficient — lower = smoother but slower |
AMP | 0.7 | Max output amplitude (rad), ~40° |
deadband | 0.008 | Dead zone (rad), ignores tilt under 0.5° |
Robot-Side Parameters
| Parameter | Value | Description |
|---|---|---|
HEAD_K | 0.40 | Head yaw gain (left/right) |
HEAD_PITCH_K | 0.65 | Head pitch gain (up/down) |
| Filter coefficients | 0.22 / 0.22 | Two-stage low-pass — lower = smoother |
Antenna Mirroring
The two antenna motors on Reachy Mini are mirror-mounted:
- Right antenna (index 0): positive = leans left, negative = leans right
- Left antenna (index 1): positive = leans right, negative = leans left
To make both antennas lean the same direction, use opposite signs: subtract for right, add for left.
Parameter Tuning
Too Laggy
- Increase screen
FILT(e.g. 0.25 → 0.30): stronger filtering on screen side - Decrease robot-side filter coefficient (e.g. 0.22 → 0.15): smoother but slower response
Too Slow / Need Large Tilts
- Increase screen
GAIN(e.g. 6.0 → 8.0): small tilts trigger bigger movements - Increase robot-side filter coefficient (e.g. 0.22 → 0.30): faster response
Head Direction Reversed
| Problem | Solution |
|---|---|
| Left/right reversed | Flip tilt sign (tilt = -asinf(ax) in .ino) |
| Up/down reversed | Flip pitch sign (pt = -asinf(ay) in .ino) |
Kaomoji Direction Wrong
| Problem | Solution |
|---|---|
| Rotation angle | Modify drawFigure(dyn + 1.5708f) — 1.5708 = 90° |
| Tilt direction reversed | Change dyn = kaoDev * 2.0f to dyn = -kaoDev * 2.0f |
FAQ
Q: What to do after power loss?
A: Restart the daemon (python start_daemon.py), then start sway_follow.py. Screen firmware and neutral calibration are saved in NVS and won't be lost.
Q: COM port number changed?
A: The screen is auto-detected by VID (0x303A), no change needed. Update the robot COM port in start_daemon.py.
Q: Robot not moving?
A: Check if the daemon is running on port 8000 (open http://127.0.0.1:8000/ in browser). If not, restart the daemon.
Q: Screen not displaying or not sending data?
A: Check USB cable, reflash firmware, use a serial tool (115200 baud) to verify sway ... pitch ... rad output.
Q: Head direction reversed?
A: Left/right reversed → flip the sign in tilt = -asinf(ax) in the .ino file. Up/down reversed → flip the sign in pt = -asinf(ay).
Tech Support
- Project Repo: GitHub
- Submit Issue: Issues
- Forum: Seeed Studio Forum
- Buy: Reachy Mini | XIAO 1.47'' Touch Display