Advanced Media Controls
This page describes advanced settings to fine-tune the camera and sound system.
Camera
The Raspberry Pi camera can be detected using the following command:
rpicam-hello --list
# Available cameras
# -----------------
# 0 : imx708_wide [4608x2592 10-bit RGGB] (/base/soc/i2c0mux/i2c@0/imx708@1a)
#     Modes: 'SRGGB10_CSI2P' : 1536x864 [120.13 fps - (768, 432)/3072x1728 crop]
#                             2304x1296 [56.03 fps - (0, 0)/4608x2592 crop]
#                              4608x2592 [14.35 fps - (0, 0)/4608x2592 crop]
To take a picture with Reachy Mini:
rpicam-still -t 1 -r -o test.jpg --width 4608 --height 2592
# Copy the picture to your computer
# scp [email protected]:/home/pollen/test.jpg .
All camera controls are detailed in the official documentation. For example, you can change the autofocus settings:
rpicam-still -t 1 -r -o test.jpg --width 4608 --height 2592 --autofocus-mode manual --lens-position 0
rpicam-still -t 1 -r -o test.jpg --width 4608 --height 2592 --autofocus-mode manual --lens-position 1000
At the SDK level, the camera is controlled by GStreamer using the libcamerasrc component. You can view available parameters with the following command:
gst-inspect-1.0 libcamerasrc
Then, the code can be adapted as follows:
def _configure_video(
    self, cam_path: str, pipeline: Gst.Pipeline, webrtcsink: Gst.Element
) -> None:
    self._logger.debug(f"Configuring video {cam_path}")
    camerasrc = Gst.ElementFactory.make("libcamerasrc")
    # camerasrc.set_property("af-mode", "manual")
    # camerasrc.set_property("lens-position", 1000)
Microphones and Speakers
The 4-microphone array is based on Seeed's reSpeaker XMOS XVF3800. It also provides audio output. By default, the audio processor performs acoustic echo cancellation (AEC), so the output from the speaker is canceled out in the microphone input. This way, the robot does not hear itself.
It appears as Pollen Robotics Reachy Mini Audio in the system. Volume control can be adjusted with alsamixer. Press F6 to select the audio card and F5 to visualize input and output volumes. It is recommended to leave everything at 100%, except for PCM (output volume), which you can adjust as needed.
AEC and other audio filtering can be tuned thanks to the XMOS XVF3800. Advanced users can refer to the official documentation to better understand the sound processing. A summary of the parameters is listed on this page.
To access these parameters, use our helper Python script audio_control_utils.py:
# Read a parameter
python src/reachy_mini/media/audio_control_utils.py PP_MIN_NS
# Output:
# PP_MIN_NS: (0.15000000596046448,)

# Write a parameter
python src/reachy_mini/media/audio_control_utils.py PP_MIN_NS --values 0
# Output:
# Writing to PP_MIN_NS with values: [0.0]
# Write operation completed successfully
The microphone array outputs a stereo channel, so it is not possible to get the raw output of all 4 mics at once. However, you can output two raw microphones at a time:
# mic 0 - left channel
python audio_control_utils.py AUDIO_MGR_OP_L --values 3 0
# mic 1 - right channel
python audio_control_utils.py AUDIO_MGR_OP_R --values 3 1

# mic 2 - left channel
python audio_control_utils.py AUDIO_MGR_OP_L --values 3 2
# mic 3 - right channel
python audio_control_utils.py AUDIO_MGR_OP_R --values 3 3
The layout of the linear array is as follows:
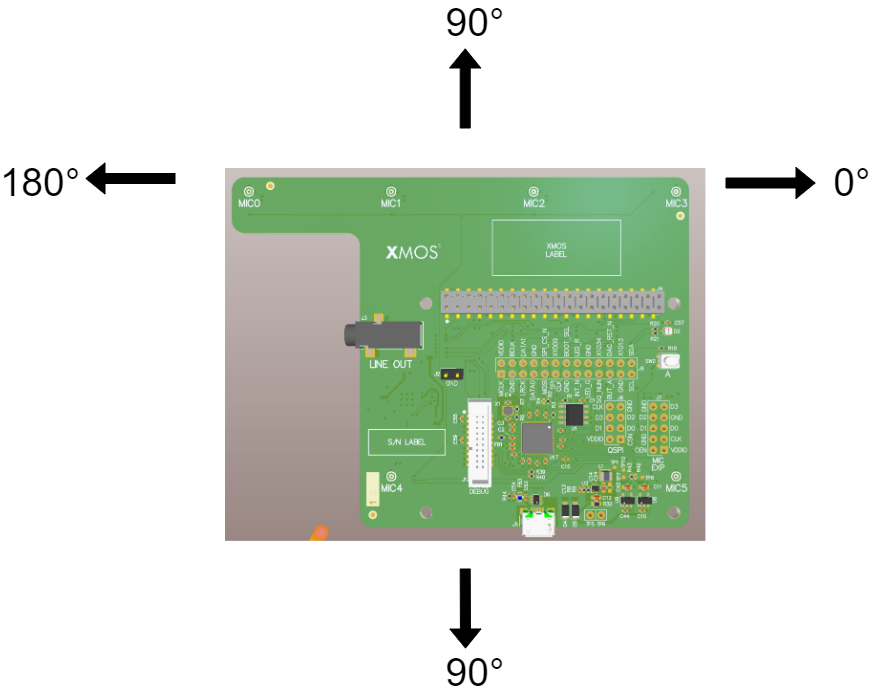
Reachy Mini's right antenna is close to mic 0, while the left antenna is close to mic 3.
Sound Direction of Arrival
Thanks to the 4 microphones, the system can estimate the direction of arrival (DoA) of sound. The direction is given based on the layout above.
python src/reachy_mini/media/audio_control_utils.py DOA_VALUE
# Output
# DOA_VALUE: [0, 133, 0, 0, 0, 1, 0, 0, 0]
python src/reachy_mini/media/audio_control_utils.py DOA_VALUE_RADIANS
# Output
# DOA_VALUE_RADIANS: (0.5410520434379578, 1.0)
This feature is also directly available from the SDK.