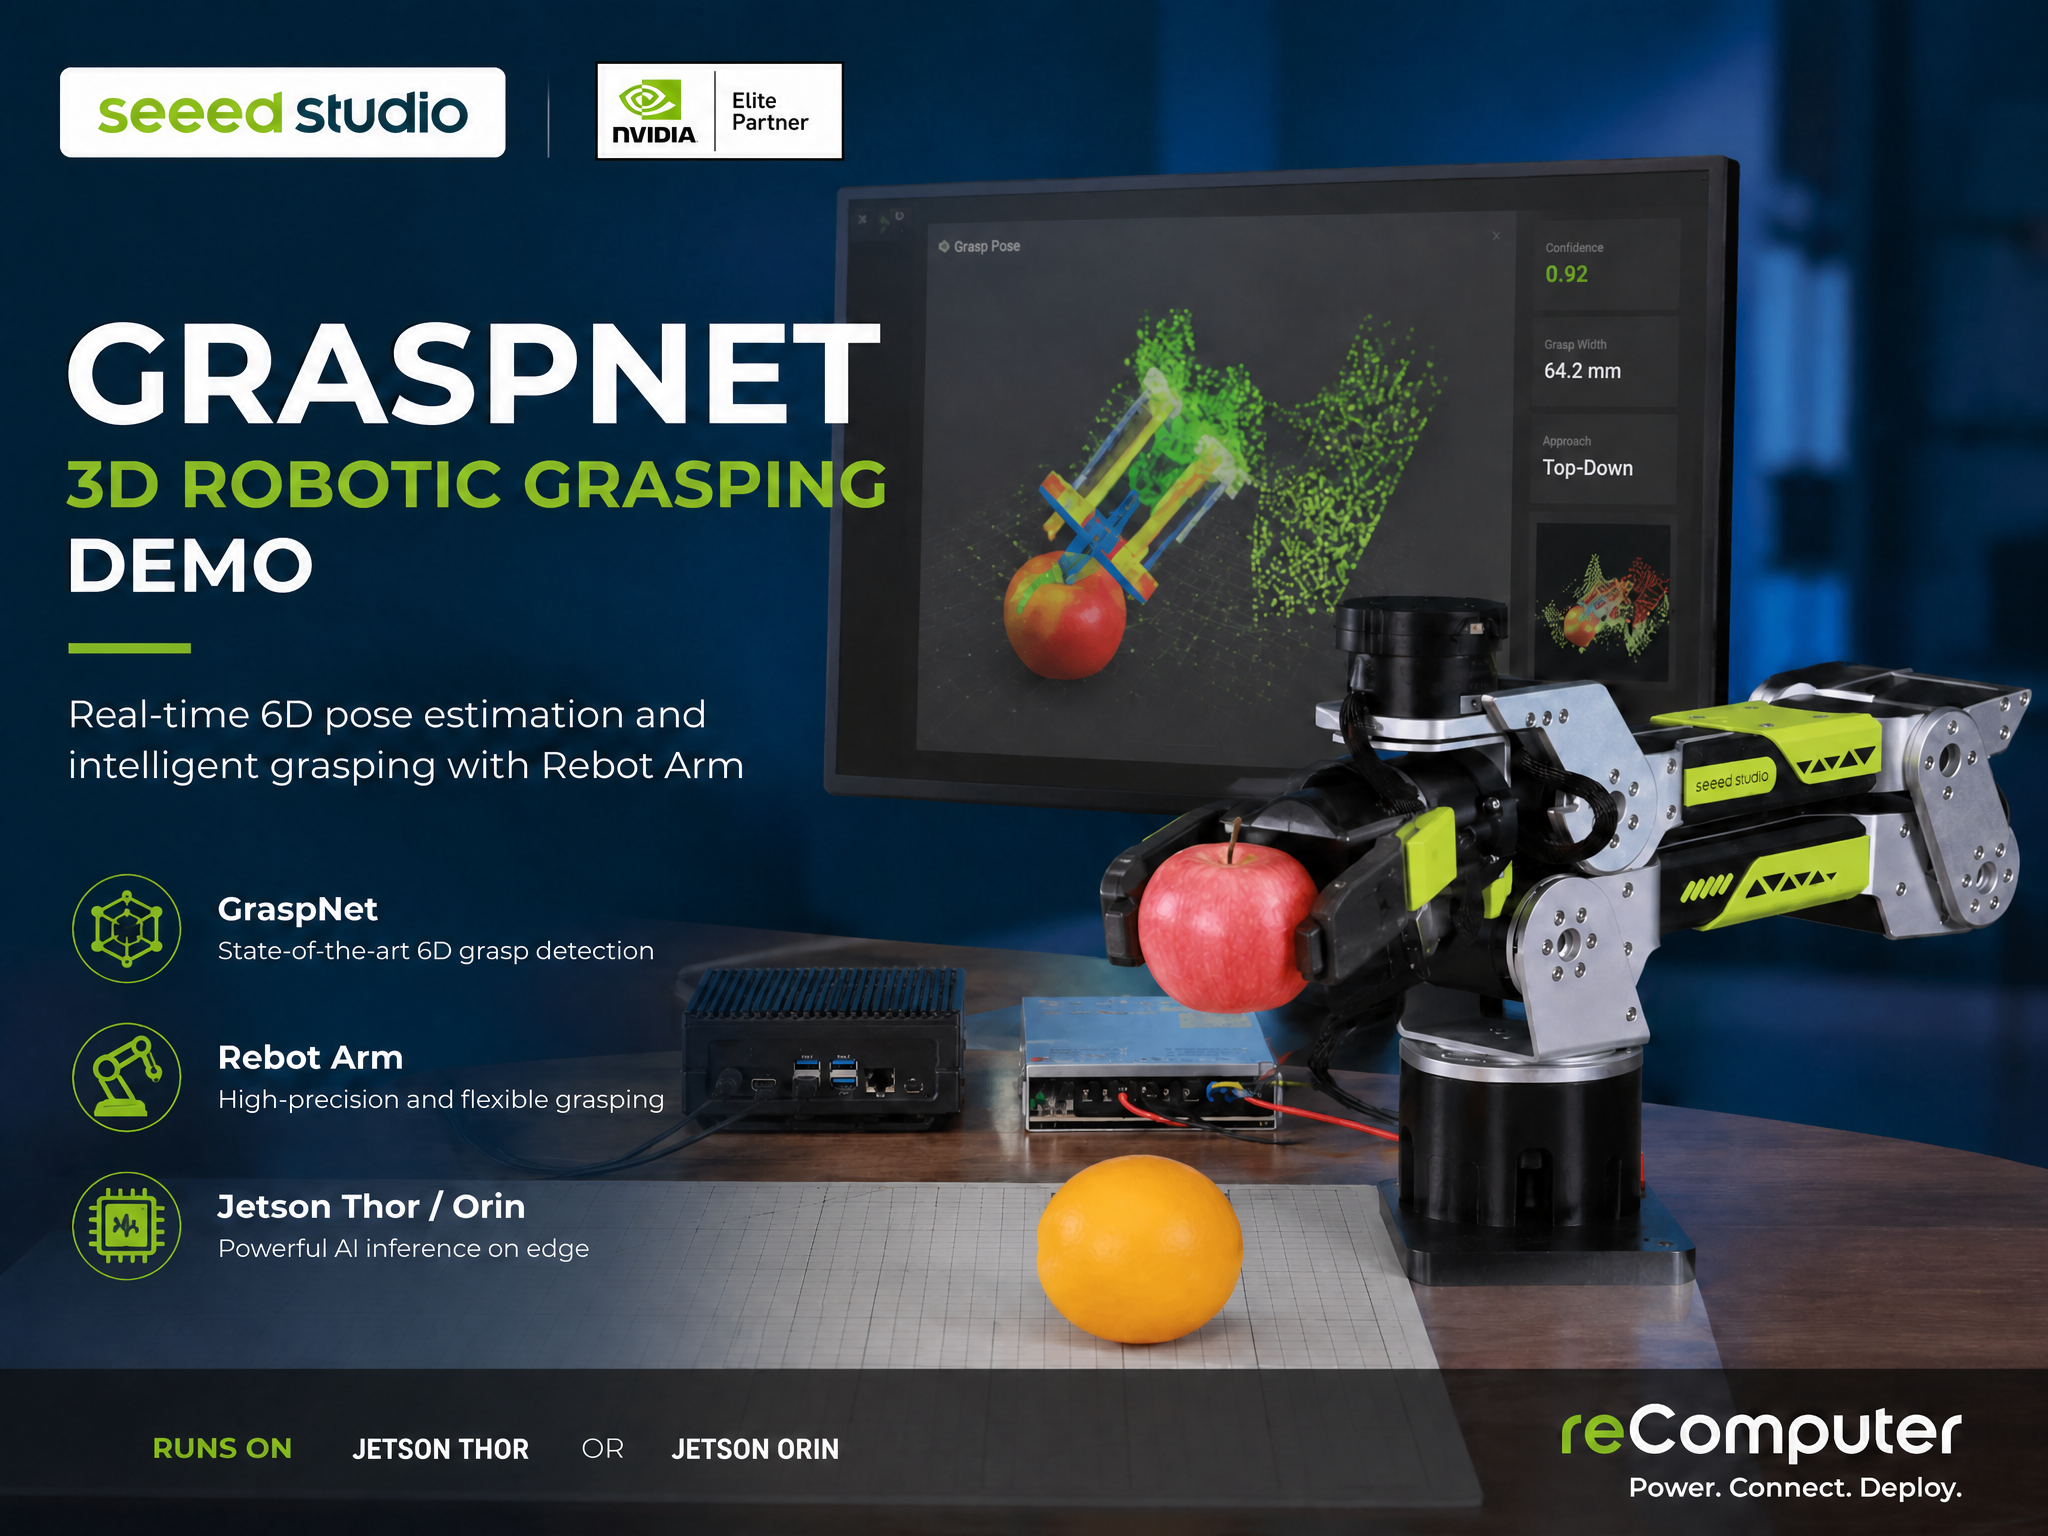
reBot Arm B601-DM GraspNet Visual Grasping on Jetson
This wiki explains how to deploy the reBot Arm B601-DM visual grasping demo on NVIDIA Jetson. The demo combines an RGB-D camera, YOLO instance segmentation, GraspNet 6-DoF grasp pose estimation, eye-in-hand calibration, and real robot control, so the arm can select and grasp common objects on a table.
Version 1.0 of this guide focuses on a reliable single-Jetson deployment and daily operation flow. The default setup uses Orbbec Gemini 2 as the RGB-D camera, YOLO11n-seg TensorRT for target filtering, and GraspNet for generic 6-DoF grasp pose generation.
| reBot Arm B601-DM Bundle with Jetson Orin |
|---|
 |
What You Will Build
The runtime pipeline is:
Orbbec Gemini 2 RGB-D camera
        |
YOLO instance segmentation for target filtering
        |
GraspNet 6-DoF grasp pose estimation
        |
Eye-in-hand calibration transform
        |
reBot Arm IK trajectory and gripper force control
        |
Optional base rotation and object placement
The project provides three practical ways to use the system:
| Mode | Entry point | Typical use |
|---|---|---|
| Web UI | scripts/grasp_web.py | Live video, target selection, grasp preview, real grasp, offset tuning |
| CLI | scripts/grasp.py | Headless grasping or scripted testing |
| HTTP API | scripts/grasp_curl.sh and scripts/grasp_api_client.py | Remote control, automation, integration with other apps |
Hardware and System Preparation
Prepare the following hardware before starting:
- reBot Arm B601-DM
- NVIDIA Jetson device running JetPack 6.x or JetPack 7.x
- Orbbec Gemini 2 RGB-D camera
- USB2CAN adapter for the robot CAN bus
- USB 3.0 cable for the camera
- ArUco marker for hand-eye calibration,
DICT_4X4_50, ID0, 0.1 m edge length - A stable table, enough clearance around the arm, and an emergency power-off method
This demo drives a real robotic arm. During all motion tests and grasp tests, keep hands, cables, and loose objects away from the arm workspace. Start with --dry-run, read-only checks, and small jog values before enabling full robot execution.
Connect the hardware:
- Connect Gemini 2 to Jetson through USB 3.0.
- Connect the USB2CAN adapter to the reBot Arm CAN bus and then to Jetson.
- Power on the reBot Arm.
- Confirm the devices are visible:
lsusb
ls /dev/ttyUSB* /dev/ttyACM* 2>/dev/null || true
Set temporary device permissions for first bring-up:
sudo chmod a+rw /dev/bus/usb/*/*
sudo chmod 666 /dev/ttyUSB0 2>/dev/null || true
sudo chmod 666 /dev/ttyACM0 2>/dev/null || true
For serial devices, it is also recommended to add the current user to dialout, then log out and log back in:
sudo usermod -aG dialout $USER
Deploy the Project on Jetson
Step 1. Install system packages and Miniconda
sudo apt update
sudo apt install -y git wget curl build-essential cmake libusb-1.0-0-dev python3-pip

wget https://repo.anaconda.com/miniconda/Miniconda3-latest-Linux-aarch64.sh
bash Miniconda3-latest-Linux-aarch64.sh
source ~/.bashrc
Step 2. Clone the project
git clone https://github.com/jjjadand/reBot-DevArm-Grasp.git rebot_grasp-jetson
cd rebot_grasp-jetson
If you are using an internal package instead of the public repository, copy that project directory to Jetson and run the remaining commands from the project root.
Step 3. Create the Python environment
Use Python 3.10 on JetPack 6.x. Use Python 3.12 on JetPack 7.x / Thor.
# JetPack 6.x
conda create -y -n graspnet python=3.10

# JetPack 7.x / Thor
# conda create -y -n graspnet python=3.12

conda activate graspnet
python -m pip install -U pip wheel setuptools
Check your JetPack and CUDA versions:
cat /etc/nv_tegra_release
nvcc --version
Step 4. Install Jetson-compatible PyTorch
Do not install the generic PyPI CPU/GPU PyTorch package on Jetson. Install a wheel that matches your JetPack, Python, and CUDA versions. For reComputer users, you can also follow the dedicated guide: Install Pytorch for reComputer Jetson.
Common starting points are:
# JetPack 6.x, CUDA 12.x, Python 3.10
pip install --extra-index-url https://pypi.jetson-ai-lab.io/jp6/cu126 torch torchvision

# JetPack 7.x / Thor, CUDA 13.x, Python 3.12
pip install --extra-index-url https://pypi.jetson-ai-lab.io/sbsa/cu130 torch torchvision
Verify CUDA from Python:
python - <<'PY'
import torch
print("torch:", torch.__version__)
print("cuda available:", torch.cuda.is_available())
print("device:", torch.cuda.get_device_name(0) if torch.cuda.is_available() else "none")
PY
cuda available must be True before continuing.
Step 5. Install Python dependencies
pip install -r requirements-graspnet-jetson.txt
Step 6. Install robot, GraspNet, and GraspNet API SDKs
mkdir -p sdk

git clone https://github.com/vectorBH6/reBotArm_control_py.git sdk/reBotArm_control_py
pip install -e sdk/reBotArm_control_py

git clone https://github.com/graspnet/graspnet-baseline.git sdk/graspnet-baseline
git clone https://github.com/graspnet/graspnetAPI.git sdk/graspnetAPI
pip install -e sdk/graspnetAPI
Download the GraspNet pretrained checkpoint from the GraspNet download page and place it here:
sdk/graspnet-baseline/checkpoints/checkpoint-rs.tar
Step 7. Set CUDA paths and build GraspNet CUDA operators
Set the CUDA path for your JetPack version:
# JetPack 6.x example
export CUDA_HOME=/usr/local/cuda-12.6

# JetPack 7.x / Thor example
# export CUDA_HOME=/usr/local/cuda-13.0

export PATH="$CUDA_HOME/bin:$PATH"
export LD_LIBRARY_PATH="$CUDA_HOME/lib64:$LD_LIBRARY_PATH"
Build the CUDA extensions used by GraspNet:
bash scripts/install_graspnet_cuda_ops.sh
bash scripts/install_graspnet_cuda_ops.sh --check
If you change JetPack, Python, CUDA, or PyTorch later, rebuild with:
bash scripts/install_graspnet_cuda_ops.sh --force
Step 8. Install the Orbbec camera SDK
The project includes a helper that installs pyorbbecsdk2 into the active Python environment:
bash scripts/install_pyorbbecsdk.sh
If you need to build the SDK locally, clone the source tree first and run the source mode:
git clone https://github.com/orbbec/pyorbbecsdk.git sdk/pyorbbecsdk
bash scripts/install_pyorbbecsdk.sh --from-source
Install Orbbec udev rules when the SDK source tree is available:
sudo bash sdk/pyorbbecsdk/scripts/env_setup/install_udev_rules.sh
sudo udevadm control --reload-rules
sudo udevadm trigger
Step 9. Download YOLO weights and export TensorRT on the target Jetson
TensorRT engine files are device-specific. Always export the .engine on the Jetson that will run the demo.
mkdir -p models
wget https://github.com/ultralytics/assets/releases/download/v8.3.0/yolo11n-seg.pt -O models/yolo11n-seg.pt

yolo export model=models/yolo11n-seg.pt format=engine imgsz=640 half=True device=0 workspace=4
The expected output is:
models/yolo11n-seg.engine
If FP16 export fails on your platform, export without half=True:
yolo export model=models/yolo11n-seg.pt format=engine imgsz=640 device=0 workspace=4
Verify and Calibrate
Run these checks in order before attempting a real grasp.
1. Check the RGB-D camera
conda activate graspnet
cd ~/rebot_grasp-jetson

python scripts/verify_pyorbbec_stream.py
python scripts/verify_pyorbbec_stream.py --preview --seconds 10
The text-only check should report RGB and depth frame information. The preview check should show RGB and depth windows when a desktop display is available.
2. Check the robot connection
Start with read-only mode:
python scripts/verify_rebot_arm_motion.py --read-only
Then run a small joint6 jog after confirming the arm path is clear:
python scripts/verify_rebot_arm_motion.py --deg 5
3. Check the GraspNet stack
python scripts/verify_graspnet_stack.py
If the camera is not connected yet but you only want to check Python, CUDA, GraspNet, and YOLO files:
python scripts/verify_graspnet_stack.py --skip-camera
4. Perform eye-in-hand calibration
This project uses eye-in-hand calibration: the camera is mounted on the end effector, and the ArUco marker is fixed on the table. The default config expects a DICT_4X4_50, ID 0, 0.1 m marker. The repository includes printable marker files such as aruco100x100.pdf.
Automatic collection:
python scripts/collect_handeye_eih.py
Manual collection with gravity compensation:
python scripts/collect_handeye_eih.py --manual
Calibration results are saved under the active camera directory:
config/calibration/orbbec_gemini2/hand_eye.npz
config/calibration/orbbec_gemini2/intrinsics.npz
Verify the saved calibration:
python scripts/verify_handeye_calibration.py
Recalibrate whenever the camera mount, gripper, ArUco board size, or table geometry changes.
Run the Web Demo
The Web UI is the recommended first user interface. It provides live MJPEG video, target selection, grasp preview, real grasp execution, compensation tuning, base jog, gripper control, ready pose, and reset operations.
Start in preview mode first. This does not execute real robot motion:
conda activate graspnet
cd ~/rebot_grasp-jetson

python scripts/grasp_web.py \
  --host 0.0.0.0 \
  --port 8090 \
  --num-point 12000 \
  --cloud-crop-nsample 32
Open the Web UI from a browser:
http://<jetson_ip>:8090
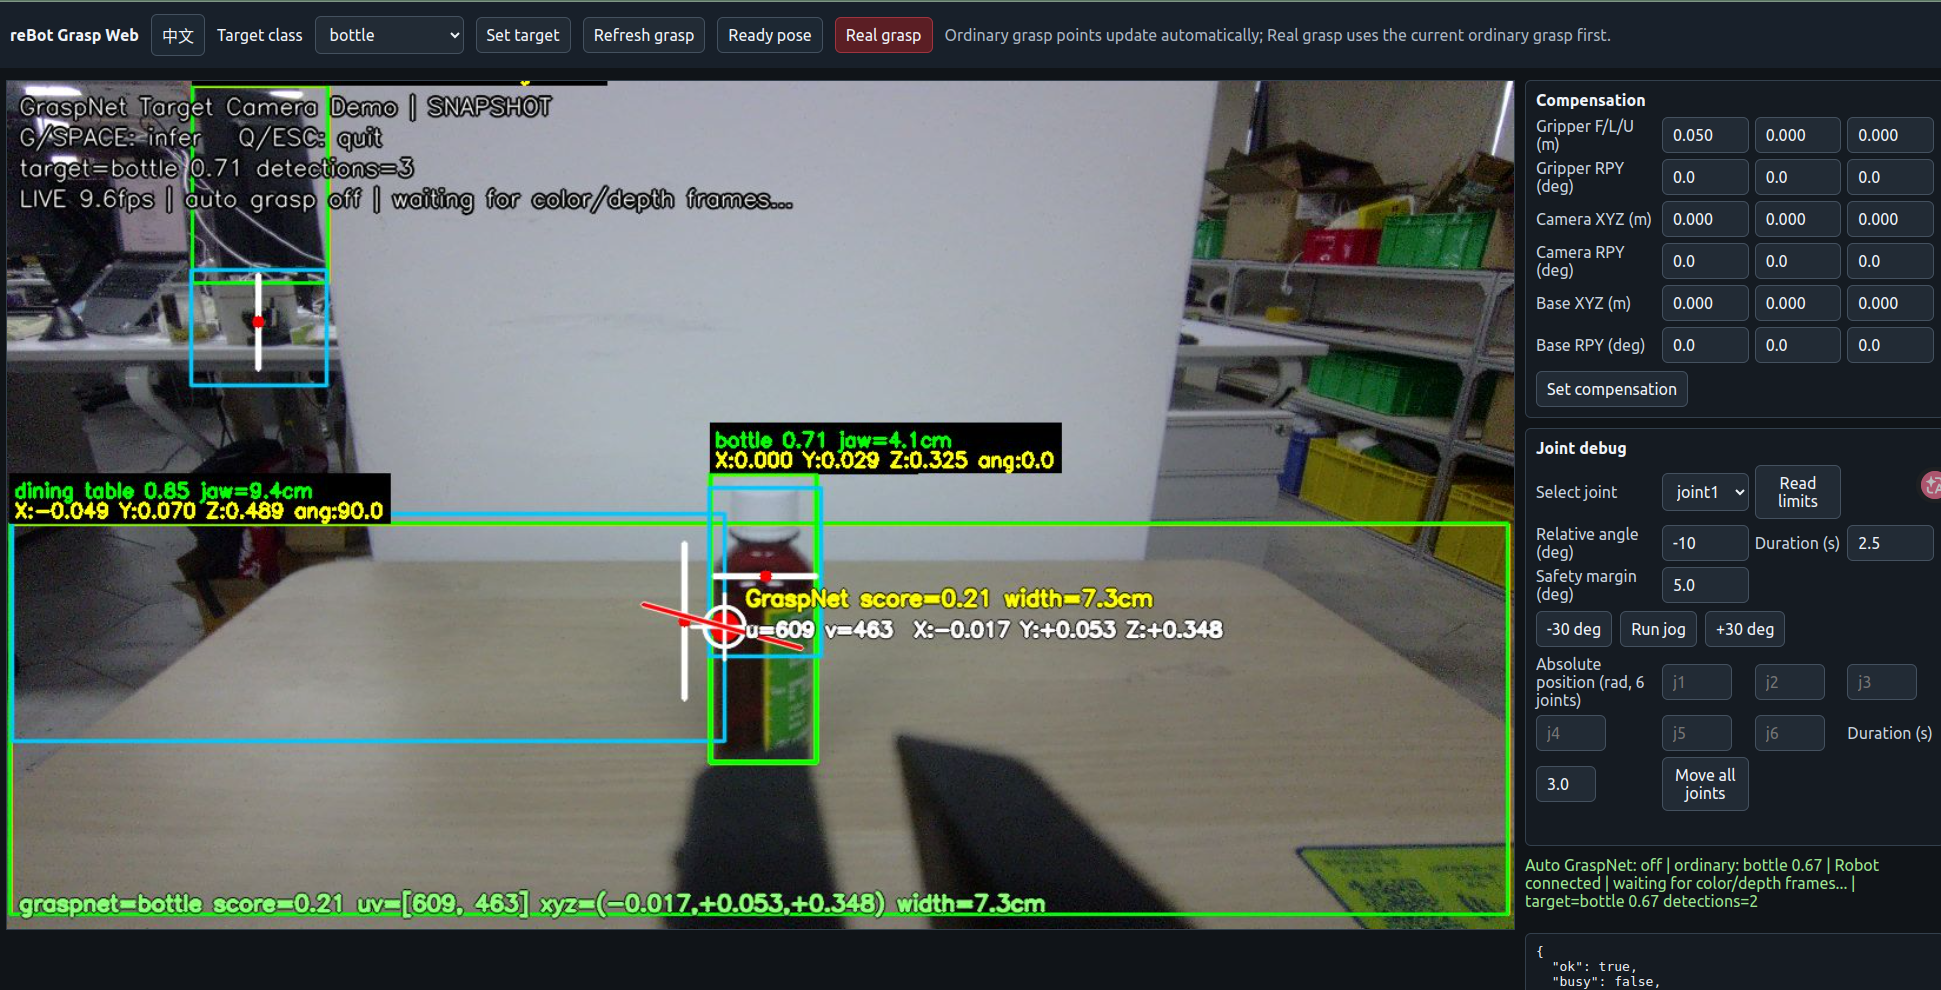
Use preview mode to confirm camera stream, YOLO detections, target filtering, and grasp-point generation. Click the infer or refresh control in the Web UI to update GraspNet preview.
When the scene is stable and the verification steps have passed, start with real robot execution:
python scripts/grasp_web.py \
  --host 0.0.0.0 \
  --port 8090 \
  --enable-robot \
  --num-point 12000 \
  --cloud-crop-nsample 32
For first real tests, disable post-grasp placement so the arm only performs the grasp and recovery motion:
python scripts/grasp_web.py \
  --host 0.0.0.0 \
  --port 8090 \
  --enable-robot \
  --no-place-after-grasp \
  --num-point 12000 \
  --cloud-crop-nsample 32
Useful startup options:
| Option | Purpose |
|---|---|
--enable-robot | Allow real arm and gripper motion |
--target-class cup | Preselect a target class |
--no-yolo | Disable YOLO filtering and run full-scene GraspNet |
--camera-type orbbec_gemini2 | Force the camera driver |
--no-place-after-grasp | Skip base rotation and placement after grasp |
--num-point 12000 | Lower GraspNet point count for Jetson memory |
--cloud-crop-nsample 32 | Lower CloudCrop samples for Jetson memory |
--graspnet-interval 2.0 | Set automatic GraspNet update interval when enabled |
The normal Web UI workflow is:
- Click Ready to move the arm to the ready pose.
- Select a target class, or leave it empty to use detected objects.
- Click Infer or Refresh to compute a grasp pose.
- Check that the grasp marker looks reasonable in the video.
- Adjust gripper, camera, or base compensation if needed.
- Click Real Grasp only when the arm path is clear.
- Use Reset if the scene changes or the robot needs to return to a safe state.
Compensation values are used to correct small mechanical and calibration errors. After tuning in the Web UI, persist the values in config/compensation.json or copy stable values into your deployment notes. Use small increments, for example 0.005 m for position offsets and 1 to 2 degrees for rotation offsets.
CLI and API Usage
For a headless dry-run, use:
python scripts/grasp.py --dry-run --camera-type orbbec_gemini2 --target-class cup
For full-scene GraspNet without YOLO filtering:
python scripts/grasp.py --dry-run --camera-type orbbec_gemini2 --no-yolo
For real CLI execution:
python scripts/grasp.py --camera-type orbbec_gemini2 --target-class cup
Disable placement during CLI commissioning:
python scripts/grasp.py \
  --camera-type orbbec_gemini2 \
  --target-class cup \
  --no-place-after-grasp
To inspect GraspNet live output without executing the robot:
python scripts/graspnet_camera_demo.py --auto --target-class cup
python scripts/graspnet_camera_demo.py --auto --no-yolo --no-visualizer
For HTTP automation, start the Web service with the helper:
bash scripts/grasp_curl.sh serve --enable-robot --no-auto-graspnet
In another terminal:
bash scripts/grasp_curl.sh state
bash scripts/grasp_curl.sh ready
bash scripts/grasp_curl.sh target bottle
bash scripts/grasp_curl.sh infer
bash scripts/grasp_curl.sh grasp
bash scripts/grasp_curl.sh reset
The same operations can be called directly with curl:
BASE=http://127.0.0.1:8090

curl -s "$BASE/state"
curl -s -X POST "$BASE/ready" -H "Content-Type: application/json" -d "{}"
curl -s -X POST "$BASE/target" -H "Content-Type: application/json" -d '{"class_name":"bottle"}'
curl -s -X POST "$BASE/infer" -H "Content-Type: application/json" -d "{}"
curl -s -X POST "$BASE/grasp" -H "Content-Type: application/json" -d "{}"
Other useful endpoints:
| Endpoint | Method | Purpose |
|---|---|---|
/state | GET | Current detection, grasp, and Web runtime state |
/robot/state | GET | Robot joints, TCP pose, gripper state |
/stream.mjpg | GET | MJPEG camera stream |
/compensation | POST | Set gripper, camera, and base compensation |
/joint/limits | GET | Read joint positions and limits |
/joint/jog | POST | Jog one joint, often joint1 for base tests |
/move/joints | POST | Move all joints to absolute positions |
/move/pose | POST | Move TCP to a target pose through IK or trajectory mode |
/gripper | POST | Open, close, release, or read gripper state |
/auto_grasp | POST | Run a background target-search and grasp cycle |
Configuration and Tuning
The main configuration file is:
config/default.yaml
Default camera settings:
camera:
  type: orbbec_gemini2
  color_width: 1280
  color_height: 720
  depth_width: 1280
  depth_height: 720
  fps: 30
Default detection and GraspNet settings:
yolo:
  model_name: "yolo11n-seg.engine"
  device: "auto"

graspnet:
  checkpoint: "checkpoint-rs.tar"
Default placement behavior:
grasp_pipeline:
  place:
    enabled: true
    base_joint: joint1
    base_delta_deg: 90.0
    base_direction: auto
    base_rotate_duration: 2.5
    base_safety_margin_deg: 5.0
    return_home: false
If the gripper consistently misses the object, tune in this order:
| Symptom | First tuning target |
|---|---|
| Gripper is too far in front or behind | grasp_forward_offset / Web gripper forward |
| Gripper misses left or right | grasp_lateral_offset or camera X/Y compensation |
| Gripper is too high or low | grasp_vertical_offset or camera Z compensation |
| Wrist angle is wrong | Gripper roll, pitch, yaw compensation |
| All grasps shift in the same direction | Camera or base compensation |
Demo Video
Troubleshooting
torch.cuda.is_available() returns False: reinstall a JetPack-matched PyTorch wheel. Generic PyPI torch is not suitable for Jetson deployment.
No module named pointnet2._ext or No module named knn_pytorch.knn_pytorch: rebuild GraspNet CUDA operators:
bash scripts/install_graspnet_cuda_ops.sh --force
pyorbbecsdk import failed or the camera cannot open: reinstall the SDK and check USB permissions:
bash scripts/install_pyorbbecsdk.sh
sudo chmod a+rw /dev/bus/usb/*/*
python scripts/verify_pyorbbec_stream.py
YOLO .engine fails to load: re-export it on the same Jetson. Engine files should not be copied between Jetson models, JetPack versions, or TensorRT versions.
ArUco marker is not detected: confirm the marker dictionary is DICT_4X4_50, ID is 0, marker edge length is 0.1 m, lighting is stable, and the marker is flat and fully visible.
The robot connects but motion fails: run verify_rebot_arm_motion.py --read-only, confirm the USB2CAN device, check motor power, and test a small --deg 5 jog before retrying grasp execution.
GraspNet runs out of memory: reduce --num-point, reduce --cloud-crop-nsample, close desktop applications, and avoid running multiple heavy inference processes at the same time.
Resources
- reBot Arm GraspNet demo reference: https://github.com/EclipseaHime017/reBot-DevArm-Grasp
- reBot Arm SDK: https://github.com/vectorBH6/reBotArm_control_py
- GraspNet baseline: https://github.com/graspnet/graspnet-baseline
- GraspNet API: https://github.com/graspnet/graspnetAPI
- Orbbec pyorbbecsdk: https://github.com/orbbec/pyorbbecsdk
- Install Pytorch for reComputer Jetson: https://wiki.seeedstudio.com/install_torch_on_recomputer/
Tech Support & Product Discussion
Thank you for choosing our products! We provide several support channels for questions, discussion, and issue reporting.