Getting Started with reBot Arm B601-RS
![]()
![]()
![]()
![]()
6-DOF Robotic Arm · Multi-Motor Support · Kinematics Solver · Trajectory Planning · Fully Open Source
The reBot Arm project has been open-sourced on GitHub. This guide will take you through the quick start of B601-RS, from assembly to operation. The content of this guide is racing towards you at the speed of light — stay tuned.
About Power Supply
- The robotic arm is not shipped with a power supply / does not include a power supply by default. You can connect a battery yourself, or purchase our open-source 48V 12.5A MeanWell Power Supply or Amazon, Please do not purchase power supplies from unbranded manufacturers or unsafe channels. Any risks or consequences arising therefrom shall be borne by the individual.
If your household voltage is 220V, set the voltage selector switch on the side of the power supply to 230V. If your household voltage is 110V, switch it to 115V.
| 220V | 110V |
|---|---|
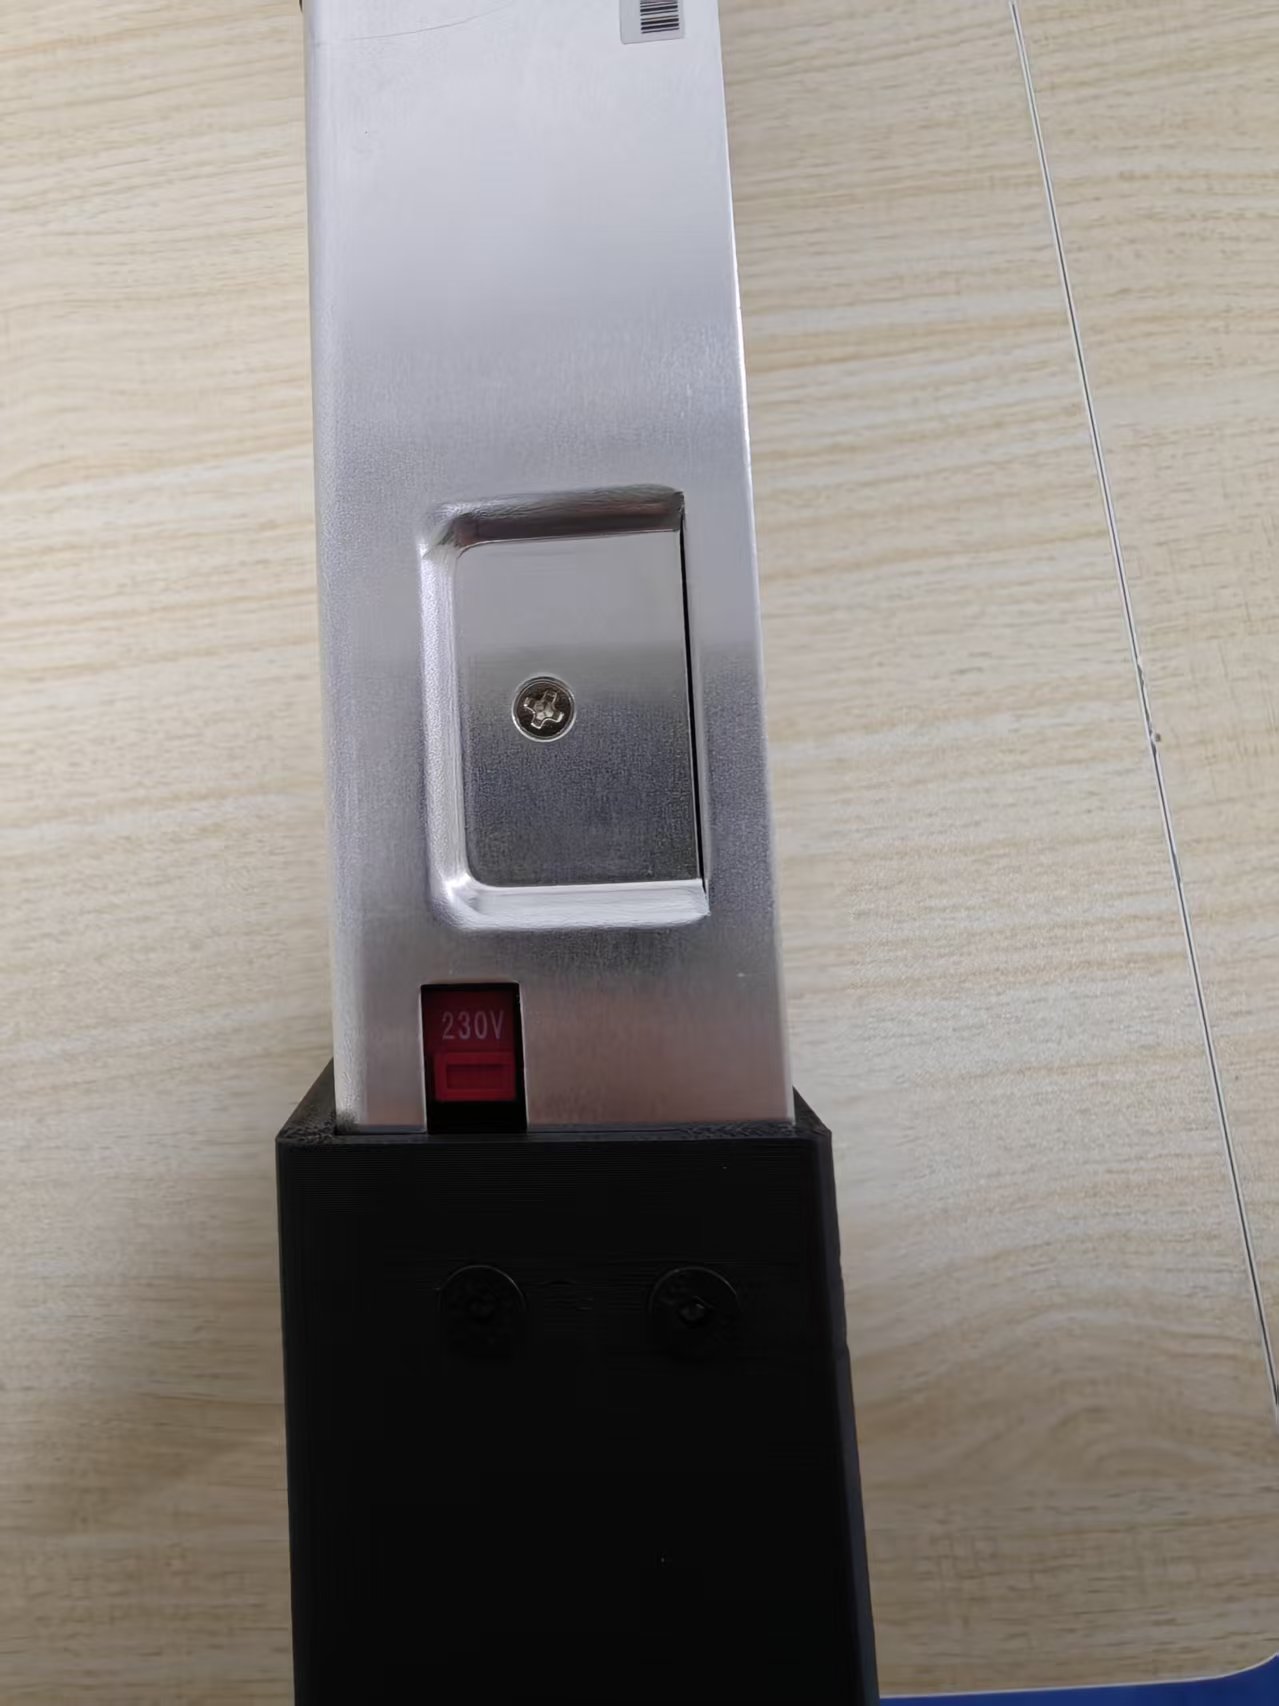 | 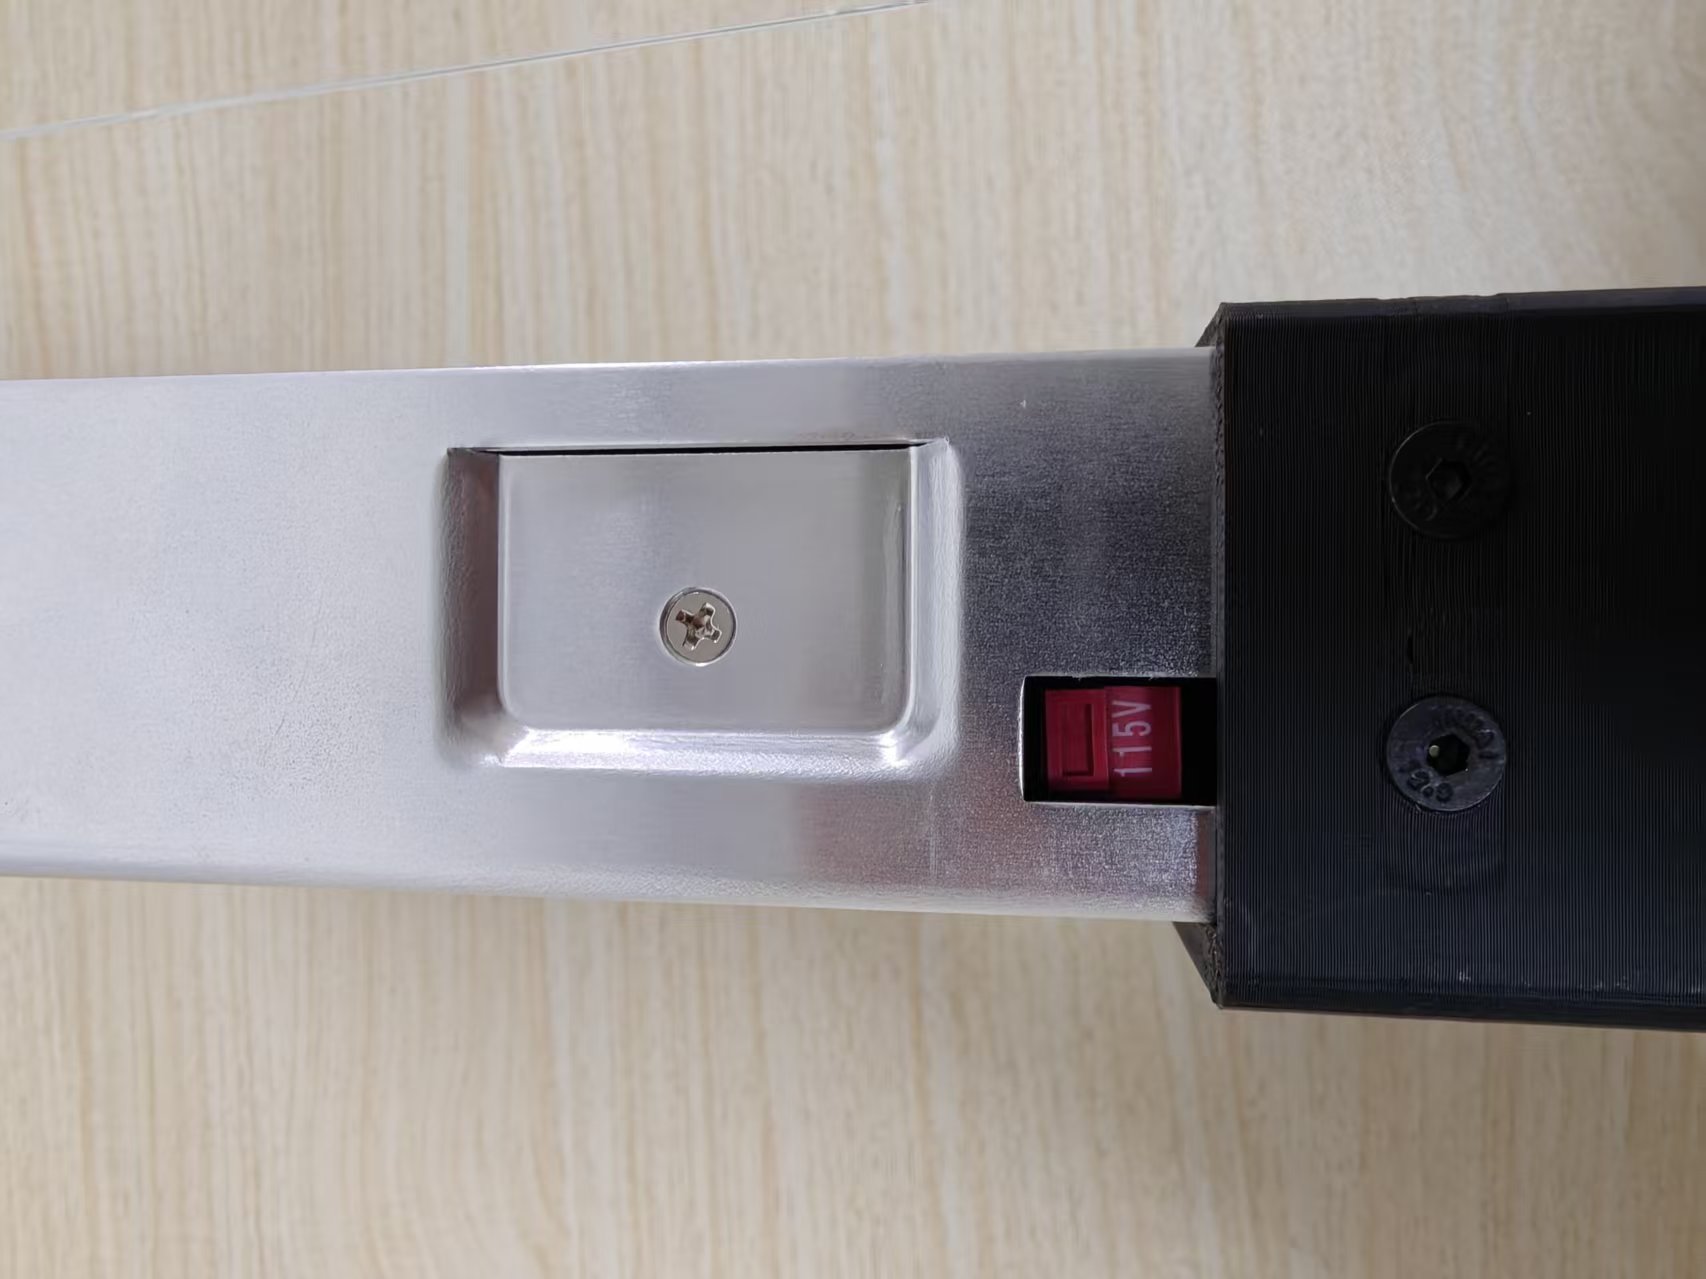 |

-
Alternatively, you can choose our open-source 24V 14.6A MeanWell power supply enclosure for self-assembly. The text instructions and BOM are open-sourced in the GitHub repository (recommended only for developers with relevant power supply assembly experience).
Assembly reference video:
Step 1: Assembly Guide
- Before assembly, please read the following instructions carefully. To ensure a smooth assembly process and a complete hands-on experience, please be patient, stay focused, and always follow these key points:
- This kit includes numerous screws and structural parts, some of which look similar. Please carefully verify the screw specifications and part models, and confirm the installation orientation before fastening.
- The video was recorded in early April. There may be minor adjustments to parts later, but this does not affect the assembly quality when following the video. The final parts are subject to what is shipped.
- For ease of screw installation and removal, the open-source BOM specifies standard screws. However, the screws shipped with the kit have thread-lock applied. You may also use your own preferred tools or an electric screwdriver (highly recommended to have one ready). If using an electric tool, be sure to set the torque to a low-to-medium level (3–6 kgf·cm) to avoid excessive torque that could strip the screws, causing irreversible damage where parts cannot be removed. If there is any sign of stripping, immediately replace the screw or realign and retry. Stripped thread-lock screws cannot be removed with a screw extractor and will scrap the entire part. Therefore, please proceed with caution.
- Please prioritize safety during assembly to avoid pinched fingers or crush injuries. Children should complete this project with the accompaniment of a parent or guardian.
Step 2: Calibrate the Robotic Arm and Get Started
-
Explore our MotorBridge platform. This platform is a one-stop comprehensive solution that supports continuous expansion of motor types, covering Damiao motors, Robstride motors, Hightorque motors, Myactuator motors, Hexfellow, and more. It is also compatible with continuously updated robotic arm products like reBot. The platform is user-friendly for beginners and also provides a Python SDK with fully consistent functionality for developers.
-
Experience the new features and details of MotorBridge specifically adapted for the reBot robotic arm, including one-click zero-point calibration, parameter writing, drag-and-drop motor control via the UI, and a built-in model visualization interface.
-
This tool is fully compatible with Windows, Ubuntu, and macOS operating systems.
-
It has been verified that virtual machine performance is insufficient for running demos and there are configuration issues. It is recommended to use an Ubuntu physical machine to control the robotic arm.
-
(Beta version) Let an agent help you initialize the robotic arm. Copy the following content and send it to the agent:
Please follow the process in AGENTS.md (https://github.com/Welt-liu/reBot-B601-Agent-Guide/blob/main/en/AGENTS.md) to help the user complete the initialization of a new robotic arm.
Note: If you purchased a pre-assembled kit, please tell the agent during the motor ID writing step: "I purchased a pre-assembled kit, please scan motors 1–7 to verify they are all online, do not rewrite the motor IDs."
- The agent uses CLI commands to complete motor ID writing, while the wiki uses a web UI interaction method. Both approaches work.
You should have completed the preliminary preparation for the robotic arm assembly by following the video. Next, we will introduce the steps for writing motor IDs and calibrating the robotic arm.
Please refer to the video and text tutorial. Before controlling the robotic arm, you need to reset the zero point again.
1. Install Miniforge (Recommended) (Supports Windows\Ubuntu\macOS\Jetson\Raspberry Pi)
- Install Miniforge and create a virtual environment to avoid conflicts with other environment packages that could cause demo failures.
Ubuntu\Jetson\Raspberry Pi:
wget "https://github.com/conda-forge/miniforge/releases/latest/download/Miniforge3-$(uname)-$(uname -m).sh"
bash Miniforge3-$(uname)-$(uname -m).sh
or macOS:
curl -L -O "https://github.com/conda-forge/miniforge/releases/latest/download/Miniforge3-MacOSX-$(uname -m).sh"
bash Miniforge3-MacOSX-$(uname -m).sh
or Windows:
Open the Miniforge Release page in your browser, find the latest version of Miniforge3-Windows-x86_64.exe and click to download:
https://github.com/conda-forge/miniforge/releases
- Create a Python 3.12 virtual environment:
Git Bash users: If the conda command is not found, it means Git Bash has not loaded the conda environment. You need to initialize it first:
# Temporary (current terminal only), replace <install_path> with the actual path
source <install_path>/etc/profile.d/conda.sh

# Permanent (write to bashrc, run once)
echo 'source <install_path>/etc/profile.d/conda.sh' >> ~/.bashrc
source ~/.bashrc
To let PowerShell automatically activate the conda environment:
conda init powershell
conda create -y -n rebot python=3.12
- Activate the virtual environment. You need to re-run this activation command every time you open a terminal to use reBot-related features:
conda activate rebot
2. Install Motorbridge
After activating the reBot virtual environment, run the following command to install motorbridge:
If you experience low frame rates during teleoperation on macOS, it may be caused by an outdated WCH CH34x driver version. For macOS 10.14 and later, the system includes a built-in AppleUSBCHC0M driver. You can uninstall the old driver and switch to the macOS built-in driver, which should effectively improve frame rates.
pip install motorbridge
3. PCAN-USB
Get the PCAN-USB device working on the CAN bus at 1Mbps for robotic arm communication.
Ubuntu\Jetson\Raspberry Pi:
# The kit includes PCAN-USB, which should normally show up as can0 or can1
sudo modprobe peak_usb
ip -br link

# If can0 appears, set the bitrate
sudo ip link set can0 down 2>/dev/null
sudo ip link set can0 type can bitrate 1000000 restart-ms 100
sudo ip link set can0 up
or macOS:
If libPCBUSB.dylib cannot be loaded, install PCBUSB first:
curl -L -o macOS_Library_for_PCANUSB_v0.13.tar.gz \
  https://raw.githubusercontent.com/tianrking/motorbridge/main/third_party/pcan/macos/macOS_Library_for_PCANUSB_v0.13.tar.gz
tar -xzf macOS_Library_for_PCANUSB_v0.13.tar.gz
cd PCBUSB
sudo ./install.sh
Configure DYLD_LIBRARY_PATH to ensure motorbridge-gateway can find the PCBUSB library at runtime. Create an activation script in the conda environment so it takes effect automatically each time you run conda activate rebot:
mkdir -p "$CONDA_PREFIX/etc/conda/activate.d"
cat > "$CONDA_PREFIX/etc/conda/activate.d/env_vars.sh" << 'EOF'
export DYLD_LIBRARY_PATH="/usr/local/lib${DYLD_LIBRARY_PATH:+:$DYLD_LIBRARY_PATH}"
EOF

echo $DYLD_LIBRARY_PATH
Check if ready:
# Check Python package and CLI are ready
python3 -c "import motorbridge; print('motorbridge OK')"
motorbridge-cli --help

# Optional: Check if PCBUSB runtime is loadable
python3 -c "import ctypes; ctypes.CDLL('libPCBUSB.dylib'); print('PCBUSB load OK')"
or Windows:
Please visit pcan-usb to install the PCAN-USB driver.
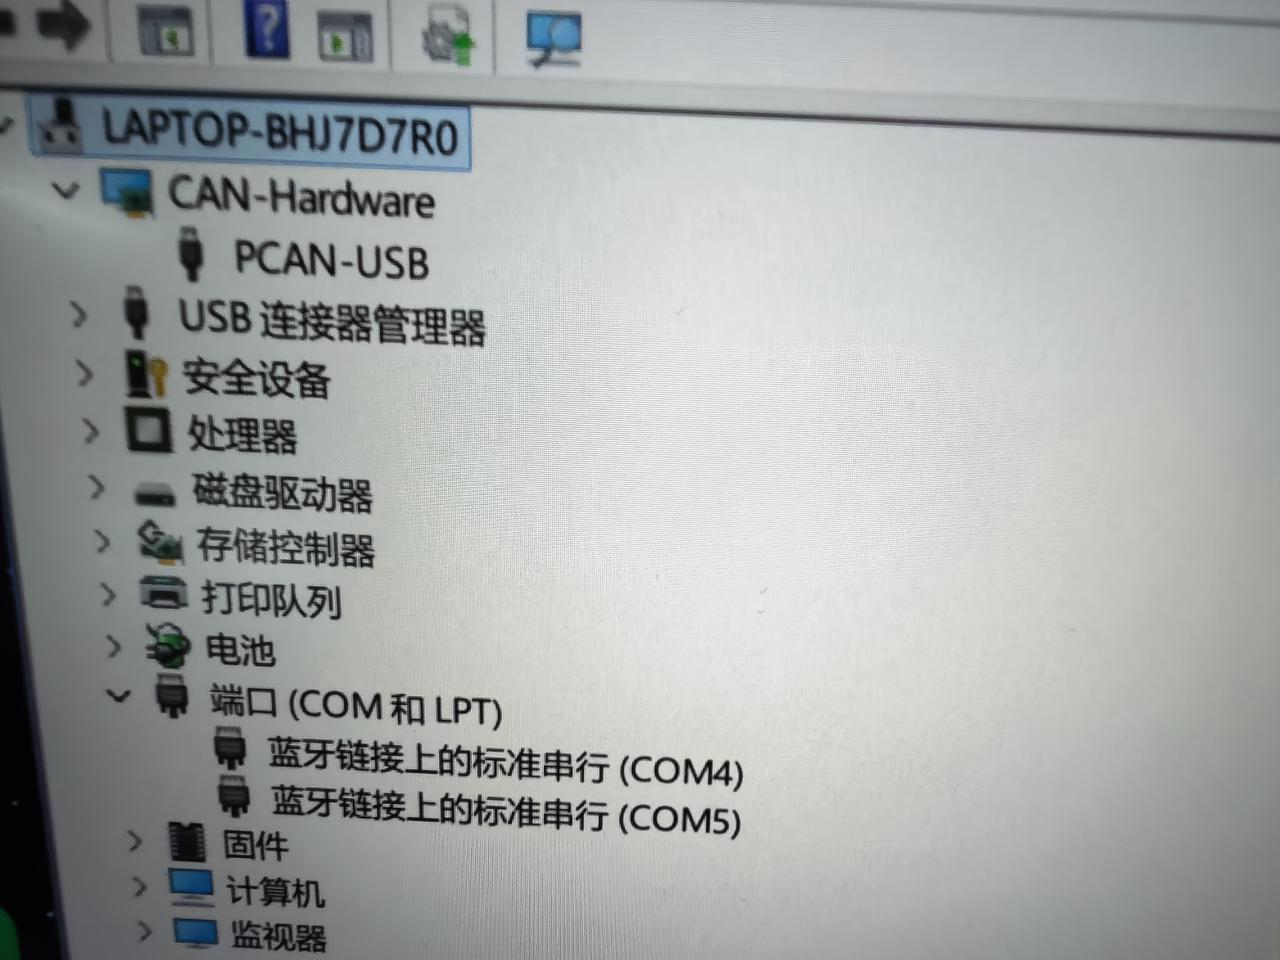
If PCAN-USB is not detected in Device Manager after installing the driver, expand the section below, download the PCAN firmware, and follow the recovery steps.
PCAN firmware download and driver recovery steps
If PCAN-USB still does not work after installing the driver and Device Manager does not show the PCAN-USB device illustrated below, download the PCAN firmware package and follow these steps to install the DFU driver and reflash the firmware.

Install the DFU Driver
- Extract the downloaded package. It contains the
Dfu toolandpcanfolders.

- Open the
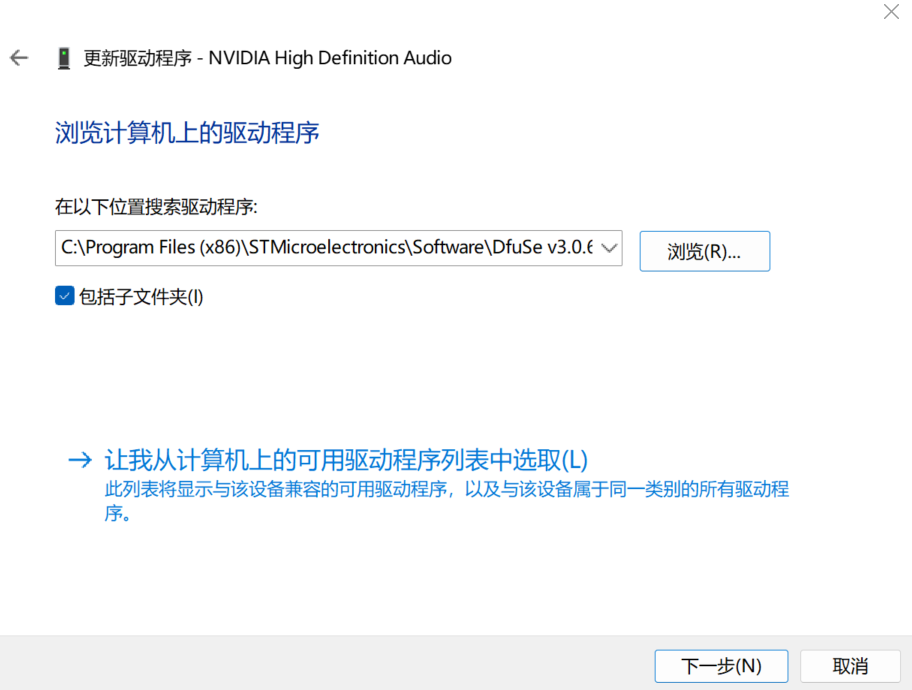
Dfu toolfolder and run the.exeinstaller. After installation, record the driver installation path, for example:
C:\Program Files (x86)\STMicroelectronics\Software\DfuSe v3.0.6\Bin\Driver

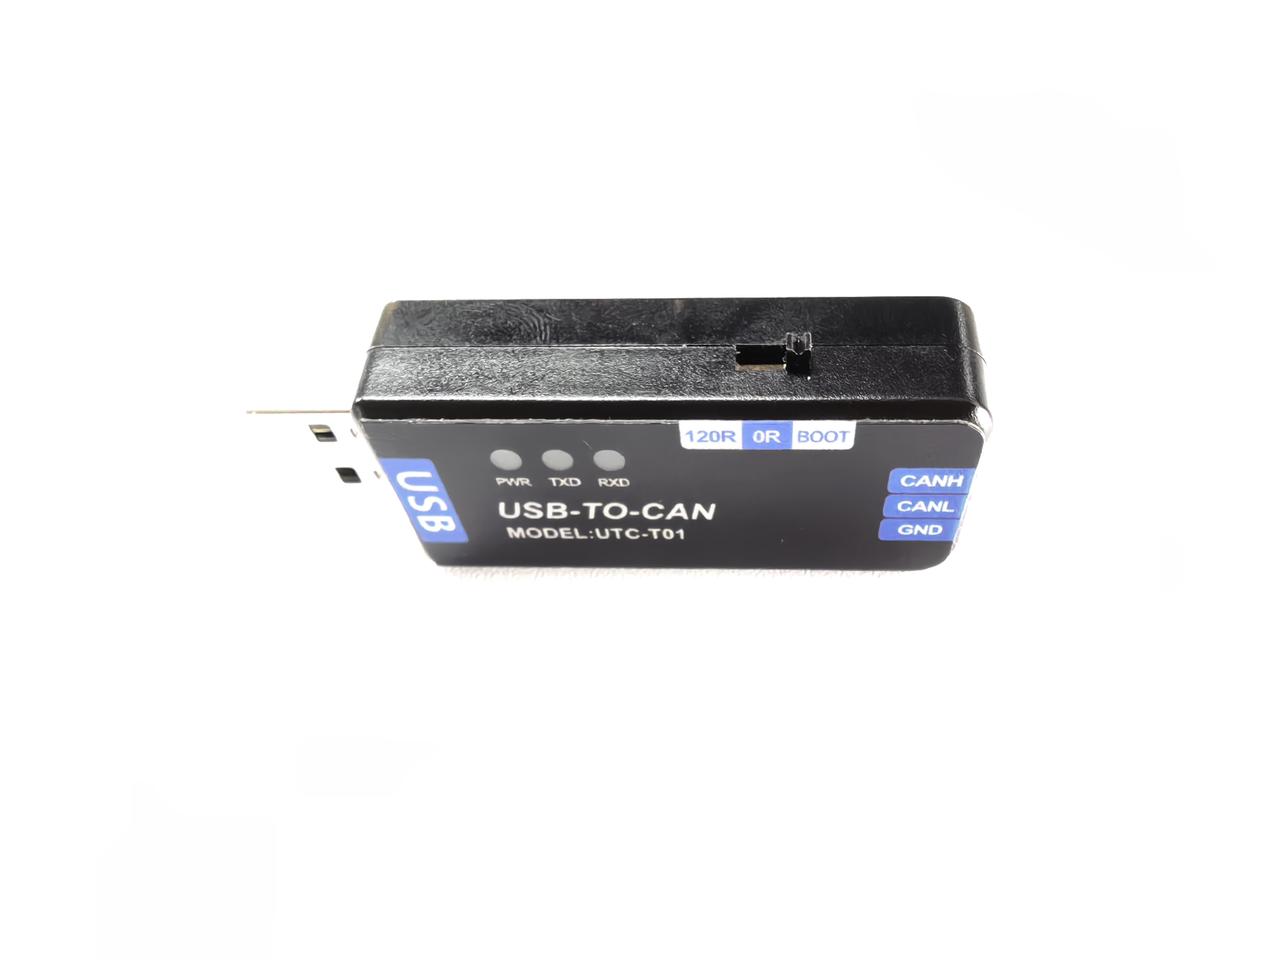
- Set the DIP switch on the USB2CAN module to BOOT, then connect the module to your computer.
- Open Device Manager, locate Other devices → STM32 BOOTLOADER, right-click it, select Update driver, and then select Browse my computer for drivers.

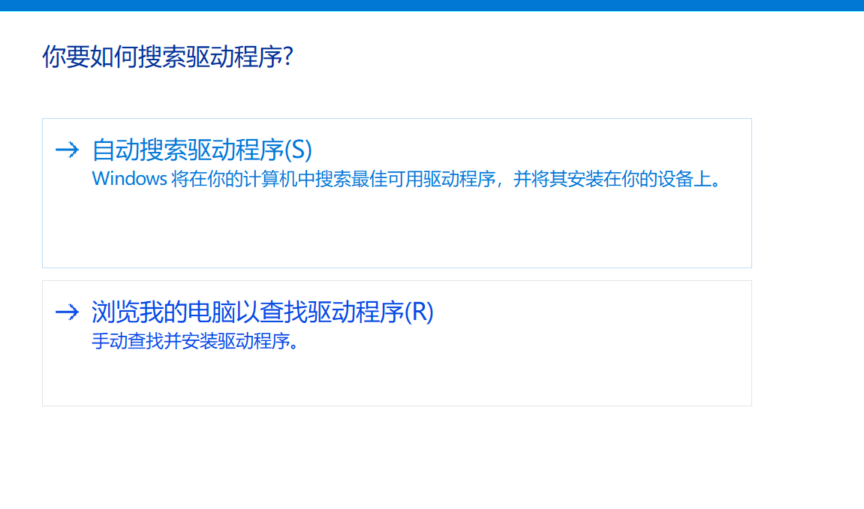
- Paste the DfuSeDemo driver path recorded earlier into the location field, select Include subfolders, and click Next.
-
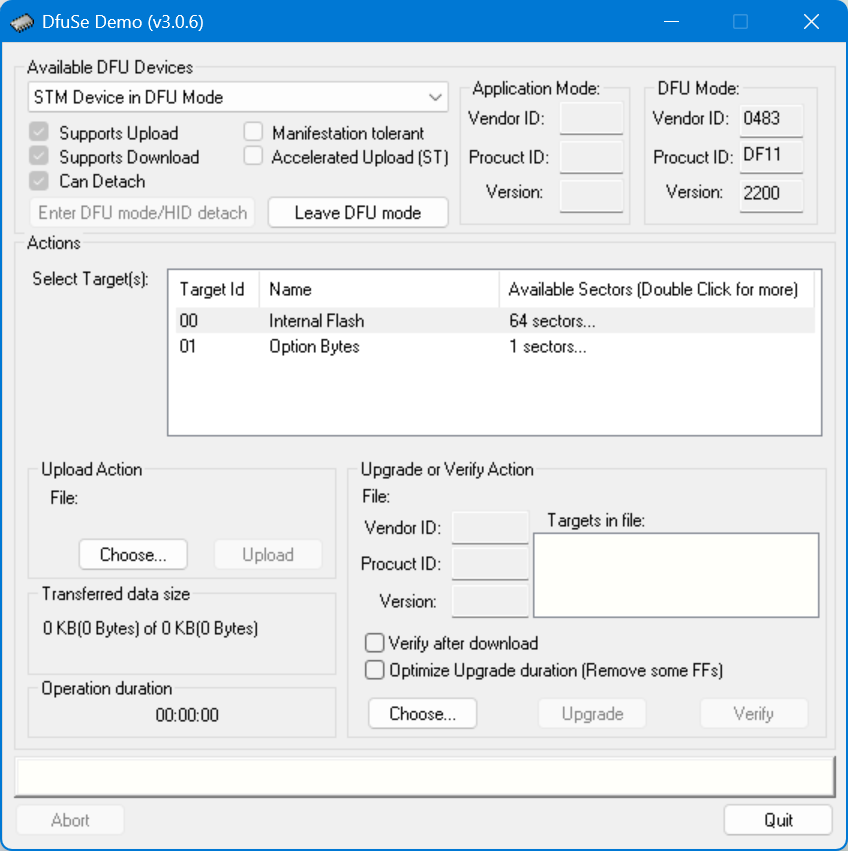
Disconnect and reconnect the USB2CAN module. If it is now identified as STM Device in DFU Mode, the driver update was successful.
-
Open DfuSeDemo and confirm that it correctly detects the USB2CAN module.
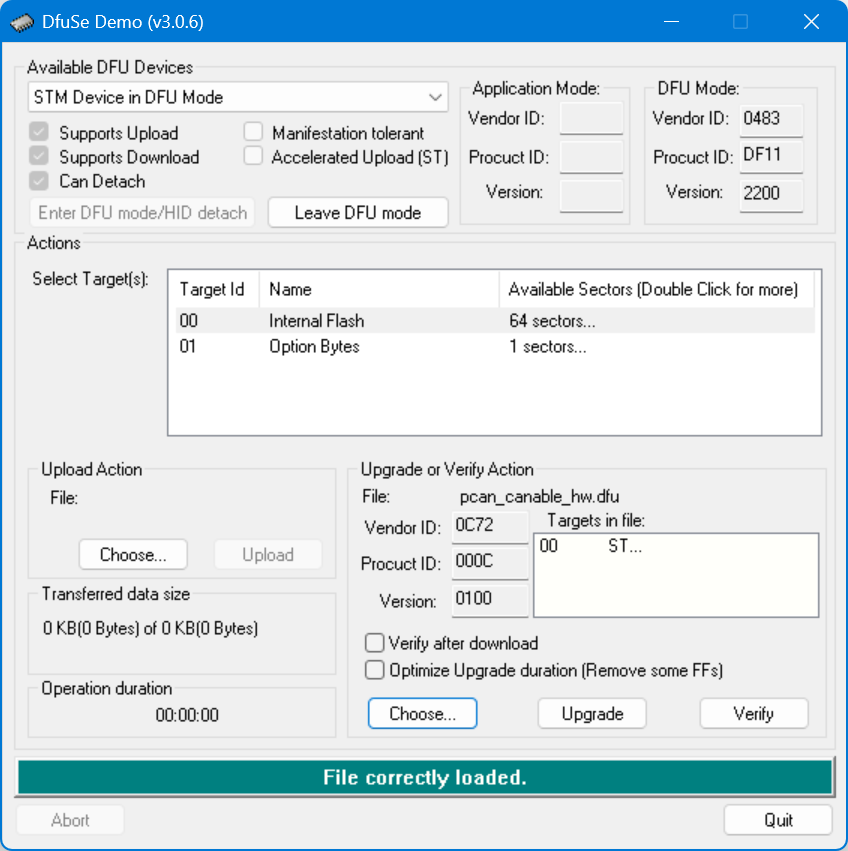
Flash the PCAN Firmware
- In DfuSeDemo, click Upgrade or Verify Action → Choose..., and select the firmware from the extracted
pcanfolder. - Click Upgrade, click Yes in the confirmation dialog, and wait for the firmware flashing process to finish. You can then close DfuSeDemo.

Restore and Verify the Device
Disconnect the USB2CAN module, set the DIP switch to 120R, and reconnect it to the computer. Open Device Manager. If the device is identified as PCAN-USB, the issue has been resolved and you can continue with this guide.
PCAN Firmware Download & Driver Repair Steps - Ubuntu
Ubuntu users please refer to this guide
1.> 📦 Click to download USB2CAN.zip
2.Switch USB2CAN to BOOT
3.Please extract the USB2CAN.zip from step 1, and place flash_pcan_ubuntu.sh and pcan_canable_hw.bin (from inside USB2CAN.zip) in the same directory
Click to download flash_pcan_ubuntu.sh
If transferring from another computer (e.g. scp):
scp flash_pcan_ubuntu.sh pcan_canable_hw.bin seeed@your_Ubuntu_IP:~/Downloads/
Or simply copy it onto a USB flash drive and plug it into the Ubuntu machine — as long as the files end up in ~/Downloads, the current directory, or /tmp, the script will find them automatically.
4.Execute:
bash flash_pcan_ubuntu.sh
Enter your password; wait for completion
After completion, switch back to "120R"
Re-plug the USB.
PCAN Firmware Download & Driver Repair Steps - MAC
MAC users please refer to this guide
1.> 📦 Click to download USB2CAN.zip
2.Switch USB2CAN to BOOT
3.Please extract the USB2CAN.zip from step 1, and place flash_pcan_mac.sh and pcan_canable_hw.bin (from inside USB2CAN.zip) in the same directory
Click to download flash_pcan_mac.sh
If transferring from another computer (e.g. scp):
scp flash_pcan_mac.sh pcan_canable_hw.bin seeed@your_MAC_IP:~/Downloads/
Or simply copy it onto a USB flash drive and plug it into the MAC — as long as the files end up in ~/Downloads, the current directory, or /tmp, the script will find them automatically.
4.Execute:
bash /Users/"your_username"/Downloads/flash_pcan_mac.sh "/Users/"your_username"/Downloads/pcan_canable_hw.bin"
The above command assumes the files are placed in the Mac Downloads path; adjust according to your actual path
Enter your password; wait for completion
After completion, switch back to "120R"
Re-plug the USB.
4. Start MotorBridge-gateway to Write Zero Points and Debug
Before Motor Reset
Before motor parameter configuration, please note the following preparations and safety rules:
- Prepare 2 tooling clamps (size ≥3 inches) and a 48V XT30-output switching power supply (please choose a reputable brand; do not use inferior power supplies).
- During debugging and operation, maintain a safe distance of at least 1 meter.
- Do not hot-plug motors; disconnect the power supply before plugging/unplugging the XT30 2+2 connector.
- Do not overload or overspeed the motors; check wiring and fasteners before startup; do not use in humid, high-temperature, or dusty environments.
- Set reasonable program parameters and emergency stop function to prevent equipment runaway.
- Please strictly follow the above rules. The seller is not liable for any risks and losses caused by non-compliant operations or human errors.
Web UI Zero Point Writing and Debugging
Open the address motorbridge-studio in your browser, click the Help option, copy the corresponding command based on your operating system and driver board, verify the IP address and port number, then press Enter in the terminal to run it.
motorbridge-gateway --bind 127.0.0.1:9002
macOS:
motorbridge-gateway --bind 127.0.0.1:9002
or
DYLD_LIBRARY_PATH=/usr/local/lib motorbridge-gateway --bind 127.0.0.1:9002