11. Leader and Follower Calibration and Teleoperation
Chapter 11 of the Seeed Embodied Intelligence Beginner's Course — environment setup, follower and leader arm calibration, joint mapping, teleoperation safety, starting master-slave teleoperation, control frequency and latency, and hands-on practice.
11.1 Unboxing, Wiring, and Mounting the Arm
11.1 Unboxing, Wiring, and Mounting the Arm
- reBot DM
- reBot RS
11.2 Environment Setup
11.2 Environment Setup
Assuming you've already created a virtual environment in Stage 2, next we just need to clone the repository and install the environment in the conda environment you created. Do NOT use a virtual machine or WSL; it's best to install Ubuntu 22.04 directly.
Remember: all subsequent steps must be performed within the virtual environment and the lerobot environment.
Step 1: Clone the Seeed LeRobot repository
mkdir ~/rebot_lerobot
cd ~/rebot_lerobot
git clone https://github.com/Seeed-Projects/lerobot.git
Step 2: Enter the virtual environment and install LeRobot and reBot plugins
conda create -y -n rebot_arm python=3.12
pip install -e ./lerobot
pip install lerobot-teleoperator-rebot-arm-102
pip install lerobot-robot-seeed-b601
pip install motorbridge
Step 3: Install ffmpeg (video codec dependency)
conda install ffmpeg -c conda-forge
Version notes:
- By default, ffmpeg 7.X will be installed (supports the libsvtav1 encoder).
- If you encounter version compatibility issues, you can specify ffmpeg 7.1.1:
conda install ffmpeg=7.1.1 -c conda-forge
- You can check via
ffmpeg -encoders | grep svtav1whether the libsvtav1 encoder is supported.
Step 4: Special configuration for NVIDIA Jetson devices (skip this step on a regular PC)
For Jetson JetPack 6.0+ devices (make sure you have installed Jetson-compatible PyTorch-gpu and Torchvision before this step):
# Install OpenCV and other dependencies via conda (Jetson JetPack 6.0+ only)
conda install -y -c conda-forge "opencv>=4.10.0.84"
# Uninstall OpenCV
conda remove opencv
# Install specific OpenCV version via pip3
pip3 install opencv-python==4.10.0.84
conda install -y -c conda-forge ffmpeg
conda uninstall numpy
# This version must be compatible with Torchvision
pip3 install numpy==1.26.0
Step 5: Check whether PyTorch GPU is available
python3

import torch
print(torch.cuda.is_available())   # Should output True
Type exit() to quit.
If it outputs False, you installed the CPU version — you need to reinstall PyTorch.
11.3 Calibrating the Follower Arm
11.3 Calibrating the Follower Arm
- Next, make sure the reBot B601-RS robot is connected to power and data cable before calibrating.
- Leader and Follower calibration files are stored at
~/.cache/huggingface/lerobot/calibration/robotsand~/.cache/huggingface/lerobot/calibration/teleoperatorsrespectively. To recalibrate, delete the corresponding files, or just run the calibration command — the terminal will prompt: press C to recalibrate, press Enter to use the existing calibration file. - If you cannot connect to the follower, refer to Stage 2 and use the motorbridge interface to test whether the arm is working properly.
- Follow the prompts to move the Follower arm to the zero position shown above. The arm only needs to be calibrated once on the same computer after assembly. Below are the calibration commands; refer to the zero position in the image (gripper should be fully closed).
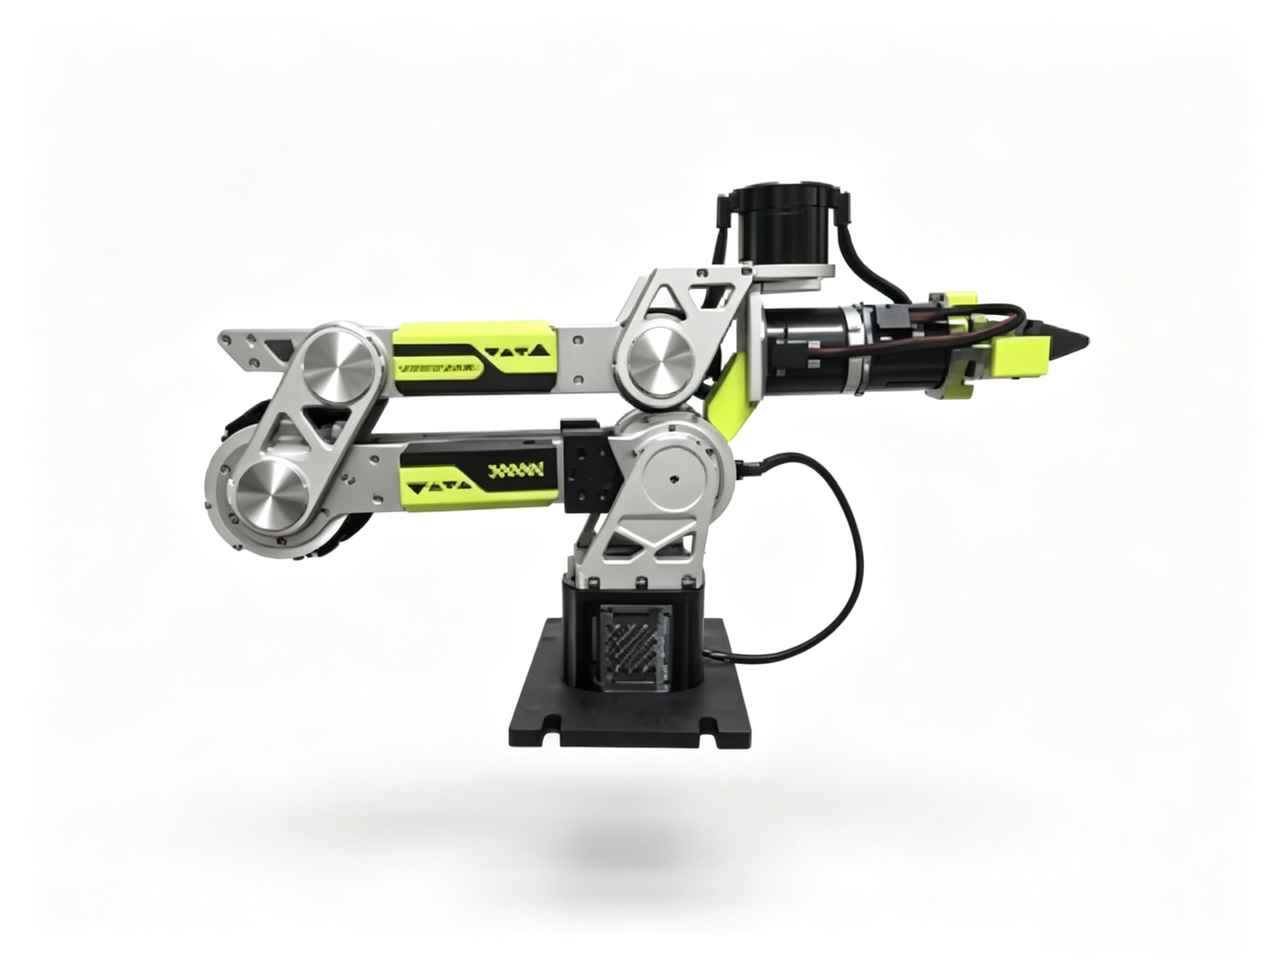
For DM Follower calibration:
sudo chmod 666 /dev/ttyACM*
cd lerobot
lerobot-calibrate \
    --robot.type=seeed_b601_dm_follower \
    --robot.port=/dev/ttyACM0 \
    --robot.id=follower1 \
    --robot.can_adapter=damiao
For RS Follower calibration:
If your system does not yet have the PCAN driver installed, please refer to this page: PCAN driver installed
sudo ip link set can0 down 2>/dev/null
sudo ip link set can0 type can bitrate 1000000
sudo ip link set can0 up
cd lerobot

lerobot-calibrate \
    --robot.type=seeed_b601_rs_follower \
    --robot.port=can0 \
    --robot.id=follower1 \
    --robot.can_adapter=socketcan
(Optional) If you're using Jetson (Jetpack 6.x), run the following command to find the CAN port number for your Jetson:
for i in /sys/class/net/can*; do
    [ "$(basename "$(readlink -f "$i/device/driver" 2>/dev/null)")" = "pcan" ] && basename "$i"
done
Example output:
can2 # Could also be can0, can1, or other CAN number
The port number used in all subsequent follower commands must match the output here.
If your Jetson doesn't have the PCAN driver installed, communication will be persistently abnormal.
11.4 Calibrating the Leader Arm
11.4 Calibrating the Leader Arm
reBot 102 Leader calibration notes:
- When calibration starts, each servo's current position on the reBot Arm 102 will be reset to zero.
joint_ranges(joint limits) come from the config fileconfig_rebot_arm_102_leader.py, not from calibration data.- If a joint always seems stuck near a limit, check the
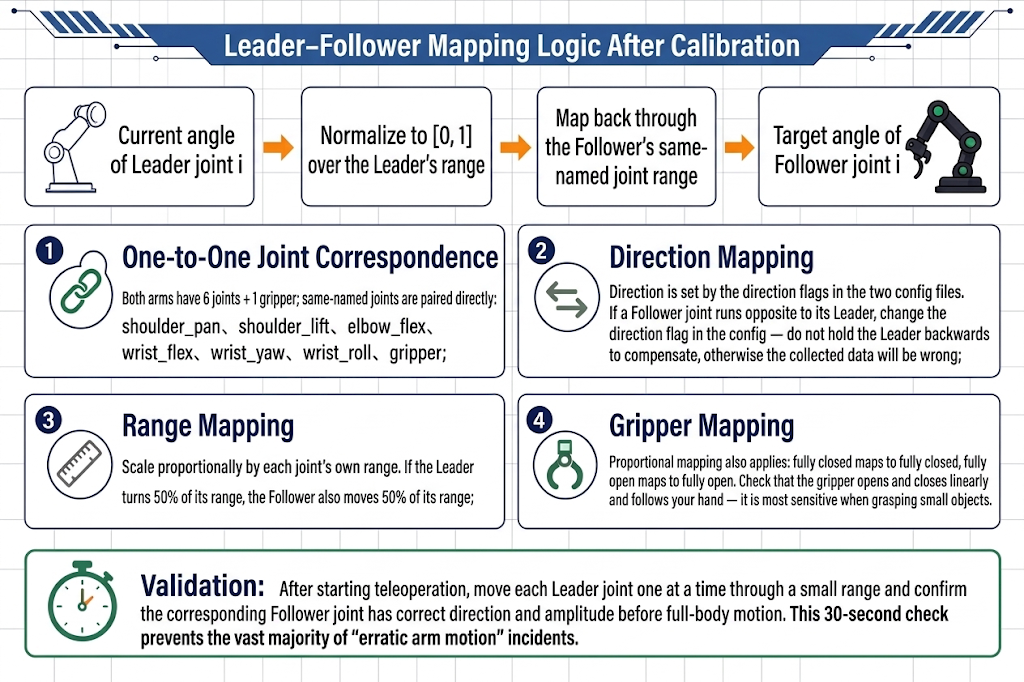
joint_rangesconfiguration first. - Joint directions are defined in the config file; if directions don't match, modify the config rather than recalibrating.
- The reBot 102 Leader uses a USB-to-UART module, usually mapped to
/dev/ttyUSB*. - Use
ls /dev/ttyUSB*to see the actual port number.
On first connection, you may get an error that serial port /dev/ttyACM0 cannot be found — this is because brltty is occupying the port. Follow these steps:
sudo dmesg | grep ttyUSB   # See 'disconnected' on the last line
sudo apt remove brltty     # Remove brltty
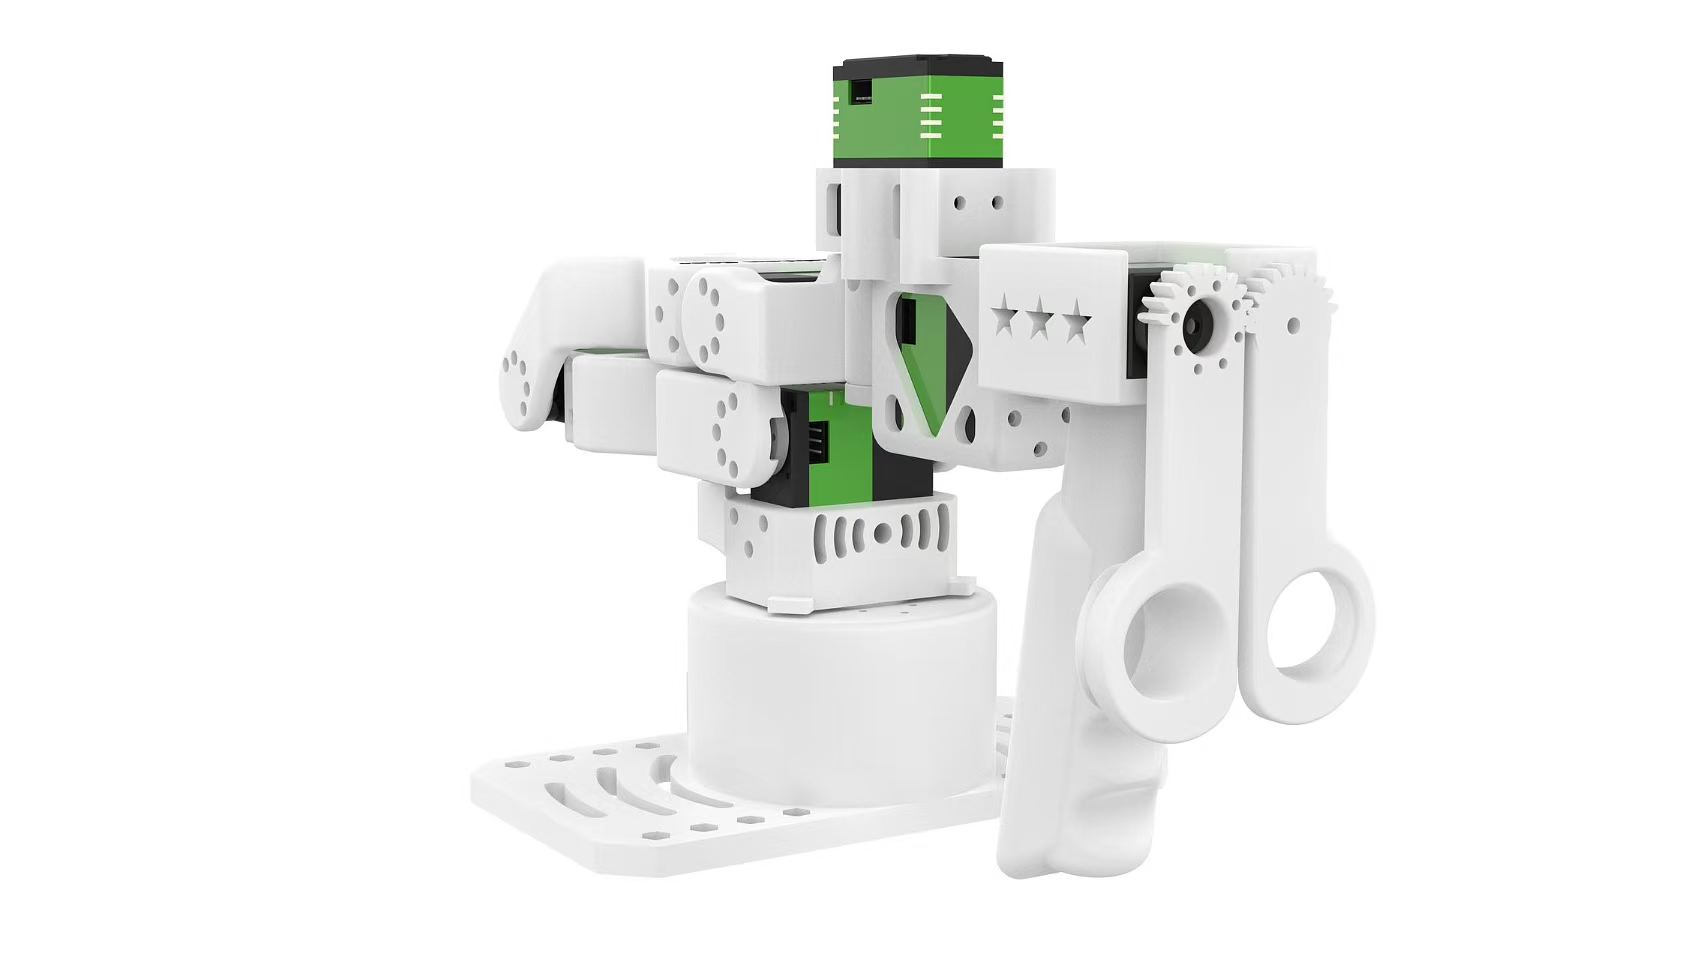
Follow the prompts to move the Leader arm to the zero position shown above:
sudo chmod 666 /dev/ttyUSB0

lerobot-calibrate \
    --teleop.type=rebot_arm_102_leader \
    --teleop.port=/dev/ttyUSB0 \
    --teleop.id=rebot_arm_102_leader
Keep it still, then press Enter until calibration is complete.
11.5 Joint Mapping: Direction, Range, and Gripper
11.5 Joint Mapping: Direction, Range, and Gripper
11.6 Teleoperation Safety Guidelines
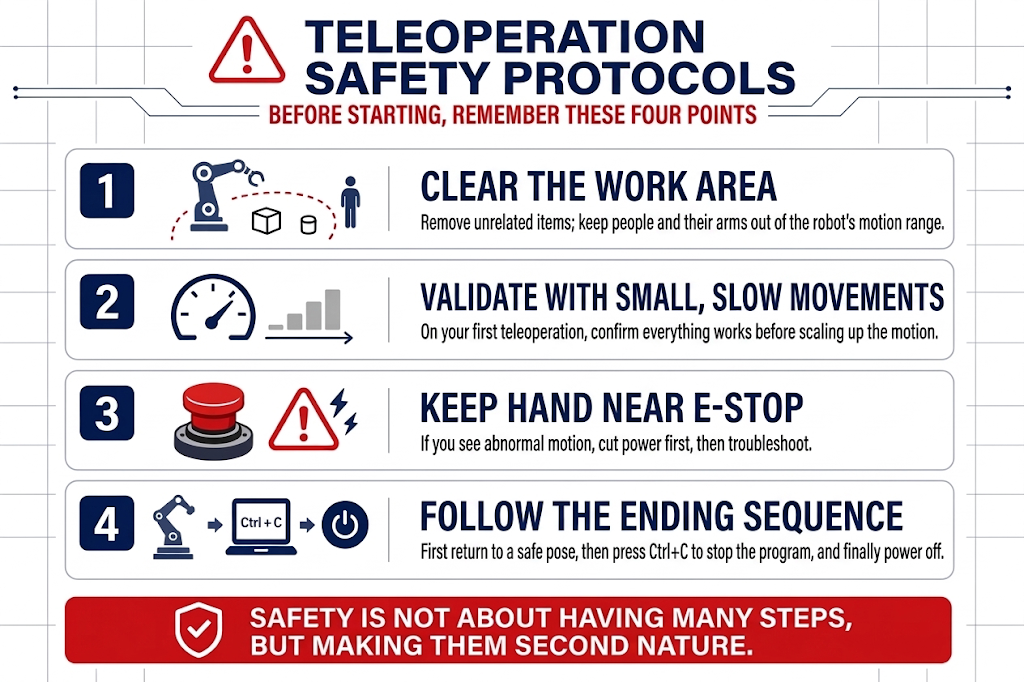
11.6 Teleoperation Safety Guidelines
11.7 Starting Master-Slave Teleoperation
11.7 Starting Master-Slave Teleoperation
During teleoperation, if power cables come loose, power connection is poor, or signal cables detach, you must first stop the code, return the arm to its initial zero position, then reconnect power and restart the program — to avoid data corruption causing the arm to go out of control and create danger.
DM teleoperation — first grant permissions to the serial ports:
# leader
sudo chmod 666 /dev/ttyUSB*
# follower
sudo chmod 666 /dev/ttyACM*
Run teleoperation:
lerobot-teleoperate \
    --robot.type=seeed_b601_dm_follower \
    --robot.port=/dev/ttyACM0 \
    --robot.id=follower1 \
    --robot.can_adapter=damiao \
    --teleop.type=rebot_arm_102_leader \
    --teleop.port=/dev/ttyUSB0 \
    --teleop.id=rebot_arm_102_leader
RS teleoperation — first grant permissions to the serial ports:
# leader
sudo chmod 666 /dev/ttyUSB*
# follower
sudo ip link set can0 down 2>/dev/null
sudo ip link set can0 type can bitrate 1000000
sudo ip link set can0 up
Run teleoperation:
lerobot-teleoperate \
    --robot.type=seeed_b601_rs_follower \
    --robot.port=can0 \
    --robot.id=follower1 \
    --robot.can_adapter=socketcan \
    --teleop.type=rebot_arm_102_leader \
    --teleop.port=/dev/ttyUSB0 \
    --teleop.id=rebot_arm_102_leader
11.8 Control Frequency and Latency
11.8 Control Frequency and Latency
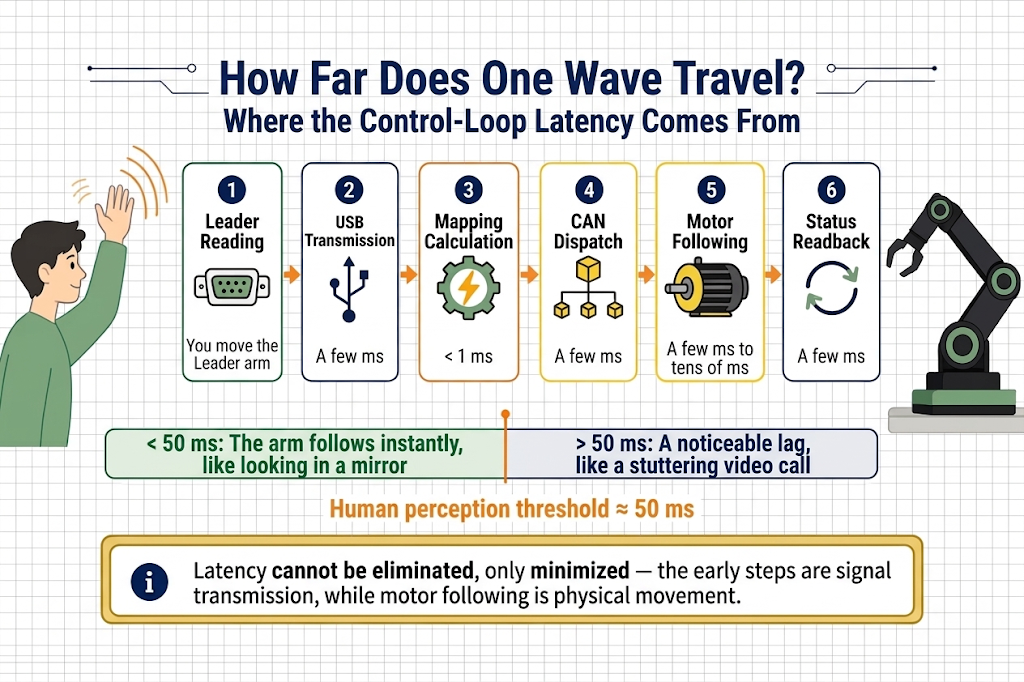
Whether teleoperation feels "responsive" depends on two things: how many loops the forwarding circuit runs per second (frequency), and how much delay there is between your hand and the arm (latency).
Where Does Latency Come From? Why Is It Inevitable?
What Is the Control Frequency? Can It Be Configured?
The teleoperation loop defaults to 60 Hz — completing 60 loops per second of "read Leader → map → send CAN → read back"; each loop has a 16.7 ms time budget. This frequency can be adjusted via the teleoperate config's fps parameter, but keep two things in mind:
- The upper limit is determined by hardware circuit time, not software. The chain above itself takes over ten milliseconds per loop, so the practical upper limit for this hardware is around 60–100 Hz. Setting it higher is pointless: the actual frequency won't increase, and you'll only see period-timeout warnings.
- 60 Hz already far exceeds what's needed. The fastest conscious human movements are only 5–10 Hz; 60 Hz is like taking ten snapshots of every tiny movement, so the sampling density fully covers the hand's bandwidth.
11.9 Hands-On Practice
11.9 Hands-On Practice: Grasping, Transporting, and Placing
Teleoperation is stable, but "can move" and "can work" still require deliberate practice. The data quality in Chapter 13 depends on your current proficiency. Practice at three levels:
- Exercise 1: Empty-load object transfer (get familiar with the feel). Place a few lightweight blocks in the workspace. Practice: move above target → descend → close gripper → lift. Goal: 10 repetitions without collisions or mid-execution drops, with each run flowing smoothly without hesitation.
- Exercise 2: Transport and placement (full task chain). Complete the full "grasp → transport → place into designated container" workflow. Goal: 10 consecutive repetitions with nearly identical start and end poses each time.
- Passing standard: you can complete 20 full tasks in a row at a steady rhythm without feeling strained — then you're ready for the next chapter.