13. Camera Configuration and LeRobot Data Collection
Chapter 13 of the Seeed Embodied Intelligence Beginner's Course — single vs dual camera setup, finding camera device names, image/action synchronization, creating a dataset, recording and re-recording, visualization, and supplementing or deleting data.
13.1 Single-Camera vs. Dual-Camera Setup
13.1 Single-Camera vs. Dual-Camera Setup
- Single-camera setup: only the overhead camera connected. Good for a first pipeline run and environment verification — one fewer camera means one fewer variable when debugging.
- Dual-camera setup (main course path, for formal collection): overhead + wrist; the ACT model also defaults to two input streams. You can also choose overhead + side view.
Three or four cameras can also be used for training and collection. ACT itself has no hard limit on camera count: each image stream passes through a shared ResNet18 backbone to produce a feature token sequence, which is concatenated into the Transformer encoder. The original ACT paper (ALOHA dual-arm) used 4 cameras (2 overhead + 2 wrist).
- Cost: each additional camera roughly linearly increases VRAM and compute, and also increases data requirements (more viewpoints mean more to learn); each stream must maintain synchronization and fixed positioning.
13.2 Overhead and Wrist Cameras
13.2 Overhead and Wrist Cameras
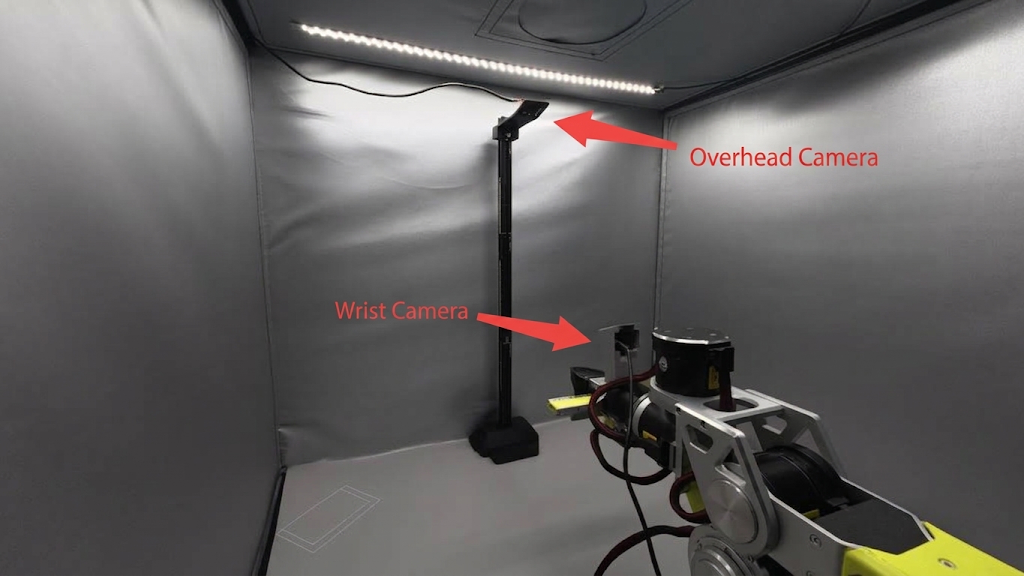
- Overhead camera (front): fixed on a mount overlooking the entire workspace; tells the model "where the target is and the arm's overall state."
- Wrist camera (wrist): mounted at the arm end, follows the gripper; tells the model "the relative position between gripper and target, and whether to close."
13.3 Finding Camera Device Names
13.3 Finding Camera Device Names
To check camera indices, first run:
lerobot-find-cameras opencv
You'll see Id: 0, where 0 is the camera index.
--- Detected Cameras ---
Camera #0:
  Name: OpenCV Camera @ 0
  Type: OpenCV
  Id: 0
  Backend api: AVFOUNDATION
  Default stream profile:
    Format: 16.0
    Width: 1920
    Height: 1080
    Fps: 15.0
--------------------
(more cameras ...)
It lists each camera's name, ID, and default resolution. You can find ~/rebot_lerobot/outputs/captured_images/ in the directory to view images captured by each camera, verifying whether camera positioning is correct and appropriate.
Also note: if using a laptop, the built-in camera will be scanned; you'll need to unplug/replug to find the correct overhead and wrist camera indices. The laptop's built-in camera is usually index 0.
- Plug order changes indices. Today overhead is 0; tomorrow after replugging it might change. Spend 10 seconds re-running
lerobot-find-camerasbefore each recording session to confirm. - USB cameras must be plugged directly into the computer, not through a dock. Bandwidth contention on passive hubs directly manifests as unreadable images or dropped frames; ideally, the two cameras should plug into different USB controllers.
13.4 Image and Action Synchronization
13.4 Image and Action Synchronization
Single Camera
RS version:
lerobot-teleoperate \
    --robot.type=seeed_b601_rs_follower \
    --robot.port=can0 \
    --robot.id=follower1 \
    --robot.can_adapter=socketcan \
    --robot.cameras="{ front: {type: opencv, index_or_path: 0, width: 640, height: 480, fps: 30, fourcc: "MJPG"}}" \
    --teleop.type=rebot_arm_102_leader \
    --teleop.port=/dev/ttyUSB0 \
    --teleop.id=rebot_arm_102_leader \
    --display_data=true
DM version:
lerobot-teleoperate \
    --robot.type=seeed_b601_dm_follower \
    --robot.port=/dev/ttyACM0 \
    --robot.id=follower1 \
    --robot.can_adapter=damiao \
    --robot.cameras="{ front: {type: opencv, index_or_path: 0, width: 640, height: 480, fps: 30, fourcc: "MJPG"}}" \
    --teleop.type=rebot_arm_102_leader \
    --teleop.port=/dev/ttyUSB0 \
    --teleop.id=rebot_arm_102_leader \
    --display_data=true
If you have more cameras, you can add them by changing the --robot.cameras parameter. Note the index_or_path format, which is determined by the last digit of the camera ID output by the python -m lerobot.find_cameras opencv command.
Dual Cameras
RS version:
lerobot-teleoperate \
    --robot.type=seeed_b601_rs_follower \
    --robot.port=can0 \
    --robot.id=follower1 \
    --robot.can_adapter=socketcan \
    --robot.cameras="{ front: {type: opencv, index_or_path: 0, width: 640, height: 480, fps: 30, fourcc: "MJPG"}, side: {type: opencv, index_or_path: 2, width: 640, height: 480, fps: 30, fourcc: "MJPG"}}" \
    --teleop.type=rebot_arm_102_leader \
    --teleop.port=/dev/ttyUSB0 \
    --teleop.id=rebot_arm_102_leader \
    --display_data=true
DM version:
lerobot-teleoperate \
    --robot.type=seeed_b601_dm_follower \
    --robot.port=/dev/ttyACM0 \
    --robot.id=follower1 \
    --robot.can_adapter=damiao \
    --robot.cameras="{ front: {type: opencv, index_or_path: 0, width: 640, height: 480, fps: 30, fourcc: "MJPG"}, side: {type: opencv, index_or_path: 2, width: 640, height: 480, fps: 30, fourcc: "MJPG"}}" \
    --teleop.type=rebot_arm_102_leader \
    --teleop.port=/dev/ttyUSB0 \
    --teleop.id=rebot_arm_102_leader \
    --display_data=true
You can see this is the image from inside the data collection box:
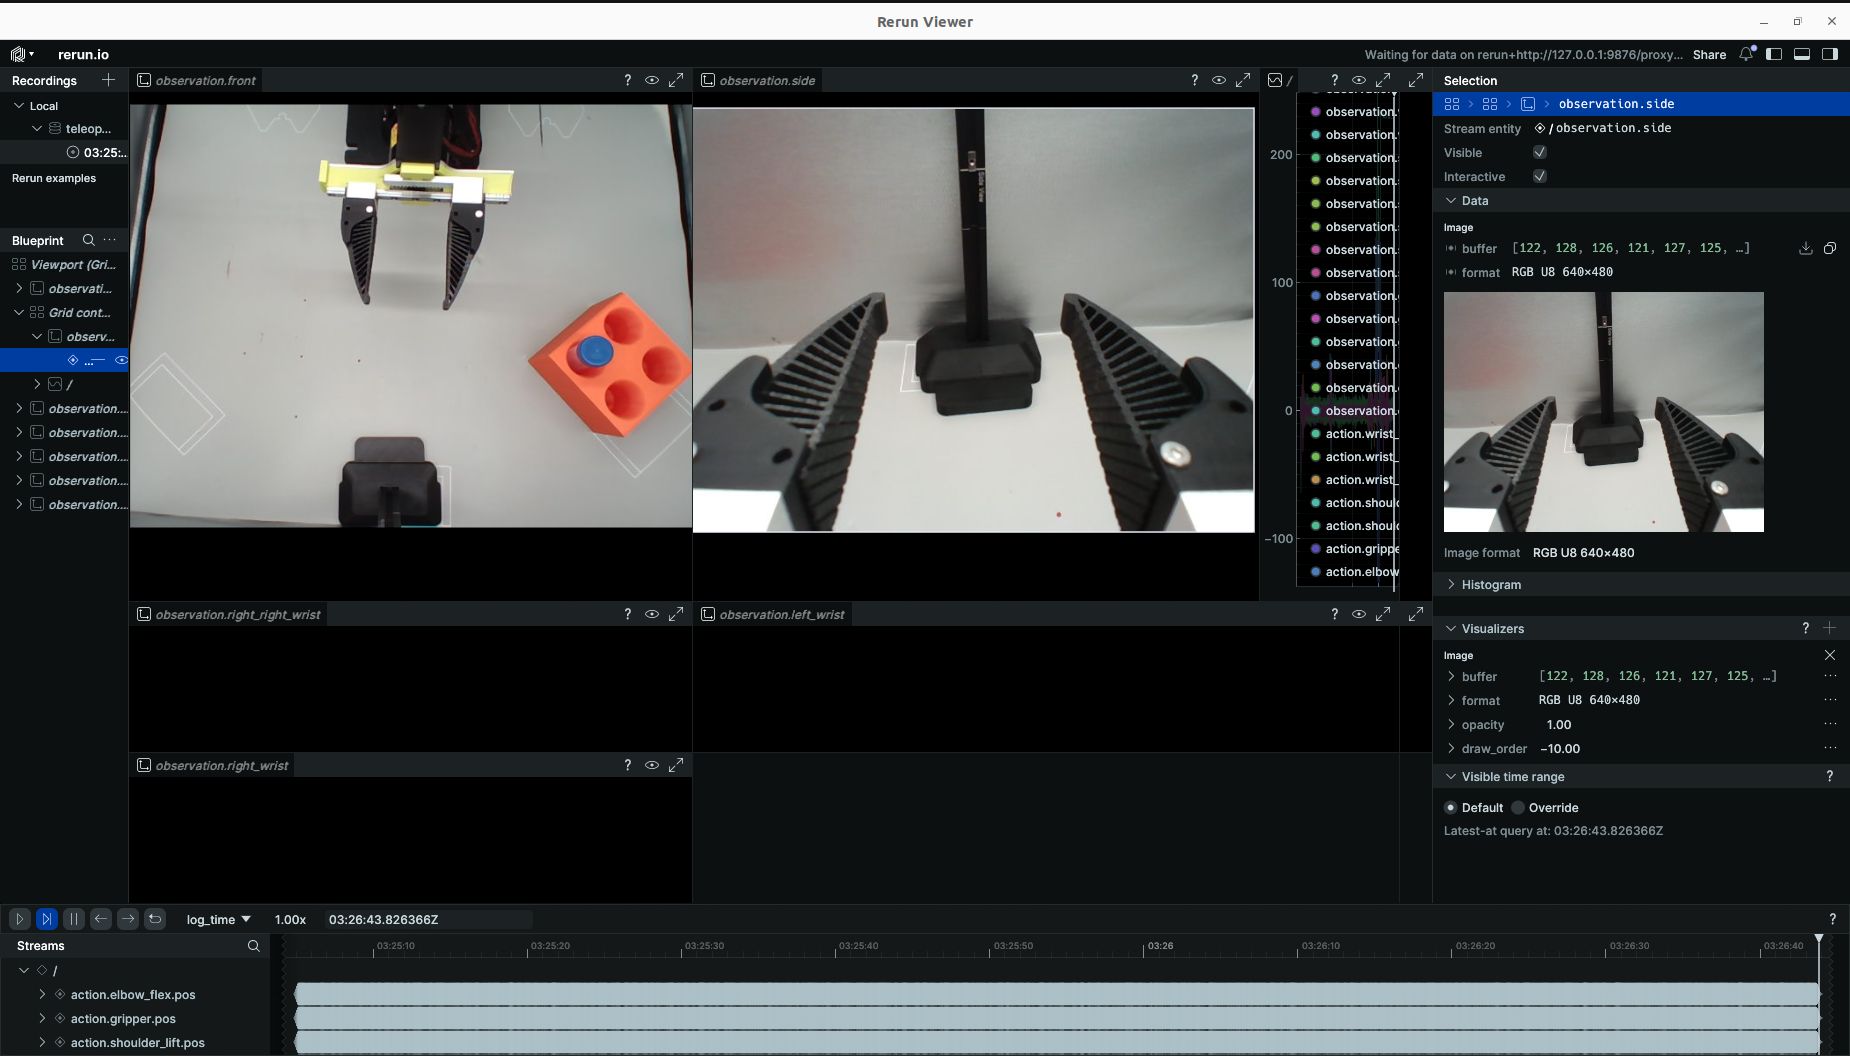
Recommended parameters: 640 × 480 @ 30 fps, fourcc: "MJPG". The three parameters each matter:
- Resolution 640×480: a balance between clarity and real-time performance. Doubling resolution quadruples USB bandwidth and storage overhead, while the model input already resizes images anyway — limited benefit.
- FPS 30: matches collection FPS. If camera FPS is lower, recording will repeatedly reuse old frames.
fourcc: "MJPG": image is compressed before transmission, reducing USB bandwidth pressure by an order of magnitude. You can of course tryYUYVformat images, but this will reduce resolution and FPS, causing arm stuttering. CurrentlyMJPGformat supports 3 cameras at 1920×1080 resolution while maintaining 30 FPS.
13.5 Create LeRobot Dataset
13.5 Create LeRobot Dataset
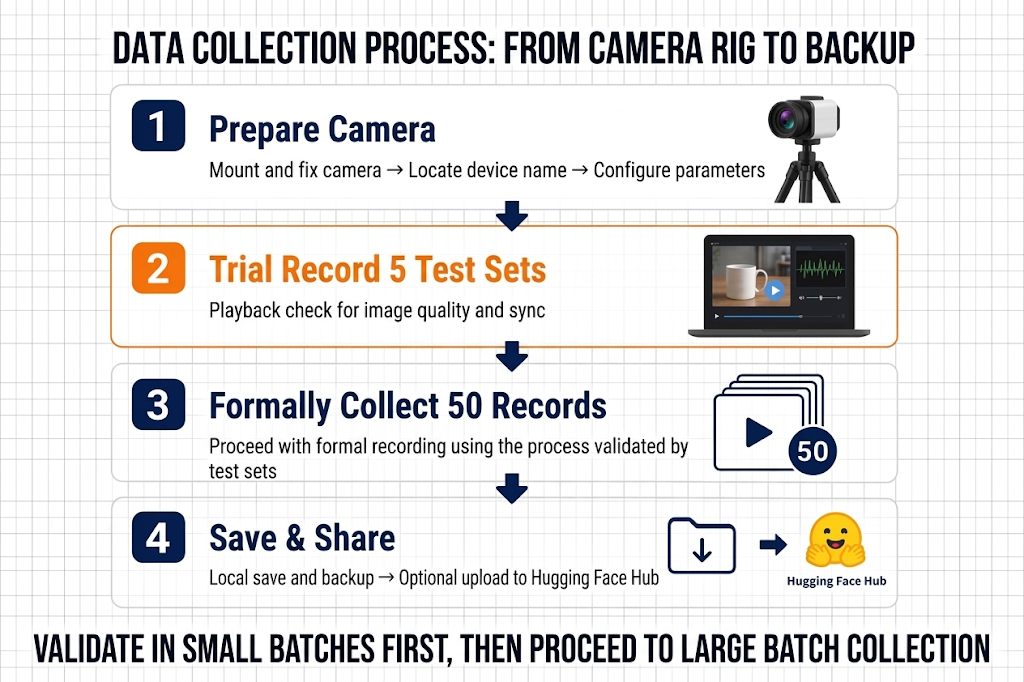
Before running the command below, be ready to record data; there will be an audio cue entering the recording phase. If not, check the terminal prompts to see if it started.
RS version:
lerobot-record \
    --robot.type=seeed_b601_rs_follower \
    --robot.port=can0 \
    --robot.id=follower1 \
    --robot.can_adapter=socketcan \
    --robot.cameras="{ front: {type: opencv, index_or_path: 0, width: 640, height: 480, fps: 30, fourcc: "MJPG"}, side: {type: opencv, index_or_path: 2, width: 640, height: 480, fps: 30, fourcc: "MJPG"}}" \
    --teleop.type=rebot_arm_102_leader \
    --teleop.port=/dev/ttyUSB0 \
    --teleop.id=rebot_arm_102_leader \
    --display_data=true \
    --dataset.repo_id=seeed_rebot_b601_rs/test \
    --dataset.num_episodes=5 \
    --dataset.single_task="Grab the crayfish into the box" \
    --dataset.push_to_hub=false \
    --dataset.episode_time_s=30 \
    --dataset.reset_time_s=20
DM version:
lerobot-record \
    --robot.type=seeed_b601_dm_follower \
    --robot.port=/dev/ttyACM0 \
    --robot.id=follower1 \
    --robot.can_adapter=damiao \
    --robot.cameras="{ front: {type: opencv, index_or_path: 0, width: 640, height: 480, fps: 30, fourcc: "MJPG"}, side: {type: opencv, index_or_path: 2, width: 640, height: 480, fps: 30, fourcc: "MJPG"}}" \
    --teleop.type=rebot_arm_102_leader \
    --teleop.port=/dev/ttyUSB0 \
    --teleop.id=rebot_arm_102_leader \
    --display_data=true \
    --dataset.repo_id=seeed_rebot_b601_dm/test \
    --dataset.num_episodes=5 \
    --dataset.single_task="Grab the crayfish into the box" \
    --dataset.push_to_hub=false \
    --dataset.episode_time_s=30 \
    --dataset.reset_time_s=20
There are several parameters related to the dataset itself:
| Parameter | Meaning | Recommendation |
|---|---|---|
--dataset.repo_id | Dataset name (also the local folder name) | Separate names for test and formal sets, e.g., rebot_b601/grab_cube_test / rebot_b601/grab_cube_v1 |
--dataset.single_task | Task description (stored in the dataset) | English, matching the task description |
--dataset.num_episodes | How many Episodes to record | Test: 5; formal: 50 (default is 50) |
--dataset.push_to_hub | Whether to upload to Hub after recording | false = don't upload |
--dataset.episode_time_s=30 | Recording time per Episode | Adjust based on task complexity |
--dataset.reset_time_s=20 | Time to reset the scene for next recording | Adjust based on scene reset time |
--display_data=true | Show camera feed in real time | - |
Afterward, the dataset will be saved in the home directory under ~/.cache/huggingface/lerobot. The above folder will be created under seeed_rebot_b601_rs/test.
13.6 Recording, Pausing, and Re-recording Episodes
13.6 Recording, Pausing, and Re-recording Episodes
Recording
Keyboard controls during recording:
| Key | Action |
|---|---|
| → (Right arrow) | End current Episode early, proceed to reset/next |
| ← (Left arrow) | Discard current Episode, re-record this one |
| ESC | End entire collection session: encode videos, compute statistics, save dataset |
If keys don't respond, it's a pynput version issue; downgrade: pip install pynput==1.6.8.
Re-recording
After recording 5 Episodes and verifying playback, for formal collection: change repo_id to the formal name, num_episodes=50 to the formal value, and follow the pencil-five-point method from Chapter 12 — 1 Episode per point, 5 points per round, 10 rounds total.
Pausing Recording
Don't press Ctrl+C to pause recording — press Esc, otherwise it will exit abnormally.
13.7 Visualizing and Playing Back a Dataset
13.7 Visualizing and Playing Back a Dataset
Visualizing a Dataset
If you uploaded data, you can also visualize it locally with:
echo ${HF_USER}/rebot_test
lerobot-dataset-viz \
  --repo-id ${HF_USER}/rebot_test \
  --episode-index 0 \
  --display-compressed-images=false
If you used --dataset.push_to_hub=false and didn't upload data, you can also visualize locally with:
RS version:
lerobot-dataset-viz \
  --repo-id seeed_rebot_b601_rs/test \
  --episode-index 0 \
  --display-compressed-images=false
DM version:
lerobot-dataset-viz \
  --repo-id seeed_rebot_b601_dm/test \
  --episode-index 0 \
  --display-compressed-images=false
Here, seeed_rebot_b601_rs/test is the custom dataset name from collection (repo_id).
Playing Back a Dataset
Now, try playing back the first dataset on your robot: --dataset.episode=0 means play back the first collected dataset, and so on.
RS version:
lerobot-replay \
    --robot.type=seeed_b601_rs_follower \
    --robot.port=can0 \
    --robot.can_adapter=socketcan \
    --robot.id=follower1 \
    --dataset.repo_id=seeed_rebot_b601_rs/test \
    --dataset.episode=0
DM version:
lerobot-replay \
    --robot.type=seeed_b601_dm_follower \
    --robot.port=/dev/ttyACM0 \
    --robot.can_adapter=damiao \
    --robot.id=follower1 \
    --dataset.repo_id=seeed_rebot_b601_dm/test \
    --dataset.episode=0
The robot should now perform the same actions you recorded during teleoperation.
13.8 Supplementing and Deleting Data
13.8 Supplementing and Deleting Data
- Checkpoints are automatically created during recording.
- Add
--resume=trueto the original command to continue supplementing data. - When resuming, set
--dataset.num_episodesto the number of additional Episodes to record (not the target total in the dataset). - To start over from scratch, manually delete the dataset directory.
Use the following command to delete Episodes: --operation.episode_indices "[0]" deletes the first Episode, and so on. Be patient during deletion, and modify the dataset name accordingly.
lerobot-edit-dataset \
  --repo_id rebot_b601/grab_cube_v1 \
  --operation.type delete_episodes \
  --operation.episode_indices "[0]"