7. MotorBridge Motor Control Library
Chapter 7 of the Seeed Embodied Intelligence Beginner's Course — MotorBridge, the cross-vendor CAN motor control library, and how to control DM and RS motors via web and Python.
7.1 What is MotorBridge?
7.1 What is MotorBridge?
MotorBridge is a cross-vendor unified CAN motor control software stack open-sourced by Seeed Studio, oriented toward integrated joint motors for robotic arms/humanoid robots. It uses a high-performance Rust core at the bottom layer, provides a standard C ABI interface, and comes with Python/C++/ROS2 language bindings. One set of APIs can drive mainstream integrated joint motors on the market.
One set of code, compatible with all mainstream joint motors, eliminating the differences in each vendor's proprietary CAN protocol — specifically solving the pain point of tedious multi-motor-brand adaptation in robotic arm development.
What industry pain points it solves:
Integrated joints on the market (Damiao, RobStride, MyActuator, etc.) each have proprietary CAN protocols, command formats, and control modes that are completely incompatible. MotorBridge provides a layer of abstract encapsulation — the upper-layer API calls are completely consistent, and the bottom layer automatically adapts to different vendor protocols. Switching motors only requires modifying vendor parameters, without changing the motion control logic.
Specifically, it solves:
- Changing the motor brand requires rewriting the entire set of CAN communication and three-loop control code;
- Developers need to learn more than 5 sets of proprietary protocols simultaneously and maintain multiple code libraries;
- Lack of unified debugging, calibration, and visualization tools — the tools bundled with each motor are not universal;
- Python native control has poor real-time performance, and GC pauses affect robot motion control.
| Motor Vendor | Bus Type | Supported Control Modes |
|---|---|---|
| Damiao | CAN2.0 / Serial Bridge | MIT Impedance, Position-Velocity, Pure Velocity, Force-Position Control |
| RobStride | CAN2.0 | MIT, Position, Velocity |
| MyActuator RMD | CAN2.0 | Current, Position, Velocity |
| HighTorque | CAN2.0 | MIT, Position-Velocity, Pure Velocity, Force-Position Control |
| Hexfellow | CAN-FD | MIT, Position-Velocity |
Overall Layered Architecture (top to bottom)
Application layer (user development layer):
Supports Python, C++ (in development), ROS2 nodes. Developers directly call unified APIs without caring about the underlying CAN protocol.
- Python: ctypes binds the dynamic library compiled by Rust, lightweight with no performance loss;
- Supporting tools: command-line CLI, Web visualization console MotorBridge-Studio.
Advantages Compared to Traditional Vendor-Specific SDKs
| Comparison Item | Vendor Native SDKs | MotorBridge |
|---|---|---|
| Multi-motor-brand compatibility | Single-brand dedicated, switching motors requires rewriting code | Unified API, changing motors only requires modifying vendor parameters |
| Real-time performance | Python implementation, GC stuttering, unstable timing | Rust bottom layer, no garbage collection, strong real-time performance |
| Debugging tools | Each has an independent upper computer, inconsistent operations | Unified CLI + Web visualization console |
| Multi-language support | Most only provide Python | Python/C++/ROS2 share the bottom-layer library |
| Protocol encapsulation | Requires developers to manually parse CAN messages | Completely shields underlying CAN protocol details |
| Cross-platform | Inconsistent adaptation | Full platform support for Windows/macOS/Linux |
7.2 Installation Environment
7.2 Installation Environment
7.2.1 Install Miniforge
Ubuntu Installation
wget https://github.com/conda-forge/miniforge/releases/latest/download/Miniforge3-Linux-x86_64.sh
bash Miniforge3-Linux-x86_64.sh
Next, follow the prompts to enter yes or press the Enter key. After successful installation, enter the following command to update the terminal script:
source ~/.bashrc
When (base) appears before the username, the installation is successful.
Other Platforms
Jetson / Raspberry Pi:
wget "https://github.com/conda-forge/miniforge/releases/latest/download/Miniforge3-$(uname)-$(uname -m).sh"
bash Miniforge3-$(uname)-$(uname -m).sh
macOS:
curl -L -O "https://github.com/conda-forge/miniforge/releases/latest/download/Miniforge3-MacOSX-$(uname -m).sh"
bash Miniforge3-MacOSX-$(uname -m).sh
Windows:
Open the Miniforge Release page in your browser, find the latest version of Miniforge3-Windows-x86_64.exe, and click to download.
7.2.2 Create Environment
Python 3.10 or above virtual environment — motorbridge requires Python version >= 3.10:
conda create -y -n rebot_motorbridge python=3.12
Then activate the virtual environment. Every time you open a terminal and want to use the related functions in the virtual environment, you need to re-execute this activation command:
conda activate rebot_motorbridge
Install motorbridge
After activating the rebot_motorbridge virtual environment, execute the following command to install motorbridge:
pip install motorbridge
7.3 MotorBridge Controls DM Motors
7.3 MotorBridge Controls DM Motors
Web Control
- Open the following address in your browser:
https://motorbridge.github.io/motorbridge-studio/
- Click the Help option, copy the corresponding command according to your operating system and the driver board used, verify the IP address and port number, then press Enter in the terminal to run.
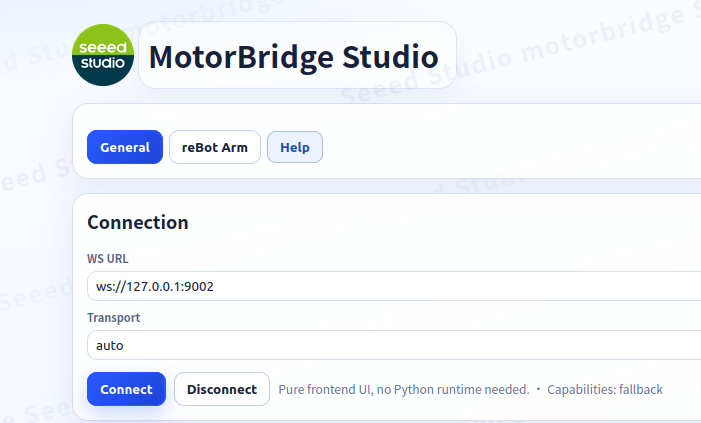
Taking Damiao DM motors as an example:
- Linux platform, enter the following command:
motorbridge-gateway -- \
  --bind 127.0.0.1:9002 --vendor damiao --transport dm-serial \
  --serial-port /dev/ttyACM0 --serial-baud 921600 \
  --dt-ms 20
- macOS platform, enter the following command:
motorbridge-gateway -- \
  --bind 127.0.0.1:9002 --vendor damiao --transport dm-serial \
  --serial-port /dev/tty.usbmodem14101 --serial-baud 921600 \
  --dt-ms 20
- Windows, enter the following command:
motorbridge-gateway -- --bind 127.0.0.1:9002 --vendor damiao --transport dm-serial --serial-port COM3 --serial-baud 921600 --dt-ms 20
The port number must be the correct port, and permissions must be granted before binding.
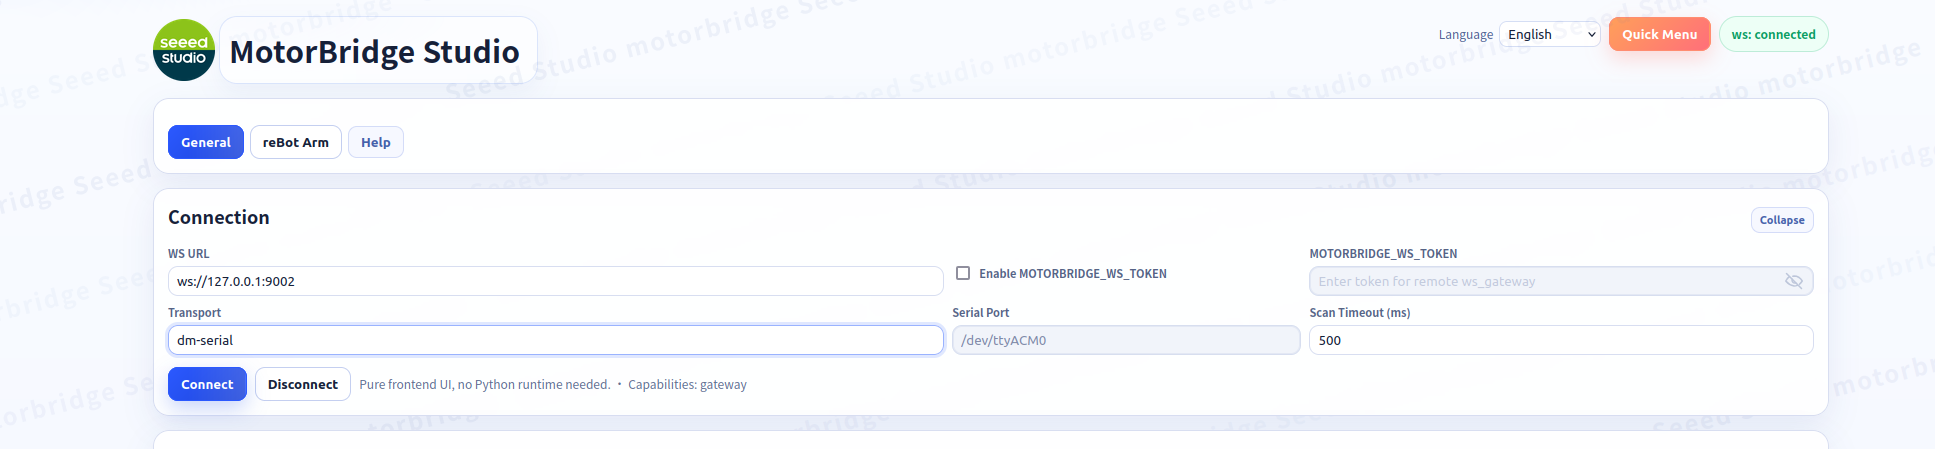
- After entering the above command, return to the webpage and click Connect. After a successful connection, green
Connectedtext will appear in the upper right corner.
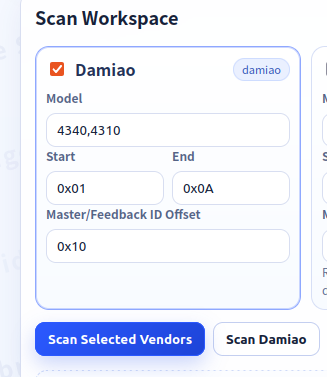
- After selecting the DM motor, click Scan Damiao.
- After a successful scan, the following card appears.
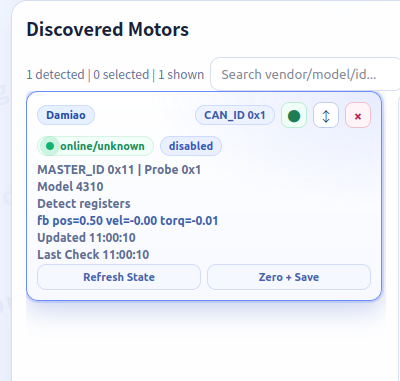
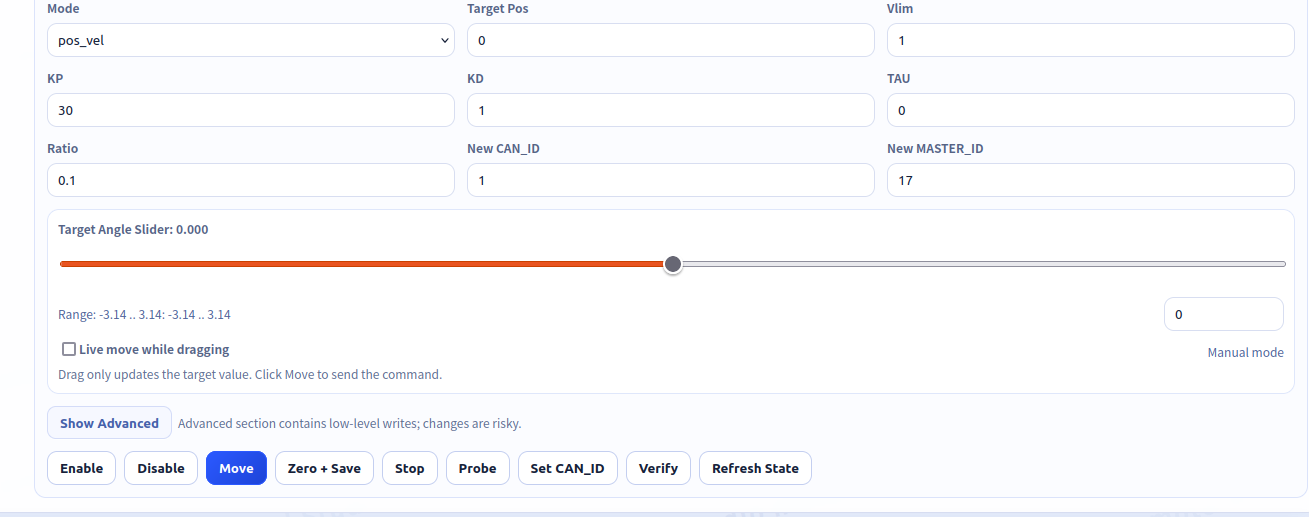
- On the right side are the motor-related parameters. Click the enable button in the lower left corner, and the motor light turns green. At this point, you can control the motor.
-
Drag the slider or enter the corresponding angle in the small box (unit is rad), then click Move, and the motor will rotate to the target angle.
-
After clicking the Enable button, click Zero+Save to set the current position as the zero point.
-
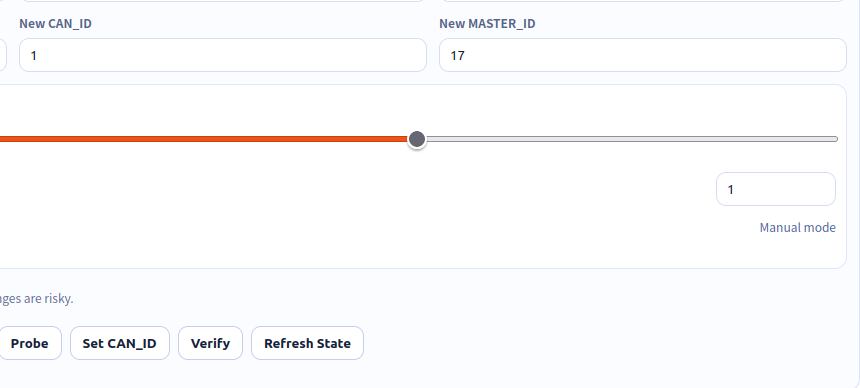
Set the motor ID. If the motor is used on reBot,
can_idshould be set to the corresponding joint number, andmaster_idshould be set to0x10 + can_id.
For example, if can_id is 1, then master_id should be 0x11, that is, 16 + 1 = 17. Then click Set CAN_ID.
Python Code Control
If the environment is not installed, please first refer to the installation environment in section 7.2. The DM motor-related examples are all implemented through Damiao's serial port.
First, pull the example code:
git clone https://github.com/hopcan/motorbridge_ctrl.git
Then activate the corresponding conda environment and enter the example code folder:
conda activate rebot_motorbridge

cd your_folder_path/motorbridge_ctrl/dm_motor_ctrl
Enable/Disable DM Motors
1_enable_dm.py is a typical example of enabling/disabling DM motors.
python 1_enable_dm.py
Phenomenon: After the DM motor is enabled, the motor light turns green. After 3 seconds, the DM motor is disabled.
# Enable specified motor, disable motor after 3 seconds
from motorbridge import Controller, Mode
import time

motor_configs = {
    1 : {
        "can_id": 0x01,
        "master_id": 0x11,  # 0x10 + 1
        "model": "4310",  # 4310 / 4340P / 6001
    },
}

ctrl = Controller.from_dm_serial("/dev/ttyACM0", 921600)

# Add motor to the bus
motor = {}
for num, cfg in motor_configs.items():
    motor[num] = ctrl.add_damiao_motor(cfg["can_id"], cfg["master_id"], cfg["model"])

# Enable all motors on the bus
ctrl.enable_all()

time.sleep(3)

# Disable all motors on the bus
ctrl.disable_all()
Scan Motor ID
2_scan_DMmotor.py is an example of scanning the CAN ID of DM motors.
python 2_scan_DMmotor.py
The input of the main implementation function scan_damiao_motors is the CAN ID range and port. After running, the scanned CAN ID and its corresponding master ID will be displayed. This script can be used to check whether the CAN ID and the corresponding master ID are correct.
from motorbridge import Controller

def scan_damiao_motors(start_can_id, end_can_id, channel="/dev/ttyACM0"):
    found_motors = []

    print(f"start scanning  {channel},canID : {start_can_id} - {end_can_id}")

    for motor_can_id in range(start_can_id, end_can_id + 1):
        ctrl = Controller.from_dm_serial(channel, 921600)
        temp_motor_master_id = 0x11 + motor_can_id

        try:
            motor = ctrl.add_damiao_motor(motor_can_id, temp_motor_master_id, "4340P")

            try:
                # Read register to get CAN ID
                esc_id = motor.get_register_u32(8, timeout_ms=100)
                master_id = motor.get_register_u32(7, timeout_ms=100)
                print(f"[find] motor_can_id=0x{esc_id:02X} motor_master_id=0x{master_id:02X}")
                found_motors.append(esc_id)

            except Exception:
                # Read error, no such CAN ID
                print(f"[no respond] motor_can_id=0x{motor_can_id:02X}")

            finally:
                motor.close()

        except Exception as e:
            print(f"[error] motor_can_id=0x{motor_can_id:02X}: {e}")
        finally:
            ctrl.close_bus()
            ctrl.close()

    print(f"\nfinish find {len(found_motors)} motor")
    return found_motors

# Run scanning
if __name__ == "__main__":
    motors = scan_damiao_motors(start_can_id=1, end_can_id=10, channel="/dev/ttyACM0")

    print("\nfind motor config:")
    for can_id in motors:
        print(f"  can_id=0x{can_id:02X}")
Set CAN ID and Corresponding Master ID
3_set_id.py is an example of setting the CAN ID and master ID of DM motors.
python 3_set_id.py
The input of the main implementation function set_DMmotor_ID is the old CAN ID, the new CAN ID to be set, the new master ID to be set, and the port.
from motorbridge import Controller
from motorbridge import Controller, RID_MST_ID, RID_ESC_ID
import time

# Set CAN ID and master ID
def set_DMmotor_ID(old_can_id, new_can_id, new_master_id, channel="/dev/ttyACM0"):

    ctrl = Controller.from_dm_serial(channel, 921600)
    temp_motor_master_id = 0x10 + old_can_id
    motor = ctrl.add_damiao_motor(old_can_id, temp_motor_master_id, "4340P")

    try:
        motor.write_register_u32(RID_MST_ID, new_master_id)
    except Exception:
        pass
    try:
        motor.write_register_u32(RID_ESC_ID, new_can_id)
    except Exception:
        pass
    new_motor = ctrl.add_damiao_motor(new_can_id, new_master_id, "4340P")
    new_motor.store_parameters()
    print("change ID and save")
    time.sleep(1)
    ctrl.close_bus()
    ctrl.close()

if __name__ == "__main__":
    old_can_id = 0x06
    new_can_id = 0x01
    new_master_id = 0x11
    set_DMmotor_ID(old_can_id, new_can_id, new_master_id, channel="/dev/ttyACM0")
Control Different Modes
4_mit_ctrl.py is a control example for MIT mode. kp is the stiffness of the controller, kd is the damping of the controller, and tau is the feedforward torque.
python 4_mit_ctrl.py
Phenomenon: The example only gives tau, so the motor will keep rotating. According to MIT mode, various control modes can be derived. For example, when kp=0 and kd is not 0, giving vel can achieve constant-speed rotation; when kp=0 and kd=0, giving tau can achieve given torque output.
- When only giving tau, do not give too large a tau. If tau is too large, the motor will rotate faster and faster to achieve the desired tau.
- When controlling position, kd cannot be set to 0, otherwise it will cause motor oscillation or even loss of control.
- The units of pos and vlim are rad and rad/s respectively, and the data type is float.
from motorbridge import Controller, Mode
import time


motor_can_id = 0x01
motor_master_id = 0x11
channel = "/dev/ttyACM0"

# Get motor control handle
ctrl = Controller.from_dm_serial(channel, 921600)
motor = ctrl.add_damiao_motor(motor_can_id, motor_master_id, "4340P")

# Enable all motors
ctrl.enable_all()

# Switch to MIT mode, timeout 1000ms
motor.ensure_mode(Mode.MIT, timeout_ms=1000)

# MIT control
motor.send_mit(
    pos=0.0,
    vel=0.0,
    kp=0.0,
    kd=0.0,
    tau=0.8  # 0.8 Nm
)

# Run for 5s
time.sleep(5)

# Disable all motors
ctrl.disable_all()
ctrl.close_bus()
ctrl.close()
5_pos_vel_ctrl.py is a control example for pos_vel mode.
python 5_pos_vel_ctrl.py
pos is the target position for control, and vlim is used to limit the maximum absolute velocity during motion.
The units of pos and vlim are rad and rad/s respectively, and the data type is float.
from motorbridge import Controller, Mode
import time


motor_can_id = 0x01
motor_master_id = 0x11
channel = "/dev/ttyACM0"

# Get motor control handle
ctrl = Controller.from_dm_serial(channel, 921600)
motor = ctrl.add_damiao_motor(motor_can_id, motor_master_id, "4340P")

# Enable all motors
ctrl.enable_all()

# Switch to position-velocity mode, timeout 1000ms
motor.ensure_mode(Mode.POS_VEL, timeout_ms=1000)

# Position-velocity mode control
motor.send_pos_vel(
    pos=2.0,    # target angle (rad)
    vlim=1.5    # max vel (rad/s)
)

# Run for 5s
time.sleep(5)

# Disable all motors
ctrl.disable_all()
ctrl.close_bus()
ctrl.close()
6_vel_ctrl.py is a control example for vel mode.
python 6_vel_ctrl.py
from motorbridge import Controller, Mode
import time


motor_can_id = 0x01
motor_master_id = 0x11
channel = "/dev/ttyACM0"

# Get motor control handle
ctrl = Controller.from_dm_serial(channel, 921600)
motor = ctrl.add_damiao_motor(motor_can_id, motor_master_id, "4340P")

# Enable all motors
ctrl.enable_all()

# Switch to velocity mode, timeout 1000ms
motor.ensure_mode(Mode.VEL, 1000)

# Velocity mode control
motor.send_vel(vel=1.0)  # 1 rad/s

# Run for 5s
time.sleep(5)

# Disable all motors
ctrl.disable_all()
ctrl.close_bus()
ctrl.close()
Where vel is the target velocity for control.
The unit of pos is rad/s, and the data type is float.
7_force_pos.py is a control example for force_pos mode.
python 7_force_pos.py
from motorbridge import Controller, Mode
import time


motor_can_id = 0x01
motor_master_id = 0x11
channel = "/dev/ttyACM0"

# Get motor control handle
ctrl = Controller.from_dm_serial(channel, 921600)
motor = ctrl.add_damiao_motor(motor_can_id, motor_master_id, "4340P")

# Enable all motors
ctrl.enable_all()

# Switch to force_pos mode, timeout 1000ms
motor.ensure_mode(Mode.FORCE_POS, 1000)

# force_pos control
motor.send_force_pos(
    pos=0.5,    # target angle (rad)
    vlim=1.0,   # max vel (rad/s)
    ratio=0.3   # torque ratio (0.0 - 1.0), 0 means no torque, 1 means full torque
)

# Run for 5s
time.sleep(5)

# Disable all motors
ctrl.disable_all()
ctrl.close_bus()
ctrl.close()
pos is the target position for control, vlim is the velocity limit, and ratio represents the amount of torque used. When ratio is 0, it means no torque; when it is 1, it means full torque.
Get Motor State
8_get_state.py is an example of getting the motor state.
python 8_get_state.py
from motorbridge import Controller, Mode
import time


motor_can_id = 0x01
motor_master_id = 0x11
channel = "/dev/ttyACM0"

# Get motor control handle
ctrl = Controller.from_dm_serial(channel, 921600)
motor = ctrl.add_damiao_motor(motor_can_id, motor_master_id, "4340P")

# Enable all motors
ctrl.enable_all()

# Switch to pos_vel mode, timeout 1000ms
motor.ensure_mode(Mode.POS_VEL, 1000)

# Record start time
start = time.perf_counter()

# Control cycle
dt = 0.01  # 10ms

# Run for 5s
while time.perf_counter() - start < 5.0:
    now_time = time.perf_counter() - start
    motor.send_pos_vel(
        pos=2.0,    # target angle (rad)
        vlim=1.5    # max vel (rad/s)
    )
    time.sleep(dt)
    state = motor.get_state()

    if state:
        print(f"time:{now_time:.3f}")
        print(f"pos: {state.pos:.3f} rad")
        print(f"vel: {state.vel:.3f} rad/s")
        print(f"torque: {state.torq:.3f} Nm\n")
    else:
        print("no respond\n")

# Disable all motors
ctrl.disable_all()
ctrl.close_bus()
ctrl.close()
The example given in 8_get_state.py is to get the response frame returned by the motor in the previous frame during the control process. This response frame is sent when a control frame is sent to the motor, and the motor will reply, equivalent to a question-and-answer mode. If you only want the motor to return a response frame to get the state without letting the motor move, you can refer to the method of reading the motor state in 9_set_zero.py.
Set Motor Zero Point
9_set_zero.py is an example of setting the motor zero point.
python 9_set_zero.py
from motorbridge import Controller, Mode
import time


motor_can_id = 0x01
motor_master_id = 0x11
channel = "/dev/ttyACM0"

# Get motor control handle
ctrl = Controller.from_dm_serial(channel, 921600)
motor = ctrl.add_damiao_motor(motor_can_id, motor_master_id, "4340P")

# Set zero point
try:
    motor.set_zero_position()
    print("set zero successfully")
except Exception:
    print("set zero failed")
time.sleep(1)

# Check position
start = time.perf_counter()
dt = 0.01  # 10ms
while time.perf_counter() - start < 1.0:
    now_time = time.perf_counter() - start
    motor.request_feedback()
    time.sleep(dt)
    state = motor.get_state()
    if state:
        print(f"time:{now_time:.3f}")
        print(f"pos: {state.pos:.3f} rad")
        print(f"vel: {state.vel:.3f} rad/s")
        print(f"torque: {state.torq:.3f} Nm\n")
    else:
        print("no respond\n")

time.sleep(1)

ctrl.close_bus()
ctrl.close()
Phenomenon: After successfully setting the zero point, the current state of the motor will be read to confirm whether the zero point setting was successful.
7.4 MotorBridge Controls RS Motors
If your system does not yet have the PCAN driver installed, please refer to this page: PCAN driver installed Drag the slider or enter the corresponding angle in the small box (unit is rad), then click Move, and the motor will rotate to the target angle. After clicking the Enable button, click Zero+Save to set the current position as the zero point. Set the motor ID. If the motor is used on reBot, Phenomenon: After the RS motor is enabled, the motor light turns green. After 3 seconds, the RS motor is disabled and the motor light turns red. The input of the main implementation function The input of the main implementation function Phenomenon: The example only gives tau, so the motor will keep rotating. According to MIT mode, various control modes can be derived. For example, when kp=0 and kd is not 0, giving vel can achieve constant-speed rotation; when kp=0 and kd=0, giving tau can achieve given torque output. Where The unit of pos is rad/s, and the data type is float. The example given in Phenomenon: After successfully setting the zero point, the current state of the motor will be read to confirm whether the zero point setting was successful.7.4 MotorBridge Controls RS Motors
Web Control
peak_usb kernel module, check the port, set the baud rate, and start the port:# The kit comes with PCAN-USB, which usually should directly appear as can0 or can1
sudo modprobe peak_usb
ip -br link
# If can0 appears, then set the bitrate
sudo ip link set can0 down 2>/dev/null
sudo ip link set can0 type can bitrate 1000000
sudo ip link set can0 up
https://motorbridge.github.io/motorbridge-studio/
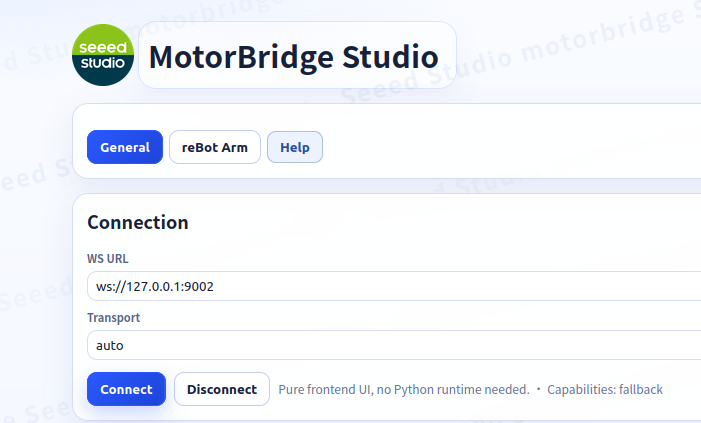
motorbridge-gateway -- --bind 127.0.0.1:9002 --transport socketcan --channel can0
motorbridge-gateway -- --bind 127.0.0.1:9002 --transport socketcan --channel can0
motorbridge-gateway -- --bind 127.0.0.1:9002 --transport socketcan --channel can0@1000000
Connected text will appear in the upper right corner.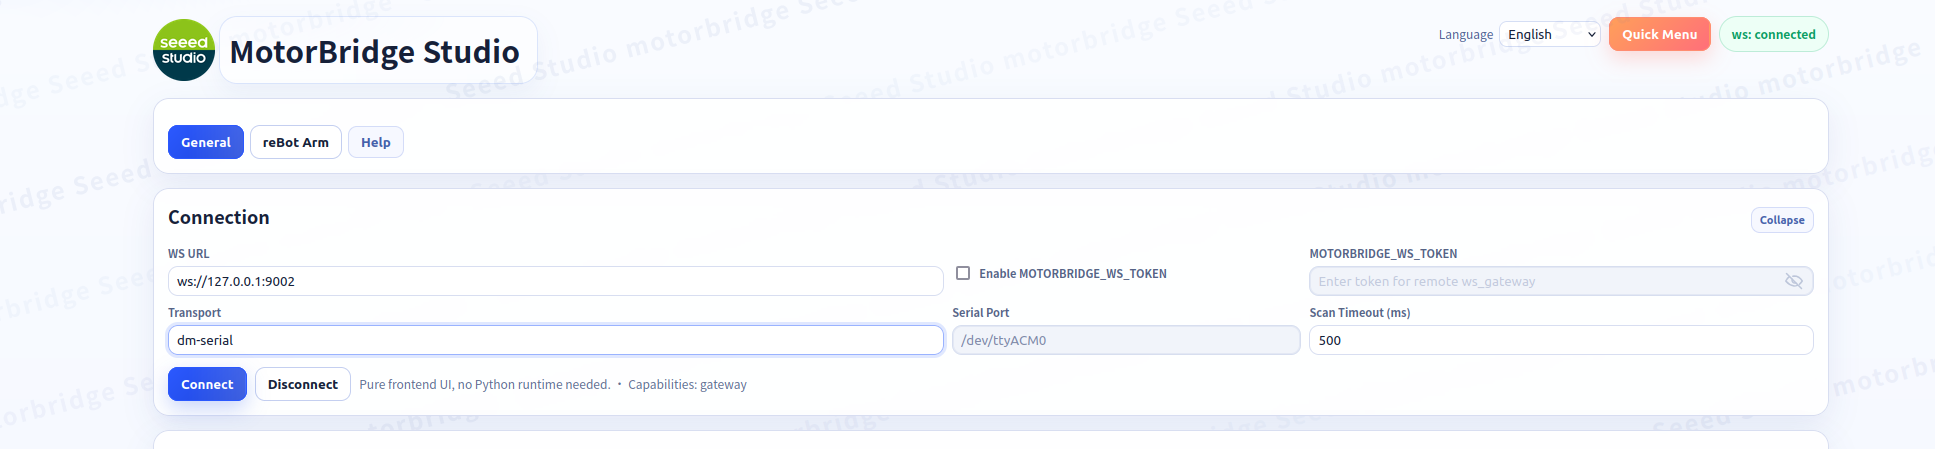
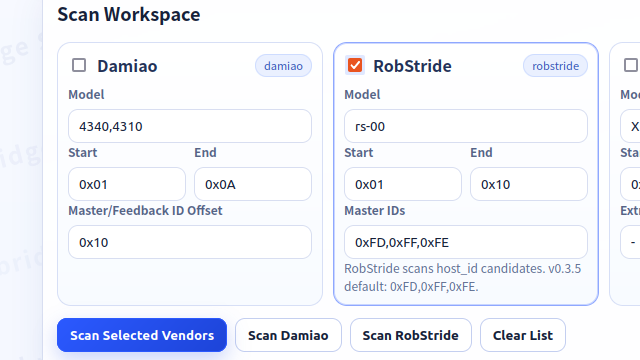
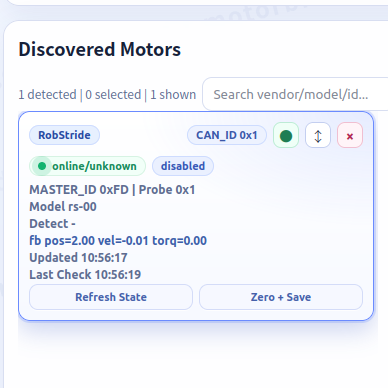
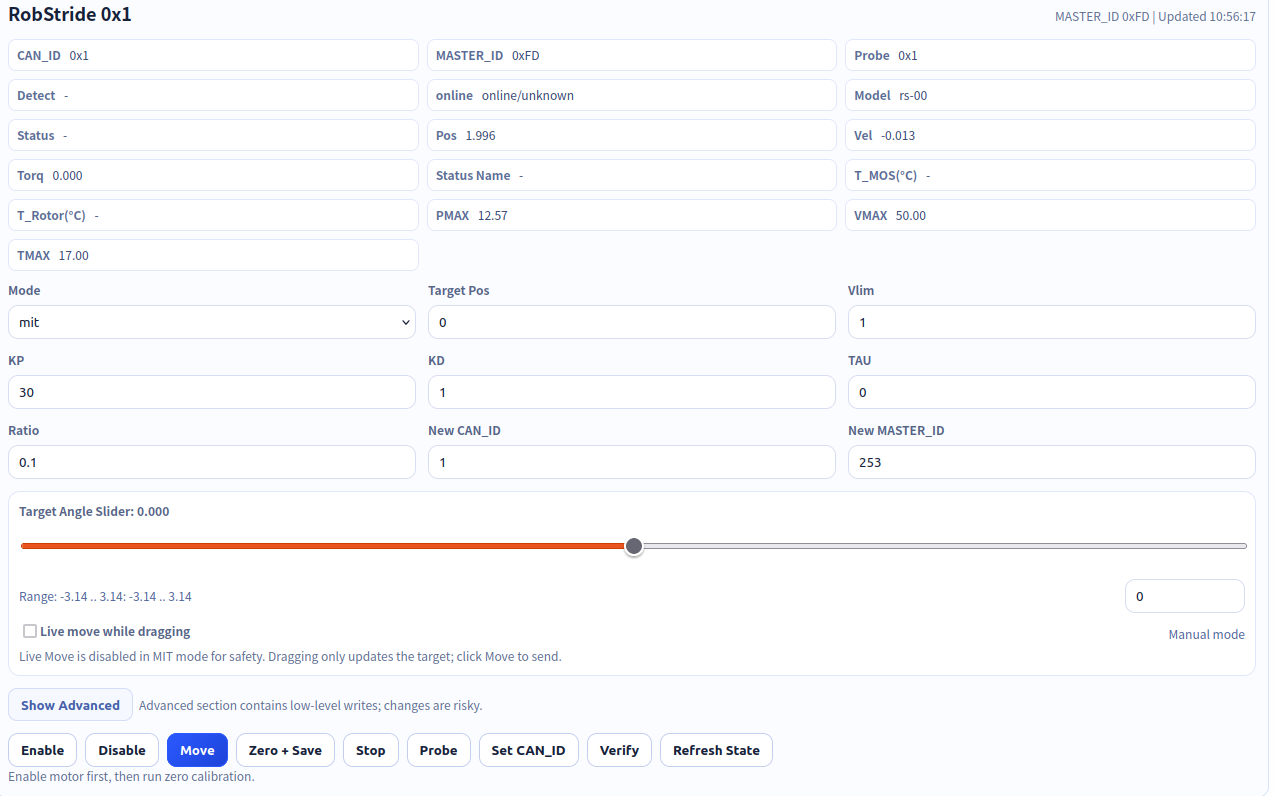
can_id should be set to the corresponding joint number, and master_id is fixed.Python Code Control
Enable/Disable RS Motors
1_enable_rs.py is a typical example of enabling/disabling RS motors.python 1_enable_rs.py# Enable specified motor, disable motor after 3 seconds
from motorbridge import Controller, Mode
import time
motor_configs = {
1 : {
"can_id": 0x07,
"master_id": 0xfd, # fixed
"model": "rs-00", # rs-06 / rs-00
},
}
ctrl = Controller("can0")
# Add motor
motor = {}
for num, cfg in motor_configs.items():
motor[num] = ctrl.add_robstride_motor(cfg["can_id"], cfg["master_id"], cfg["model"])
# Enable all motors
ctrl.enable_all()
# Switch to MIT mode, timeout 1000ms
motor[1].ensure_mode(Mode.MIT, timeout_ms=1000)
# Control MIT
motor[1].send_mit(
pos=0.0,
vel=0.0,
kp=0.0,
kd=0.0,
tau=0.3 # 0.3 Nm
)
time.sleep(3)
# Disable all motors
ctrl.disable_all()Scan Motor ID
2_scan_RSmotor.py is an example of scanning the CAN ID of RS motors.python 2_scan_RSmotor.pyfrom motorbridge import Controller, Mode
import time
def scan_robstride_motors(start_can_id, end_can_id, channel="can0"):
found_motors = []
for motor_can_id in range(start_can_id, end_can_id + 1):
ctrl = Controller(channel)
try:
motor = ctrl.add_robstride_motor(motor_can_id, 0xfd, "rs-00")
try:
can_id, respond_id = motor.robstride_ping()
found_motors.append(can_id)
print(f"can_id={can_id:02X} respond_id={respond_id:02X}") # response ID is not master ID
except Exception:
# Scan error
print(f"[no respond] no this motor_can_id=0x{motor_can_id:02X}")
finally:
motor.close()
except Exception as e:
print(f"[error] motor_can_id=0x{motor_can_id:02X}: {e}")
finally:
ctrl.close_bus()
ctrl.close()
print(f"\nfinish find {len(found_motors)} motor\n")
return found_motors
if __name__ == "__main__":
motors = scan_robstride_motors(1, 10, channel="can0")
print("\nfind motor config:")
for can_id in motors:
print(f" can_id=0x{can_id:02X}")scan_robstride_motors is the CAN ID range and port. After running, the scanned CAN ID and its corresponding master ID will be displayed. This script can be used to check whether the CAN ID and the corresponding master ID are correct.Set CAN ID and Corresponding Master ID
3_set_id.py is an example of setting the CAN ID and master ID of RS motors.python 3_set_id.pyfrom motorbridge import Controller
from motorbridge import Controller, RID_MST_ID, RID_ESC_ID
import time
# Set CAN ID
def set_RSmotor_ID(old_can_id, new_can_id, channel="can0"):
ctrl = Controller(channel)
motor = ctrl.add_robstride_motor(old_can_id, 0xfd, "rs-00")
try:
motor.robstride_set_device_id(new_can_id)
print(f"change to new id :{new_can_id}")
except Exception:
print("set id failed")
time.sleep(1)
ctrl.close_bus()
ctrl.close()
if __name__ == "__main__":
old_can_id = 0x01
new_can_id = 0x01
set_RSmotor_ID(old_can_id, new_can_id, channel="can0")set_RSmotor_ID is the old CAN ID, the new CAN ID to be set, and the port.Control Different Modes
4_mit_ctrl.py is a control example for MIT mode. kp is the stiffness of the controller, kd is the damping of the controller, and tau is the feedforward torque.python 4_mit_ctrl.pyfrom motorbridge import Controller, Mode
import time
motor_can_id = 0x01
motor_master_id = 0xfd
channel = "can0"
# Get motor handle
ctrl = Controller(channel)
motor = ctrl.add_robstride_motor(motor_can_id, motor_master_id, "rs-00")
# Enable all motors
ctrl.enable_all()
# Switch to MIT mode, timeout 1000ms
motor.ensure_mode(Mode.MIT, timeout_ms=1000)
# Control MIT
motor.send_mit(
pos=0.0,
vel=0.0,
kp=0.0,
kd=0.0,
tau=0.3 # 0.3 Nm
)
# Run for 3s
time.sleep(3)
# Disable all motors
ctrl.disable_all()
ctrl.close_bus()
ctrl.close()
5_pos_vel_ctrl.py is a control example for pos_vel mode.python 5_pos_vel_ctrl.pyfrom motorbridge import Controller, Mode
import time
motor_can_id = 0x01
motor_master_id = 0xfd
channel = "can0"
# Get motor handle
ctrl = Controller(channel)
motor = ctrl.add_robstride_motor(motor_can_id, motor_master_id, "rs-00")
# Enable all motors
ctrl.enable_all()
# Switch to position-velocity mode, timeout 1000ms
motor.ensure_mode(Mode.POS_VEL, timeout_ms=1000)
# Control position-velocity
motor.send_pos_vel(
pos=2.0, # target angle (rad)
vlim=1.5 # max vel (rad/s)
)
# Run for 5s
time.sleep(5)
# Disable all motors
ctrl.disable_all()
ctrl.close_bus()
ctrl.close()pos is the target position for control, and vlim is used to limit the maximum absolute velocity during motion.
6_vel_ctrl.py is a control example for vel mode.python 6_vel_ctrl.pyfrom motorbridge import Controller, Mode
import time
motor_can_id = 0x01
motor_master_id = 0xfd
channel = "can0"
# Get motor handle
ctrl = Controller(channel)
motor = ctrl.add_robstride_motor(motor_can_id, motor_master_id, "rs-00")
# Enable all motors
ctrl.enable_all()
# Switch to position-velocity mode, timeout 1000ms
motor.ensure_mode(Mode.POS_VEL, timeout_ms=1000)
# Control position-velocity
motor.send_pos_vel(
pos=2.0, # target angle (rad)
vlim=1.5 # max vel (rad/s)
)
# Run for 5s
time.sleep(5)
# Disable all motors
ctrl.disable_all()
ctrl.close_bus()
ctrl.close()vel is the target velocity for control.Get Motor State
7_get_state.py is an example of getting the motor state.python 7_get_state.pyfrom motorbridge import Controller, Mode
import time
motor_can_id = 0x01
motor_master_id = 0xfd
channel = "can0"
# Get motor handle
ctrl = Controller(channel)
motor = ctrl.add_robstride_motor(motor_can_id, motor_master_id, "rs-00")
# Enable all motors
ctrl.enable_all()
# Switch to position-velocity mode, timeout 1000ms
motor.ensure_mode(Mode.POS_VEL, 1000)
# Record start time
start = time.perf_counter()
# Control cycle
dt = 0.01 # 10ms
# Run for 5s
while time.perf_counter() - start < 5.0:
now_time = time.perf_counter() - start
motor.send_pos_vel(
pos=2.0, # target angle (rad)
vlim=1.5 # max vel (rad/s)
)
time.sleep(dt)
state = motor.get_state()
if state:
print(f"time:{now_time:.3f}")
print(f"pos: {state.pos:.3f} rad")
print(f"vel: {state.vel:.3f} rad/s")
print(f"torque: {state.torq:.3f} Nm\n")
else:
print("no respond\n")
# Disable all motors
ctrl.disable_all()
ctrl.close_bus()
ctrl.close()7_get_state.py is to get the response frame returned by the motor in the previous frame during the control process. This response frame is sent when a control frame is sent to the motor, and the motor will reply, equivalent to a question-and-answer mode. If you only want the motor to return a response frame to get the state without letting the motor move, you can refer to the example of reading the motor state in 8_set_zero.py.Set Motor Zero Point
8_set_zero.py is an example of setting the motor zero point.python 8_set_zero.pyfrom motorbridge import Controller, Mode
import time
motor_can_id = 0x01
motor_master_id = 0xfd
channel = "can0"
# Get motor handle
ctrl = Controller(channel)
motor = ctrl.add_robstride_motor(motor_can_id, motor_master_id, "rs-00")
try:
motor.set_zero_position()
print("set zero successfully")
except Exception:
print("set zero failed")
time.sleep(1)
# Check position
start = time.perf_counter()
dt = 0.01 # 10ms
while time.perf_counter() - start < 1.0:
now_time = time.perf_counter() - start
motor.request_feedback()
time.sleep(dt)
state = motor.get_state()
if state:
print(f"time:{now_time:.3f}")
print(f"pos: {state.pos:.3f} rad")
print(f"vel: {state.vel:.3f} rad/s")
print(f"torque: {state.torq:.3f} Nm\n")
else:
print("no respond\n")
time.sleep(1)
ctrl.close_bus()
ctrl.close()