17. Real-Robot Inference, Evaluation, and Data Iteration
Chapter 17 of the Seeed Physical AI Beginner's Course — inference data flow, preprocessing and de-normalization, starting inference, action chunk execution, safety, success-rate evaluation, generalization testing, failure analysis, and failure-driven data collection.
17.1 Inference Data Flow
17.1 Inference Data Flow: Understand in One Diagram
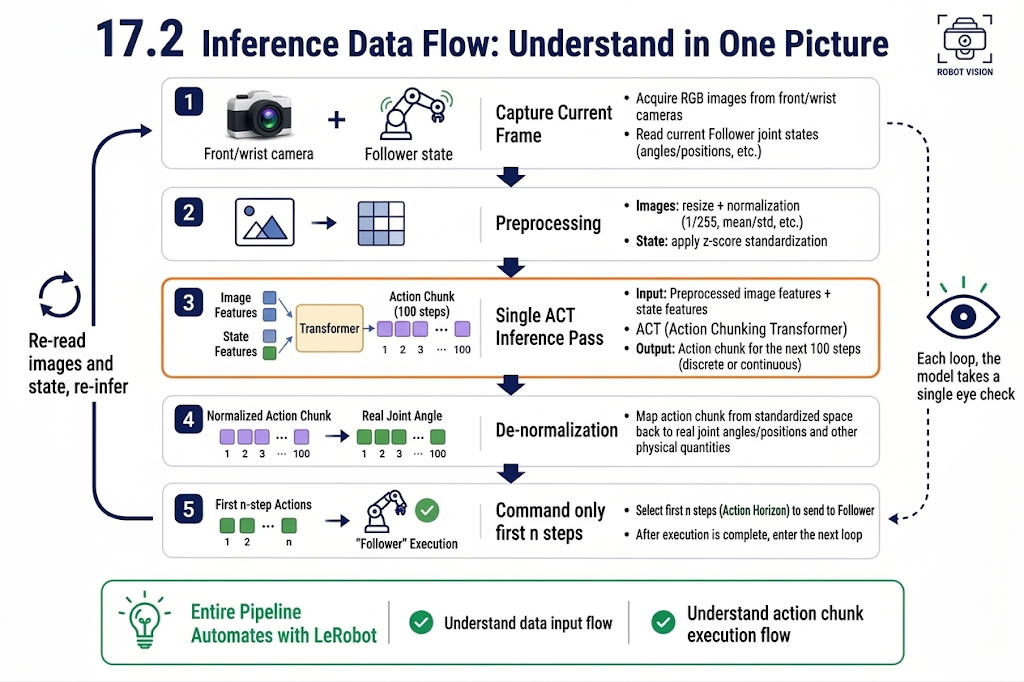
17.2 Preprocessing and De-normalization
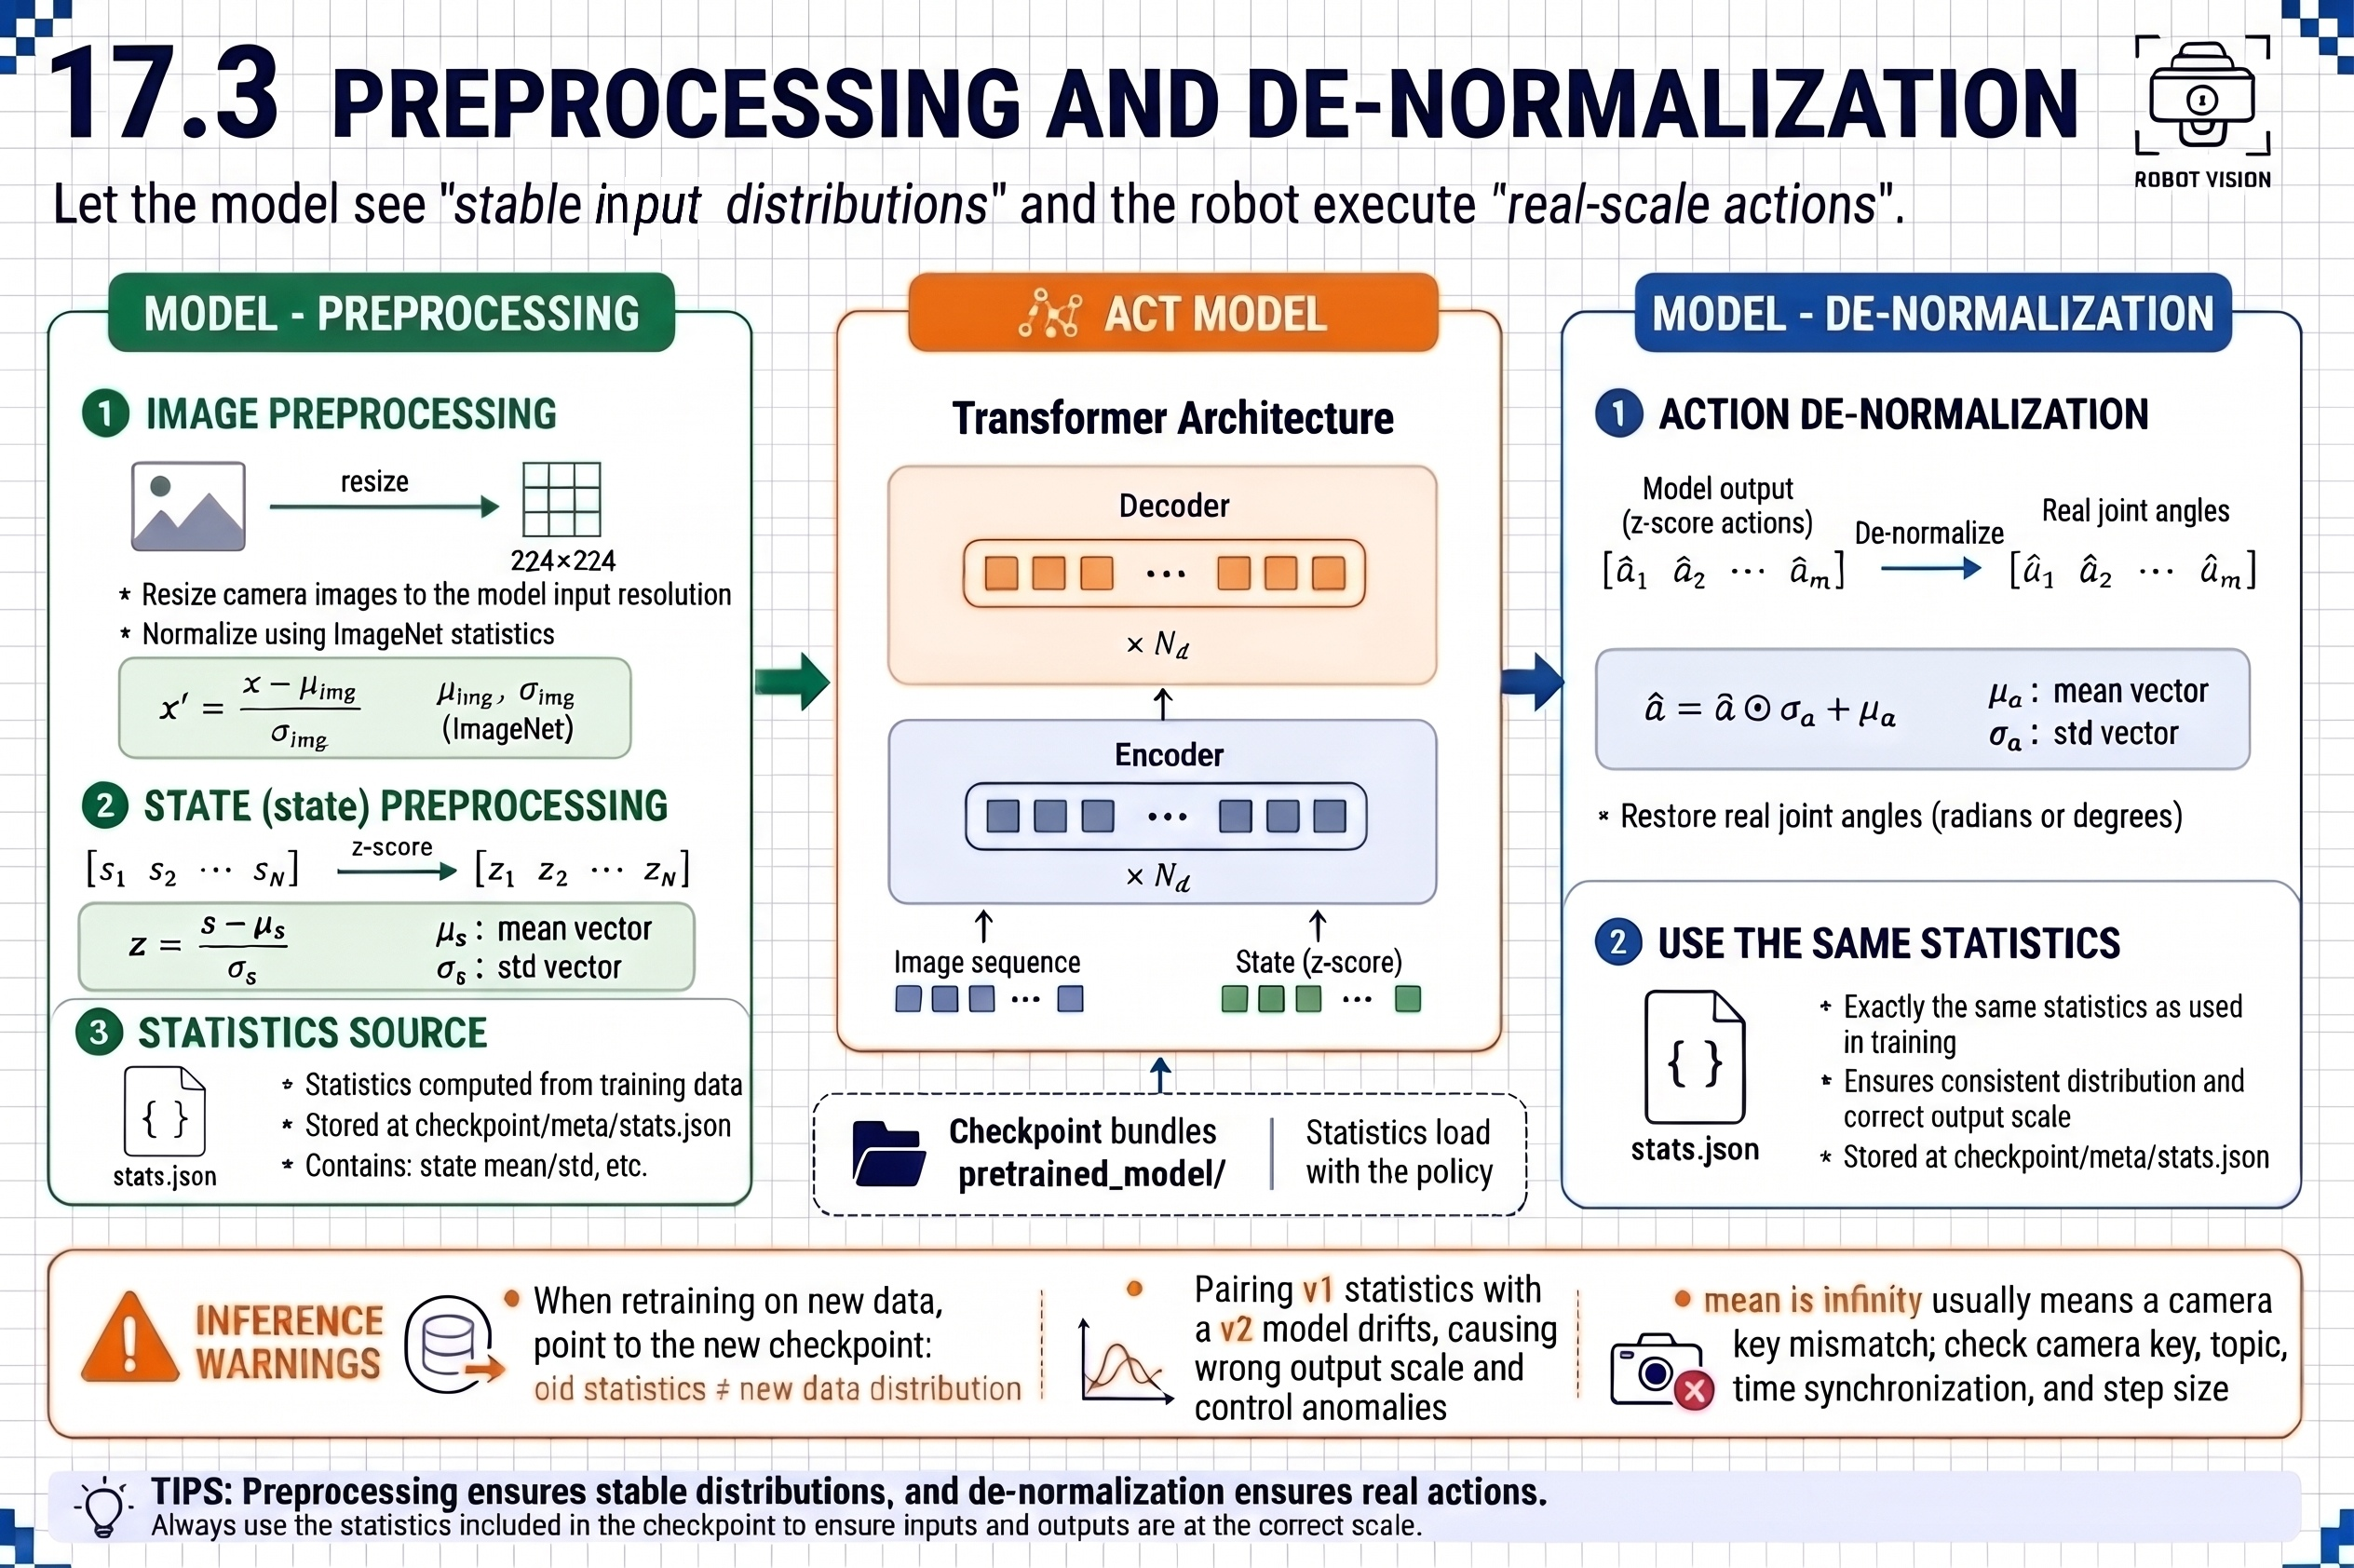
17.2 Preprocessing and De-normalization
During training the model eats normalized data; during inference you must follow the same rules for both input and output:
| Direction | Processing | Statistics Used |
|---|---|---|
| Into model | Image resize + ImageNet mean/std; state minus mean, divided by std (z-score) | Training dataset's meta/stats.json |
| Out of model | Action multiplied by std, plus mean; restore to real joint angles | Same as above |
17.3 Starting Real-Robot Inference
17.3 Starting Real-Robot Inference
Use lerobot-record to load the policy; robot and camera parameters are identical to collection:
RS version:
lerobot-record \
  --robot.type=seeed_b601_rs_follower \
  --robot.port=can0 \
  --robot.can_adapter=socketcan \
  --robot.cameras='{ front: {type: opencv, index_or_path: 0, width: 640, height: 480, fps: 30, fourcc: "MJPG"}, side: {type: opencv, index_or_path: 2, width: 640, height: 480, fps: 30, fourcc: "MJPG"} }' \
  --robot.id=follower1 \
  --display_data=false \
  --dataset.repo_id=seeed/eval_test18 \
  --dataset.single_task="Grab the crayfish into the box" \
  --dataset.num_episodes=10 \
  --dataset.episode_time_s=60 \
  --dataset.reset_time_s=10 \
  --policy.path=outputs/train/act_rebot_test/checkpoints/last/pretrained_model \
  --policy.push_to_hub=false
DM version:
lerobot-record \
  --robot.type=seeed_b601_dm_follower \
  --robot.port=/dev/ttyACM0 \
  --robot.can_adapter=damiao \
  --robot.cameras='{ front: {type: opencv, index_or_path: 0, width: 640, height: 480, fps: 30, fourcc: "MJPG"}, side: {type: opencv, index_or_path: 2, width: 640, height: 480, fps: 30, fourcc: "MJPG"} }' \
  --robot.id=follower1 \
  --display_data=false \
  --dataset.repo_id=seeed/eval_test18 \
  --dataset.single_task="Grab the crayfish into the box" \
  --dataset.num_episodes=10 \
  --dataset.episode_time_s=60 \
  --dataset.reset_time_s=10 \
  --policy.path=outputs/train/act_rebot_test/checkpoints/last/pretrained_model \
  --policy.push_to_hub=false
--dataset.num_episodes=10: run 10 episodes.--dataset.episode_time_s=60: max 60 seconds per episode. Set it based on task duration — e.g., grasping a crayfish into a box takes ~20-30 seconds, so set 30-40 to leave margin. If you want to test the model without waiting, set it very long (e.g., 300), since there's a gap between episodes.--dataset.reset_time_s=10: 10 seconds between episodes for you to reset objects (during evaluation, keep initial state as consistent as possible).
17.4 Action Chunk Execution
17.4 Action Chunk Execution
- One inference outputs a 100-step action chunk; only the first n steps are executed open-loop (
n_action_steps), then re-observe — predictions further out are less reliable. - When temporal ensembling is enabled (
temporal_ensemble_coeff), the action at each timestep is a weighted average of multiple predictions, with near-zero jitter. - If the real robot looks "stuttery," it's likely the computation gap between chunks — old chunk finished, new one not yet computed. Increasing
n_action_stepscan help, at the cost of weaker disturbance resistance.
17.5 Safety: Limits, Speed Limits, E-Stop
17.5 Safety: Limits, Speed Limits, E-Stop
- Always use ESC to stop; don't use Ctrl+C. Before stopping, let the arm finish the current action chunk or manually return it to a safe pose to avoid stopping mid-air in a loaded position.
- Always be ready to cut power; if the arm behaves abnormally, emergency power-off is needed.
17.6 Evaluation: Success Rate and Completion Time
17.6 Evaluation: Success Rate and Completion Time
Fix starting conditions, run 20 consecutive tests, record each one.
- Success rate = successes ÷ 20. For a first trained model, >50% is a normal start, >80% is excellent.
- Completion time: check stability — are the successful runs similar in duration? Inconsistent speed means the policy is "hesitating."
- Failed runs — don't just record a ✗ — note the failure mode.
17.7 Generalization Testing
17.7 Generalization Testing
After testing under standard conditions, vary conditions one by one and see how much success rate drops (ACT with 50 Episodes won't have great generalization; we recommend adding data).
| Test | Method | Expectation |
|---|---|---|
| Position generalization | Place block outside the five pencil points but within training coverage | Should barely drop; if it drops, position diversity is insufficient |
| Mild disturbance | Place unrelated objects on the table | A visually clean-trained model should be unaffected |
| Major distribution shift | Brand-new objects, mirrored reflective surface | Failure is expected; no need to fix |
The point of generalization testing isn't to prove how strong the model is, but to map out its capability boundary — use freely within the boundary; supplement data and gradually expand it beyond.
17.8 Failure Type Analysis
17.8 Failure Type Analysis
| Failure Type | Most Likely Cause | Countermeasure |
|---|---|---|
| Can't reach: moves toward wrong position | Insufficient data coverage at that position (out of distribution) | Supplement demonstrations in that area |
| Unstable grasp: touches but can't hold/drops | Gripper closing timing learned imprecisely; too few grasp-moment demonstrations | Add high-quality demonstrations of the grasp moment |
| Random motion throughout; actions are absurd | Training didn't converge at all, or scene/lighting changed significantly | Check whether data collection scene and lighting match inference |
Rule out config issues first, then suspect data issues — random motion is a config disease; can't-reach is a data disease.
17.9 Data Iteration: Failure-Driven Data Collection
17.9 Data Iteration: Failure-Driven Data Collection
The final step of the loop — turn failures into data:
- Categorize: identify failure type and corresponding scene.
- Supplement: record 10-20 new demonstrations for the failure scene — can't reach? record at that position; unstable grasp? record the grasp moment. Consciously expand the grasp boundary gradually — e.g., place blocks at points 5-10 cm beyond the original cross to expand the dataset.
- Retrain: retrain with the new dataset.
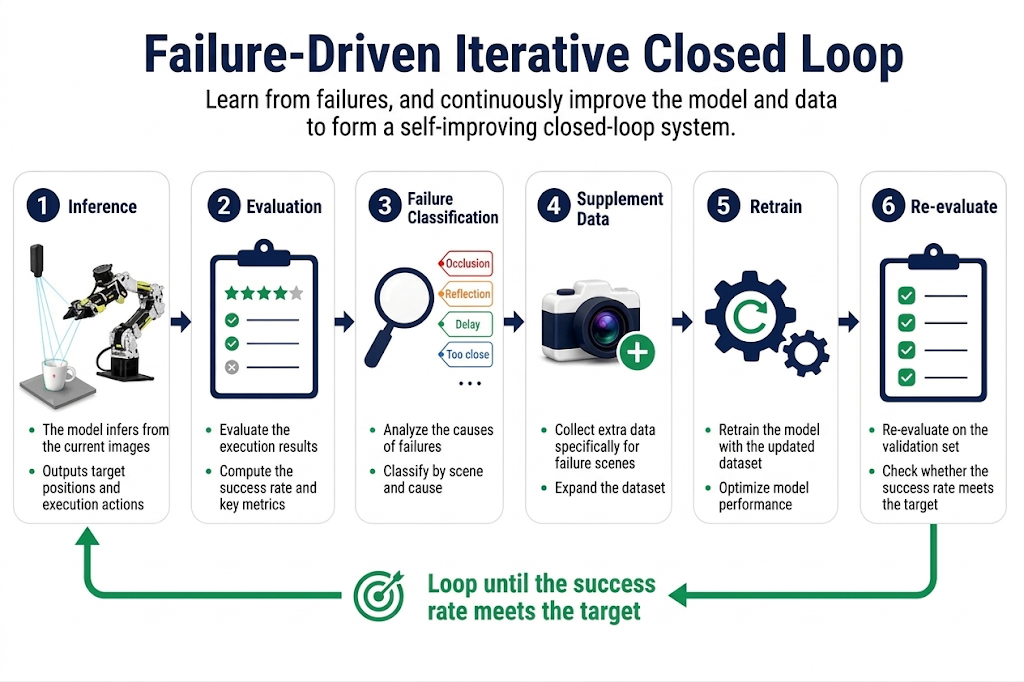
With this, the closed loop from the start of the chapter is fully complete: teleoperation, collection, inspection, training, inference, evaluation, iteration — this pipeline is reused as-is for any new task. That is the core deliverable of Stage 3.