Deploy Monocular Depth Estimation on reCamera (FastDepth, INT8)
This guide walks through converting, quantizing, and deploying a monocular depth estimation model — FastDepth — to the reCamera's CV181x TPU, and running it on-device. All commands were run and all numbers measured on real hardware.
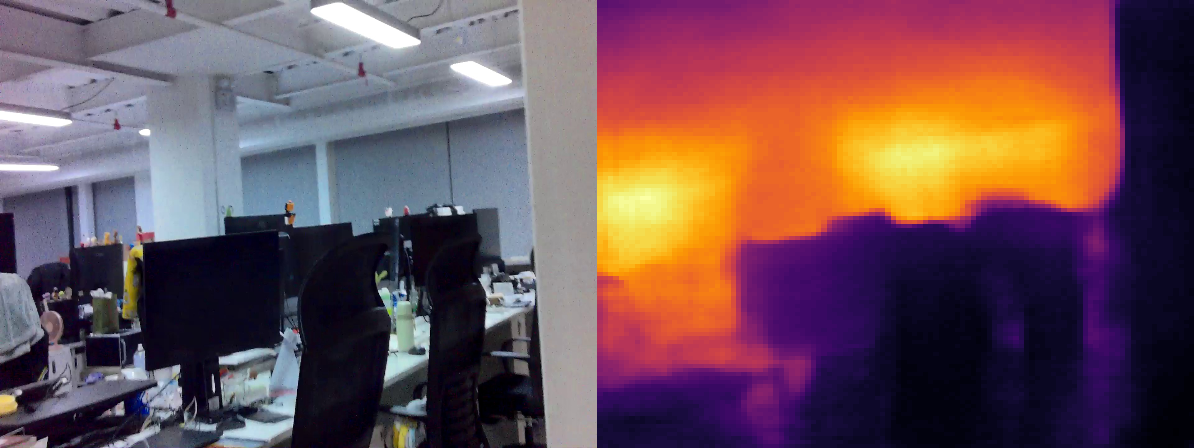
Measured results you can expect at the end:
| Metric | Result |
|---|---|
| Depth inference latency (INT8, 224×224) | 18.4 ms (P50 18.36 / P95 18.46, n=300) |
| Standalone depth FPS | 54 |
| Depth + YOLO11n serial, per frame | 53.9 ms → 18.5 FPS (model-level) |
| INT8 accuracy loss vs BF16 (DIODE AbsRel) | < 2% |
.cvimodel size | 1.5 MB (INT8) / 3.1 MB (BF16) |
| 30-min continuous soak | no crashes, no drift, stable memory |
FastDepth predicts relative depth and was trained on the NYU Depth V2 indoor dataset. Indoors it produces correct near/far structure; outdoor scenes come out with a strongly compressed range (see Qualitative results). Do not interpret raw outputs as meters.
The pipeline: ONNX → Top-MLIR (model_transform) → INT8 calibration table (run_calibration, 500 images) → compiled .cvimodel (model_deploy, two validation gates) → on-device inference (cviruntime).
Prerequisites
- reCamera 2002 series (SG2002 SoC, CV181x TPU), connected over USB (
192.168.42.1), ssh access as userrecamera - Docker on your development machine
- The TPU-MLIR toolchain container:
docker pull sophgo/tpuc_dev:v3.4
docker run --rm -it -v $(pwd):/workspace sophgo/tpuc_dev:v3.4
Inside the container, install TPU-MLIR into a virtual environment kept on the bind mount (so it survives container restarts):
python3 -m venv /workspace/tpu_env
source /workspace/tpu_env/bin/activate
pip install "tpu_mlir[onnx]==1.28.1"
pip install psutil
pip install torch --index-url https://download.pytorch.org/whl/cpu
- Install the
[onnx]extra, not[all]—tpu_mlir[all]==1.28.1pins a paddlepaddle version that has been removed from PyPI and cannot be installed anymore. psutilandtorchare undeclared dependencies — without them the tools crash at import time. Use the CPU-only torch wheel (the default PyPI package pulls a multi-GB CUDA stack you don't need).
Verify: model_transform.py --help should print the TPU-MLIR version banner.
Step 1 — Get the ONNX model
Export FastDepth (the mobilenet-nnconv5dw-skipadd-pruned variant) to ONNX with a fixed 1×3×224×224 input, opset ≥ 13, and run it through onnxsim. After simplification the graph contains only Conv / Clip / Relu / Resize / Add — all supported by TPU-MLIR for CV181x. (Auditing the op list before conversion is a habit that pays off — see Will your model run on this chip? below.)
Step 2 — Translate to Top-MLIR
FastDepth's expected preprocessing is plain resize + RGB + /255 — no mean/std normalization. You declare the recipe once here; it gets baked into the .mlir, and every downstream tool (calibration, deployment) reuses it automatically:
mkdir -p /workspace/build/fastdepth && cd /workspace/build/fastdepth
model_transform.py --model_name fastdepth \
  --model_def /workspace/fastdepth_224.onnx \
  --input_shapes [[1,3,224,224]] \
  --mean 0.0,0.0,0.0 \
  --scale 0.00392156862745098,0.00392156862745098,0.00392156862745098 \
  --pixel_format rgb \
  --test_input /workspace/test_image.jpg \
  --test_result fastdepth_top_outputs.npz \
  --mlir fastdepth_224.mlir
You should see: a layer-by-layer comparison against ONNX ending in all layers passed (46/46, cosine similarity ≈ 1.0).
Keep fastdepth_in_f32.npz and fastdepth_top_outputs.npz — they are the frozen float32 references that validate the quantized model later.
The --test_input extension check is case-sensitive: .JPG crashes with a confusing assertion. Use lowercase .jpg — for this file and every calibration image.
Step 3 — Build a calibration dataset
Here is the part most tutorials skip, and it decides your INT8 quality. Quantization spreads 256 levels over the value range each layer actually produces on your calibration images. At inference, values outside that recorded range get clipped — information destroyed at the layer. So the set must cover what the camera will really see:
- ~500 images, mostly frames captured with the target reCamera itself (day / indoor / night / backlit), topped up with a public dataset (e.g. DIODE validation images)
- Spread picks evenly across recordings — never consecutive near-duplicates
- Identical preprocessing to deployment: supply original images and let the tools apply the recipe from the
.mlir— do not resize them yourself - Lowercase
.jpgfilenames
MPEG-TS frame counts lie. When extracting frames from .ts recordings, CAP_PROP_FRAME_COUNT can report 3× the real count — count frames by reading sequentially to the end.
Generate the calibration table (~3 minutes for 500 images):
run_calibration.py fastdepth_224.mlir \
  --dataset /workspace/calib_set --input_num 500 \
  -o fastdepth_cal_table
Step 4 — Quantize and compile
model_deploy.py --mlir fastdepth_224.mlir --quantize INT8 \
  --calibration_table fastdepth_cal_table --processor cv181x \
  --test_input fastdepth_in_f32.npz \
  --test_reference fastdepth_top_outputs.npz \
  --tolerance 0.85,0.45 \
  --model fastdepth_224_int8.cvimodel
The tool runs two validation gates — learn to read both, they answer different questions:
| Gate | Compares | Question it answers | FastDepth result |
|---|---|---|---|
| 1 | quantized MLIR vs float32 reference | did quantization hurt the math? | cosine 0.9997 ✅ |
| 2 | compiled .cvimodel (TPU simulator) vs its own quantized MLIR | did compilation preserve the math? | EQUAL (1.0) ✅ |
Code generation can print warnings (e.g. cvkcv181x tiu ... wrong parameter) and still report [Success] while producing a numerically broken model.
Only Gate 2 catches this. If Gate 1 passes but Gate 2 collapses, your problem is model-vs-chip compatibility, not quantization — see Will your model run on this chip?
For an accuracy reference, build a BF16 variant the same way — drop --calibration_table and use --quantize BF16 (no calibration needed: BF16 keeps real number ranges).
Step 5 — Run it on the reCamera
The reCamera OS image doesn't ship a generic .cvimodel runner, so we use a small C program against the cviruntime API, cross-compiled with the sscma-example-sg200x toolchain and statically linked against the SDK's libcviruntime-static.a / libcvikernel-static.a / libcvimath-static.a.
The API is pleasantly small:
#include "cviruntime.h"

CVI_MODEL_HANDLE model = NULL;
CVI_NN_RegisterModel("fastdepth_224_int8.cvimodel", &model);

CVI_TENSOR *inputs, *outputs;
int32_t input_num, output_num;
CVI_NN_GetInputOutputTensors(model, &inputs, &input_num, &outputs, &output_num);

// fill inputs[0] with 1x3x224x224 float32 (RGB/255, CHW), then:
CVI_NN_Forward(model, inputs, input_num, outputs, output_num);
// outputs[0] now holds the 1x1x224x224 depth map (float32)

CVI_NN_CleanupModel(model);
Preprocessing on the host side (Python — produces the raw input file):
import cv2
img = cv2.imread("frame.jpg")
img = cv2.resize(img, (224, 224))
img = cv2.cvtColor(img, cv2.COLOR_BGR2RGB)
img = img.astype("float32") / 255.0
img.transpose(2, 0, 1).tofile("input.bin")
On the camera, the TPU needs root and a free video subsystem:
sudo /etc/init.d/S93sscma-supervisor stop   # frees VPSS/ION held by the stock stack
sudo ./depth_runner fastdepth_224_int8.cvimodel input.bin depth_out.bin 300
You should see (real output from our device):
model registered: fastdepth_224_int8.cvimodel (target cv181x)
input : name=data fmt=FP32 count=150528 shape=[1,3,224,224]
output: name=decode_conv6/2_Relu_f32 fmt=FP32 count=50176 shape=[1,1,224,224]
depth latency over 300 runs (after 20 warm-up): mean 18.38 ms  P50 18.36 ms  P95 18.46 ms  (54.41 fps mean)
Visualize the result as a heatmap:
import cv2, numpy as np
d = np.fromfile("depth_out.bin", dtype="float32").reshape(224, 224)
g = ((d - d.min()) / (d.max() - d.min()) * 255).astype("uint8")
cv2.imwrite("depth_map.png", cv2.applyColorMap(g, cv2.COLORMAP_INFERNO))
Benchmark results
All numbers: 224×224 input, preprocessing as above, 20-inference warm-up, 300 measured runs, on-device (CV181x TPU):
| Benchmark | mean | P50 | P95 | FPS |
|---|---|---|---|---|
| FastDepth INT8 | 18.38 ms | 18.36 | 18.46 | 54.4 |
| FastDepth BF16 | 19.55 ms | 19.54 | 19.58 | 51.2 |
| YOLO11n detection INT8 (stock model) | 35.51 ms | 35.50 | 35.53 | 28.2 |
| FastDepth INT8 + YOLO11n, serial | 53.90 ms | 53.88 | 53.99 | 18.5 |
Three findings worth knowing:
- The TPU is deterministic — P95 − P50 ≤ 0.1 ms across every variant. No jitter to engineer around.
- Co-residency is free — loading YOLO alongside costs the depth model +0.01 ms. A 30-minute continuous combined run: no crashes, no latency drift, memory stable.
- INT8's speed edge over BF16 is only ~6% — at this model size the TPU is bandwidth-bound, so INT8 mostly buys you half the model size. Both precisions are viable; INT8 measured < 2% AbsRel difference vs BF16 on DIODE (scale-and-shift aligned), far below a typical 5% budget.
Qualitative results (what to expect)
- Indoors (in-distribution): correct global structure — nearest objects darkest, far walls bright, deepest corridors brightest.
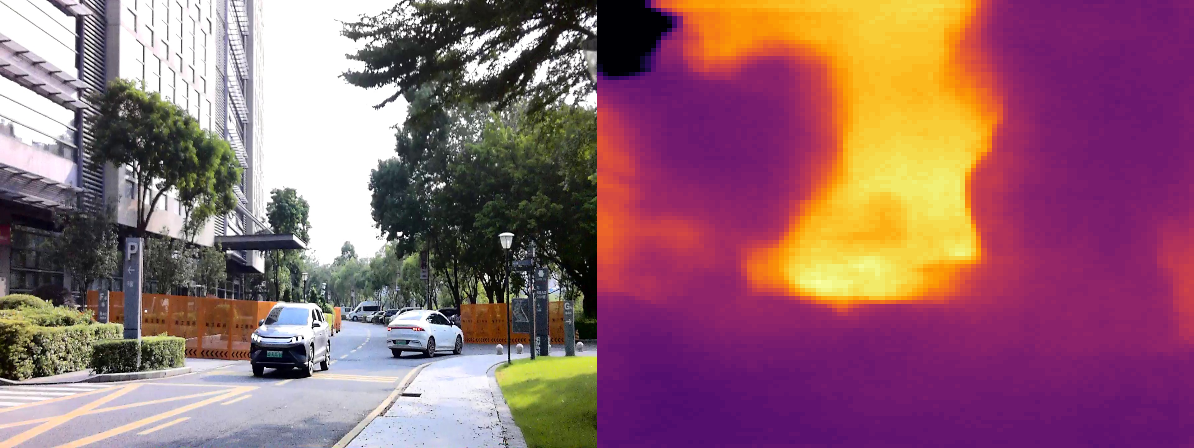
- Outdoors: out-of-distribution for NYU-trained FastDepth — the range compresses sharply (a 40 m street maps into a ~3-unit span) and structure goes coarse. Usable for rough near/far cues at best.
- Night: on a camera without IR illumination, lamp-lit scenes yield coarse blobs with the most compressed ranges of all; fully unlit scenes are near-black input and not meaningful.
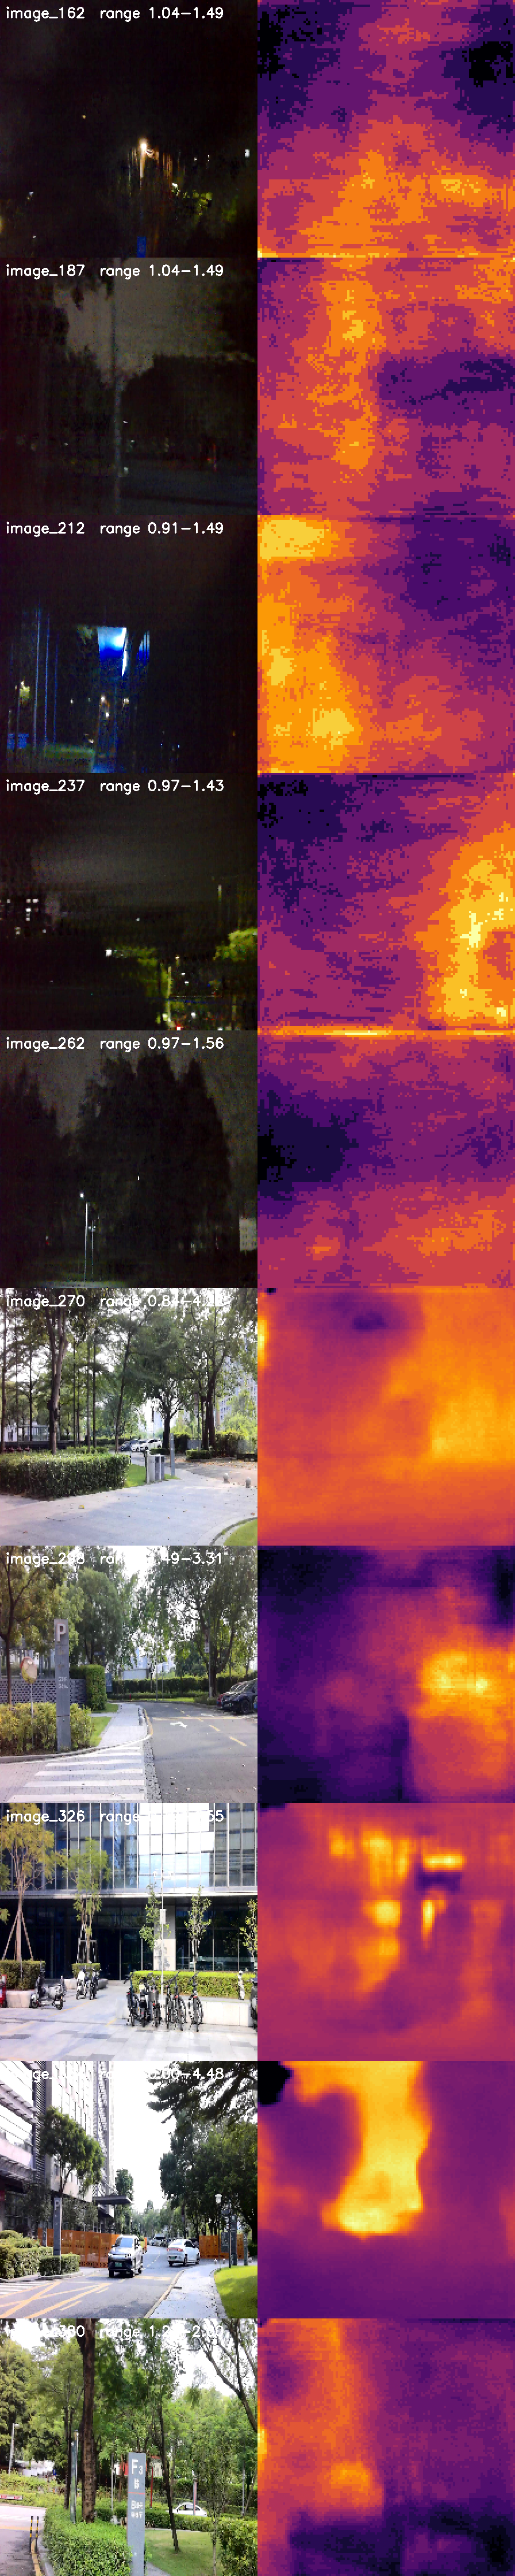
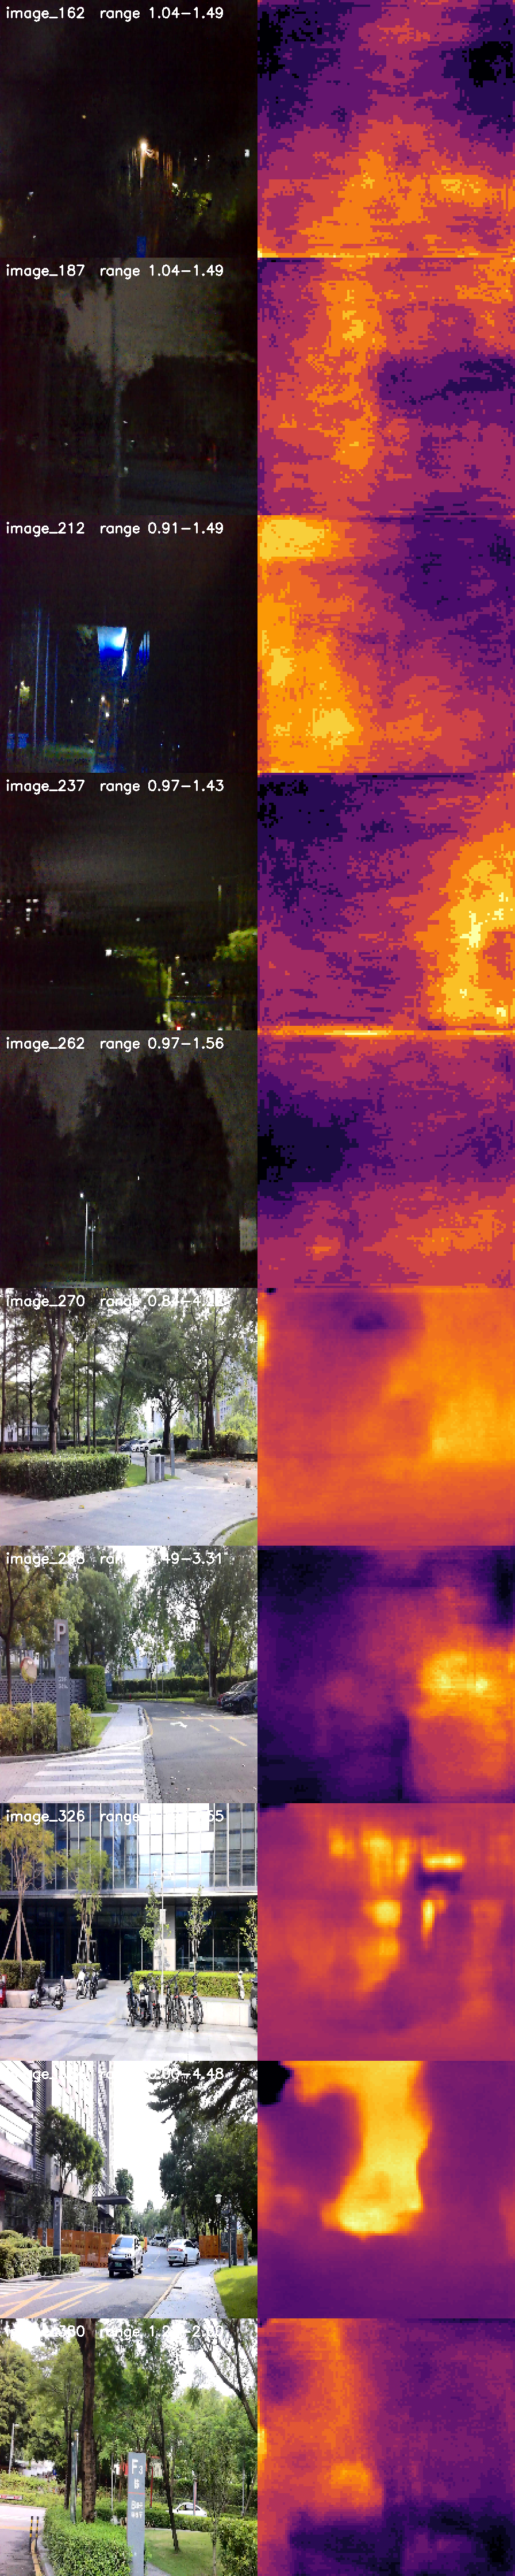
If your product needs quality outdoor or night depth, plan for target-domain fine-tuning or distillation from a stronger teacher (e.g. Depth Anything V2) into a chip-friendly student architecture.
Will your model run on this chip?
Converting successfully is not the same as running correctly. A real case from this project: ZipDepth (an NPU-oriented depth model) quantizes properly: Gate 1 cosine ≥ 0.998 in both INT8 and BF16, but its strip-pooling attention uses average pools of shape [48,1], [1,48] (stride 48) and [24,24]: larger than the CV181x TIU pooling unit can encode. Codegen printed cvkcv181x tiu avg pool: wrong parameter four times (once per pool), still reported success, and the compiled model produced noise — caught only by Gate 2 (negative SQNR). The failure is precision-independent, so no mixed INT8/BF16 quantization table can work around it.
Checklist before you commit to a depth model for reCamera:
- ✅ Audit the ONNX op list first (Netron is your friend); prefer architectures built from small convolutions
- ⚠️ Avoid large or strip-shaped average pools — small
MaxPool(e.g. SPPF's 5×5) compiles fine - ✅ Always pass
--test_input/--test_referenceso both gates run - If Gate 1 passes but Gate 2 fails with pooling warnings: the model needs architectural surgery (e.g. decomposing a large pool into an exact chain of small ones — a mean of means over equal groups is the overall mean) before it can target this chip
Troubleshooting
| Symptom | Cause | Fix |
|---|---|---|
Assertion failed ... device_init on the camera | stock AI stack holds the TPU/ION memory | sudo /etc/init.d/S93sscma-supervisor stop, run with sudo |
model_runner.py: not found in container | venv not activated | source /workspace/tpu_env/bin/activate |
tpu_mlir[all] install fails | upstream pin on deleted paddlepaddle | install tpu_mlir[onnx] instead |
--test_input assertion on a valid image | uppercase .JPG extension | rename to lowercase .jpg |
| Gate 2 fails, Gate 1 passes | codegen/chip incompatibility (check for wrong parameter warnings) | see Will your model run on this chip? |
| Frame extraction reads fewer frames than expected | .ts metadata frame count is wrong | count by sequential read |
Resources
reCamera example (cross-compile toolchain)
Tech Support & Product Discussion
Thank you for choosing our products! We are here to provide you with different support to ensure that your experience with our products is as smooth as possible. We offer several communication channels to cater to different preferences and needs.