Building a Long-Range Security System with reCamera and Meshtastic

1. Introduction
How to implement intelligent security monitoring in the wilderness, large farms, or remote mountainous areas without WiFi or cellular network coverage?
This tutorial provides a highly geeky "network-free security" solution: leverage the powerful edge AI computing power of reCamera PoE for real-time human detection. Once a target is detected, immediately trigger the XIAO ESP32S3 + Wio-SX1262 module (transmitter) via the underlying hardware pins. The alert signal is converted into low-frequency radio waves, traversing kilometers of complex terrain to be captured by the indoor Wio-SX1262 receiver, and seamlessly translated into MQTT messages pushed to your local Home Assistant (HA) system.
The entire link requires no cloud servers, truly achieving the perfect combination of privacy, low power consumption, and ultra-long range.
System Communication Architecture
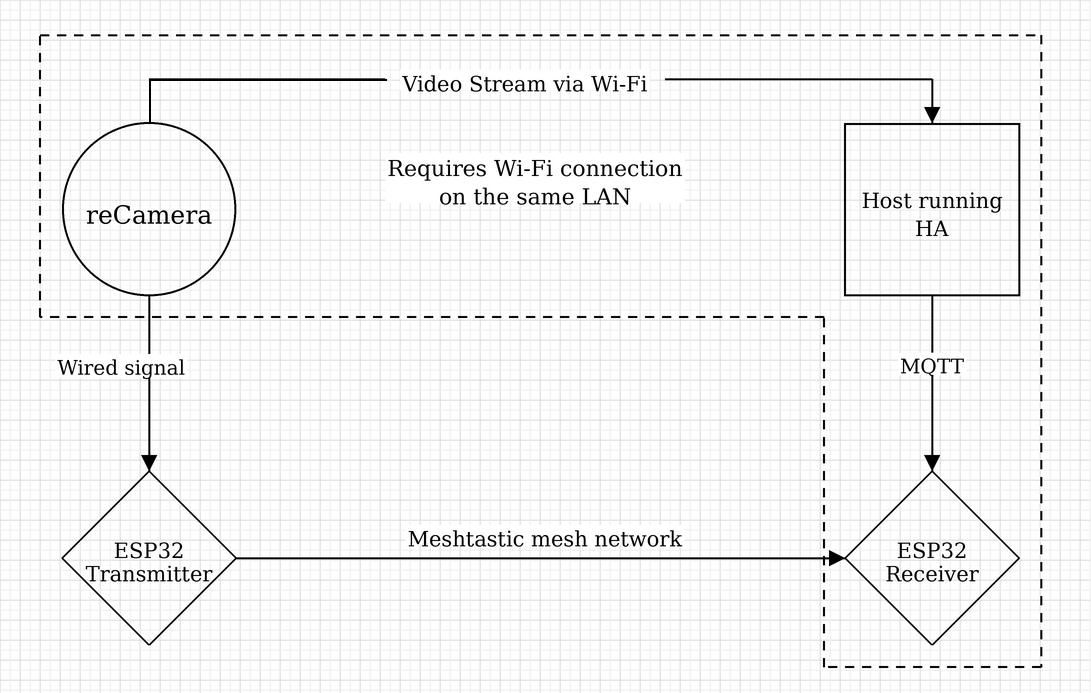
The overall data flow is as follows:
- reCamera PoE runs the YOLO human detection model and outputs a low-level signal through the GPIO pin when a human is detected
- XIAO ESP32S3 (transmitter) captures the low-level trigger via the D2 pin and sends LoRa radio packets through Wio-SX1262
- XIAO ESP32S3 (receiver) receives LoRa packets via Wio-SX1262 and pushes them to Home Assistant via WiFi using the MQTT protocol
- Home Assistant receives the MQTT message and triggers automated alerts (notifications, linkage with other smart devices, etc.)
2. Hardware Preparation
| XIAO ESP32S3 & Wio-SX1262 Kit | reCamera PoE |
|---|---|
 | 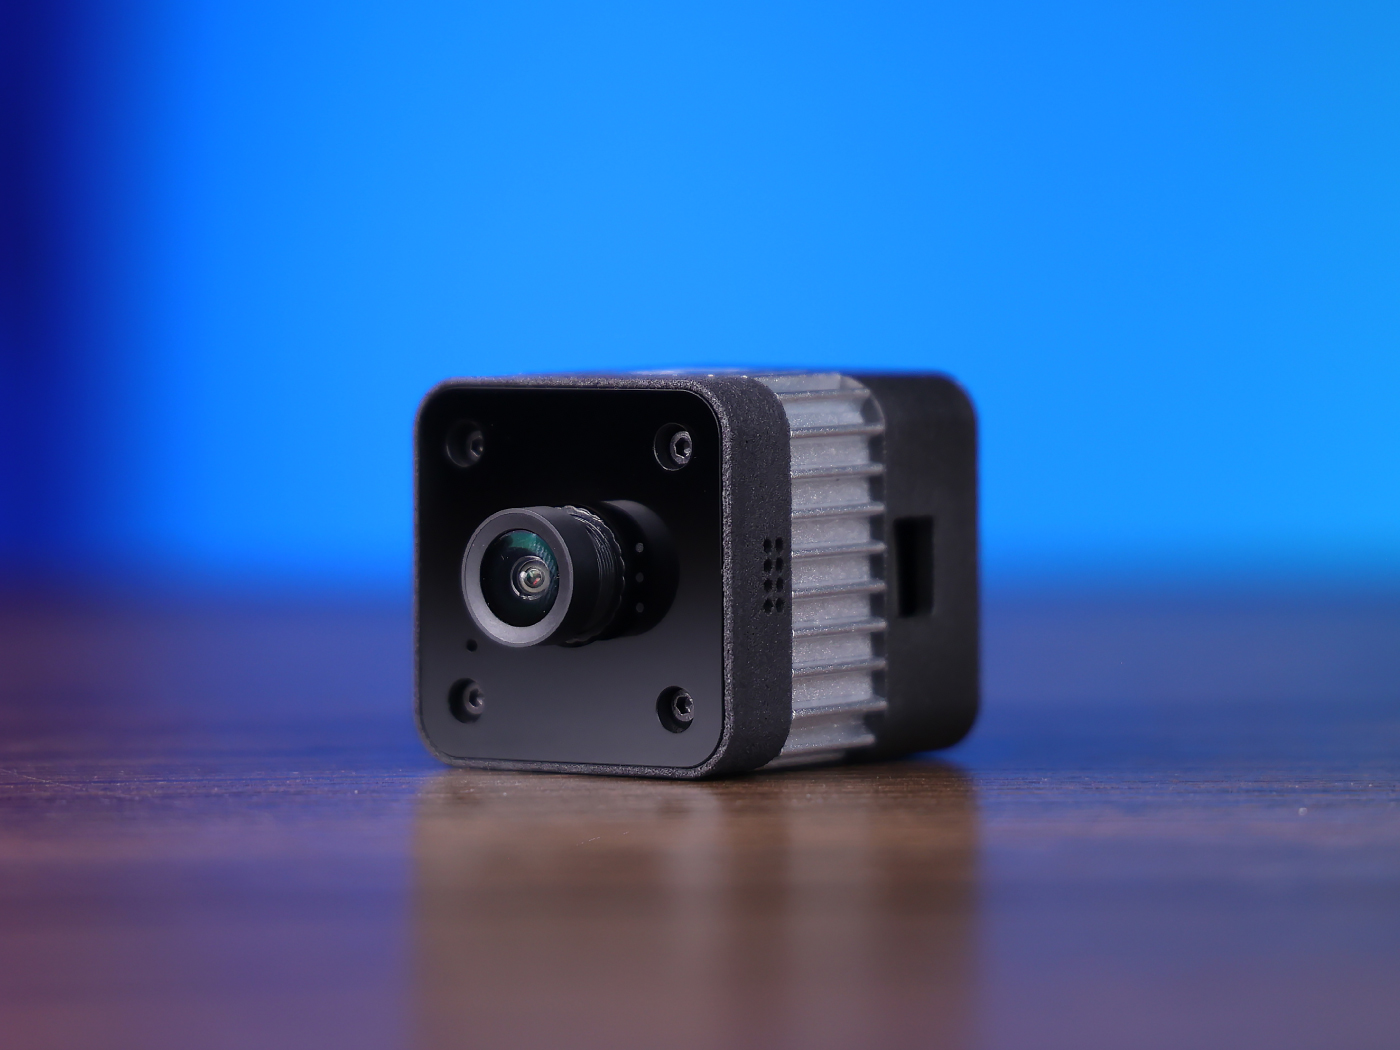 |
- XIAO ESP32S3 & Wio-SX1262 Kit: 2 sets (one for LoRa transmitter, one for LoRa receiver)
- Local smart host: 1 unit, used to run Home Assistant and MQTT Broker (any small host capable of running HA is acceptable)
- Dupont extension cables: several, used for physical signal wiring between reCamera GPIO and XIAO ESP32S3
3. Meshtastic Network Configuration
To achieve long-range LoRa communication between two XIAO ESP32S3 devices, we need to flash them with the Meshtastic open-source firmware.
3.1 Firmware Flashing and Basic RF Synchronization (Required for Both Receiver and Transmitter)
Step 1: Connect the XIAO ESP32S3 to the computer via a USB-C data cable.
Before flashing, put the ESP32 into Bootloader download mode. Operation method: press and hold the BOOT button, press the RESET button once, then release the BOOT button.
Step 2: Visit the Meshtastic Web Flasher, select Seeed Xiao ESP32-S3 as the device type, check Full Erase, and click Flash to write the firmware.
Step 3: After the firmware is flashed, visit the Meshtastic Web Client, click Add Connection to add a new device, select Serial as the connection method, select the corresponding serial device, and click Connect.
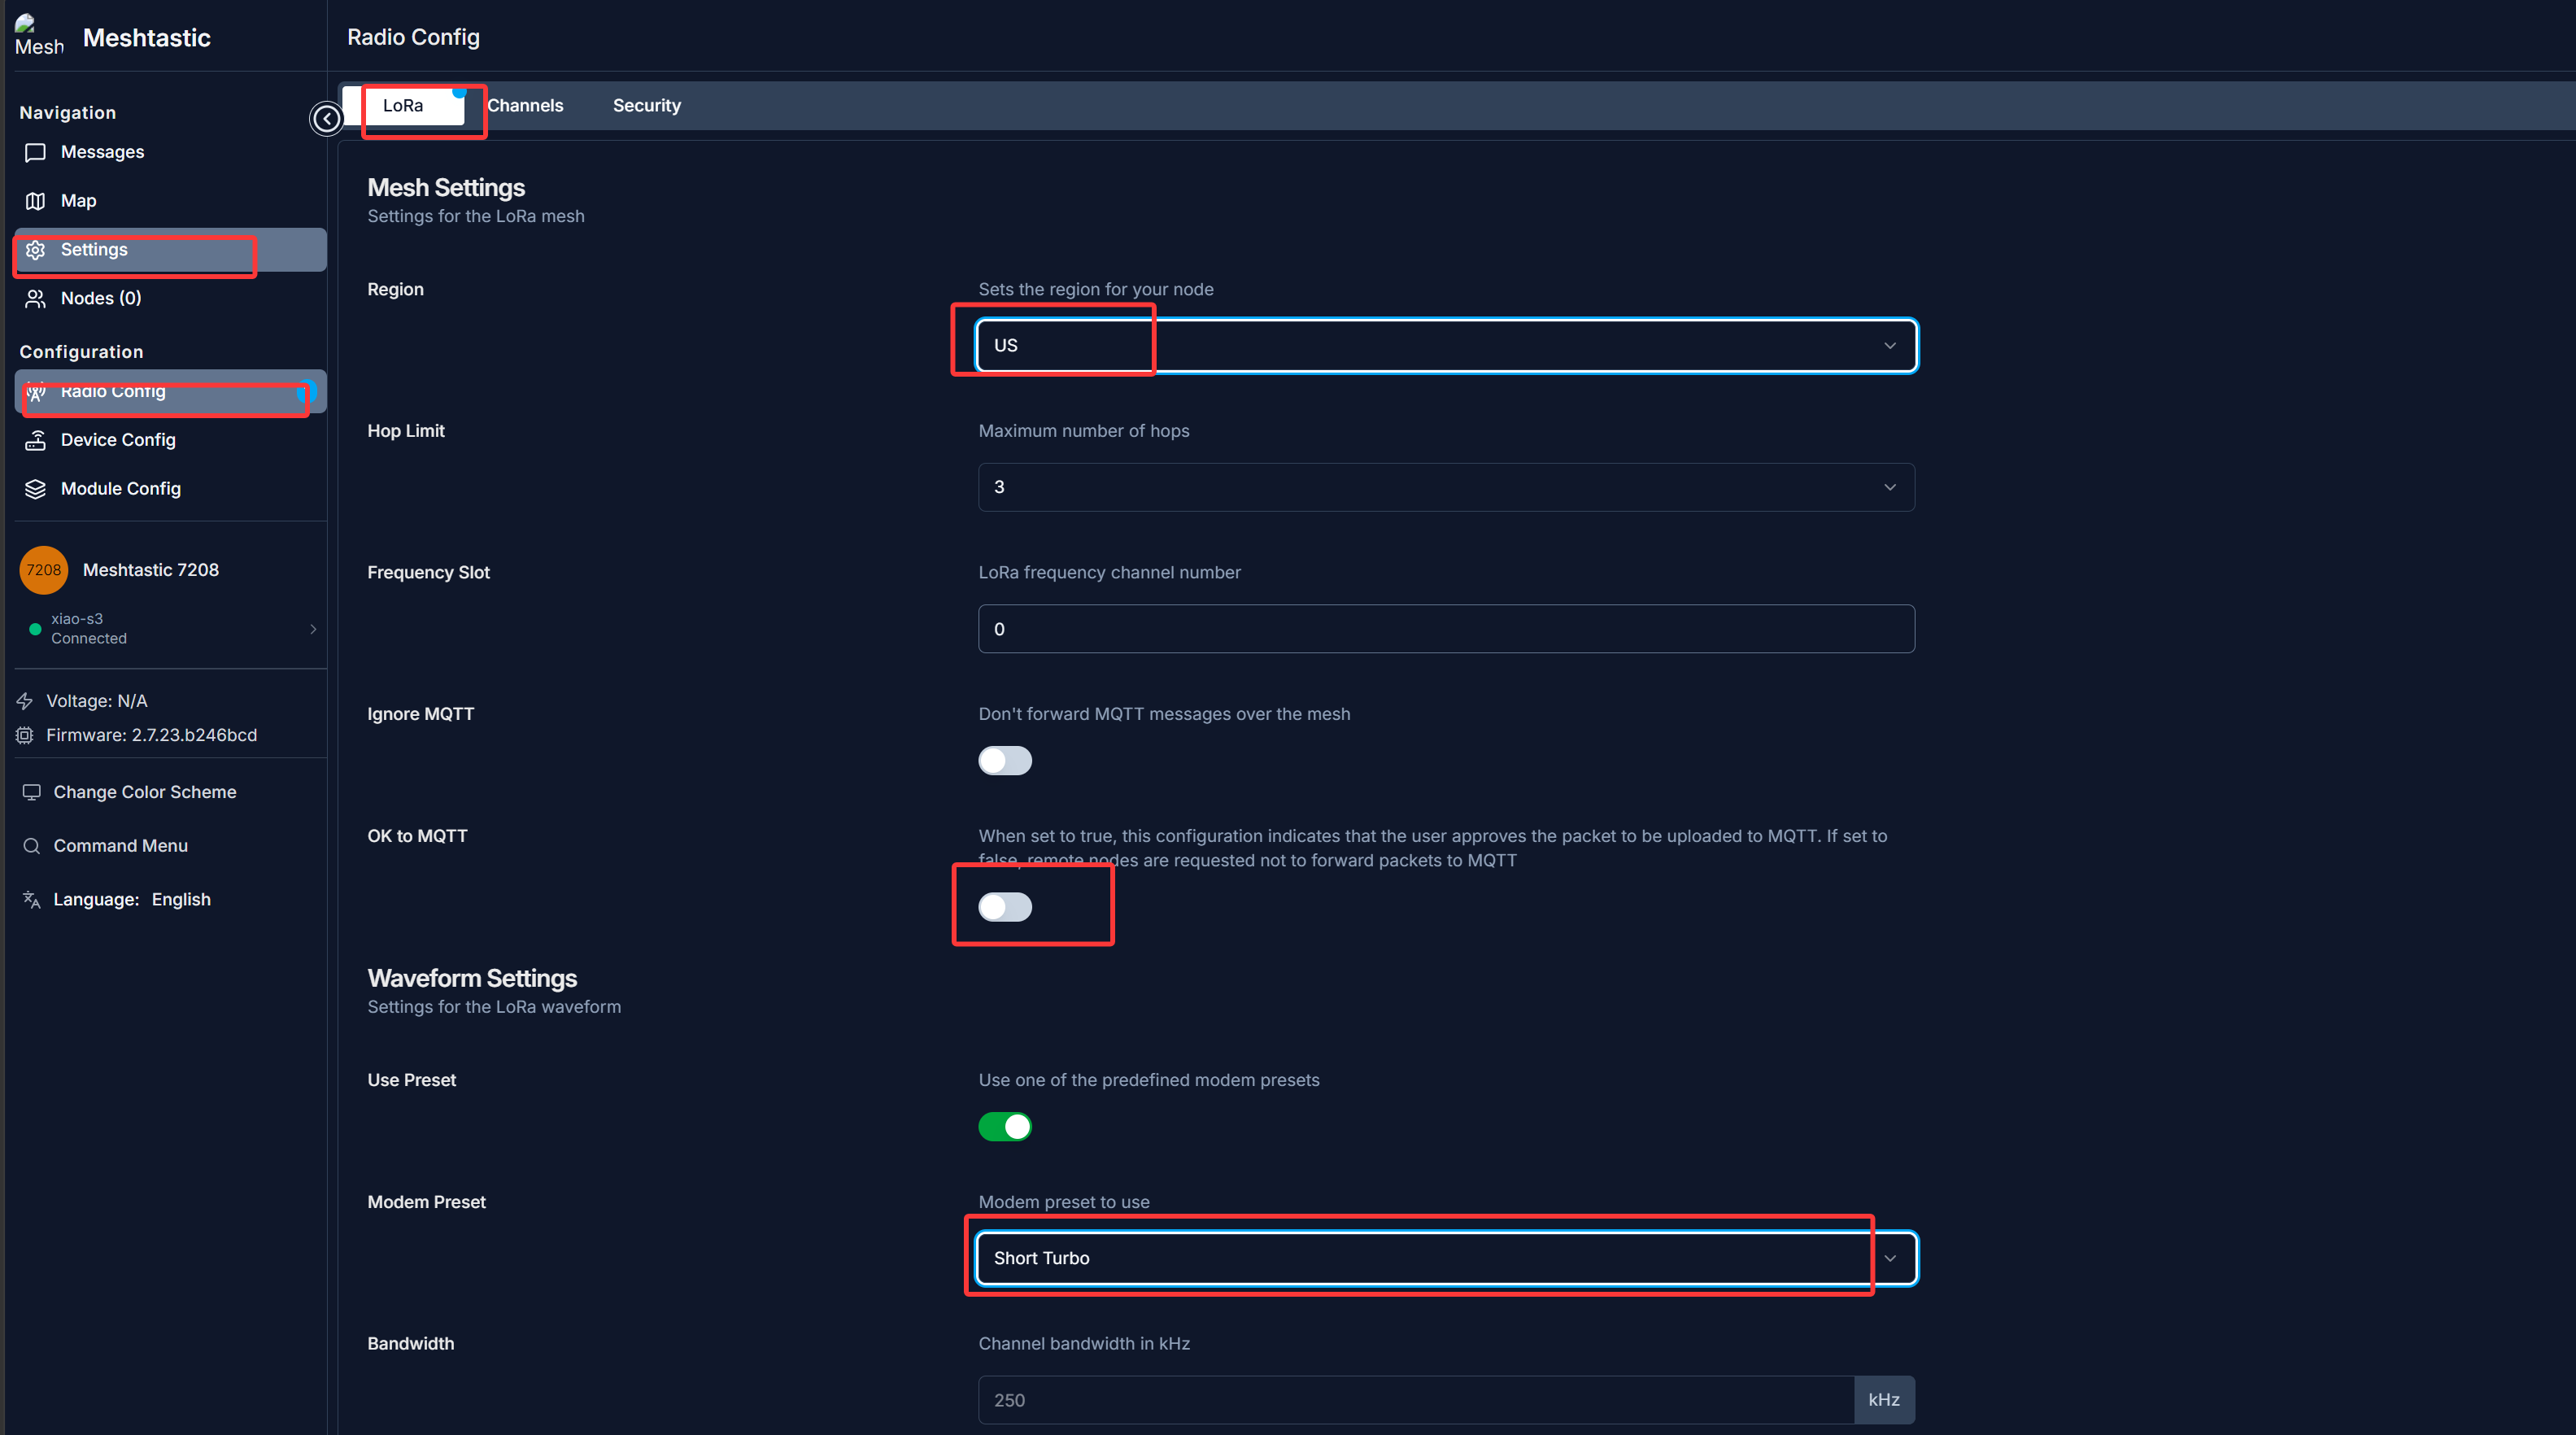
Step 4: Go to Settings → Radio Config → LoRa, adjust the Region to the legal frequency band in your location (e.g., CN or US), and set Modem Preset to Short Turbo for faster response speed.
3.2 Receiver Configuration (Placed Indoors to Connect to HA)
The receiver is responsible for receiving LoRa packets and pushing them to Home Assistant via MQTT over WiFi.
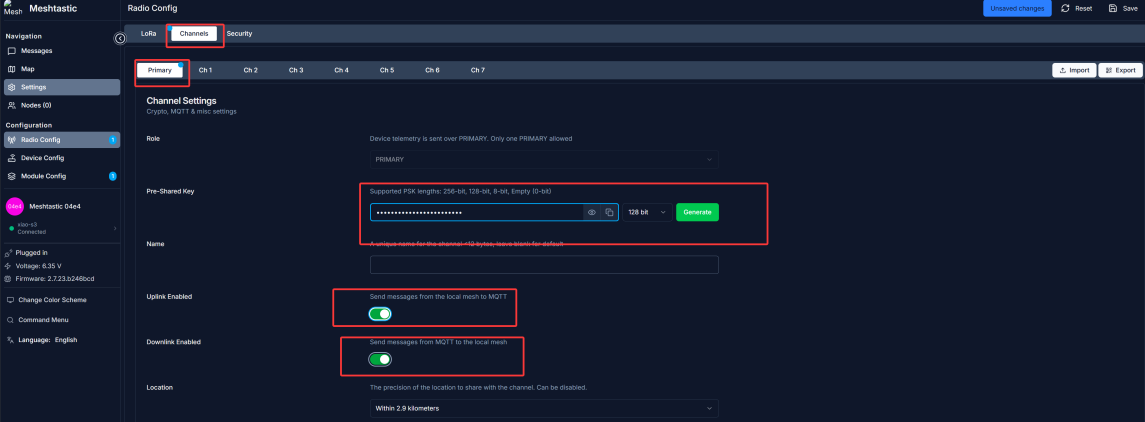
Step 1 — Generate and Save the Key: In the Channels tab, generate a 128-bit Pre-Shared Key for the Primary channel.
Be sure to copy and save this key offline; it will need to be entered into the transmitter later, and the keys on both ends must be identical.
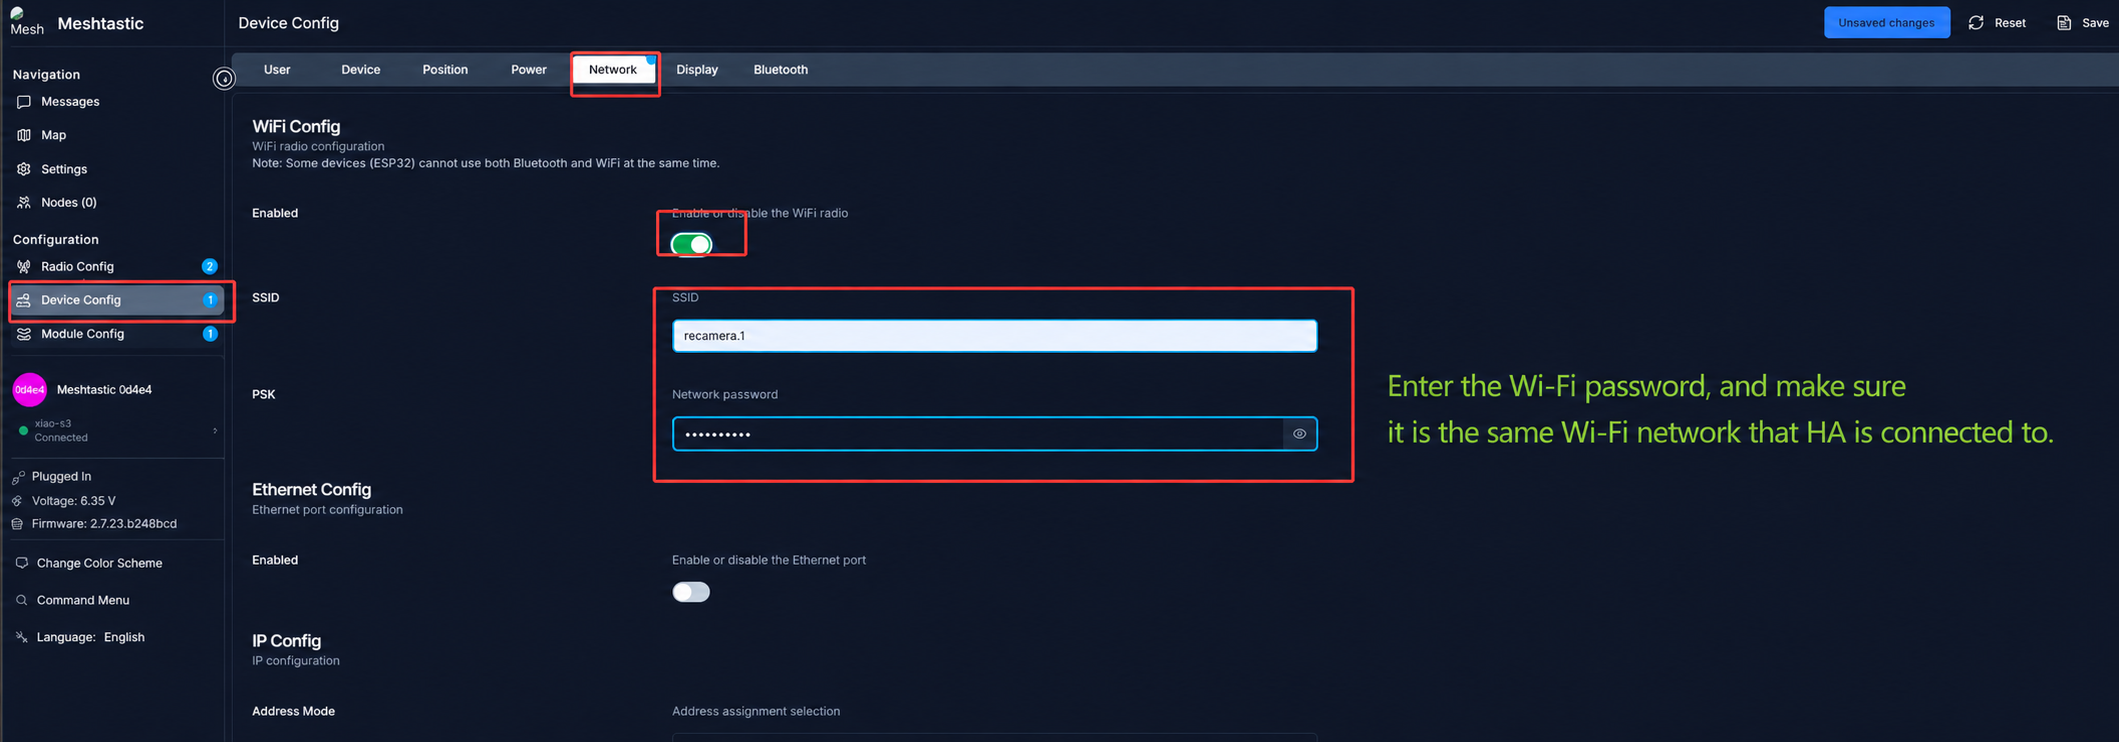
Step 2 — Connect to Local Network: In Device Config → Network, enable WiFi and enter your home WiFi SSID and password.
Step 3 — Enable MQTT Forwarding: In Module Config → MQTT, check Enable MQTT Client, enable JSON Enabled, and accurately enter the local IP address of your HA host in Address (e.g., 192.168.4.7).
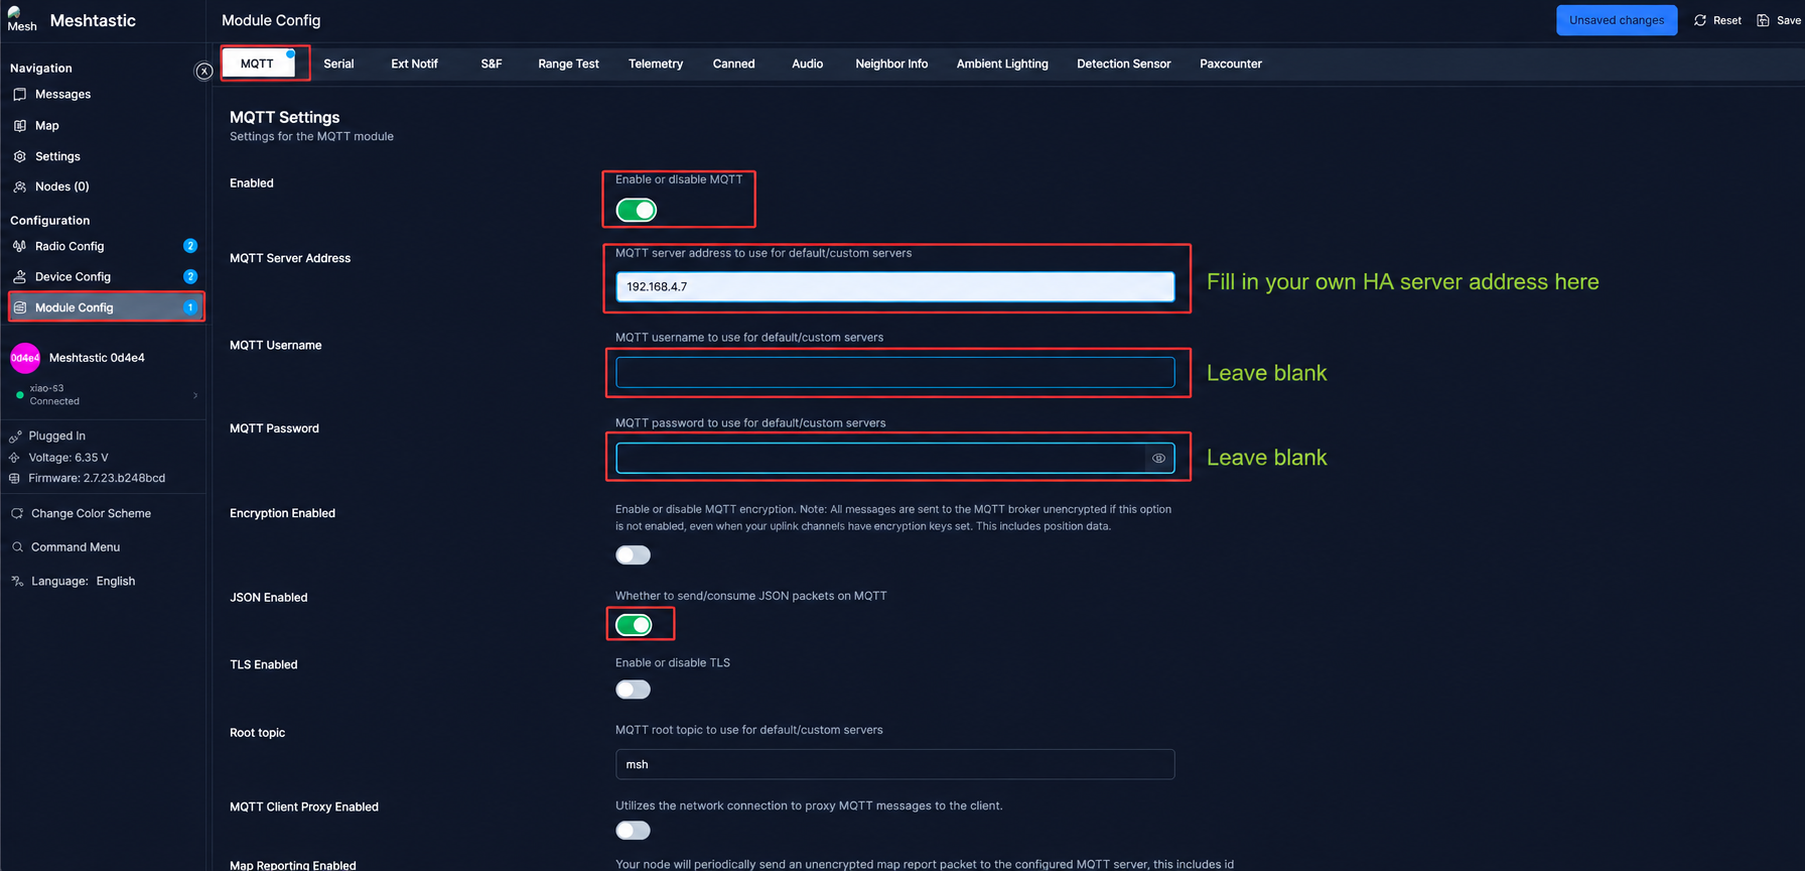
Step 4: After completing all configurations, click Save in the upper right corner to save and wait for the device to restart.
3.3 Transmitter Configuration (Placed Outdoors to Connect to reCamera)
The transmitter is responsible for monitoring GPIO pin level changes and sending LoRa alert packets when a low level is detected.
Do not enable WiFi and MQTT on the transmitter; it only needs to focus on receiving GPIO triggers and sending LoRa radio signals.
Step 1: Disconnect the receiver ESP32, replace it with the ESP32 for the transmitter, and click Connect directly in the Meshtastic Web Client to connect.
Step 2 — Synchronize RF Parameters: Go to Radio Config → LoRa and ensure they are consistent with the receiver (Region and Modem Preset are exactly the same); there is no need to enable MQTT.
Step 3 — Enter the Pre-Shared Key: In the Channels tab, paste the Pre-Shared Key generated by the receiver in full.
Step 4 — Configure GPIO Hardware Trigger: Activate the module in Module Config → Detection Sensor and configure it with the following parameters:
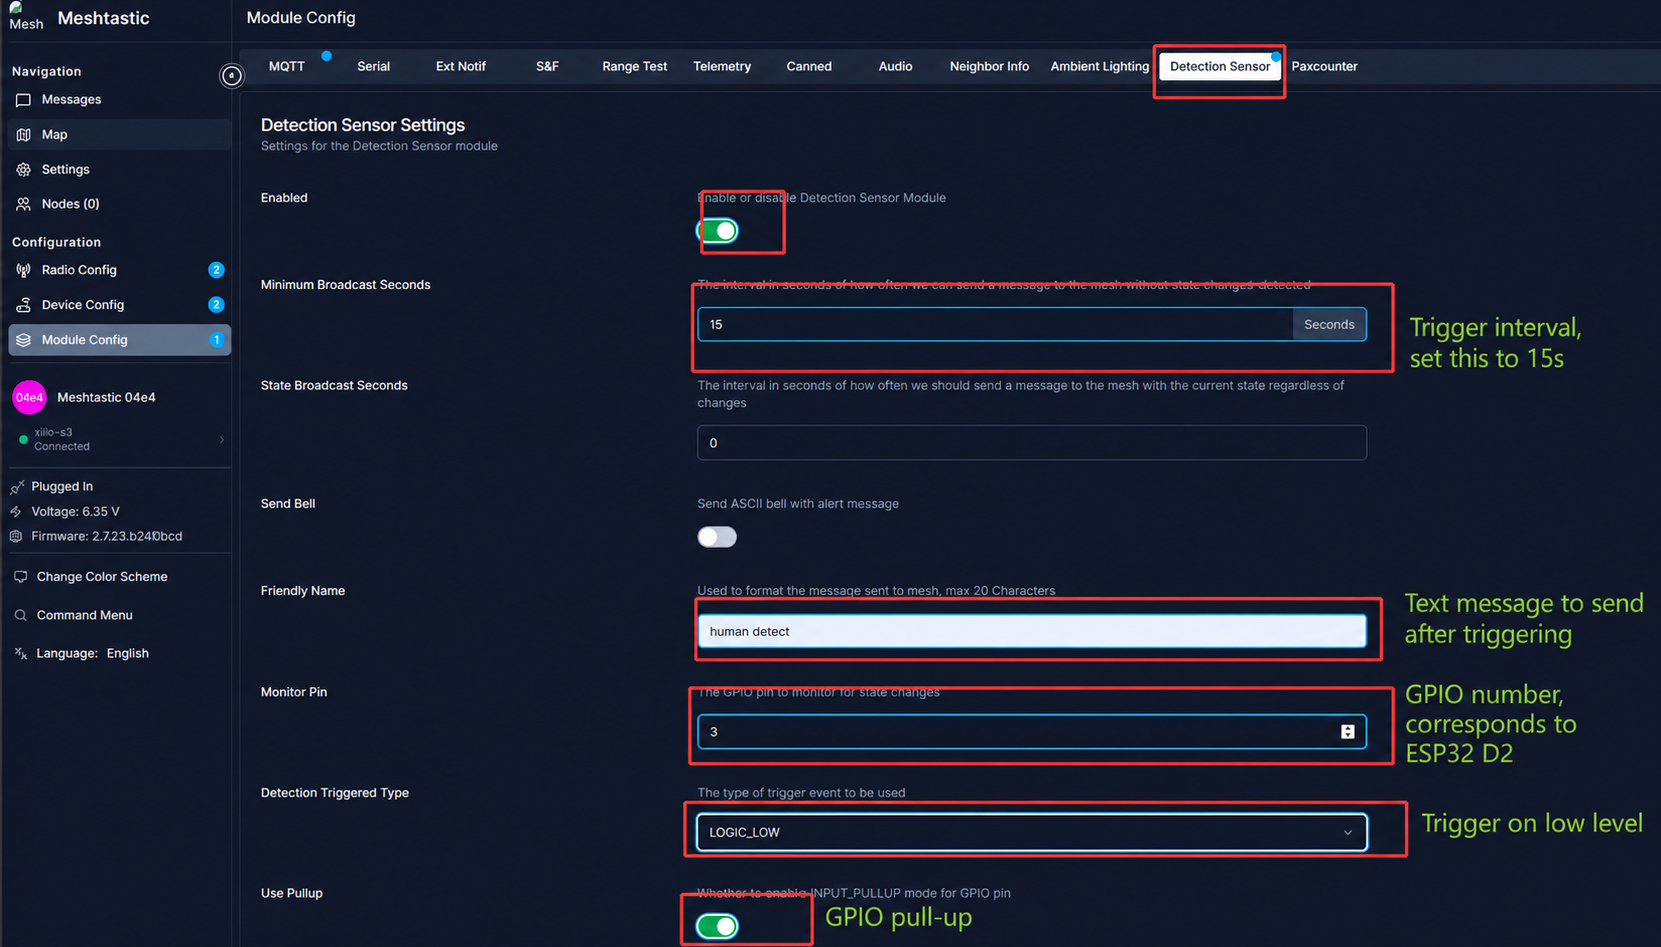
| Parameter | Setting | Description |
|---|---|---|
| Minimum Broadcast Seconds | 15 | Minimum broadcast interval to prevent channel congestion caused by frequent triggers |
| Friendly Name | Human | Custom alert name, which will be used as the MQTT message identifier |
| Monitor Pin | 3 | Corresponding to the D2 pin of XIAO ESP32S3 |
| Detection Triggered Type | LOGIC_LOW | Low-level trigger (reCamera outputs low level when a human is detected) |
Step 5: Click Save in the upper right corner to save and wait for the device to restart.
4. reCamera Endpoint Configuration and Physical Wiring
4.1 Release System Resources
By default, the Node-RED and SSCMA background services of reCamera occupy camera resources. Log in to reCamera via SSH (default IP is 192.168.42.1, username and password are both recamera), and execute the following commands in the terminal to stop the background services:
sudo /etc/init.d/S03node-red stop
sudo /etc/init.d/S91sscma-node stop
sudo /etc/init.d/S93sscma-supervisor stop
4.2 Start the Video Stream Forwarding Script
The host running the script must be on the same local network as the reCamera PoE. The reCamera PoE version only needs to be connected to the same router or switch to obtain an IP address.
On the monitoring host you use to receive the video stream, run the Python script to receive the video frames pushed by reCamera:
python udp_client.py
4.3 Start the Human Detection Program
Execute the following command in the reCamera terminal to start the onboard YOLO human detection model. The first parameter is the model file path (you can directly use the model that comes with reCamera), and the second parameter is the IP address of the host running the video stream forwarding script:
sudo ./model_detector ./Models/model.cvimodel 192.168.4.7
4.4 Connect the ESP32 Transmitter to reCamera
After completing the above software configurations, use Dupont cables to physically connect the XIAO ESP32S3 (transmitter) to reCamera:
- Black cable: Connect the GND pin of ESP32 → GND pin of reCamera
- Green cable: Connect the D2 pin of ESP32 → GPIO signal output pin of reCamera
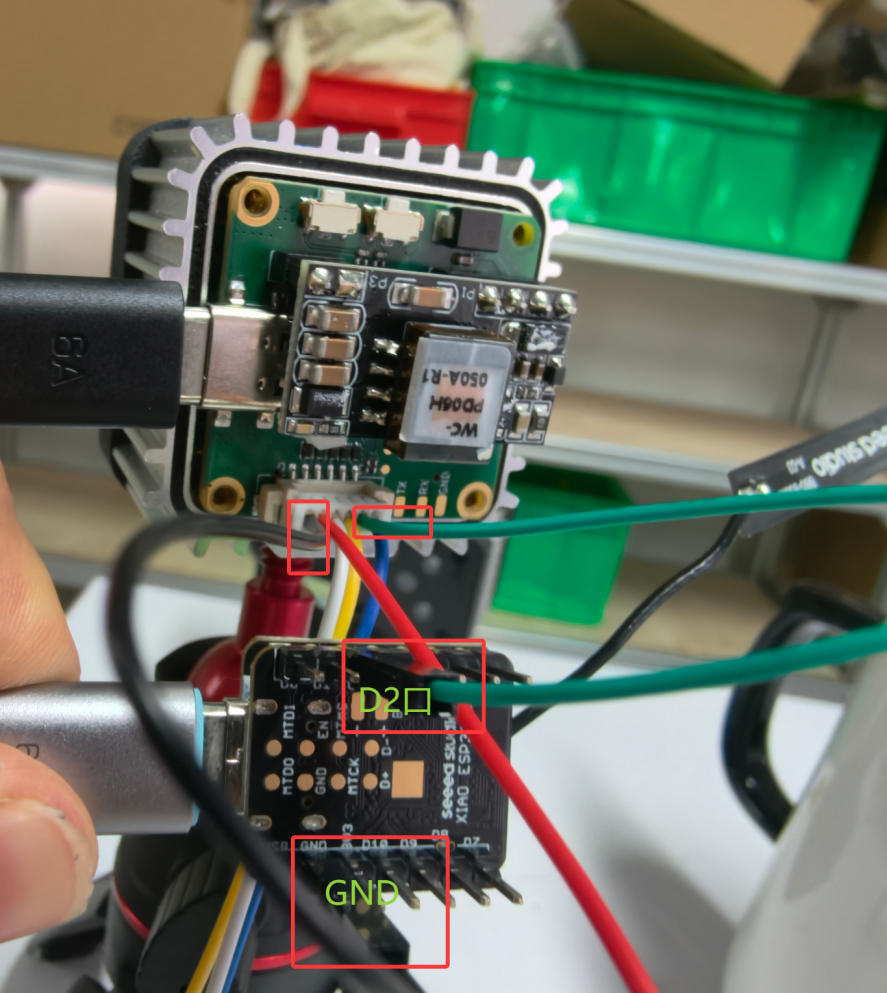
Please provide separate power supply for the ESP32 transmitter (via USB cable or battery) to ensure the LoRa module has sufficient transmission power.
5. Receiving Alerts in Home Assistant
5.1 Confirm the Receiver is Running Normally
Before starting, ensure the receiver ESP32 is powered on and running, connected to the same WiFi network as the HA host, and the MQTT address is configured correctly.
5.2 Listen for MQTT Messages in HA
Open a browser, enter the IP address of Home Assistant, and go to the MQTT management interface. Enable the Listen to all option in the configuration.
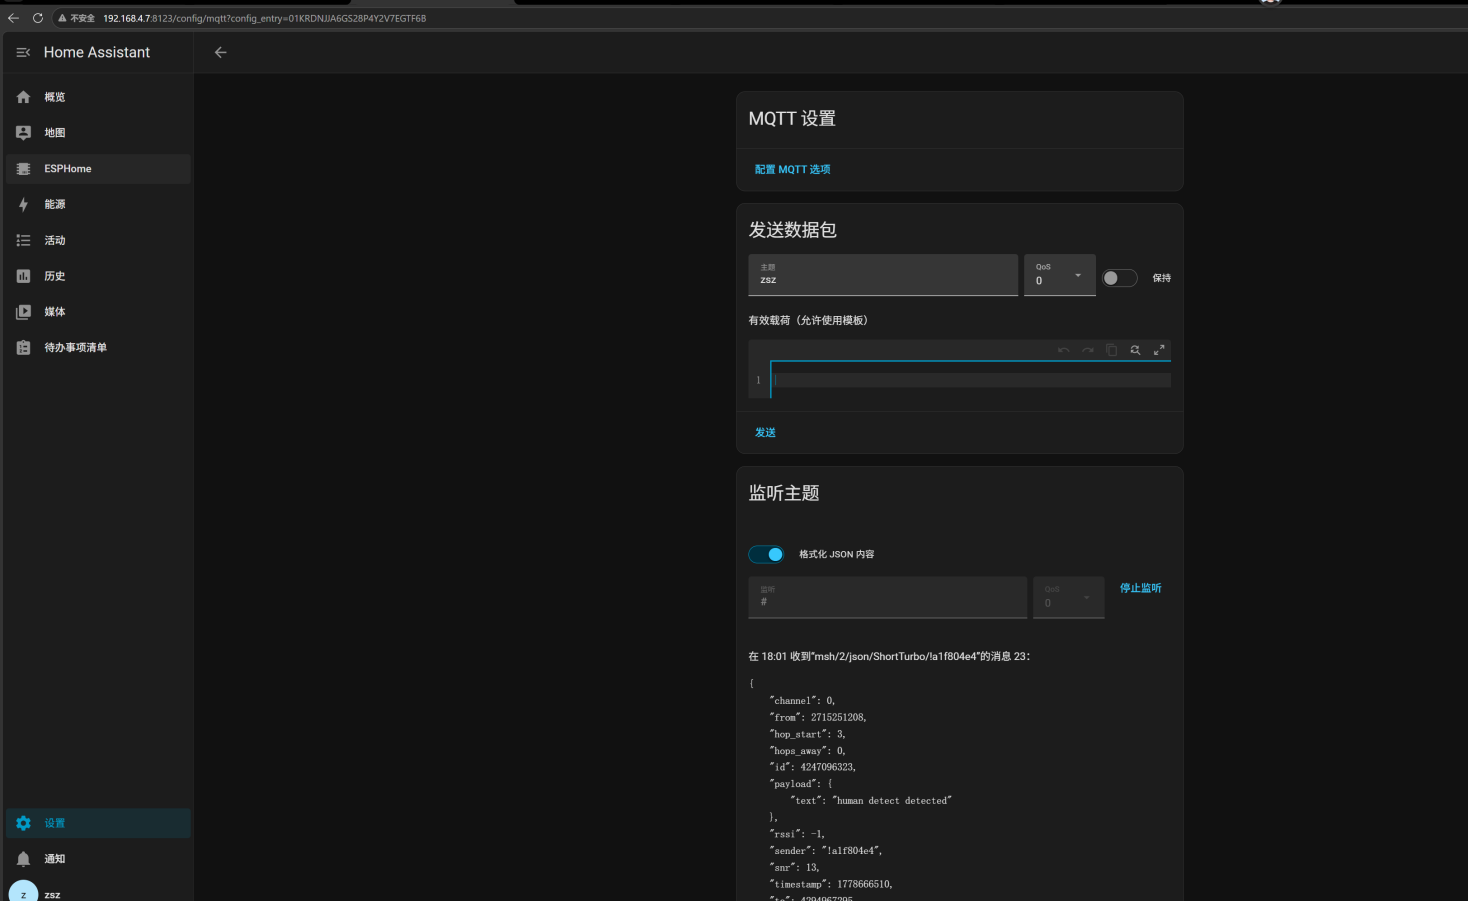
When reCamera detects a human, the Meshtastic transmitter sends alert information via LoRa to the receiver, which then pushes a message containing Human (the Friendly Name configured on the transmitter) to HA via MQTT. You will see the alert message in real time in the MQTT listening interface:
{
  "payload": {
    "text":"Human detect"
  }
}
5.3 Configure Automated Alerts in HA
Create an automation rule in Home Assistant to trigger alert actions (such as mobile notifications, linkage with alarms, log recording, etc.) when payload.text in the MQTT message is Human detect, completing the closed loop of the entire "network-free security" system.
6. Notes
- The LoRa
RegionandModem Presetof the transmitter and receiver must be exactly the same; otherwise, communication will fail - The
Pre-Shared Keyof the transmitter and receiver must be the same; otherwise, the packets cannot be decrypted correctly - Setting
Minimum Broadcast Secondstoo short may cause LoRa channel congestion; it is recommended to keep it above 15 seconds - The reCamera GPIO pin is 3.3V level, which is compatible with the D2 pin level of XIAO ESP32S3, no level conversion is required
- The transmitter should be placed in an open and high position as much as possible to obtain the best LoRa communication distance
7. Frequently Asked Questions
Q1: What if the receiver and transmitter cannot communicate?
Check if the LoRa Region and Modem Preset on both ends are exactly the same, and if the Pre-Shared Key is identical. In addition, confirm that the distance between the two devices is within the effective LoRa communication range, and check if the antenna is installed correctly.
Q2: reCamera detects a human but HA does not receive the alert?
Troubleshoot in the following order: whether the GPIO signal output of reCamera is normal (measurable with a multimeter); whether the Monitor Pin of the Detection Sensor module on the transmitter is correctly configured to 3 (D2); whether the WiFi and MQTT configurations of the receiver are correct, and whether the MQTT Address is filled with the HA host IP.
Q3: How to confirm that the Meshtastic receiver has successfully connected to WiFi and MQTT?
Check the device status panel of the receiver in the Meshtastic Web Client to confirm that the WiFi status is Connected and the MQTT status is Connected.
8. Resources
- reCamera Quick Start Guide
- Meshtastic Official Documentation
- Meshtastic Web Flasher
- reCamera OS GitHub
- XIAO ESP32S3 Wiki
Technical Support and Product Discussion
Thank you for choosing our products! We provide different levels of support to ensure your experience with our products is as smooth as possible. We offer multiple communication channels to meet different preferences and needs.