Convert and deploy a custom YOLO detection model in the reCamera web interface
reCamera's web management interface provides built-in cloud-based model conversion functionality. After training or fine-tuning a YOLO detection model, users can directly upload and export the ONNX model without needing to configure TPU-MLIR, Docker, or other model conversion environments locally.
After uploading, the system will automatically convert the ONNX model into one that can run on reCamera. .cvimodel Format. After successful model conversion, the model can be directly applied to the current device, and the real-time detection results can be viewed through the Dashboard page.
Function Overview
The following operations can be performed through the reCamera web interface:
- Upload the trained or fine-tuned YOLO Detect ONNX model;
- Use Seeed's cloud services to automatically convert models;
- Convert ONNX models to reCamera-supported versions.
.cvimodelFormat; - Download the converted model file;
- Apply the model directly to the current reCamera;
- Preview the target detection results in real time in the Dashboard.
The entire process does not require users to install a model conversion toolchain locally, making it suitable for quickly validating and deploying custom object detection models.
Support range
This feature is currently primarily designed for YOLO series object detection models (Detect).
Please confirm before uploading:
- The model has been exported in ONNX format;
- ONNX models use fixed input dimensions;
- The model can be executed normally in the local ONNX Runtime environment.
This feature is primarily used for the YOLO Detect model. Classification, instance segmentation, pose estimation, and rotated bounding box detection models may use different output structures and may not be directly deployable through the current conversion process.
Preparing the ONNX model
First, train or fine-tune the YOLO model using Ultralytics or another training framework, and then export the model in ONNX format.
Taking Ultralytics YOLO as an example:
yolo export \
  model=runs/detect/train/weights/best.pt \
  format=onnx \
  imgsz=640 \
  opset=17 \
  simplify=True
tpu-mlir only supports a maximum opset version of 17. ONNX models with opset > 17 may not be able to complete online conversion.
After exporting, you will get a file similar to the following:
best.onnx
It is recommended to check the ONNX model before uploading:
pip install model-inspect-tool

model-inspect
Once the model passes the ONNX check, it can be uploaded to reCamera.
Step 1: Open the model conversion page
Access reCamera's web management interface using a browser.
Find it in the device management area on the left:
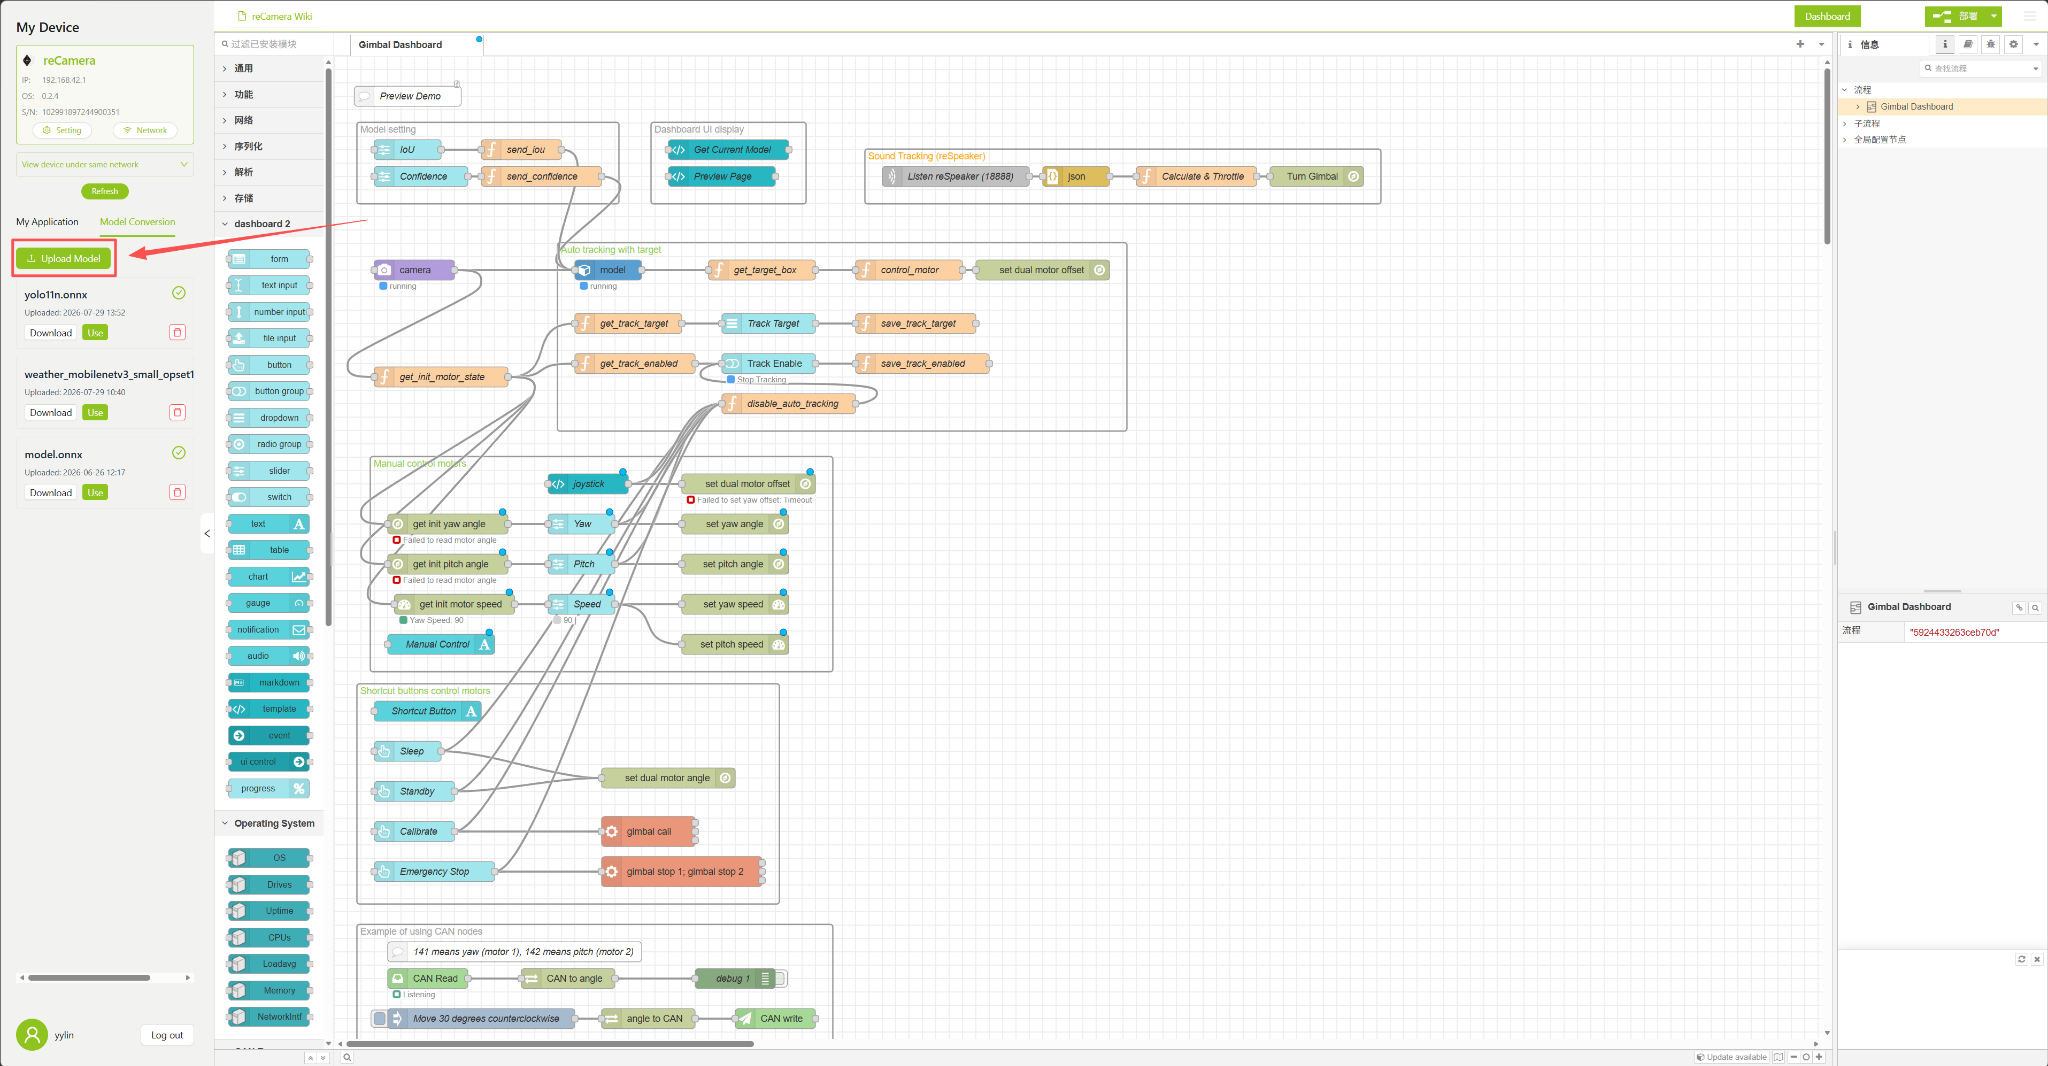
After entering the Model Conversion page, you can see the models that have been uploaded or converted.
The models on the page typically provide the following operations:
DownloadDownload the converted model;UseSet the model as the currently used model;- Delete button: Deletes the corresponding model record.
Step 2: Upload the ONNX model
Click the Upload Model button on the page, and in the file selection window, select the YOLO ONNX model you want to convert.
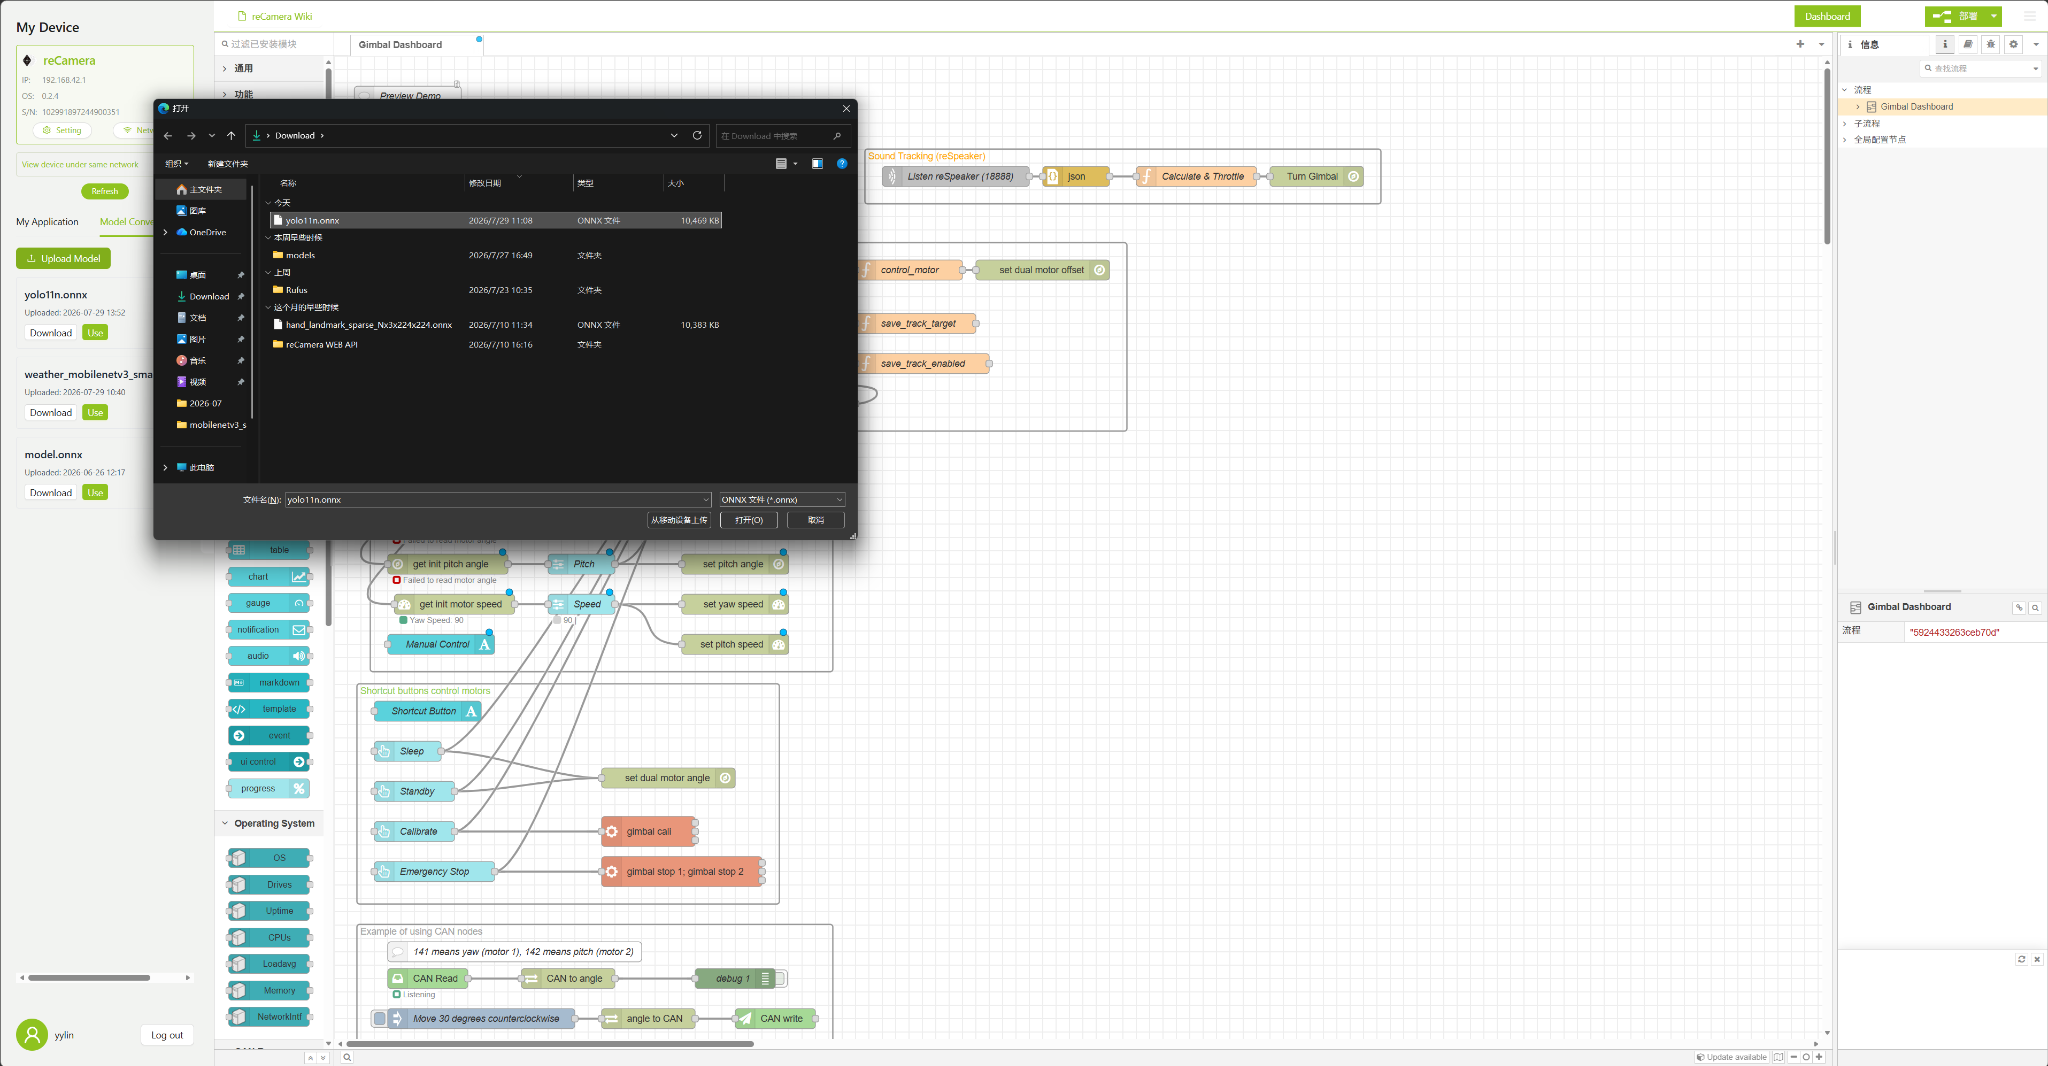
After selecting the file, click "Open," and the model will begin uploading.
Step 3: Wait for the cloud model to be converted.
After the model is uploaded, reCamera will call the cloud-based model conversion service provided by Seeed to convert the ONNX model into a format that reCamera can run. .cvimodel Format.
During the conversion process, the model card will display the current conversion progress.
During the conversion, you can see:
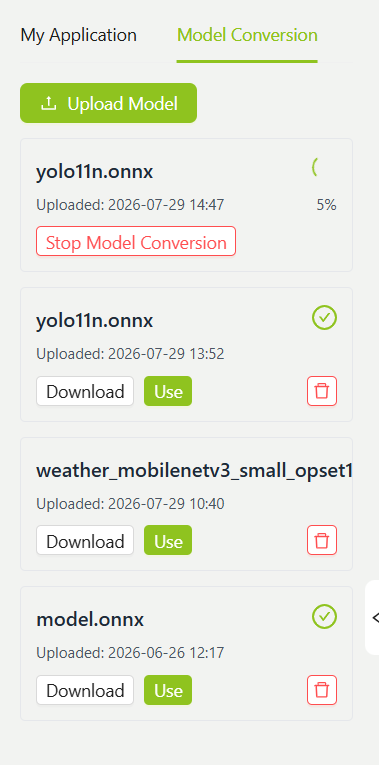
- Model name;
- Upload time;
- Current conversion progress;
Stop Model ConversionButton.
Please ensure a stable network connection for reCamera until the model conversion is complete.
Uploading and converting models requires access to cloud services. If the device cannot access the internet, or the network connection is unstable, the model conversion may fail or remain stuck at a certain progress point for an extended period.
Step 4: Confirm model conversion is complete
After successful conversion, a green completion marker will appear in the upper right corner of the model, along with the following buttons:
Download
Use
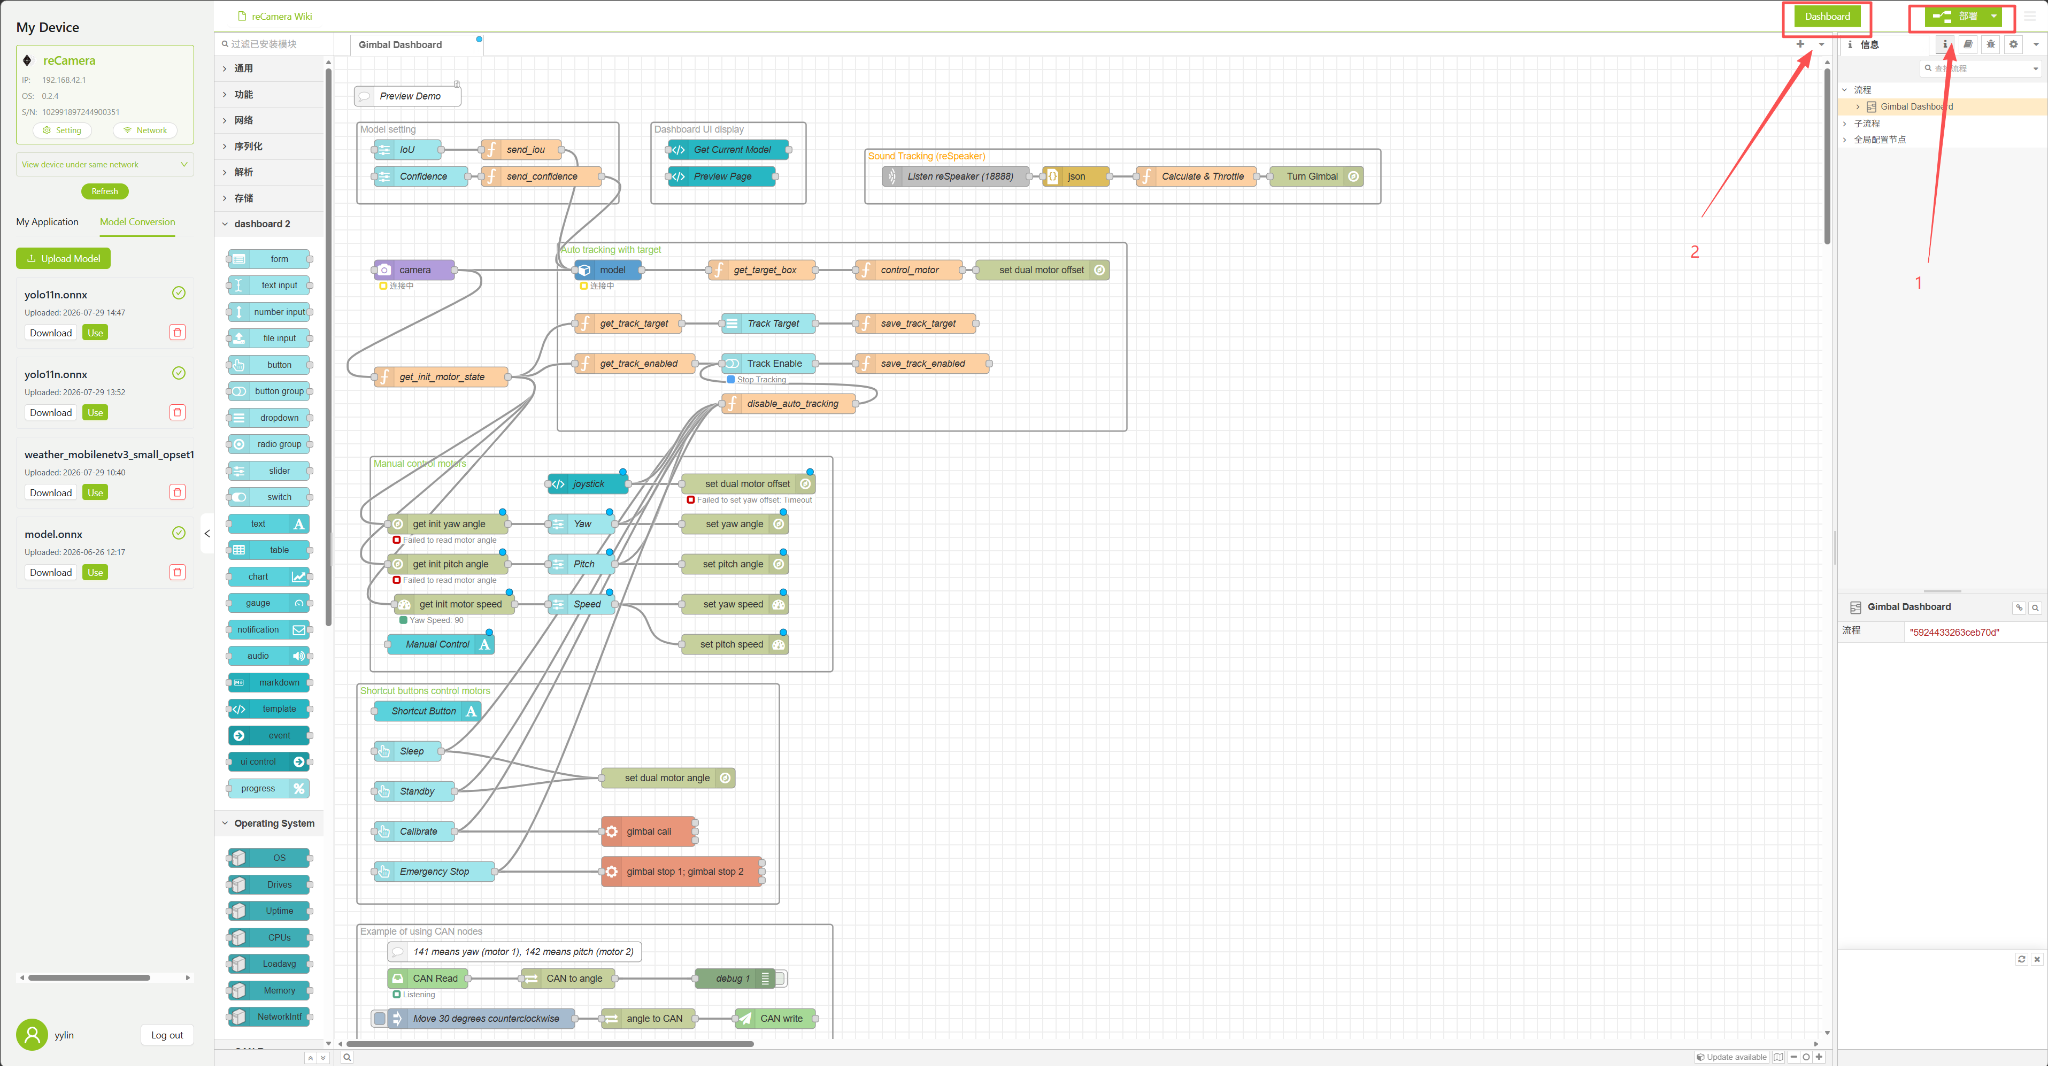
This indicates that the cloud has completed the ONNX to... .cvimodel The conversion.
Download Model
Click Download to download the converted model to your local computer for saving.
The downloaded file can be used for:
- Model backup;
- Customize the reCamera application;
- Node-RED model nodes;
- C/C++ inference program;
- Subsequent offline deployment.
Using the model
Clicking Use will set this model as the inference model currently used by the reCamera application.
After applying the model, the current model name will be synchronized to the relevant model node or preview page.
If multiple models with the same name exist in the list, you can determine the version that needs to be used based on the upload time. For easier management, it is recommended to use filenames with version information before uploading, such as...
person_detect_v1.onnx。
Step 5: Deploy the current Node-RED process
After selecting a model, you need to deploy the current Node-RED process to make the model configuration officially effective.
Click the Deploy button in the upper right corner of the page.
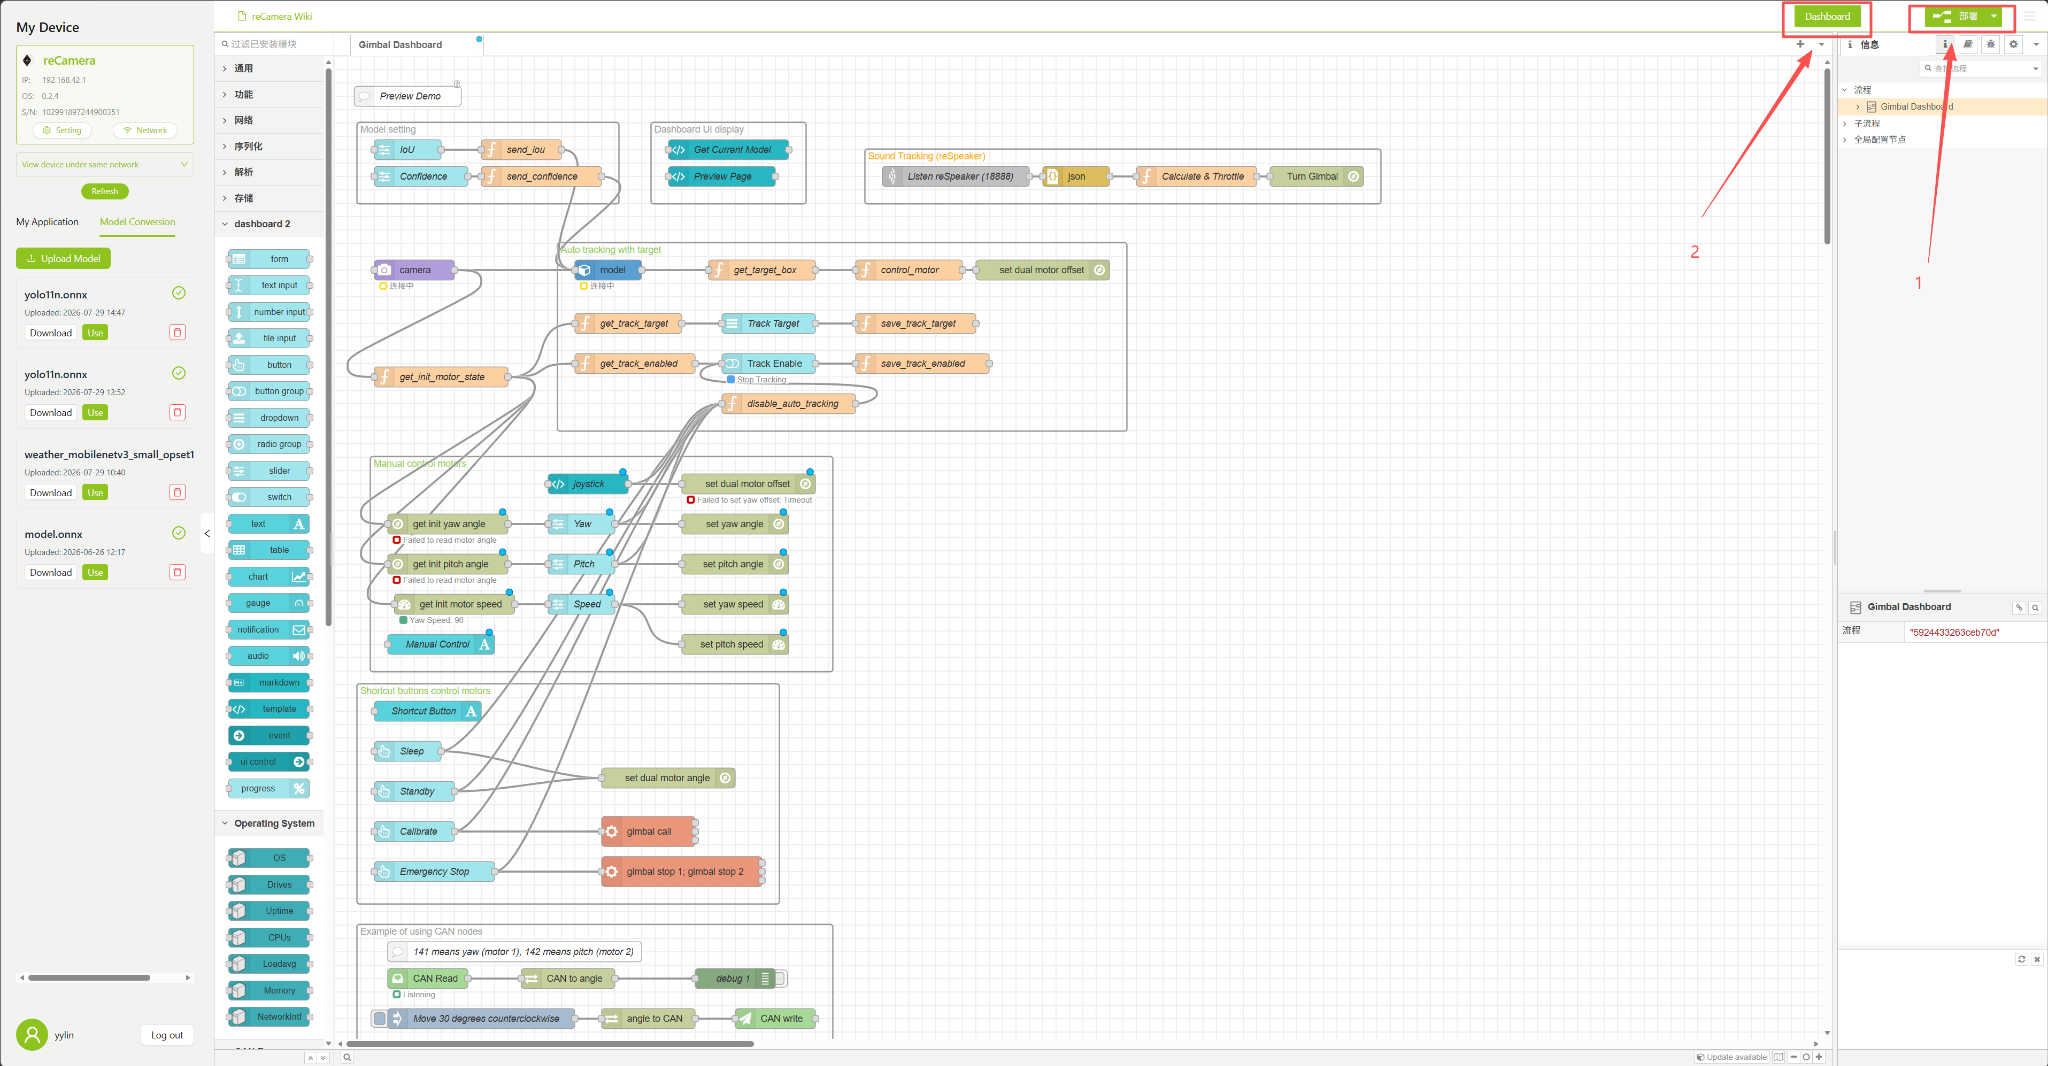
Once deployment is complete, the camera nodes, model nodes, and Dashboard page will run according to the new configuration.
Click only
UseIt might just be an update to the model selection. To ensure the model switch takes full effect, it is recommended to click the deploy button again after selecting the model.
Step Six: Open the Dashboard Preview Page
Once deployment is complete, click the Dashboard button in the upper right corner of the page.

The browser will then take you to the model preview and device control page.
In the Preview area, you can see:
- The name of the model currently in use;
- IoU threshold;
- Confidence threshold;
- Live camera feed;
- Object detection bounding box;
- Detection category name;
- Detect confidence level.
For example, when a person is detected, the screen will display:
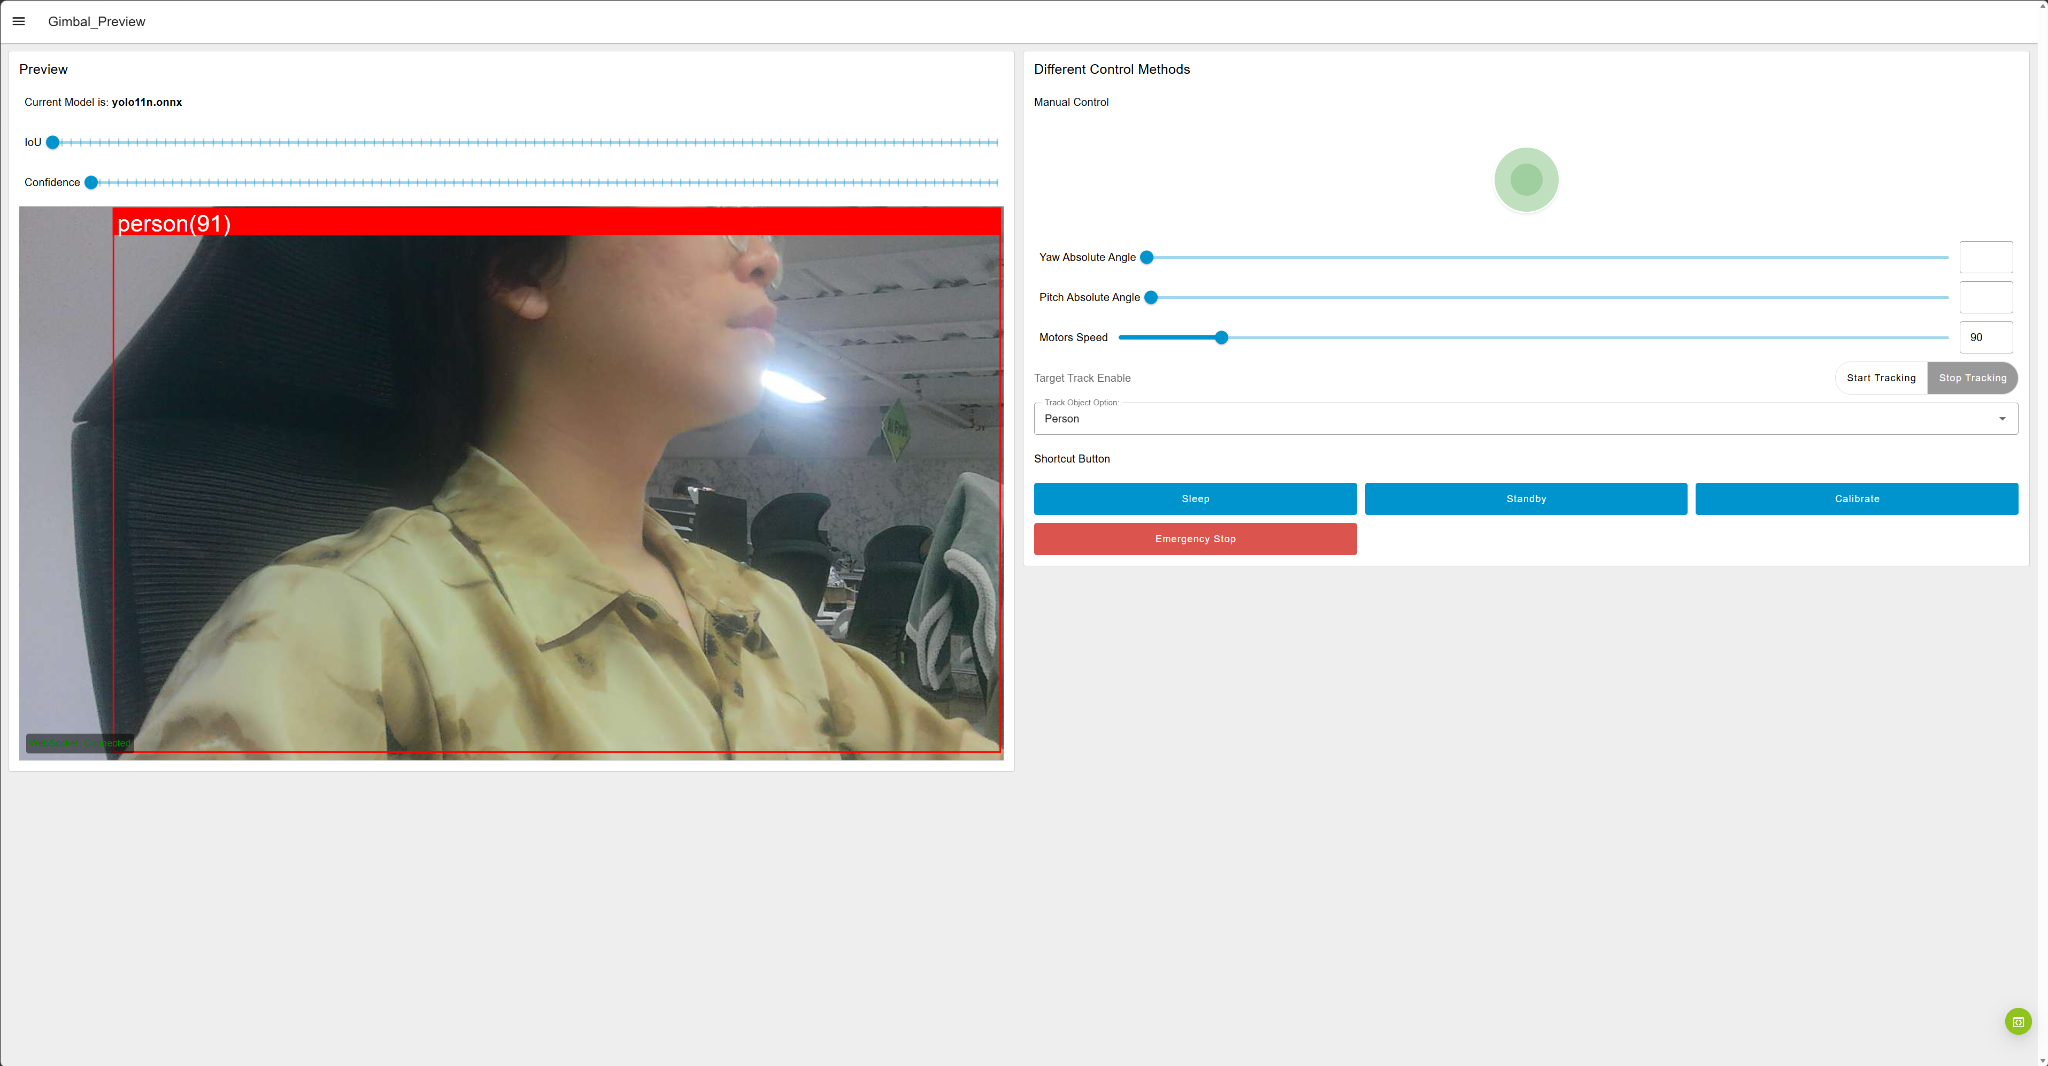
in:
personIndicates the detection category;91This indicates a detection confidence level of approximately 91%.
Frequently Asked Questions
The model remains stuck in the conversion process for an extended period of time.
Check, please:
- Can reCamera access the internet normally?
- Is the ONNX file uploaded completely?
- Is the model file too large?
- Can the ONNX model be loaded normally?
Alternatively, you can stop the current conversion task and upload again.
Model conversion failed
Common causes include:
- The ONNX model contains operators that are not currently supported;
- The model uses dynamic input dimensions;
- The model output structure has been customized.
- The ONNX exported version or Opset is incompatible;
- The model file is corrupted.
It is recommended to re-export the model and prioritize using fixed input dimensions:
yolo export \
  model=best.pt \
  format=onnx \
  imgsz=640 \
  opset=17 \
  simplify=True \
  dynamic=False
The preview result did not change after clicking Use.
Please confirm:
- The model has been clicked.
UseButton; - The deployment button in the upper right corner has been clicked;
- Is the Current Model displayed on the Dashboard the target model?
- Are the model nodes running?
- Are the camera node and model node correctly connected?
If necessary, the process can be redeployed or the Dashboard page can be refreshed.
Tech Support & Product Discussion
Thank you for choosing our products! We are here to provide you with different support to ensure that your experience with our products is as smooth as possible. We offer several communication channels to cater to different preferences and needs.