Live View
The reCamera Pro has a built-in real-time video monitoring page, allowing users to view live camera feeds directly through a browser. Users can configure video streams, display settings, OSD overlays, privacy masking, and streaming parameters. This page is suitable for device installation and debugging, previewing footage, adjusting video parameters, and functional verification before deployment. The reCamera Pro has a built-in real-time video monitoring page, allowing users to view live camera feeds directly through a browser. Users can configure video streams, display settings, OSD overlays, privacy masking, and streaming parameters. This page is suitable for device installation and debugging, previewing footage, adjusting video parameters, and functional verification before deployment. Upon entering the real-time video monitoring page, the left side displays the video preview area, and the right side shows the function configuration area. Users can complete video playback, stream switching, and related parameter configuration on the same page.
Video Preview
The left side of the page provides a real-time video preview window where users can choose to play either the main stream or the sub-stream. Clicking Start Playback allows you to view the current camera feed in your browser.
The bottom of the preview area offers basic playback control functions, including:
-
Main Stream / Sub-Stream Selection
-
Start Playback / Stop Playback
-
Volume Adjustment
-
Current Connection Status Display
When the device is disconnected, the video stream is abnormal, or the network is unreachable, the preview window will display a connection failure prompt, making it easy for users to quickly determine the current video stream status.
Basic Settings
In the function area on the right, users can access the Basic Settings page to configure video encoding parameters for the main stream and sub-stream separately.
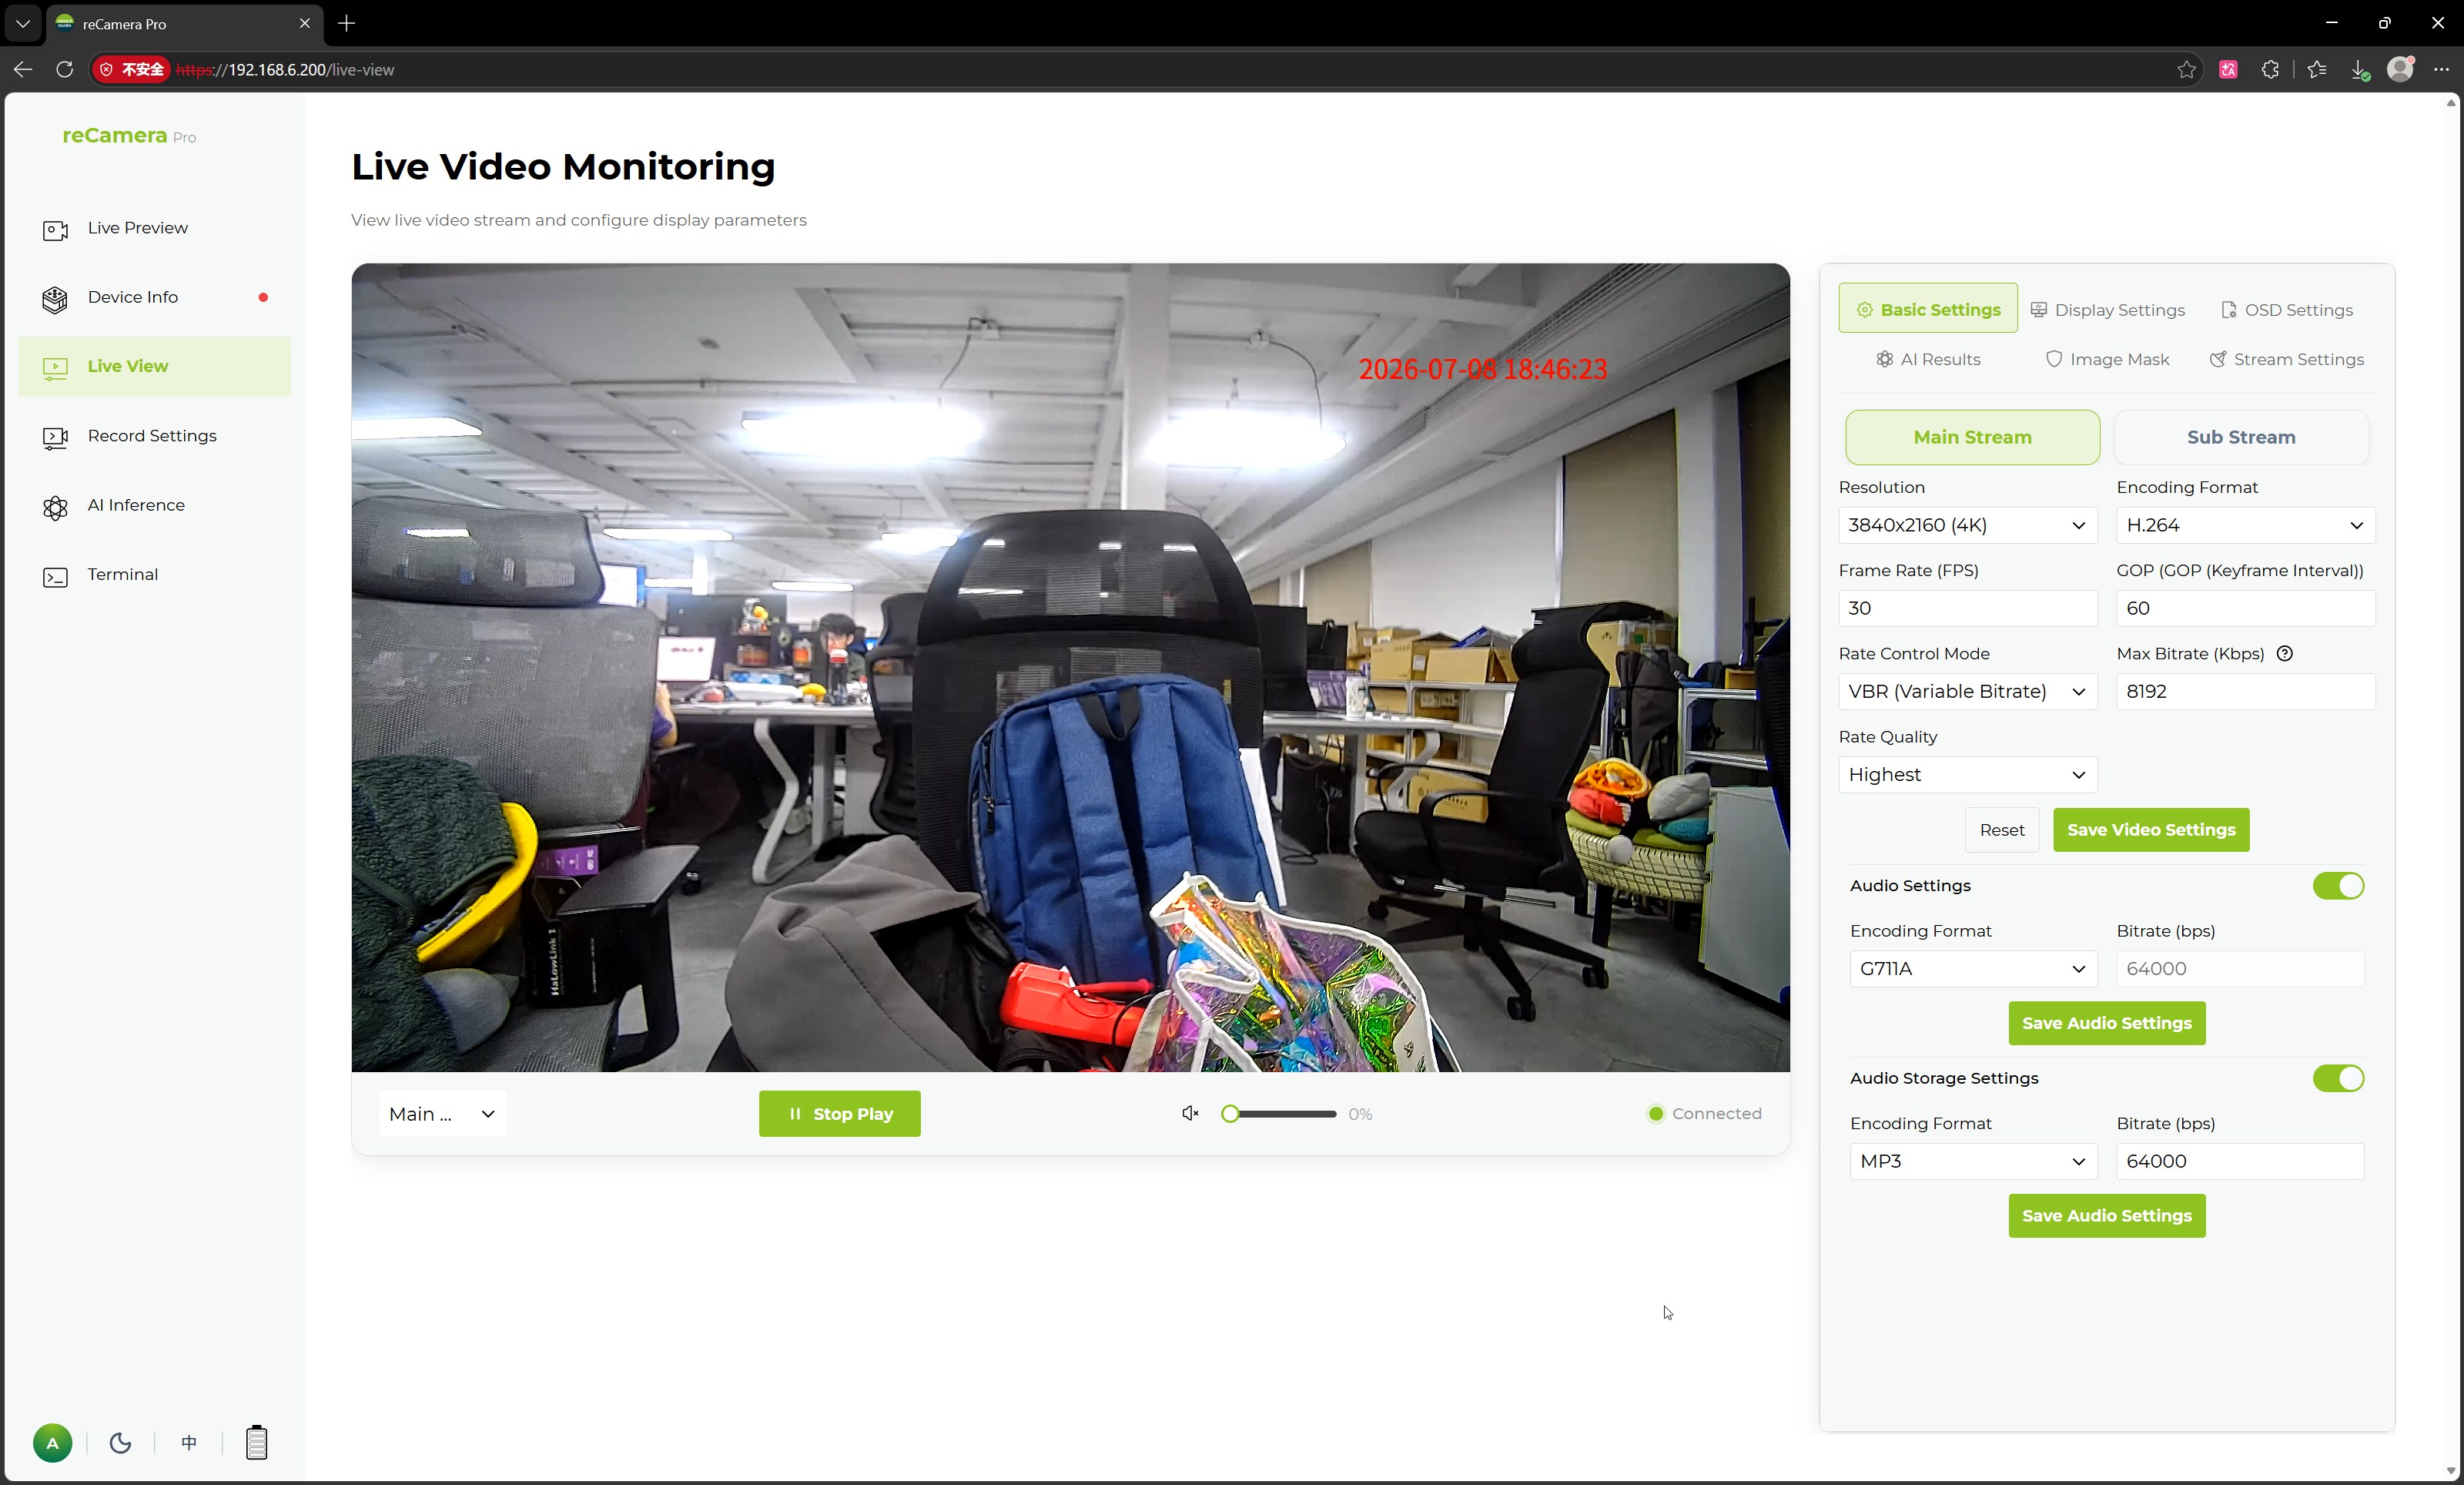
Configurable parameters include:
| Parameter | Description |
|---|---|
| Resolution | Sets the video output resolution, e.g., 1920×1080 (1080P) |
| Encoding Format | Sets the video encoding format, e.g., H.264 |
| Frame Rate (FPS) | Sets the video frame rate, e.g., 30 FPS |
| GOP | Sets the keyframe interval, used to control the frequency of keyframe generation |
| Bitrate Control Mode | Sets the bitrate control method, e.g., VBR (Variable Bitrate) |
| Max Bitrate | Sets the maximum bitrate for the video stream, in Kbps |
| Bitrate Quality | Sets the video encoding quality level |
Users can choose to configure the main stream or sub-stream based on their actual application scenarios. The main stream is suitable for high-definition preview, video storage, and AI analysis; the sub-stream is suitable for low-bandwidth preview, remote viewing, or multi-channel video access scenarios.
After making modifications, click Save Video Settings to apply the current configuration. To restore or re-enter parameters, click Reset.
The page also provides audio-related switches, including Audio Settings and Audio Storage Settings, allowing users to enable or disable audio capture and audio storage functions as needed.
Display Settings
The Display Settings page is used to adjust the camera's display effects and basic image parameters.
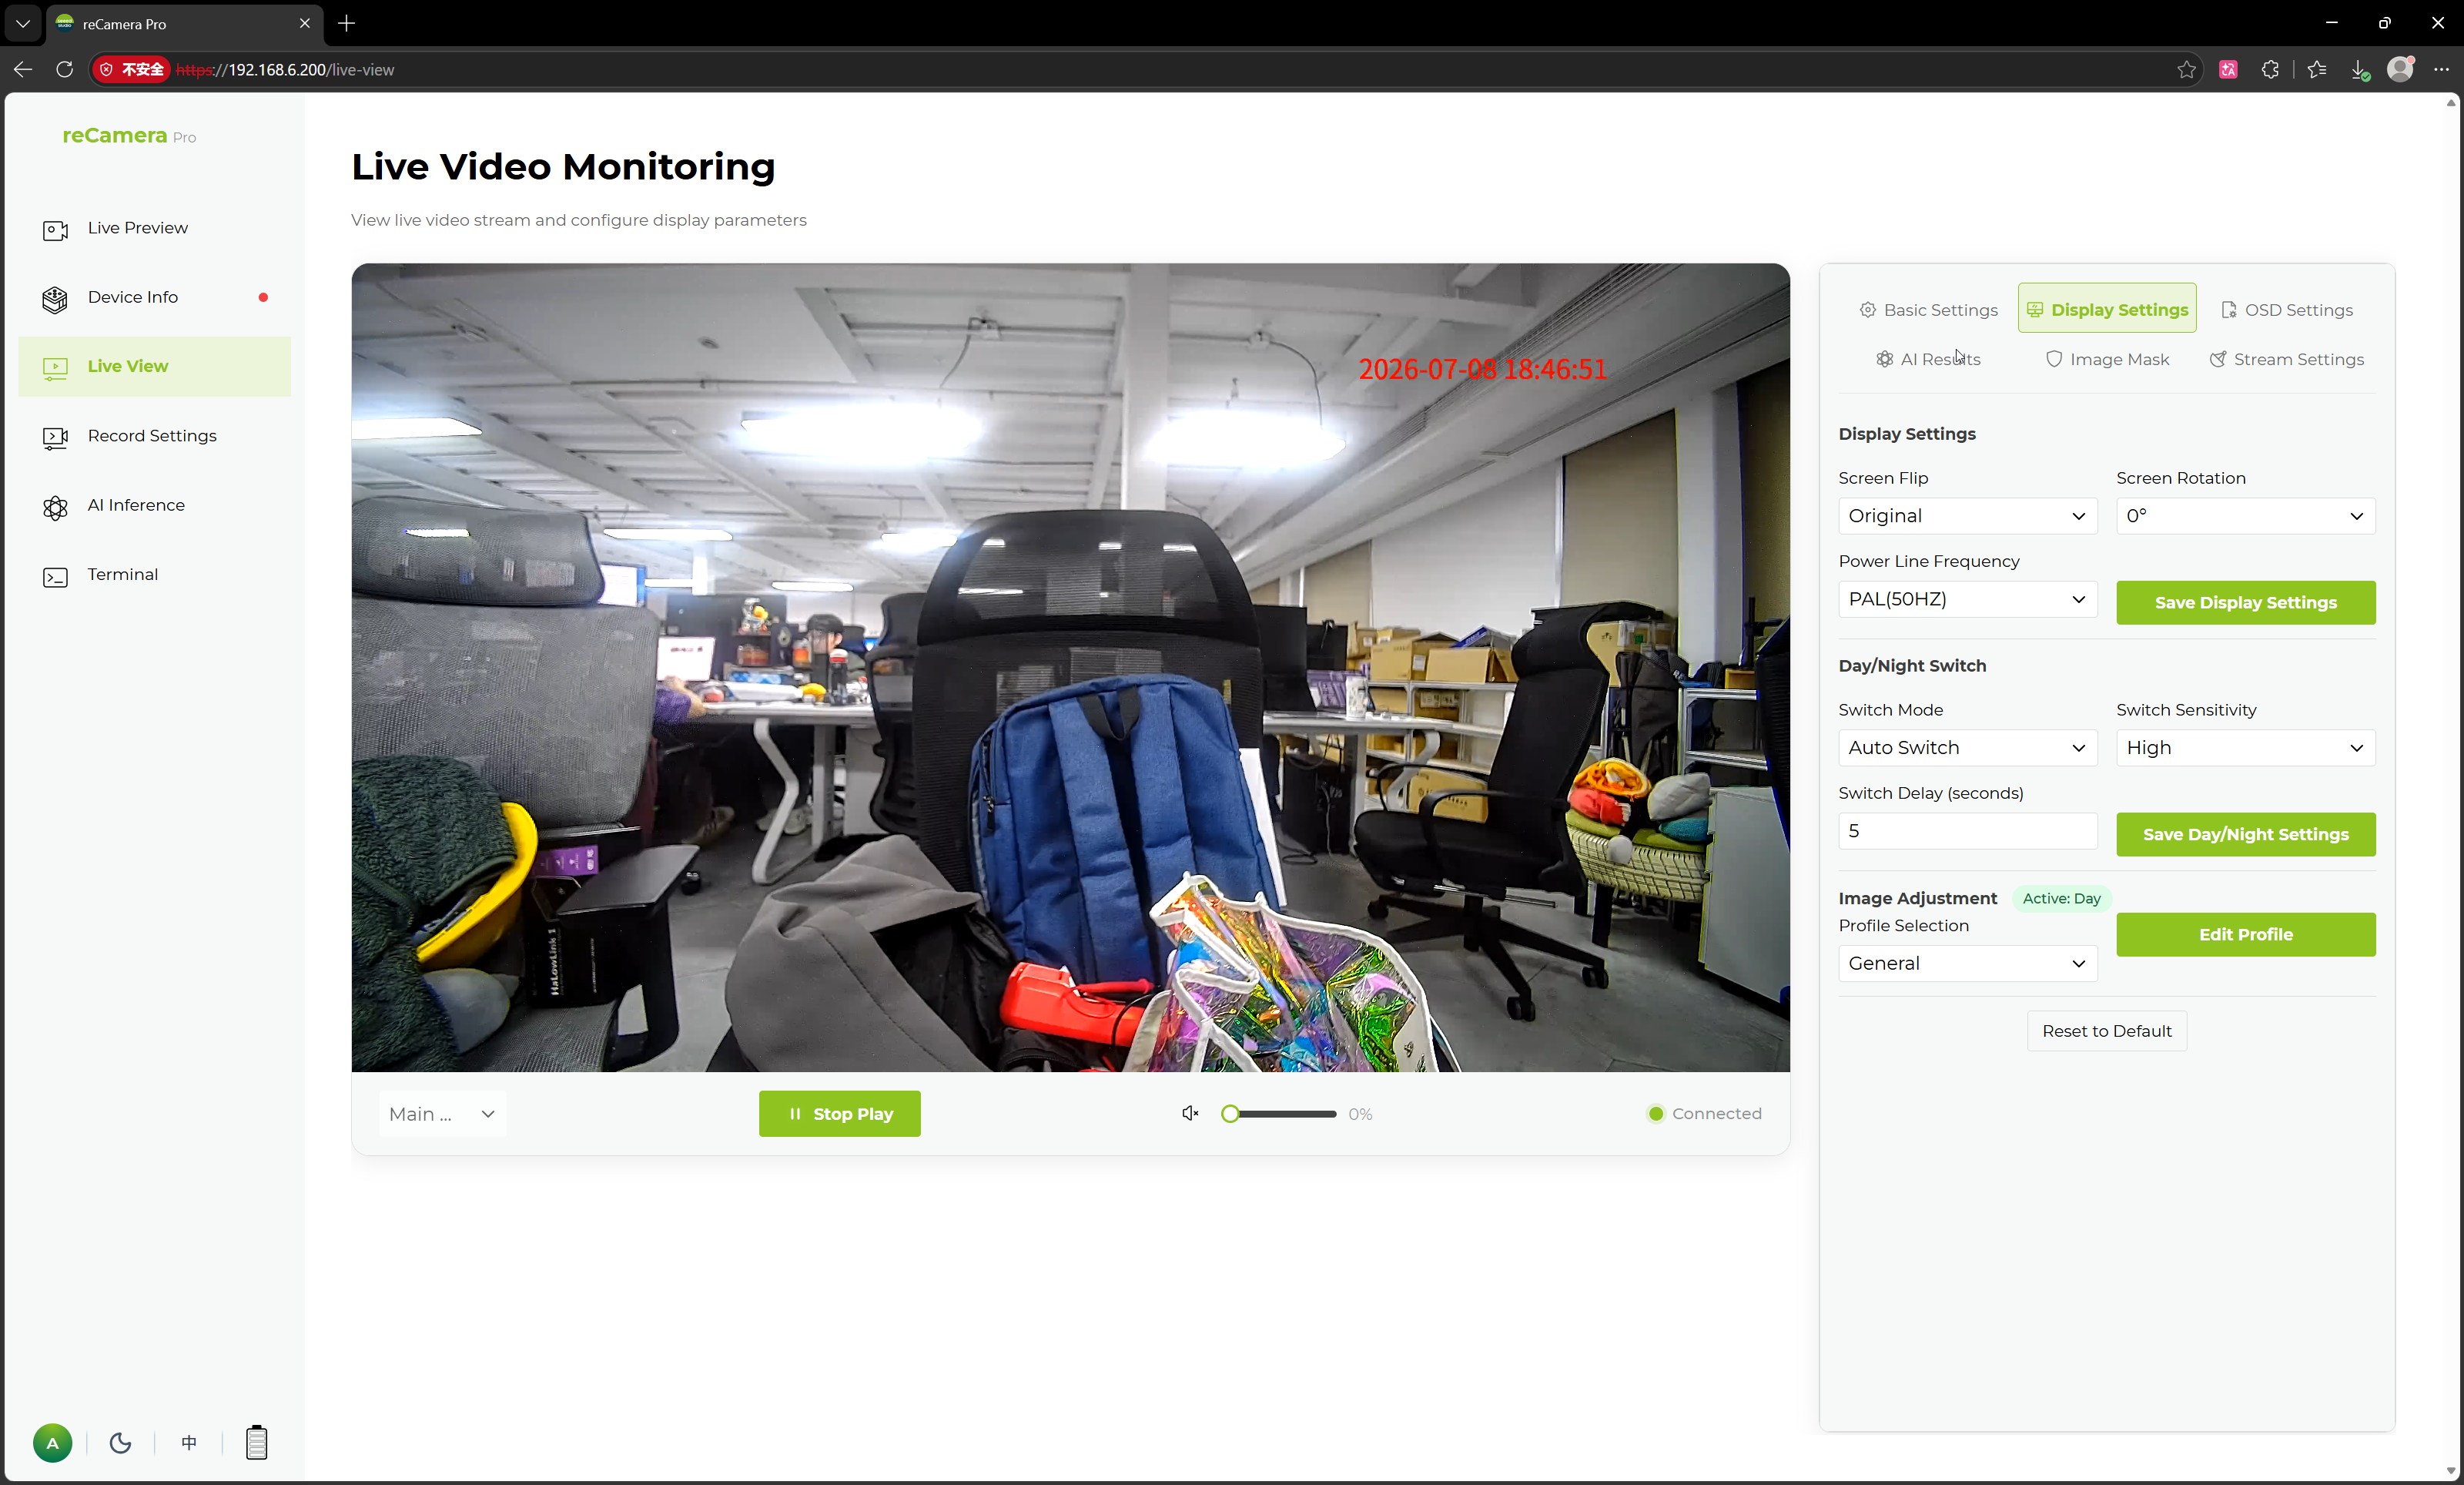
Supported display settings include:
| Parameter | Description |
|---|---|
| Flip | Sets whether the image is flipped, which can be used to adapt to different installation orientations |
| Rotate | Sets the rotation angle of the image, e.g., 0° |
| Video Standard | Sets the video standard, e.g., PAL (50HZ) |
Additionally, this page supports day/night parameter switching configurations, including:
| Parameter | Description |
|---|---|
| Switch Mode | Sets the day/night mode switching method, e.g., automatic switching |
| Switch Threshold Sensitivity | Sets the sensitivity for triggering day/night switching |
| Switch Hysteresis Time | Sets the delay time for day/night mode switching to avoid frequent switching |
In the basic image adjustment area, users can select different profiles and adjust camera image parameters such as:
-
Brightness
-
Contrast
-
Saturation
-
Sharpness
-
Hue
-
Exposure Mode
-
Gain Mode
These parameters can be used to optimize image effects based on the on-site lighting environment, such as indoor, outdoor, low-light, or strong light conditions.
After making modifications, click Save Display Settings or Save Configuration to apply the current settings.
OSD Settings
OSD Settings are used to configure overlay information on the video feed, such as channel name, date and time, and device serial number. This feature is applicable to video surveillance, video playback, and device identification scenarios.
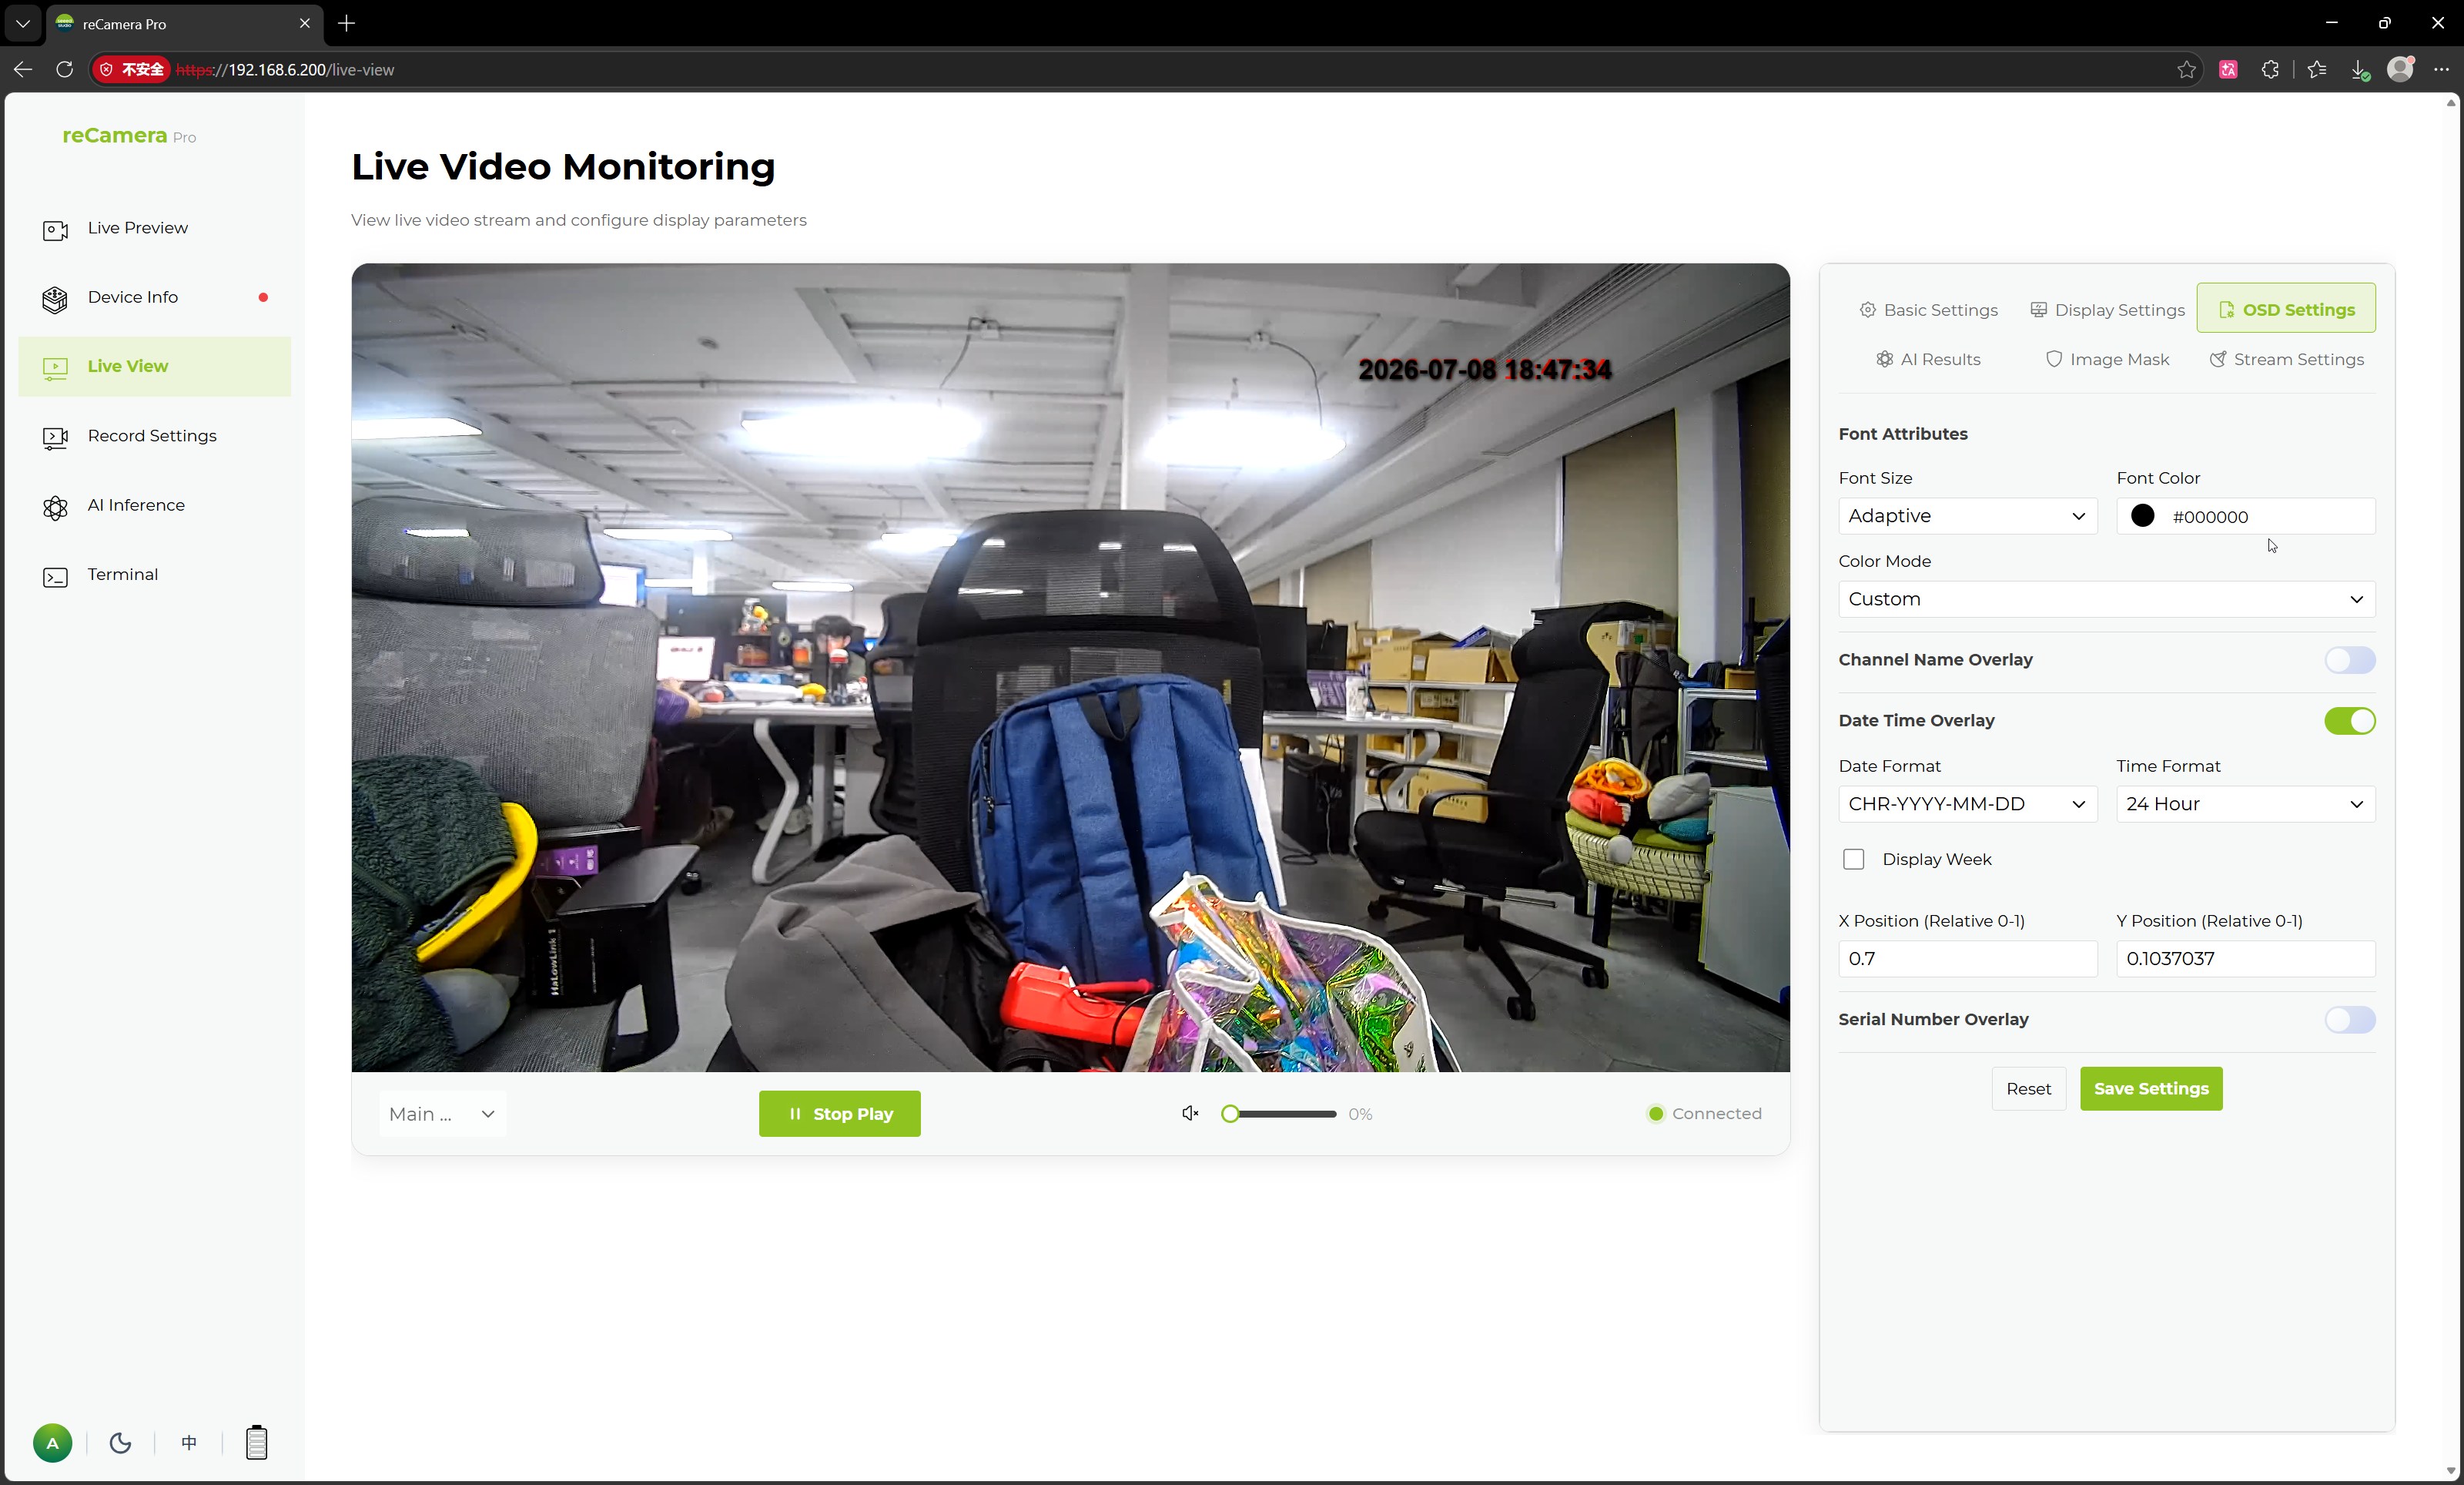
Supported OSD configurations include:
| Configuration Item | Description |
|---|---|
| Font Size | Sets the OSD text size |
| Font Color | Sets the OSD text color |
| Color Mode | Sets the OSD color mode, with an option for custom colors |
| Channel Name Overlay | Enables displaying the channel name on the screen when turned on |
| Channel Name | Custom channel name to display, e.g., Camera 01 |
| Channel Name Coordinates | Sets the display position of the channel name on the screen |
| Date and Time Overlay | Enables displaying the date and time on the screen when turned on |
| Date Format | Sets the date display format |
| Time Format | Sets the time display format, e.g., 24-hour format |
| Show Weekday | Controls whether to display weekday information |
| Date and Time Coordinates | Sets the display position of the date and time on the screen |
| Serial Number Overlay | Controls whether to display the device serial number on the screen |
OSD coordinates are configured using relative positions, allowing users to place text in suitable locations based on the screen layout. You can also directly drag the text to your preferred position.
After configuration, click Save Settings to apply the OSD parameters.
Image Masking
The Image Masking function is used to configure privacy masking areas. Users can enable privacy masking to obscure sensitive areas in the video feed, preventing private information from being exposed in real-time previews, recordings, or streams.
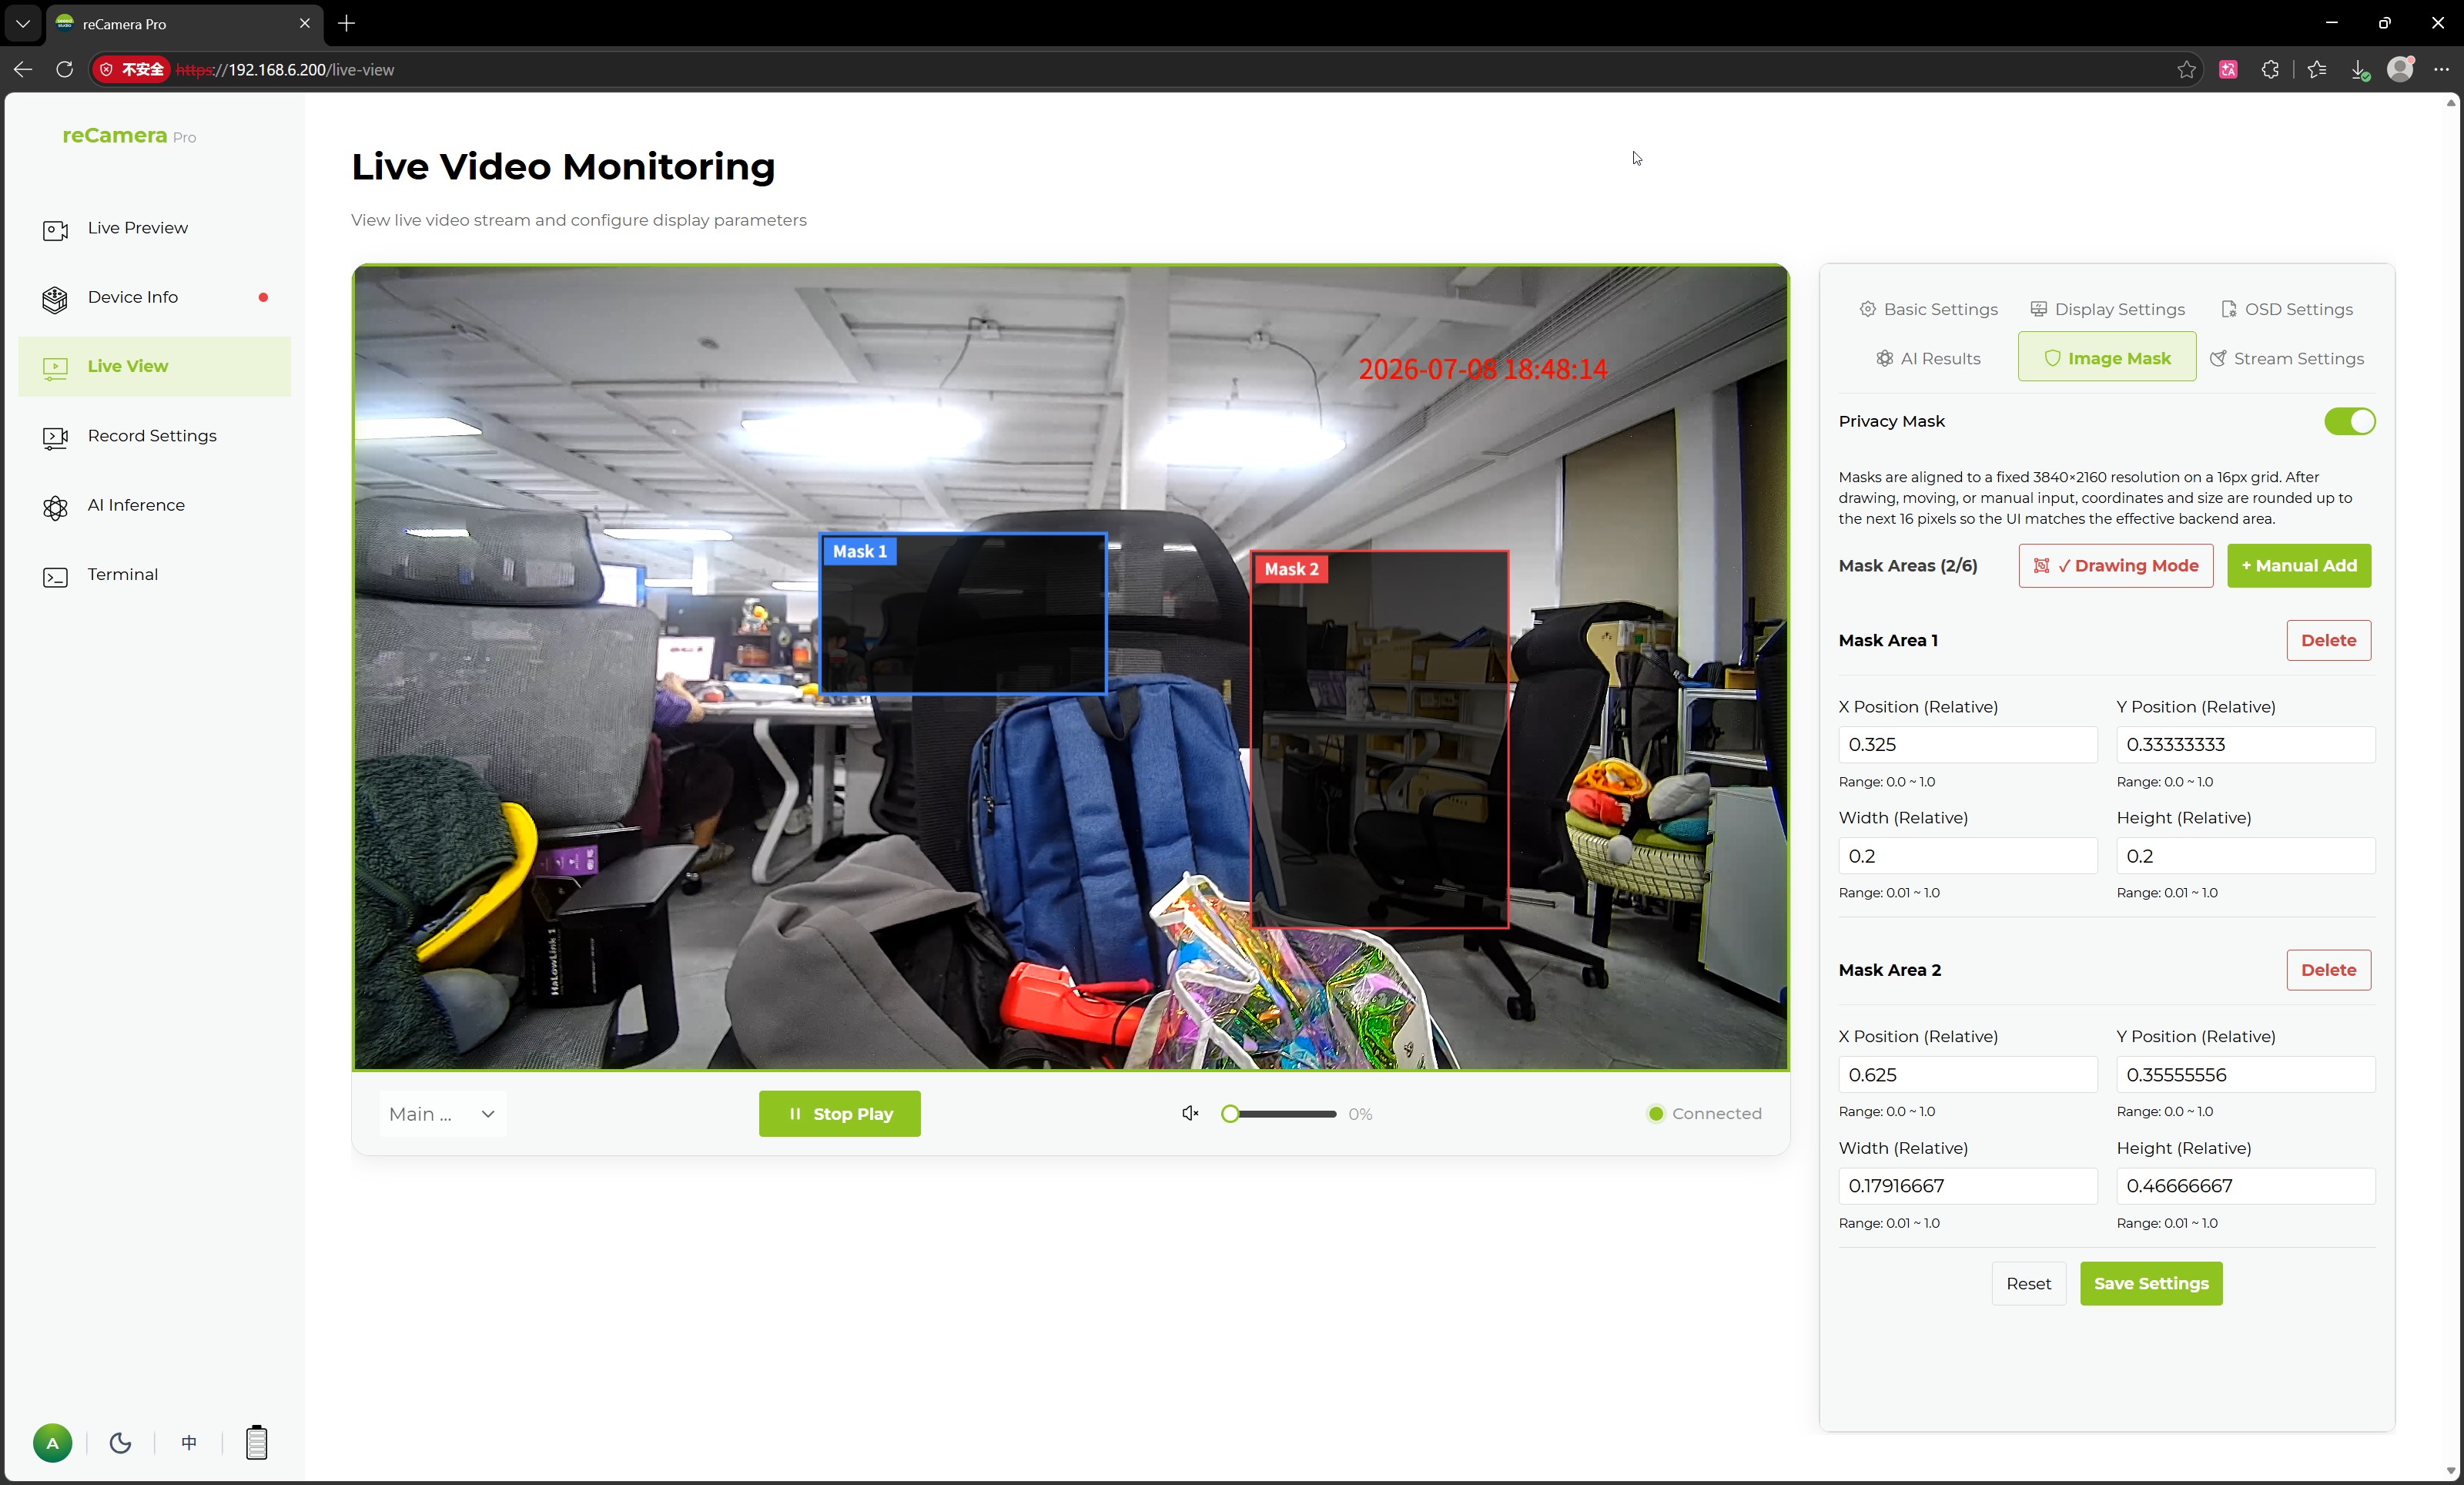
You can manually add and automatically draw masks. After adding them, saving the settings will immediately show the effect.
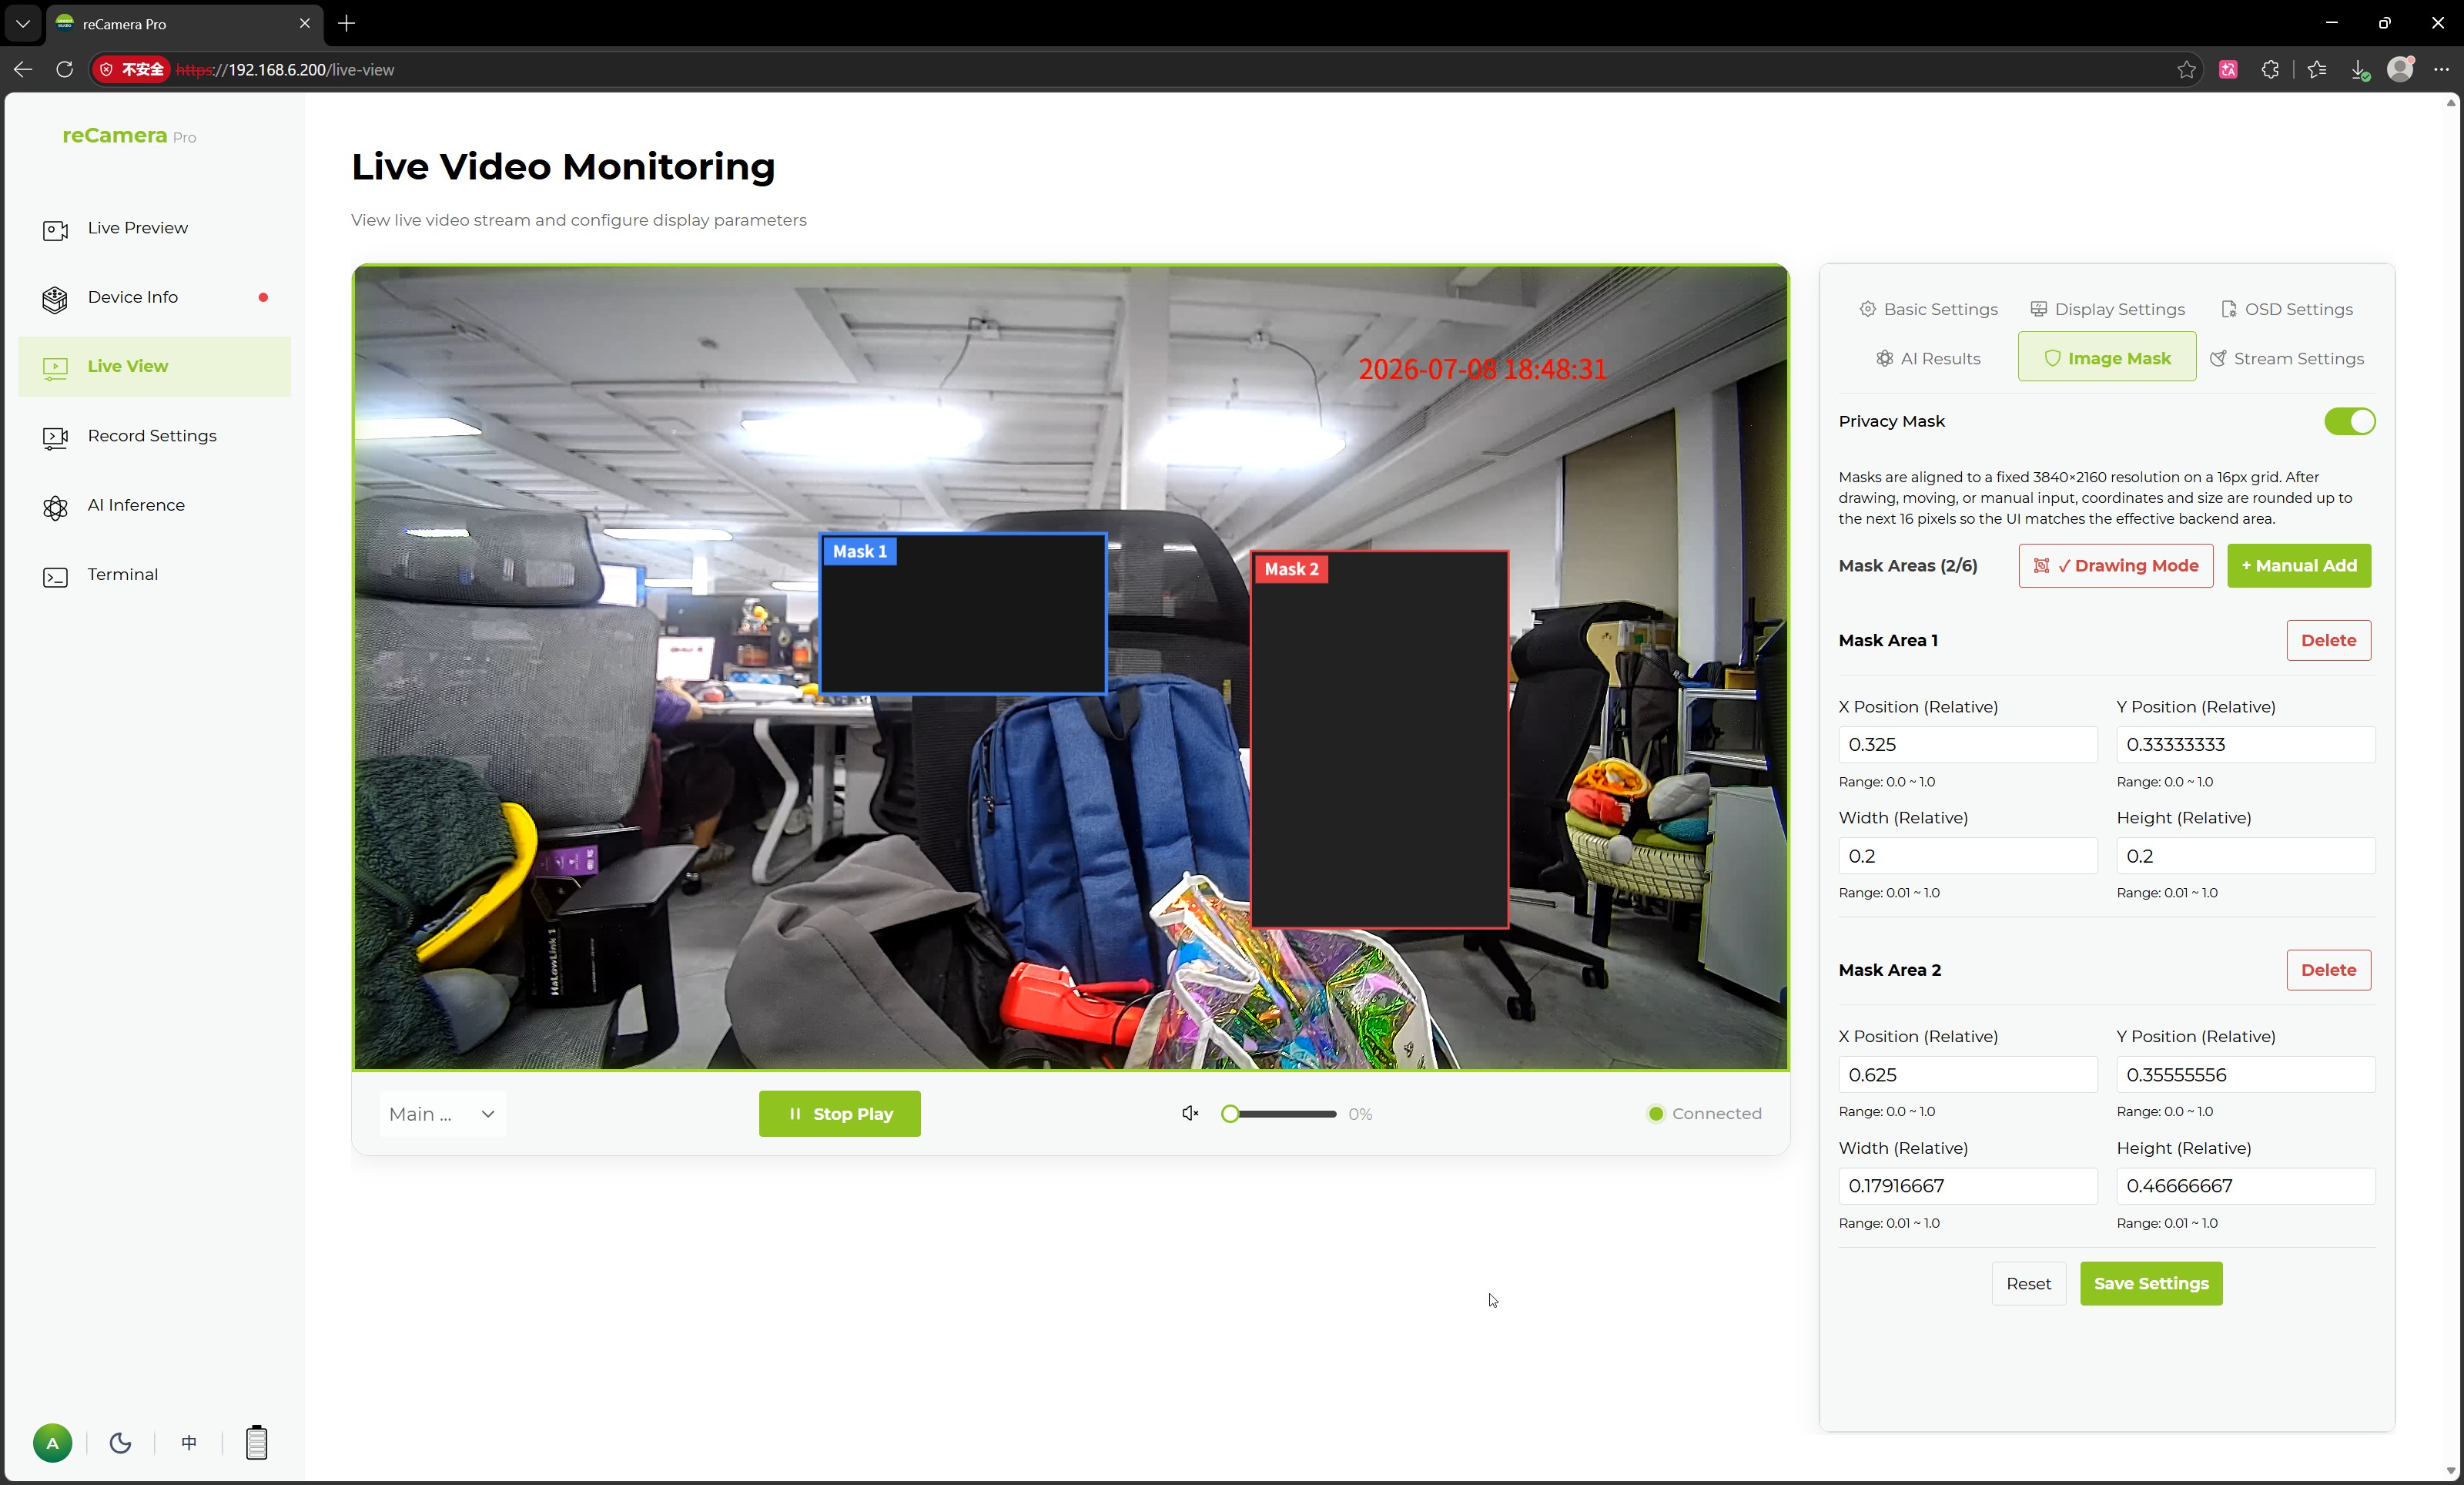
This feature is applicable in the following scenarios:
-
Masking sensitive information in office areas
-
Masking private areas such as residences, door numbers, and screens
-
Meeting specific video privacy protection needs in various scenarios
Streaming Settings
The Streaming Settings page is used to configure video stream output methods, facilitating the integration of reCamera Pro with third-party platforms, NVRs, video management systems, or custom applications.
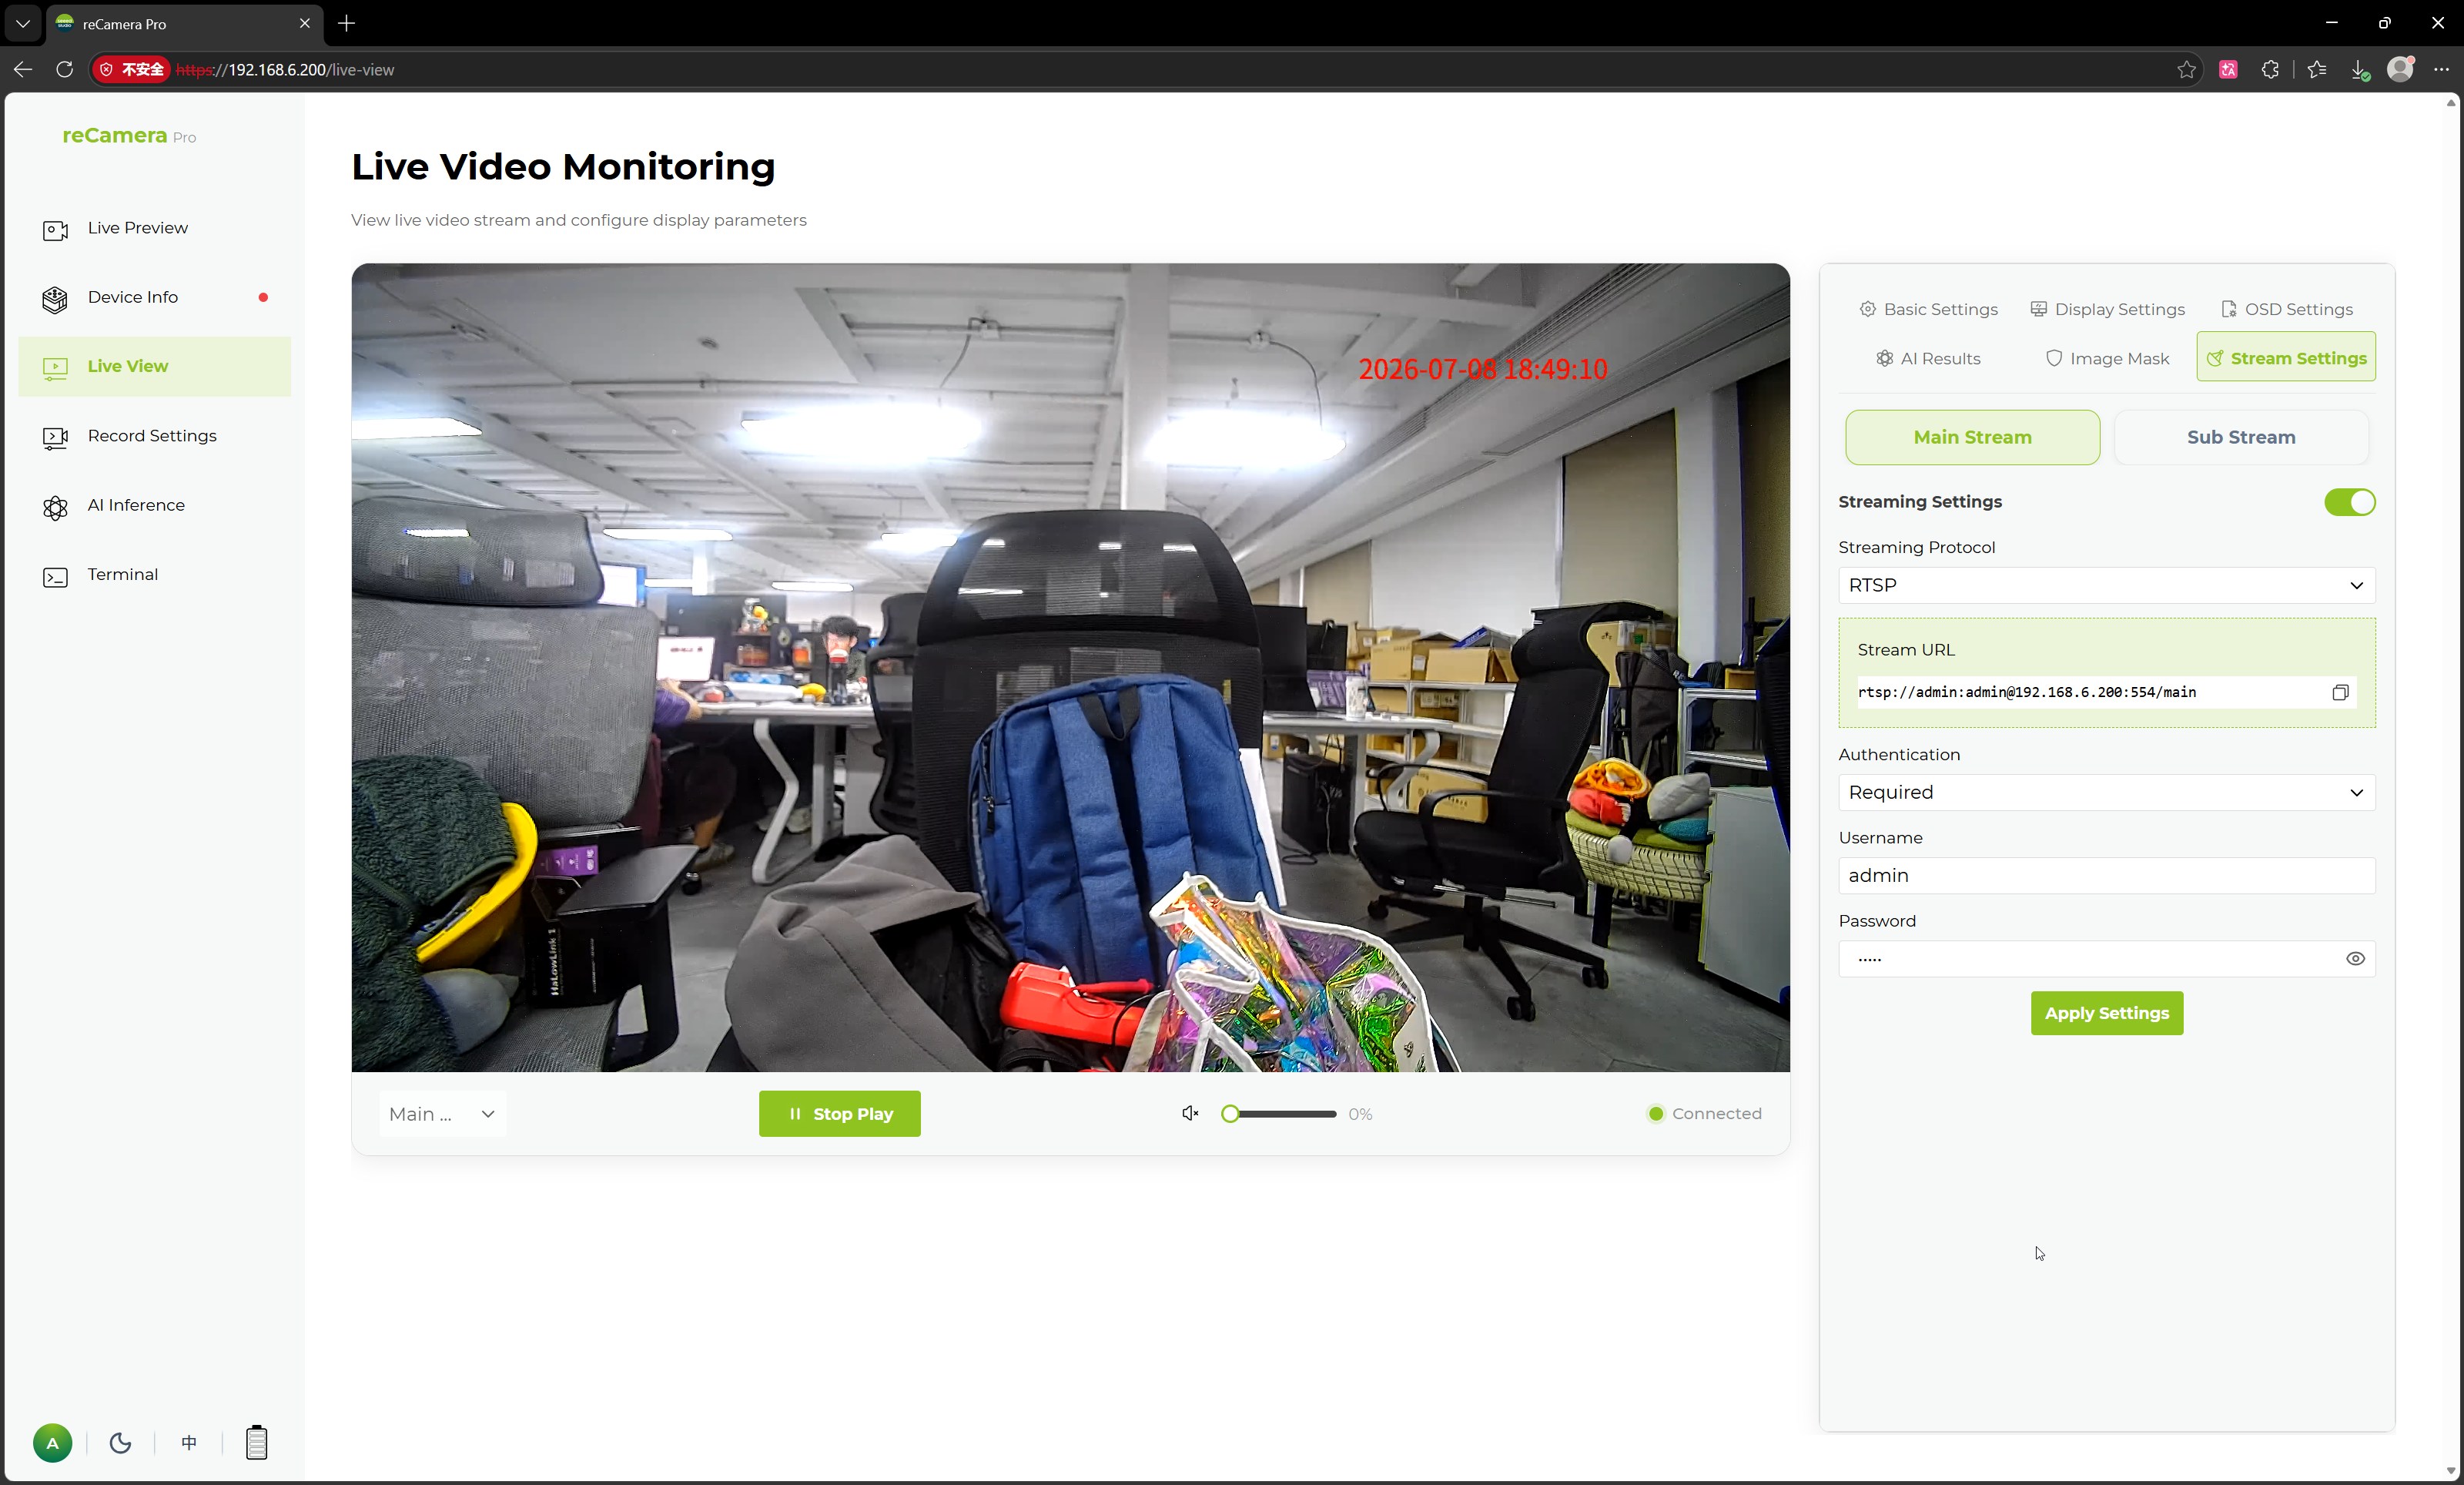
Supported configuration items include:
| Parameter | Description |
|---|---|
| Stream Setting Switch | Enables or disables the streaming function for the current stream |
| Main Stream / Sub-Stream | Selects the stream to configure |
| Streaming Protocol | Sets the streaming protocol, e.g., RTSP |
| Authentication Type | Sets the authentication method for video stream access, e.g., no authentication |
| Apply Settings | Saves and applies the current streaming configuration |
Users can configure streaming parameters for the main stream or sub-stream separately based on their actual deployment needs. After configuration, third-party clients or platforms can access the reCamera Pro video feed through the corresponding stream address.
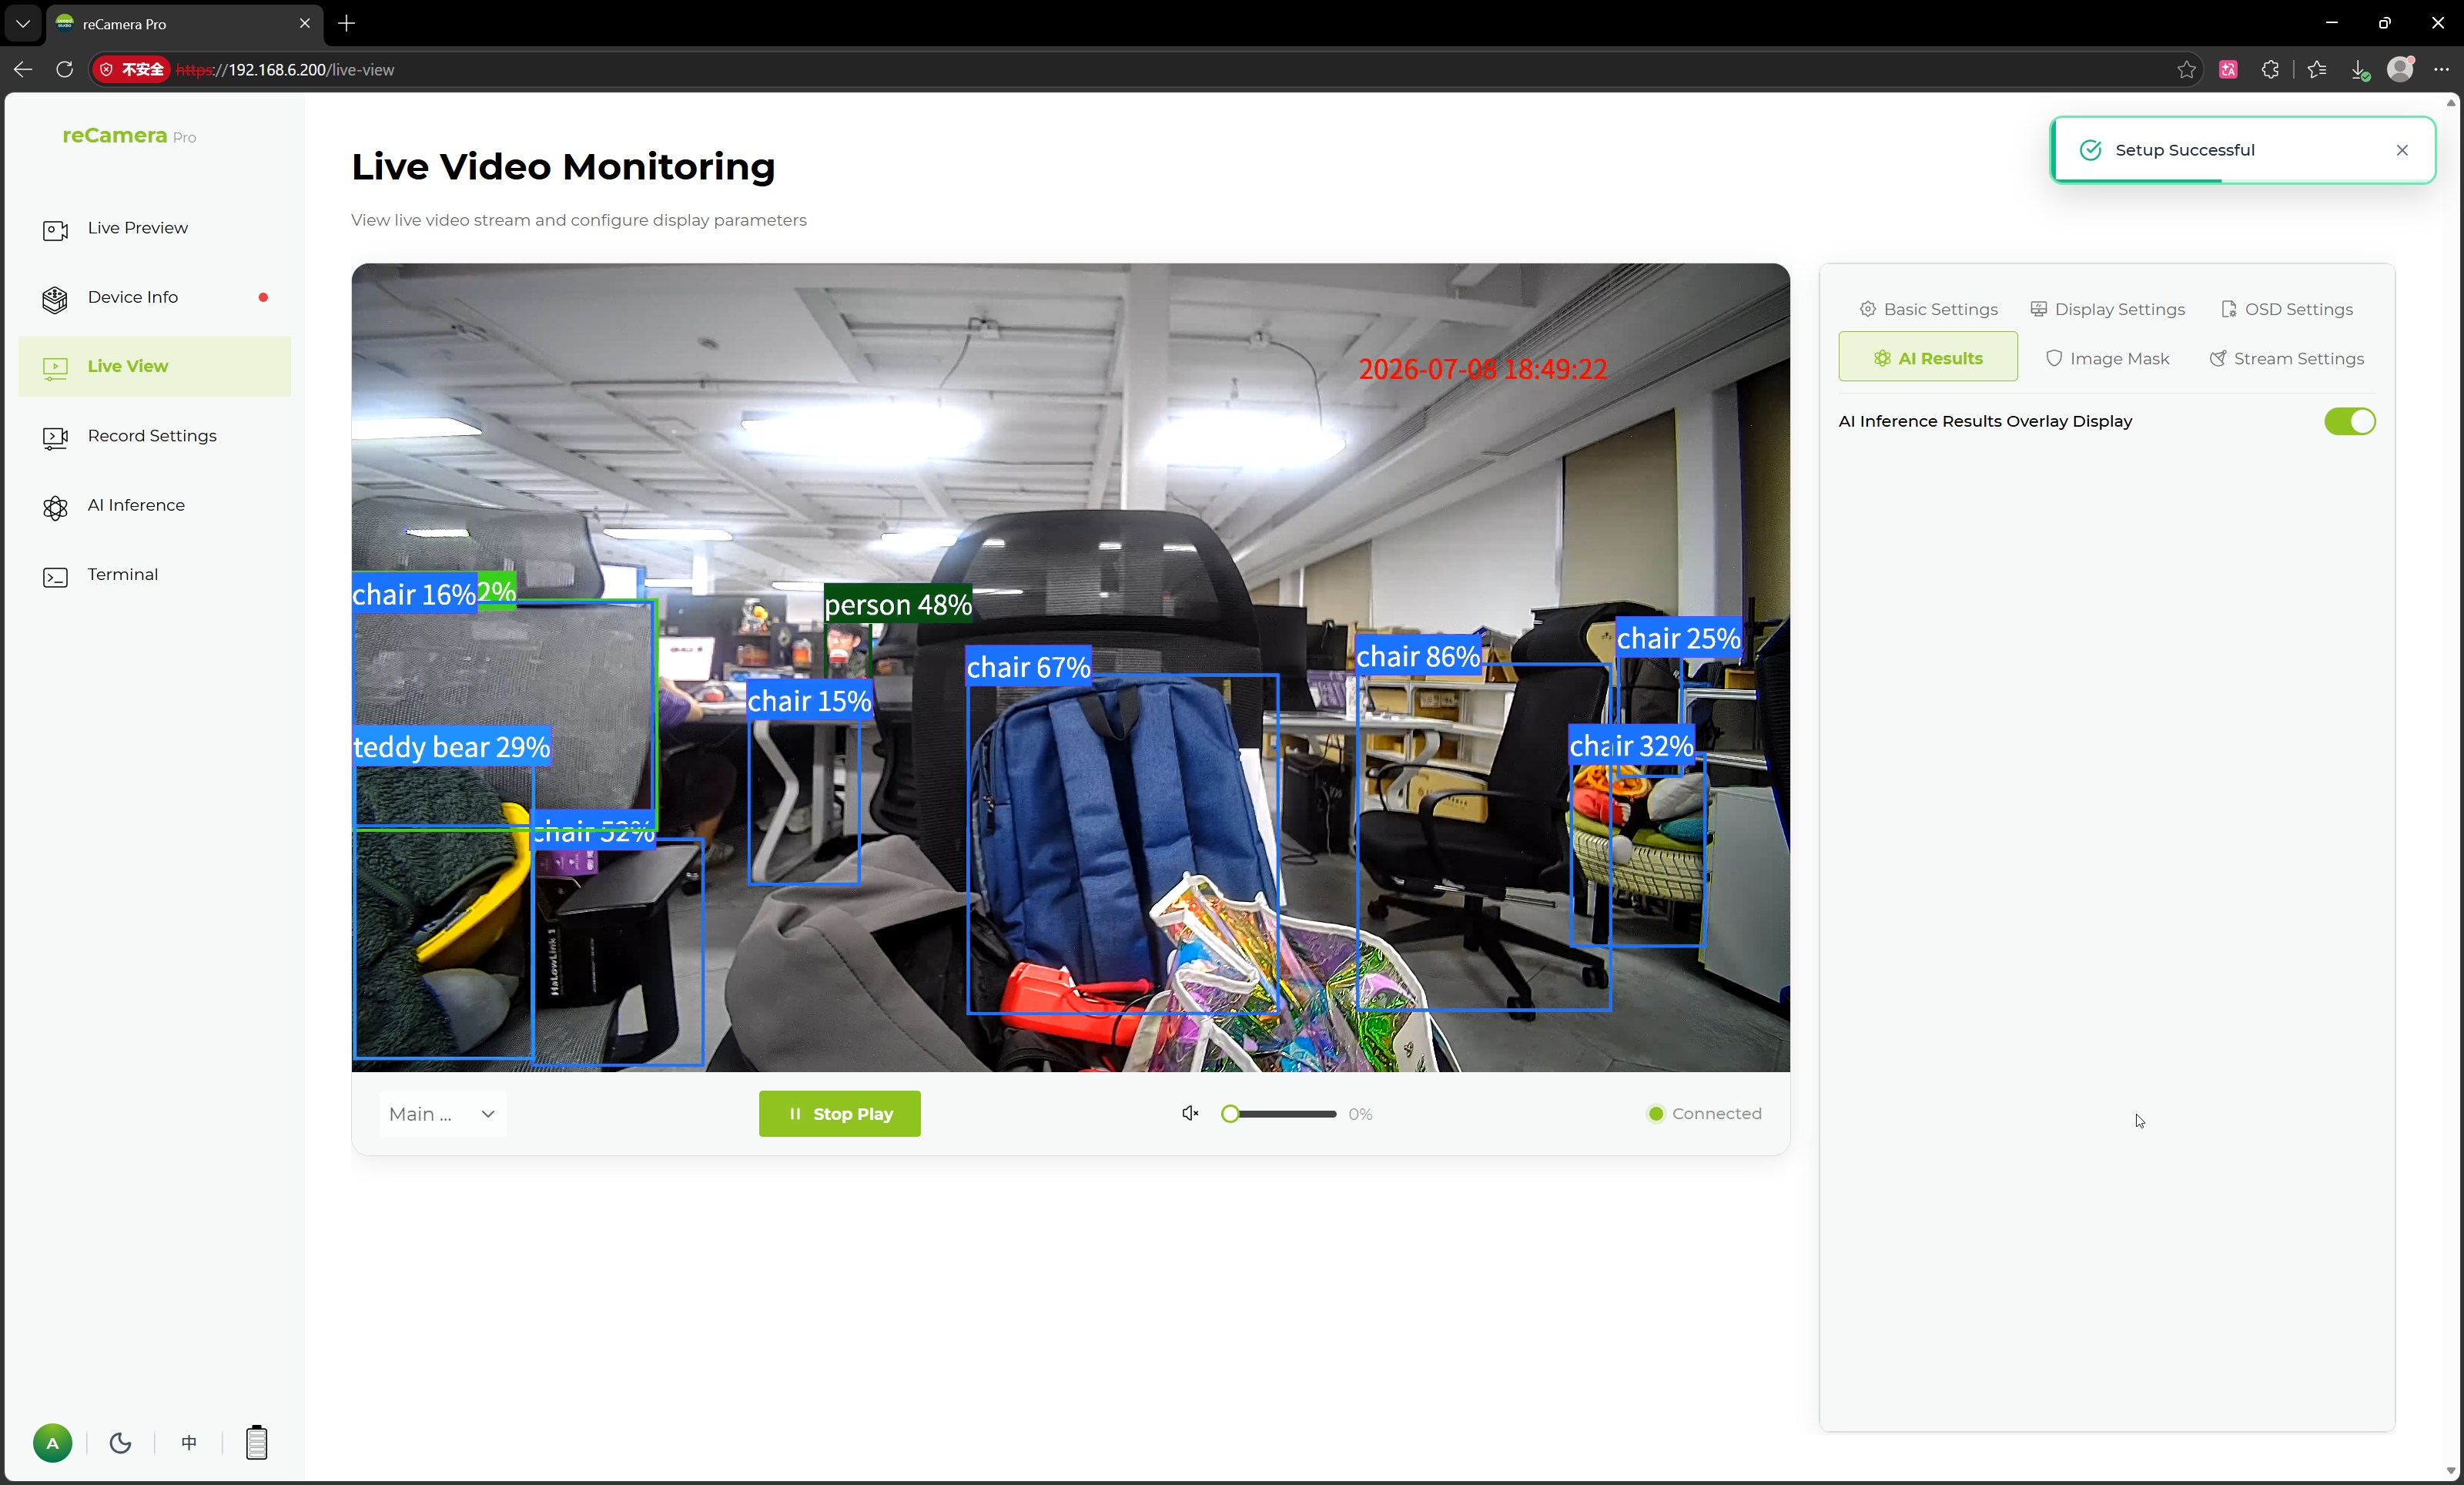
AI Results
The page also provides an AI Results entry for viewing or configuring how AI inference results are displayed. This feature can be used in edge AI application scenarios such as object detection and classification recognition, allowing users to observe model output results in real-time footage.
Typical Use Cases
The real-time video monitoring page is suitable for the following scenarios:
-
Confirming real-time footage after camera installation
-
Configuring main stream and sub-stream parameters
-
Adjusting video resolution, frame rate, bitrate, and encoding format
-
Debugging day/night modes and image parameters
-
Overlaying OSD time, channel names, and device information
-
Configuring privacy masking areas
-
Accessing third-party platforms or NVRs via RTSP streaming
-
Verifying AI inference result display
Through the real-time video monitoring page, users can complete video preview, image debugging, stream configuration, and streaming settings for reCamera Pro without installing additional clients, significantly improving device deployment and debugging efficiency.
Tech Support & Product Discussion
Thank you for choosing our products! We are here to provide you with different support to ensure that your experience with our products is as smooth as possible. We offer several communication channels to cater to different preferences and needs.