Getting Started with reComputer Mini
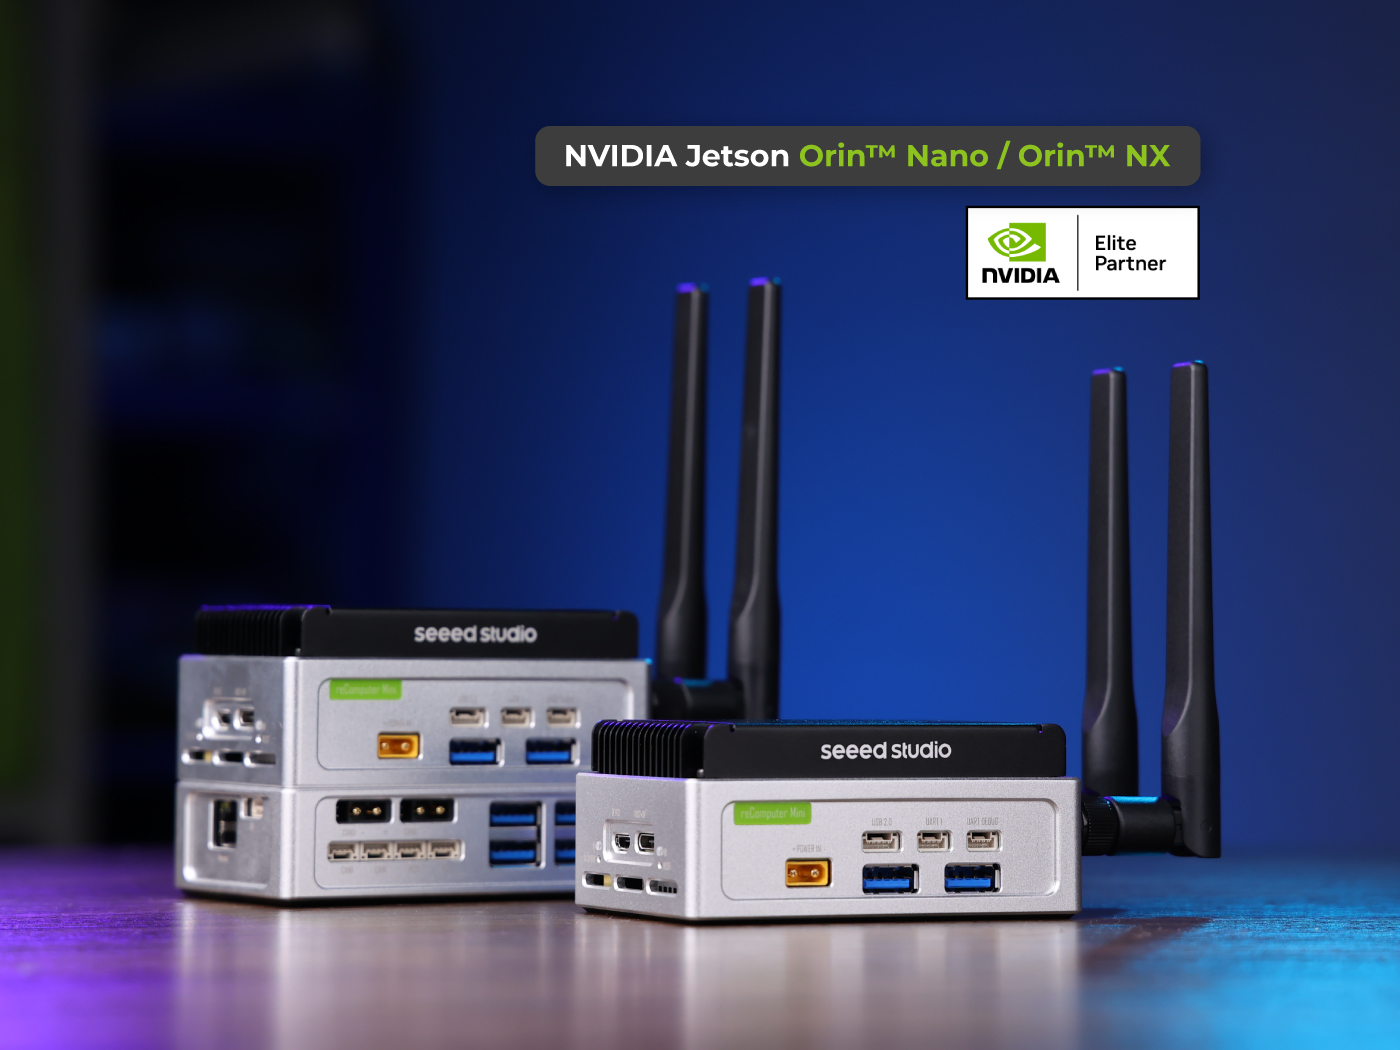
reComputer Mini is a tiny AI computer powered by NVIDIA Jetson Orin Nano/Orin NX module,delivering up to 100 TOPS AI performance. It‘s equipped with PCIe port at the bottom to provide rich expansion capabilities, which also can be customized flexibly. The whole system is designed for embedding into autonomous machines such as drones, patrol robots, delivering robots, etc. It can directly occupy 54V DC input, able to be widely used in battery powered systems.
Features
- Brilliant AI Performance for Production: Achieves up to 100 TOPS AI performance with low power and latency, built by NVIDIA Orin SoC combining the NVIDIA Ampere™ GPU architecture with 64-bit operating capability, integrated advanced multi-function video and image processing, and NVIDIA Deep Learning Accelerators.
- Hand-Size Edge AI Device: Compact size at 63mmx95mmx42mm, featuring an NVIDIA Jetson Orin NX 16GB module, Mini J401 carrier board, fan and enclosure. Support desktop and wall mounting.
- Expandable with Rich I/Os: Includes up to 7x USB, 1x DP 2.1, 1x RJ45 for GbE, M.2 Key E, M.2 Key M, dual channel CAN, and GPIO with extension board.
- Accelerate Solutions to Market: Pre-installed JetPack 6.0 on 128GB NVMe SSD, Linux OS BSP, supporting Jetson software and leading AI frameworks.
- Scale to deploy: support OTA, remote management services powered by Allxon and Balena.
- Flexible Customization: inlcudes changing accessories modules, logo, and hardware interfaces modification based on reComputer Mini J4012 original design.
Specifications
| Jetson Orin System on Module | ||||
|---|---|---|---|---|
| Specifications | reComputer Mini J3010 | reComputer Mini J3011 | reComputer Mini J4011 | reComputer Mini J4012 |
| Module | Jetson Orin Nano 4GB | Jetson Orin Nano 8GB | Jetson Orin NX 8GB | Jetson Orin NX 16GB |
| AI Performance | 20 TOPS | 40 TOPS | 70 TOPS | 100 TOPS |
| GPU | 512-core NVIDIA Ampere architecture GPU with 16 Tensor Cores | 1024-core NVIDIA Ampere architecture GPU with 32 Tensor Cores | ||
| CPU | 6-core Arm® Cortex®-A78AE v8.2 64-bit CPU 1.5MB L2 + 4MB L3 | 6-core Arm® Cortex®-A78AE v8.2 64-bit CPU 1.5MB L2 + 4MB L3 | 8-core Arm® Cortex®-A78AE v8.2 64-bit CPU 2MB L2 + 4MB L3 | |
| CPU Max Frequency | 1.5 GHz | 2 GHz | ||
| Memory | 4GB 64-bit LPDDR5 34 GB/s | 8GB 128-bit LPDDR5 68 GB/s | 8GB 128-bit LPDDR5 102.4GB/s | 16GB 128-bit LPDDR5 102.4GB/s |
| DL Accelerator | / | 1x NVDLA v2 | 2x NVDLA v2 | |
| Video Encoder | 1080p30 supported by 1-2 CPU cores | 1x 4K60 (H.265) | 3x 4K30 (H.265) 6x 1080p60 (H.265) | 12x 1080p30 (H.265) | ||
| Video Decoder | 1x 4K60 (H.265) 2x 4K30 (H.265) 5x 1080p60 (H.265) 11x 1080p30 (H.265) | 1x 8K30 (H.265) 2x 4K60 (H.265) 4x 4K30 (H.265) 9x 1080p60 (H.265) 18x 1080p30 (H.265) | ||
| Carrier Board | ||||
| Storage | 128GB NVMe SSD | |||
| Networking | M.2 KEY E | 1x M.2 Key E for WiFi/Bluetooth module | ||
| I/O | USB | 2x USB 3.2 Type-A (10Gbps) 1x USB 2.0 Micro-B (Device Mode) 1x USB 3.0 Type-C (Host Mode) 1x USB 2.0 JST-5pin (Host Mode) | ||
| UART | 1x UART; 1x UART for Debug | |||
| Display | 1x DP 2.1 (included in Type-C conenctor) | |||
| Fan | 1x 4 pin Fan Connector (5V PWM) | |||
| Button | 1x Reset Button; 1x Recovery Button | |||
| Extension Port | 2x 60 pin High Speed Connector (For extension board) 1x 10 pin Power Connector (For extension board) | |||
| RTC | 1x RTC 2-pin | |||
| Power | 1x XT30 Connector (12-54V DC) | |||
| Extension Board | ||||
| Networking | Ethernet | 1x RJ-45 Gigabit Ethernet (10/100/1000M) | ||
| I/O | USB | 4x USB 3.2 Type-A (5 Gbps) | ||
| CAN | 1x CAN JST 4pin (3.3V); 1x CAN (XT30 2+2) | |||
| Fan | 1x 4 pin Fan Connector (5V PWM) | |||
| I2C | 2x I2C JST 4pin (3.3V) | |||
| SPI | 1x I2S JST 6pin (3.3V) | |||
| Power | 2x XT30 2+2 Connector (12-54V DC) | |||
| Others | ||||
| Mechanical | Dimensions (W x D x H) | 63mm * 95mm * 42mm (Without Extension) 63mm * 95mm * 66.7mm (With Extension) | ||
| Weight | 345g (Without Extension) 462g (With Extension) | |||
| Installation | Desk, wall-mounting | |||
| Operating Temperature | -10℃ ~ 50℃ | |||
| Warranty | 1 Year | |||
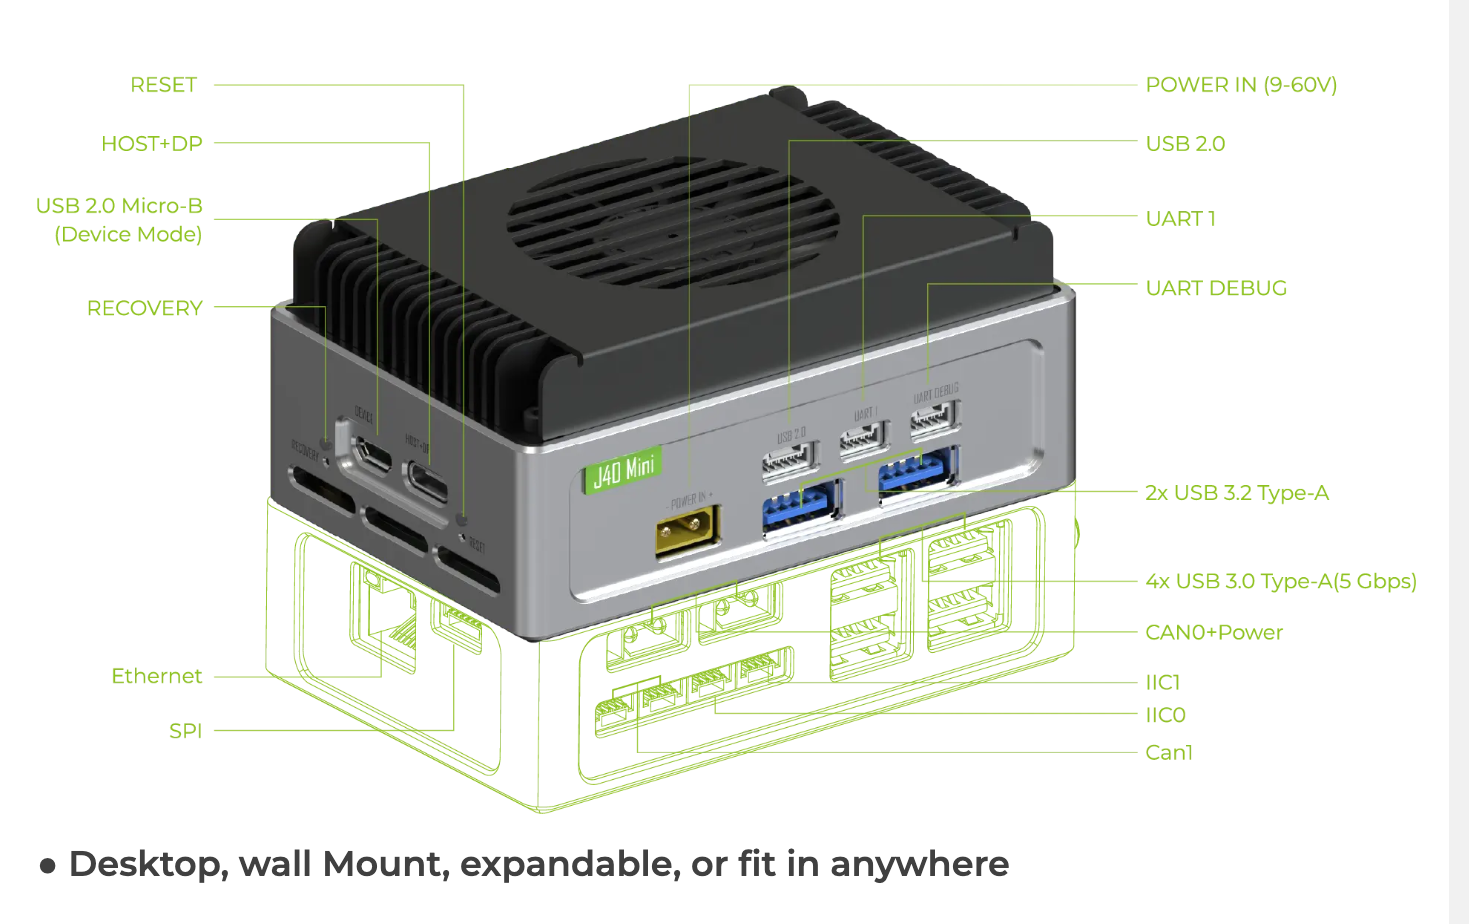
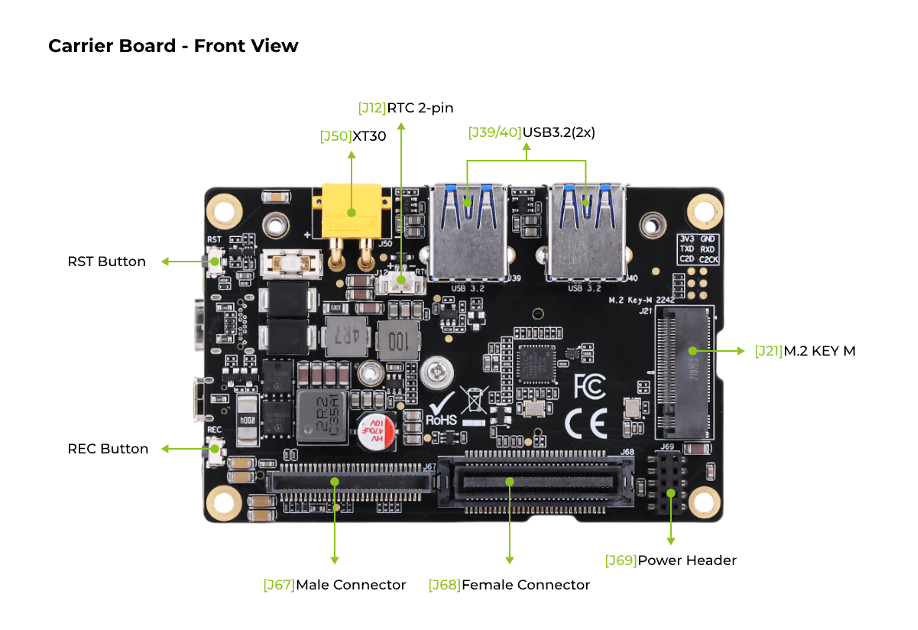
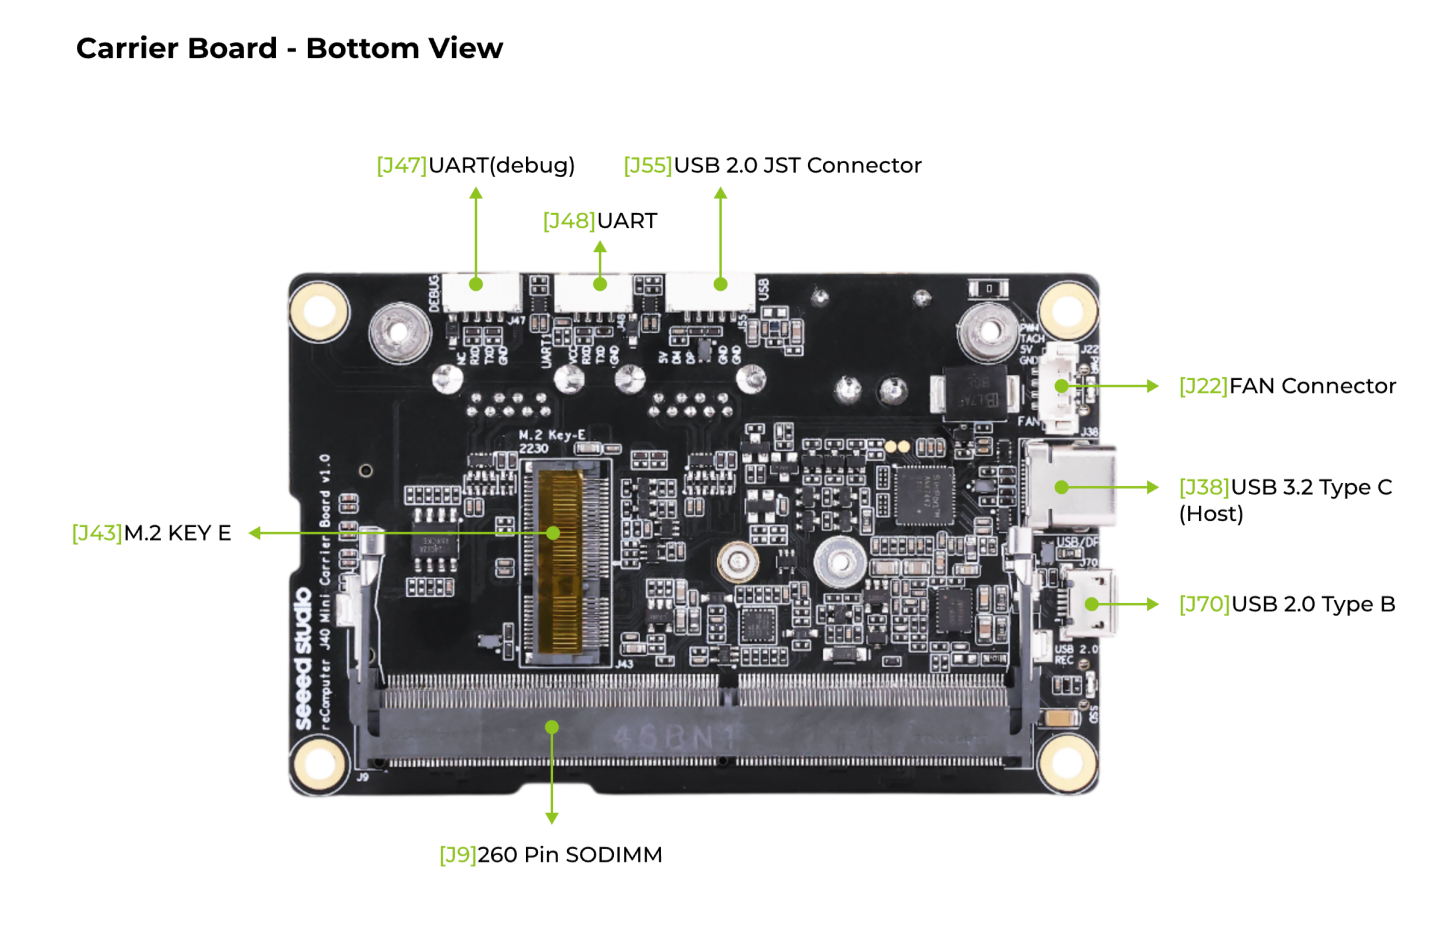
Hardware Overview
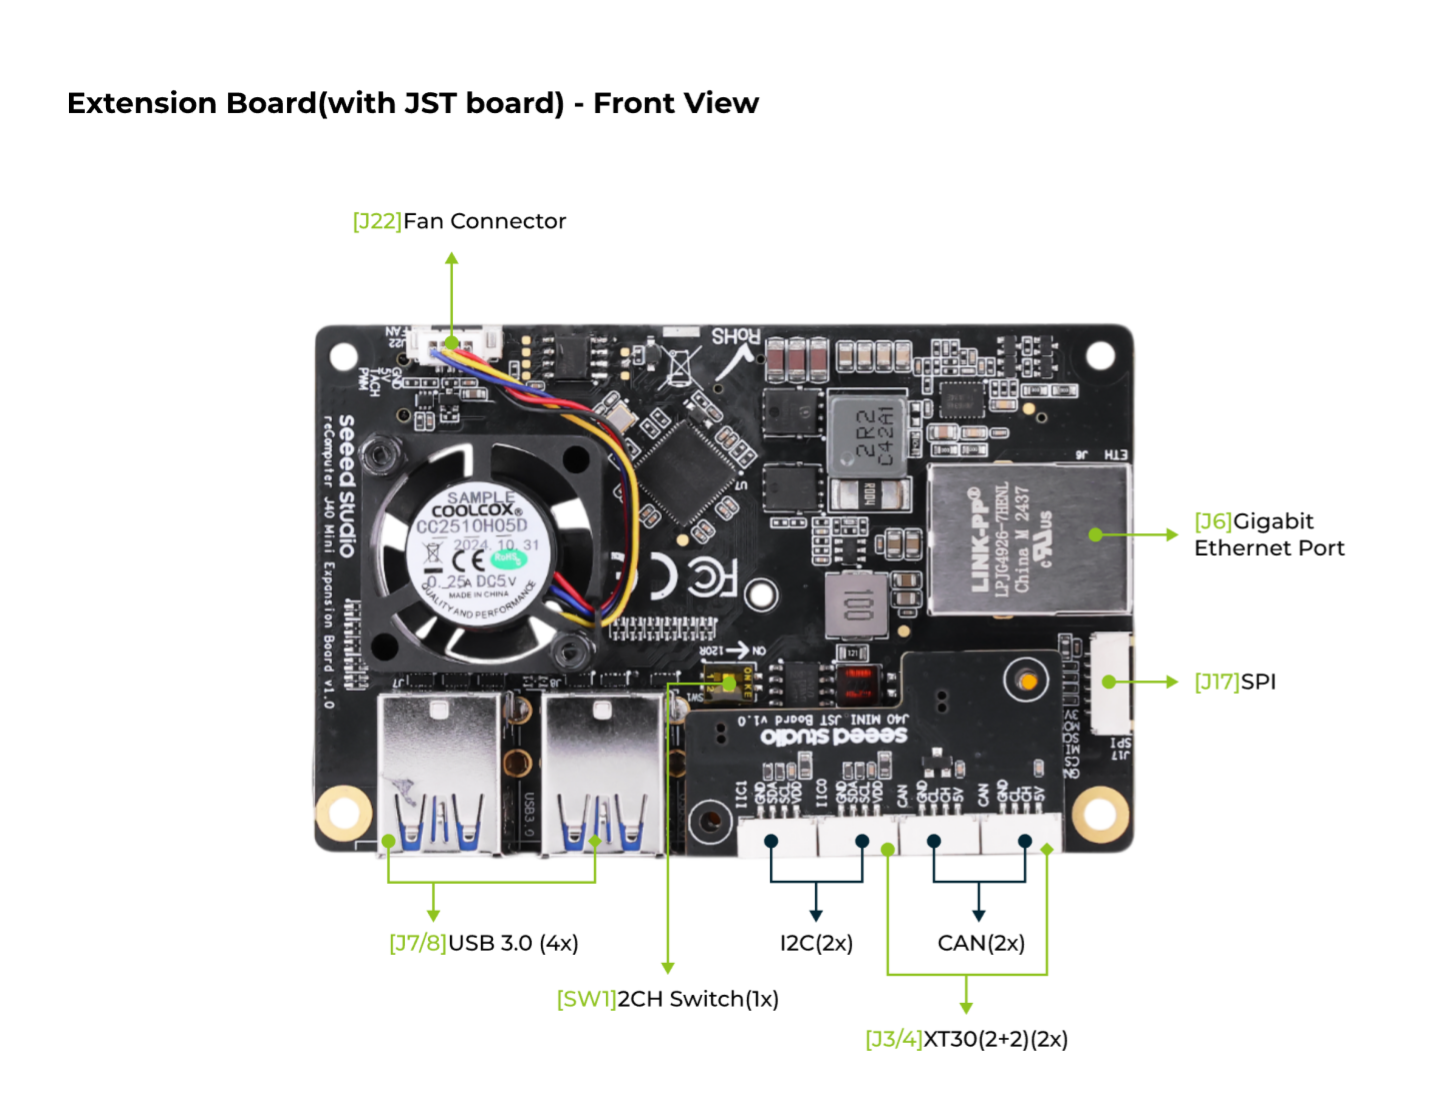
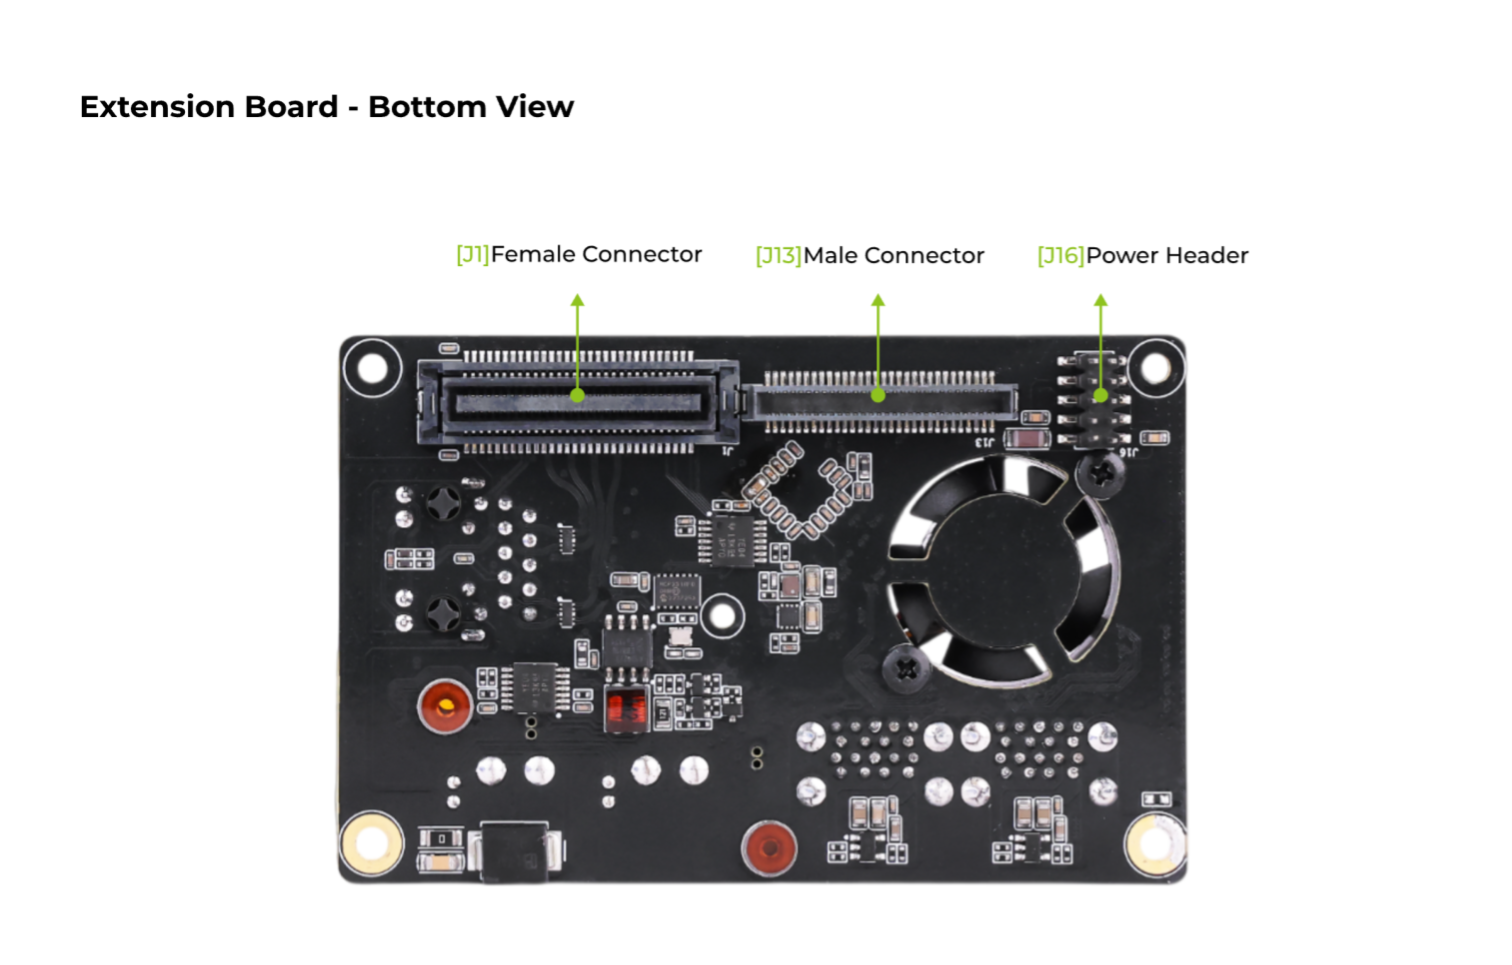
Flash JetPack OS
Here, we will show you how to flash Jetpack 6.0 to an NVMe SSD connected to the reComputer Mini.
Supported Nvidia Jetson Module
- NVIDIA® Jetson Orin™ Nano Module 4GB
- NVIDIA® Jetson Orin™ Nano Module 8GB
- NVIDIA® Jetson Orin™ NX Module 8GB
- NVIDIA® Jetson Orin™ NX Module 16GB
Prerequisites
- Ubuntu Host Computer
- reComputer Mini J4012/ J4011/ J3010 or J3011
- USB Micro-B data transmission cable
We recommend that you use physical ubuntu host devices instead of virtual machines. Please refer to the table below to prepare the host machine.
| JetPack Version | Ubuntu Version (Host Computer) | ||
| 18.04 | 20.04 | 22.04 | |
| JetPack 5.x | ✅ | ✅ | |
| JetPack 6.x | ✅ | ✅ | |
Prepare the Jetpack Image
Here, we need to download the system image to our Ubuntu PC corresponding to the Jetson module we are using:
| Jetpack Version | Jetson Module | Download Link | SHA256 |
|---|---|---|---|
| 5.1.3 | Orin Nx 16GB | Download | 82ab9068c5e03081391d22dc5d7c4db ac9041016c1dd7a7ec2475871a10fd543 |
| Orin Nx 8GB | Download | 5f016131a9ab6e90c3bd21850efe13b 479d72046aea4aa6d3bd2f3a04df5a7a2 | |
| Orin Nano 8GB | Download | a2ea4d9ad06e66e2befab14484471cb 6984ccef396e59262c83c40ed7911bbb2 | |
| Orin Nano 4GB | Download | 928a20a94320e901576cfd8679affc2 6caae9e9a30f3bc9497534f42ac4093cc | |
| 6.0 | Orin Nx 16GB | Download | 7B4ABE1D1A8711D5D4E9B676DBB1E76 CDA35C614608CE7ECE112BC4A50E71C7C |
| Orin Nx 8GB | Download | 3956B968F2BFB9FDF37D952E83DDB70 3980C813156919BC367CA5E23BBDEC89F | |
| Orin Nano 8GB | Download | BF6921DF313B467254154BDA835C379 AD86D817E03D0301543B62F7CA0C9222F | |
| Orin Nano 4GB | Download | 8941C13204A8069CE70B109B6A13EA2 40CBB02F69B8D4028D465134B3744BC28 | |
| 6.2 | Orin Nano 8GB | Download | A1C5F44B19B6C06E11AC38ABDA79AD6 CBFF2AAFBEEA7BF3A14B2FE08EA37267F |
| Orin Nano 4GB | Download | 23855098982DD1E05C025D3F078BCA0 2F396C1FB68DC58E539D83569A894571D |
The Jetpack6 image file is approximately 16.7GB in size and should take around 60 minutes to download. Please kindly wait for the download to complete.
To verify the integrity of the downloaded firmware, you can compare the SHA256 hash value.
On an Ubuntu host machine, open the terminal and run the command sha256sum <File> to obtain the SHA256 hash value of the downloaded file. If the resulting hash matches the SHA256 hash provided in the wiki, it confirms that the firmware you downloaded is complete and intact.
Enter Force Recovery Mode
Before we can move on to the installation steps, we need to make sure that the board is in force recovery mode.
Step-by-Step
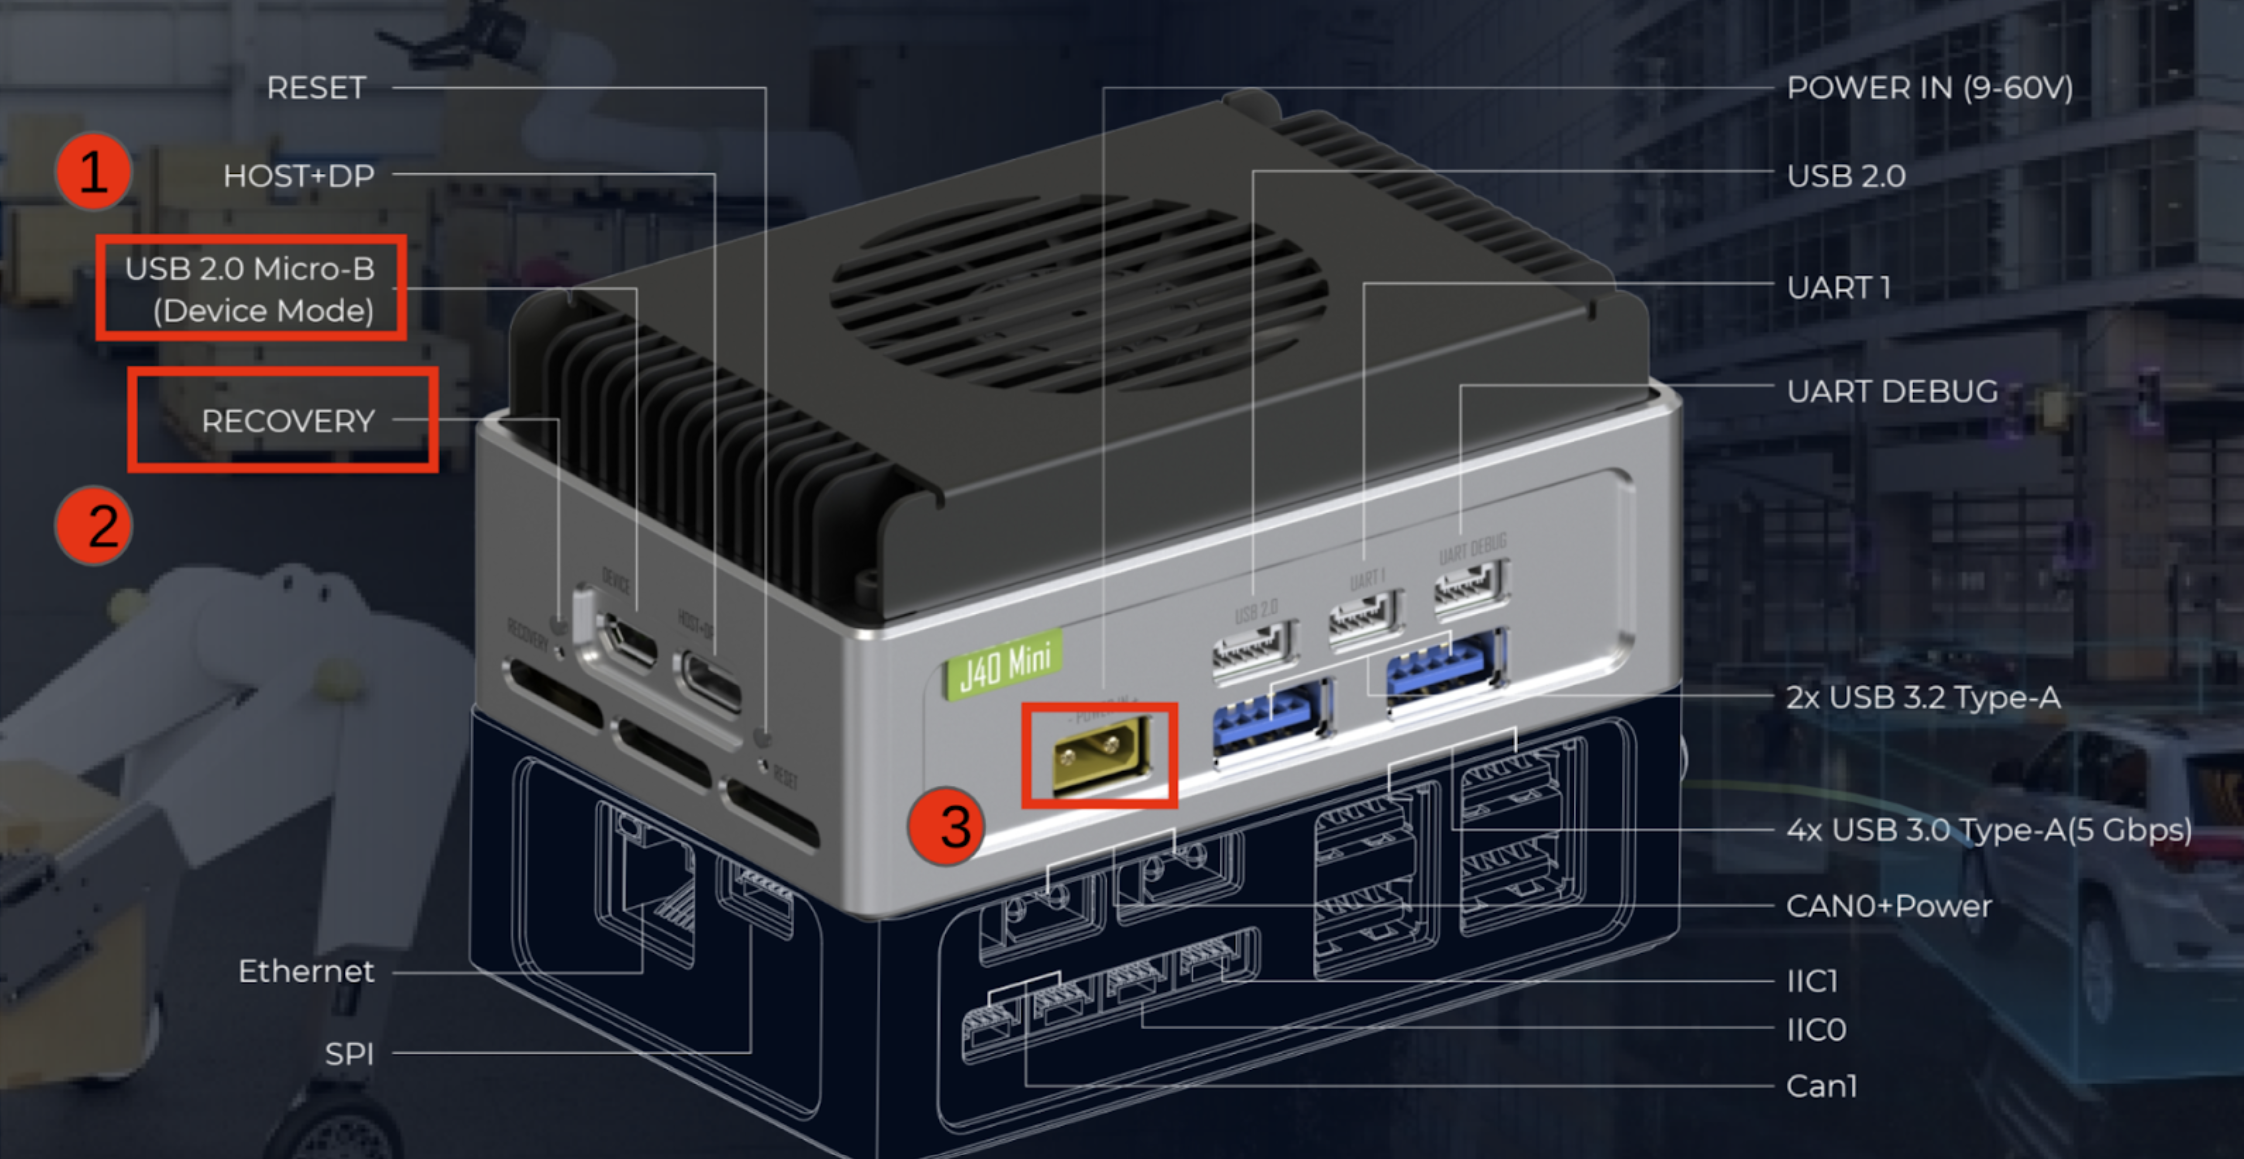
- Step 1. Connect a USB Micro-B cable between USB2.0 DEVICE port and the ubuntu host PC.
- Step 2. Use a pin and insert into the RECOVERY hole to press recovery button and while holding this.
- Step 3. Connect the power supply.
- Step 4. Release the recovery button.
On the Linux host PC, open a Terminal window and enter the command lsusb. If the returned content has one of the following outputs according to the Jetson SoM you use, then the board is in force recovery mode.
- For Orin NX 16GB: 0955:7323 NVidia Corp
- For Orin NX 8GB: 0955:7423 NVidia Corp
- For Orin Nano 8GB: 0955:7523 NVidia Corp
- For Orin Nano 4GB: 0955:7623 NVidia Corp
The below image is for Orin Nx 16GB:

Flash to Jetson Step by Step
Step 1: Extract the downloaded image file on ubuntu host PC:
cd <path-to-image>
sudo tar xpf mfi_xxxx.tar.gz
# For example: sudo tar xpf mfi_recomputer-orin-nano-8g-j401-6.0-36.3.0-2024-06-07.tar.gz
Step 2: Execute the following command to flash jetpack system to the NVMe SSD:
cd mfi_xxxx
# For example: cd mfi_recomputer-orin-j401
sudo ./tools/kernel_flash/l4t_initrd_flash.sh --flash-only --massflash 1 --network usb0  --showlogs
You will see the following output if the flashing process is successful

The flash command may run for 2-10 minutes.
Step 3: Connect the J401 to a display using the USB Type-C with DisplayPort on the board and finish the initial configuration setup:
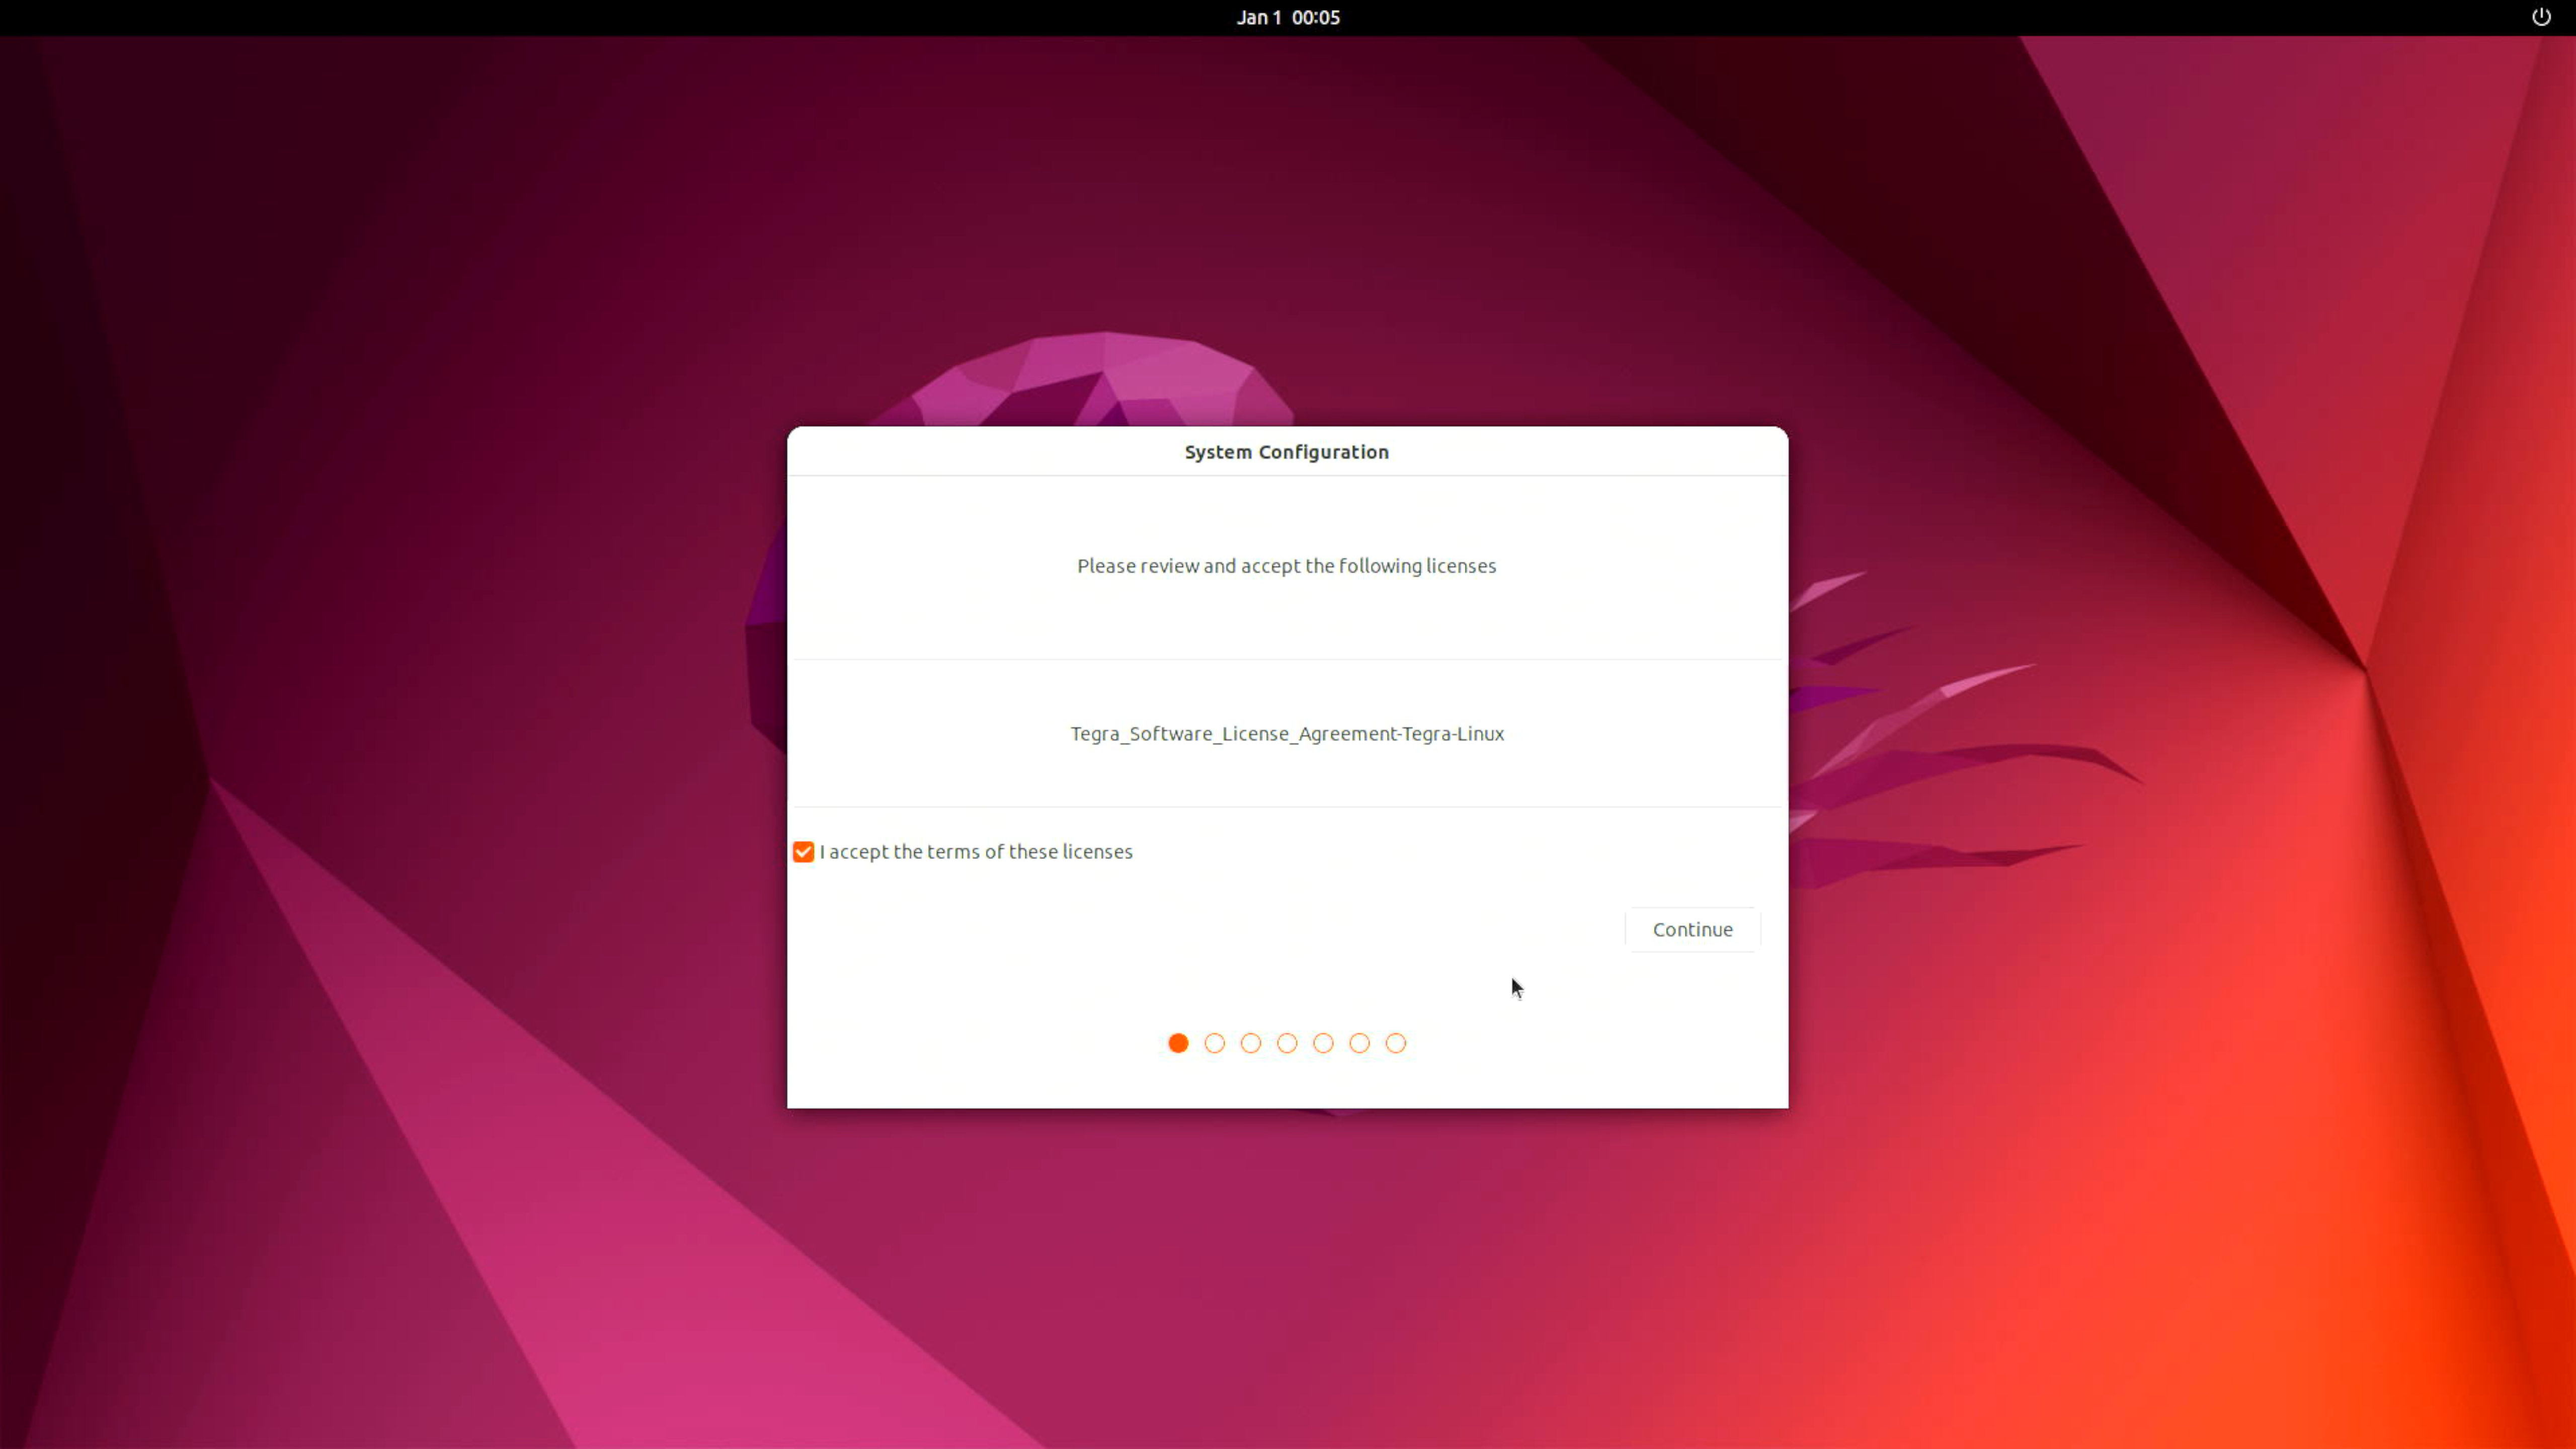
Please complete the System Configuration according to your needs.
Step 4 (Optional): Install Nvidia Jetpack SDK
Please open the terminal on the Jetson device and execute the following commands:
sudo apt update
sudo apt install nvidia-jetpack
Hardware Interfaces Usage
If you want to learn more about the detailed specifications and usage of the hardware interface, please refer to this wiki.
Resources
- reComptuer Mini Datasheet
- reComptuer Mini Schematic
- reComputer Mini 3D file
- Seeed Jetson Serials Catalog
- Seeed Studio Edge AI Success Stories
- Seeed Jetson Serials Comparision
- Seeed Jetson Devices One Page
Tech Support & Product Discussion
Thank you for choosing our products! We are here to provide you with different support to ensure that your experience with our products is as smooth as possible. We offer several communication channels to cater to different preferences and needs.