reComputer R1000 Raspbian OS to eMMC

The reComputer R1000 edge IoT controller is built on the high-performance Raspberry Pi CM4 platform, featuring a quad-core A72 processor with a maximum support of 8GB RAM and 32GB eMMC. Equipped with dual Ethernet interfaces that can be flexibly configured, it also includes 3 isolated RS485 channels supporting BACnet, Modbus RTU, Modbus TCP/IP ,and KNX protocols. With robust IoT network communication capabilities, the R1000 series supports multiple wireless communication options including 4G, LoRa®, Wi-Fi/BLE, allowing for flexible configurations to serve as corresponding wireless gateways. This controller is well-suited for remote device management, energy management, and various other scenarios in the field of smart buildings.
Hardware Requirements
You need to prepare the following hardware
- reComputer R1000 x 1
- Host Computer (Windows/Mac/Linux) x 1
- Ethernet cable x 1
- Power adapter (12V-24V) BYO
- USB Type-C cable x 1
Software Requirements
Boot from NVME
Flash os to the NVME
Please refer this link, and then insert it into the M.2 slot.
Boot from emmc and update eeprom
Use command like below to open the file
sudo nano /etc/default/rpi-eeprom-update
Modify as shown below:
FIRMWARE_RELEASE_STATUS="latest"
RPI_EEPROM_USE_FLASHROM=1
CM4_ENABLE_RPI_EEPROM_UPDATE=1
Use Ctrl+x to save the file.
Use command like below to open the file
sudo nano /boot/firmware/config.txt
Modify [cm4] part as shown below:
[cm4]
dtparam=spi=on
dtoverlay=audremap
dtoverlay=spi-gpio40-45
Use Ctrl+x to save the file, and reboot the machine use command:
sudo reboot
Then update the eeprom use command like below:
sudo rpi-eeprom-update -a
The output is like below:
recomputer@reComputer-R100x:~ $ sudo rpi-eeprom-update -a
BOOTLOADER: up to date
   CURRENT: Tue Feb 11 05:00:13 PM UTC 2025 (1739293213)
    LATEST: Tue Feb 11 05:00:13 PM UTC 2025 (1739293213)
   RELEASE: latest (/usr/lib/firmware/raspberrypi/bootloader-2711/latest)
            Use raspi-config to change the release.

  VL805_FW: Using bootloader EEPROM
     VL805: up to date
   CURRENT:
    LATEST:
Flash the lastest eeprom and modify the boot order
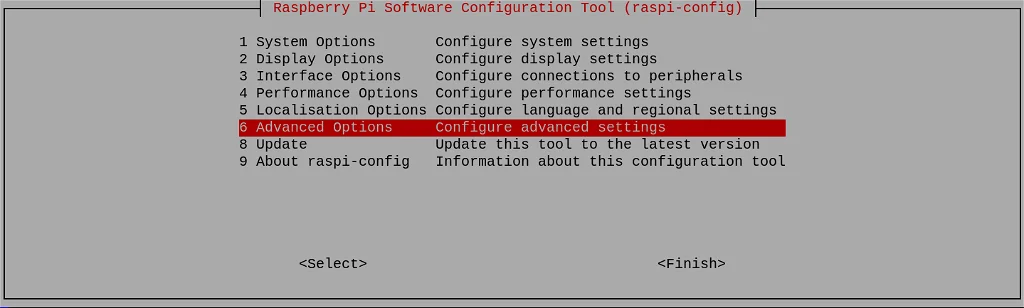
Use command like below to open the raspi-config:
sudo raspi-config
Scroll down to Advanced Options and press Enter:
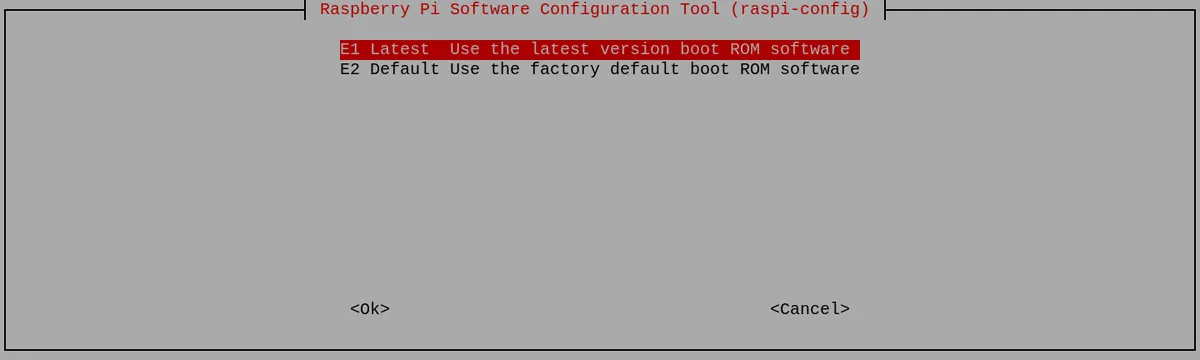
Scroll down to Bootloader Version and press Enter:

And finally choose Latest, and press Enter:
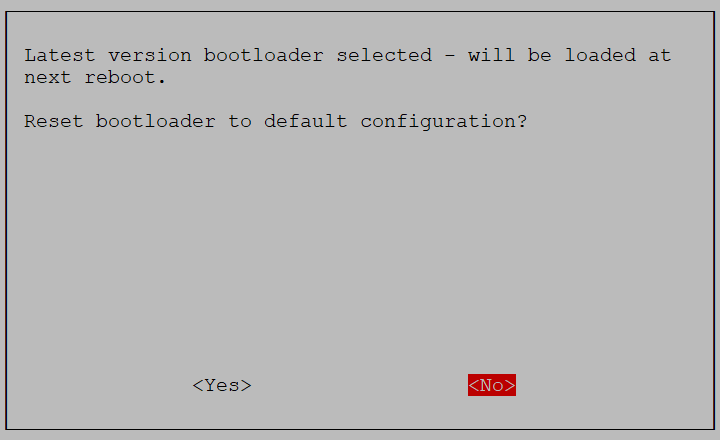
Select No here - you want the latest bootloader.
And exit from the tool by selecting Finish:
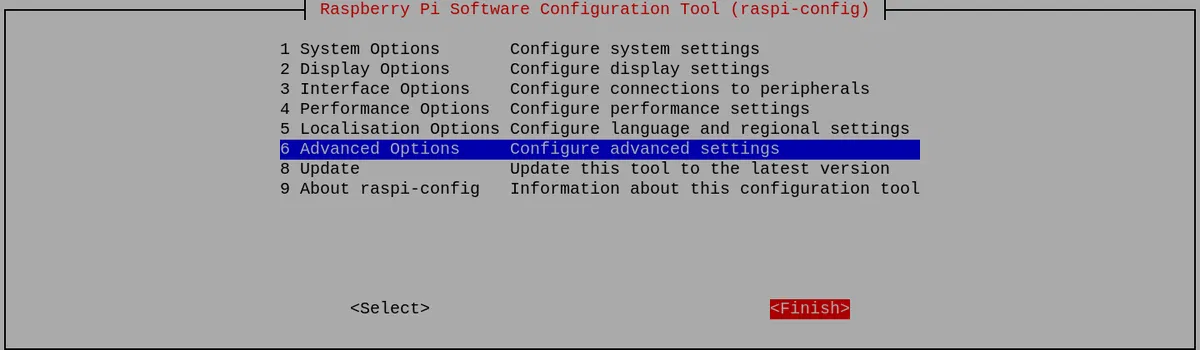
If asked to reboot, select Yes.

Then modify the boot order with command like below:
sudo -E rpi-eeprom-config --edit
Modify the file like below:
[all]
BOOT_UART=0
WAKE_ON_GPIO=1
POWER_OFF_ON_HALT=0
BOOT_ORDER=0xf416
Use Ctrl+x to save the file, and then reboot your machine.
Steps for Flashing Raspbian OS
Note: The latest system image packaged by Seeed, including the appropriate drivers: pi-gen-expand
- Step 1. Make sure switch is set to
Flash modeaccording to the diagram below:
| Switch Position | Mode | Description | nRPI-BOOT |
|---|---|---|---|
 | Normal mode | Boot from eMMC | Low |
 | Flash mode | Boot from USB | High |
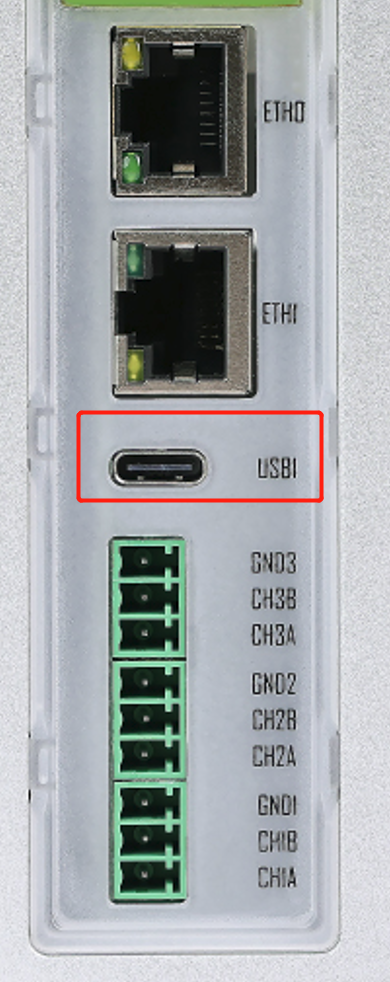
- Step 2. Please use the USB Type-C data cable connect to the Type-C port on the reComputer R1000, as shown in the below image,
- Step 3. Please connect the Power Cord from the power supply to the reComputer R1000 power port.

The power solution utilizes a bridge rectifier diode for reverse polarity protection and is compatible with both AC and DC inputs. This ensures that regardless of how the power supply's positive and negative terminals are connected, the circuit will not be damaged. By using a bridge rectifier, the output voltage polarity remains fixed irrespective of the input DC polarity, providing effective reverse polarity protection.
Now let's move on to software set up on your host computer. Please follow the steps according to your desired operating system
For Windows
-
Step 1. Download the rpiboot setup installer by click here to install the necessary drivers and the boot tool
-
Step 2. Connect reComputer R1000 the PC via USB Type-C cable
Windows will now find the hardware and install the necessary drivers
-
Step 3. Search for rpiboot tool that we installed before and open it
-
Step 4. Open file explorer and you will see the eMMC of the Computer Module 4 shown as a USB mass storage device
-
Step 5. Download Raspberry Pi Imager software from here
-
Step 6. Open Raspberry Pi Imager software

- Step 7. Press CTRL + SHIFT + X on the keyboard to open Advanced options window

Here you can set a hostname, enable SSH, set a password, configure wiFi, set locale settings and more
The system has preset a username and password. Please set the default username to "recomputer" and the default password to "12345678" when logging in. If you set different credentials and encounter issues, please reflash OS if your purchase the first batch of reComputer R1000.
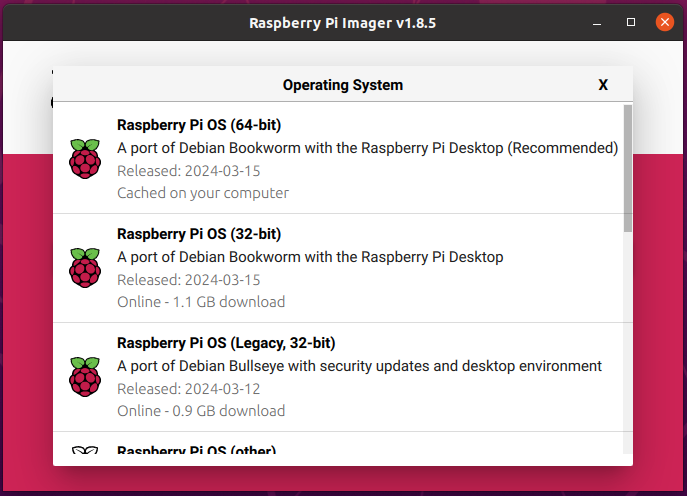
- Step 8. Click CHOOSE OS and select your preferred OS

NOTE: You can select other OS such as 64-bit Ubuntu by navigating into Other general purpose OS
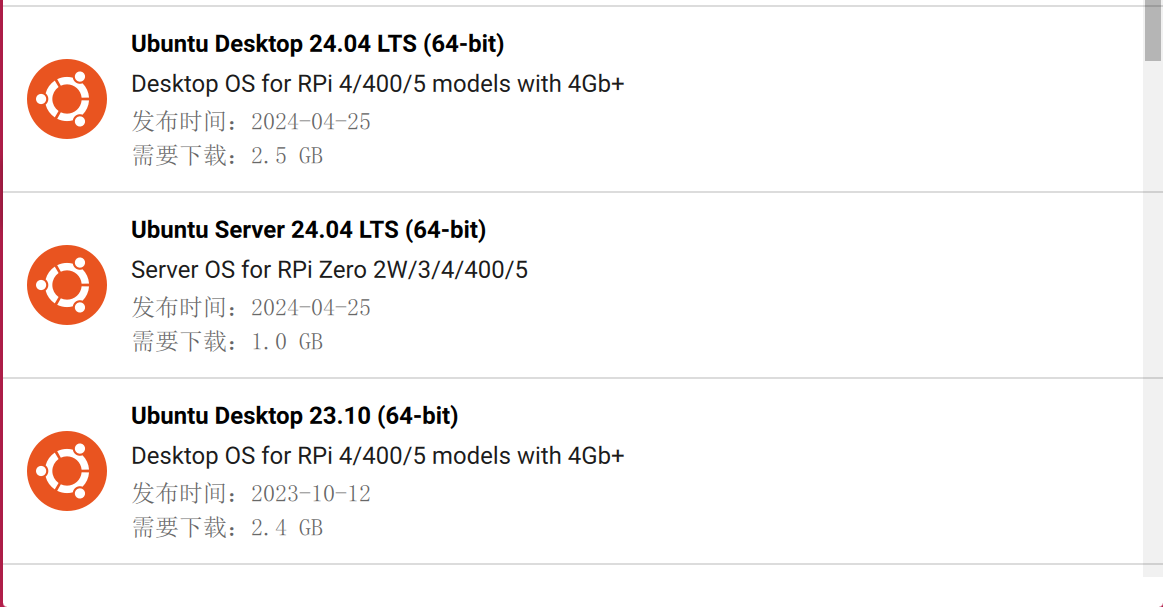
Or you can use this link to download the image file:
-
Step 9. Click CHOOSE STORAGE and select the connected eMMC drive
-
Step 10. Finally, click WRITE

Please wait a few minutes until the flashing process is complete.
- Step 11. Flip the Boot Mode switch back to the Normal mode position
Now you can skip to here
For MAC
You need to install homebrew before proceed the following steps.
Please open a terminal and type brew -v to check if you have setup the correct homebrew environment, you should see the version of the homebrew environment you have installed.
- Step 1. Clone the usbboot repository
git clone --depth=1 https://github.com/raspberrypi/usbboot
cd usbboot
- Step 2. Install libusb
brew install libusb
- Step 3. Install pkg-config
brew install pkg-config
- Step 4. Build using make
make
- Step 5. Run the binary
sudo ./rpiboot
-
Step 6. Connect reComputer R1000 to the your Mac computer via USB Type-C cable
-
Step 7. Download and Install Raspberry Pi Imager Application by visiting this link
-
Step 8. Open the Raspberry Pi Imager Application
- Step 9. Press CTRL + SHIFT + X on the keyboard to open Advanced options window
Here you can set a hostname, enable SSH, set a password, configure wifi, set locale settings and more
The system has preset a username and password. Please set the default username to "recomputer" and the default password to "12345678" when logging in. If you set different credentials and encounter issues, please reflash OS if your purchase the first batch of reComputer R1000.
- Step 10. Click CHOOSE OS and select your preferred OS
NOTE: You can select other OS such as 64-bit Ubuntu by navigating into Other general purpose OS
Or you can use this link to download the image file:
-
Step 11. Click CHOOSE STORAGE and select the connected eMMC drive
-
Step 12. Finally, click WRITE
Please wait a few minutes until the flashing process is complete.
- Step 13. Flip the Boot Mode switch back to the Normal mode position
Now you can skip to here
For Linux
We will use Git to obtain the rpiboot source code, so make sure Git is installed
- Step 1. Open a Terminal window and type the following to update the packages list
sudo apt-get update
- Step 2. Install Git by the following command
sudo apt install git pkg-config make gcc libusb-1.0-0-dev
- Step 3. Git might produce an error if the date is not set properly. Type the following to correct this
sudo date MMDDhhmm
NOTE: Where MM is the month, DD is the date, and hh and mm are hours and minutes respectively.
- Step 4. Clone the usbboot tool repository
git clone --depth=1 https://github.com/raspberrypi/usbboot
cd usbboot
- Step 5. Build and install the usbboot tool
make
-
Step 6. Connect reComputer R1000 to the PC via USB Type-C cable
-
Step 7. Run the usbboot tool and it will wait for a connection
sudo ./rpiboot
The result is shown as below:

- Step 8. Download snap
sudo apt install snap
- Step 9. Download rpi-imager
snap install rpi-imager
- Step 10. Open Raspberry Pi Imager software
rpi-imager
The result is shown as below:

- Step 11. Press CTRL + SHIFT + X on the keyboard to open Advanced options window
Set a hostname, set a password, configure wifi, set locale settings

Enable SSH

Here you can set a hostname, enable SSH, set a password, configure wifi, set locale settings and more
The system has preset a username and password. Please set the default username to "recomputer" and the default password to "12345678" when logging in. If you set different credentials and encounter issues, please reflash OS if your purchase the first batch of reComputer R1000.
- Step 11. Click CHOOSE OS and select your preferred OS
NOTE: You can select other OS such as 64-bit Ubuntu by navigating into Other general purpose OS
Or you can use this link to download the image file:
-
Step 12. Click CHOOSE STORAGE and select the connected eMMC drive
-
Step 13. Finally, click NEXT and YES

Please wait a few minutes until the flashing process is complete. The result is shown as below:

- Step 14. Flip the Boot Mode switch back to the Normal mode position
Install Drivers
Access reComputer R1000 via SSH
The following steps require some basic Linux command line knowledge, Please prepare yourself a cup of coffee and getting ready.
As following the above flashing OS steps, the reComputer R1000 should have SSH enabled with the hostname of raspberrypi.local.
Now please connect the Ethernet cable to the reComputer R1000 and a router which is on the same network as your host computer.
To test if your reComputer R1000 is on the same network with host computer, you can use ping raspberrypi.local
if you see the following output after the ping command which means both devices are on the same network:

For Windows
- Step 1. Open Command Prompt and type the following
- Step 2. Type yes for the prompt

- Step 3. Enter the password as follows
raspberry
- Step 4. If you have sucessfully logged into the Raspberry Pi OS, you will see the following output

For Mac/Linux
- Step 1. Open Terminal on the computer and type the following
# ssh username@hostname
ssh [email protected]
- Step 2. Type yes for the following message
ECDSA key fingerprint is SHA256:XXXXXXX.
Are you sure you want to continue connecting (yes/no/[fingerprint])?
- Step 3. When it asks for the password, type the following
# password for user
raspberry
- Step 4. If you have sucessfully logged into the Raspberry Pi OS, you will see the following output

Install reComputer R1000 drivers after flashing new Raspbian OS
reComputer R1000 comes with the necessary drivers pre-installed out-of-the-box so you don't need to install any additional drivers. However, if you flash new OS by yourself, you need to install the necessary drivers separately.
For install 32-bit OS driver, Please carefully follow the steps below:
The Operating System that pre-installed on reComputer R1000 is 64-bit, if you wish to install 32-bit OS please use the following method to install the DTS drivers.
Please follow the Access reComputer R1000 via SSH step, and then enter the following command:
echo arm_64bit=0 | sudo tee -a /boot/config.txt
Then continue the Install drivers after flashing new Raspbian OS process
- Step 1. Clone the following repo in the ssh shell you have connected to reComputer R1000 from the above steps
sudo apt install git -y
git clone --depth 1 https://github.com/Seeed-Studio/seeed-linux-dtoverlays
- Step 2. Enter the repo
cd seeed-linux-dtoverlays
- Step 3. Type the following to install the drivers
sudo ./scripts/reTerminal.sh --device reComputer-R100x
- Step 4. Reboot the reComputer R1000
sudo reboot
This process will ensure that your drivers are up to date before updating the firmware.
Note: For reComputer R1000 V1.0, it need to change the /boot/firmware/config.txt file after restarting and enter the following command:
sudo nano /boot/firmware/config.txt
Modify the final content of the file to:
  enable_uart=1
  dtoverlay=dwc2,dr_mode=host
  dtoverlay=vc4-kms-v3d
  dtoverlay=reComputer-R100x,uart2
Then restart:
sudo reboot
Tech Support & Product Discussion
Thank you for choosing our products! We are here to provide you with different support to ensure that your experience with our products is as smooth as possible. We offer several communication channels to cater to different preferences and needs.