reComputer R1000 and Modbus with Home Assistant
Introduction
In modern building management systems (BMS), integrating various protocols and devices is crucial for efficient monitoring and control. This guide focuses on leveraging the capabilities of Modbus communication protocols (Modbus TCP and Modbus RTU) with Home Assistant OS, using the powerful reComputer R1000, a Raspberry Pi-powered solution. Whether you're setting up a new system or enhancing an existing one, this guide will walk you through the process of connecting your Modbus devices to Home Assistant, ensuring seamless integration and control.
Getting Start
Before you start this project, you may need to prepare your hardware in advance as described here.
Hardware Preparation
| reComputer R1000 |
|---|
 |
Software Preperation
Before diving into the integration process, it's crucial to ensure that all necessary drivers and tools are installed. Proper installation of drivers is a prerequisite for seamless communication between Modbus RTU devices and Home Assistant. It is highly recommended to thoroughly study and install the required drivers before proceeding with this guide.
Additionally, if you haven't installed Home Assistant yet, please follow the Home Assistant installation guide to set it up on your reComputer R1000.
File Editor Add-on
While you can configure most of Home Assistant directly from the user interface under Settings, some parts require you to edit files such as configuration.yaml. This file contains integrations to be loaded along with their configurations. By adding code snippets to this configuration file, you can enable specific functionalities, including Modbus integration.
To get started, you need to install the File Editor add-on in Home Assistant:
- Open Home Assistant.
- Navigate to
Settings > Add-ons.

- Click on the
Add-on Store.

- Search for
File Editorand click on it.

- Click the Install button.
- Once installed, click on Start to launch the File Editor.
- Optionally, enable Show in Sidebar for quick access.

With the File Editor add-on, you can now edit the configuration.yaml file to add Modbus integration

Enabling Modbus TCP Integration
To enable the Modbus integration in Home Assistant, you need to add specific parameters to your configuration.yaml file. Below are the parameters and their descriptions that you will need to configure:
- name: The name of this hub. Must be unique.
- host: The IP address or name of your Modbus device, e.g.,
192.168.1.1. - port: The network port for communication.
- type: The type of Modbus connection. Options are tcp or serial.Here we used
tcp
To configure entities for your Modbus integration, you need to define various parameters for each entity. Below are the parameters required for setting up binary sensors: There are several entities. You can check on Offical modbus Home Assistant page.
- binary_sensors: A list of all binary sensors configured for this connection.
- address: The address of the coil/register.
- name: The name of the entity, which must be unique within the entity type.
- scan_interval: The update interval in seconds. Set scan_interval = 0 for no polling. Entities are read shortly after startup and then according to scan_interval.
- slave: Identical to device_address.
- input_type: The type of request. Options are coil, holding, or input.
Example :
modbus:
  - name: modbus_hub
    type: tcp
    host: IP_ADDRESS_of_PLC
    port: 502
    binary_sensors:
      - name: Relay_1
        address: 8193
        slave: 1
        input_type: coil
        scan_interval: 1
      - name: Relay_2
        address: 8194
        slave: 1
        input_type: coil
        scan_interval: 1

It is neccesary save and restart HA after changing configuration.yml file
Enabling Modbus RTU Integration
To enable Modbus RTU integration in Home Assistant, you need to add the following parameters to your configuration.yaml file:
- name: The name of this hub. Must be unique.
- type: The type of Modbus connection. Here, it should be serial.
- port: The serial port or USB device where your Modbus device is connected to your Home Assistant host. We found that it is
/dev/ttyAMA30 - baudrate: The speed of the serial connection.
- method: The method of connection to Modbus. Options are rtu and ascii.
- parity: The parity of the data bytes. Options are E (Even), O (Odd), N (None).
- bytesize: The data size in bits of each byte. Typically 8.
- stopbits: The stop bits of the data bytes.
To configure entities for your Modbus RTU integration, you need to define various parameters for each sensor. Below are the parameters required for setting up sensors:
- sensors: The Modbus sensor allows you to gather data from Modbus registers.
- name: The name of the entity, which must be unique within the entity type.
- address: The address of the register.
- slave: Identical to device_address.
- input_type: The Modbus register type for the sensor. Options are holding or input.
- scale: The scale factor.
- device_class: The type/class of the sensor to set the icon in the frontend.
- unit_of_measurement: The unit to attach to the value.
Example:
modbus:
  - name: modbus_hub2
    type: serial
    port: /dev/ttyAMA30
    baudrate: 9600
    bytesize: 8
    method: rtu
    parity: N
    stopbits: 1
    sensors:
      - name: Room Temperature
        address: 1
        input_type: input
        slave: 1
        scale: 0.01
        device_class: temperature
        unit_of_measurement: °C
      - name: Room Humidity
        address: 2
        input_type: input
        slave: 1
        scale: 0.01
        unit_of_measurement: '%'
        device_class: humidity

It is neccesary save and restart HA after changing configuration.yml file
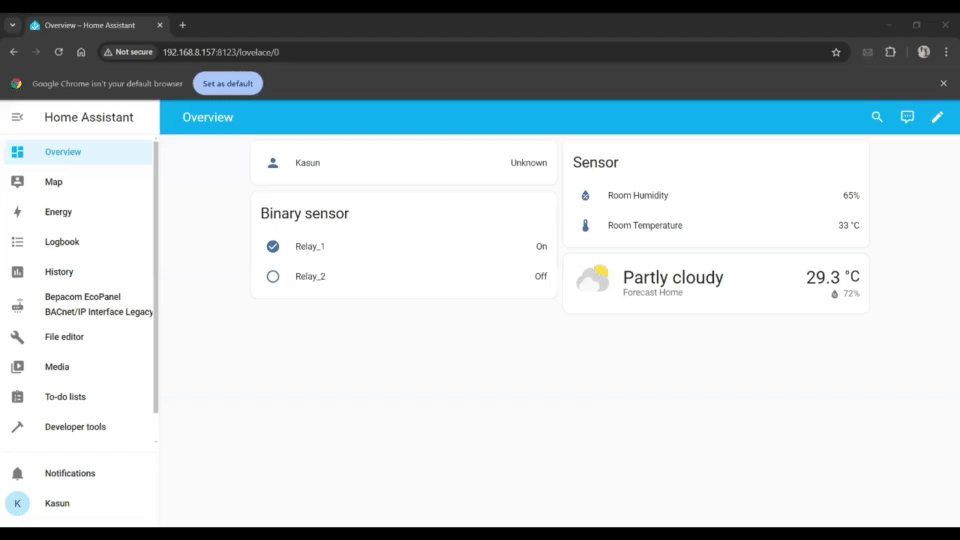
Finally you will be able to see the working phenomina.
Tech Support & Product Discussion
Thank you for choosing our products! We are here to provide you with different support to ensure that your experience with our products is as smooth as possible. We offer several communication channels to cater to different preferences and needs.