Getting Started with reSpeaker XVF3800 44mm 4-Mic Array
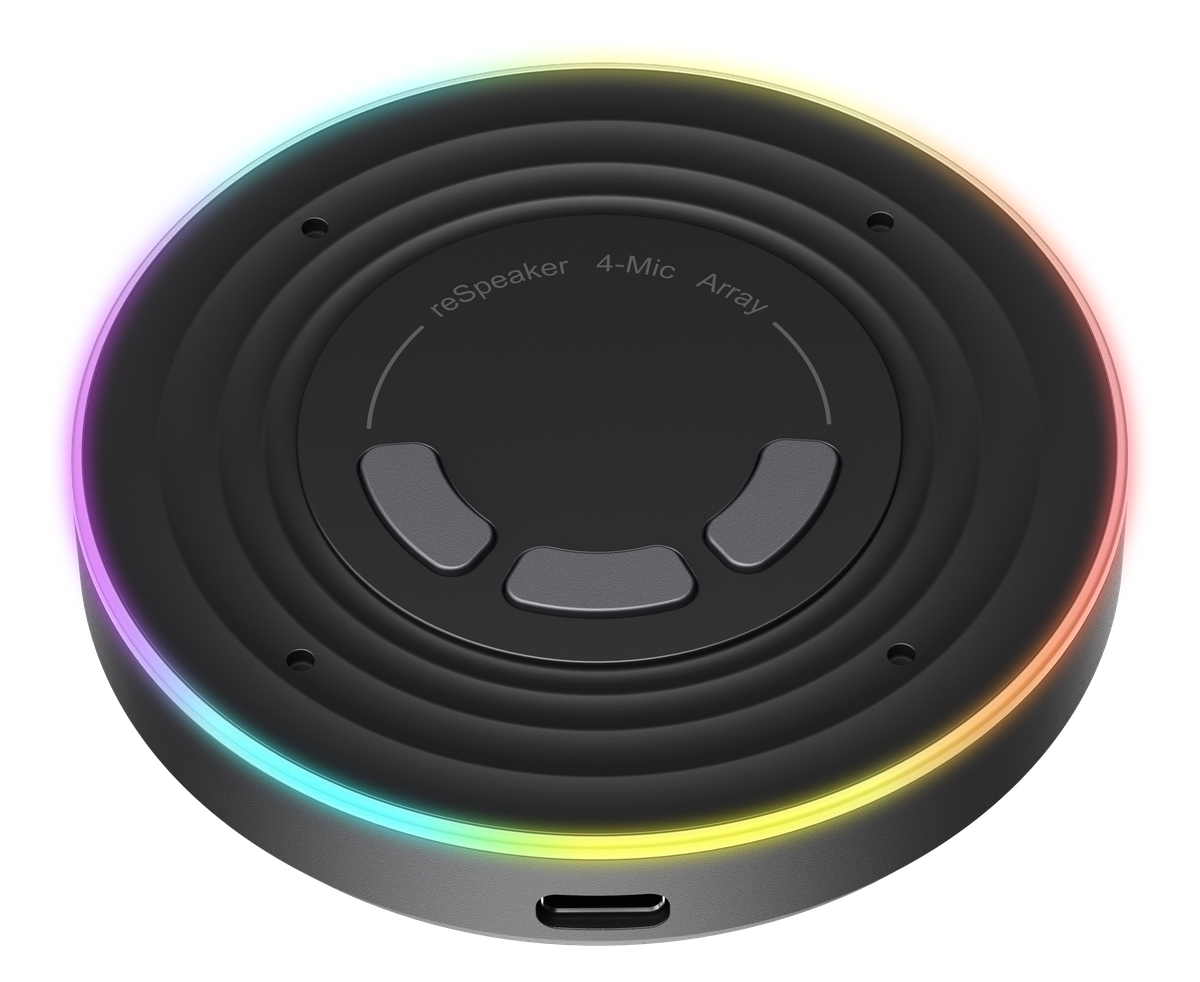
The reSpeaker XVF3800 4-Mic Array 44mm is a compact, circular voice-processing module built around the XMOS XVF3800 audio processor, designed for speech recognition, voice control, smart assistants, and robotics. Four PDM MEMS microphones are arranged in a ring with a 44 mm pitch, giving 360° far-field capture in a board that is noticeably smaller than the 66 mm-pitch reSpeaker XVF3800 Circular 4-Mic Array, while keeping the same XMOS processing platform and the same audio quality.
The module runs the full XVF3800 voice pipeline — Acoustic Echo Cancellation (AEC), Automatic Gain Control (AGC) with a 60 dB range, multi-channel beamforming, Direction of Arrival (DoA) detection, Voice Activity Detection (VAD), dynamic noise suppression, and de-reverberation — all with user-adjustable parameters. A ring of 24 WS2812 RGB LEDs, three physical buttons (volume up, volume down, mute), and a hardware mute indicator make it usable out of the box, while USB Audio Class 2.0 and I2S modes cover both plug-and-play and embedded integration. An optional XIAO ESP32-S3 Plus can be soldered directly onto the board, and an optional speaker expansion adds a 5 W speaker with a 1200 mAh battery.
Product Lineup
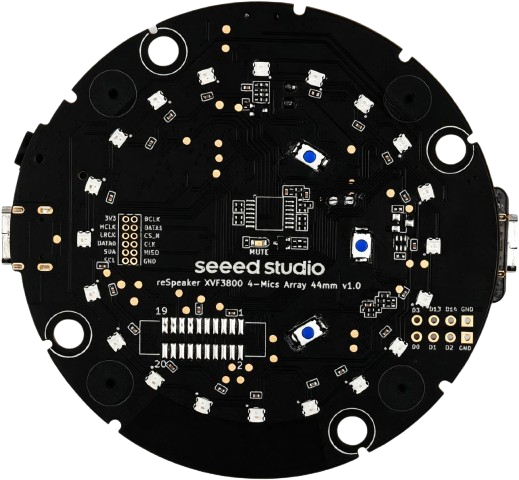 reSpeaker XMOS XVF3800 4 Mics Array 44mm | reSpeaker XMOS XVF3800 4 Mics Array 44mm With Case | 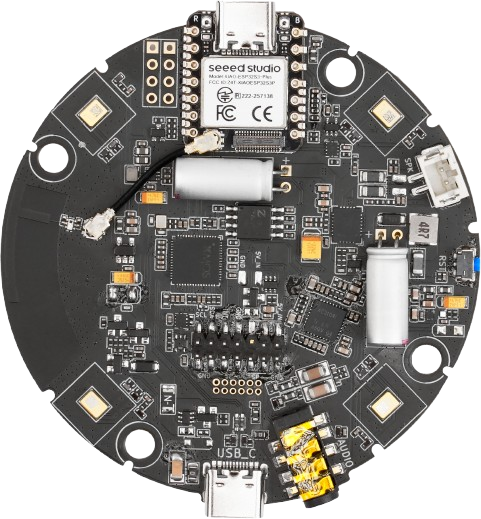 reSpeaker XMOS XVF3800 4 Mics Array 44mm With XIAO ESP32S3 Plus |
reSpeaker XMOS XVF3800 4 Mics Array 44mm With Case and XIAO ESP32S3 Plus | 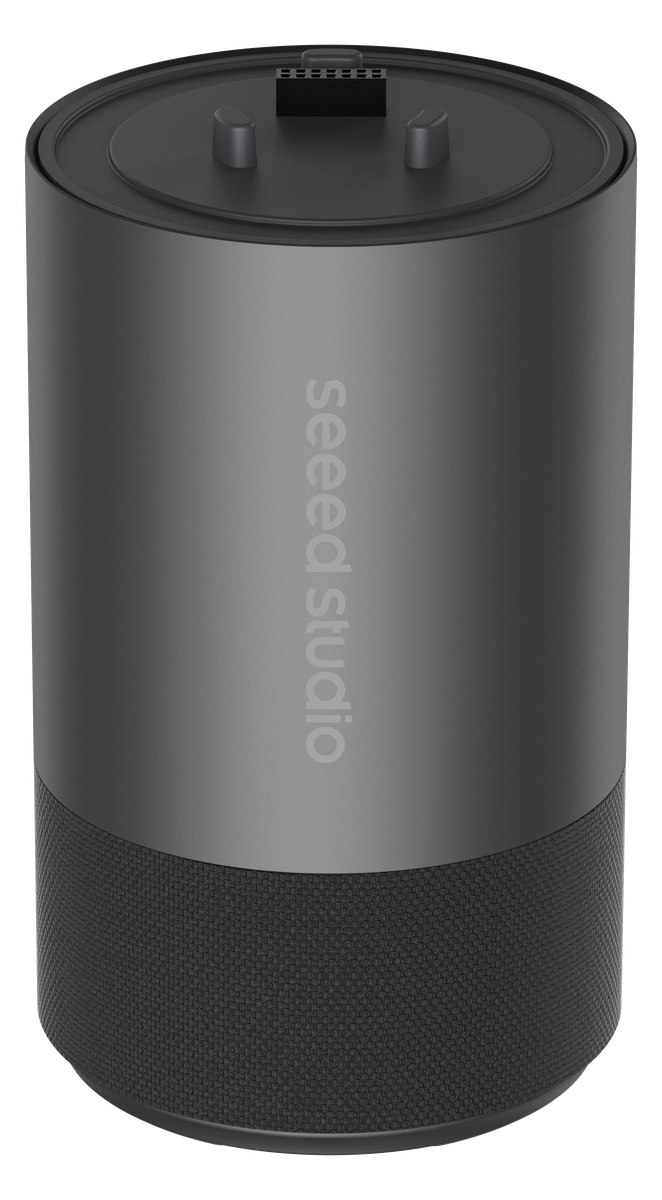 reSpeaker Sound Base |
Features
-
Compact 44 mm design: the microphone pitch is reduced from 66 mm to 44 mm, shrinking the board diameter so it fits into space-constrained products.
-
XMOS XVF3800 audio processing: AEC, AGC (60 dB range), multi-channel beamforming, DoA, VAD, dynamic noise suppression, and de-reverberation, with adjustable parameters.
-
High audio quality: designed to be on par with the existing 66 mm-pitch reSpeaker XVF3800 Circular 4-Mic Array.
-
Dual operating modes: USB Audio Class 2.0 for plug-and-play with PCs and SBCs, or I2S/INT-Device mode for embedded hosts — selected by firmware.
-
Flexible control and updates: configuration over USB or I2C, with USB DFU and I2C DFU support depending on the flashed firmware.
-
Unique device identification: read and write a UUID/SN for multi-device management, identification, and data tracking.
-
Programmable RGB feedback: 24 × WS2812 LEDs show device status, boot animation, and DoA direction; the mute state is shown by a dedicated red LED.
-
Three customizable buttons: volume up, volume down, and mute by default when wired to the XMOS processor, with a switch to route them to the XIAO instead.
-
Speaker ready: onboard Class D amplifier, a vertical JST speaker connector for a 5 W 4 Ω speaker, a 3.5 mm AUX jack, and solder pads for a hard-wired speaker.
-
Broad platform compatibility: USB hosts such as Windows, macOS, and Raspberry Pi OS, plus I2S integration with XIAO, ESP32, and Arduino-class boards.
Hardware Overview
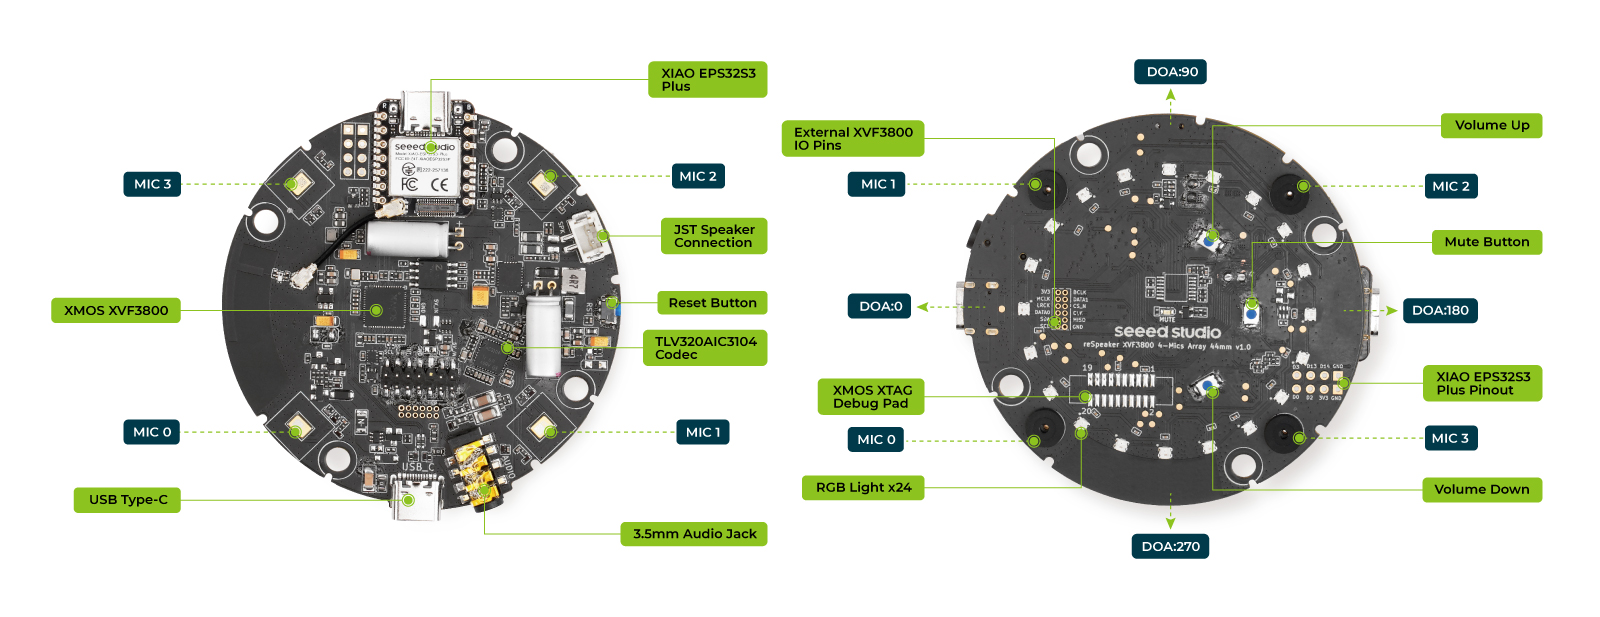
The front of the board carries the four microphones and the 24 RGB LEDs on the outermost ring, so both the acoustic ports and the light ring stay visible once the board is mounted in an enclosure. The back carries the USB-C connector, the 3.5 mm jack, the JST speaker connector, the reset button, the XIAO ESP32-S3 Plus footprint, and all breakout pads.
Main Components
| Component / Feature | Description |
|---|---|
| Main Audio Processor | XMOS XVF3800 (firmware v3.2.1) for AEC, beamforming, noise suppression, DoA detection, and the rest of the voice pipeline |
| Microphone Array | 4 × PDM MEMS microphones in a circular layout with a 44 mm pitch, 360° far-field capture |
| Audio Codec | TLV320AIC3104, audio conversion and DAC output |
| Amplifier | LM48511 Class D audio amplifier |
| RGB LEDs | 24 × WS2812 individually addressable RGB LEDs for status and audio activity |
| Customizable Buttons | Three physical buttons, defaulting to volume up, volume down, and mute when connected to the XVF3800 |
| Button Connection Selection | Switch that routes the three buttons between the XVF3800 and the XIAO module pads |
| Mute Indicator LED | Red LED that lights while the microphones are muted; audio is unmuted at power-on |
| Safe Mode Entry | Hold the mute button while applying power to boot the recovery firmware |
| Onboard Antenna | Supports wireless communication when a compatible XIAO wireless module is fitted |
| USB Type-C Port | 5 V power input plus USB data for UAC audio, control, and DFU |
| USB Power Delivery (USB PD) | USB-C power input arrangement for running the board and driving a 5 W speaker |
| 3.5 mm AUX Jack | Side-mounted headphone / line output from the onboard DAC |
| Speaker Connector | Vertical JST connector for a 4 Ω speaker rated 5 W or higher, with solder pads retained for a wired speaker |
| External Power Supply Pads | Alternative power input for the whole system |
| Debug Interface | XTAG4-compatible pads for XMOS programming and debugging, no connector soldered |
| XVF3800 I2C Interface | Exposes the XVF3800 I2C pins for control and configuration in INT-Device mode |
| XVF3800 I2S Interface | Exposes the XVF3800 I2S pins for audio to an external host in INT-Device mode |
| Power and Ground Headers | 5 V and GND breakout for external integration |
| XVF3800 GPIO Pads | Additional XVF3800 I/O for external control |
| XIAO ESP32-S3 Plus Footprint | Solder-on module position with I2S, I2C, reset, button, and LED routing |
| IPEX Antenna Connector | Feeds the onboard antenna to the XIAO antenna interface with a suitable RF cable |
| Mounting Holes | Fixing holes matched to the enclosure |
XIAO ESP32-S3 Plus Support
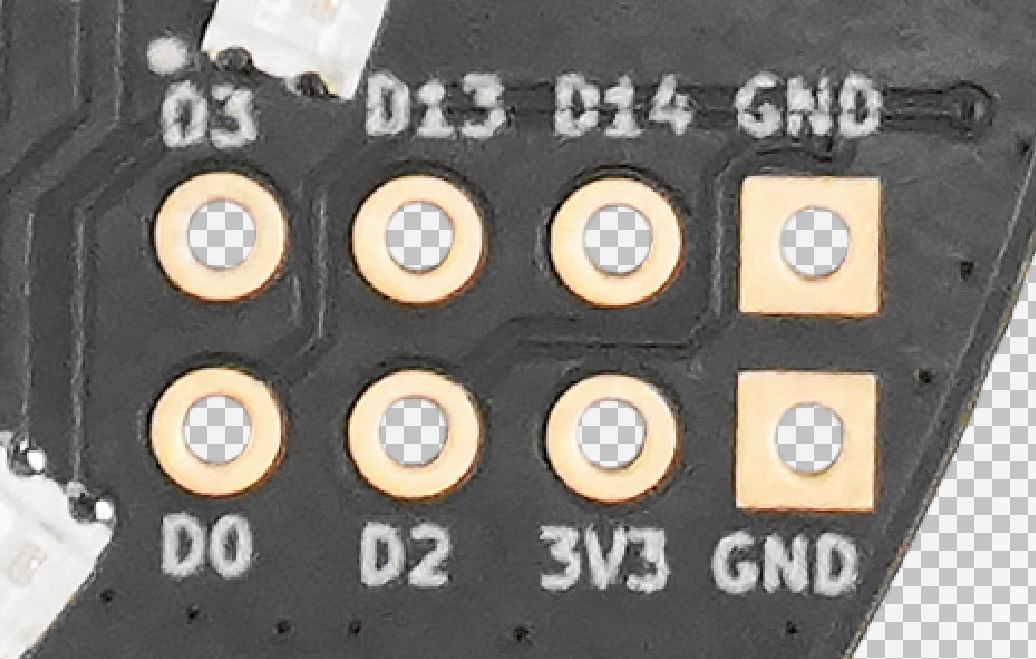
The XIAO ESP32-S3 Plus can be soldered directly onto the back of the board. When it is fitted, it is wired to the XVF3800 and to the onboard buttons and LEDs:
| Feature | Description |
|---|---|
| XIAO ESP32-S3 Plus Support | Solder a XIAO ESP32-S3 Plus module directly onto the array for integrated voice processing and application development |
| XVF3800 Communication | I2S for recording and playback with shared BCLK, MCLK, and LRCLK, plus I2C for XVF3800 control and configuration |
| XVF3800 Reset Control | An RST-related GPIO so the XIAO can reset the XVF3800 in hardware |
| Flexible Button and LED Routing | Switch the onboard buttons and LEDs between the XVF3800 and the XIAO GPIO pads for custom controls and feedback |
| Expanded GPIO Access | Remaining XIAO I/O on labeled pads for sensors, peripherals, and application hardware, aligned with the XVF3800 I/O area |
| External Antenna Connection | IPEX connector to link the onboard antenna to the XIAO antenna interface with an RF feeder cable |
reSpeaker Sound Base (Speaker Expansion)
The speaker expansion turns the microphone array into a standalone voice terminal. It combines a 5 W, 4 Ω speaker, a 1200 mAh rechargeable battery, charging and power-management circuitry, a USB-C charging port, and a physical power switch in a modular enclosure that clips or slides onto the bottom of the array housing.
- The enclosure can be detached so the battery and speaker can be replaced by the user.
- The exposed XMOS I/O connector carries speaker output, 5 V power, and battery-level signals between the two boards.
- A charging LED ring shows the battery percentage while charging and stays off when no battery is connected.
- The switch only controls the output; charging continues with the switch off.
Pinout
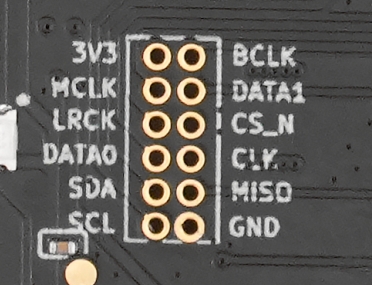
The XVF3800 I/O area breaks out the buses needed for INT-Device operation and for the speaker expansion. Follow the silkscreen for the exact pad order on your revision.
| Signal | Description |
|---|---|
| 3V3 | 3.3 V rail for external logic |
| GND | Ground |
| MCLK | I2S master clock |
| BCLK | I2S bit clock |
| LRCK | I2S left/right (word) clock |
| DATA0 | I2S data, record path |
| DATA1 | I2S data, playback path |
| SDA / SCL | I2C control bus for the XVF3800 |
| CS_N / CLK / MISO | SPI signals for compatible peripherals |
| Speaker pins | Speaker output for an external speaker, shared with the onboard JST connector |
The XIAO footprint additionally exposes the remaining module I/O on labeled pads (D0, D2, D3, D13, D14, 3V3, GND), so peripherals can be wired without a separate carrier board.
GPIO Overview
The XVF3800 exposes configurable GPIO for button sensing, volume, mute, amplifier enable, LED power, and peripheral communication.
| Pin Name | Function | Description |
|---|---|---|
| X1D09 | Mute Button Status (GPI) | Reads the mute button state; high when released |
| X1D13 | Audio Up | Receives the volume-up button signal |
| X1D34 | Audio Down | Receives the volume-down button signal |
| X0D11 | I2C Initialize | Used for I2C initialization and related control |
| X0D30 | Mute LED / Mic Mute Control | Drives the mute indicator LED and the microphone mute function |
| X0D31 | Amplifier Enable | Enables or disables the audio amplifier |
| X0D33 | WS2812 LED Power Control | Controls power to the WS2812 RGB LED circuit |
| X0D39 | SPI MOSI | SPI master-out, slave-in data for compatible peripherals |
Getting Started
Hardware Preparation
- USB Type-C cable
- Host computer, or a Raspberry Pi
- Optional: 5 W 4 Ω speaker for playback
- Optional: XIAO ESP32-S3 Plus for wireless / embedded operation
Software Preparation
- Audacity for recording and playback tests
- dfu-util for firmware updates
- Python 3 with
pyusbfor parameter tuning
Out of Box Usage
To ensure optimal voice pickup and correct operation of the audio algorithms, point the microphone ports (mic inlet / sound holes) on the back of the device toward the sound source. The microphone port is on the side printed with the Seeed Studio logo.
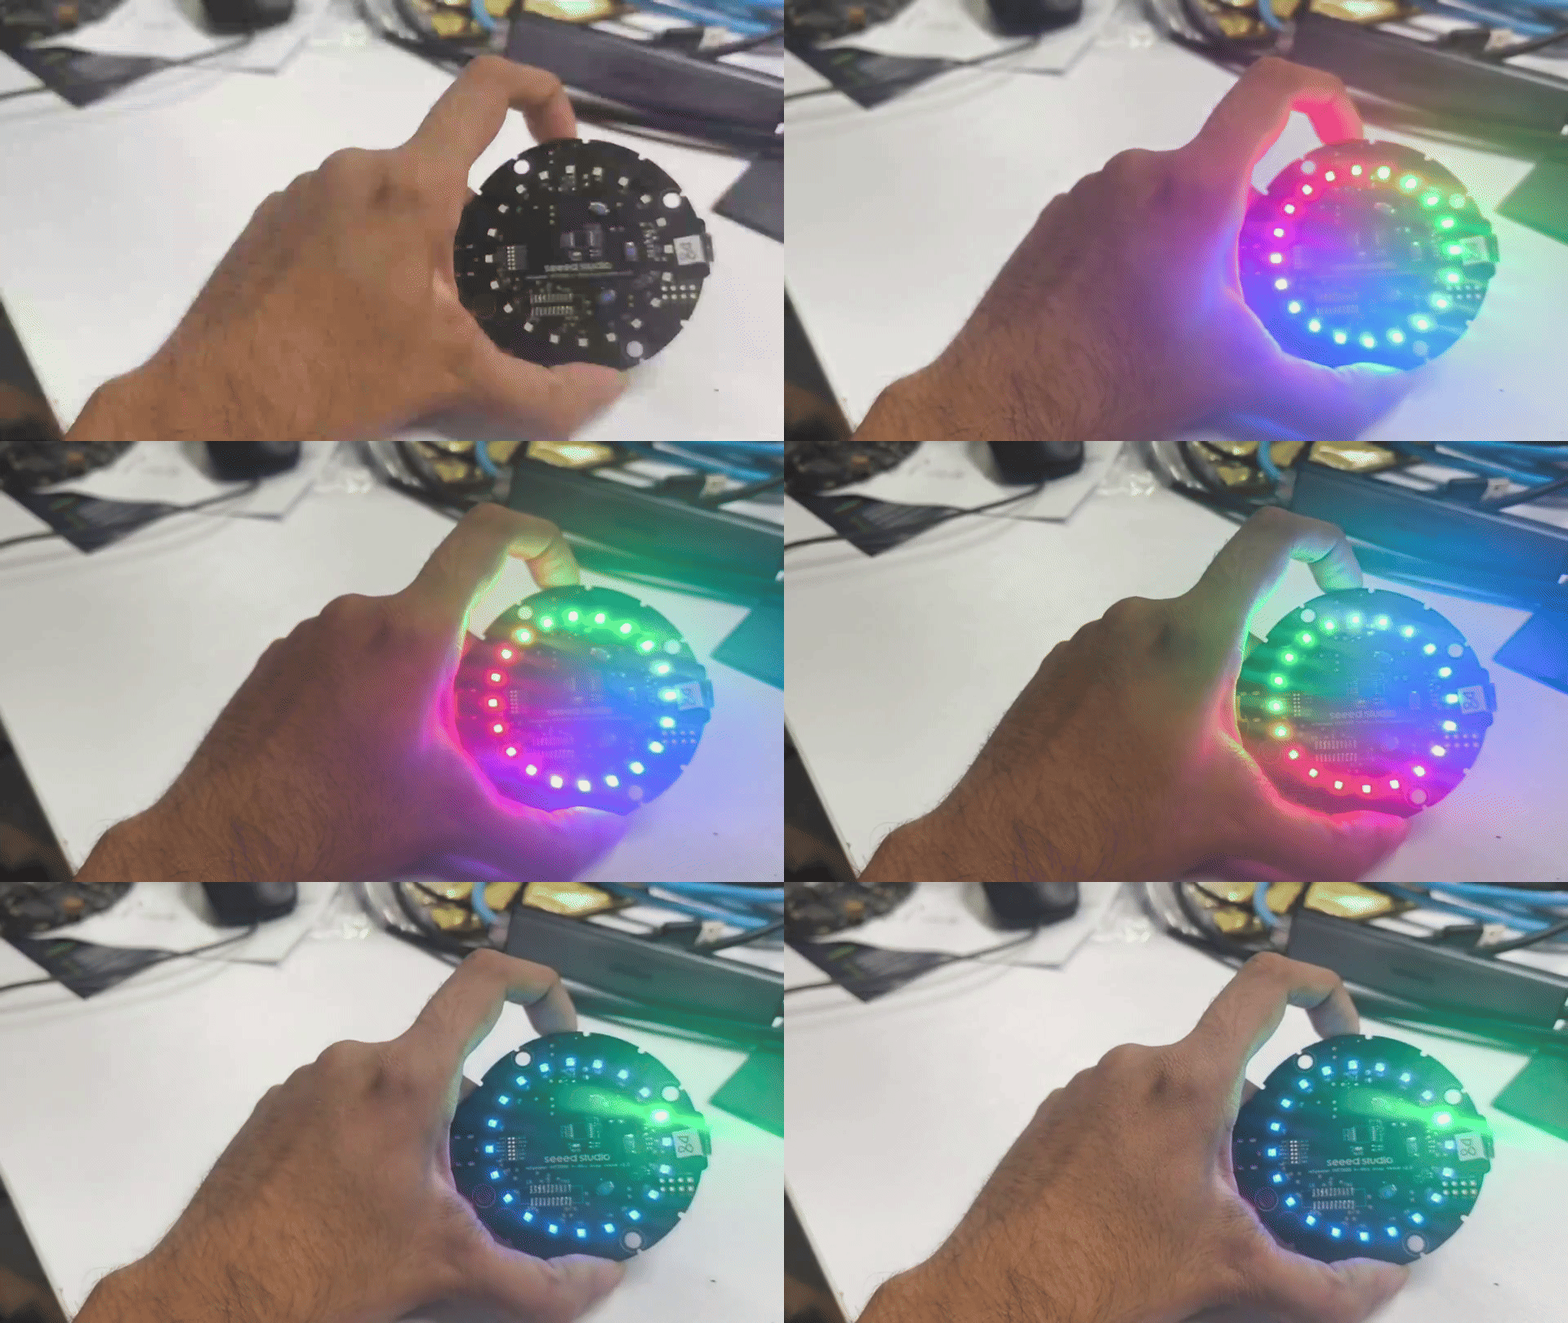
DoA (Direction of Arrival)
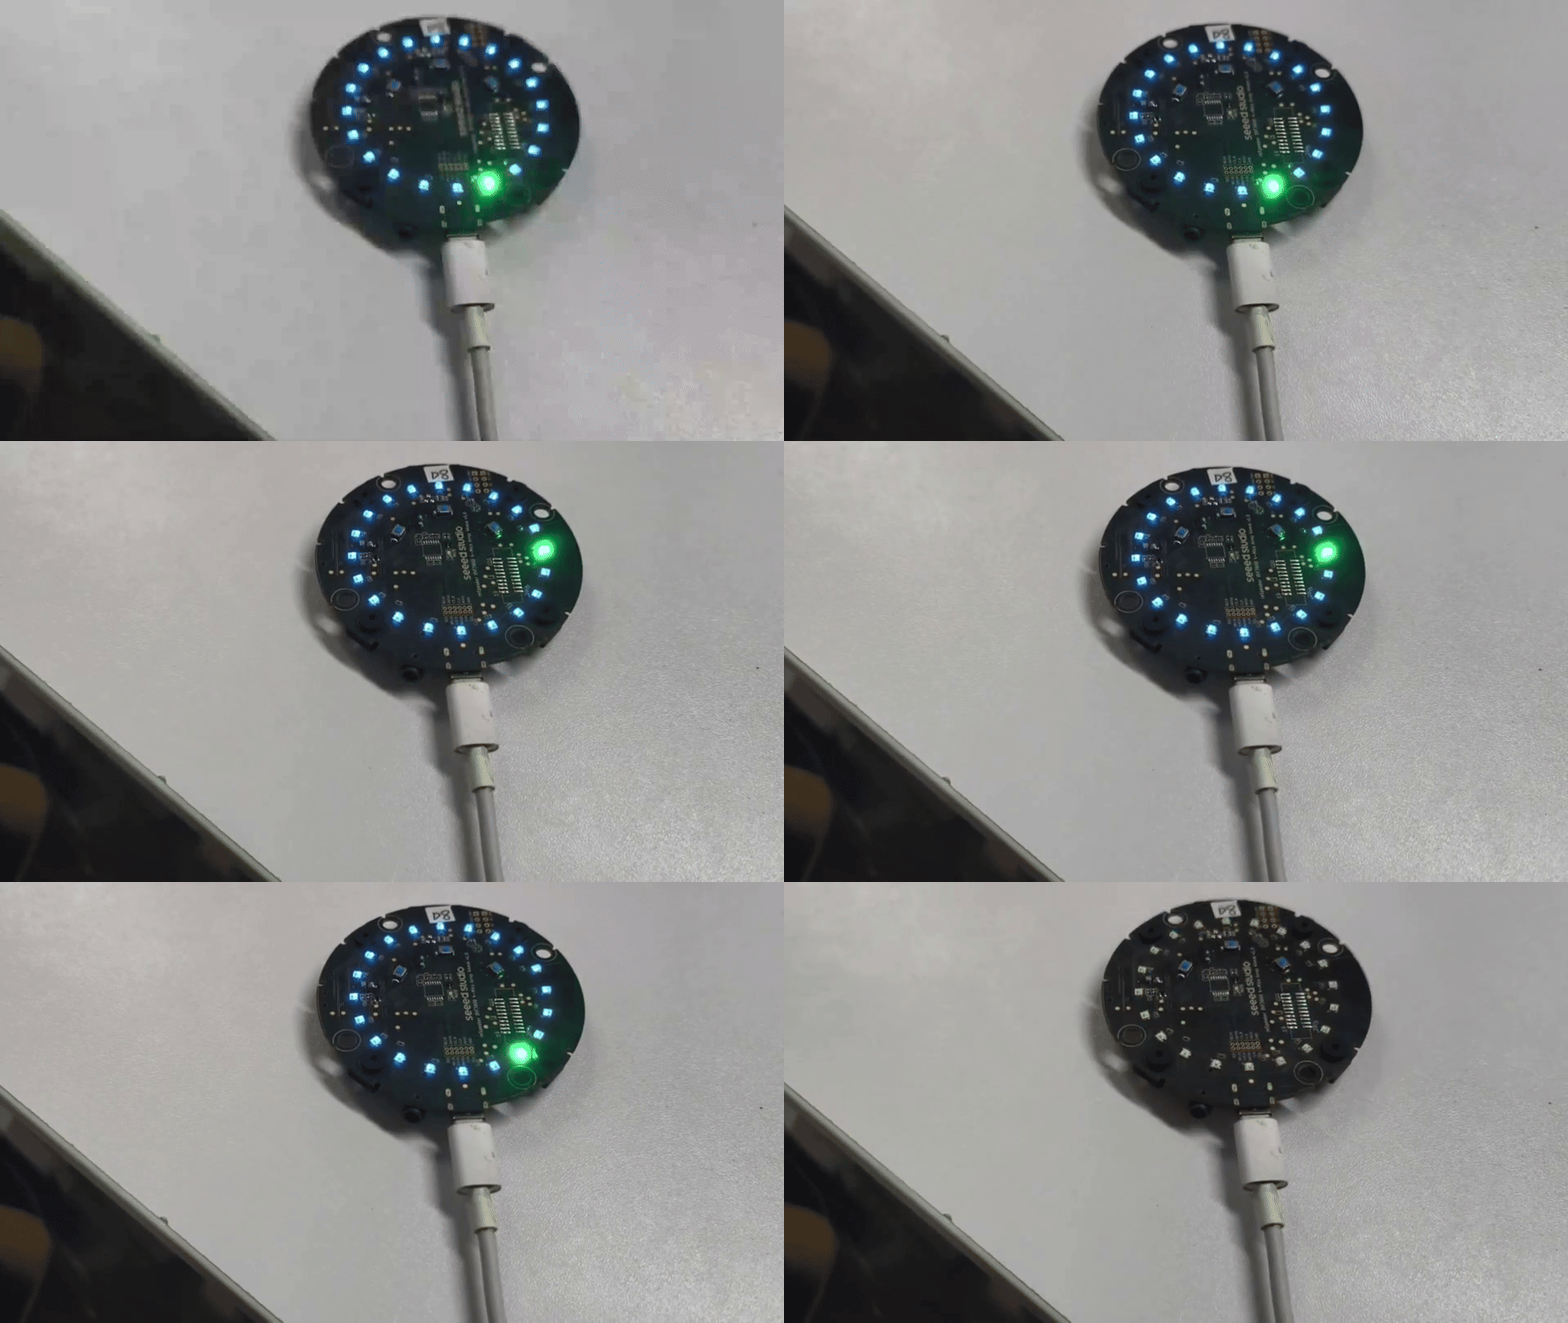
The LED ring follows the direction of the incoming voice, so you can see the detected angle without any software. The DoA value is also readable over USB/I2C for your own application.
Mute Button
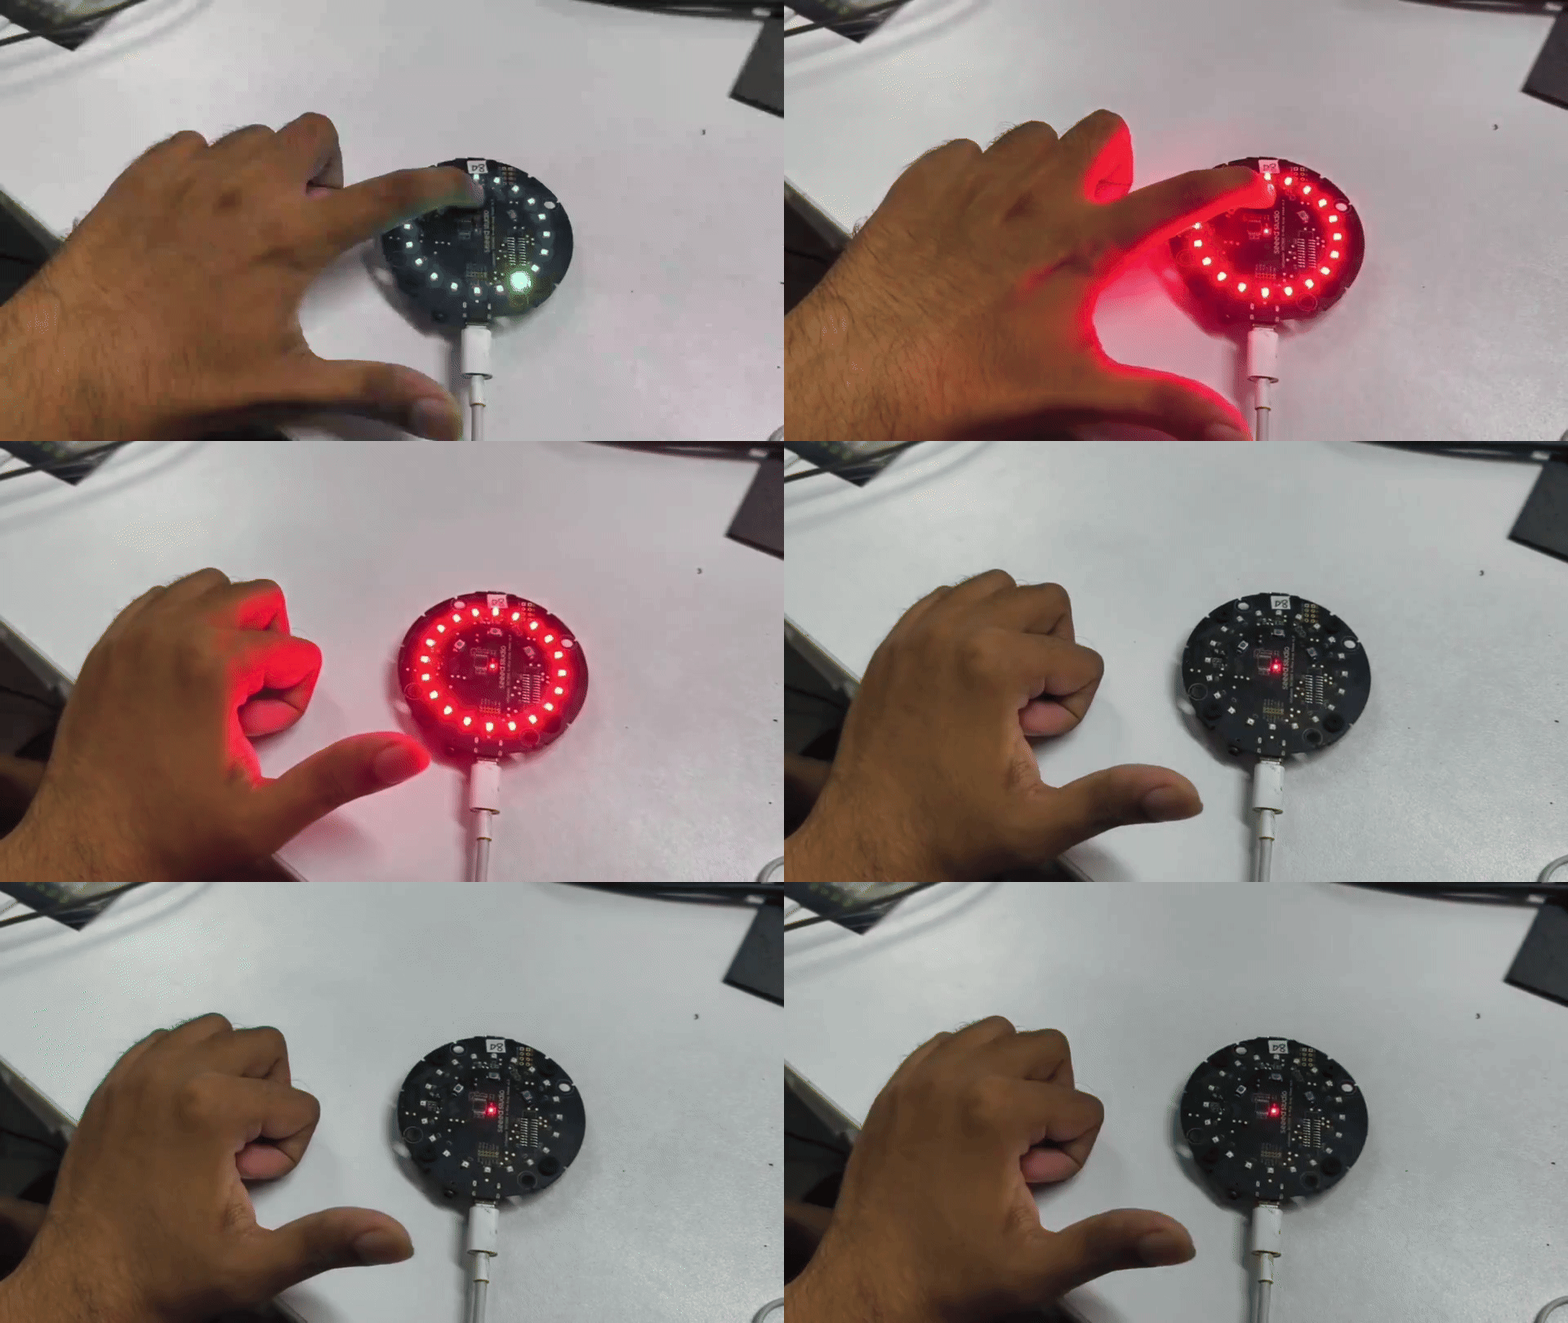
The mute button temporarily disables capture from the microphone array.
- The microphones are muted, so external voices are no longer captured or processed.
- Red LED lights up while mute is active.
- No audio input is sent to the host.
- Pressing the button again unmutes the array. The device boots unmuted.
Volume Up / Down
The two remaining buttons adjust the playback volume by default when they are routed to the XVF3800. They are one-shot controls: each press steps the volume once. The same level can be set from the host with the Python control tool or the OS mixer.
Reset Button
The reset (RST) button provides a hardware reset of the XVF3800. Pressing it restarts the chip and reinitializes the system from the beginning, exactly like a full power cycle.
Speaker Connection
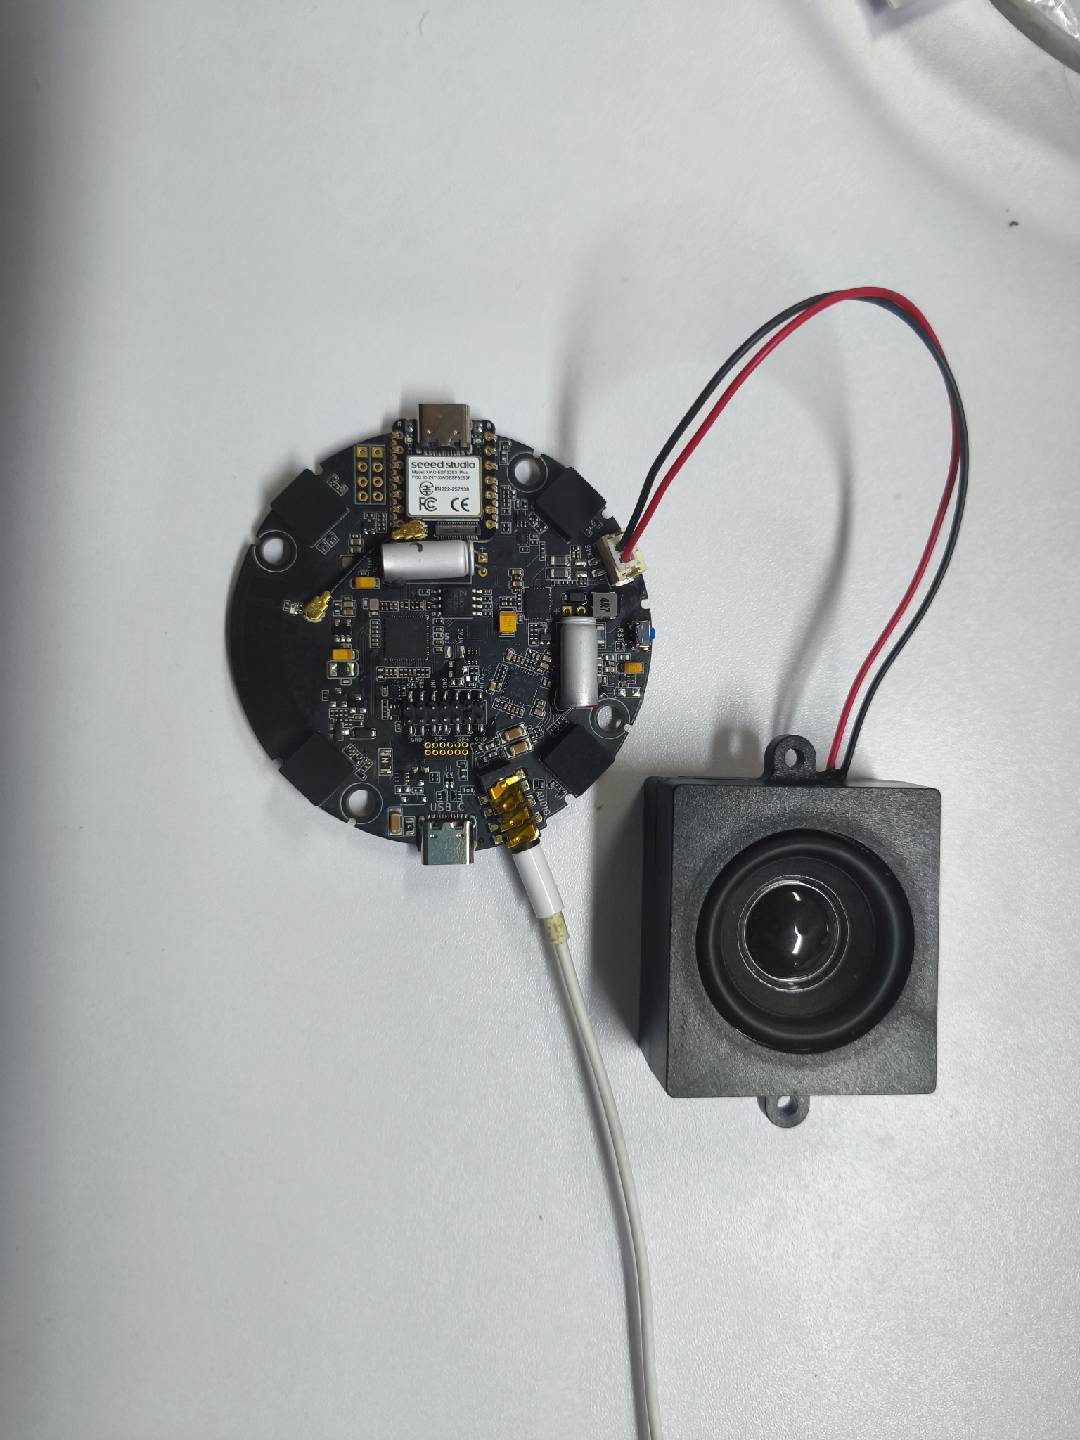
You can connect a speaker through the onboard JST connector or the 3.5 mm AUX jack, depending on your audio output preference. Use the JST connector with a 4 Ω, 5 W speaker to drive it from the onboard LM48511 amplifier.
Safe Mode
Safe Mode is a recovery mode that allows you to flash firmware over USB DFU or I2C DFU. Use it if you previously flashed the I2S firmware and want to switch back to USB firmware, or if the board no longer enumerates.
| Firmware | USB DFU | I2C DFU |
|---|---|---|
| USB firmware | Yes | No |
| I2S firmware | No | Yes |
| Safe Mode firmware (Factory partition) | Yes | Yes |
When to use Safe Mode
- The firmware is not working properly (USB not detected, LED not behaving as expected).
- You need to re-flash but the current firmware does not respond.
- You flashed the wrong firmware and want to recover the board.
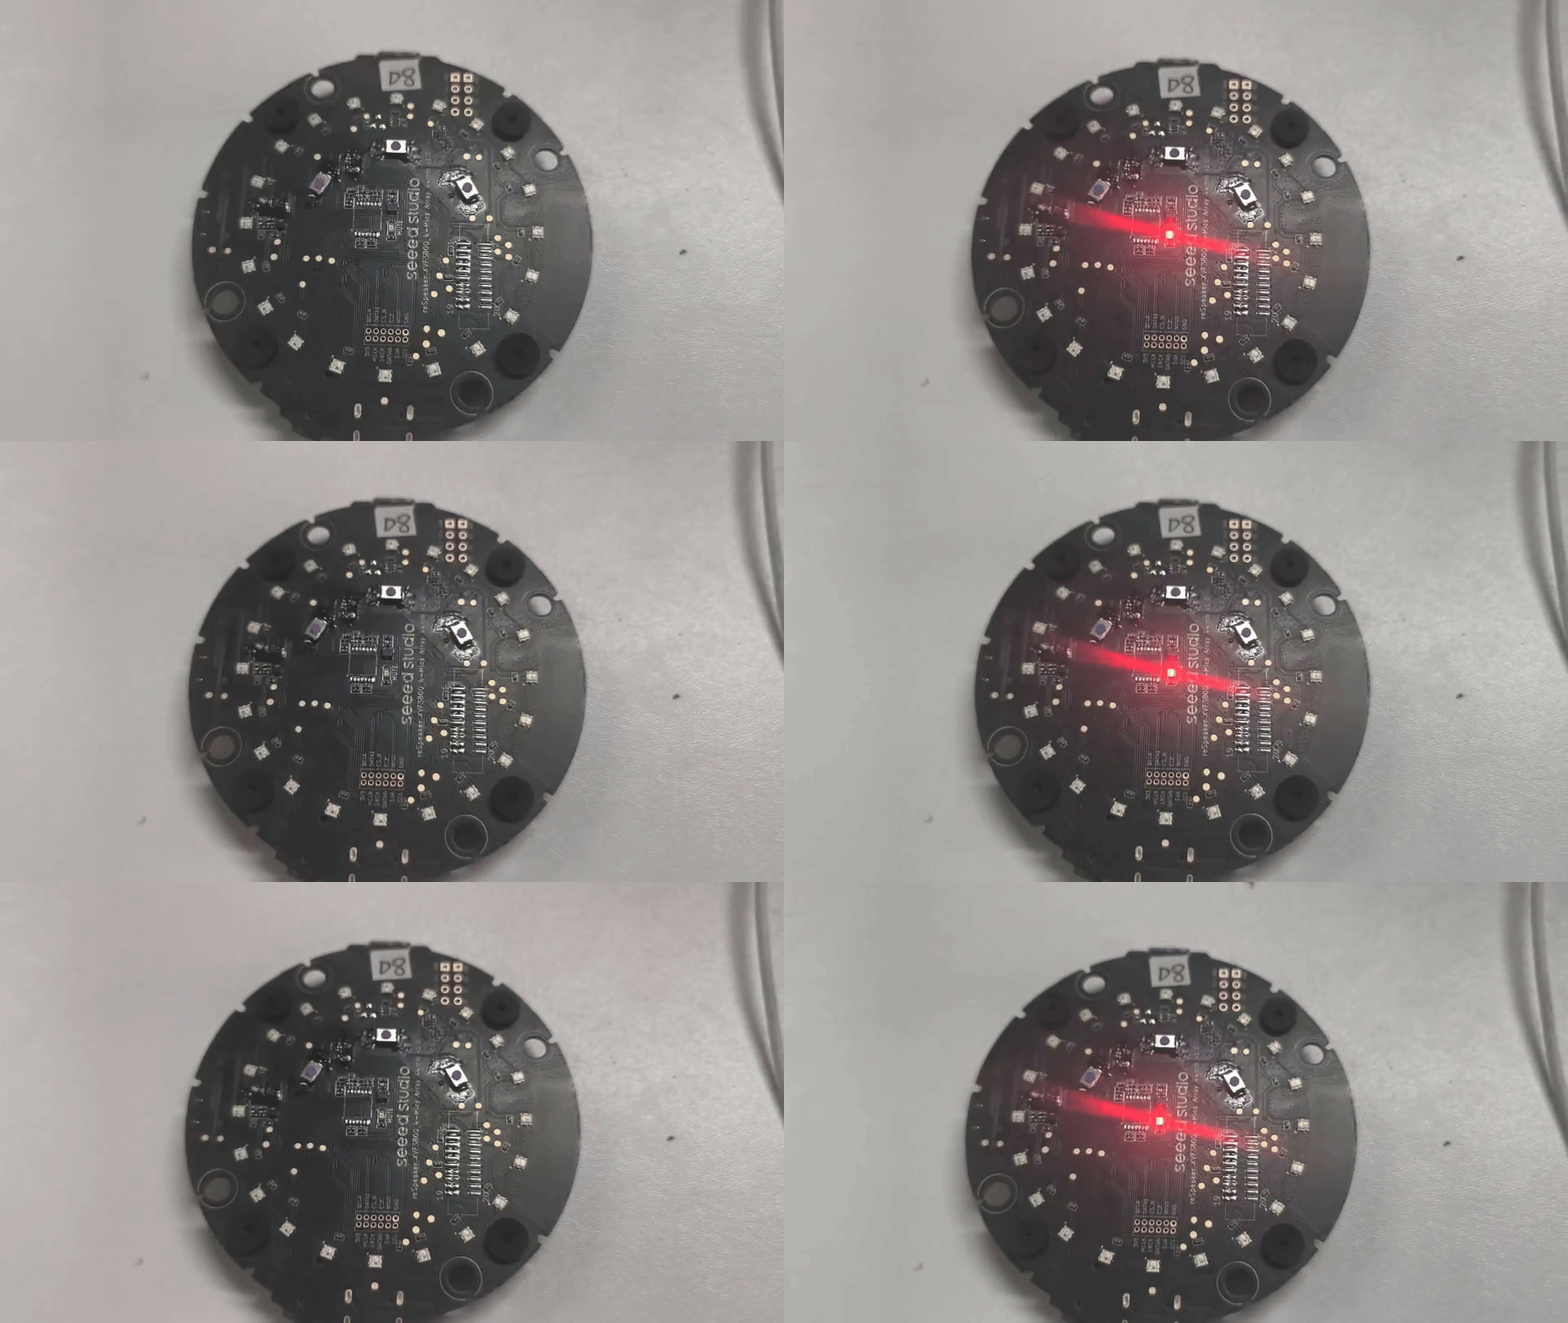
How to enter Safe Mode
- Power the device off completely.
- Press and hold the Mute button.
- While holding it, reconnect the power.
- The red LED starts blinking — the device is now running the Safe Mode firmware from the Factory partition.
Update Firmware
Two firmware images are provided in the official GitHub repository:
- USB firmware for host systems such as Windows, Linux, and macOS
- I2S firmware for microcontroller hosts such as the XIAO ESP32-S3 Plus
Do not use "Save as" to download the firmware files from GitHub — the binaries will be corrupted. Clone the repository, or use Download ZIP to get the whole repository with all included files.
Repository: reSpeaker_XVF3800_4MIC_44mm
USB Firmware
The USB firmware enumerates as a UAC 2.0 sound card and is intended for Windows, Linux, and macOS hosts.
| Firmware Image | USB Audio Profile |
|---|---|
respeaker_44mm_usb_c48k2ch_v1.0.0.bin | 48 kHz, 2-channel USB audio |
The firmware directory does not ship a USB Audio Class descriptor dump. After flashing, verify the formats reported by the host before configuring your recording application — do not assume a sample width or extra sample-rate/channel configurations without confirming them from the device descriptors.
I2S Firmware
The I2S firmware is used when the array is connected to a microcontroller host such as the XIAO ESP32-S3 Plus. Audio is transmitted over I2S, and the XVF3800 is controlled over I2C.
| Firmware | Channels | Notes |
|---|---|---|
respeaker_44mm_i2s_c48k2ch_v1.0.0.bin | 2 | Processed 2-channel output: Channel 0 = Conference, Channel 1 = ASR |
To flash the XMOS firmware, connect the board to your PC with a USB cable. Use the XMOS USB-C port, located near the 3.5 mm audio jack.
Install DFU Util
dfu-util is a command line tool for Device Firmware Upgrade over USB.
- Windows
- macOS
- Linux
-
Download
dfu-util-0.11-binaries.tar.xzand extract it, for example toD:\dfu-util-0.11-binaries\win64\ -
Add the path to
dfu-util.exeto your systemPathvariable:My Computer > Properties > Advanced > Environment Variables > Path -
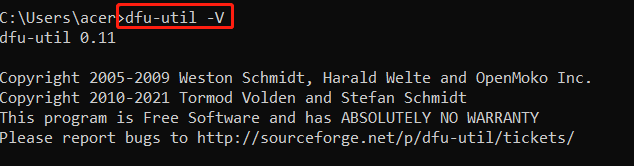
Open Command Prompt (
cmd) and verify the installation:
dfu-util -V
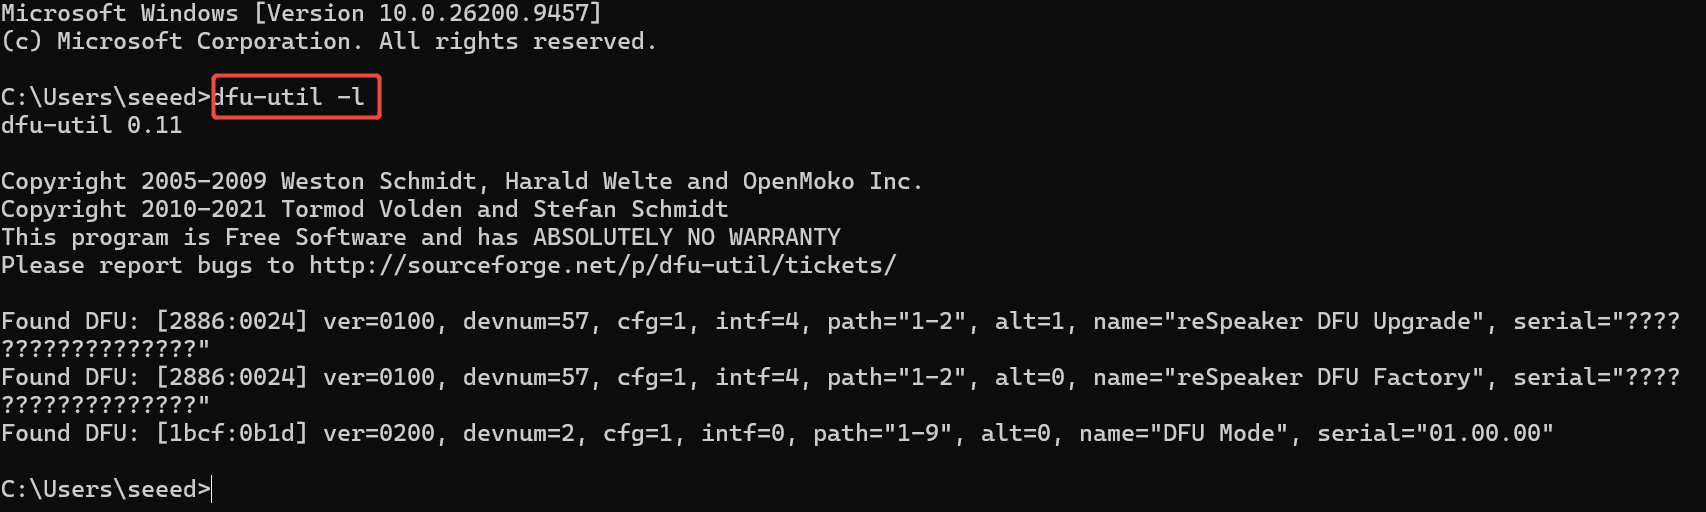
- Connect the reSpeaker XVF3800 44mm and check that the device is detected:
dfu-util -l
If you get:
Cannot open DFU device 2886:0024 ... (LIBUSB_ERROR_NOT_SUPPORTED)continue with the driver installation below.
- Install Zadig
- Open Zadig →
Options > List All Devices - Select
reSpeaker 3800 44 mmorreSpeaker XVF3800 4-Mic Array 44mm - Install the WinUSB driver
- Power-cycle the device
- Run
dfu-util -lagain to confirm detection
- Open Zadig →
- Install dfu-util with Homebrew:
brew install dfu-util
- Check that the device is detected:
dfu-util -l
Expected Output:
dfu-util -l
dfu-util 0.11

Copyright 2005-2009 Weston Schmidt, Harald Welte and OpenMoko Inc.
Copyright 2010-2021 Tormod Volden and Stefan Schmidt
This program is Free Software and has ABSOLUTELY NO WARRANTY
Please report bugs to http://sourceforge.net/p/dfu-util/tickets/

Found DFU: [2886:0024] ver=0100, devnum=57, cfg=1, intf=4, path="1-2", alt=1, name="reSpeaker DFU Upgrade", serial="??????????????????"
Found DFU: [2886:0024] ver=0100, devnum=57, cfg=1, intf=4, path="1-2", alt=0, name="reSpeaker DFU Factory", serial="??????????????????"
- Install dfu-util:
sudo apt install dfu-util
- Connect the board and check that it is detected:
sudo dfu-util -l
Expected Output:
pi@raspberrypi:~ $ sudo dfu-util -l
dfu-util 0.9

Copyright 2005-2009 Weston Schmidt, Harald Welte and OpenMoko Inc.
Copyright 2010-2016 Tormod Volden and Stefan Schmidt
This program is Free Software and has ABSOLUTELY NO WARRANTY
Please report bugs to http://sourceforge.net/p/dfu-util/tickets/

Found DFU: [2886:0024] ver=0100, devnum=57, cfg=1, intf=4, path="1-2", alt=1, name="reSpeaker DFU Upgrade", serial="??????????????????"
Found DFU: [2886:0024] ver=0100, devnum=57, cfg=1, intf=4, path="1-2", alt=0, name="reSpeaker DFU Factory", serial="??????????????????"
Flash the Firmware
- Run the following command, pointing
-Dat the.binfile you want to flash:
dfu-util -R -e -a 1 -D /path/to/dfu_firmware.bin
- On Linux, run it with
sudo:
sudo dfu-util -R -e -a 1 -D /path/to/dfu_firmware.bin
The -R option restarts the board automatically after flashing.
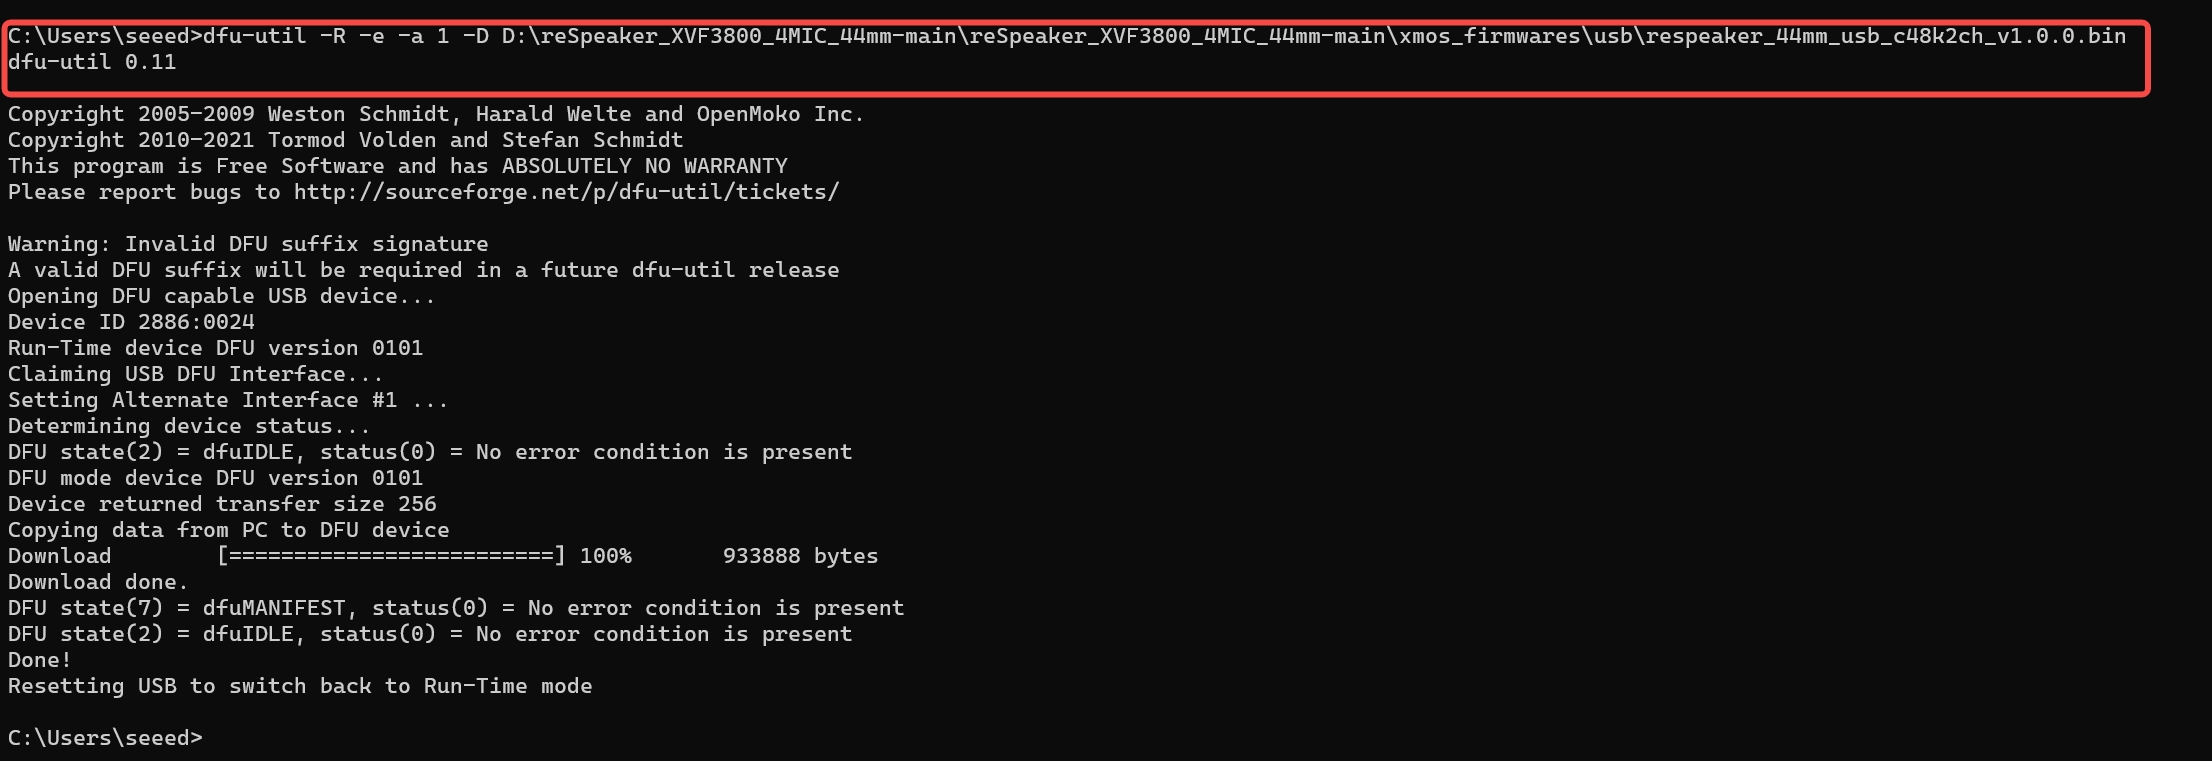
Run dfu-util -l again to confirm the new firmware version is running.
Record and Playback
- Windows
- macOS
- Raspberry Pi / Linux
Setup Audacity (Windows)
- Open Audacity.
- Go to Audio Setup > Audio Settings.
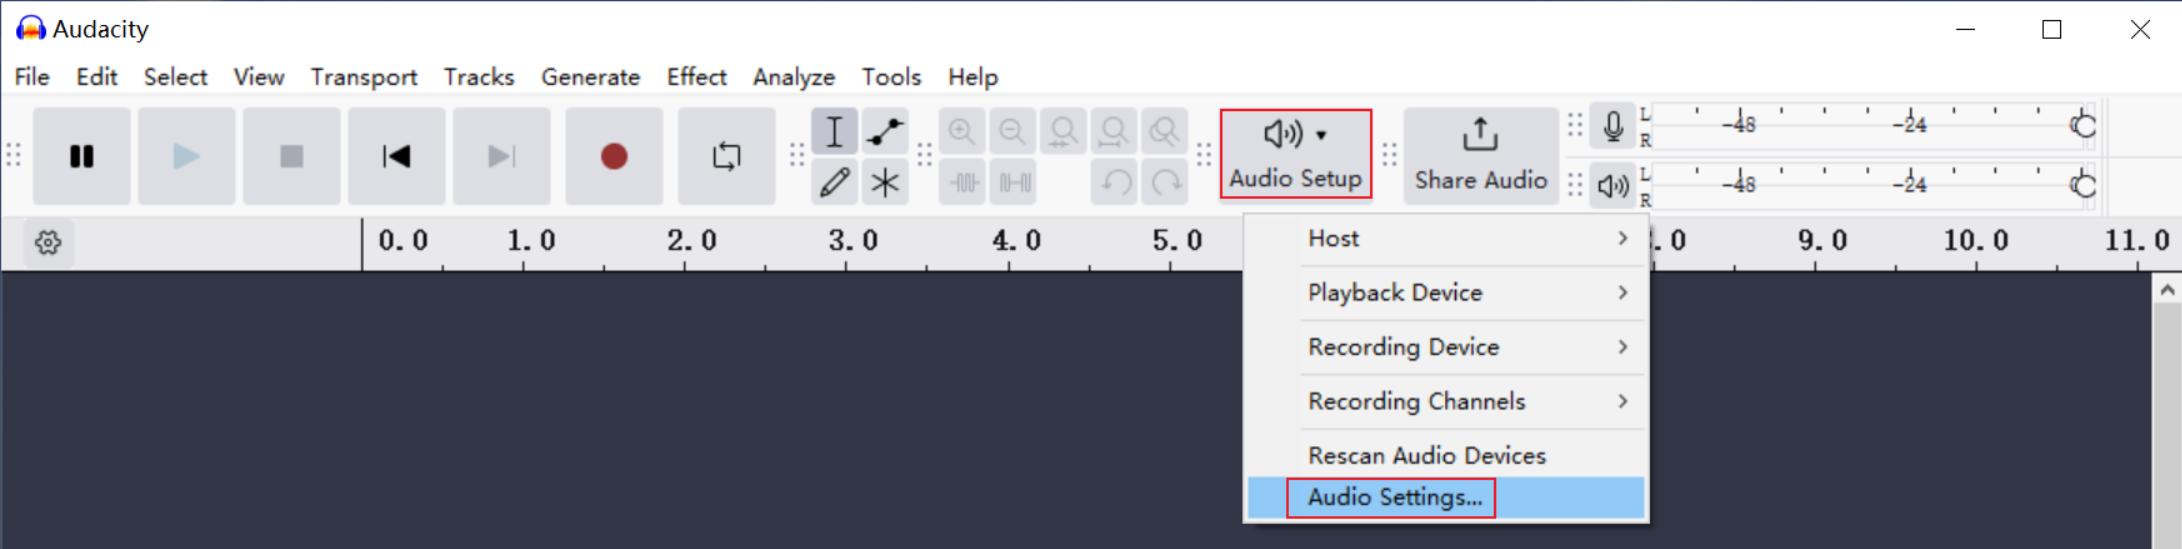
- Set:
- Host:
Windows WASAPI - Playback Device:
reSpeaker XVF3800 4-Mic 44mm - Recording Device:
reSpeaker XVF3800 4-Mic 44mm - Channels:
2 (Stereo) - Project Sample Rate:
48000 Hz - Default Sample Rate:
48000 Hz - Default Sample Format:
32-bit float
- Host:
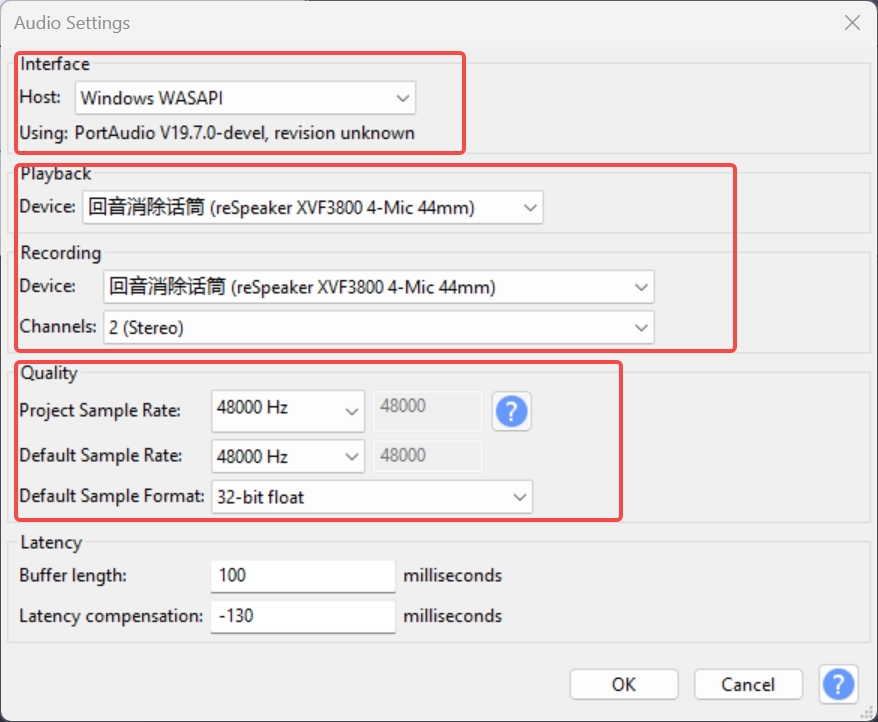
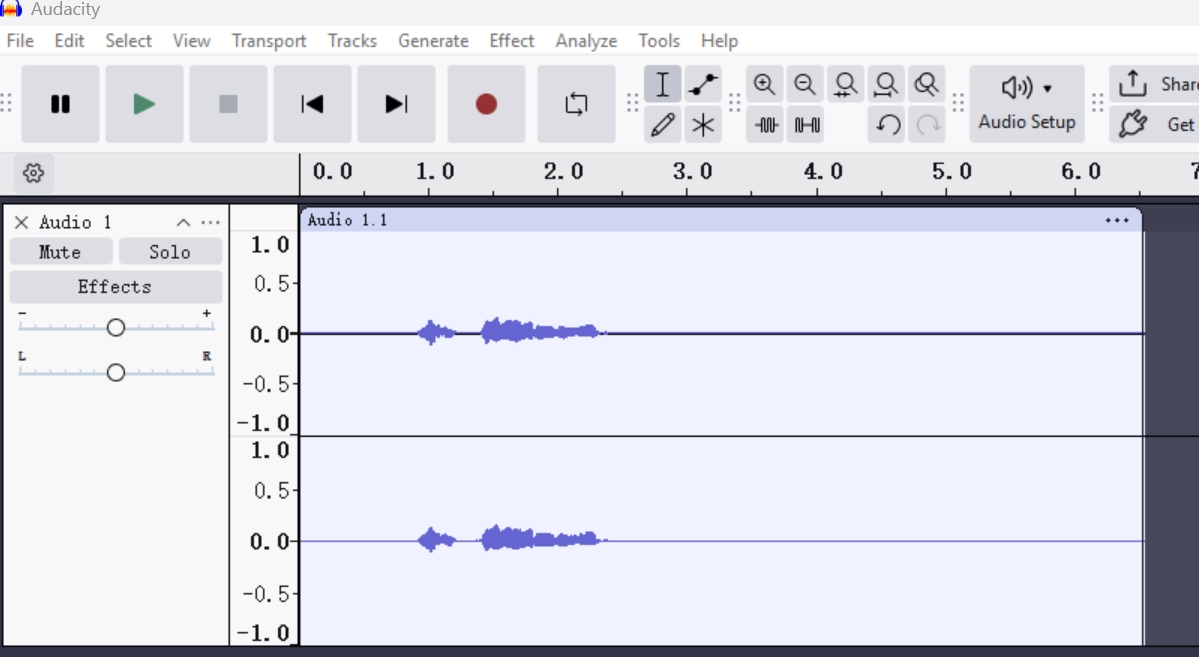
- Click OK — you are ready to record.
Setup Audacity (macOS)
- Open Audacity.
- Go to Audio Setup and select Recording Device > reSpeaker XVF3800 4-Mic 44mm.
- Open Audio Settings and set:
- Recording Device:
reSpeaker XVF3800 4-Mic 44mm - Channels:
2 (Stereo) - Project Sample Rate:
48000 Hz - Default Sample Rate:
48000 Hz - Default Sample Format:
32-bit float
- Recording Device:
- Click OK and start recording.
macOS requires microphone permission for Audacity under System Settings > Privacy & Security > Microphone.
Record from the command line
- Find the card number:
arecord -l
Look for the entry named reSpeaker XVF3800 4-Mic 44mm and note its card number, for example card 3.
- Record 5 seconds of audio:
arecord -D plughw:3,0 -c 2 -r 48000 -f S32_LE -d 5 output.wav
Replace 3 with your actual card number.
- Play it back:
aplay -D plughw:3,0 output.wav
- Adjust the volume with
alsamixerif needed (see Troubleshooting).
Record with Audacity
- Install Audacity, for example through Pi-Apps:
wget -qO- https://raw.githubusercontent.com/Botspot/pi-apps/master/install | bash
- Open Audio Setup > Audio Settings and choose:
- Host:
ALSA - Recording Device:
reSpeaker XVF3800 4-Mic 44mm - Playback Device:
reSpeaker XVF3800 4-Mic 44mm - Channels:
2 (Stereo)
- Host:
- Click OK and start recording.
Tuning Parameters
Tuning lets you configure the built-in audio algorithms and talk to the XMOS chip directly. A Python control interface is provided for parameter configuration and device interaction.
With the provided scripts you can:
- Configure built-in audio algorithm parameters
- Retrieve DoA (Direction of Arrival) data
- Retrieve VAD (Voice Activity Detection) data
- Control the onboard LEDs
- Control the voice processing pipeline
- Read and write the device UUID
- Route signals to the USB output channels
System Requirements
- Python 3.6 or later
pyusbPython librarylibusbsystem library
Installation and Dependencies
pip install pyusb
On Windows, the libusb-package pip package is the simplest way to provide libusb. On Linux, install libusb through your package manager.
Usage
Basic syntax
python xvf_host.py [options] command [--values value(s)...]
Command options
| Option | Description |
|---|---|
-l, --list | List all supported commands with detailed information |
--vid | Set USB Vendor ID (default: 0x2886) |
--pid | Set USB Product ID; when omitted, the device is auto-discovered by VID |
--values | Provide values for write commands (optional), decimal or hex (0x7B) |
Usage Examples
1. List all available commands
python xvf_host.py --list
2. Read the firmware version
python xvf_host.py VERSION
VERSION: [1, 0, 0]
The reported tuple follows the firmware you flashed.
3. Read the Direction of Arrival
python xvf_host.py DOA_VALUE
DOA_VALUE: [135]
The angle is reported in degrees, 0–359.
4. Set the LED color
python xvf_host.py LED_COLOR --values 0xFF0000
5. Set the LED brightness
python xvf_host.py LED_BRIGHTNESS --values 50
6. Read the microphone array geometry
python xvf_host.py AEC_MIC_ARRAY_GEO
AEC_MIC_ARRAY_GEO:
[0.033, -0.033, 0.000,
 0.033,  0.033, 0.000,
-0.033,  0.033, 0.000,
-0.033, -0.033, 0.000]
The values are the microphone X/Y coordinates in metres as used by the beamformer. Check that the reported geometry matches the microphone pitch of your board and the firmware image you flashed before doing acoustic measurements or calibration.
USB Output Channel Selection
The USB firmware routes signals to the stereo output through AUDIO_MGR_OP_L and AUDIO_MGR_OP_R. Each command takes two values: a category (signal group) and a source (signal inside that group). Omit --values to read the current routing.
python xvf_host.py AUDIO_MGR_OP_L
python xvf_host.py AUDIO_MGR_OP_L --values 6 3
python xvf_host.py AUDIO_MGR_OP_R --values 1 0
Those last two commands route the automatically selected beam to the left channel and raw microphone 0 to the right channel. Raw microphone streams bypass voice enhancement and are normally quieter than the processed audio.
Save the routing so it survives a restart:
python xvf_host.py SAVE_CONFIGURATION --values 1
Troubleshooting
Speaker playback is too quiet on Linux
The XVF3800 sound card has its own ALSA mixer levels. If playback is too low:
-
Open the mixer:
alsamixer -
Press F6, select the
reSpeaker XVF3800 4-Mic 44mmcard, and press Enter. -
Use the arrow keys to select PCM-1 and raise it to 100%.
-
Exit with ESC and store the settings:
sudo alsactl store -
If it is still quiet, install PulseAudio Volume Control and raise the output above 100%:
sudo apt install pavucontrol -y
The board is not listed as a sound device on Windows after flashing
Open Device Manager, find the related reSpeaker entries, right-click each one and choose Uninstall device. Then unplug and replug the USB cable — Windows re-installs the correct sound-card driver.
dfu-util -l reports LIBUSB_ERROR_NOT_SUPPORTED
The WinUSB driver is not bound to the DFU interface. Install Zadig, enable Options > List All Devices, select reSpeaker 3800 44 mm, install WinUSB, power-cycle the board, and run dfu-util -l again.
The board does not enumerate at all
Enter Safe Mode (hold the mute button while applying power, wait for the red LED to blink), then re-flash the USB firmware. Safe Mode firmware supports both USB DFU and I2C DFU, so it can always be recovered.
Resources
Tech Support & Product Discussion
Thank you for choosing our products! We are here to provide you with different support to ensure that your experience with our products is as smooth as possible. We offer several communication channels to cater to different preferences and needs.